


Ansible部署ELk日志系统
描述
本案例讲述了多个节点部署Elk集群日志分析系统,分别在三个节点使用ansible部署Kibana、Logstash以及Elasticsearch服务。
一、Linux系统句柄优化
准备
1.规划节点
节点规划见表1-1。
表1-1 节点规划
| IP | 主机名 | 节点 |
| 192.168.20.100 | ansible | Ansible节点 |
| 192.168.20.101 | node1 | Elasticsearch/Kibana |
| 192.168.20.102 | node2 | Elasticsearch/Logstash |
| 192.168.20.103 | node1 | Elasticsearch |
2.基础准备
使用CentOS7.9镜像创建四台云主机,1VCPU/2GB内存/20GB硬盘。
实施
1.ELK介绍
ELK常见架构:
Elasticsearch+Logstash+Kibana:这种架构是最常见的一种,也是最简单的一种架构,这种架构通过Logstash收集日志,运用Elasticsearch分析日志,最后通过Kibana中展示日志信息。
Elasticsearch:开源分布式搜索引擎,提供存储、分析、搜索功能。特点:分布式、基于reasful风格、支持海量高并发的准实时搜索场景、稳定、可靠、快速、使用方便等。 接收搜集的海量结构化日志数据,并提供给Kibana查询分析。
Logstash:开源日志搜集、分析、过滤框架,支持多种数据输入输出方式。 用于收集日志,对日志进行过滤形成结构化数据,并转发到Elasticsearch中。
Kibana:开源日志报表系统,对Elasticsearch以及Logstash有良好的web页面支持。数据可视化工具,提供了图形界面,用户可以通过它查询和可视化存储在 Elasticsearch 中的数据。Kibana 提供了强大的可视化功能,如仪表盘、折线图、条形图等,帮助用户更直观地分析日志数据。
2.ELK部署
(1)配置主机映射:
修改ansible节点主机映射,命令如下:
[root@ansible ~]# cat /etc/hosts

127.0.0.1   localhost localhost.localdomain localhost4 localhost4.localdomain4

::1         localhost localhost.localdomain localhost6 localhost6.localdomain6

192.168.20.100 ansible

192.168.20.101 node1

192.168.20.102 node2

192.168.20.103 node3
配置免密访问,虚拟机root用户密码为000000,命令如下:
[root@ansible ~]# ssh-keygen

[root@ansible ~]# ssh-copy-id node1

[root@ansible ~]# ssh-copy-id node2

[root@ansible ~]# ssh-copy-id node3
修改文件使得不需要输入密码访问节点:
重要!!!!
vi /etc/ssh/sshd_config

PubkeyAuthentication yes

AuthorizedKeysFile .ssh/authorized_keys

sudo systemctl restart sshd
将ansible节点的域名解析文件复制给安装Elasticsearch集群服务的三个节点,命令如下:
[root@ansible ~]# scp /etc/hosts node1:/etc/

[root@ansible ~]# scp /etc/hosts node2:/etc/

[root@ansible ~]# scp /etc/hosts node3:/etc/
关闭ansible节点的防火墙和Selinux配置(如已关闭,则不需要操作),命令如下:
[root@redis ~]# systemctl stop firewalld

[root@redis ~]# setenforce 0
(2)软件包上传及Yum源配置
修将提供的Elasticsearch、Kibana以及Logstash软件包上传至ansible节点/root目录下,并将相应服务的软件包拷贝至不同节点。
[root@ansible ~]# ls

elasticsearch-6.0.0.rpm

kibana-6.0.0-x86_64.rpm

logstash-6.0.0.rpm
修将Elasticsearch软件包拷贝至三个节点,将Kibana软件包拷贝至node1节点,将Logstash软件包拷贝至node2节点,命令如下:
[root@ansible ~]# scp elasticsearch-6.0.0.rpm node1:/root/

[root@ansible ~]# scp elasticsearch-6.0.0.rpm node2:/root/

[root@ansible ~]# scp elasticsearch-6.0.0.rpm node3:/root/

[root@ansible ~]# scp kibana-6.0.0-x86_64.rpm node1:/root/

[root@ansible ~]# scp logstash-6.0.0.rpm node2:/root/
将软件包ansible.tar.gz上传至ansible节点配置本地Yum源,并安装ansible:
[root@ansible ~]# ls

ansible.tar.gz  elasticsearch-6.0.0.rpm  kibana-6.0.0-x86_64.rpm  logstash-6.0.0.rpm

[root@ansible ~]# tar -zxvf ansible.tar.gz -C /opt/

[root@ansible ~]# mv /etc/yum.repos.d/* /media/

[root@ansible ~]# vi /etc/yum.repos.d/local.repo

[ansible]

name=ansible

baseurl=file:///opt/ansible

gpgcheck=0

enabled=1

[root@ansible ~]# yum -y install ansible
(3)配置Ansible主机映射
创建示例目录,并配置ansible主机映射。
[root@ansible ~]# mkdir example

[root@ansible ~]# cd example

[root@ansible example]# vi /etc/ansible/hosts

[node1]

192.168.20.101

[node2]

192.168.20.102

[node3]

192.168.20.103
使用CentOS-7-x86_64-DVD-2009.iso镜像文件作为安装库,将镜像挂载至/opt/centos,编写Yum源文件,安装vsftpd服务,用于给远程主机安装Java。命令如下:
[root@redis example]# mkdir /opt/centos

[root@ansible example]# mount /root/CentOS-7-x86_64-DVD-2009.iso /opt/centos/

[root@ansible example]# vi /etc/yum.repos.d/local.repo

[ansible]

name=ansible

baseurl=file:///opt/ansible

gpgcheck=0

enabled=1

[centos]

name=centos

baseurl=file:///opt/centos

gpgcheck=0

enabled=1

[root@ansible example]# yum install -y vsftpd

[root@ansible example]# vi /etc/vsftpd/vsftpd.conf

anon_root=/opt

[root@ansible example]# systemctl restart vsftpd

[root@ansible example]# vi ftp.repo

[centos]

name=centos

baseurl=ftp://192.168.20.100/centos/

gpgcheck=0

enabled=1
(3)安装elasticsearch获取配置文件
安装Elasticsearch服务并编写node1节点配置文件,命令如下:
[root@ansible example]# rpm -ivh /root/elasticsearch-6.0.0.rpm

[root@ansible example]# cp -rf /etc/elasticsearch/elasticsearch.yml elk1.yml

[root@ansible example]# cat elk1.yml | grep -Ev "^$|^#"

cluster.name: ELK

node.name: node1

node.master: true

node.data: false

path.data: /var/lib/elasticsearch

path.logs: /var/log/elasticsearch

network.host: 192.168.20.101

http.port: 9200

discovery.zen.ping.unicast.hosts: ["node1","node2","node3"]
编写node2节点配置文件,命令如下:
[root@ansible example]# cp elk1.yml elk2.yml

[root@ansible example]# cat elk2.yml | grep -Ev "^$|^#"

cluster.name: ELK

node.name: node2

node.master: false

node.data: true

path.data: /var/lib/elasticsearch

path.logs: /var/log/elasticsearch

network.host: 192.168.20.102

http.port: 9200

discovery.zen.ping.unicast.hosts: ["node1","node2","node3"]
编写node3节点配置文件,命令如下:
[root@ansible example]# cp elk1.yml elk3.yml

[root@ansible example]# cat elk3.yml | grep -Ev "^$|^#"

cluster.name: ELK

node.name: node3

node.master: false

node.data: true

path.data: /var/lib/elasticsearch

path.logs: /var/log/elasticsearch

network.host: 192.168.20.103

http.port: 9200

discovery.zen.ping.unicast.hosts: ["node1","node2","node3"]
(3)安装kibana获取配置文件
安装kibana服务并编写配置文件,命令如下:
[root@ansible example]# rpm -ivh /root/kibana-6.0.0-x86_64.rpm

[root@ansible example]# cp -rf /etc/kibana/kibana.yml .

[root@ansible example]# cat kibana.yml |grep -v ^#

server.port: 5601

server.host: "192.168.20.101"

elasticsearch.url: "http://192.168.20.101:9200"
(4)安装logstash获取配置文件
安装logstash服务并获取配置文件,命令如下:
sudo yum install java-1.8.0-openjdk-devel

[root@ansible example]# rpm -ivh /root/logstash-6.0.0.rpm

[root@ansible example]# cp -rf /etc/logstash/logstash.yml .

[root@ansible example]# vi logstash.yml

http.host: "192.168.20.102"  //node2节点
新建日志输出文件,内容如下:
[root@ansible example]# vi syslog.conf

input {

    file {

        path => "/var/log/messages" #指定文件的路径

        type => "systemlog" #定义日志类型,可自定义

        start_position => "beginning" #指定何时开始收集

        stat_interval => "3"

    }

}

output {

    if [type] == "systemlog" {

        elasticsearch {

            hosts => ["192.168.20.101:9200"]   #这里的地址为node1主机地址

            index => "system-log-%{+YYYY.MM.dd}"

        }

    }

}
(5)编写剧本文件
安编写Playbook剧本文件,命令如下:
[root@ansible example]# vi cscc_install.yaml

- hosts: all

  remote_user: root

  tasks:

    - name: rm repo

      shell: rm -rf /etc/yum.repos.d/*

    - name: copy repo

      copy: src=ftp.repo dest=/etc/yum.repos.d/

    - name: install java

      shell: yum -y install java-1.8.0-*

    - name: install elk

      shell: rpm -ivh elasticsearch-6.0.0.rpm

- hosts: node1

  remote_user: root

  tasks:

    - name: copy config

      copy: src=elk1.yml dest=/etc/elasticsearch/elasticsearch.yml

    - name: daemon-reload

      shell: systemctl daemon-reload

    - name: start elk

      shell: systemctl start elasticsearch && systemctl enable elasticsearch

    - name: install kibana

      shell: rpm -ivh kibana-6.0.0-x86_64.rpm

    - name: copy config

      template: src=kibana.yml dest=/etc/kibana/kibana.yml

    - name: start kibana

      shell: systemctl start kibana && systemctl enable kibana

- hosts: node2

  remote_user: root

  tasks:

    - name: copy config

      copy: src=elk2.yml dest=/etc/elasticsearch/elasticsearch.yml

    - name: daemon-reload

      shell: systemctl daemon-reload

    - name: start elk

      shell: systemctl start elasticsearch && systemctl enable elasticsearch

    - name: install logstash

      shell: rpm -ivh logstash-6.0.0.rpm

    - name: copy config

      copy: src=logstash.yml dest=/etc/logstash/logstash.yml

    - name: copy config

      copy: src=syslog.conf dest=/etc/logstash/conf.d/syslog.conf

- hosts: node3

  remote_user: root

  tasks:

    - name: copy config

      copy: src=elk3.yml dest=/etc/elasticsearch/elasticsearch.yml

    - name: daemon-reload

      shell: systemctl daemon-reload

    - name: start elk

      shell: systemctl start elasticsearch && systemctl enable elasticsearch
执行PlayBook完成ELK集群的部署,命令如下:
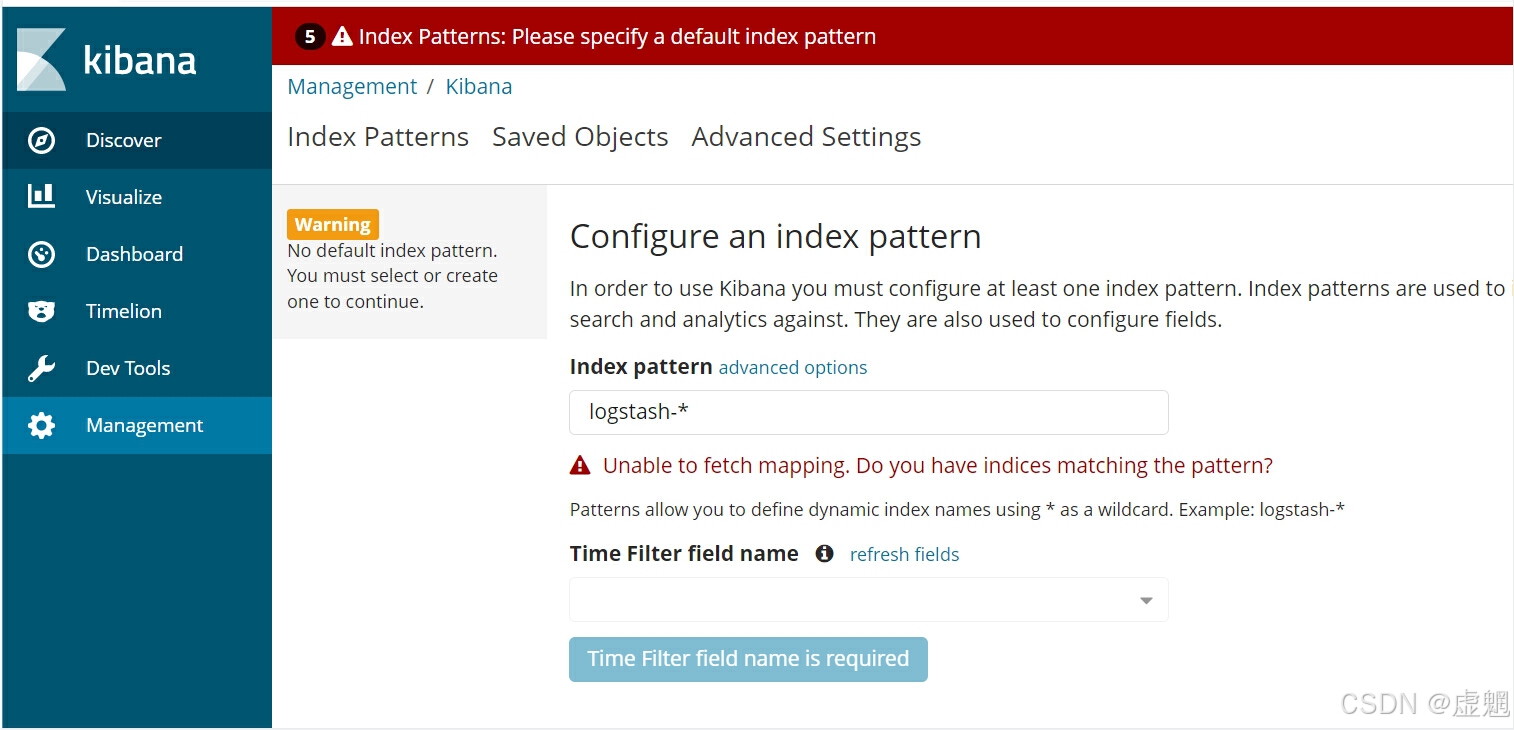
[root@ansible example]# ansible-playbook cscc_install.yaml浏览器访问node1节点5601端口,http://192.168.20.101:5601/,如下图所示:


 1万+
1万+

 被折叠的 条评论
为什么被折叠?
被折叠的 条评论
为什么被折叠?
 到【灌水乐园】发言


