


一、预测年龄
1.加载预训练的人脸检测模型
face_cascade = cv2.CascadeClassifier('haarcascade_frontalface_default.xml')
2.加载预训练的性别和年龄识别模型
gender_net = cv2.dnn.readNetFromCaffe('deploy_gender.prototxt', 'gender_net.caffemodel')
age_net = cv2.dnn.readNetFromCaffe('deploy_age.prototxt', 'age_net.caffemodel')
3.定义性别和年龄的标签列表
gender_list = ['Male', 'Female']
age_list = ['(0-2)', '(4-6)', '(8-12)', '(15-20)', '(25-32)', '(38-43)', '(48-53)', '(60-100)']
4.定义选择图片的函数
def select_image():
    file_path = filedialog.askopenfilename()
    if file_path:
        img = cv2.imread(file_path)
        if img is not None:
            display_image(file_path)
5.创建一个按钮,用于打开文件选择对话框
image = Image.open("A.gif")  # 加载一张图片
photo2 = ImageTk.PhotoImage(image)
open_image_btn = tk.Button(root, image=photo2, command=select_image)
open_image_btn.place(x=30,y=30)
6.定义显示图片的函数
def display_image(file_path):
6.1确保 img 变量已经定义
global img
img = cv2.imread(file_path)
if img is not None:
6.2调整图像大小到相等的大小
img = cv2.resize(img, (300, 300)) # 假设您想要将图像调整到 227x227 的大小
6.3将 OpenCV 图像转换为 PIL 图像
pil_image = Image.fromarray(cv2.cvtColor(img, cv2.COLOR_BGR2RGB))
6.4在这里调整图像到固定大小
pil_image = pil_image.resize((300, 400)) # 调整图像到300x400像素
6.5将 PIL 图像转换为 tkinter 支持的格式
image_tk = ImageTk.PhotoImage(pil_image)
6.6在 root 窗口中创建一个标签来显示图像
 label = tk.Label(root, image=image_tk)
    label.image = image_tk  # 保持引用,否则图像在重新绘制时会丢失
    label.place(x=30, y=100)
    # label.pack()
7.创建预测年龄的函数
def predict_age():
7.1确保 img 变量已经定义
global img
if img is not None:
7.2转换为灰度图像
gray = cv2.cvtColor(img, cv2.COLOR_BGR2GRAY)
7.3检测人脸
faces = face_cascade.detectMultiScale(gray, 1.1, 4)
7.4遍历检测到的人脸
for (x, y, w, h) in faces:
7.5从原始图像中裁剪人脸区域
face_img = img[y:y + h, x:x + w].copy()
7.6预处理人脸图像以适应神经网络输入
blob = cv2.dnn.blobFromImage(face_img, 1, (227, 227), (78.4263377603, 87.7689143744, 114.895847746), swapRB=False)
7.7预测年龄
 age_net.setInput(blob)
        age_preds = age_net.forward()
        age = age_list[age_preds[0].argmax()]
7.8在人脸周围画框并显示年龄
   cv2.rectangle(img, (x, y), (x + w, y + h), (255, 255, 0), 2)
        cv2.putText(img, f'{age}', (x, y - 10), cv2.FONT_HERSHEY_SIMPLEX, 0.8, (0, 255, 0), 2, cv2.LINE_AA)
7.9将 OpenCV 图像转换为 PIL 图像
pil_image = Image.fromarray(cv2.cvtColor(img, cv2.COLOR_BGR2RGB))
7.10在这里调整图像到固定大小
pil_image = pil_image.resize((300, 400)) # 调整图像到300x400像素
7.11将 PIL 图像转换为 tkinter 支持的格式
image_tk = ImageTk.PhotoImage(pil_image)
7.12在 root 窗口中创建一个标签来显示图像
  label = tk.Label(root, image=image_tk)
        label.image = image_tk  # 保持引用,否则图像在重新绘制时会丢失
        label.place(x=360, y=100)
7.13将 OpenCV 图像转换为 PIL 图像
pil_image = Image.fromarray(cv2.cvtColor(img, cv2.COLOR_BGR2RGB))
7.14在这里调整图像到固定大小
pil_image = pil_image.resize((300, 400)) # 调整图像到300x400像素
7.15将 PIL 图像转换为 tkinter 支持的格式
image_tk = ImageTk.PhotoImage(pil_image)
运行结果:
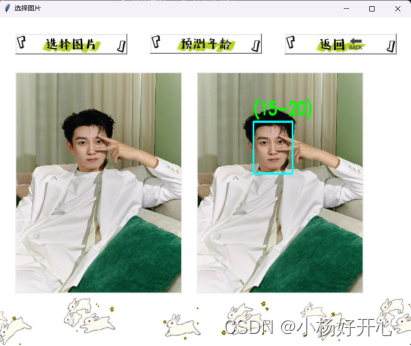
下一个博客 我会将年龄于性别预测相结合,大家敬请期待!!!


 被折叠的 条评论
为什么被折叠?
被折叠的 条评论
为什么被折叠?
 到【灌水乐园】发言


