


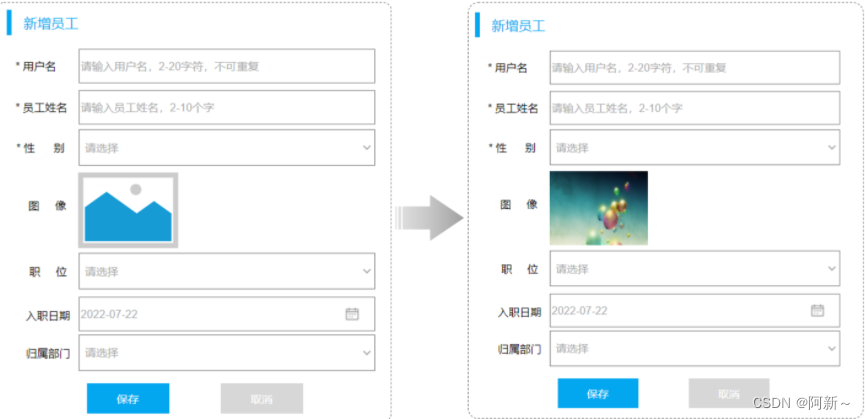
项目新增员工基本信息,我们已经保存到数据库了。那接下来,我们要来完成的是员工图像的上传。
2. 文件上传
2.1 简介
-
文件上传,也称为upload,是指将本地图片、视频、音频等文件上传到服务器上,可以供其他用户浏览或下载的过程。
-
文件上传在项目中应用非常广泛,我们经常发微博、发微信朋友圈都用到了文件上传功能。
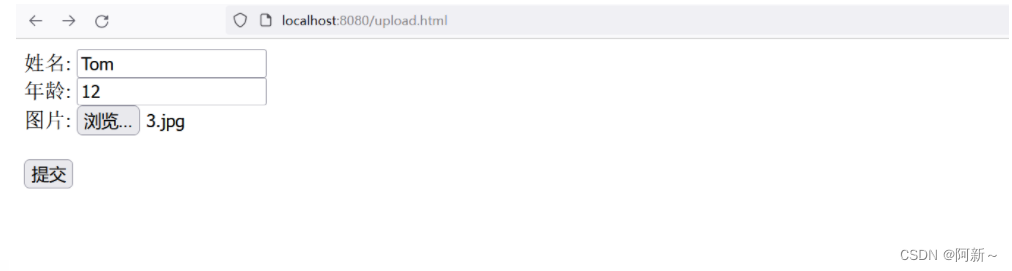
2.1.1 前端代码
<form action="#" method="post" enctype="multipart/form-data">
    姓名: <input type="text" name="name"/><br/>
    年龄: <input type="text" name="age"/></br>
    图片: <input type="file" name="image"/><br/><br/>
    <input type="submit" value="提交"/>
</form>
上传文件的原始form表单,要求表单必须具备以下三点(上传文件页面三要素):
-
表单必须有 file 域,用于选择要上传的文件。
-
表单提交方式必须为 POST。
-
表单的编码类型enctype必须要设置为 multipart/form-data。
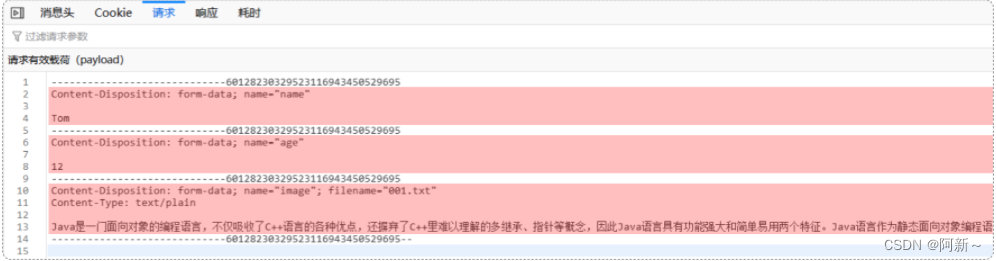
如果我们加上 enctype="multipart/form-data",代表的是我们请求的数据是多部分的,通过浏览器的开发者工具( firefox浏览器 ),我们也可以看到请求的数据:

请求体的数据,也是分为多个部分:
2.1.2 后端代码
在服务端,我们要想接收上传上来的文件,需要使用Spring给我们提供的一个,专门接收文件的API : MultipartFile。
package com.itheima.controller;
import com.itheima.pojo.Result;
import lombok.extern.slf4j.Slf4j;
import org.springframework.web.bind.annotation.PostMapping;
import org.springframework.web.bind.annotation.RestController;
import org.springframework.web.multipart.MultipartFile;
import java.io.IOException;
@Slf4j
@RestController
public class UploadController {
@PostMapping("/upload")
public Result upload(Integer age,String username,MultipartFile image) throws IOException {
log.info("接收浏览器提交的上传文件:{} {} {}",age,username,image);
return Result.success();
}
}上传上来的文件,其实呢,是暂存在系统的临时文件中了。 我们可以通过debug,就可以看出来。
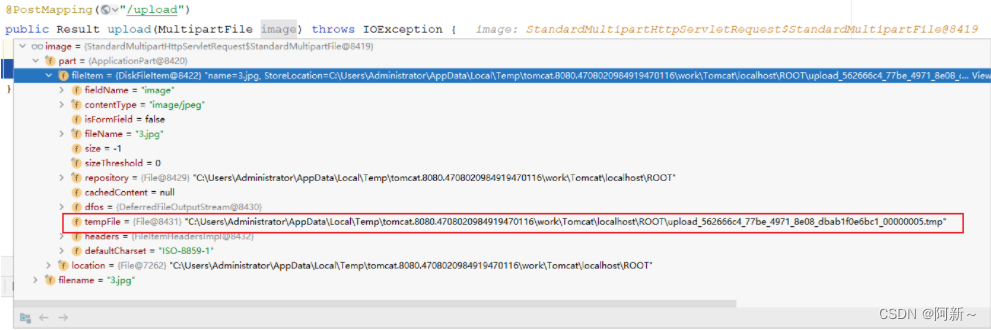
当我们,程序运行完毕之后,这个临时文件会自动删除。
所以,我们如果想上传文件,需要将这个临时文件,要转存到我们的磁盘目录中。
2.2 本地存储
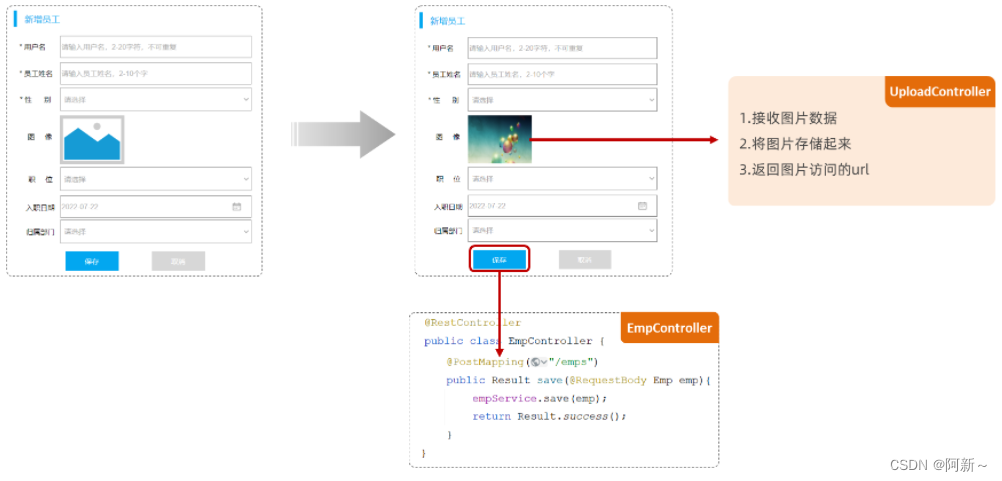
对于这个图片上传功能呢,主要分为两部操作:
-
选择文件,进行图片上传,将图片文件上传到服务器存储起来,然后返回图片访问的URL。
-
当点击保存时,除了页面的基本表单数据需要提交到服务端,图片访问的URL,也需要提交到服务端。
2.2.1 代码实现
我们先来完成第一部分,将上传的图片保存在本地磁盘目录。
package com.itheima.controller;

import com.itheima.pojo.Result;
import lombok.extern.slf4j.Slf4j;
import org.springframework.web.bind.annotation.PostMapping;
import org.springframework.web.bind.annotation.RestController;
import org.springframework.web.multipart.MultipartFile;

import java.io.File;
import java.io.IOException;
import java.util.UUID;

@Slf4j
@RestController
public class UploadController {

    //上传至本地服务器
    @PostMapping("/upload")
    public Result upload(Integer age,String username,MultipartFile image) throws IOException {
        log.info("接收浏览器提交的上传文件:{} {} {}",age,username,image);

        //获取原始文件名
        String originalFilename = image.getOriginalFilename();

        //将文件保存在服务器端 E:/images/ 目录下
        /*
            注意:按照如下书写,上传到服务器文件名就是固定的了,如果上传的文件名一样的例如都是1.jpeg,那么后上传的会覆盖
            之前上传的文件,因此我们需要解决文件名相同的情况,可以使用UUID.
            UUID可以生成不同的内容,可以到测试类中进行测试
         */
        //image.transferTo(new File("E:/images/"+originalFilename));

        //构建新的文件名
        /*
            UUID.randomUUID().toString() 作为文件名 655592a3-558d-49c7-b65c-85bdea414e80
            前端提交的文件名:originalFilename===》1.jpeg  1.0.0.jpeg
            originalFilename.lastIndexOf(".") 获取最后一个点的索引
            originalFilename.substring(originalFilename.lastIndexOf(".")) 表示从最后一个点的索引开始截取到文件末尾 .jpeg
            拼接:655592a3-558d-49c7-b65c-85bdea414e80.jpeg
         */
        String newFileName = UUID.randomUUID().toString()+originalFilename.substring(originalFilename.lastIndexOf("."));
        //将文件保存在服务器端 E:/images/ 目录下
        image.transferTo(new File("E:/images/"+newFileName));
        return Result.success();
    }

}
测试类:
package com.itheima;

import org.junit.jupiter.api.Test;
import org.springframework.boot.test.context.SpringBootTest;

import java.util.UUID;

@SpringBootTest
class TliasWebManagementApplicationTests {

    @Test
    public void test01() {
        for (int i = 0; i < 10; i++) {
            String s = UUID.randomUUID().toString();
            System.out.println(s);
        }
    }
}
7e87c9ad-7dd6-4cb8-a8e4-7d824eba5766
fc2b9d37-83a3-4b8c-9f8d-eba136f4a326
37ce10ea-07f2-4bf1-967b-e853a3856d28
6e8585d6-f954-40bd-95ab-0345bd53bc0e
524c321a-76c7-4d65-a4e7-fd455314c712
8e9b5a76-aec9-4465-b8ea-a042e30e4db5
a1158cbc-1e46-4970-b797-637f2e521896
8c6fc200-8c72-4bc1-a8eb-f8f7a81ad59f
fcdb048b-d4ad-4a34-9623-d4aade3db783
da32c906-8abc-40bf-9f59-8f616a5dcdb7MultipartFile 常见方法:
getOriginalFilename():获取原始文件名 getContentType():获取文件的类型 getInputStream():获取文件的输入流 getBytes():获取文件的字节数组
2.2.2 测试
可以直接使用我们准备好的文件上传的页面进行测试。
我们也可以使用postman来进行测试。

2.2.3 配置
在我们进行图片上传的测试中,我们发现,有时候可以上传成功,而有时候呢,又不能上传成功,报出如下错误。

报错我原因呢,是因为:在SpringBoot中,文件上传,默认单个文件允许最大大小为 1M,如果需要上传大文件,可以在application.properties进行如下配置:
#配置单个文件的最大上传大小
spring.servlet.multipart.max-file-size=10MB

#配置单个请求最大上传大小(一次请求可以上传多个文件)
spring.servlet.multipart.max-request-size=100MB
2.2.4 问题分析
我们现在上传的文件呢都是存储在本地电脑上的,将来程序部署到服务器之后,那这些图片就存在服务器的本地磁盘中。
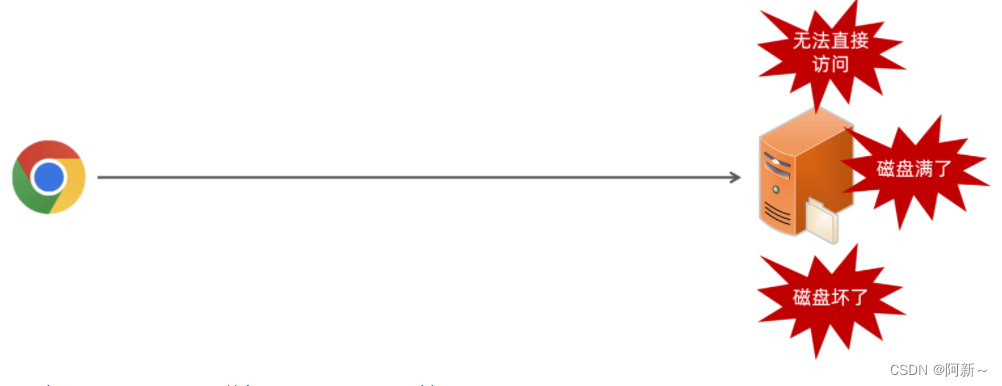
如果直接存储在服务器的磁盘目录中,存在以下缺点:
-
不安全:磁盘如果损坏,所有的文件就会丢失。
-
容量有限:如果存储大量的图片,磁盘空间有限(磁盘不可能无限制扩容)。
-
无法直接访问
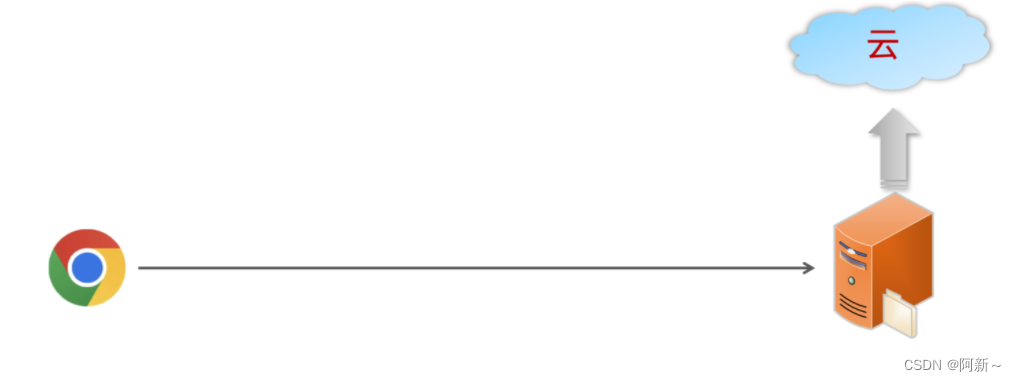
为了解决上述问题呢,一般有两种解决方案:
-
自己搭建文件存储系统,如:fastDFS
-
自己搭建对象存储服务,如:MinIO
-
使用现成的云服务,如:阿里云,腾讯云,华为云
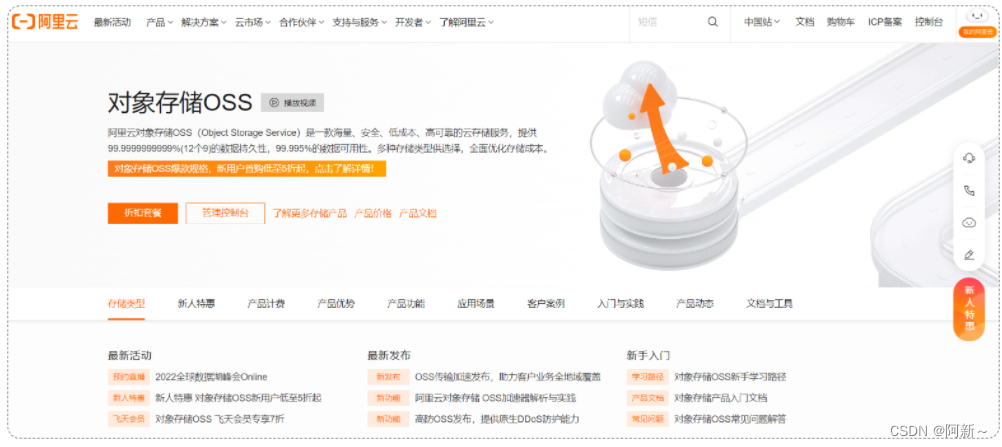
2.3 阿里云OSS
2.3.1 介绍
阿里云对象存储OSS(Object Storage Service)是一款海量、安全、低成本、高可靠的云存储服务,提供99.9999999999% (12个9)的数据持久性,99.995%的数据可用性。多种存储类型供选择,全面优化存储成本。
2.3.2 步骤

SDK:Software Development Kit 的缩写,软件开发工具包。这是一个覆盖面相当广泛的名词,辅助开发某一类软件的相关文档、范例和工具的集合都可以叫做SDK。
【1】注册完账号之后,就可以登录阿里云:

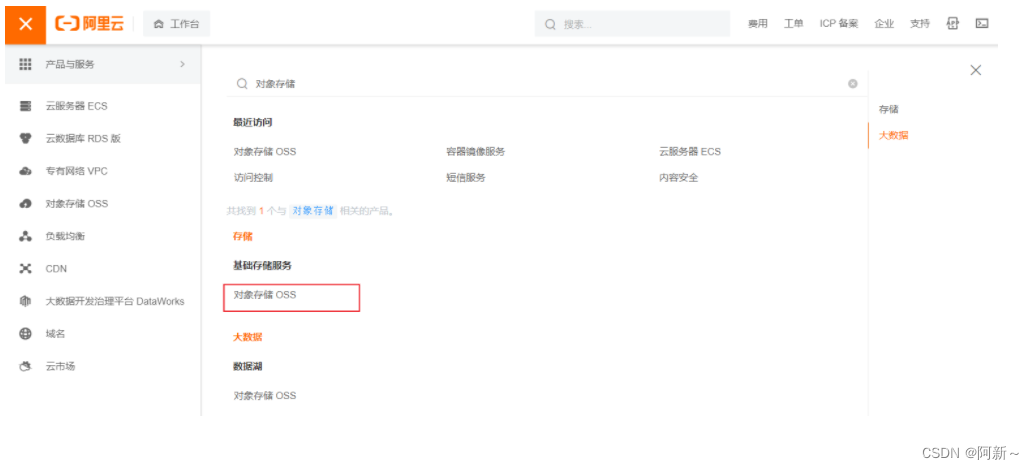
【2】点击控制台,然后找到 对象存储OSS 服务。

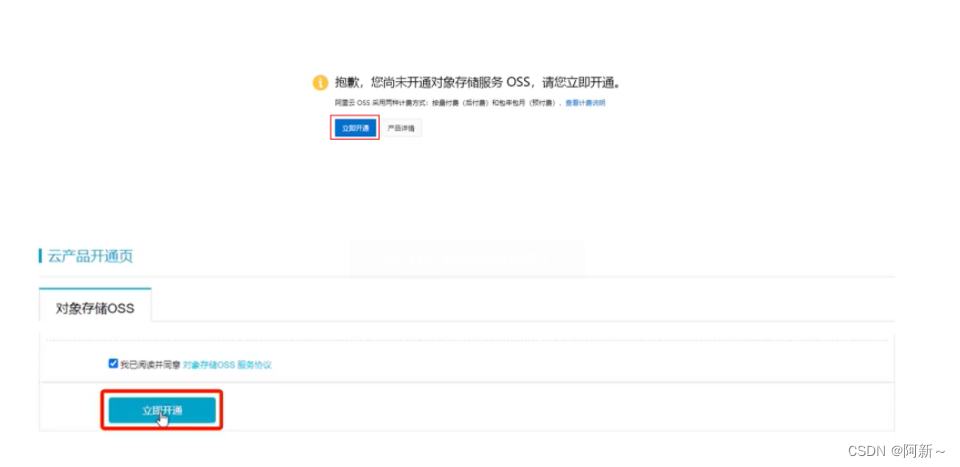
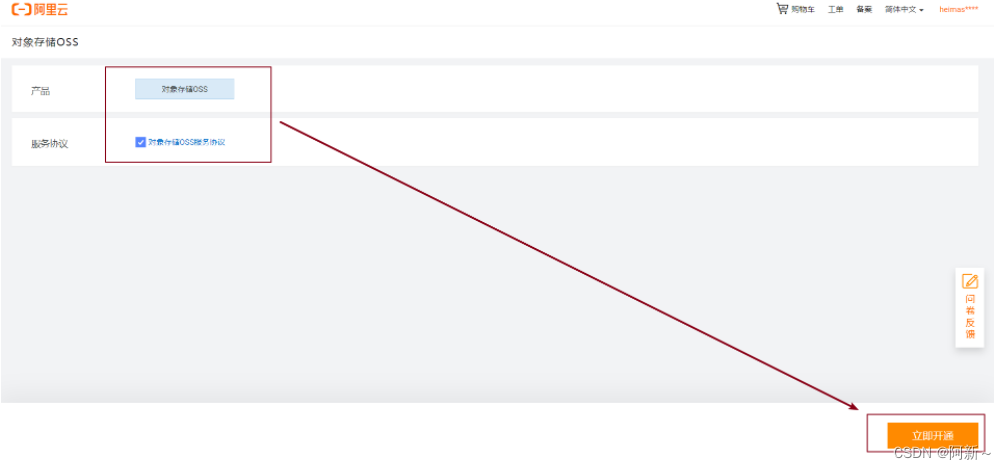
【3】如果是第一次访问,还需要开通 对象存储服务OSS。
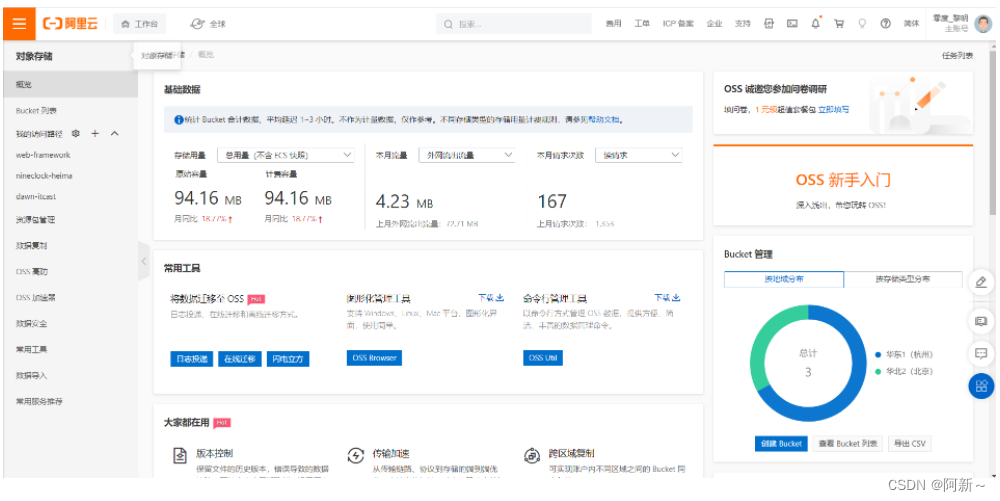
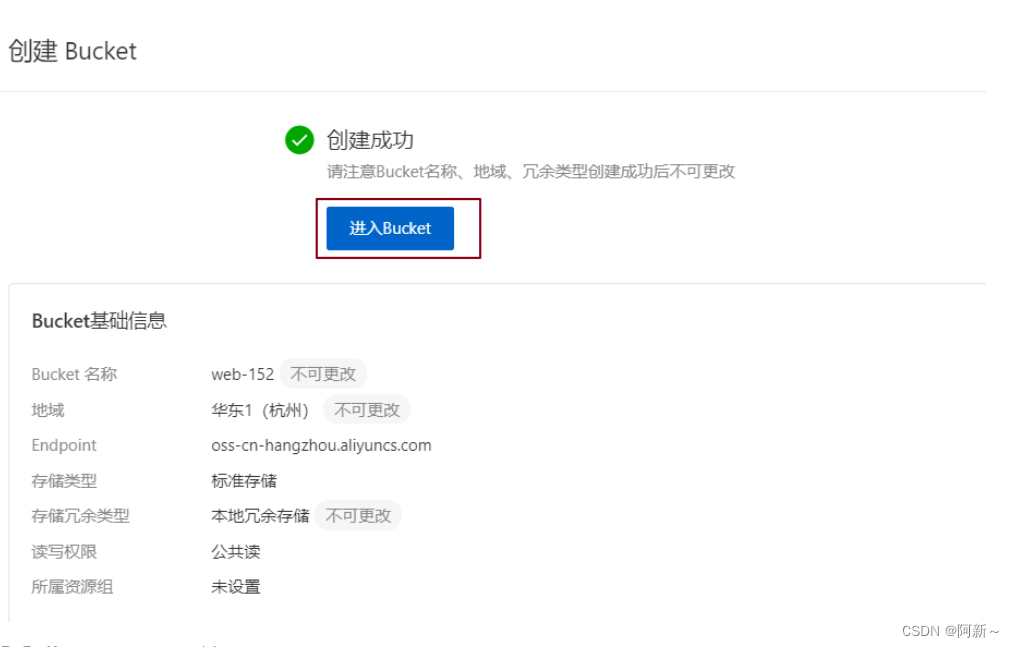
【4】开通之后,就可以进入到阿里云对象存储的控制台。
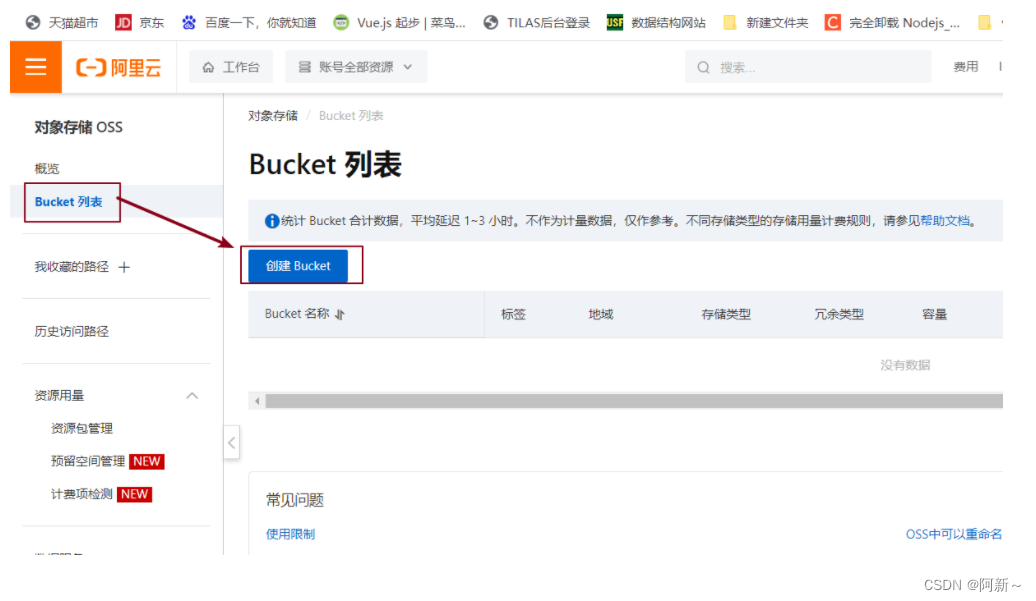
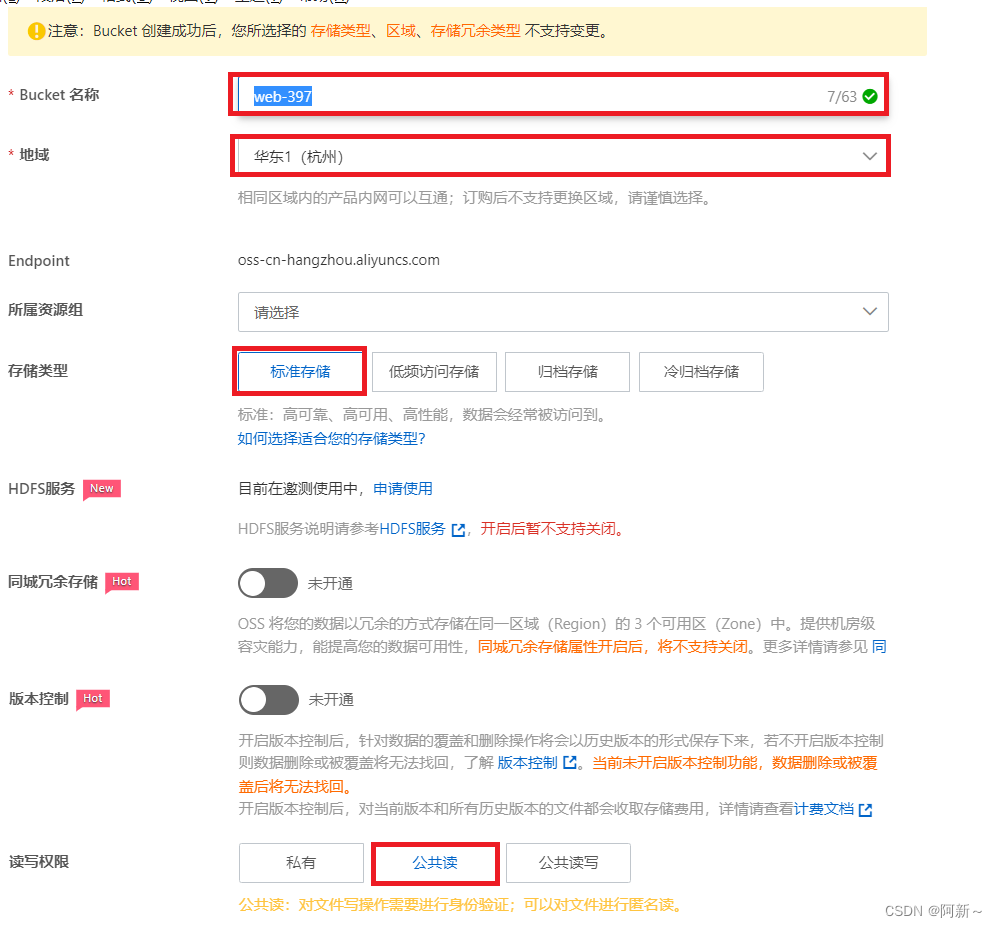
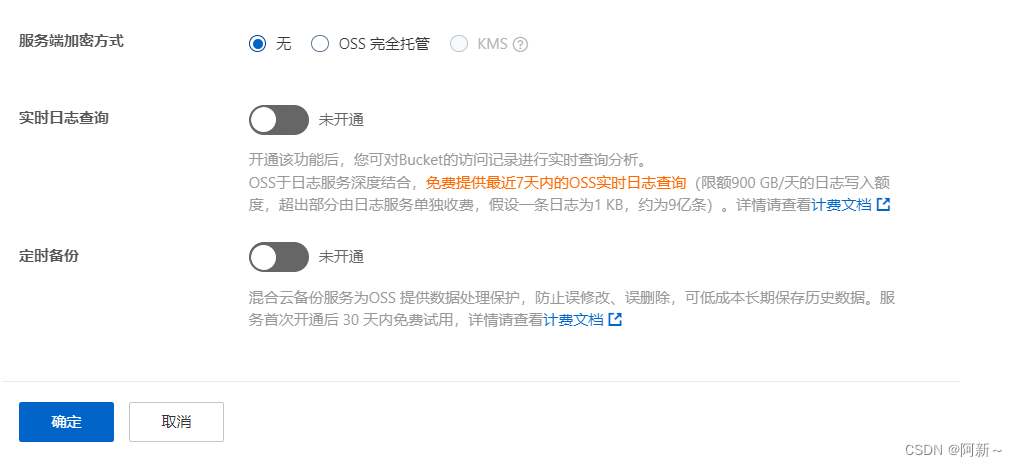
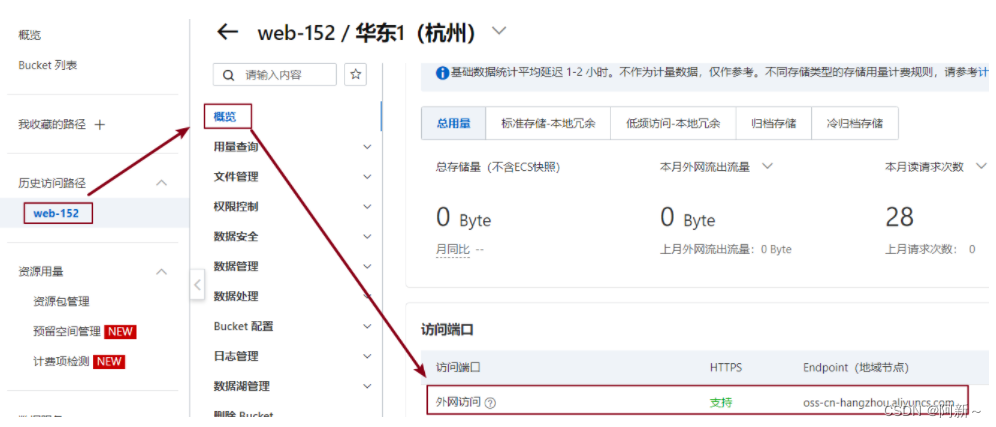
【5】点击左侧的 "Bucket列表",然后创建一个Bucket。
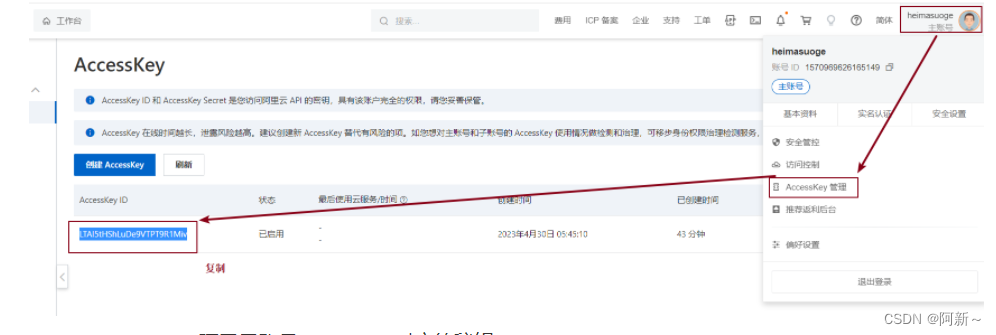
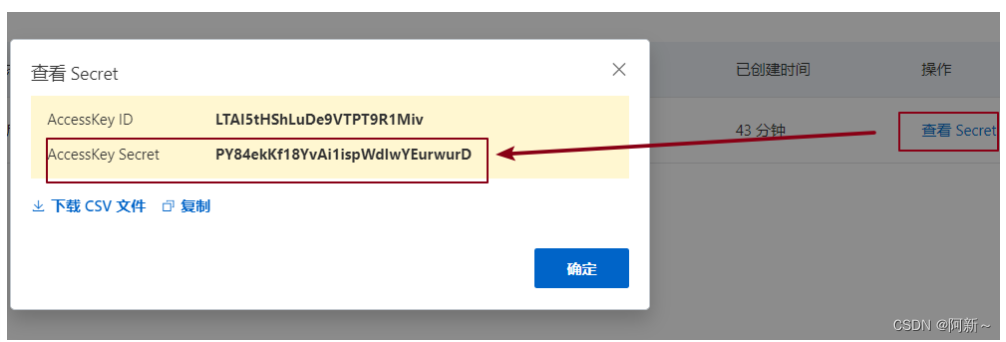
【6】获取AccessKey(秘钥)
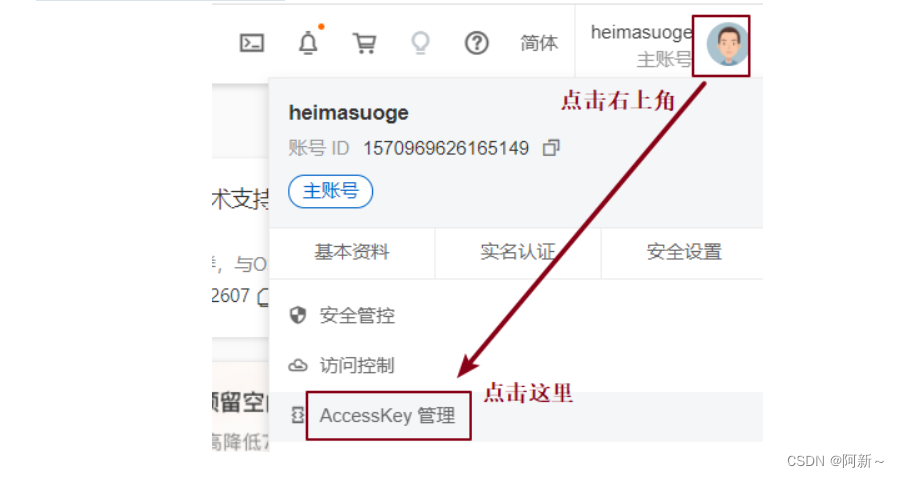
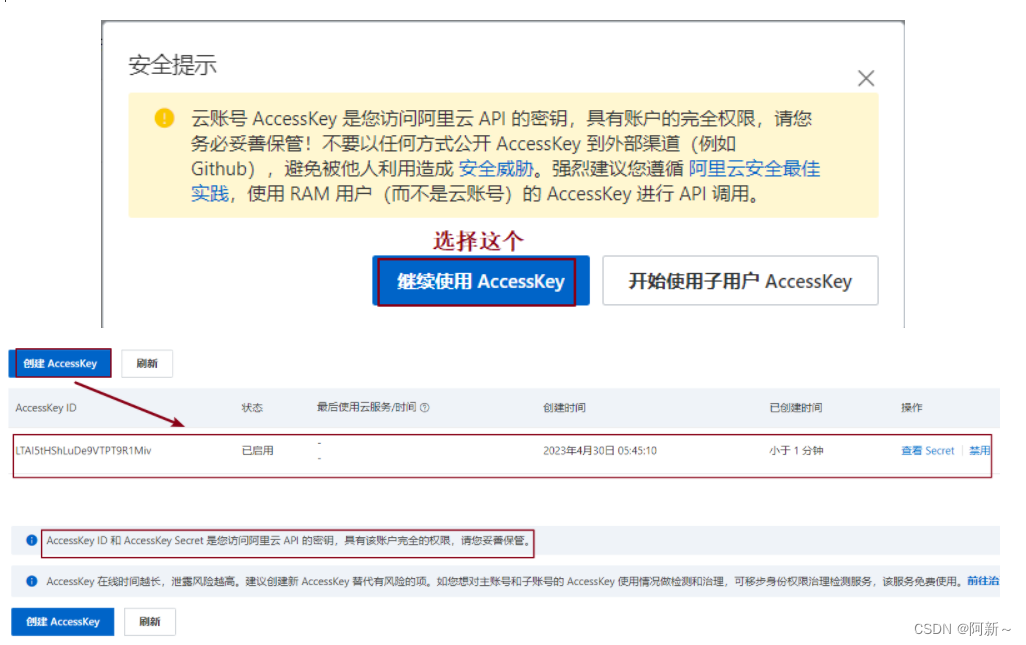
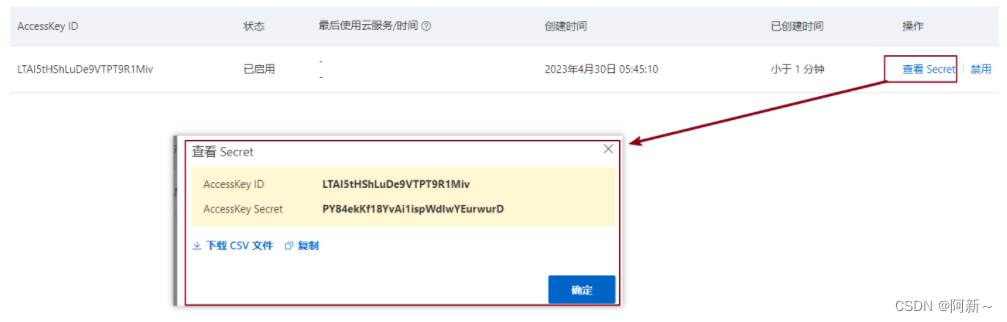
注意:AccessKey ID 和 AccessKey Secret 是您访问阿里云 API 的密钥,具有该账户完全的权限,我们下面操作oss需要AccessKey ID 和 AccessKey Secret
2.3.3 文件上传
参照官方提供的SDK,改造一下,即可实现文件上传功能。
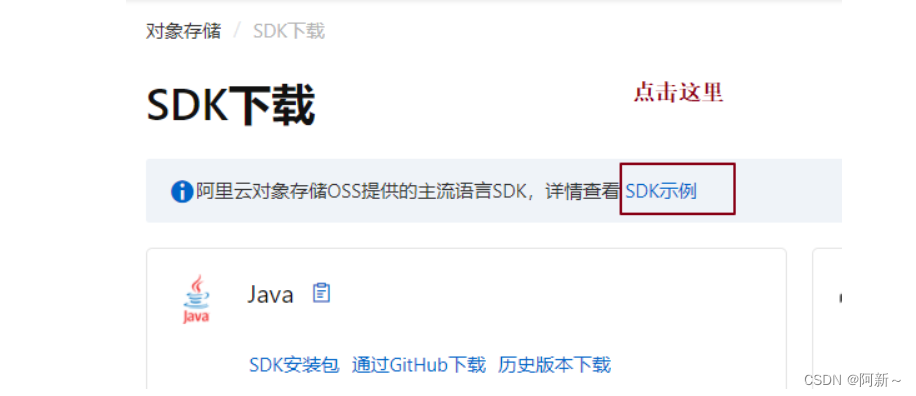
【1】退回到工作台找到左下角的SDK下载
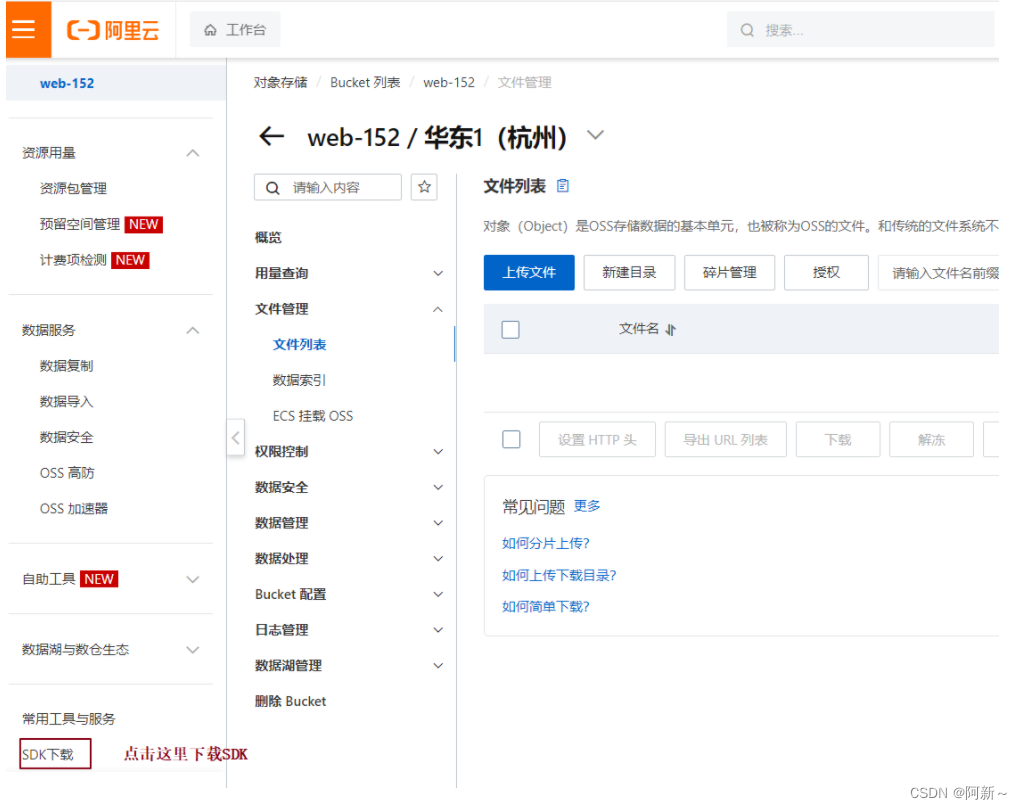
【2】点击SDK示例
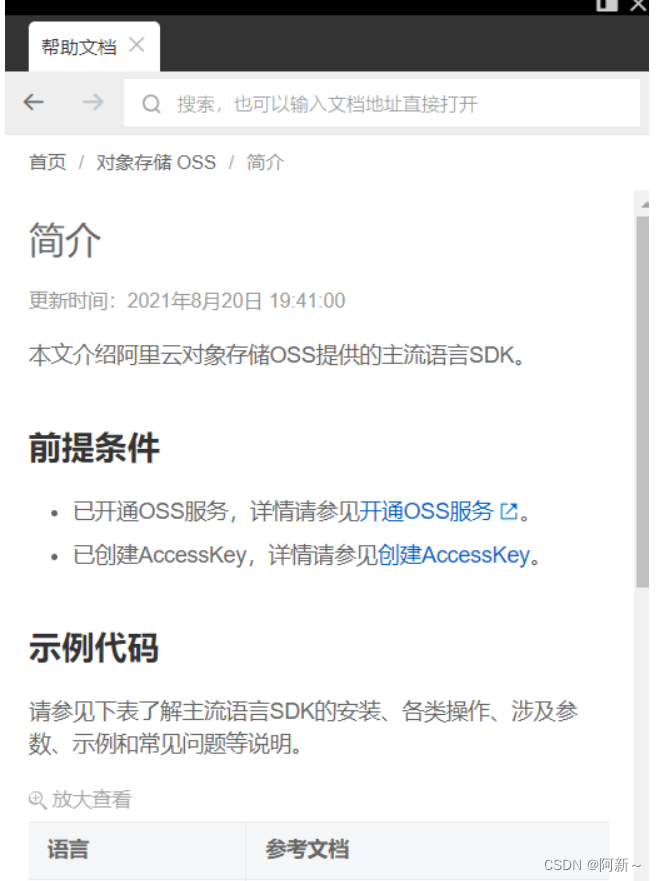
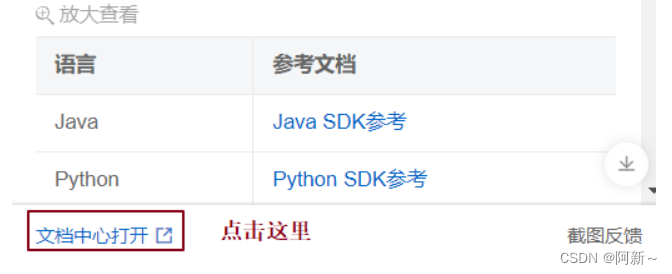
【3】文档中心打开
【4】找到java安装SDK位置,导入maven依赖
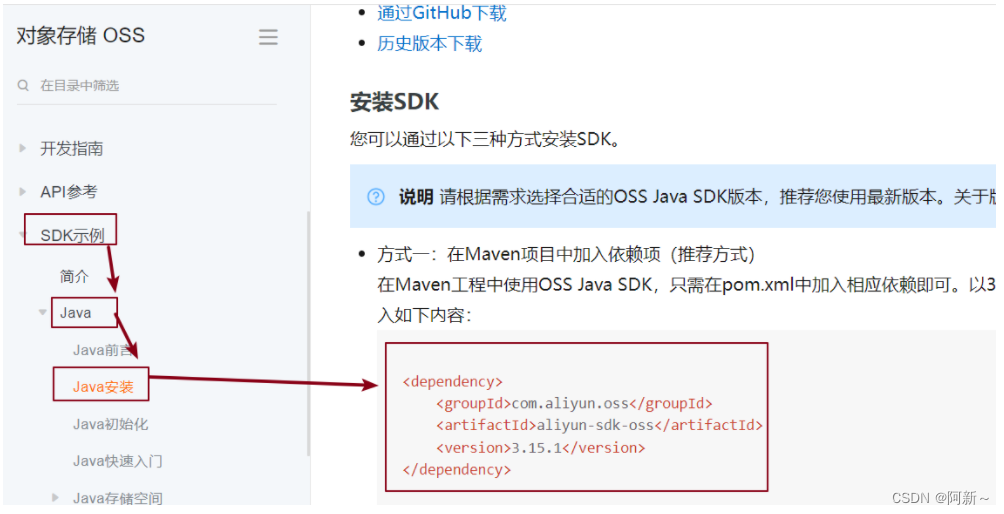
pom.xml
<dependency>
    <groupId>com.aliyun.oss</groupId>
    <artifactId>aliyun-sdk-oss</artifactId>
    <version>3.15.1</version>
</dependency>
如果使用的是Java 9及以上的版本,则需要添加jaxb相关依赖。添加jaxb相关依赖示例代码如下:
<dependency>
    <groupId>javax.xml.bind</groupId>
    <artifactId>jaxb-api</artifactId>
    <version>2.3.1</version>
</dependency>
<dependency>
    <groupId>javax.activation</groupId>
    <artifactId>activation</artifactId>
    <version>1.1.1</version>
</dependency>
<!-- no more than 2.3.3-->
<dependency>
    <groupId>org.glassfish.jaxb</groupId>
    <artifactId>jaxb-runtime</artifactId>
    <version>2.3.3</version>
</dependency>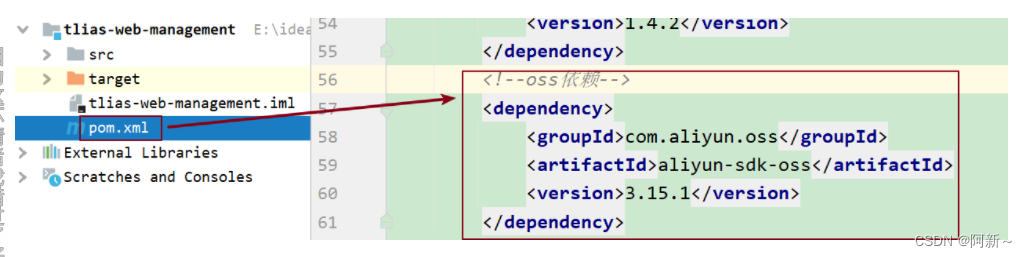
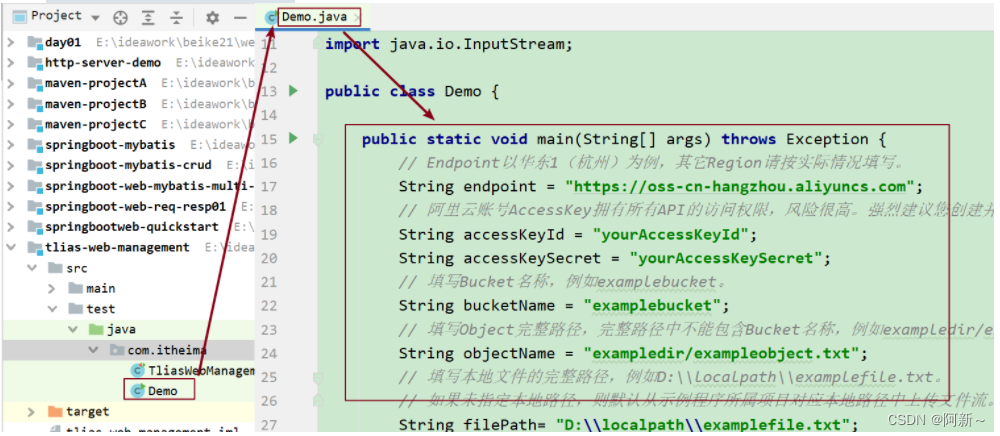
【5】测试文件上传

说明:将上述图中的代码复制到工程下的测试类中。
public class Demo {

    public static void main(String[] args) throws Exception {
        // Endpoint以华东1(杭州)为例,其它Region请按实际情况填写。
        String endpoint = "https://oss-cn-hangzhou.aliyuncs.com";
        // 阿里云账号AccessKey拥有所有API的访问权限,风险很高。强烈建议您创建并使用RAM用户进行API访问或日常运维,请登录RAM控制台创建RAM用户。
        String accessKeyId = "yourAccessKeyId";
        String accessKeySecret = "yourAccessKeySecret";
        // 填写Bucket名称,例如examplebucket。
        String bucketName = "examplebucket";
        // 填写Object完整路径,完整路径中不能包含Bucket名称,例如exampledir/exampleobject.txt。
        String objectName = "exampledir/exampleobject.txt";
        // 填写本地文件的完整路径,例如D:\\localpath\\examplefile.txt。
        // 如果未指定本地路径,则默认从示例程序所属项目对应本地路径中上传文件流。
        String filePath= "D:\\localpath\\examplefile.txt";

        // 创建OSSClient实例。
        OSS ossClient = new OSSClientBuilder().build(endpoint, accessKeyId, accessKeySecret);

        try {
            InputStream inputStream = new FileInputStream(filePath);
            // 创建PutObjectRequest对象。
            PutObjectRequest putObjectRequest = new PutObjectRequest(bucketName, objectName, inputStream);
            // 设置该属性可以返回response。如果不设置,则返回的response为空。
            putObjectRequest.setProcess("true");
            // 创建PutObject请求。
            PutObjectResult result = ossClient.putObject(putObjectRequest);
            // 如果上传成功,则返回200。
            System.out.println(result.getResponse().getStatusCode());
        } catch (OSSException oe) {
            System.out.println("Caught an OSSException, which means your request made it to OSS, "
                    + "but was rejected with an error response for some reason.");
            System.out.println("Error Message:" + oe.getErrorMessage());
            System.out.println("Error Code:" + oe.getErrorCode());
            System.out.println("Request ID:" + oe.getRequestId());
            System.out.println("Host ID:" + oe.getHostId());
        } catch (ClientException ce) {
            System.out.println("Caught an ClientException, which means the client encountered "
                    + "a serious internal problem while trying to communicate with OSS, "
                    + "such as not being able to access the network.");
            System.out.println("Error Message:" + ce.getMessage());
        } finally {
            if (ossClient != null) {
                ossClient.shutdown();
            }
        }
    }
} 
package com.itheima;

import com.aliyun.oss.OSS;
import com.aliyun.oss.OSSClientBuilder;
import com.aliyun.oss.OSSException;

import java.io.FileInputStream;
import java.io.InputStream;

public class Demo {

    public static void main(String[] args) throws Exception {
        // Endpoint以华东1(杭州)为例,其它Region请按实际情况填写。
        String endpoint = "https://oss-cn-hangzhou.aliyuncs.com";
        // 阿里云账号AccessKey拥有所有API的访问权限,风险很高。
        // 强烈建议您创建并使用RAM用户进行API访问或日常运维,请登录RAM控制台创建RAM用户。
        String accessKeyId = "LTAI5tHShLuDe9VTPT9R1Miv";
        String accessKeySecret = "PY84ekKf18YvAi1ispWdIwYEurwurD";
        // 填写Bucket名称,例如examplebucket。
        String bucketName = "web-152";
        // 填写Object完整路径,完整路径中不能包含Bucket名称,例如exampledir/exampleobject.txt。
        String objectName = "1.jpeg";
        // 填写本地文件的完整路径,例如D:\\localpath\\examplefile.txt。
        // 如果未指定本地路径,则默认从示例程序所属项目对应本地路径中上传文件流。
        String filePath = "E:\\itcast\\就业班\\web\\全天模式\\version2\\day11-SpringBootWeb案例\\资料\\文件上传文件素材\\1\\1.jpeg";

        // 创建OSSClient实例。
        OSS ossClient = new OSSClientBuilder().build(endpoint, accessKeyId, accessKeySecret);

        try {
            InputStream inputStream = new FileInputStream(filePath);
            // 创建PutObject请求。
            //向oss中上传文件
            ossClient.putObject(bucketName, objectName, inputStream);
        } catch (OSSException oe) {
            System.out.println("Caught an OSSException, which means your request made it to OSS, "
                    + "but was rejected with an error response for some reason.");
            System.out.println("Error Message:" + oe.getErrorMessage());
            System.out.println("Error Code:" + oe.getErrorCode());
            System.out.println("Request ID:" + oe.getRequestId());
            System.out.println("Host ID:" + oe.getHostId());
        } catch (Exception ce) {
            System.out.println("Caught an ClientException, which means the client encountered "
                    + "a serious internal problem while trying to communicate with OSS, "
                    + "such as not being able to access the network.");
            System.out.println("Error Message:" + ce.getMessage());
        } finally {
            if (ossClient != null) {
                ossClient.shutdown();
            }
        }
    }
}
在上述的代码中,需要替换的内容为:
-
endpoint
-
accessKeyId:阿里云账号AccessKey
-
accessKeySecret:阿里云账号AccessKey对应的秘钥
-
bucketName:Bucket名称
-
objectName:对象名称,在Bucket中存储的对象的名称
-
filePath:文件路径
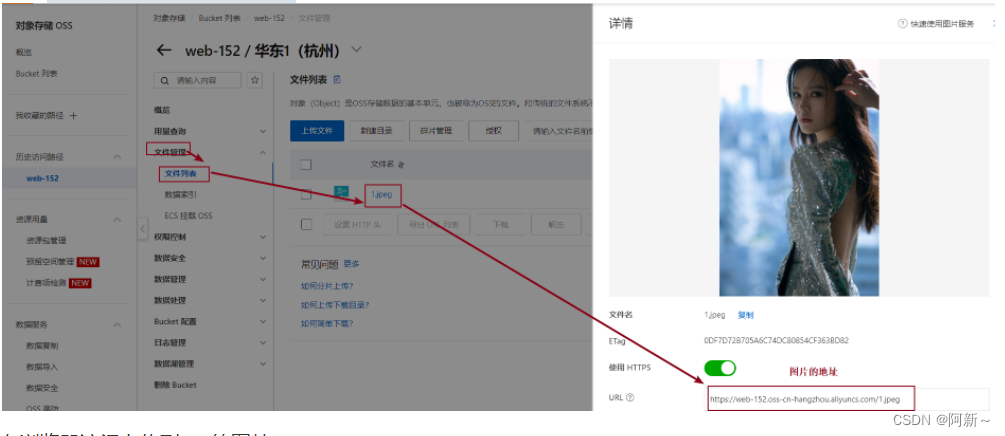
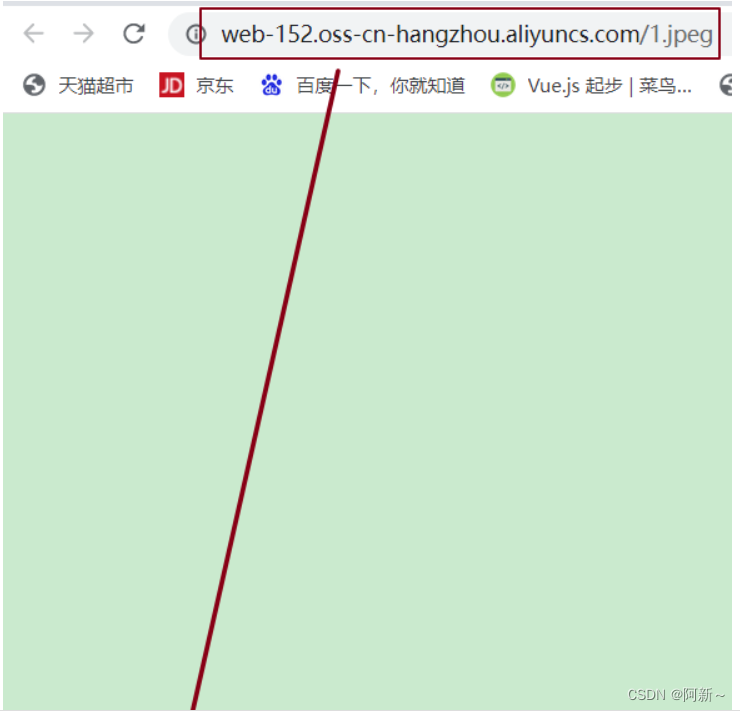
在浏览器访问上传到oss的图片:
2.3.4 案例集成OSS
1). 引入阿里云OSS文件上传工具类(由官方SDK改造而来) -- 资料中已提供
import com.aliyun.oss.OSS;
import com.aliyun.oss.OSSClientBuilder;
import org.springframework.stereotype.Component;
import org.springframework.web.multipart.MultipartFile;
import java.io.*;
import java.time.LocalDateTime;
import java.time.format.DateTimeFormatter;
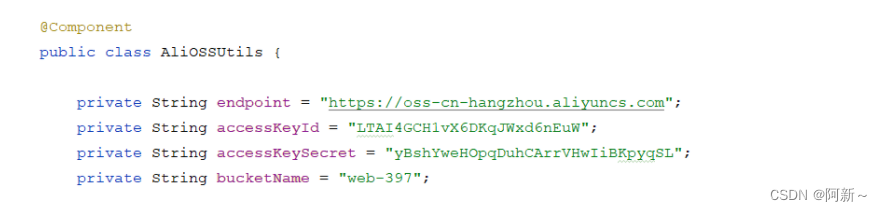
/**
* 阿里云 OSS 工具类
*/
@Component
public class AliOSSUtils {
private String endpoint = "https://oss-cn-hangzhou.aliyuncs.com";
private String accessKeyId = "LTAI4GCH1vX6DKqJWxd6nEuW";
private String accessKeySecret = "yBshYweHOpqDuhCArrVHwIiBKpyqSL";
private String bucketName = "web-397";
/**
* 实现上传图片到OSS
*/
public String upload(MultipartFile multipartFile) throws IOException {
// 获取上传的文件的输入流
InputStream inputStream = multipartFile.getInputStream();
// 避免文件覆盖
String fileName = LocalDateTime.now().format(DateTimeFormatter.ofPattern("yyyy-MM-dd-HH-mm-ss")) + multipartFile.getOriginalFilename();
//上传文件到 OSS
OSS ossClient = new OSSClientBuilder().build(endpoint, accessKeyId, accessKeySecret);
ossClient.putObject(bucketName, fileName, inputStream);
//文件访问路径
String url = endpoint.split("//")[0] + "//" + bucketName + "." + endpoint.split("//")[1] + "/" + fileName;
// 关闭ossClient
ossClient.shutdown();
return url;// 把上传到oss的路径返回
}
}2). 上传图片功能升级改造
在原有的UploadController的基础上进行升级改造
@RestController
public class UploadController {

    @Autowired
    private AliOSSUtils aliOSSUtils;

    //上传至本地服务器
    /*@PostMapping("/upload")
    public Result upload(MultipartFile image) throws IOException {
        //获取原始文件名
        String originalFilename = image.getOriginalFilename();
        //构建新的文件名
        String newFileName = UUID.randomUUID().toString()+originalFilename.substring(originalFilename.lastIndexOf("."));
        //将文件保存在服务器端 E:/images/ 目录下
        image.transferTo(new File("E:/images/"+newFileName));
        return Result.success();
    }*/

    @PostMapping("/upload")
    public Result upload(MultipartFile image) throws IOException {
        String url = aliOSSUtils.upload(image);
        return Result.success(url);
    }

}
3). 测试
启动后端服务器:

postman:
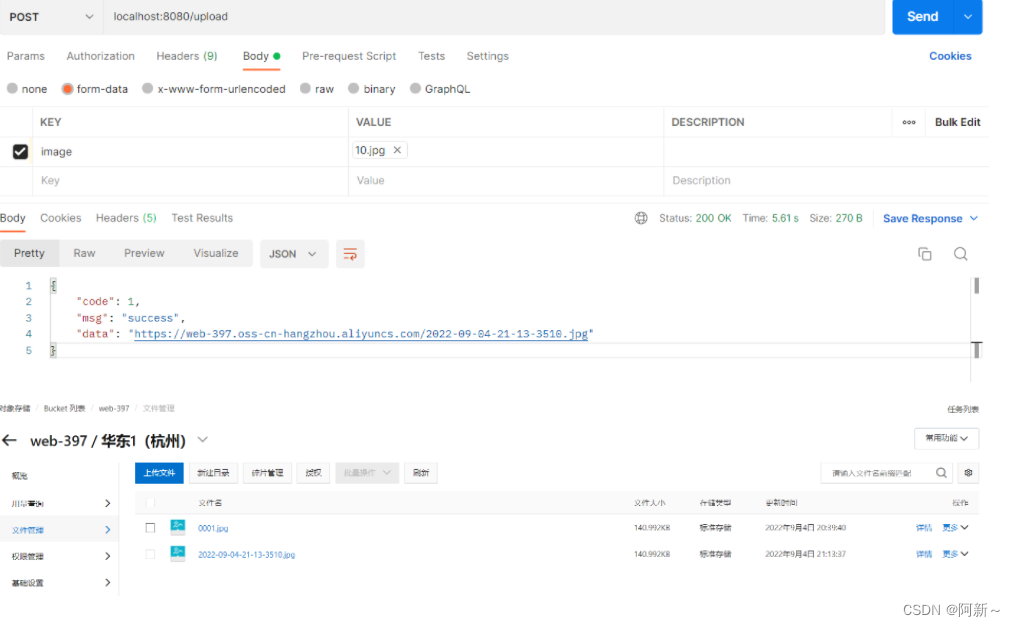
4). 联调测试

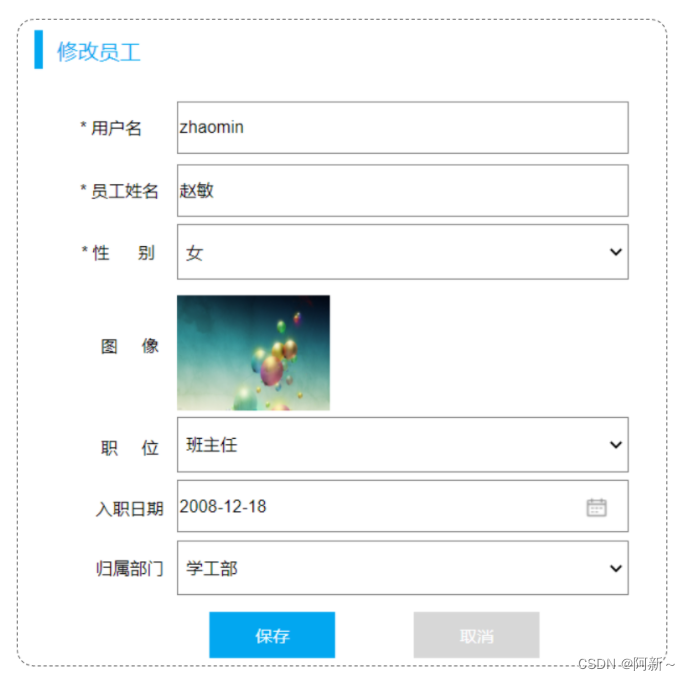
3. 修改员工
3.1 需求
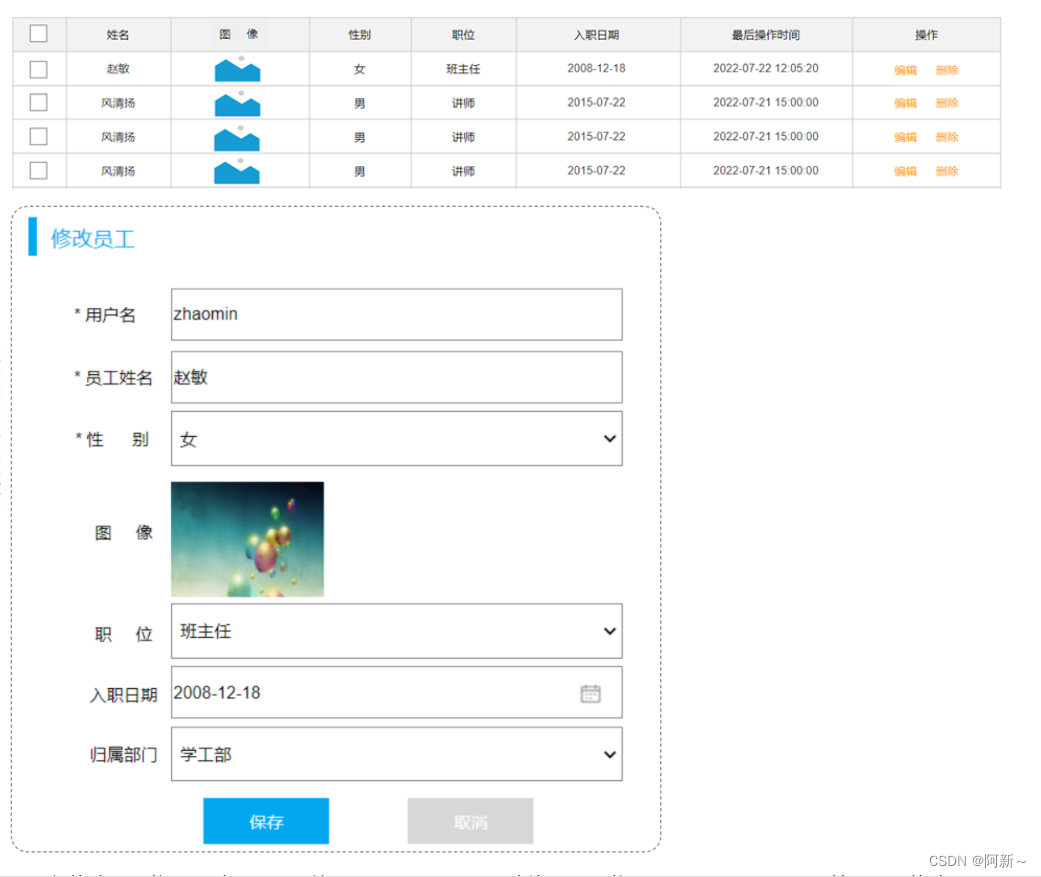
在进行修改员工信息的时候,我们首先先要根据员工的ID查询员工的信息用于页面回显展示,然后用户修改员工数据之后,点击保存按钮,就可以将修改的数据提交到服务端,保存到数据库。 所以呢,分为两部操作:
-
根据ID查询员工信息
-
保存修改
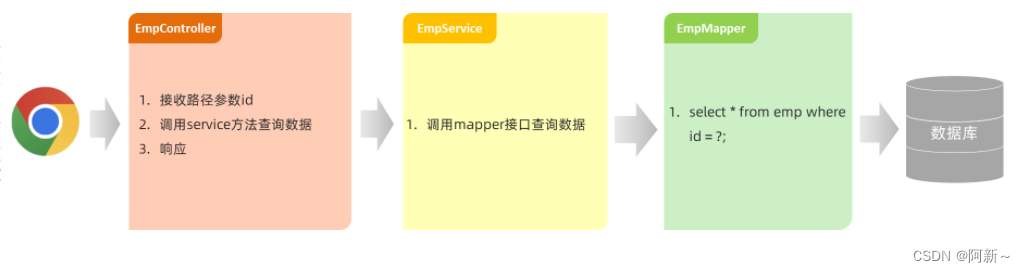
3.2 查询回显
查询回显,就是根据ID查询员工的信息,用于页面回显展示。接下来,我们就需要参考接口文档进行开发:
1). EmpMapper
//根据ID查询员工信息
@Select("select * from emp where id = #{id}")
Emp getById(Integer id);
2). EmpService / EmpServiceImpl
EmpService
/**
* 根据ID查询员工
* @param id
* @return
*/
Emp getById(Integer id);
EmpServiceImpl
@Override
public Emp getById(Integer id) {
	return empMapper.getById(id);
}
3). EmpController
//根据id查询
@GetMapping("/{id}")
public Result getById(@PathVariable Integer id){
Emp emp = empService.getById(id);
return Result.success(emp);
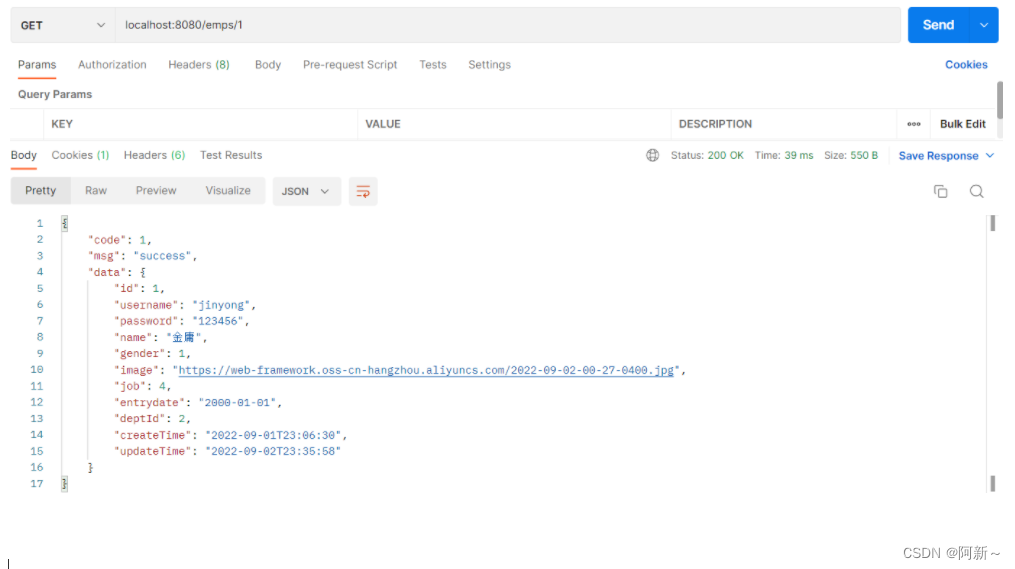
}4). 测试
代码编写完毕后,启动服务器,打开Postman发送 GET 请求,请求连接:http://localhost:8080/emps/1
3.3 保存修改
当用户修改完数据之后,点击保存按钮,就需要将数据提交到服务端,然后服务端需要将数据保存到数据库中。 具体的执行流程为:
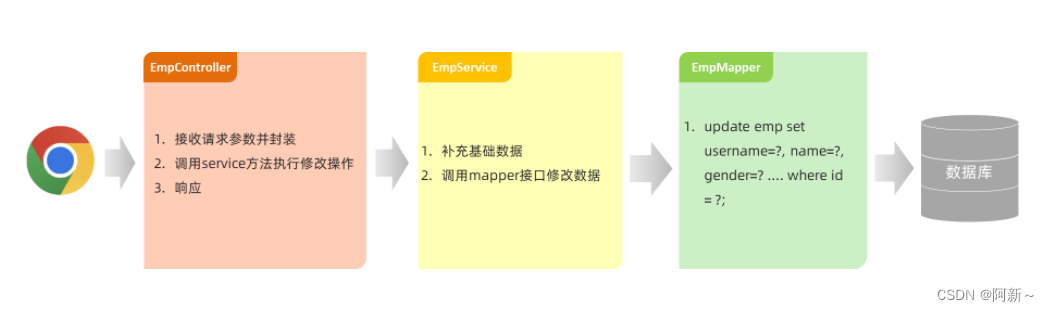
接下来,我们就可以根据接口文档进行功能开发了。
1). EmpMapper
EmpMapper接口
//修改员工信息
void update(Emp emp);
EmpMapper.xml
<update id="update">
    update emp
    <set>
        <if test="username != null and username != ''">
        	username = #{username},
        </if>
        <if test="password != null and password != ''">
       	 	password = #{password},
        </if>
        <if test="name != null and name != ''">
        	name = #{name},
        </if>
        <if test="gender != null">
        	gender = #{gender},
        </if>
        <if test="image != null and image != ''">
        	image = #{image},
        </if>
        <if test="job != null">
        	job = #{job},
        </if>
        <if test="entrydate != null">
        	entrydate = #{entrydate},
        </if>
        <if test="deptId != null">
        	dept_id = #{deptId},
        </if>
        <if test="updateTime != null">
        	update_time = #{updateTime}
        </if>
    </set>
    where id = #{id}
</update>
2). EmpService / EmpServiceImpl
EmpService
/**
* 更新员工
* @param emp
*/
void update(Emp emp);
EmpServiceImpl
@Override
public void update(Emp emp) {
    emp.setUpdateTime(LocalDateTime.now()); //更新修改时间为当前时间
    empMapper.update(emp);
}
3). EmpController
//修改
@PutMapping
public Result update(@RequestBody Emp emp){
    empService.update(emp);
    return Result.success();
}
4). 测试
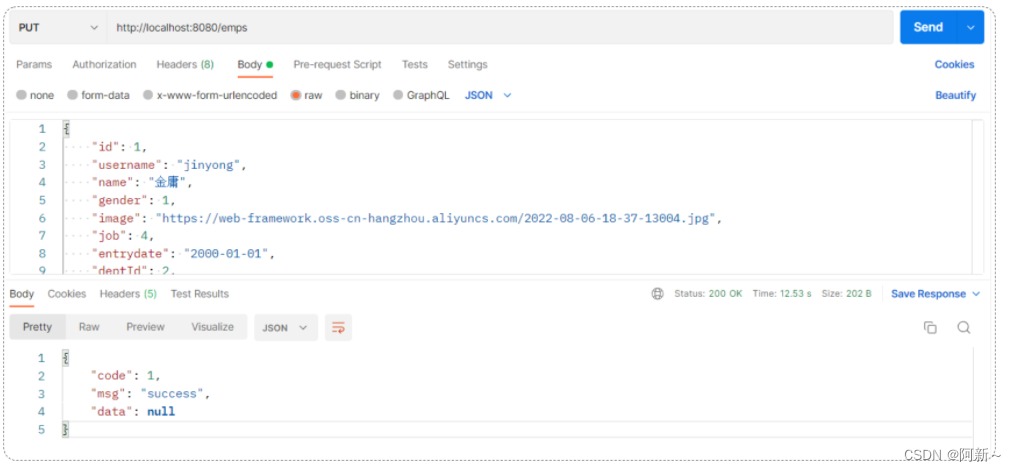
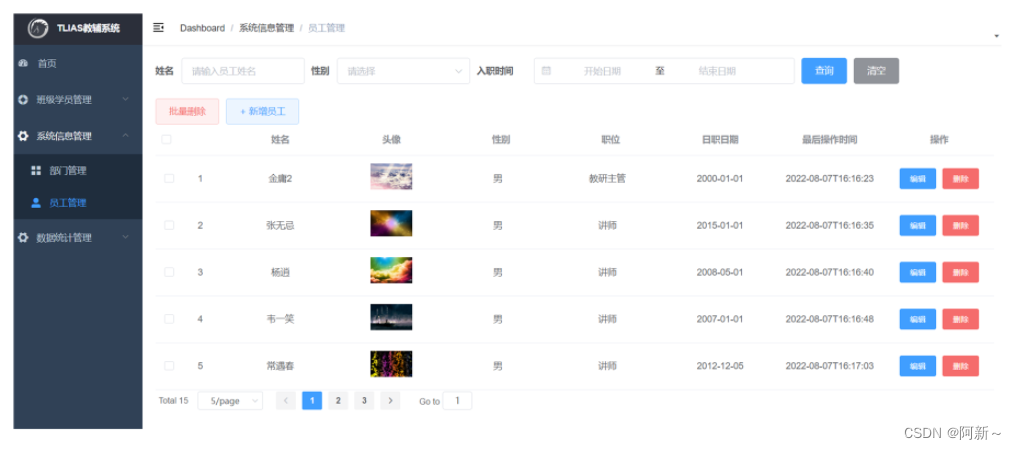
5). 联调测试
4. 配置文件
4.1 @Value
在上述的案例中,关于阿里云的相关配置信息,我们是直接写死在java代码中了,这样做,功能虽然实现了,但是是不便于维护和管理的。 为了解决这个问题呢,我们可以将其配置在properties的配置文件中。如下:
#自定义的阿里云OSS配置信息
aliyun.oss.endpoint=https://oss-cn-hangzhou.aliyuncs.com
aliyun.oss.accessKeyId=LTAI5tHShLuDe9VTPT9R1Miv
aliyun.oss.accessKeySecret=PY84ekKf18YvAi1ispWdIwYEurwurD
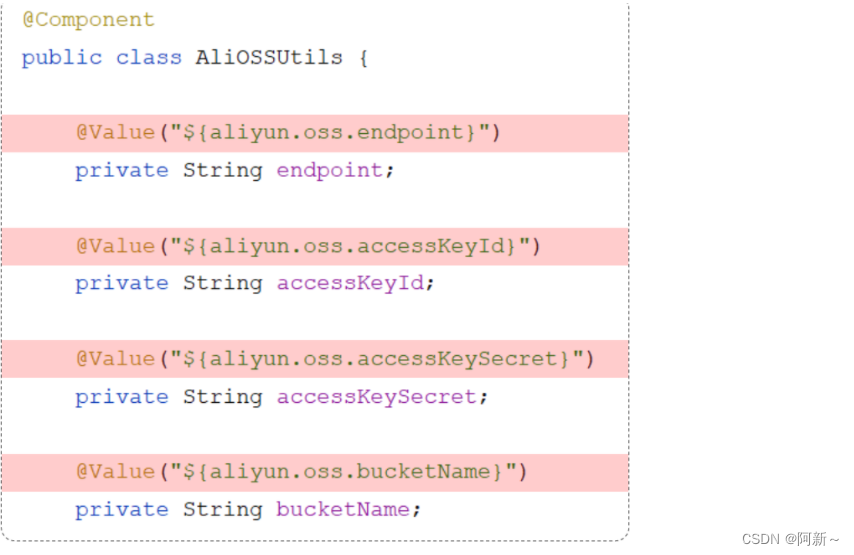
aliyun.oss.bucketName=web-152配置在了配置文件之后,如果我们想在java代码中使用。 我们可以直接通过@Value注解,就可以加载并读取配置文件中的配置项,具体形式为:@Value("${key}")
package com.itheima.utils;

import com.aliyun.oss.OSS;
import com.aliyun.oss.OSSClientBuilder;
import org.springframework.beans.factory.annotation.Value;
import org.springframework.stereotype.Component;
import org.springframework.web.multipart.MultipartFile;

import java.io.IOException;
import java.io.InputStream;
import java.time.LocalDateTime;
import java.time.format.DateTimeFormatter;

/**
 * 阿里云 OSS 工具类
 */
@Component
public class AliOSSUtils {

//    private String endpoint = "https://oss-cn-hangzhou.aliyuncs.com";
//    private String accessKeyId = "LTAI5tHShLuDe9VTPT9R1Miv";
//    private String accessKeySecret = "PY84ekKf18YvAi1ispWdIwYEurwurD";
//    private String bucketName = "web-152";

    @Value("${aliyun.oss.endpoint}")
    private String endpoint;
    @Value("${aliyun.oss.accessKeyId}")
    private String accessKeyId;
    @Value("${aliyun.oss.accessKeySecret}")
    private String accessKeySecret;
    @Value("${aliyun.oss.bucketName}")
    private String bucketName;

    /**
     * 实现上传图片到OSS
     */
    public String upload(MultipartFile multipartFile) throws IOException {
        // 获取上传的文件的输入流
        InputStream inputStream = multipartFile.getInputStream();

        // 避免文件覆盖
        String fileName = LocalDateTime.now().format(DateTimeFormatter.ofPattern("yyyy-MM-dd-HH-mm-ss")) + multipartFile.getOriginalFilename();

        //上传文件到 OSS
        OSS ossClient = new OSSClientBuilder().build(endpoint, accessKeyId, accessKeySecret);
        ossClient.putObject(bucketName, fileName, inputStream);

        //文件访问路径 重新拼接url
        //https://web-152.oss-cn-hangzhou.aliyuncs.com/1.jpeg
        //       bucketName
        String url = endpoint.split("//")[0] + "//" + bucketName + "." + endpoint.split("//")[1] + "/" + fileName;
        // 关闭ossClient
        ossClient.shutdown();
        return url;// 把上传到oss的路径返回
    }
}
@Value 注解通常用于外部配置的属性注入,具体用法为: @Value("${配置文件中的key}")
4.2 yml配置
1 介绍
前面我们一直使用springboot项目创建完毕后自带的application.properties进行属性的配置,那其实呢,在springboot项目中提供了多种属性的配置方式:
-
application.properties
server.port=8080 server.address=127.0.0.1 -
application.yml
server: port: 8080 address: 127.0.0.1 -
application.yaml
server:
  port: 8080
  address: 127.0.0.1
我们看到,配置同样的数据信息,yml格式的数据呢,有以下特点:
-
容易阅读
-
容易与脚本语言交互
-
以数据为核心,重数据轻格式
yml 格式的配置文件,后缀名有两种:
-
yml (推荐)
-
yaml
2 基本语法
-
大小写敏感
-
数值前边必须有空格,作为分隔符
-
使用缩进表示层级关系,缩进时,不允许使用Tab键,只能用空格(idea中会自动将Tab转换为空格)
-
缩进的空格数目不重要,只要相同层级的元素左侧对齐即可
-
表示注释,从这个字符一直到行尾,都会被解析器忽略

3 基本格式
-
对象/Map集合
user: name: zhangsan age: 18 password: 123456 -
数组/List/Set集合
hobby:
  - java
  - game
  - sport
4 配置改造
将原来使用的application.properties 改名为 _application.properties(名字随便一换,springboot就加载不到了)。然后创建新的配置文件 application.yml,然后再将application.properties 改造称为 application.yml。
改造后效果如下:
spring:
  datasource:
    driver-class-name: com.mysql.cj.jdbc.Driver
    url: jdbc:mysql://localhost:3306/tlias
    username: root
    password: 1234
  servlet:
    multipart:
      max-file-size: 10MB
      max-request-size: 100MB

mybatis:
  configuration:
    log-impl: org.apache.ibatis.logging.stdout.StdOutImpl
    map-underscore-to-camel-case: true

aliyun:
  oss:
    endpoint: https://oss-cn-hangzhou.aliyuncs.com
    accessKeyId: LTAI4GCH1vX6DKqJWxd6nEuW
    accessKeySecret: yBshYweHOpqDuhCArrVHwIiBKpyqSL
    bucketName: web-397
5 问题分析
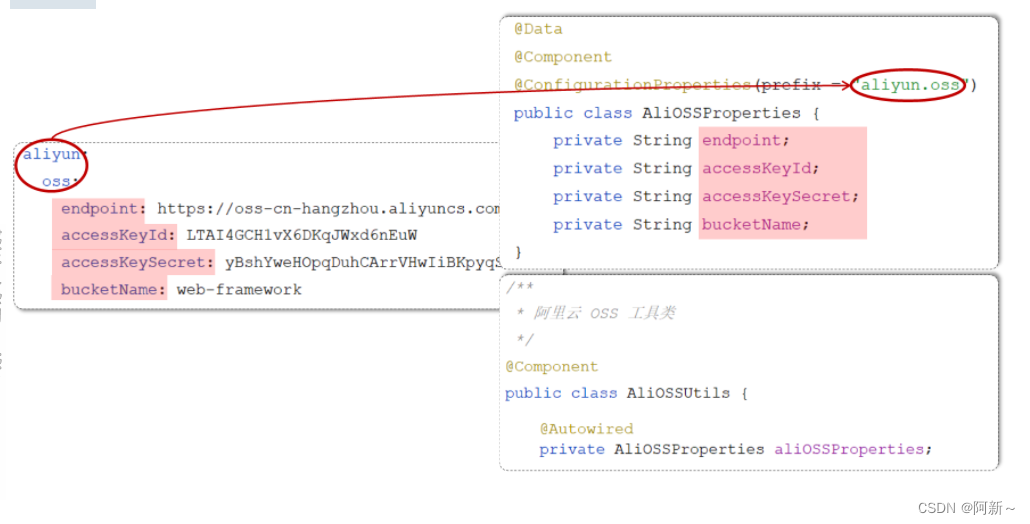
我们在 application.properties 或者 application.yml 中配置了自定义的信息之后,如果需要在 java 需要注入这些属性,我们直接直接通过@Value注解来进行注入,这种方式没有问题。 但是如果说需要注入的属性较多,我们写起来会比较繁琐,此时我们可以通过 @ConfigurationProperties 来简化。
4.3 @ConfigurationProperties
1). 定义实体类,用于封装需要注入的属性。
import lombok.Data;
import org.springframework.boot.context.properties.ConfigurationProperties;
import org.springframework.stereotype.Component;

@Data
@Component
@ConfigurationProperties(prefix = "aliyun.oss") //指定配置文件
public class AliOSSProperties {
    private String endpoint;
    private String accessKeyId;
    private String accessKeySecret;
    private String bucketName;
}
2). 在工具类中,注解注入上述的bean对象,然后调用get方法就可以获取到各个属性
import com.aliyun.oss.OSS;
import com.aliyun.oss.OSSClientBuilder;
import org.springframework.beans.factory.annotation.Autowired;
import org.springframework.beans.factory.annotation.Value;
import org.springframework.stereotype.Component;
import org.springframework.web.multipart.MultipartFile;
import java.io.*;
import java.time.LocalDateTime;
import java.time.format.DateTimeFormatter;

/**
 * 阿里云 OSS 工具类
 */
@Component
public class AliOSSUtils {

    @Autowired
    private AliOSSProperties aliOSSProperties;

    /**
     * 实现上传图片到OSS
     */
    public String upload(MultipartFile multipartFile) throws IOException {
        // 获取上传的文件的输入流
        InputStream inputStream = multipartFile.getInputStream();

        // 避免文件覆盖
        String fileName = LocalDateTime.now().format(DateTimeFormatter.ofPattern("yyyy-MM-dd-HH-mm-ss")) + multipartFile.getOriginalFilename();

        //上传文件到 OSS
        OSS ossClient = new OSSClientBuilder().build(aliOSSProperties.getEndpoint(), aliOSSProperties.getAccessKeyId(), aliOSSProperties.getAccessKeySecret());
        ossClient.putObject(aliOSSProperties.getBucketName(), fileName, inputStream);

        //文件访问路径
        String url = aliOSSProperties.getEndpoint().split("//")[0] + "//" + aliOSSProperties.getBucketName() + "." + aliOSSProperties.getEndpoint().split("//")[1] + "/" + fileName;
        // 关闭ossClient
        ossClient.shutdown();
        return url;// 把上传到oss的路径返回
    }

}
<dependency>
    <groupId>org.springframework.boot</groupId>
    <artifactId>spring-boot-configuration-processor</artifactId>
</dependency>


 被折叠的 条评论
为什么被折叠?
被折叠的 条评论
为什么被折叠?
 到【灌水乐园】发言


