


小阿轩yx-Docker Compose 与私有仓库部署
Docker 的网络模式
Docker 四种网络模式
| 网络模式 | 参数 | 说明 |
| host 模式 | - - net=host | 容器和宿主机共享 Network namespace |
| container 模式 | - - net={id} | 容器和另外一个容器共享 Network namespace。 kubernetes 中的pod就是多个容器共享一个 Network namespace |
| none 模式 | - - net=none | 容器有独立的Network namespace,但并没有对其进行任何网络设置,如分配 veth pair 和网桥连接,配置IP等 |
| bridge 模式 | - - net=bridge | 默认为该模式,通过 -p 指定端口映射 |
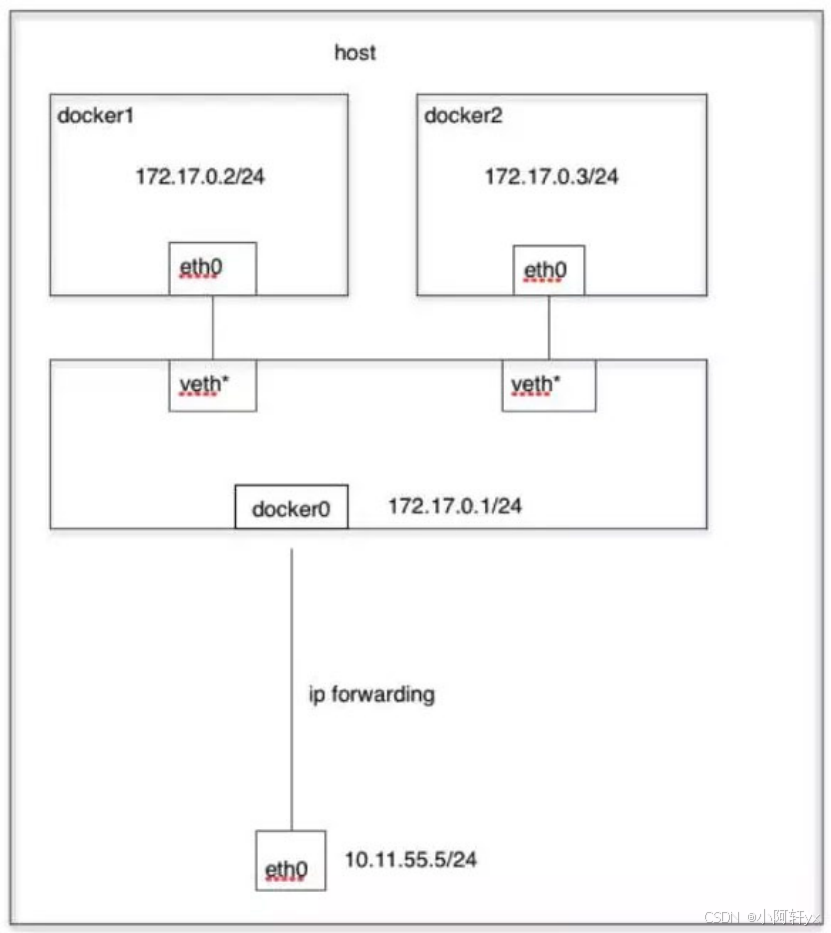
Bridge 模式
- 是 docker 的默认网络模式
- 不写-net参数,就是 bridge 模式
bridge 模式图
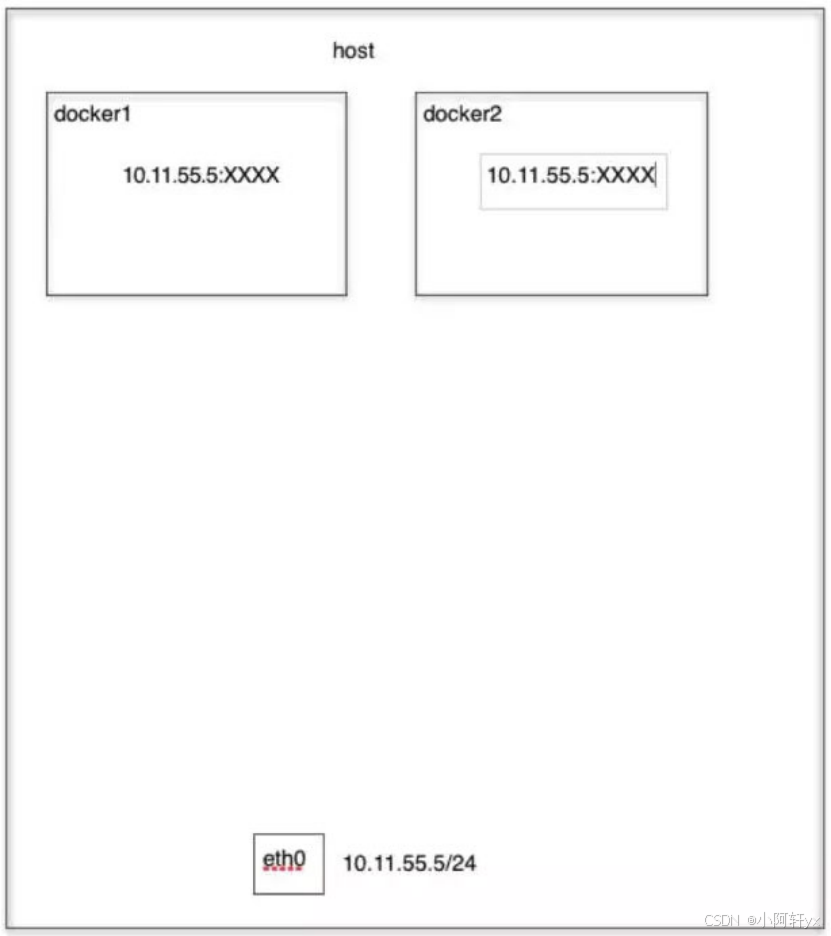
Host 模式
- 容器不会获得一个独立的 Network Namespace,是和宿主机共用一个 Network Namespace
- 容器不会虚拟出自己的网卡、配置自己的 IP 等,使用宿主机的 IP 和端口
- 容器的文件系统、进程列表等和宿主机是隔离的
Host 模式图
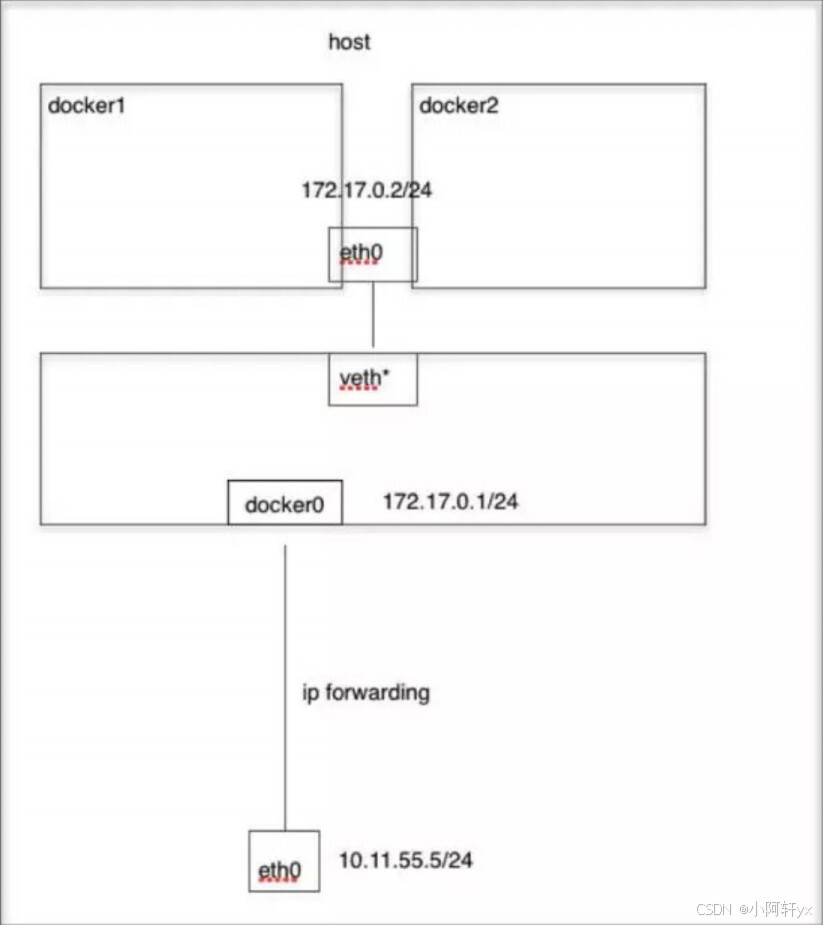
Container 模式
- 指定新创建的容器和已经存在的容器共享一个 Network Namespace,不和宿主机共享
- 不会创建自己网卡、配置自己的 IP ,是和指定的容器共享 IP、端口范围
- 除了网络方面,文件系统、进程列表还是隔离的
Container 模式图
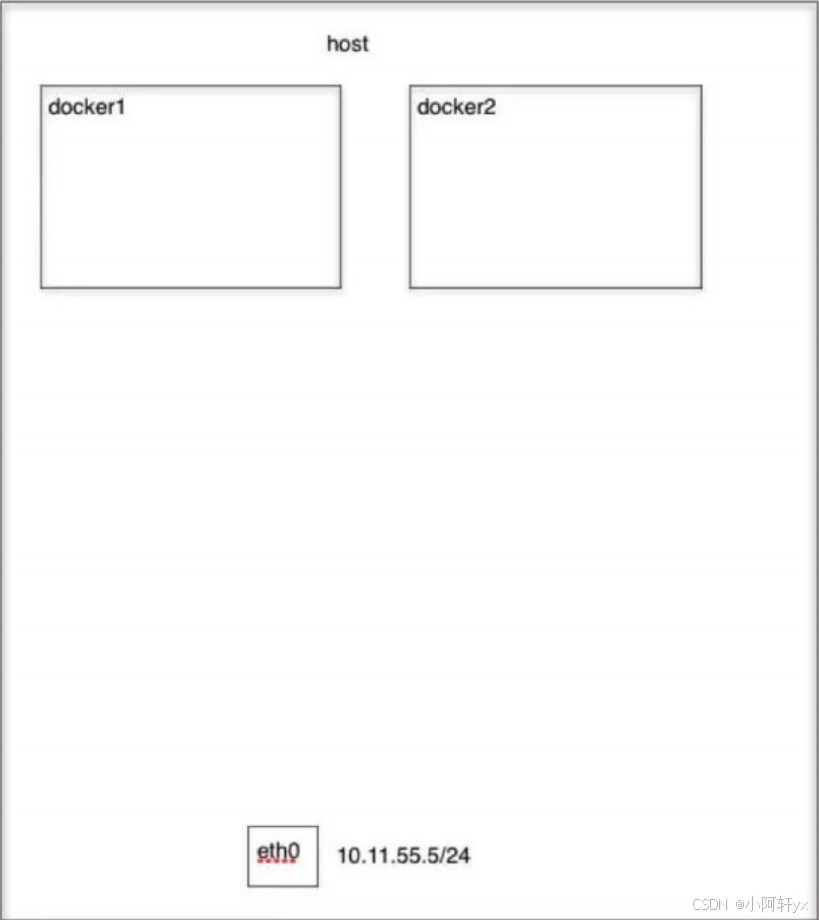
None 模式
- 容器拥有自己的 Network Namespace,但是不为 Docker 容器进行网络配置
- 容器没有网卡、IP、路由等信息,需要手动设置
None 模式图
Docker 重启策略
- 面向生产环境的一个启动策略,在开发过程中可以忽略该策略
- 都是由 Docker 守护进程完成的,因此与守护进程息息相关
no
- 默认策略,在容器退出时不重启容器
on-failure
- 在容器非正常退出时(退出状态非0),才会重启容器
on-failure:3
- 指定启动的次数,在容器非正常退出时重启容器,最多重启3次
always
- 在容器退出时总是重启容器
unless-stopped
- 在容器退出时总是重启容器,但是不考虑在 Docker 守护进程启动时就已经停止了的容器
Docker 容器的常见退出状态码
| 状态码 | 说明 |
| 0 | 正常退出 |
| 125 | Docker 守护进程本身错误 |
| 126 | 容器启动后,要执行的默认命令无法调用 |
| 127 | 容器启动后,要执行的默认命令不存在 |
| 其他 | 容器启动后正常执行的命令返回的状态码 |
- 通过状态码可以大概判断出容器的情况
Docker Compose 工具
什么是 Docker Compose
- 前身是 Fig
- 它是一个定义及运行多个 Docker 容器的工具
文件格式以及编写注意事项
YAML
- 一种标记语言
- 它可以很直观的展示数据序列化格式
- 可读性高
- 类似于 XML 数据描述语言,语法比 XML 简单的很多
- 数据结构通过缩进来表示
- 连续的项目通过减号来表示
使用 YAML 时需要注意事项
- 不支持制表符 tab 键缩进、需要使用空格缩进
- 通常开头缩进两个空格
- 字符后缩进一个空格,如冒号、逗号、横杆
- 用#号注释
- 如果包含特殊字符,要使用单引号('')引起来
- 布尔值(true、false、yes、no、on、off)必须用引号("")括起来,这样分析器会将它们截石位字符串
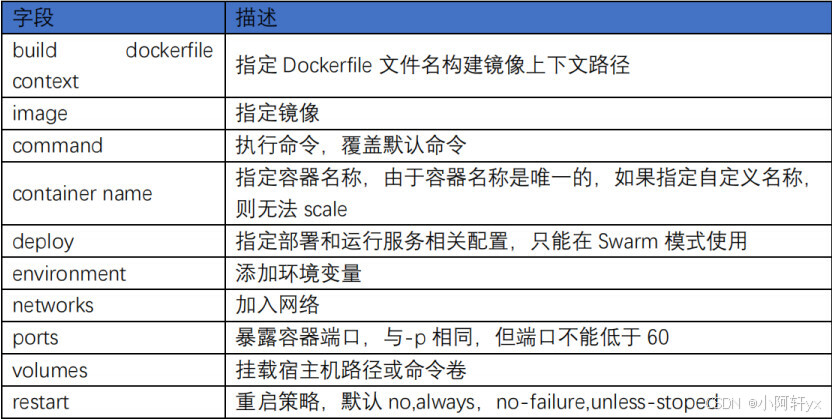
常用字段
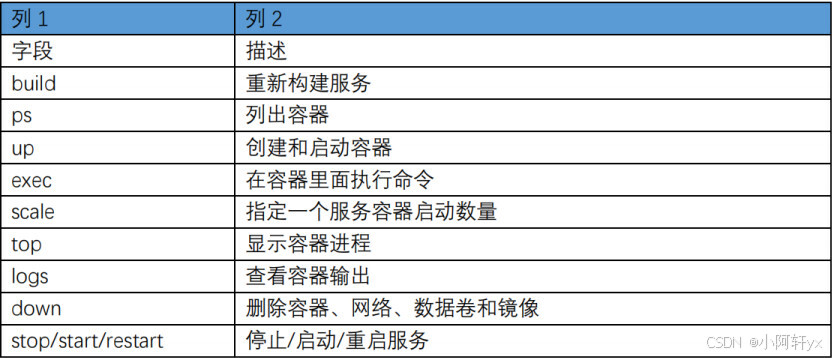
常用命令
Harbor 私有仓库
什么是 Harbor
- 是 VMWare 公司开源的企业级 Docker Registry 项目
- 扩展了开源 Docker Distribution
- 是一个企业级私有 Registry 服务器
目标
- 帮助用户迅速搭建一个企业级的 Docker Registry 服务
它以 Docker 公司开源的 Registry 为基础,提供企业用户需求的功能
- 管理 UI
- 基于角色的访问控制(Role Based AccessControl)
- AD/LDAP 集成
- 审计日志(Auditlogging)
特点
- 更好的性能和安全
- 提升用户使用 Registry 构建和运行环境传输镜像的效率
Harbor 的优势
基于角色控制
- 用户和仓库都是基于项目进行组织的,而用户在项目中可以拥有不同的权限
基于镜像的复制策略
- 镜像可以在多个 Harbor 实例之间进行复制(同步),适用于负载平衡、高可用性、多数据中心、多混合多云场景
支持 LDAP/AD
- Harbor 与现有的企业 LDAP/AD 集成,用于用户认证和管理
删除图像和收集垃圾
- 镜像可以被删除,也可以回收镜像占用空间
图形 UI
- 用户可以轻松浏览、搜索镜像仓库对项目进行管理
审计
- 对存储库的所有操作都进行记录
RESTful API
- 用户大多数管理操作的 RESTful API,易于与外部系统集成
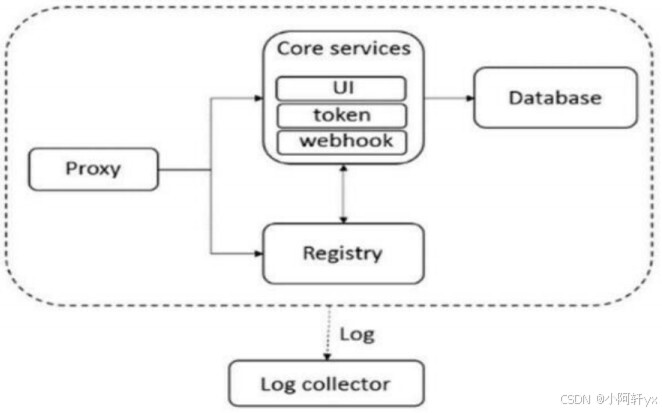
Harbor 的构成
Harbor 架构上主要有五个组件
- Proxy
- Core services
- Database(Harbor-db)
- Logcollector(Harbor-log)
Proxy
- Harbor 的 Registry、UI、Token 等服务通过一个前置的反向代理统一接收浏览器和 Docker 客户端的请求,并将请求转发给后端不同的服务
Registry
- 负责储存 Docker 镜像,并处理 Docker push/pul 命令。
- 由于要对用户进行访问控制,即不同用户对 Dockerimage 有不同的读写权限,Registry 会指向一个 Token 服务,强制用户的每次 Docker pull/push 请求都要携带一个合法的 Token,Registry 会通过公钥对Token 进行解密验证。
Core services
- 这是 Harbor 的核心功能
主要提供的服务
Ul(Harbor-ui)
- 提供图形化界面,帮助用户管理 Registry 上的镜像(image),并对 用户进行授权。
Webhook
- 为了及时获取Registry上image 状态变化的情况,在 Registry上 配 置 Webhook, 把状态变化传递给 UI 模块。
Token 服务
- 负责根据用户权限给每个 Dockerpush/pul 命令签发 Token。Docker 客 户端向 Registry 服务发起的请求,如果不包含 Token,会被重定向,获得 Token 后再 重新向Registry 进行请求
Database(Harbor-db)
- 为 coreservices 提供数据库服务,负责存储用户权限、审计日志、Docker image 分组信息等数据
Log collector(Harbor-log)
- 为了帮助监控 Harbor 运行,负责收集其它组件的 log,供日后进行分析
- Harbor 的每个组件都是以 Docker 容器的形似构建的,因此,使用 Docker Compose 来对它进行部署
部署 Harbor 私有仓库
资源列表
| 操作系统 | 主机名 | 配置 | IP |
| CentOS7.9-101 | harbor、client | 2C4G | 192.168.10.101 |
| CentOS7.9-106 | harbor | 2C4G | 192.168.10.106 |
使用 Compose 基本上分为三步
- Dockerfile 定义应用的运行环境
- docker-compose.yml 定义组成应用的各服务
- docker-compose up 启动整个应用
基础环境
- 两个节点都要操作
- 更改使用最新本v2.29.1的 docker-compose
提升权限
[root@localhost ~]# chmod +x docker-compose查看版本
[root@localhost ~]# docker-compose -version
docker compose version v2.29.1
将 images 镜像包通过 Xftp 上传至虚拟机
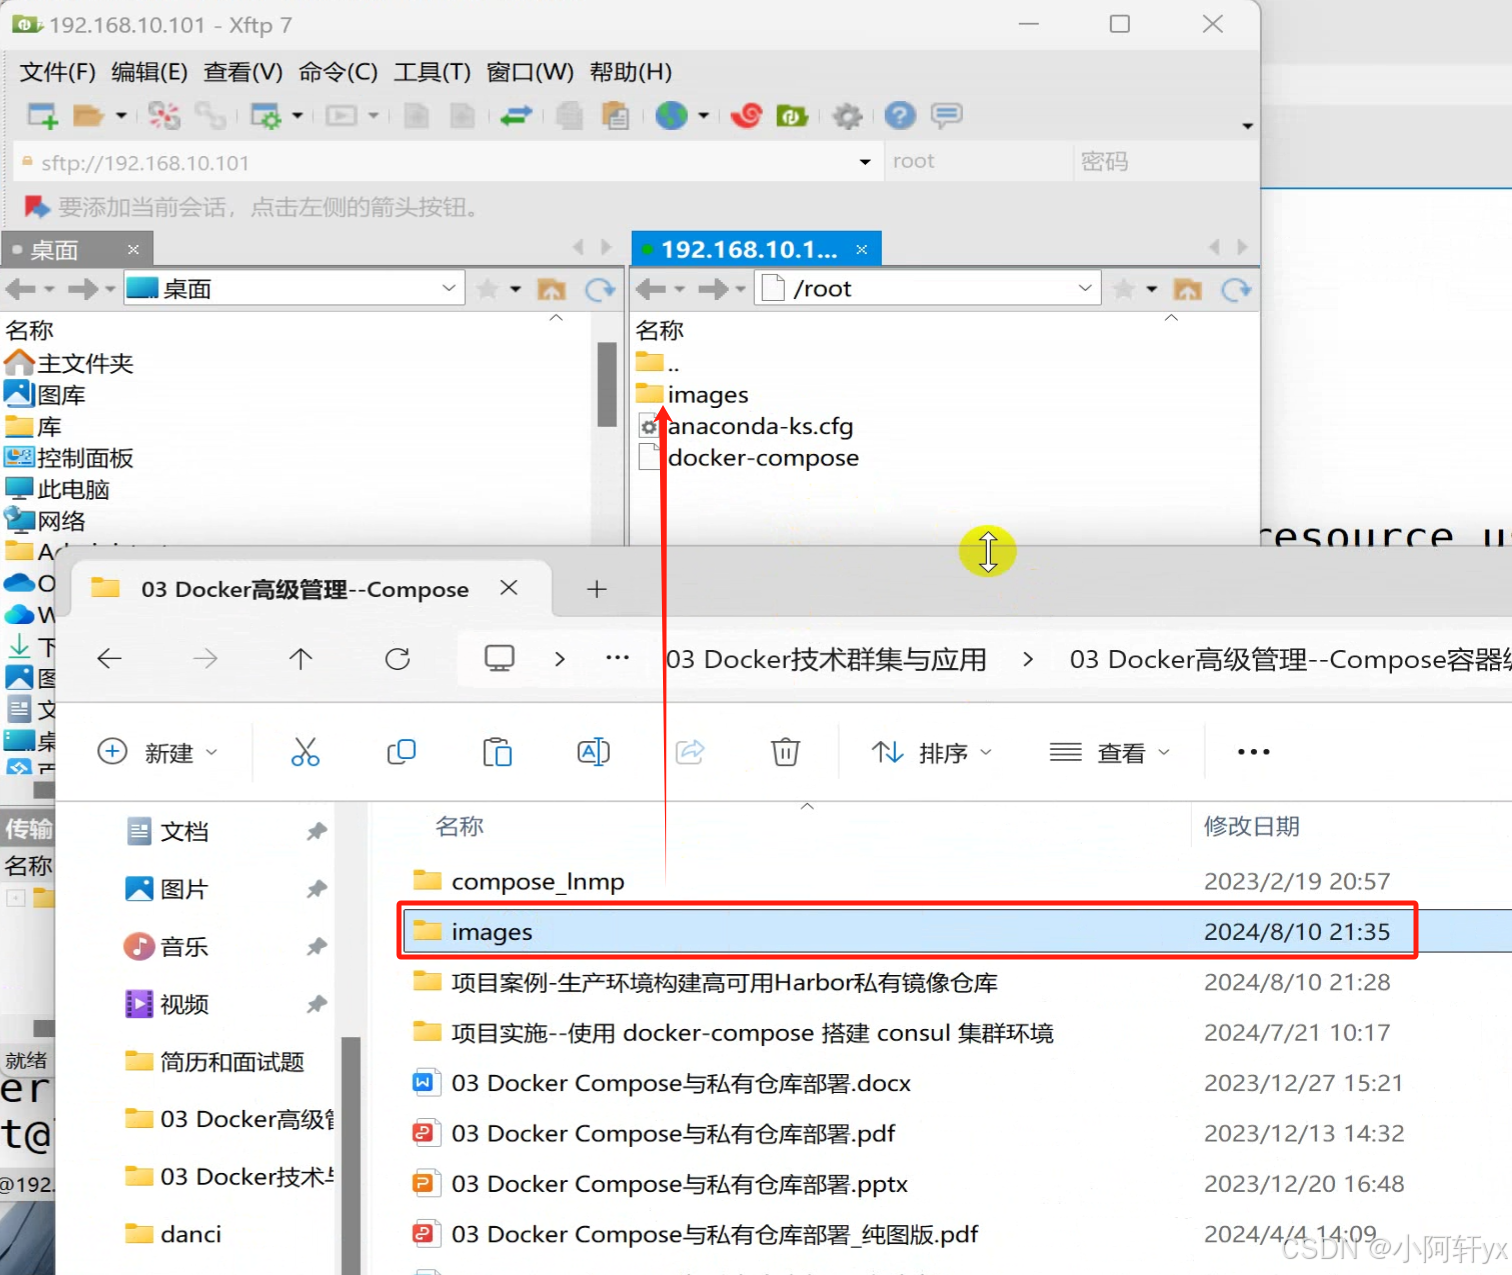
进入 images 目录
[root@localhost ~]# cd images/执行导入的脚本文件
[root@localhost images]# bash imp_docker_img.sh退出目录并查看镜像
[root@localhost images]# cd
[root@localhost ~]# docker images
REPOSITORY                TAG            IMAGE ID            CREATED
mysql                     latest         99afc808f15b        12 month
cirrors                   latest         2008a6682996        15 month
httpd                     latest         daablfa13f86        17 month
nginx                     latest         904b8cb13b93        17 month
centos                    7              eebbee3f44bd        2 years
gliderlabs/registrator    latest         3b59190c6c80        8 years
Docker Compose 文件结构
编写编排文件
compose 默认的模版文件名字为 docker-compose.yaml
[root@localhost ~]# vim docker-compose.yaml
services:
  webapp:
    image: 'httpd:latest'
    ports:
      - "80:80"
      - "443:443"
    volumes:
- "/var/www/html:/usr/local/apache2/htdocs:rw"- httpd 的容器中网站的根目录在:/usr/local/apache2/htdocs
- Compose 文件格式有3个版本:1.x、2.x、3.x,目前主流的为 3.x,其支持 docker 1.13.0 及其以上版本
Docker Compose 常用命令
执行文件,生成容器
[root@localhost ~]# docker-compose up -d
[+] Running 2/2
√ Network root_default    Created            0.1s
√ Network root_webapp-1 Started 0.6s- 不加选项-d会在前台运行,结束该进程,这个容器就关闭了,加上-d后可以让容器在后台持续运行
列出当前运行的容器
[root@localhost ~]# docker-compose ps
    Name            Command        State         Ports
-------------------------------------------------------------
root_webapp_1   httpd-foreground   Up      0.0.0.0:80->80/tcp
进入 html 目录
[root@localhost ~]# cd /var/www/html/创建一个测试页面
[root@localhost html]# echo test>index.html用浏览器访问
- 192.168.10.101

退出到家目录并查看服务日志
[root@localhost html]# cd
[root@localhost ~]# docker-compose logs webapp
port:打印绑定的公共端口,下面命令可以输出httpd服务80端口和443端口所绑定的公共端口
[root@localhost ~]# docker-compose port webapp 80
0.0.0.0:80

[root@localhost ~]# docker-compose port webapp 443
0.0.0.0:443
停止正在运行的服务器
[root@localhost ~]# docker-compose stop webapp
[+] Stopping 1/1
√ Container root-webapp-1    Stopped            1.2s
启动存在的服务器
[root@localhost ~]# docker-compose start webapp
[+] Running 1/1
√ Container root-webapp-1    Started            0.4s
重启存在的服务器
[root@localhost ~]# docker-compose restart webapp
[+] Restarting 1/1
√ Container root-webapp-1    Started            1.6s
删除指定的容器
[root@localhost ~]# docker-compose stop webapp
[root@localhost ~]# docker-compose rm webapp
? Going to remove root-webapp-1 Yes
[+] Remove 1/0
√ Container root-webapp-1 Removed            0.0s
kill:通过发送 SIGKILL 信号来杀死指定服务的容器
[root@localhost ~]# docker-compose kill webapp先注释掉文件中的端口
[root@localhost httpd]# cat docker-compose.yml

services:
  webapp:
    image: 'httpd:latest'
#    ports:
#      - "9090:80"
#      - "443:443"
    volumes:
      - "/var/www/html:/usr/local/apache2/htdocs:rw"
杀死并删除所有的容器
[root@localhost ~]# docker-compose kill webapp
[root@localhost ~]# docker-compose em webapp
给容器做副本
[root@localhost ~]# docker-compose scale webapp=3
[+] Running 3/3
√ Container root-webapp-3 Started                0.4s
√ Container root-webapp-1 Started                0.4s
√ Container root-webapp-2 Started                0.4s
查看状态
[root@localhost ~]# docker-compose pscompose 案例
进入目录
[root@localhost ~]# cd /opt编写配置文件
[root@localhost ~]# vim docker-compose.yaml
services:
  webapp:
    image: 'nginx'
    ports:
      - "80:80"
    volumes:
      - "/www/html:/www/html:rw"
      - "/opt/nginx/nginx.conf:/etc/nginx/nginx.conf"
创建配置文件
[root@localhost ~]# mkdir /opt/nginx进入目录
[root@localhost ~]# cd nginx/将 nginx 配置上传至服务器
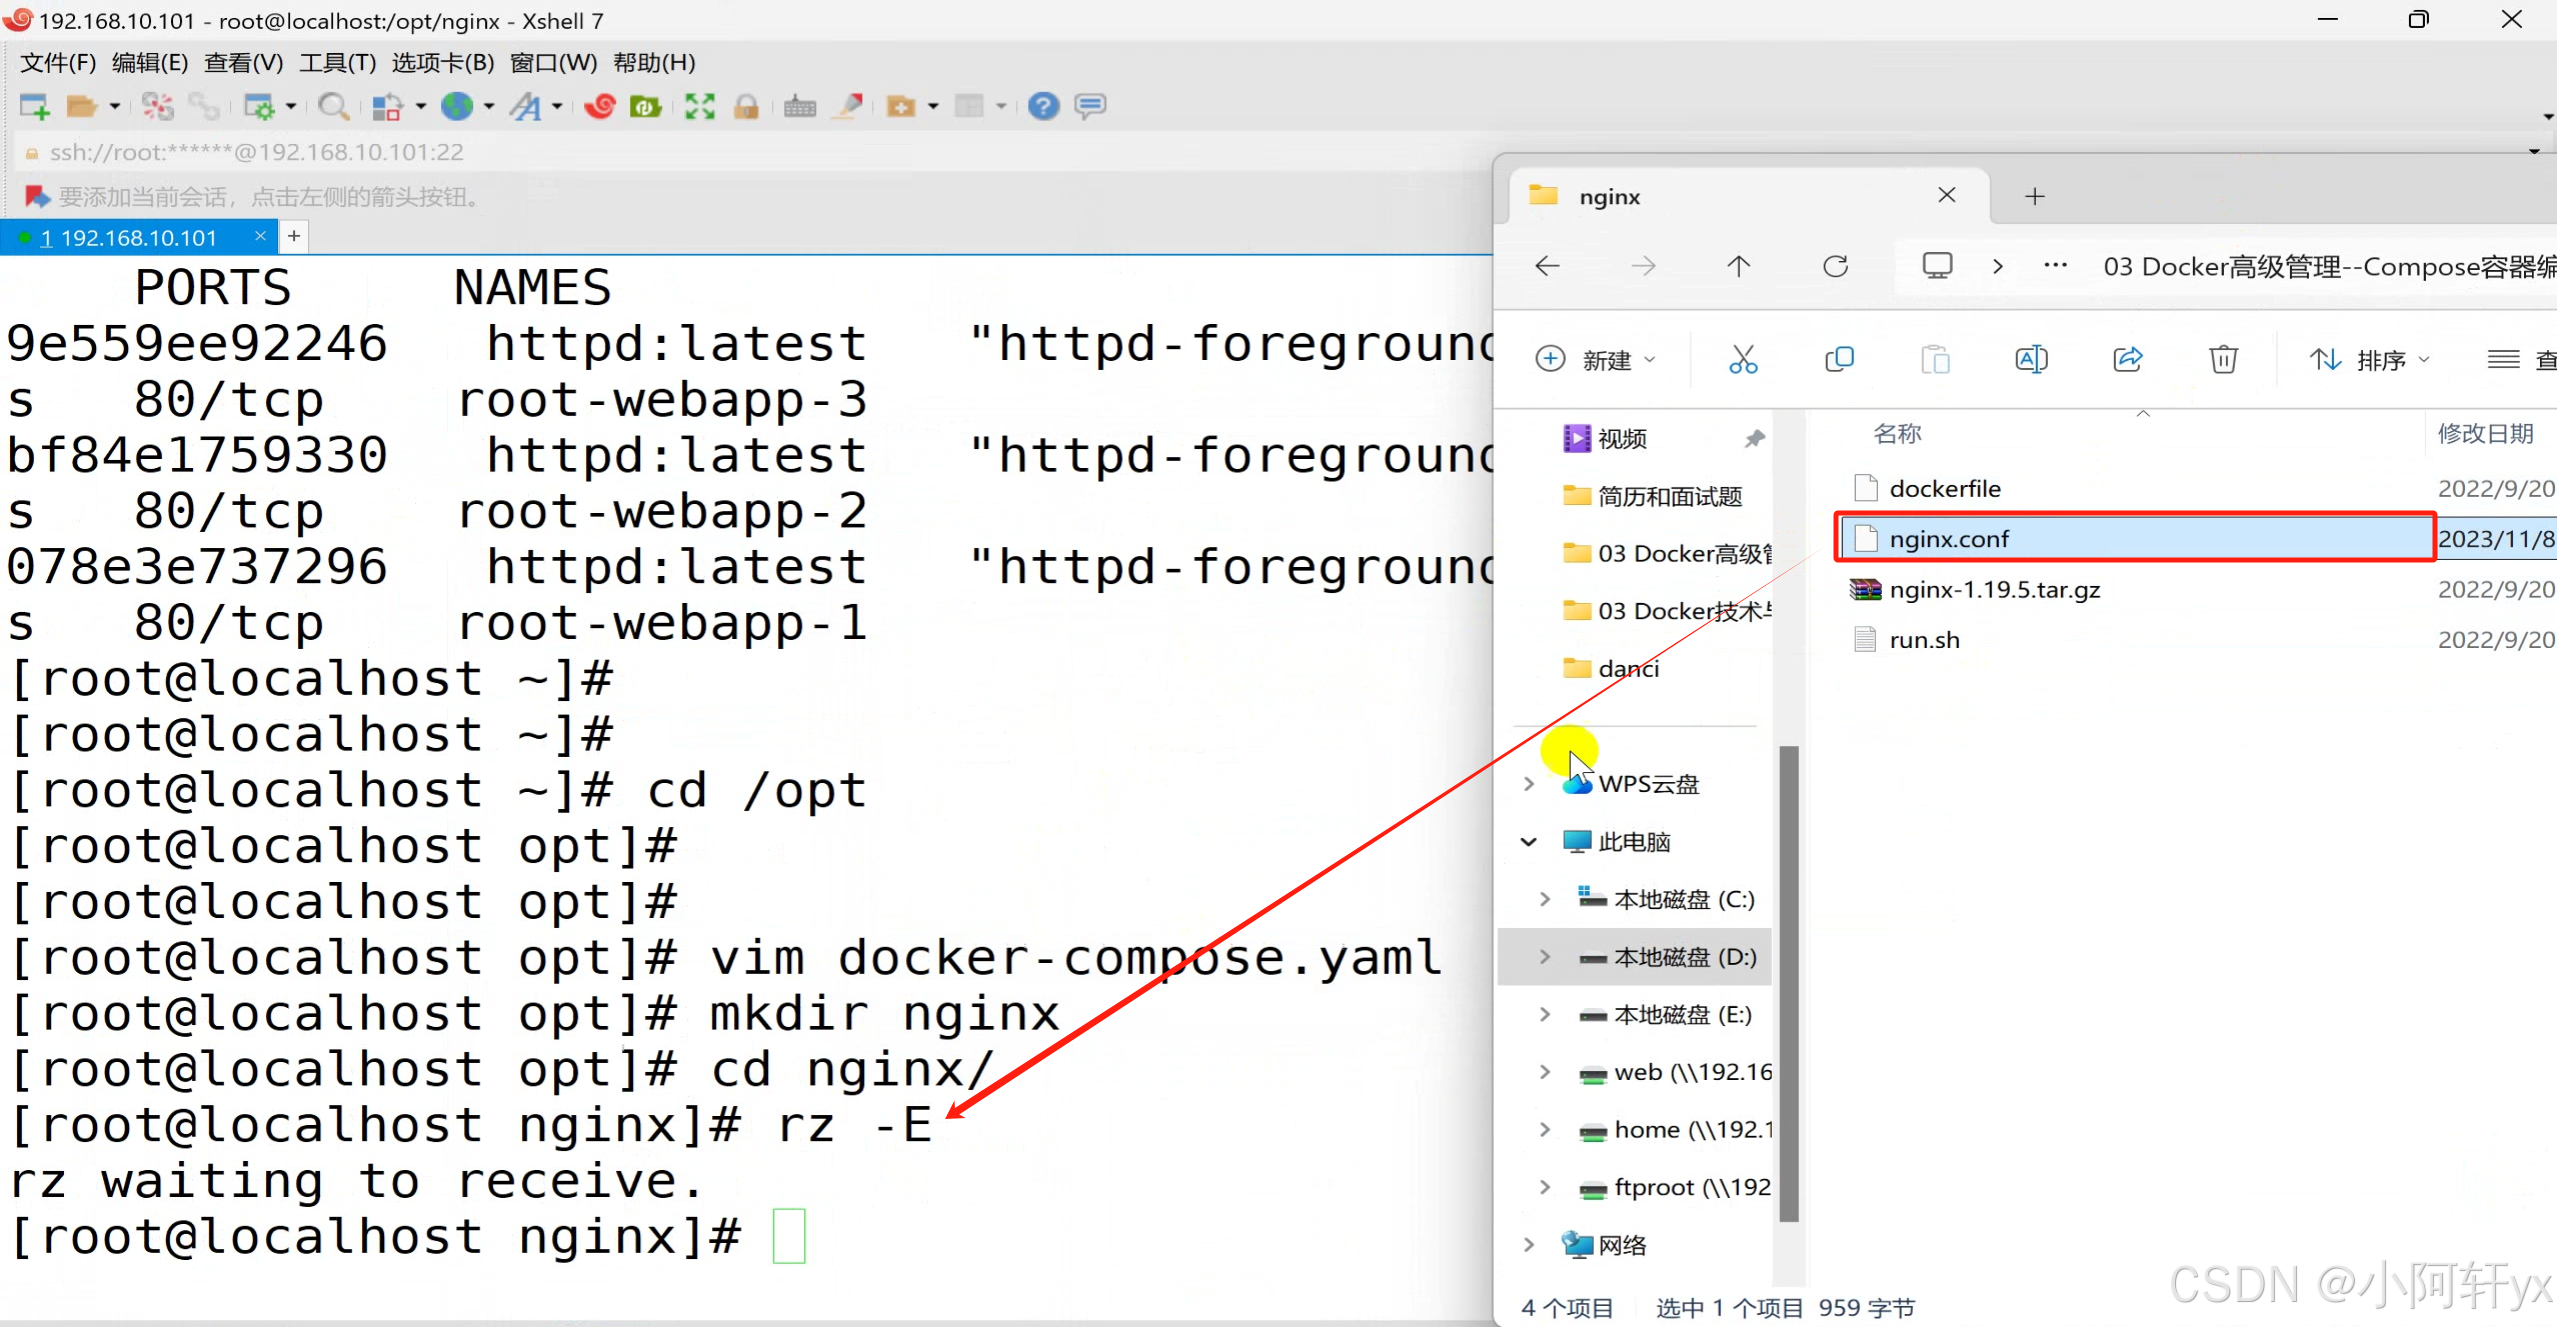
修改 nginx 配置文件
[root@localhost nginx]# vim nginx.conf
location / {
            //30行
            root   /www/html;
            index  index.html index.htm index.php;
        }

location ~ \.php$ {
            //40行
            root           /www/html;
            fastcgi_pass   127.0.0.1:9000;
            fastcgi_index  index.php;
            //43行
            fastcgi_param  SCRIPT_FILENAME  /www/html$fastcgi_script_name;
            include        fastcgi_params;
        }
//末尾删除
daemon off;
退出到 opt 目录
[root@localhost nginx]# cd ..执行文件,生成容器
[root@localhost opt]# docker-compose up -d
[+] Running 2/2
√ Network opt_default        Created            0.1s
√ Container opt-webnginx-1   Started            0.4s
列出当前运行的容器
[root@localhost ~]# docker-compose up
或
[root@localhost ~]# docker-compose ps
新开一个192.168.10.106主机
将 harbor-offline-installer-v2.4.3.tgz源码包通过Xftp上传至106服务器

解压源码包
[root@localhost ~]# tar zxvf harbor-offline-installer-v2.4.3.tgz进入目录并查看
[root@localhost ~]# cd harbor
[root@localhost harbor]# ls
common.sh  harbor.v2.4.3.tar.gz  harbor.yml.tmpl  install.sh  LICENSE  prepare
配置harbor
将配置文件模板拷贝一份,并命名为harbor.yml,这是默认的配置文件名称
[root@localhost harbor]# cp harbor.yml.tmpl harbor.yml解压 harbor 包
[root@localhost harbor]# tar zxvf harbor.v2.4.3.tar.gz- 其实也没必要解压(包很大,几百兆)
修改配置文件
[root@localhost harbor]# vim harbor.yml
# 修改为当前所在节点的ip
# 第5行
hostname: 192.168.10.106

# 登录界面的密码
harbor_admin_password: pwd123

# 将https相关的配置给注释掉,这里为了简单只使用http,而且也可以在nginx那一层去做https
# https related config
#https:
  # https port for harbor, default is 443
#  port: 443
  # The path of cert and key files for nginx
#  certificate: /your/certificate/path
# private_key: /your/private/key/path- 注释掉 https 相关的行
运行 Harbor 的安装脚本
[root@localhost harbor]# ./install.sh

[Step 0]: checking if docker is installed ...

Note: docker version: 26.1.4

[Step 1]: checking docker-compose is installed ...

Note: docker-compose version: 2.29.1

[Step 2]: loading Harbor images ...
Loaded image: goharbor/prepare:v2.4.3
Loaded image: goharbor/harbor-jobservice:v2.4.3
Loaded image: goharbor/harbor-registryctl:v2.4.3
Loaded image: goharbor/registry-photon:v2.4.3
Loaded image: goharbor/harbor-core:v2.4.3
Loaded image: goharbor/notary-signer-photon:v2.4.3
Loaded image: goharbor/clair-photon:v2.4.3
Loaded image: goharbor/trivy-adapter-photon:v2.4.3
Loaded image: goharbor/harbor-log:v2.4.3
Loaded image: goharbor/nginx-photon:v2.4.3
Loaded image: goharbor/clair-adapter-photon:v2.4.3
Loaded image: goharbor/chartmuseum-photon:v2.4.3
Loaded image: goharbor/harbor-portal:v2.4.3
Loaded image: goharbor/harbor-db:v2.4.3
Loaded image: goharbor/redis-photon:v2.4.3
Loaded image: goharbor/notary-server-photon:v2.4.3

[Step 3]: preparing environment ...

[Step 4]: preparing harbor configs ...
prepare base dir is set to /usr/local/src/harbor
WARNING:root:WARNING: HTTP protocol is insecure. Harbor will deprecate http protocol in the future. Please make sure to upgrade to https
Generated configuration file: /config/log/logrotate.conf
Generated configuration file: /config/log/rsyslog_docker.conf
Generated configuration file: /config/nginx/nginx.conf
Generated configuration file: /config/core/env
Generated configuration file: /config/core/app.conf
Generated configuration file: /config/registry/config.yml
Generated configuration file: /config/registryctl/env
Generated configuration file: /config/registryctl/config.yml
Generated configuration file: /config/db/env
Generated configuration file: /config/jobservice/env
Generated configuration file: /config/jobservice/config.yml
Generated and saved secret to file: /data/secret/keys/secretkey
Successfully called func: create_root_cert
Generated configuration file: /compose_location/docker-compose.yml
Clean up the input dir

[Step 5]: starting Harbor ...
Creating network "harbor_harbor" with the default driver
Creating harbor-log ... done
Creating harbor-db     ... done
Creating harbor-portal ... done
Creating redis         ... done
Creating registryctl   ... done
Creating registry      ... done
Creating harbor-core   ... done
Creating harbor-jobservice ... done
Creating nginx             ... done
✔ ----Harbor has been installed and started successfully.----
查看状态
[root@localhost harbor]# docker-compose ps
或
[root@localhost harbor]# docker images
安装完成,使用浏览器访问Harbor,正常情况下应能进入登录界面
- 192.168.10.106

账号
- admin
密码
- Harbor12345
登录成功
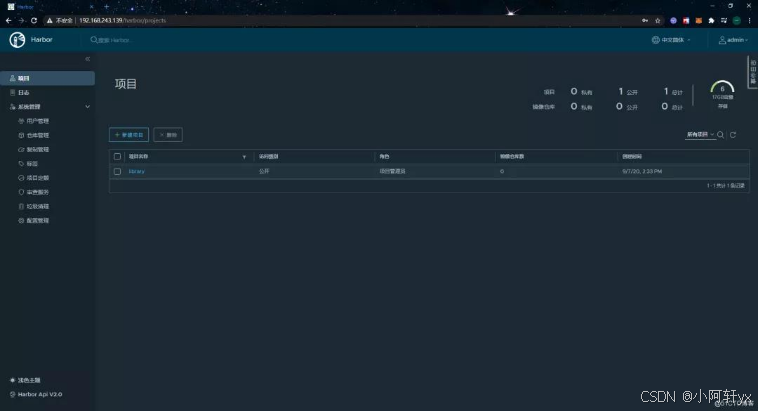
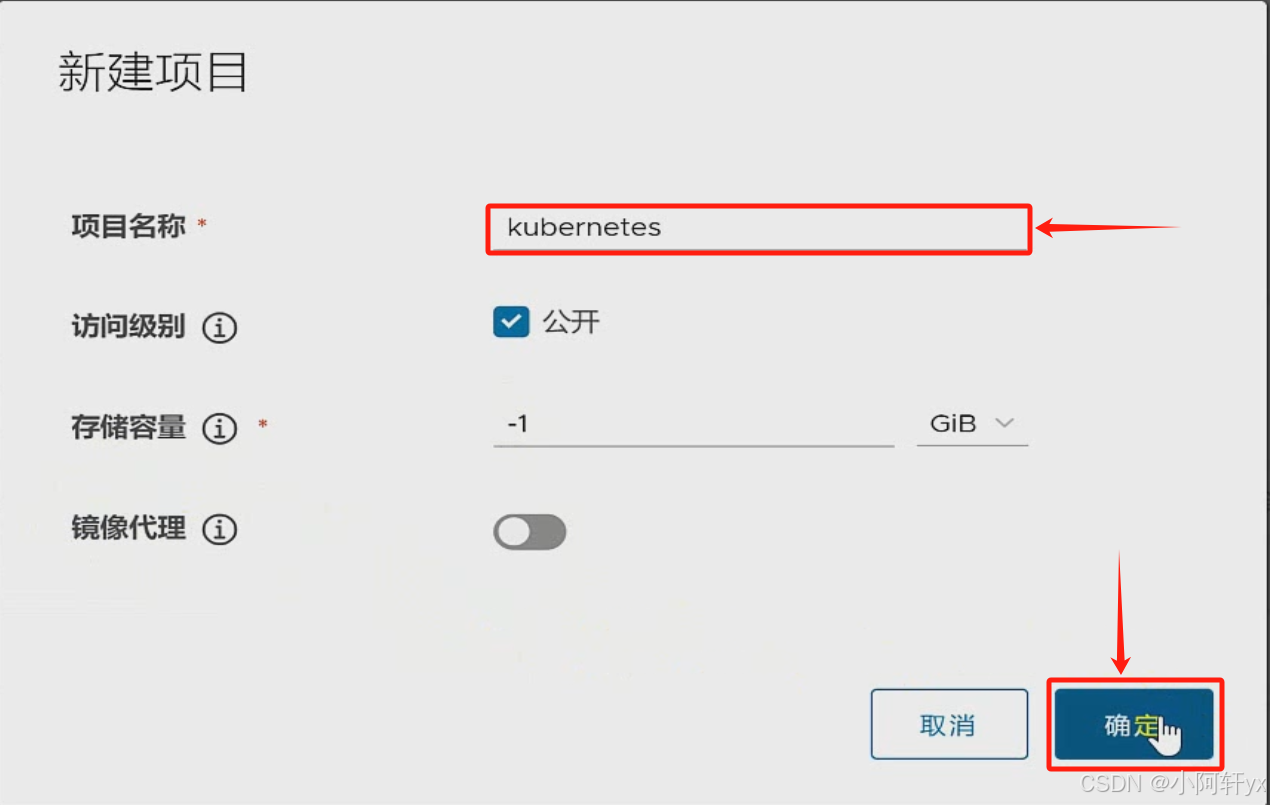
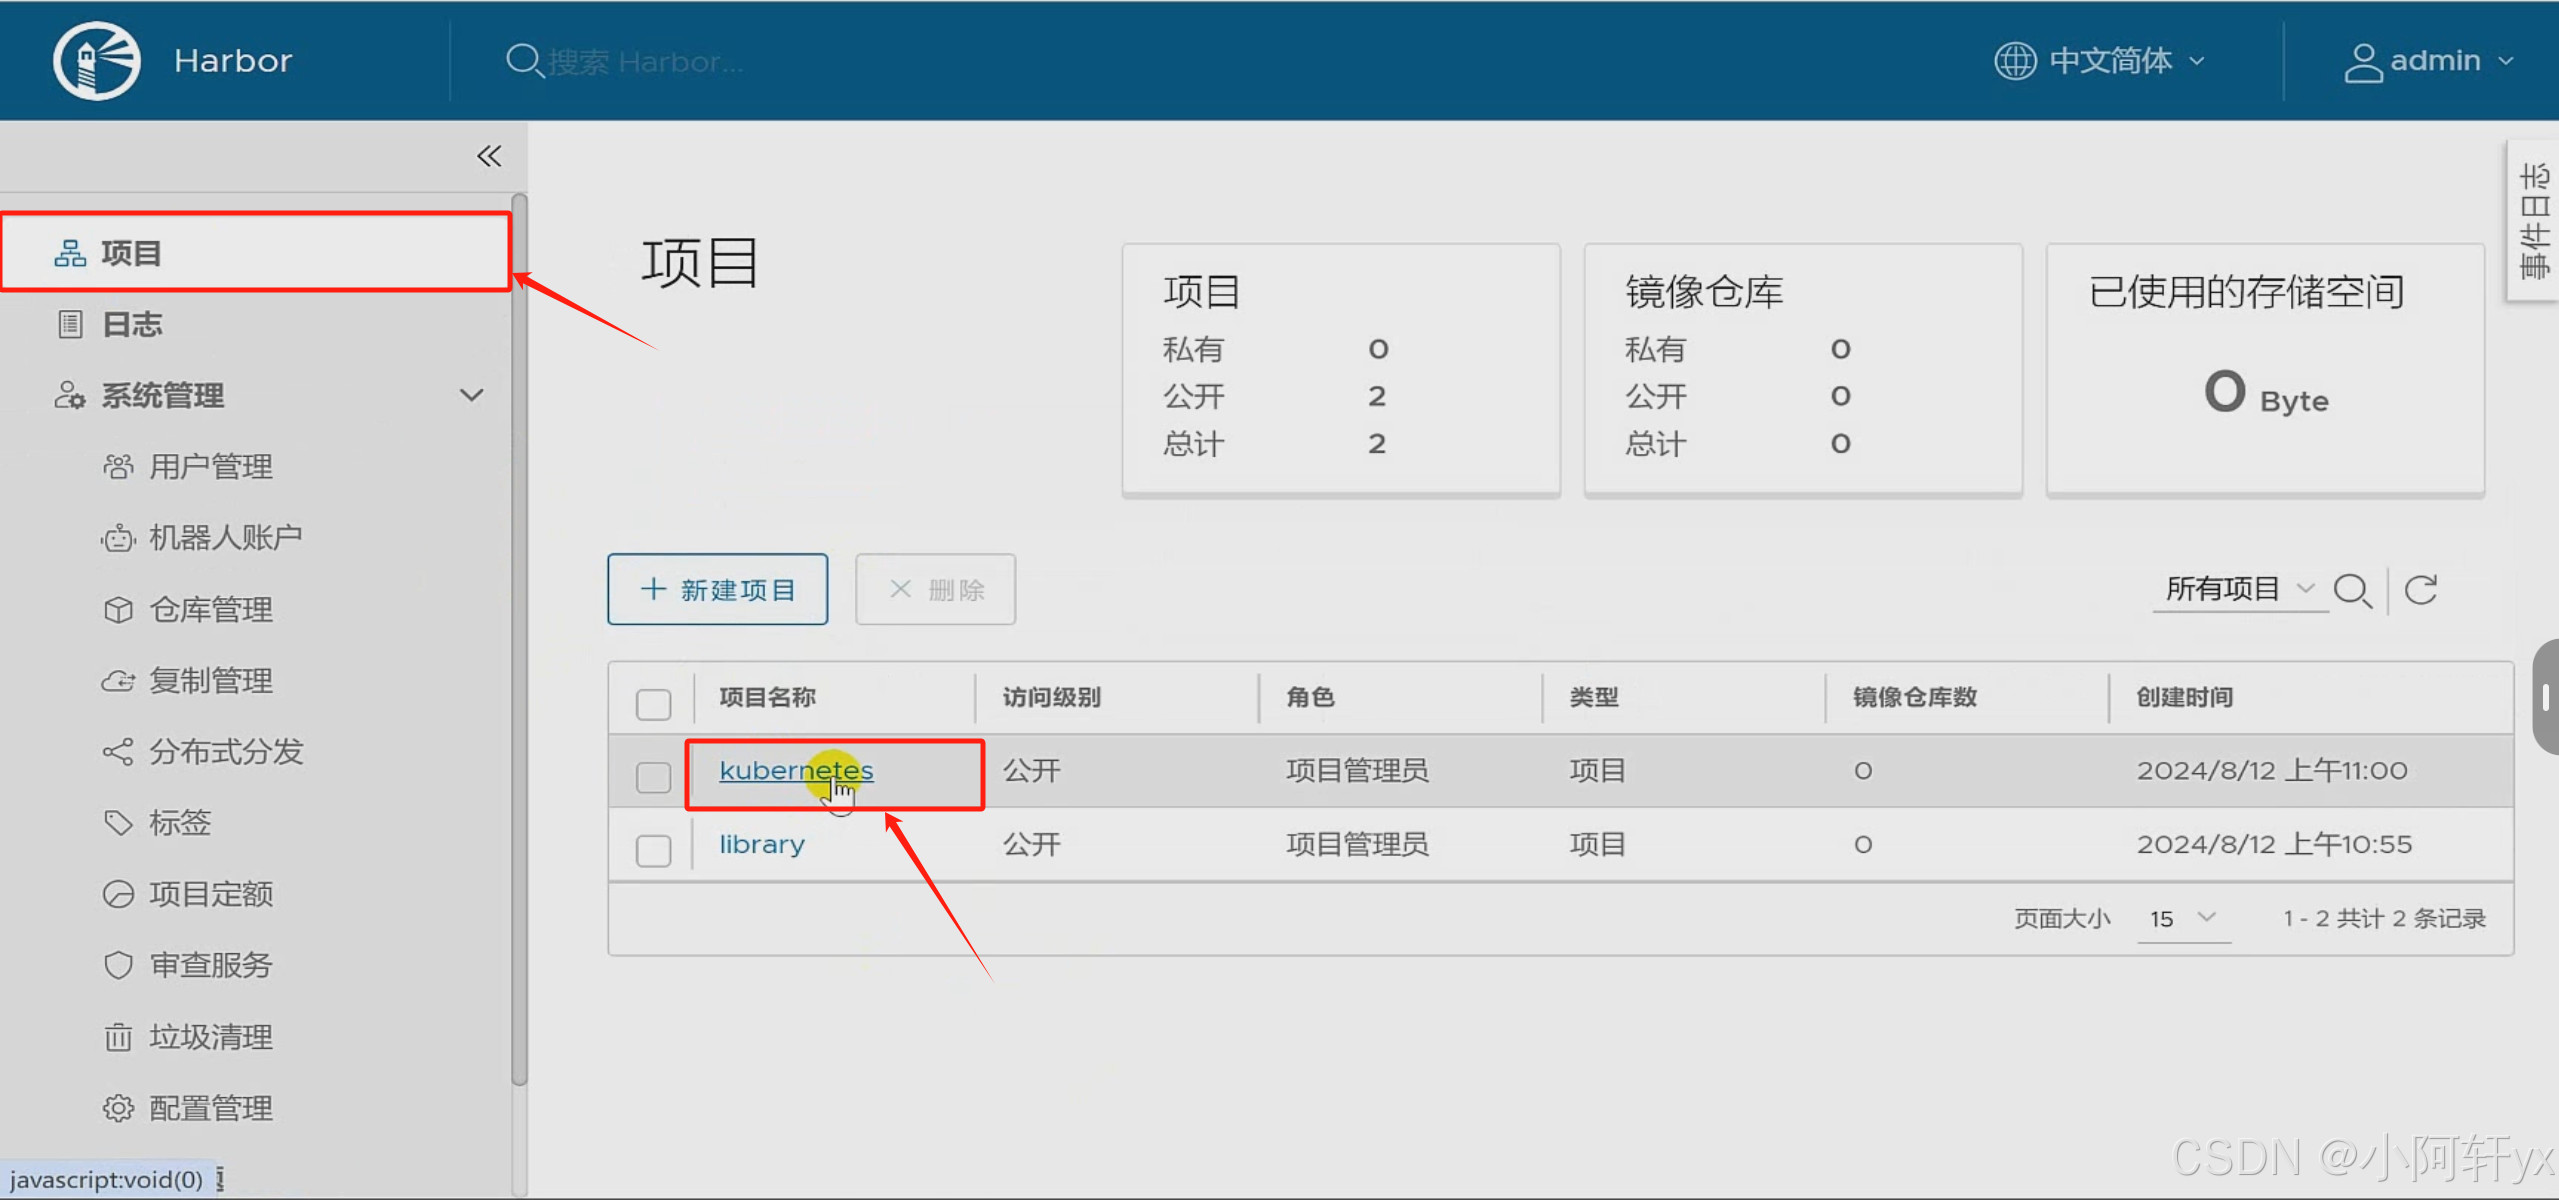
添加项目
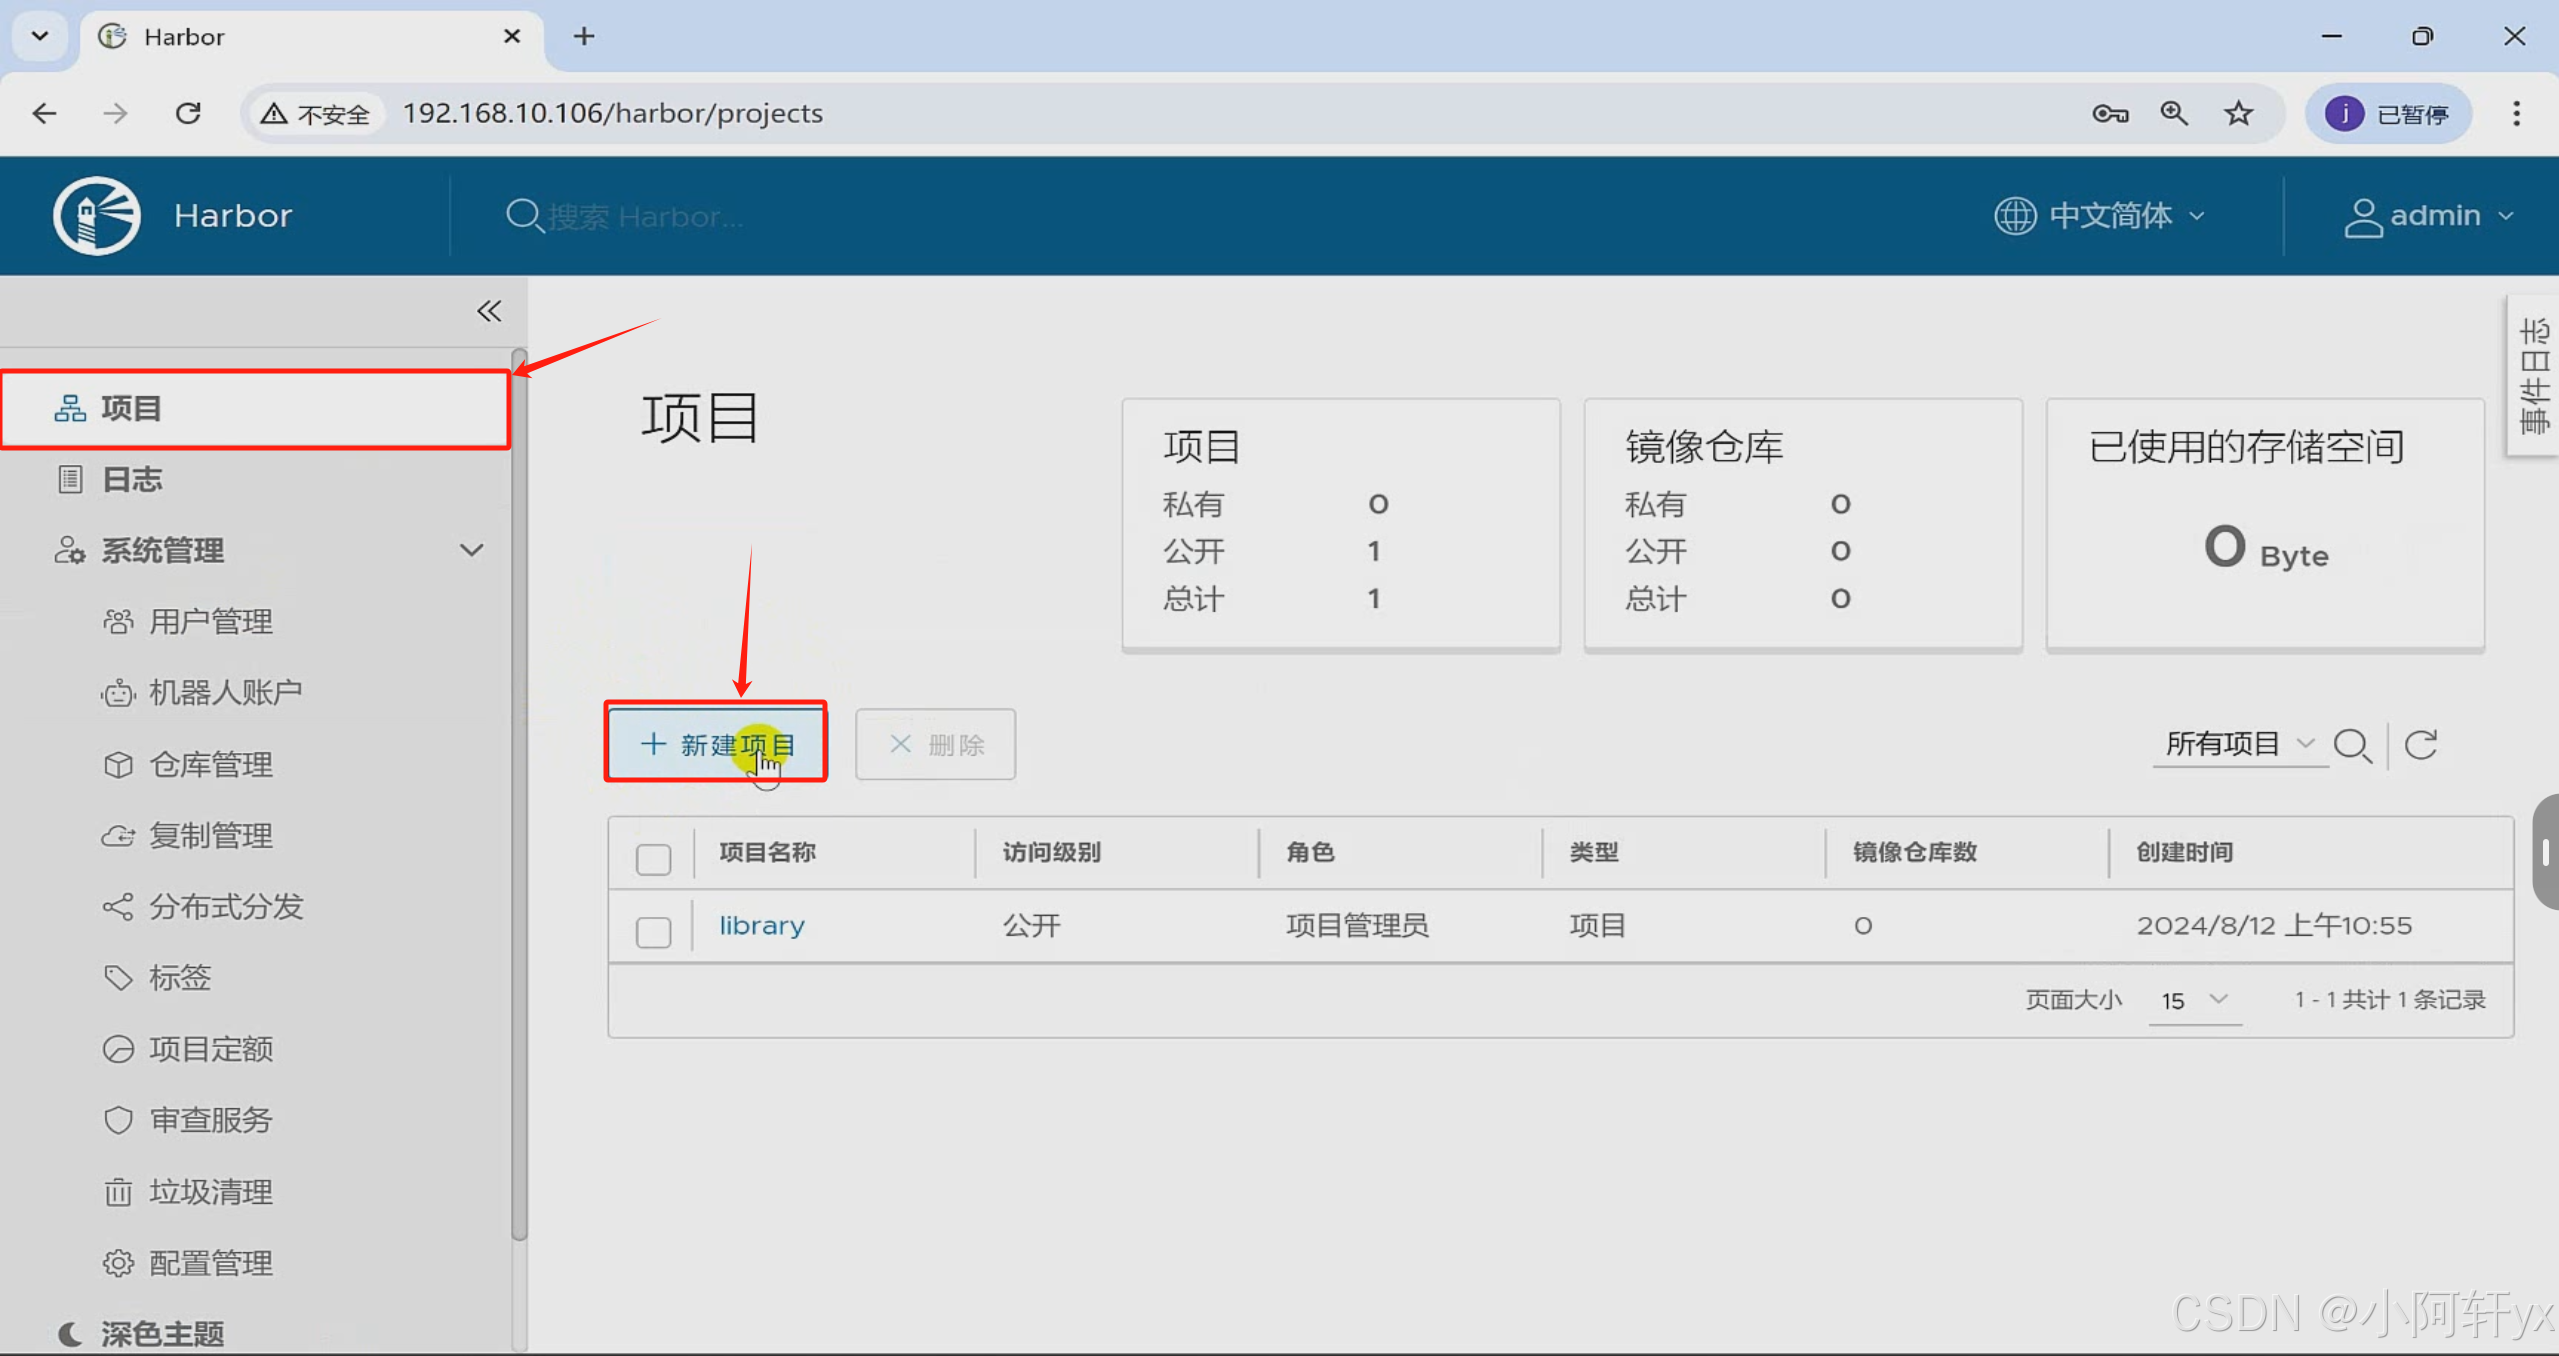

- 到这一步106做一个快照
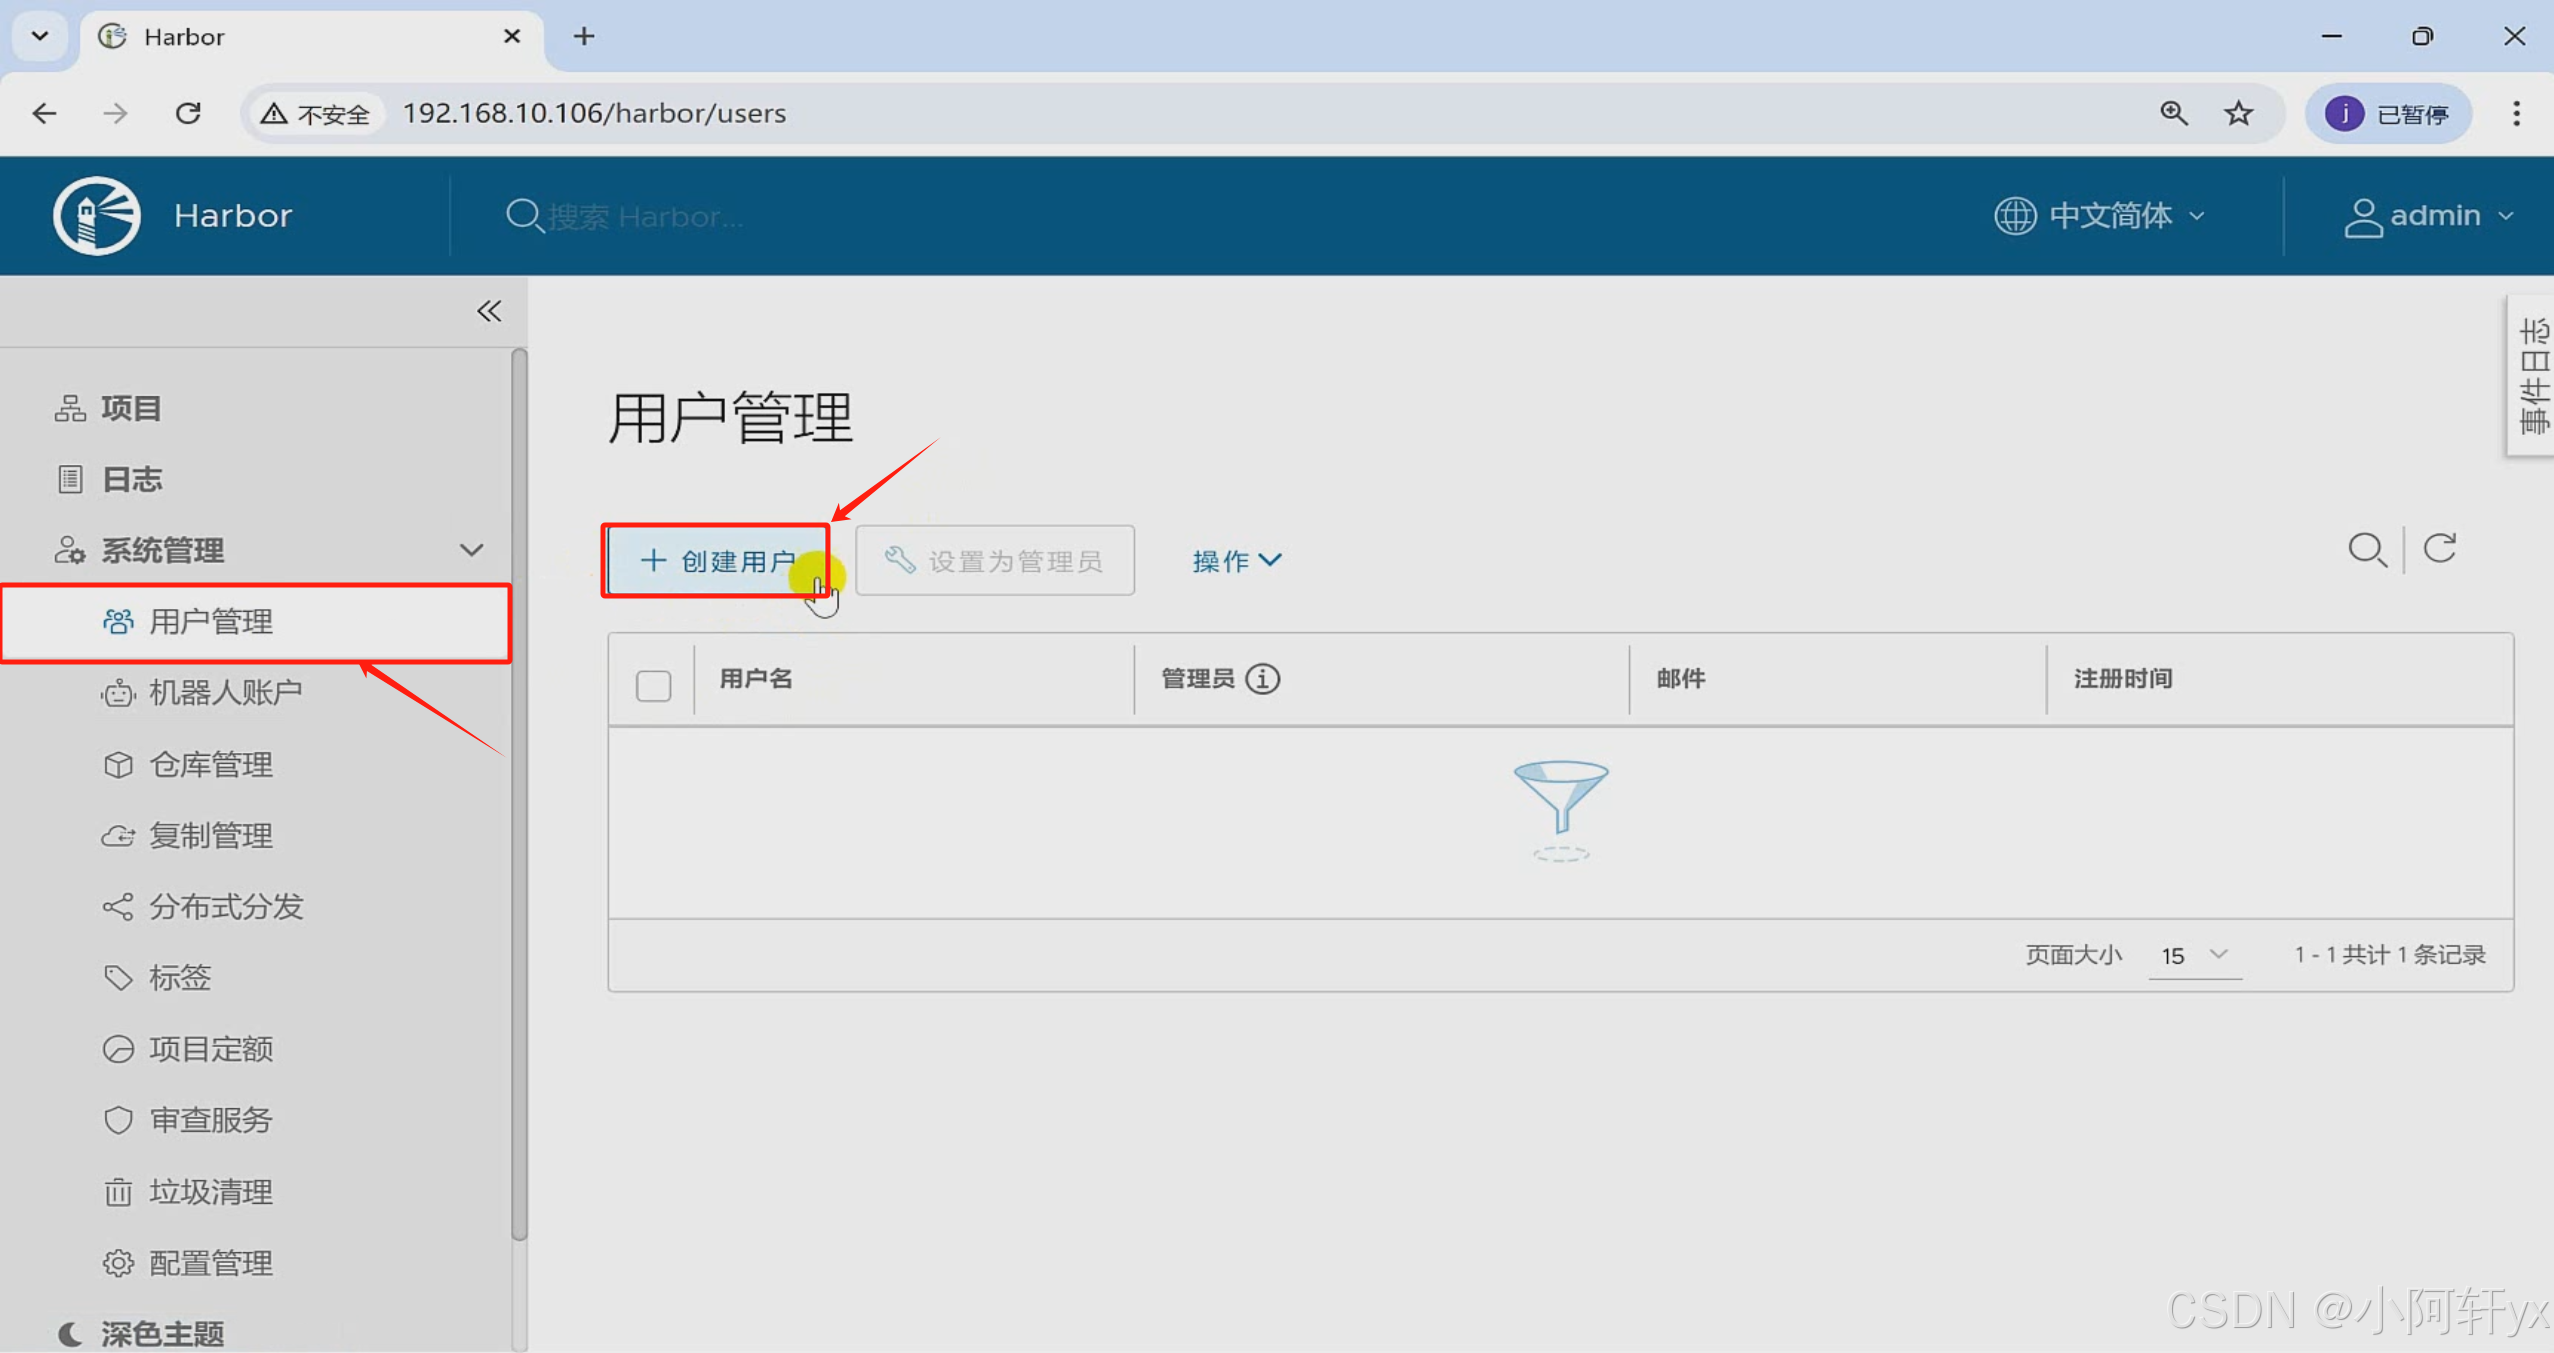
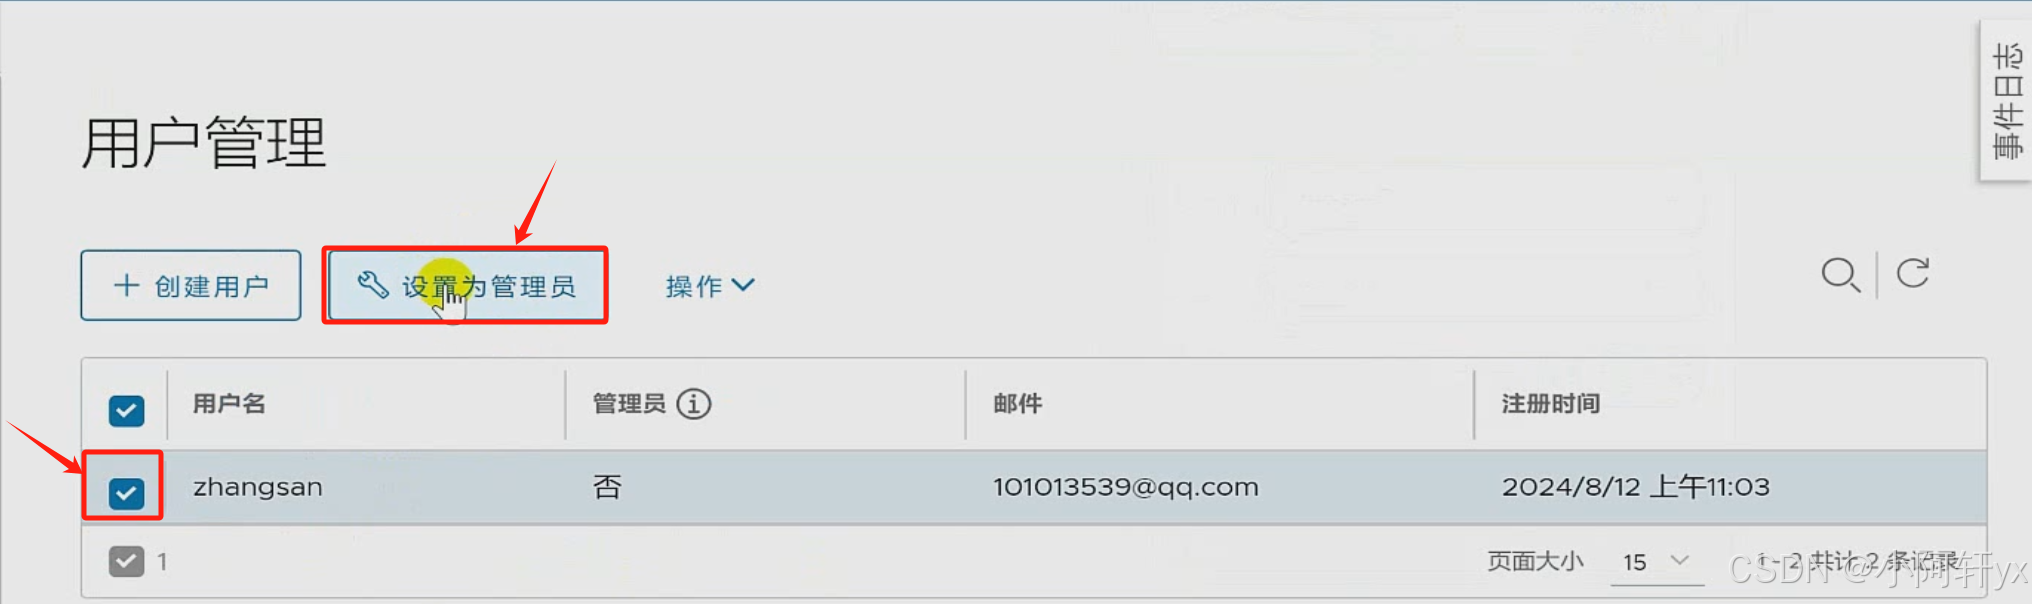
添加用户

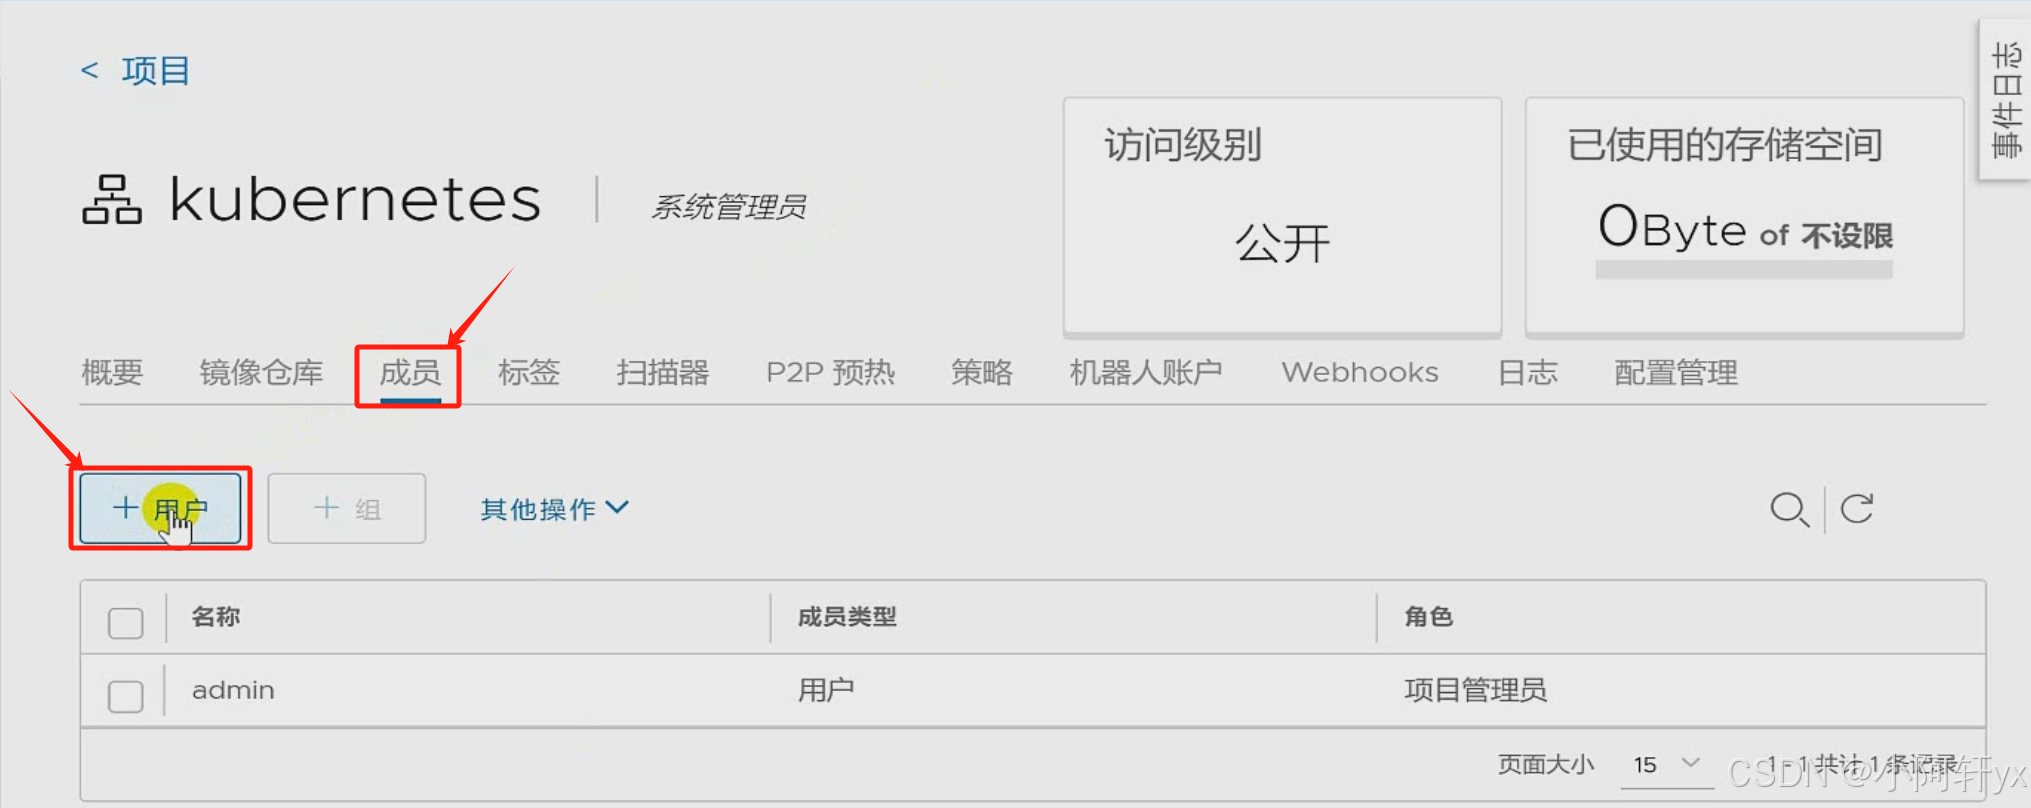
添加项目成员
将 192.168.10.101 当作客户端
查看镜像
[root@localhost ~]# docker images
REPOSITORY                TAG            IMAGE ID            CREATED
mysql                     latest         99afc808f15b        12 month
cirrors                   latest         2008a6682996        15 month
httpd                     latest         daablfa13f86        17 month
nginx                     latest         904b8cb13b93        17 month
centos                    7              eebbee3f44bd        2 years
gliderlabs/registrator    latest         3b59190c6c80        8 years
修改 cirrors 名字
[root@localhost ~]# docker tag cirros 192.168.10.106/kubernetes/cirros:v1查看镜像
[root@localhost ~]# docker images
//改名字之后的镜像
192.168.10.106/kubernetes/cirros    v1    2008a6682996 15 months    ago    16.3MB
登录镜像仓库
[root@localhost ~]# docker login 192.168.10.106
Username: zhangsan
Password:
WARNING! Your password will be stored unencrypted in /root/.docker/configJson.
Configure a credential helper to remove this warning. Seehttps://docs.docker.com/engine/reference/commandline/login/#credentials-store

Login Succeeded
上传镜像
[root@localhost ~]# docker push 192.168.10.106/kubernetes/cirros:v1
The push refers to repository [192.168.10.106/kubernetes/cirros]
d8083b07a8e2: Pushed
b42b2edd1b7f: Pushed
032cc20cbfb2: Pushed
v1: digest:sha256:d573d48afdadelef2c5bba38681e8c8ce0794e985409e7d5c35a2c3653c547aa
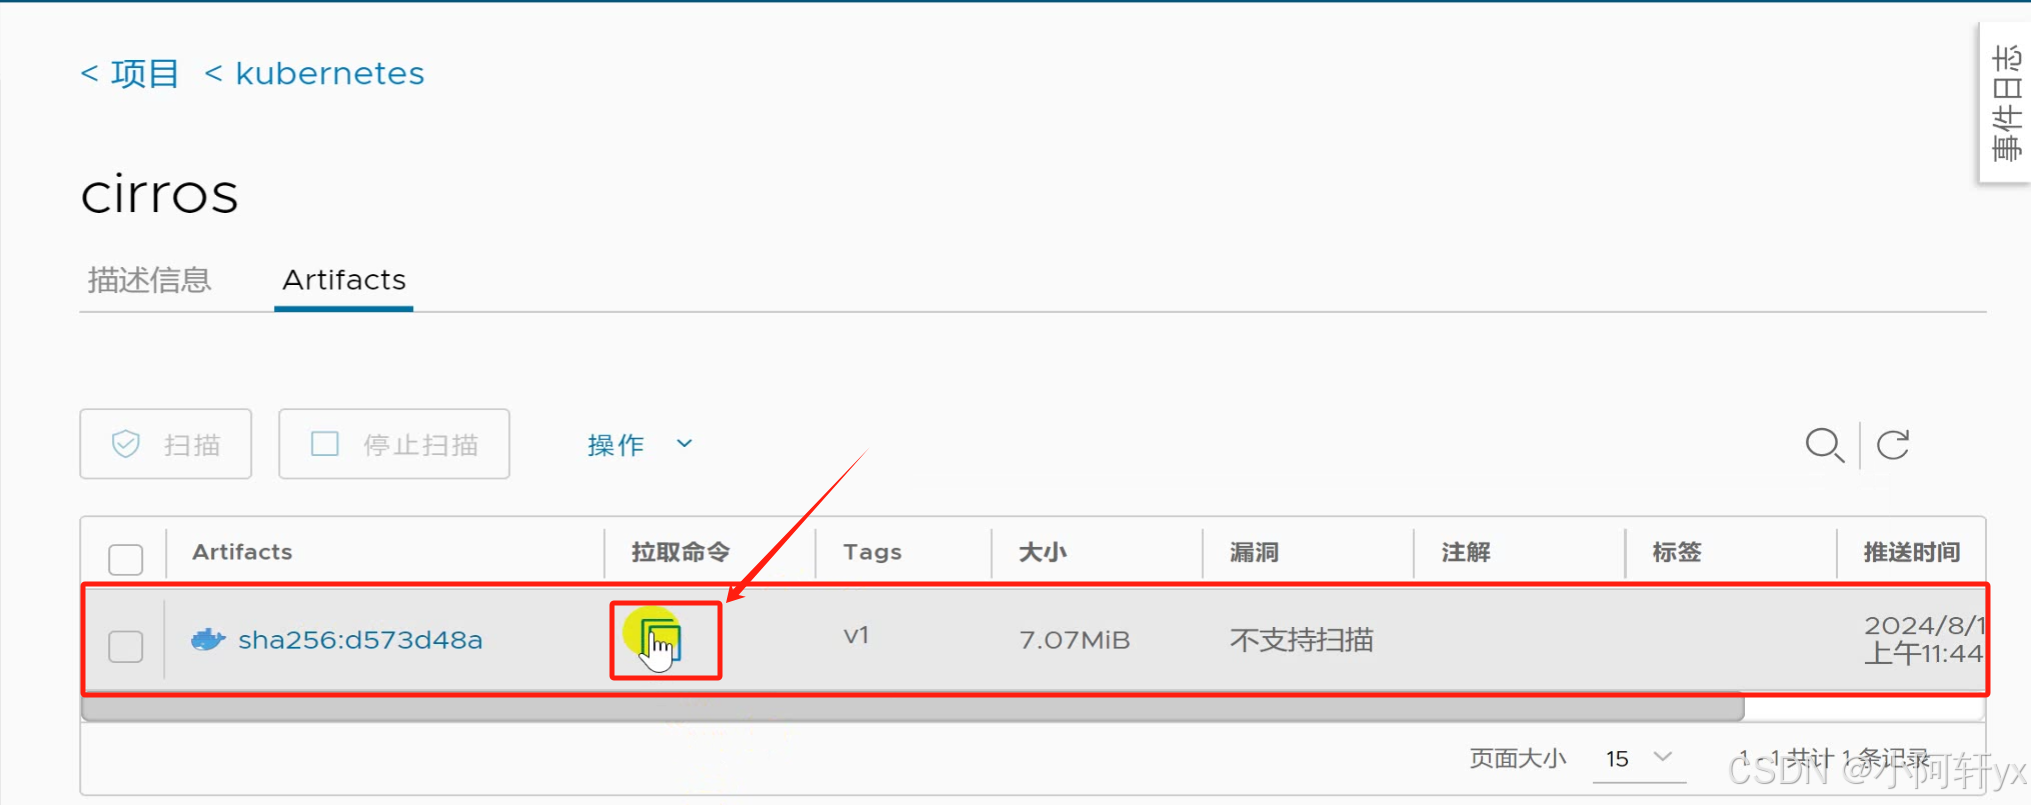
size: 943用浏览器验证查看

拉取镜像复制命令
再新开一个192.168.10.102服务器恢复 docker 快照
将复制的命令粘贴在102上
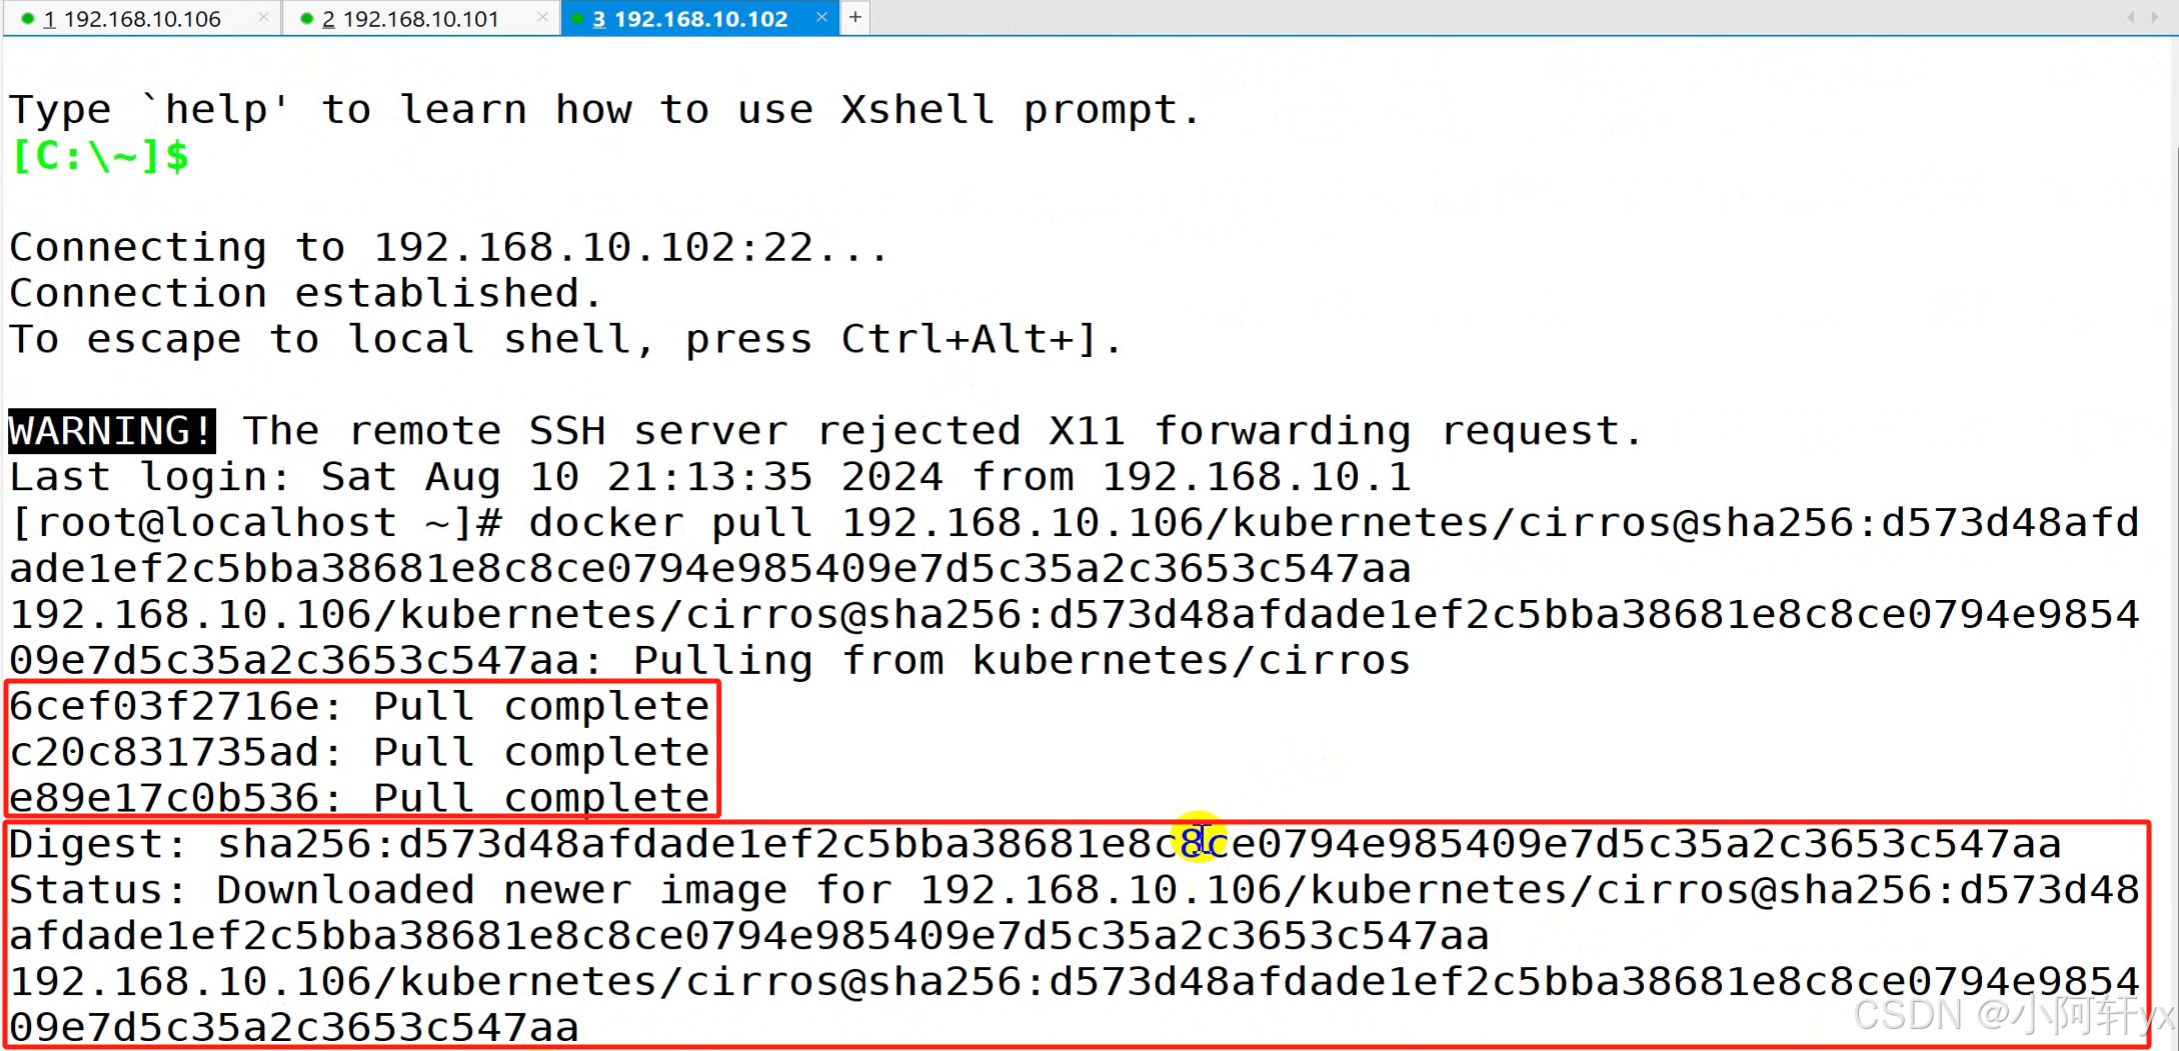
[root@localhost ~]# docker pull 192.168.10.106/kubernetes/cirros:v1
v1: Pulling from kubernetes/cirros
Digest:sha256:d573d48afdadelef2c5bba38681e8c8ce0794e985409e7d5c35a203653c547aa
Status: Downloaded newer image for 192.168.10.106/kubernetes/cirros:v
192.168.10.106/kubernetes/cirros:v1
查看镜像
[root@localhost ~]# docker images
REPOSITORY                            TAG        IMAGE ID            CREATED        SIZE
192.168.10.106/kubernetes/cirros      v1         2008a668299615      months ago     16.3MB
小阿轩yx-Docker Compose 与私有仓库部署


 2057
2057

 被折叠的 条评论
为什么被折叠?
被折叠的 条评论
为什么被折叠?
 到【灌水乐园】发言


