


先自我介绍一下,小编浙江大学毕业,去过华为、字节跳动等大厂,目前阿里P7
深知大多数程序员,想要提升技能,往往是自己摸索成长,但自己不成体系的自学效果低效又漫长,而且极易碰到天花板技术停滞不前!
因此收集整理了一份《2024年最新网络安全全套学习资料》,初衷也很简单,就是希望能够帮助到想自学提升又不知道该从何学起的朋友。


既有适合小白学习的零基础资料,也有适合3年以上经验的小伙伴深入学习提升的进阶课程,涵盖了95%以上网络安全知识点,真正体系化!
由于文件比较多,这里只是将部分目录截图出来,全套包含大厂面经、学习笔记、源码讲义、实战项目、大纲路线、讲解视频,并且后续会持续更新
如果你需要这些资料,可以添加V获取:vip204888 (备注网络安全)

正文
postgresql12-12.7-2PGDG.rhel8.x86_64
postgresql12-libs-12.7-2PGDG.rhel8.x86_64
postgresql12-server-12.7-2PGDG.rhel8.x86_64
 结论

 postgresql12 ≠ postgresql,所以wazuh使用redhat的OVAL文件可以搜出redhat打包的postgresql的漏洞,其他就不可以。

 ### 维护管理

 #### 客户端的删除

 SHELL
cd /var/ossec/bin/
执行管理程序
[root@vlnx101057 bin]# ./manage_agents
- Wazuh v4.1.5 Agent manager. *
- The following options are available: *
(A)dd an agent (A). 手动增加客户端
(E)xtract key for an agent (E). 提取客户端秘钥
(L)ist already added agents (L). 列出当前客户端
®emove an agent ®. 删除客户端
(Q)uit. 退出
Choose your action: A,E,L,R or Q:R 输入R,确认删除客户端
Provide the ID of the agent to be removed (or ‘\q’ to quit): 180 输入agent id
Confirm deleting it?(y/n): 确认删除
Agent ‘180’ removed. 完成删除
 #### 客户端的离线注册


Wazuh-Manager和Wazuh-Agent之间通过1515/tcp端口来进行认证的,具体实现形式类似CA证书的形式。Manager有自建Key,然后Agent通过注册的形式提交主机名、IP地址获取相应的ID和Key。注册之后,Manager和Agent就不再使用1515端口进行认证,只使用1514/TCP端口进行加密的数据通讯。


在无法开通1515/tcp端口或者其他特定情况下,我们需要离线注册Wazuh-Agent。大体步骤为:


1. 在管理端注册Agent主机名和IP地址,并获取相应主机ID;
2. 导出客户端注册Key;
3. 在Agent上导入上述Key;
4. 重启Agent服务。


SHELL
on the Manger
/var/ossec/bin/manage_agents -a <agent_IP> -n <agent_name>
/var/ossec/bin/manage_agents -l | grep <agent_name>
ID: 001, Name: agent_1, IP: any
/var/ossec/bin/manage_agents -e <agent_id>
Agent key information for ‘001’ is:
MDAxIDE4NWVlNjE1Y2YzYiBhbnkgMGNmMDFiYTM3NmMxY2JjNjU0NDAwYmFhZDY1ZWU1YjcyMGI2NDY3ODhkNGQzMjM5ZTdlNGVmNzQzMGFjMDA4Nw==
on the Agent
/var/ossec/bin/manage_agents -i
修改Agent上的Manager IP
vim /var/ossec/etc/ossec.conf
…
systemctl restart wazuh-agent
#### 其他


此外,Wazuh Manager默认是开放认证的,即只要知道Manager的IP就可直接注册。但它也支持通过密码认证、通过SSL证书认证、通过API认证、通过主机环境认证(限定主机名和主机组来认证)。
 以下,仅提供密码认证的配置介绍:


SHELL
在Manager主机上打开密码认证选项
vim /var/ossec/etc/ossec.conf
... yes ...添加随机密码
systemctl restart wazuh-manager
grep “Random password” /var/ossec/logs/ossec.log
添加指定密码
如不进行如下操作,wazuh实际就会产生一个随机密码
echo “<custom_password>” > /var/ossec/etc/authd.pass
systemctl restart wazuh-manager
在Agent上开启密码认证并注册
/var/ossec/bin/agent-auth -m <manager_IP> -P “<custom_password>”
systemctl restart wazuh-agent
或者将密码注入相应文件
echo “<custom_password>” > /var/ossec/etc/authd.pass
/var/ossec/bin/agent-auth -m <manager_IP>
systemctl restart wazuh-agent
### 系统调优


wazuh本身是一个对资源要求较低的系统,但长期运行下来,还是会出现各种各样资源使用不足的问题。因此,需要进行一定程度的优化和调整


#### 调整ES参数


开启内存锁定参数


SHELL
锁定物理内存地址,防止ES内存被交换出去,避免频繁使用swap分区
cat >> /etc/elasticsearch/elasticsearch.yml <<EOF
bootstrap.memory_lock: true
EOF
限制系统资源


SHELL
配置Elasticsearch的systemd调用
mkdir -p /etc/systemd/system/elasticsearch.service.d/
cat > /etc/systemd/system/elasticsearch.service.d/elasticsearch.conf << EOF
[Service]
LimitMEMLOCK=infinity
EOF
调整内核参数


SHELL
cat >> /etc/security/limits.conf <<EOF
elasticsearch soft memlock unlimited
elasticsearch hard memlock unlimited
EOF
调整JVM参数


SHELL
在可用内存使用率不超过50%,且使用量不超过32GB内存的情况下,设定Xms和Xmx的值为当年内存总量的一半
当前内存总量为8GB
cat >> /etc/elasticsearch/jvm.options <<EOF
-Xms4g
-Xmx4g
EOF
重启服务


SHELL
systemctl daemon-reload
systemctl restart elasticsearch
#### 设置分片和副本数据量


Wazuh设置单节点ES主机


SHELL
获取Wazuh ES 模板
curl https://raw.githubusercontent.com/wazuh/wazuh/v4.1.5/extensions/elasticsearch/7.x/wazuh-template.json -o w-elastic-template.json
结合实际环境,设置分片数为1,副本数为0
{
“order”: 1,
“index_patterns”: [“wazuh-alerts-4.x-*”],
“settings”: {
“index.refresh_interval”: “5s”,
“index.number_of_shards”: “1”,
“index.number_of_replicas”: “0”,
“index.auto_expand_replicas”: “0-1”,
“index.mapping.total_fields.limit”: 2000
},
“mappings”: {
“…”: “…”
}
}
应用模板
curl -X PUT “http://localhost:9200/_template/wazuh-custom” -H ‘Content-Type: application/json’ -d @w-elastic-template.json
设置永久分片数


SHELL
设置ES的永久分片数为20000
curl -XPUT “127.0.0.1:9200/_cluster/settings” -H ‘Content-Type: application/json’ -d ‘{“persistent”:{“cluster”:{“max_shards_per_node”:20000}}}’
#### 删除过期分片


SHELL
删除2021.06所有分片
curl -XDELETE http://127.0.0.1:9200/wazuh-alerts-4.x-2021.06.*
#### 硬件调优
使用固态磁盘
更多的CPU和内存
### 群集部署
在中大型网络环境中,单台Allinone的Wazuh系统或者单节点的分布式部署Wazuh系统从性能上已经无法满足日志分析和漏洞扫描的需求,因此应当采用高可用、多节点的分布式部署来满足Wazuh对CPU和存储的要求。
| 序号 | 系统描述 | 配置 | 网络地址 | 系统角色 |
| --- | --- | --- | --- | --- |
| 1 | Lvsnode1 | 1c/1g | 192.168.79.51 | LVS+KeepLived 提供VIP和负载均衡 |
| 2 | Lvsnode2 | 1c/1g | 192.168.79.52 | LVS+KeepLived 提供VIP和负载均衡 |
| 3 | Wazuhnode0 | 2c/2g | 192.168.79.60 | Wazuh主节点,提供认证以及cve库 |
| 4 | Wazuhnode1 | 1c/1g | 192.168.79.61 | WazuhWorker,工作节点,提供事件日志分析和漏洞扫描 |
| 5 | Wazuhnode2 | 1c/1g | 192.168.79.62 | WazuhWorker,工作节点,提供事件日志分析和漏洞扫描 |
| 6 | KibanaNode | 2c/4g | 192.168.79.80 | Kibana展示节点 |
| 7 | ElasticNode1 | 4c/4g | 192.168.79.81 | ElasticSearch 群集节点 |
| 8 | ElasticNode2 | 4c/4g | 192.168.79.82 | ElasticSearch 群集节点 |
| 9 | ElasticNode3 | 4c/4g | 192.168.79.83 | ElasticSearch 群集节点 |
| 10 | UbuntuNode | 1c/1g | 192.168.79.127 | Ubuntu 20.04 LTS 测试机 + Wordpress |
| 11 | CentOSNode | 1c/1g | 192.168.79.128 | CentOS 8.4 测试机 + PostgreSQL |
| 12 | WindowsNode | 2c/2g | 192.168.79.129 | Windows Server 2012R2 测试机+ SQL Server |
| 13 | VIP | ——- | 192.168.79.50 | 前端访问IP |
| 14 | Gateway | 1c/1g | 192.168.79.254 | 使用iKuai提供网关服务和外部DNS服务 |
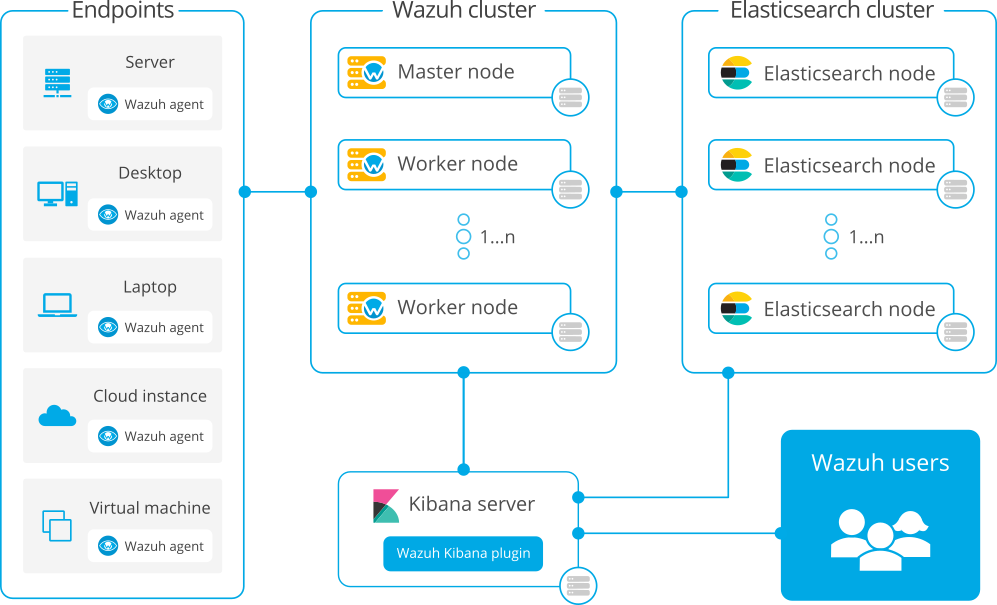
#### 后端存储群集
1. ElasticSearch三节点部署
CODE
安装前置软件
yum install -y zip unzip curl
导入秘钥
rpm --import https://artifacts.elastic.co/GPG-KEY-elasticsearch
增加官方源
cat > /etc/yum.repos.d/elastic.repo << EOF
[elasticsearch-7.x]
name=Elasticsearch repository for 7.x packages
baseurl=https://artifacts.elastic.co/packages/7.x/yum
gpgcheck=1
gpgkey=https://artifacts.elastic.co/GPG-KEY-elasticsearch
enabled=1
autorefresh=1
type=rpm-md
EOF
安装软件
yum makecache
yum upgrade -y
yum install -y elasticsearch-7.11.2
导入配置文件
cp -a /etc/elasticsearch/elasticsearch.yml{,_$(date +%F)}
依次在各个节点上设置
cat > /etc/elasticsearch/elasticsearch.yml << EOF
network.host: 192.168.79.81
node.name: elasticnode1
cluster.name: elastic
cluster.initial_master_nodes:
- elasticnode1
- elasticnode2
- elasticnode3
discovery.seed_hosts:
- 192.168.79.81
- 192.168.79.82
- 192.168.79.83
EOF
开通防火墙
firewall-cmd --permanent --add-service=elasticsearch
firewall-cmd --reload
启动服务
systemctl daemon-reload
systemctl enable elasticsearch
systemctl start elasticsearch
禁用软件源,避免非控升级组件
sed -i “s/^enabled=1/enabled=0/” /etc/yum.repos.d/elastic.repo
在各个节点上依次部署,注意变更主机名和IP地址
2. ElasticSearch群集验证

 CODE
sujx@LEGION:~$ curl http://192.168.79.81:9200/_cluster/health?pretty
{
“cluster_name” : “elastic”,
“status” : “green”,
“timed_out” : false,
“number_of_nodes” : 3,
“number_of_data_nodes” : 3,
“active_primary_shards” : 0,
“active_shards” : 0,
“relocating_shards” : 0,
“initializing_shards” : 0,
“unassigned_shards” : 0,
“delayed_unassigned_shards” : 0,
“number_of_pending_tasks” : 0,
“number_of_in_flight_fetch” : 0,
“task_max_waiting_in_queue_millis” : 0,
“active_shards_percent_as_number” : 100.0
}
sujx@LEGION:~$ curl http://192.168.79.81:9200/_cat/nodes?v
ip heap.percent ram.percent cpu load_1m load_5m load_15m node.role master name
192.168.79.83 10 86 0 0.08 0.08 0.03 cdhilmrstw - elasticnode3
192.168.79.82 18 97 0 0.01 0.12 0.08 cdhilmrstw * elasticnode2
192.168.79.81 16 95 0 0.06 0.08 0.08 cdhilmrstw - elasticnode1
---

#### 处理系统群集


	1. Wazuh Master的部署

	 CODE


	```
	# 安装前置软件
	yum install -y zip unzip curl
	# 导入秘钥
	rpm --import https://packages.wazuh.com/key/GPG-KEY-WAZUH
	rpm --import https://artifacts.elastic.co/GPG-KEY-elasticsearch

	# 配置官方软件源
	cat > /etc/yum.repos.d/wazuh.repo << EOF
	[wazuh]
	gpgcheck=1
	gpgkey=https://packages.wazuh.com/key/GPG-KEY-WAZUH
	enabled=1
	name=EL-$releasever - Wazuh
	baseurl=https://packages.wazuh.com/4.x/yum/
	protect=1
	EOF

	cat > /etc/yum.repos.d/elastic.repo << EOF
	[elasticsearch-7.x]
	name=Elasticsearch repository for 7.x packages
	baseurl=https://artifacts.elastic.co/packages/7.x/yum
	gpgcheck=1
	gpgkey=https://artifacts.elastic.co/GPG-KEY-elasticsearch
	enabled=1
	autorefresh=1
	type=rpm-md
	EOF

	# 安装软件
	yum makecache
	yum upgrade -y

	yum install -y wazuh-manager
	yum install -y filebeat-7.11.2

	# 配置Filebeat
	cp -a /etc/filebeat/filebeat.yml{,_$(date +%F)}

	cat > /etc/filebeat/filebeat.yml<<EOF
	filebeat.modules:
	  - module: wazuh
	    alerts:
	      enabled: true
	    archives:
	      enabled: false

	setup.template.json.enabled: true
	setup.template.json.path: '/etc/filebeat/wazuh-template.json'
	setup.template.json.name: 'wazuh'
	setup.template.overwrite: true
	setup.ilm.enabled: false

	output.elasticsearch.hosts: ['http://192.168.79.81:9200','http://192.168.79.82:9200','http://192.168.79.83:9200']
	EOF

	# 导入filebeat的wazuh日志模板
	curl -so /etc/filebeat/wazuh-template.json https://raw.githubusercontent.com/wazuh/wazuh/4.1/extensions/elasticsearch/7.x/wazuh-template.json
	chmod go+r /etc/filebeat/wazuh-template.json

	# 导入filebeat的wazuh日志模型
	curl -s https://packages.wazuh.com/4.x/filebeat/wazuh-filebeat-0.1.tar.gz | tar -xvz -C /usr/share/filebeat/module

	# 配置防火墙规则
	firewall-cmd --permanent --add-port={1514/tcp,1515/tcp,1516/tcp,55000/tcp}
	firewall-cmd --reload

	# 禁用软件源,避免非控升级组件
	sed -i "s/^enabled=1/enabled=0/" /etc/yum.repos.d/elastic.repo
	sed -i "s/^enabled=1/enabled=0/" /etc/yum.repos.d/wazuh.repo

	# 启动服务
	systemctl daemon-reload
	systemctl enable --now wazuh-manager
	systemctl enable --now filebeat

	# 测试filebeat
	[root@WazuhNode0 wazuh]# filebeat test output
	elasticsearch: http://192.168.79.81:9200...
	  parse url... OK
	  connection...
	    parse host... OK
	    dns lookup... OK
	    addresses: 192.168.79.81
	    dial up... OK
	  TLS... WARN secure connection disabled
	  talk to server... OK
	  version: 7.11.2
	elasticsearch: http://192.168.79.82:9200...
	  parse url... OK
	  connection...
	    parse host... OK
	    dns lookup... OK
	    addresses: 192.168.79.82
	    dial up... OK
	  TLS... WARN secure connection disabled
	  talk to server... OK
	  version: 7.11.2
	elasticsearch: http://192.168.79.83:9200...
	  parse url... OK
	  connection...
	    parse host... OK
	    dns lookup... OK
	    addresses: 192.168.79.83
	    dial up... OK
	  TLS... WARN secure connection disabled
	  talk to server... OK
	  version: 7.11.2
	```
	2. Wazuh worker的部署

	 CODE


	```
	# 同Master部署一致

	# 安装软件
	yum install -y wazuh-manager
	yum install -y filebeat-7.11.2

	# 配置Filebeat
	cp -a /etc/filebeat/filebeat.yml{,_$(date +%F)}

	cat > /etc/filebeat/filebeat.yml<<EOF
	filebeat.modules:
	  - module: wazuh
	    alerts:
	      enabled: true
	    archives:
	      enabled: false

	setup.template.json.enabled: true
	setup.template.json.path: '/etc/filebeat/wazuh-template.json'
	setup.template.json.name: 'wazuh'
	setup.template.overwrite: true
	setup.ilm.enabled: false

	output.elasticsearch.hosts: ['http://192.168.79.81:9200','http://192.168.79.82:9200','http://192.168.79.83:9200']
	EOF

	# 导入filebeat的wazuh日志模板
	curl -so /etc/filebeat/wazuh-template.json https://raw.githubusercontent.com/wazuh/wazuh/4.1/extensions/elasticsearch/7.x/wazuh-template.json
	chmod go+r /etc/filebeat/wazuh-template.json

	# 导入filebeat的wazuh日志模型
	curl -s https://packages.wazuh.com/4.x/filebeat/wazuh-filebeat-0.1.tar.gz | tar -xvz -C /usr/share/filebeat/module

	# 配置防火墙规则
	firewall-cmd --permanent --add-port={1514/tcp,1516/tcp}
	firewall-cmd --reload

	# 启动服务
	systemctl daemon-reload
	systemctl enable --now wazuh-manager
	systemctl enable --now filebeat
	```
	3. 实现wazuh群集

	 CODE


	```
	# 进行群集认证
	# Master节点
	#生成随机串值
	openssl rand -hex 16
	d84691d111f86e70e8ed7eff80cde39e

	# 编辑ossec.conf的cluster

	  <cluster>
	    <name>wazuh</name>
	    <node_name>wazuhnode0</node_name>
	    <node_type>master</node_type>
	    <key>d84691d111f86e70e8ed7eff80cde39e</key>
	    <port>1516</port>
	    <bind_addr>0.0.0.0</bind_addr>
	    <nodes>
	        <node>192.168.79.60</node>
	    </nodes>
	    <hidden>no</hidden>
	    <disabled>no</disabled>
	  </cluster>

	# Worker节点
	# 编辑ossec.conf的cluster

	  <cluster>
	    <name>wazuh</name>
	    <node_name>wazuhnode1</node_name>
	    <node_type>worker</node_type>
	    <key>d84691d111f86e70e8ed7eff80cde39e</key>
	    <port>1516</port>
	    <bind_addr>0.0.0.0</bind_addr>
	    <nodes>
	        <node>192.168.79.60</node>
	    </nodes>
	    <hidden>no</hidden>
	    <disabled>no</disabled>
	  </cluster>

	# 验证
	[root@WazuhNode0 bin]# ./cluster_control -l
	NAME        TYPE    VERSION  ADDRESS
	wazuhnode0  master  4.1.5    192.168.79.60
	wazuhnode1  worker  4.1.5    192.168.79.61
	wauzhnode2  worker  4.1.5    192.168.79.62
	```


---


#### 前端群集


1. 前端部署采用Keeplived+Nginx代理的模式,提供一个VIP供Wazuh的agent进行部署。
2. 部署Nginx的TCP代理节点

 BASH
部署第一个节点Node1
开放防火墙端口
firewall-cmd --permanent --add-port={1514/tcp,1515/tcp}
firewall-cmd --reload
新增官方源地址
cat > /etc/yum.repos.d/nginx.repo <<\EOF
[nginx]
name=nginx repo
baseurl=http://nginx.org/packages/centos/
r
e
l
e
a
s
e
v
e
r
/
releasever/
releasever/basearch/
gpgcheck=0
enabled=1
EOF
安装Nginx
yum makecache
yum install -y nginx
systemctl daemon-reload
systemctl enable nginx.service --now
配置stream
cd /etc/nginx
cp -a nginx.conf{,_$(date +%F)}
cat >> /etc/nginx/nginx.conf <<EOF
include /etc/nginx/stream.d/*.conf;
EOF
mkdir ./stream.d
touch /etc/nginx/stream.d/wazuh.conf
cat > /etc/nginx/stream.d/wazuh.conf<<EOF
stream {
upstream cluster {
hash $remote_addr consistent;
server 192.168.79.61:1514;
server 192.168.79.62:1514;
}
upstream master {
server 192.168.79.60:1515;
}
server {
listen 1514;
proxy_pass cluster;
}
server {
listen 1515;
proxy_pass master;
}
}
EOF
重启Nginx
systemctl restart nginx
检查端口情况
[root@lvsnode1 nginx]# netstat -tlnp
Active Internet connections (only servers)
Proto Recv-Q Send-Q Local Address Foreign Address State PID/Program name
tcp 0 0 0.0.0.0:1514 0.0.0.0:* LISTEN 1897/nginx: master
tcp 0 0 0.0.0.0:1515 0.0.0.0:* LISTEN 1897/nginx: master
tcp 0 0 0.0.0.0:80 0.0.0.0:* LISTEN 1897/nginx: master
tcp 0 0 0.0.0.0:22 0.0.0.0:* LISTEN 1022/sshd
tcp6 0 0 :::80 ::😗 LISTEN 1897/nginx: master
tcp6 0 0 :::22 ::😗 LISTEN 1022/sshd
安装Keeplived
yum install -y keepalived
cd /etc/keepalived/
cp -a keepalived.conf{,_$(date +%F)}
进行配置
cat > keepalived.conf<<EOF
Configuration File for keepalived
global_defs {
router_id nginxnode1
vrrp_mcast_group4 224.0.0.18
lvs_timeouts tcp 900 tcpfin 30 udp 300
lvs_sync_daemon ens160 route_lvs
vrrp_skip_check_adv_addr
#vrrp_strict
vrrp_garp_interval 0
vrrp_gna_interval 0
}
vrrp_instance route_lvs {
state BACKUP
priority 100
virtual_router_id 18
interface ens160
track_interface {
ens160
}
advert_int 3
authentication {
auth_type PASS
auth_pass password
}
virtual_ipaddress {
192.168.79.50/24 dev ens160 label ens160:0
}
}
EOF
systemctl enable keepalived.service --now
3. 验证服务

 SHELL
sujx@LEGION:~$ ping 192.168.79.50
PING 192.168.79.50 (192.168.79.50) 56(84) bytes of data.
64 bytes from 192.168.79.50: icmp_seq=1 ttl=64 time=0.330 ms
64 bytes from 192.168.79.50: icmp_seq=2 ttl=64 time=0.306 ms
— 192.168.79.50 ping statistics —
3 packets transmitted, 3 received, 0% packet loss, time 2002ms
rtt min/avg/max/mdev = 0.306/0.430/0.655/0.159 ms
sujx@LEGION:~$ telnet 192.168.79.50 1515
Trying 192.168.79.140…
Connected to 192.168.79.140.
Escape character is ‘^]’.
sujx@LEGION:~$ telnet 192.168.79.50 1514
Trying 192.168.79.140…
Connected to 192.168.79.140.
Escape character is ‘^]’.
---


#### 访问面板


1. 部署Elastic协调节点

 SHELL
如果 Elasticsearch 集群有多个节点,分发 Kibana 节点之间请求的最简单的方法就是在 Kibana 机器上运行一个 Elasticsearch 协调(Coordinating only node) 的节点。Elasticsearch 协调节点本质上是智能负载均衡器,也是集群的一部分,如果有需要,这些节点会处理传入 HTTP 请求,重定向操作给集群中其它节点,收集并返回结果
在Kibana节点上安装Elasticsearch
安装前置软件
yum install -y zip unzip curl
导入源秘钥
rpm --import https://artifacts.elastic.co/GPG-KEY-elasticsearch
增加官方源
cat > /etc/yum.repos.d/elastic.repo << EOF
[elasticsearch-7.x]
name=Elasticsearch repository for 7.x packages
baseurl=https://artifacts.elastic.co/packages/7.x/yum
gpgcheck=1
gpgkey=https://artifacts.elastic.co/GPG-KEY-elasticsearch
enabled=1
autorefresh=1
type=rpm-md
EOF
安装软件
yum makecache
yum upgrade -y
yum install -y elasticsearch-7.11.2
#配置防火墙
firewall-cmd --permanent --add-service=http
firewall-cmd --permanent --add-service=elasticsearch
firewall-cmd --reload
修改配置
其他ES节点也需要增加该主机NodeIP,并重启服务
cat >> /etc/elasticsearch/elasticsearch.yml<<EOF
node.name: kibananode0
cluster.name: elastic
node.master: false
node.data: false
node.ingest: false
network.host: localhost
http.port: 9200
transport.host: 192.168.79.80
transport.tcp.port: 9300
discovery.seed_hosts:
- 192.168.79.81
- 192.168.79.82
- 192.168.79.83
- 192.168.79.80
EOF
查看群集信息,只允许本机Kibana访问
[root@kibana wazuh]# curl http://localhost:9200/_cat/nodes?v
ip heap.percent ram.percent cpu load_1m load_5m load_15m node.role master name
192.168.79.81 18 96 0 0.04 0.06 0.02 cdhilmrstw - elasticnode1
192.168.79.80 12 97 3 0.01 0.08 0.07 lr - kibananode0
192.168.79.82 23 96 0 0.04 0.09 0.04 cdhilmrstw * elasticnode2
192.168.79.83 23 87 0 0.09 0.11 0.05 cdhilmrstw - elasticnode3
2. 配置Kibana

 SHELL
yum install -y kibana-7.11.2
修改配置文件
cp -a /etc/kibana/kibana.yml{,_$(date +%F)}
cat >> /etc/kibana/kibana.yml << EOF
server.port: 5601
server.host: “localhost”
server.name: “kibana”
i18n.locale: “zh-CN”
elasticsearch.hosts: [“http://localhost:9200”]
kibana.index: “.kibana”
kibana.defaultAppId: “home”
server.defaultRoute : “/app/wazuh”
EOF
创建数据目录
mkdir /usr/share/kibana/data
chown -R kibana:kibana /usr/share/kibana
离线安装插件
wget https://packages.wazuh.com/4.x/ui/kibana/wazuh_kibana-4.1.5_7.11.2-1.zip
cp ./wazuh_kibana-4.1.5_7.11.2-1.zip /tmp
cd /usr/share/kibana
sudo -u kibana /usr/share/kibana/bin/kibana-plugin install file:///tmp/wazuh_kibana-4.1.5_7.11.2-1.zip
配置服务
systemctl daemon-reload
systemctl enable kibana
systemctl start kibana
禁用软件源,避免非控升级组件
sed -i “s/^enabled=1/enabled=0/” /etc/yum.repos.d/elastic.repo
配置反向代理
yum install -y nginx
systemctl enable --now nginx
vim /etc/ngix/nginx.conf
在server{}中添加配置项
```
proxy_redirect off;
proxy_set_header X-Real-IP $remote_addr;
proxy_set_header X-Forwarded-For $proxy_add_x_forwarded_for;
proxy_set_header Host $http_host;
    location / {
            proxy_pass http://localhost:5601/;
    }
```
nginx -s reload
登录kibana之后选择wazuh插件
返回控制台修改插件配置文件
sed -i “s/localhost/192.168.79.60/g” /usr/share/kibana/data/wazuh/config/wazuh.yml
 #### 客户端验证
3. 部署Wazuh-Agent

 SHELL
CentOS主机
sudo WAZUH_MANAGER=‘192.168.79.50’ WAZUH_AGENT_GROUP=‘default’ yum install https://packages.wazuh.com/4.x/yum/wazuh-agent-4.1.5-1.x86_64.rpm -y
Ubuntu主机
curl -so wazuh-agent.deb https://packages.wazuh.com/4.x/apt/pool/main/w/wazuh-agent/wazuh-agent_4.1.5-1_amd64.deb && sudo WAZUH_MANAGER=‘192.168.79.60’ WAZUH_AGENT_GROUP=‘default’ dpkg -i ./wazuh-agent.deb
启动服务
systemctl daemon-reload
systemctl enable wazuh-agent
systemctl start wazuh-agent
Windows主机
Invoke-WebRequest -Uri https://packages.wazuh.com/4.x/windows/wazuh-agent-4.1.5-1.msi -OutFile wazuh-agent.msi; ./wazuh-agent.msi /q WAZUH_MANAGER=‘192.168.79.50’ WAZUH_REGISTRATION_SERVER=‘192.168.79.50’ WAZUH_AGENT_GROUP=‘default’
start-service wazuh
4. 验证客户端所在管理节点
### 更新数据
---
相比较单机版本,群集化的Wazuh需要处理的第一个问题就是如何保证ossec.conf文件和漏洞库的统一配置、统一更新、统一下发。以下将使用简单的Ansible命令和Shell脚本实现前述功能。
#### 建立共享
1. 部署Nginx
SHELL
在wazuh-master上安装Nginx
yum install -y nginx
mkdir -p /var/www/wazuh
chown -R nginx:nginx /var/www/wazuh
2. 下载更新

 SHELL
下载离线文件
cd /var/www/wazuh/
下载Ubuntu 20.04的漏洞种子
wget -N https://people.canonical.com/~ubuntu-security/oval/com.ubuntu.focal.cve.oval.xml.bz2
下载RHEL 7 8的漏洞种子文件
wget https://www.redhat.com/security/data/oval/v2/RHEL6/rhel-6-including-unpatched.oval.xml.bz2
wget https://www.redhat.com/security/data/oval/v2/RHEL7/rhel-7-including-unpatched.oval.xml.bz2
wget https://www.redhat.com/security/data/oval/v2/RHEL8/rhel-8-including-unpatched.oval.xml.bz2
下载微软CVE文件
wget https://feed.wazuh.com/vulnerability-detector/windows/msu-updates.json.gz
下载Redhat的安全数据Json文件
wget https://raw.githubusercontent.com/wazuh/wazuh/master/tools/vulnerability-detector/rh-generator.sh
chmod +x ./*.sh
mkdir redhat
./rh-generator.sh redhat/
下载NVD的安全数据库(CVE)
wget https://raw.githubusercontent.com/wazuh/wazuh/master/tools/vulnerability-detector/nvd-generator.sh
chmod +x ./*.sh
mkdir nvd
./nvd-generator.sh 2010 nvd/
3. 页面发布

 SHELL
配置nginx文件
vim /etc/nginx/nginx.conf
在server{}中修改增补如下配置
    root         /var/www/wazuh;

    location / {
            autoindex on;
            autoindex_exact_size off;
            autoindex_localtime on;
    }
 #### 定时更新
4. 在/opt/wazuh/目录下建立wazuhupdate.sh文件

 SHELL
#!/bin/bash
cd /var/www/wazuh/
下载Ubuntu 20.04的漏洞种子
wget -N https://people.canonical.com/~ubuntu-security/oval/com.ubuntu.focal.cve.oval.xml.bz2
下载RHEL 6/7/8的漏洞种子
wget -N https://www.redhat.com/security/data/oval/v2/RHEL6/rhel-6-including-unpatched.oval.xml.bz2
wget -N https://www.redhat.com/security/data/oval/v2/RHEL7/rhel-7-including-unpatched.oval.xml.bz2
wget -N https://www.redhat.com/security/data/oval/v2/RHEL8/rhel-8-including-unpatched.oval.xml.bz2
下载微软漏洞文件
wget -N https://feed.wazuh.com/vulnerability-detector/windows/msu-updates.json.gz
#下载Redhat的安全数据Json文件
/bin/bash /var/www/wazuh/rh-generator.sh /var/www/wazuh/redhat
下载NVD的安全数据库(CVE)
/bin/bash /var/www/wazuh/nvd-generator.sh 2010 /var/www/wazuh/nvd
更新文件权限
chown -R nginx:nginx /var/www/wazuh
重启服务,更新数据库
systemctl restart wazuh-manager.service
5. 建立定时文件

 SHELL
#检查crond.service运行状态
systemctl status crond.service
crontab -e
每周一、四下午6点半执行脚本进行升级
30 18 * * 1,4 /bin/bash /opt/wazuh/wazuhupdate.sh
 #### 批量下发
6. 安装配置Ansbile

 SHELL
yum install -y centos-release-ansible-29.noarch
yum install -y ansible
因主机默认设置不允许root使用ssh登录,需要切换到普通用户目录
cd ~
mkdir ansible
cd ansible
touch .inventory
cat > .inventory <<EOF
[master]
192.168.79.60
[worker]
192.168.79.61
192.168.79.62
EOF
ssh-keygen
ssh-copy-id sujx@192.168.79.60
ssh-copy-id sujx@192.168.79.61
ssh-copy-id sujx@192.168.79.62
ansible all -m ping
[sujx@WazuhNode0 ansible]$ ansible worker -m ping
192.168.79.62 | SUCCESS => {
“ansible_facts”: {
“discovered_interpreter_python”: “/usr/libexec/platform-python”
},
“changed”: false,
“ping”: “pong”
}
192.168.79.61 | SUCCESS => {
“ansible_facts”: {
“discovered_interpreter_python”: “/usr/libexec/platform-python”
},
“changed”: false,
“ping”: “pong”
}
7. 建立批量更新脚本

 SHELL
在每台Worker主机上建立相应脚本
mkdir /opt/wazuh
touch /opt/wazuh/cluster.sh
cat > /opt/wazuh/cluster.sh <<EOF
#!/bin/bash
cd ~
配置文件
wget http://192.168.79.60/conf/ossec.conf
自定义规则文件
wget http://192.168.79.60/conf/0015-ossec_rules.xml
替换主机名
workername= ( h o s t n a m e − s ) s e d − i " s / v l n x 000000 / (hostname -s) sed -i "s/vlnx000000/ (hostname−s)sed−i"s/vlnx000000/workername/g" ~/ossec.conf
替换配置文件
rm -Rf /var/ossec/etc/ossec.conf
mv ~/ossec.conf /var/ossec/etc/
chown root:ossec /var/ossec/etc/ossec.conf
更新自定义文件
rm -Rf /var/ossec/ruleset/rules/0015-ossec_rules.xml
mv ~/0015-ossec_rules.xml /var/ossec/ruleset/rules/
chown root:ossec /var/ossec/ruleset/rules/0015-ossec_rules.xml
Reset The Service
systemctl restart wazuh-manager.service
EOF
chmod +x /opt/wazuh/cluster.sh
8. 建立worker配置文件

 SHELL
SHELL
# 每个Worker上创建目录
ansible worker -a 'mkdir /opt/wazuh'
# 复制脚本到worker上
ansible worker -m copy -a "src=/opt/wazuh/cluster.sh dest=/opt/wazuh owner=root group=root mode=0744"
# 每个worker执行脚本
ansible worker -a '/bin/sh /opt/wazuh/cluster.sh'
还有兄弟不知道网络安全面试可以提前刷题吗?费时一周整理的160+网络安全面试题,金九银十,做网络安全面试里的显眼包!
王岚嵚工程师面试题(附答案),只能帮兄弟们到这儿了!如果你能答对70%,找一个安全工作,问题不大。
对于有1-3年工作经验,想要跳槽的朋友来说,也是很好的温习资料!
【完整版领取方式在文末!!】
***93道网络安全面试题***
内容实在太多,不一一截图了
### 黑客学习资源推荐
最后给大家分享一份全套的网络安全学习资料,给那些想学习 网络安全的小伙伴们一点帮助!
对于从来没有接触过网络安全的同学,我们帮你准备了详细的学习成长路线图。可以说是最科学最系统的学习路线,大家跟着这个大的方向学习准没问题。
#### 1️⃣零基础入门
##### ① 学习路线
对于从来没有接触过网络安全的同学,我们帮你准备了详细的**学习成长路线图**。可以说是**最科学最系统的学习路线**,大家跟着这个大的方向学习准没问题。
##### ② 路线对应学习视频
同时每个成长路线对应的板块都有配套的视频提供:
**网上学习资料一大堆,但如果学到的知识不成体系,遇到问题时只是浅尝辄止,不再深入研究,那么很难做到真正的技术提升。**
**需要这份系统化的资料的朋友,可以添加V获取:vip204888 (备注网络安全)**

**一个人可以走的很快,但一群人才能走的更远!不论你是正从事IT行业的老鸟或是对IT行业感兴趣的新人,都欢迎加入我们的的圈子(技术交流、学习资源、职场吐槽、大厂内推、面试辅导),让我们一起学习成长!**
uster.sh'
还有兄弟不知道网络安全面试可以提前刷题吗?费时一周整理的160+网络安全面试题,金九银十,做网络安全面试里的显眼包!
王岚嵚工程师面试题(附答案),只能帮兄弟们到这儿了!如果你能答对70%,找一个安全工作,问题不大。
对于有1-3年工作经验,想要跳槽的朋友来说,也是很好的温习资料!
【完整版领取方式在文末!!】
***93道网络安全面试题***


内容实在太多,不一一截图了
### 黑客学习资源推荐
最后给大家分享一份全套的网络安全学习资料,给那些想学习 网络安全的小伙伴们一点帮助!
对于从来没有接触过网络安全的同学,我们帮你准备了详细的学习成长路线图。可以说是最科学最系统的学习路线,大家跟着这个大的方向学习准没问题。
#### 1️⃣零基础入门
##### ① 学习路线
对于从来没有接触过网络安全的同学,我们帮你准备了详细的**学习成长路线图**。可以说是**最科学最系统的学习路线**,大家跟着这个大的方向学习准没问题。

##### ② 路线对应学习视频
同时每个成长路线对应的板块都有配套的视频提供:

**网上学习资料一大堆,但如果学到的知识不成体系,遇到问题时只是浅尝辄止,不再深入研究,那么很难做到真正的技术提升。**
**需要这份系统化的资料的朋友,可以添加V获取:vip204888 (备注网络安全)**
[外链图片转存中...(img-BllpRZPP-1713419066383)]
**一个人可以走的很快,但一群人才能走的更远!不论你是正从事IT行业的老鸟或是对IT行业感兴趣的新人,都欢迎加入我们的的圈子(技术交流、学习资源、职场吐槽、大厂内推、面试辅导),让我们一起学习成长!**


 1006
1006


 被折叠的 条评论
为什么被折叠?
被折叠的 条评论
为什么被折叠?
 到【灌水乐园】发言


