


 文章详细描述了如何在Spring框架中创建和配置WebApplicationContext,包括确定应用上下文类、设置上下文属性、初始化过程以及定制上下文。重点介绍了如何处理servlet上下文参数、初始化参数和属性源的管理和替换。
// 3.配置和刷新web应用上下文
configureAndRefreshWebApplicationContext(cwac, servletContext);
}
}
// 4.设置WebApplicationContext属性
servletContext.setAttribute(WebApplicationContext.ROOT_WEB_APPLICATION_CONTEXT_ATTRIBUTE, this.context);
ClassLoader ccl = Thread.currentThread().getContextClassLoader();
if (ccl == ContextLoader.class.getClassLoader()) {
currentContext = this.context;
} else if (ccl != null) {
currentContextPerThread.put(ccl, this.context);
}
if (logger.isDebugEnabled()) {
logger.debug(“Published root WebApplicationContext as ServletContext attribute with name [” +
WebApplicationContext.ROOT_WEB_APPLICATION_CONTEXT_ATTRIBUTE + “]”);
}
if (logger.isInfoEnabled()) {
long elapsedTime = System.currentTimeMillis() - startTime;
logger.info(“Root WebApplicationContext: initialization completed in " + elapsedTime + " ms”);
}
return this.context;
} catch (RuntimeException ex) {
logger.error(“Context initialization failed”, ex);
servletContext.setAttribute(WebApplicationContext.ROOT_WEB_APPLICATION_CONTEXT_ATTRIBUTE, ex);
throw ex;
} catch (Error err) {
logger.error(“Context initialization failed”, err);
servletContext.setAttribute(WebApplicationContext.ROOT_WEB_APPLICATION_CONTEXT_ATTRIBUTE, err);
throw err;
}
}
2.创建一个 WebApplicationContext,见代码块1详解。
3.配置和刷新 web 应用上下文,见代码块3详解。
**代码块1:**createWebApplicationContext
protected WebApplicationContext createWebApplicationContext(ServletContext sc) {
// 1.确定要创建的应用上下文的Class
Class<?> contextClass = determineContextClass(sc);
// 2.校验contextClass是否为ConfigurableWebApplicationContext或其子类、子接口
if (!ConfigurableWebApplicationContext.class.isAssignableFrom(contextClass)) {
throw new ApplicationContextException(“Custom context class [” + contextClass.getName() +
“] is not of type [” + ConfigurableWebApplicationContext.class.getName() + “]”);
}
// 3.实例化contextClass,并强转成ConfigurableWebApplicationContext返回
return (ConfigurableWebApplicationContext) BeanUtils.instantiateClass(contextClass);
}
1.确定要创建的应用上下文的 Class,见代码块2详解。
代码块2:determineContextClass
protected Class<?> determineContextClass(ServletContext servletContext) {
// 1.从servletContext中解析初始化参数contextClass(web.xml可以配置该参数)
String contextClassName = servletContext.getInitParameter(CONTEXT_CLASS_PARAM);
if (contextClassName != null) {
try {
// 2.contextClassName不为空,则使用工具类构建出contextClassName的实例
return ClassUtils.forName(contextClassName, ClassUtils.getDefaultClassLoader());
} catch (ClassNotFoundException ex) {
throw new ApplicationContextException(
“Failed to load custom context class [” + contextClassName + “]”, ex);
}
} else {
// 3.如果没有配置contextClass参数,则从defaultStrategies缓存中拿到默认的WerApplicationContext对应的ClassName,
// 即:org.springframework.web.context.support.XmlWebApplicationContext
contextClassName = defaultStrategies.getProperty(WebApplicationContext.class.getName());
try {
// 4.使用工具类构建出contextClassName的实例
return ClassUtils.forName(contextClassName, ContextLoader.class.getClassLoader());
} catch (ClassNotFoundException ex) {
throw new ApplicationContextException(
“Failed to load default context class [” + contextClassName + “]”, ex);
}
}
}
3.如果没有配置 contextClass 参数,从 defaultStrategies 缓存中拿到默认的 WerApplicationContext 对应的 ClassName,这边拿到的就是我们在本文开头解析到的默认 WebApplicationContext 的 ClassName,也就是 org.springframework.web.context.support.XmlWebApplicationContext。
**代码块3:**configureAndRefreshWebApplicationContext
protected void configureAndRefreshWebApplicationContext(ConfigurableWebApplicationContext wac, ServletContext sc) {
// 1.如果应用上下文id是原始默认值,则根据相关信息生成一个更有用的
if (ObjectUtils.identityToString(wac).equals(wac.getId())) {
// The application context id is still set to its original default value
// -> assign a more useful id based on available information
// 1.1 从servletContext中解析初始化参数contextId(可以在web.xml中配置)
String idParam = sc.getInitParameter(CONTEXT_ID_PARAM);
if (idParam != null) {
// 1.1.1 如果idParam不为空, 则设置为wac的Id属性
wac.setId(idParam);
} else {
// Generate default id…
// 1.1.2 如果idParam为空, 则生成默认的id, 例如: org.springframework.web.context.WebApplicationContext:
wac.setId(ConfigurableWebApplicationContext.APPLICATION_CONTEXT_ID_PREFIX +
ObjectUtils.getDisplayString(sc.getContextPath()));
}
}
// 2.为应用上下文设置servletContext
wac.setServletContext(sc);
// 3.从servletContext中解析初始化参数contextConfigLocation(可以在web.xml中配置, 这个参数一般我们都会设置)
String configLocationParam = sc.getInitParameter(CONFIG_LOCATION_PARAM);
if (configLocationParam != null) {
// 4.设置wac的configLocations属性值为configLocationParam
wac.setConfigLocation(configLocationParam);
}
// The wac environment’s #initPropertySources will be called in any case when the context
// is refreshed; do it eagerly here to ensure servlet property sources are in place for
// use in any post-processing or initialization that occurs below prior to #refresh
ConfigurableEnvironment env = wac.getEnvironment();
if (env instanceof ConfigurableWebEnvironment) {
// 5.初始化属性源(主要是将servletContextInitParams的占位类替换成sc)
((ConfigurableWebEnvironment) env).initPropertySources(sc, null);
}
// 6.自定义上下文
customizeContext(sc, wac);
// 7.应用上下文的刷新
wac.refresh();
}
4.设置 wac 的 configLocations 属性值为 configLocationParam,见代码块4详解。
5.初始化属性源,见代码块11详解。
6.自定义上下文,见代码块12详解。
7.应用上下文的刷新,IoC 核心内容,本文不介绍,之后通过一系列文章介绍。
代码块4:wac.setConfigLocation
// AbstractRefreshableConfigApplicationContext.java
public void setConfigLocation(String location) {
// tokenizeToStringArray: 将location通过分割符(,;\t\n)分割成String数组
// setConfigLocations: 将分割后的路径赋值给configLocations
setConfigLocations(StringUtils.tokenizeToStringArray(location, CONFIG_LOCATION_DELIMITERS));
}
public void setConfigLocations(String… locations) {
if (locations != null) {
Assert.noNullElements(locations, “Config locations must not be null”);
this.configLocations = new String[locations.length];
// 1.遍历解析locations
for (int i = 0; i < locations.length; i++) {
// 2.解析给定路径,必要时用相应的环境属性值替换占位符
this.configLocations[i] = resolvePath(locations[i]).trim();
}
}
else {
this.configLocations = null;
}
}
2.解析给定路径,必要时用相应的环境属性值替换占位符,见代码块5详解。
代码块5:resolvePath
protected String resolvePath(String path) {
// 1.getEnvironment:获取环境属性
// 2.resolveRequiredPlaceholders: 解析给定路径,必要时用相应的环境属性值替换占位符,例如${path}
return getEnvironment().resolveRequiredPlaceholders(path);
}
1.获取环境属性,见代码块6详解。
代码块6:getEnvironment
@Override
public ConfigurableEnvironment getEnvironment() {
if (this.environment == null) {
// 1.创建Environment
this.environment = createEnvironment();
}
return this.environment;
}
1.创建 Environment,见代码块7详解。
代码块7:createEnvironment
protected ConfigurableEnvironment createEnvironment() {
return new StandardEnvironment();
}
此时,如果我们通过鼠标直接点击代码块6的 createEnvironment() 代码,会跳到该代码。
但是,实际上我们此时并不是走该方法(通过 debug 也可以发现)。我们注意到,该方法是通过 protected 修饰的,是允许重写的,上面这个代码是 AbstractApplicationContext 的默认实现。而此时,我们知道,我们拿到的应用上下文具体实现类是 XmlWebApplicationContext,XmlWebApplicationContext 前面几层的继承关系如下图。

createEnvironment() 方法的所有重写如下图:
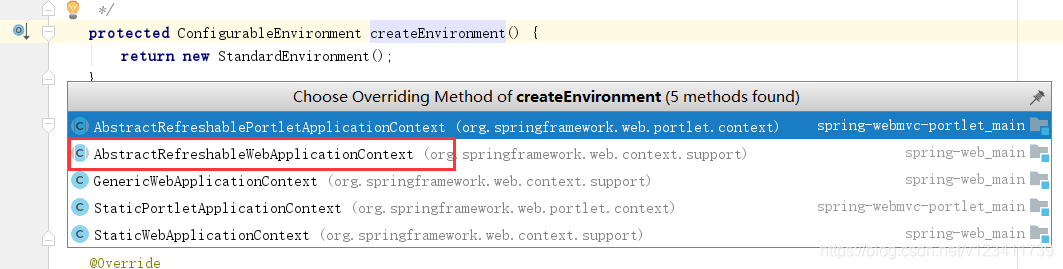
此时,我们看到 createEnvironment() 有5个重写,其中就包含 AbstractRefreshableWebApplicationContext,而通过上面的继承图,我们可以看到 XmlWebApplicationContext 直接继承自 AbstractRefreshableWebApplicationContext。因此,此时会走到 AbstractRefreshableWebApplicationContext 的重写方法中去,也就是以下代码。
@Override
protected ConfigurableEnvironment createEnvironment() {
// 新建StandardServletEnvironment
return new StandardServletEnvironment();
}
这边会新建 StandardServletEnvironment,这里面还包含了几个重要操作,因此单独在拿出来讲,见代码块8详解。
代码块8:new StandardServletEnvironment()
StandardServletEnvironment 的继承关系图

我们知道,初始化时,必须先初始化父类。因此,此时会先初始化 AbstractEnvironment,AbstractEnvironment 的构造函数如下。
public AbstractEnvironment() {
// 1.自定义属性源
customizePropertySources(this.propertySources);
if (logger.isDebugEnabled()) {
logger.debug("Initialized " + getClass().getSimpleName() + " with PropertySources " + this.propertySources);
}
}
1.自定义数据源,见代码块9详解。
代码块9:customizePropertySources
protected void customizePropertySources(MutablePropertySources propertySources) {
}
AbstractEnvironment 中的 customizePropertySources 方法为空方法,通过 protected 修饰,用于给子类进行重写。因此,此时我们会走到 StandardServletEnvironment 中的重写方法。
@Override
protected void customizePropertySources(MutablePropertySources propertySources) {
// 1.添加servletConfigInitParams属性源(作为占位符, 之后会被替换)
propertySources.addLast(new StubPropertySource(SERVLET_CONFIG_PROPERTY_SOURCE_NAME));
// 2.添加servletContextInitParams属性源(作为占位符, 之后会被替换)
propertySources.addLast(new StubPropertySource(SERVLET_CONTEXT_PROPERTY_SOURCE_NAME));
if (JndiLocatorDelegate.isDefaultJndiEnvironmentAvailable()) {
// 3.添加jndiProperties属性源
propertySources.addLast(new JndiPropertySource(JNDI_PROPERTY_SOURCE_NAME));
}
// 4.调用父类中的customizePropertySources方法
super.customizePropertySources(propertySources);
}
1.添加 servletConfigInitParams 属性源(作为占位符,之后会被替换)
2.添加 servletContextInitParams 属性源(作为占位符,之后会被替换)
4.调用父类中的 customizePropertySources 方法,见代码块10详解。
代码块10:customizePropertySources
@Override
protected void customizePropertySources(MutablePropertySources propertySources) {
// 添加systemProperties属性源
propertySources.addLast(new MapPropertySource(SYSTEM_PROPERTIES_PROPERTY_SOURCE_NAME, getSystemProperties()));
// 添加systemEnvironment属性源
propertySources.addLast(new SystemEnvironmentPropertySource(SYSTEM_ENVIRONMENT_PROPERTY_SOURCE_NAME, getSystemEnvironment()));
}
至此,代码块6的 createEnvironment() 方法执行结束,此时的 environment 如下。

代码块11:initPropertySources
public static void initServletPropertySources(
MutablePropertySources propertySources, ServletContext servletContext, ServletConfig servletConfig) {
Assert.notNull(propertySources, “‘propertySources’ must not be null”);
if (servletContext != null && propertySources.contains(StandardServletEnvironment.SERVLET_CONTEXT_PROPERTY_SOURCE_NAME) &&
propertySources.get(StandardServletEnvironment.SERVLET_CONTEXT_PROPERTY_SOURCE_NAME) instanceof StubPropertySource) {
// 1.如果servletContext不为null && propertySources中包含servletContextInitParams数据源 && 该数据源的类型为StubPropertySource,
// 则将servletContextInitParams的数据源替换成servletContext
propertySources.replace(StandardServletEnvironment.SERVLET_CONTEXT_PROPERTY_SOURCE_NAME,
new ServletContextPropertySource(StandardServletEnvironment.SERVLET_CONTEXT_PROPERTY_SOURCE_NAME, servletContext));
}
if (servletConfig != null && propertySources.contains(StandardServletEnvironment.SERVLET_CONFIG_PROPERTY_SOURCE_NAME) &&
propertySources.get(StandardServletEnvironment.SERVLET_CONFIG_PROPERTY_SOURCE_NAME) instanceof StubPropertySource) {
// 2.如果servletConfig不为null && propertySources中包含servletConfigInitParams数据源 && 该数据源的类型为StubPropertySource,
// 则将servletConfigInitParams的数据源替换成servletConfig
propertySources.replace(StandardServletEnvironment.SERVLET_CONFIG_PROPERTY_SOURCE_NAME,
new ServletConfigPropertySource(StandardServletEnvironment.SERVLET_CONFIG_PROPERTY_SOURCE_NAME, servletConfig));
}
}
将代码块9中设置的占位符数据源,替换成真正的数据源。
代码块12:customizeContext
protected void customizeContext(ServletContext sc, ConfigurableWebApplicationContext wac) {
// 1.确定应用上下文的初始化类
List<Class<ApplicationContextInitializer>> initializerClasses =
determineContextInitializerClasses(sc);
// 2.如果initializerClasses不为空, 遍历处理initializerClasses
for (Class<ApplicationContextInitializer> initializerClass : initializerClasses) {
Class<?> initializerContextClass =
GenericTypeResolver.resolveTypeArgument(initializerClass, ApplicationContextInitializer.class);
if (initializerContextClass != null && !initializerContextClass.isInstance(wac)) {
throw new ApplicationContextException(String.format(
"Could not apply context initializer [%s] since its generic parameter [%s] " +
"is not assignable from the type of application context used by this " +
“context loader: [%s]”, initializerClass.getName(), initializerContextClass.getName(),
wac.getClass().getName()));
}
// 3.实例化initializerClass, 并添加到contextInitializers中
this.contextInitializers.add(BeanUtils.instantiateClass(initializerClass));
}
AnnotationAwareOrderComparator.sort(this.contextInitializers);
// 4.遍历实例化后的contextInitializers
for (ApplicationContextInitializer initializer : this.contextInitializers) {
// 5.调用initializer的initialize方法,进行自定义初始化wac操作
initializer.initialize(wac);
}
}
1.确定应用上下文的初始化类,见代码块13详解。
代码块13:determineContextInitializerClasses
protected List<Class<ApplicationContextInitializer>>
determineContextInitializerClasses(ServletContext servletContext) {
List<Class<ApplicationContextInitializer>> classes =
new ArrayList<Class<ApplicationContextInitializer>>();
// 1.从servletContext中解析初始化参数globalInitializerClasses(可在web.xml中配置)
String globalClassNames = servletContext.getInitParameter(GLOBAL_INITIALIZER_CLASSES_PARAM);
if (globalClassNames != null) {
// 1.1 如果globalClassNames不为空, 则使用分割符分割, 然后进行遍历
for (String className : StringUtils.tokenizeToStringArray(globalClassNames, INIT_PARAM_DELIMITERS)) {
// 1.2 实例化className,获得className对应的类实例
classes.add(loadInitializerClass(className));
}
}
// 2.解析初始化参数contextInitializerClasses(可在web.xml中配置)
String localClassNames = servletContext.getInitParameter(CONTEXT_INITIALIZER_CLASSES_PARAM);
if (localClassNames != null) {
// 2.1 如果localClassNames不为空, 则使用分割符分割, 然后进行遍历
for (String className : StringUtils.tokenizeToStringArray(localClassNames, INIT_PARAM_DELIMITERS)) {
// 2.2 实例化className,获得className对应的类实例
classes.add(loadInitializerClass(className));
}
}
return classes;
}
1.2 实例化 className,见代码块14详解。
代码块14:loadInitializerClass
@SuppressWarnings(“unchecked”)
private Class<ApplicationContextInitializer> loadInitializerClass(String className) {
try {
// 1.实例化className
Class<?> clazz = ClassUtils.forName(className, ClassUtils.getDefaultClassLoader());
if (!ApplicationContextInitializer.class.isAssignableFrom(clazz)) {
// 2.校验clazz是否实现了ApplicationContextInitializer接口, 如果没有则抛异常
throw new ApplicationContextException(
"Initializer class does not implement ApplicationContextInitializer interface: " + clazz);
}
// 3.clazz强转成ApplicationContextInitializer, 并返回
return (Class<ApplicationContextInitializer>) clazz;
} catch (ClassNotFoundException ex) {
throw new ApplicationContextException(“Failed to load context initializer class [” + className + “]”, ex);
}
}
customizeContext方法扩展
====================
从代码块12到代码块14,可以很明显的看出 customizeContext 方法是 Spring 提供给开发者的一个扩展点,我们可以通过此方法对 ConfigurableApplicationContext 进行一些自定义操作,具体使用如下。
1.创建一个 ApplicationContextInitializer 接口的实现类,例如下面的 SpringApplicationContextInitializer,并在 initialize 方法中进行自己的逻辑操作,例如:添加监听器、添加 BeanFactoryPostProcessor。
package com.joonwhee.open.spring;
import com.joonwhee.open.listener.EarlyListener;
import com.joonwhee.open.processor.MyBeanFactoryPostProcessor;
import org.springframework.context.ApplicationContextInitializer;
import org.springframework.context.ConfigurableApplicationContext;
/**
-
@author joonwhee
-
@date 2019/1/19
*/
public class SpringApplicationContextInitializer implements ApplicationContextInitializer {
@Override
public void initialize(ConfigurableApplicationContext applicationContext) {
// 自己的逻辑实现
// 例子1:通过硬编码的方式添加监听器
EarlyListener earlyListener = new EarlyListener();
applicationContext.addApplicationListener(earlyListener);
// 例子2:通过硬编码的方式添加BeanFactoryPostProcessor
MyBeanFactoryPostProcessor myBeanFactoryPostProcessor = new MyBeanFactoryPostProcessor();
applicationContext.addBeanFactoryPostProcessor(myBeanFactoryPostProcessor);
}
}
2.在web.xml中,定义 contextInitializerClasses 或 globalInitializerClasses 参数,参数值为 SpringApplicationContextInitializer 的全路径。
自我介绍一下,小编13年上海交大毕业,曾经在小公司待过,也去过华为、OPPO等大厂,18年进入阿里一直到现在。
深知大多数Java工程师,想要提升技能,往往是自己摸索成长或者是报班学习,但对于培训机构动则几千的学费,着实压力不小。自己不成体系的自学效果低效又漫长,而且极易碰到天花板技术停滞不前!
因此收集整理了一份《2024年Java开发全套学习资料》,初衷也很简单,就是希望能够帮助到想自学提升又不知道该从何学起的朋友,同时减轻大家的负担。

既有适合小白学习的零基础资料,也有适合3年以上经验的小伙伴深入学习提升的进阶课程,基本涵盖了95%以上Java开发知识点,真正体系化!
由于文件比较大,这里只是将部分目录截图出来,每个节点里面都包含大厂面经、学习笔记、源码讲义、实战项目、讲解视频,并且会持续更新!
如果你觉得这些内容对你有帮助,可以扫码获取!!(备注Java获取)

最后
这份文档从构建一个键值数据库的关键架构入手,不仅带你建立起全局观,还帮你迅速抓住核心主线。除此之外,还会具体讲解数据结构、线程模型、网络框架、持久化、主从同步和切片集群等,帮你搞懂底层原理。相信这对于所有层次的Redis使用者都是一份非常完美的教程了。

整理不易,觉得有帮助的朋友可以帮忙点赞分享支持一下小编~
你的支持,我的动力;祝各位前程似锦,offer不断!!!
《互联网大厂面试真题解析、进阶开发核心学习笔记、全套讲解视频、实战项目源码讲义》点击传送门即可获取!
于培训机构动则几千的学费,着实压力不小。自己不成体系的自学效果低效又漫长,而且极易碰到天花板技术停滞不前!**
因此收集整理了一份《2024年Java开发全套学习资料》,初衷也很简单,就是希望能够帮助到想自学提升又不知道该从何学起的朋友,同时减轻大家的负担。[外链图片转存中…(img-XVx36AS7-1713301516261)]
[外链图片转存中…(img-NFfZI0QC-1713301516262)]
[外链图片转存中…(img-ARibipBo-1713301516262)]
既有适合小白学习的零基础资料,也有适合3年以上经验的小伙伴深入学习提升的进阶课程,基本涵盖了95%以上Java开发知识点,真正体系化!
由于文件比较大,这里只是将部分目录截图出来,每个节点里面都包含大厂面经、学习笔记、源码讲义、实战项目、讲解视频,并且会持续更新!
如果你觉得这些内容对你有帮助,可以扫码获取!!(备注Java获取)
最后
这份文档从构建一个键值数据库的关键架构入手,不仅带你建立起全局观,还帮你迅速抓住核心主线。除此之外,还会具体讲解数据结构、线程模型、网络框架、持久化、主从同步和切片集群等,帮你搞懂底层原理。相信这对于所有层次的Redis使用者都是一份非常完美的教程了。
[外链图片转存中…(img-XQ7zuHAm-1713301516262)]
整理不易,觉得有帮助的朋友可以帮忙点赞分享支持一下小编~
你的支持,我的动力;祝各位前程似锦,offer不断!!!
《互联网大厂面试真题解析、进阶开发核心学习笔记、全套讲解视频、实战项目源码讲义》点击传送门即可获取!


 482
482


 被折叠的 条评论
为什么被折叠?
被折叠的 条评论
为什么被折叠?
 到【灌水乐园】发言


