


《一线大厂Java面试题解析+核心总结学习笔记+最新讲解视频+实战项目源码》,点击传送门,即可获取!
$ curl -X GET ‘http://localhost:10004/bus/env?key=hangzhou’
-
unknown%
- ⌚
$ curl -X GET ‘http://localhost:10005/bus/env?key=hangzhou’
-
unknown%
- ⌚ $ curl -X POST ‘http://localhost:10001/actuator/bus-env?name=hangzhou&value=alibaba’ -H ‘content-type: application/json’
- ⌚
$ curl -X GET ‘http://localhost:10005/bus/env?key=hangzhou’
-
alibaba%
- ⌚
$ curl -X GET ‘http://localhost:10004/bus/env?key=hangzhou’
-
alibaba%
- ⌚
$ curl -X GET ‘http://localhost:10003/bus/env?key=hangzhou’
-
alibaba%
- ⌚
$ curl -X GET ‘http://localhost:10002/bus/env?key=hangzhou’
-
alibaba%
- ⌚
$ curl -X GET ‘http://localhost:10001/bus/env?key=hangzhou’
alibaba%
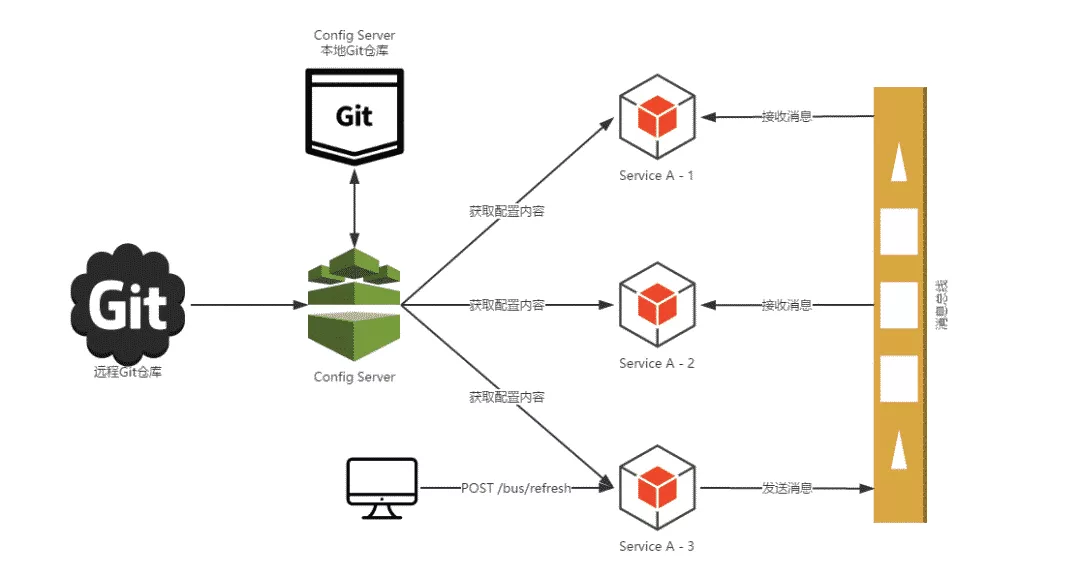
可以看到,所有节点都新增了一个 key 为hangzhou的配置,且对应的 value 是alibaba。这个配置项是通过 Bus 提供的 EnvironmentBusEndpoint 完成的。
这里引用 程序猿DD 画的一张图片,Spring Cloud Config 配合 Bus 完成所有节点配置的刷新来描述之前的实例(本文实例不是刷新,而是新增配置,但是流程是一样的):
比如在 node1 上指定 destination 为 rocketmq-bus-node2 ( node2 配置了 spring.cloud.bus.id 为rocketmq-bus-node2:10002,可以匹配上) 进行配置的修改:
curl -X POST ‘http://localhost:10001/actuator/bus-env/rocketmq-bus-node2?name=hangzhou&value=xihu’ -H ‘content-type: application/json’
访问/bus/env 获取配置(由于在 node1 上发送消息,Bus 也会对发送方的节点 node1 进行配置修改):
~ ⌚
-
$ curl -X POST ‘http://localhost:10001/actuator/bus-env/rocketmq-bus-node2?name=hangzhou&value=xihu’ -H ‘content-type: application/json’
- ⌚
$ curl -X GET ‘http://localhost:10005/bus/env?key=hangzhou’
-
alibaba%
- ⌚
$ curl -X GET ‘http://localhost:10004/bus/env?key=hangzhou’
-
alibaba%
- ⌚
$ curl -X GET ‘http://localhost:10003/bus/env?key=hangzhou’
-
alibaba%
- ⌚
$ curl -X GET ‘http://localhost:10002/bus/env?key=hangzhou’
-
xihu%
- ⌚
$ curl -X GET ‘http://localhost:10001/bus/env?key=hangzhou’
xihu%
可以看到,只有 node1 和 node2 修改了配置,其余的 3 个节点配置未改变。
============================================================================
1)事件
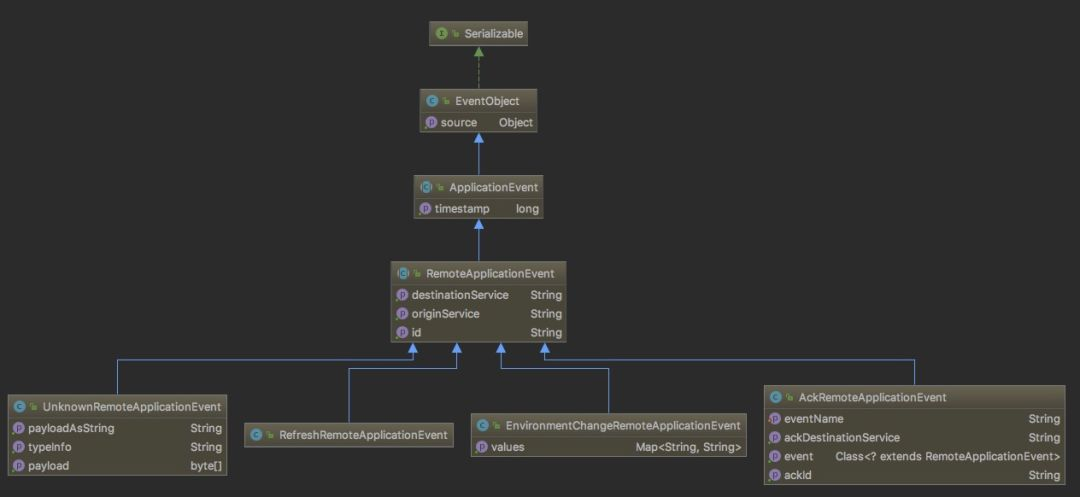
Bus 中定义了远程事件RemoteApplicationEvent,该事件继承了 Spring 的事件ApplicationEvent,而且它目前有 4 个具体的实现:
-
EnvironmentChangeRemoteApplicationEvent:远程环境变更事件。主要用于接收一个 Map<String,String> 类型的数据并更新到 Spring 上下文中 Environment 中的事件。文中的实例就是使用这个事件并配合 EnvironmentBusEndpoint 和 EnvironmentChangeListener 完成的。
-
AckRemoteApplicationEvent:远程确认事件。Bus 内部成功接收到远程事件后会发送回AckRemoteApplicationEvent确认事件进行确认。
-
RefreshRemoteApplicationEvent: 远程配置刷新事件。配合 @RefreshScope 以及所有的 @ConfigurationProperties注解修饰的配置类的动态刷新。
-
UnknownRemoteApplicationEvent:远程未知事件。Bus 内部消息体进行转换远程事件的时候如果发生异常会统一包装成该事件。
Bus 内部还存在一个非RemoteApplicationEvent事件 -SentApplicationEvent消息发送事件,配合 Trace 进行远程消息发送的记录。
这些事件会配合ApplicationListener进行操作,比如EnvironmentChangeRemoteApplicationEvent配了EnvironmentChangeListener进行配置的新增/修改:
public class EnvironmentChangeListener
implements ApplicationListener {
private static Log log = LogFactory.getLog(EnvironmentChangeListener.class);
@Autowired
private EnvironmentManager env;
@Override
public void onApplicationEvent(EnvironmentChangeRemoteApplicationEvent event) {
Map<String, String> values = event.getValues();
log.info("Received remote environment change request. Keys/values to update "
- values);
for (Map.Entry<String, String> entry : values.entrySet()) {
env.setProperty(entry.getKey(), entry.getValue());
}
}
}
收到其它节点发送来EnvironmentChangeRemoteApplicationEven事件之后调用EnvironmentManager#setProperty进行配置的设置,该方法内部针对每一个配置项都会发送一个EnvironmentChangeEvent事件,然后被ConfigurationPropertiesRebinder所监听,进行 rebind 操作新增/更新配置。
2)Actuator Endpoint
Bus 内部暴露了 2 个 Endpoint,分别是EnvironmentBusEndpoint和RefreshBusEndpoint,进行配置的新增/修改以及全局配置刷新。它们对应的 Endpoint id 即 url 是 bus-env和bus-refresh。
3)配置
Bus 对于消息的发送必定涉及到 Topic、Group 之类的信息,这些内容都被封装到了BusProperties中,其默认的配置前缀为spring.cloud.bus,比如:
-
spring.cloud.bus.refresh.enabled用于开启/关闭全局刷新的 Listener。
-
spring.cloud.bus.env.enabled 用于开启/关闭配置新增/修改的 Endpoint。
-
spring.cloud.bus.ack.enabled 用于开启开启/关闭AckRemoteApplicationEvent事件的发送。
-
spring.cloud.bus.trace.enabled 用于开启/关闭息记录 Trace 的 Listener。
消息发送涉及到的 Topic 默认用的是springCloudBus,可以配置进行修改,Group 可以设置成广播模式或使用 UUID 配合 offset 为 lastest 的模式。
每个 Bus 应用都有一个对应的 Bus id,官方取值方式较复杂:
KaTeX parse error: Expected ‘}’, got ‘EOF’ at end of input: …plication.name:{spring.application.name:application}}:KaTeX parse error: Expected ‘}’, got ‘EOF’ at end of input: …instance_index:{spring.application.index:KaTeX parse error: Expected ‘}’, got ‘EOF’ at end of input: …al.server.port:{server.port:0}}}}:KaTeX parse error: Expected ‘}’, got ‘EOF’ at end of input: …on.instance_id:{random.value}}
建议手动配置 Bus id,因为 Bus 远程事件中的 destination 会根据 Bus id 进行匹配:
spring.cloud.bus.id= s p r i n g . a p p l i c a t i o n . n a m e − {spring.application.name}- spring.application.name−{server.port}
Bus 的底层分析无非牵扯到这几个方面:
-
消息是如何发送的
-
消息是如何接收的
-
destination 是如何匹配的
-
远程事件收到后如何触发下一个 action
BusAutoConfiguration自动化配置类被@EnableBinding(SpringCloudBusClient.class)所修饰。
@EnableBinding的用法在文章《Spring Cloud Stream 体系及原理介绍》中已经说明,且它的 value 为SpringCloudBusClient.class,会在SpringCloudBusClient中基于代理创建出 input 和 output 的DirectChannel:
public interface SpringCloudBusClient {
String INPUT = “springCloudBusInput”;
String OUTPUT = “springCloudBusOutput”;
@Output(SpringCloudBusClient.OUTPUT)
MessageChannel springCloudBusOutput();
@Input(SpringCloudBusClient.INPUT)
SubscribableChannel springCloudBusInput();
}
springCloudBusInput 和 springCloudBusOutput 这两个 Binding 的属性可以通过配置文件进行修改(比如修改 topic):
spring.cloud.stream.bindings:
springCloudBusInput:
destination: my-bus-topic
springCloudBusOutput:
destination: my-bus-topic
消息的接收和发送:
// BusAutoConfiguration
@EventListener(classes = RemoteApplicationEvent.class) // 1
public void acceptLocal(RemoteApplicationEvent event) {
if (this.serviceMatcher.isFromSelf(event)
&& !(event instanceof AckRemoteApplicationEvent)) { // 2
this.cloudBusOutboundChannel.send(MessageBuilder.withPayload(event).build()); // 3
}
}
@StreamListener(SpringCloudBusClient.INPUT) // 4
public void acceptRemote(RemoteApplicationEvent event) {
if (event instanceof AckRemoteApplicationEvent) {
if (this.bus.getTrace().isEnabled() && !this.serviceMatcher.isFromSelf(event)
&& this.applicationEventPublisher != null) { // 5
this.applicationEventPublisher.publishEvent(event);
}
// If it’s an ACK we are finished processing at this point
return;
}
if (this.serviceMatcher.isForSelf(event)
&& this.applicationEventPublisher != null) { // 6
if (!this.serviceMatcher.isFromSelf(event)) { // 7
this.applicationEventPublisher.publishEvent(event);
}
if (this.bus.getAck().isEnabled()) { // 8
AckRemoteApplicationEvent ack = new AckRemoteApplicationEvent(this,
this.serviceMatcher.getServiceId(),
this.bus.getAck().getDestinationService(),
event.getDestinationService(), event.getId(), event.getClass());
this.cloudBusOutboundChannel
.send(MessageBuilder.withPayload(ack).build());
this.applicationEventPublisher.publishEvent(ack);
}
}
if (this.bus.getTrace().isEnabled() && this.applicationEventPublisher != null) { // 9
// We are set to register sent events so publish it for local consumption,
// irrespective of the origin
this.applicationEventPublisher.publishEvent(new SentApplicationEvent(this,
event.getOriginService(), event.getDestinationService(),
event.getId(), event.getClass()));
}
}
-
利用 Spring 事件的监听机制监听本地所有的RemoteApplicationEvent远程事件(比如bus-env会在本地发送EnvironmentChangeRemoteApplicationEvent事件,bus-refresh会在本地发送RefreshRemoteApplicationEvent事件,这些事件在这里都会被监听到)。
-
判断本地接收到的事件不是AckRemoteApplicationEvent远程确认事件(不然会死循环,一直接收消息,发送消息…)以及该事件是应用自身发送出去的(事件发送方是应用自身),如果都满足执行步骤 3。
-
构造 Message 并将该远程事件作为 payload,然后使用 Spring Cloud Stream 构造的 Binding name 为 springCloudBusOutput 的 MessageChannel 将消息发送到 broker。
4.@StreamListener注解消费 Spring Cloud Stream 构造的 Binding name 为 springCloudBusInput 的 MessageChannel,接收的消息为远程消息。
-
如果该远程事件是AckRemoteApplicationEvent远程确认事件并且应用开启了消息追踪 trace 开关,同时该远程事件不是应用自身发送的(事件发送方不是应用自身,表示事件是其它应用发送过来的),那么本地发送AckRemoteApplicationEvent远程确认事件表示应用确认收到了其它应用发送过来的远程事件,流程结束。
-
如果该远程事件是其它应用发送给应用自身的(事件的接收方是应用自身),那么进行步骤 7 和 8,否则执行步骤 9。
-
该远程事件不是应用自身发送(事件发送方不是应用自身)的话,将该事件以本地的方式发送出去。应用自身一开始已经在本地被对应的消息接收方处理了,无需再次发送。
总结
本文从基础到高级再到实战,由浅入深,把MySQL讲的清清楚楚,明明白白,这应该是我目前为止看到过最好的有关MySQL的学习笔记了,我相信如果你把这份笔记认真看完后,无论是工作中碰到的问题还是被面试官问到的问题都能迎刃而解!
MySQL50道高频面试题整理:

《一线大厂Java面试题解析+核心总结学习笔记+最新讲解视频+实战项目源码》,点击传送门,即可获取!
了其它应用发送过来的远程事件,流程结束。
-
如果该远程事件是其它应用发送给应用自身的(事件的接收方是应用自身),那么进行步骤 7 和 8,否则执行步骤 9。
-
该远程事件不是应用自身发送(事件发送方不是应用自身)的话,将该事件以本地的方式发送出去。应用自身一开始已经在本地被对应的消息接收方处理了,无需再次发送。
总结
本文从基础到高级再到实战,由浅入深,把MySQL讲的清清楚楚,明明白白,这应该是我目前为止看到过最好的有关MySQL的学习笔记了,我相信如果你把这份笔记认真看完后,无论是工作中碰到的问题还是被面试官问到的问题都能迎刃而解!
MySQL50道高频面试题整理:
[外链图片转存中…(img-JJYkUvjm-1714748883379)]
《一线大厂Java面试题解析+核心总结学习笔记+最新讲解视频+实战项目源码》,点击传送门,即可获取!


 1449
1449


 被折叠的 条评论
为什么被折叠?
被折叠的 条评论
为什么被折叠?
 到【灌水乐园】发言


