


根据操作系统(Windows或Unix)下载相应的 Spring 压缩包。本教程使用版本为 spring-framework-5.2.3.RELEASE-dist.zip,该文件目录结构如下:
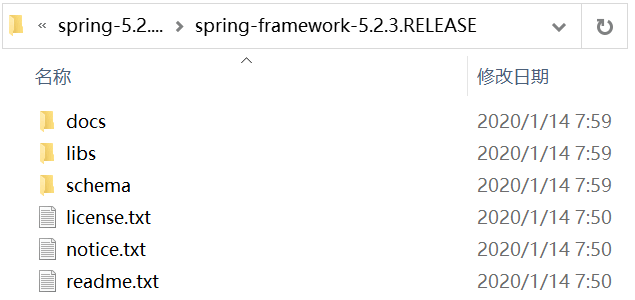
下面对上图所示的目录进行简单介绍,具体如表 1 所示。
| 名称 | 作用 |
|---|---|
| docs | 包含 Spring 的 API 文档和开发规范 |
| libs | 包含开发需要的 jar 包和源码包 |
| schema | 包含开发所需要的 schema 文件,在这些文件中定义了 Spring 相关配置文件的约束 |
在 libs 目录中,包含了 Spring 框架提供的所有 jar 文件,其中有 4 个 jar 文件是 Spring 框架的基础包,分别对应 Spring 容器的四个模块,具体如表 2 所示。
| 名称 | 作用 |
|---|---|
| spring-core-x.x.xx.RELEASE.jar | 包含 Spring 框架基本的核心工具类,Spring 其他组件都要用到这个包中的类,是其他组件的基本核心。 |
| spring-beans-x.x.xx.RELEASE.jar | 所有应用都要用到的,它包含访问配置文件、创建和管理 Bean 以及进行 Inversion of Control(IoC)或者 Dependency Injection(DI)操作相关的所有类。 |
| spring-context-x.x.xx.RELEASE.jar | Spring 提供在基础 IoC 功能上的扩展服务,此外还提供许多企业级服务的支持,如邮件服务、任务调度、JNDI 定位、EJB 集成、远程访问、缓存以及各种视图层框架的封装等 |
| spring-expression-x.x.xx.RELEASE.jar | 定义了 Spring 的表达式语言。 需要注意的是,在使用 Spring 开发时,除了 Spring 自带的 JAR 包以外,还需要一个第三方 JAR 包 commons.logging 处理日志信息 |
使用 Spring 框架时,只需将 Spring 的 4 个基础包以及 commons-logging-1.2.jar 包复制到项目的 lib 目录,并发布到类路径中即可。
使用两种方法来创建Spring项目
我在看教程的过程中,发现有的教程是使用自己导入Spring包的方式,有的是使用Maven的方式来导入Spring包的,因此为了文章的完备性,本文也会使用这两种方法来分别创建Spring项目。
对Maven不了解的,可看这篇博客:maven引入依赖包,import依赖包,编译运行maven项目.
1.1使用IDEA新建一个普通项目

新建好之后,项目目录结构如下:

1.2导入Spring包
因为我们的项目要使用这些包,因此要将其导入。
在项目名上右键,选择Open Module Settings

选择Libraries
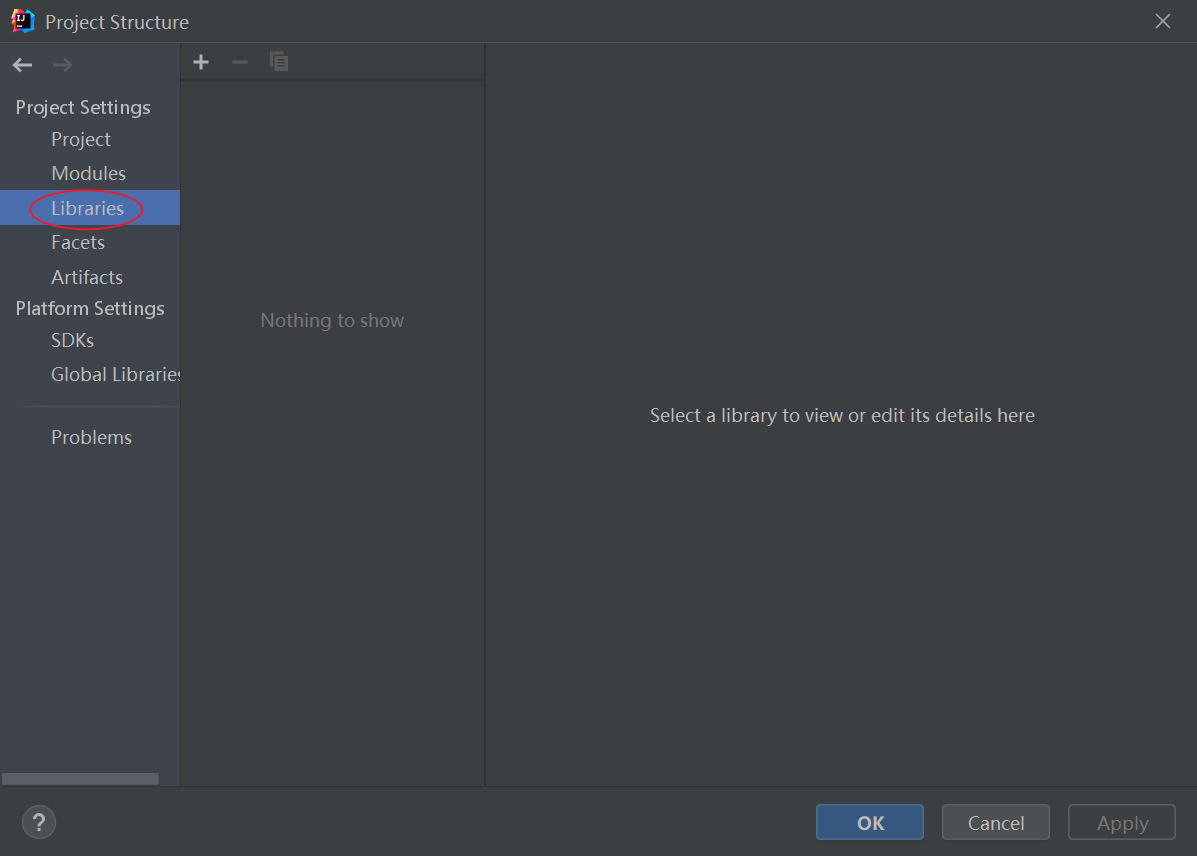
点击+号,新建Java

使用 Spring 框架时,只需将 Spring 的 4 个基础包以及 commons-logging-1.2.jar 包复制到项目的 lib 目录,并发布到类路径中即可。
如下图所示,将这5个包添加进来即可。

先点击Apply,再点击OK即可。

1.3新建两个java文件用来测试
新建两个文件MainApp.java和HelloWorld.java。文件内容如下
MainApp.java
import org.springframework.context.ApplicationContext;
import org.springframework.context.support.ClassPathXmlApplicationContext;

public class MainApp {

    public static void main(String[] args) {

        ApplicationContext context = new ClassPathXmlApplicationContext("Beans.xml");

        HelloWorld obj = (HelloWorld) context.getBean("helloWorld");
        obj.getMessage();
    }
}
HelloWorld.java
public class HelloWorld {
    private String message;
    public void setMessage(String message) {
        this.message = message;
    }
    public void getMessage() {
        System.out.println("message : " + message);
    }
}
此时,项目目录结构如下:

1.4创建Spring配置文件
为啥要创建这个配置文件,要理解这个问题,需要对Spring框架有一些了解。
我们需要创建一个配置文件 Beans.xml 。文件内容如下:
<?xml version="1.0" encoding="UTF-8"?>
<beans xmlns="http://www.springframework.org/schema/beans"
 xmlns:xsi="http://www.w3.org/2001/XMLSchema-instance"
 xsi:schemaLocation="http://www.springframework.org/schema/beans http://www.springframework.org/schema/beans/spring-beans.xsd">

    <bean id="helloWorld" class="HelloWorld">
        <property name="message" value="Hello World!" />
    </bean>

</beans>
此时项目的目录结构如下:

1.5 Project Structure设置
首先我们可以先看下这篇博客来了解一下IDEA中Project Structure设置:玩转IDEA项目结构Project Structure,打Jar包、模块/依赖管理全搞定
点击File-Project Structure,注意设置一下Source文件路径设置,以及Excluded的路径设置。

在上面的页面,点击Facets

继续点击+号,新增一下 Beams.xml

1.6注意看一下iml配置文件
我之前按照上面步骤配置的时候,发现会报错,后面发现是iml配置文件中
有关iml配置文件的了解可以看下面两篇博客:
我的iml配置文件中的内容如下:
<?xml version="1.0" encoding="UTF-8"?>
<module type="JAVA\_MODULE" version="4">
  <component name="FacetManager">
    <facet type="Spring" name="Spring">
      <configuration>
        <fileset id="fileset" name="Spring Application Context" removed="false">
          <file>file://$MODULE_DIR$/Beans.xml</file>
        </fileset>
      </configuration>
    </facet>
  </component>
  <component name="NewModuleRootManager" inherit-compiler-output="true">
    <exclude-output />
    <content url="file://$MODULE\_DIR$">
      <sourceFolder url="file://$MODULE\_DIR$" isTestSource="false" />
      <sourceFolder url="file://$MODULE\_DIR$/src" isTestSource="false" />
    </content>
    <orderEntry type="inheritedJdk" />
    <orderEntry type="sourceFolder" forTests="false" />
    <orderEntry type="library" name="spring-beans-5.2.9.RELEASE" level="project" />
    <orderEntry type="library" name="spring-context-5.2.9.RELEASE" level="project" />
    <orderEntry type="library" name="spring-core-5.2.9.RELEASE" level="project" />
    <orderEntry type="library" name="spring-expression-5.2.9.RELEASE" level="project" />
    <orderEntry type="library" name="commons-logging-1.2" level="project" />
  </component>
</module>
我们可以解析一下这个配置文件:
  <component name="FacetManager">
    <facet type="Spring" name="Spring">
      <configuration>
        <fileset id="fileset" name="Spring Application Context" removed="false">
          <file>file://$MODULE_DIR$/Beans.xml</file>
        </fileset>
      </configuration>
    </facet>
  </component>
这边的配置就是Spring框架的配置
file://
M
O
D
U
L
E
D
I
R
MODULE_DIR
MODULEDIR/Beans.xml,这边的设置就是Spring的配置文件的路径。
    <content url="file://$MODULE\_DIR$">
      <sourceFolder url="file://$MODULE\_DIR$" isTestSource="false" />
      <sourceFolder url="file://$MODULE\_DIR$/src" isTestSource="false" />
    </content>
上面 设置是整个项目的文件结构,源文件的路径。
    <orderEntry type="inheritedJdk" />
    <orderEntry type="sourceFolder" forTests="false" />
    <orderEntry type="library" name="spring-beans-5.2.9.RELEASE" level="project" />
    <orderEntry type="library" name="spring-context-5.2.9.RELEASE" level="project" />
    <orderEntry type="library" name="spring-core-5.2.9.RELEASE" level="project" />
    <orderEntry type="library" name="spring-expression-5.2.9.RELEASE" level="project" />
    <orderEntry type="library" name="commons-logging-1.2" level="project" />
上面这些则是Spring框架的jar包。
一般如果我们配置正常的话,我们其实是可以不用管iml配置文件的。如果不能正常运行,那我们可能就要检查一下。
1.7看是否能否正常运行

如上图所示,则是运行成功了!
1.8可能会出现的问题
我在此过程中,出现过下面几种错误。
运行之后,报错信息如下:
Exception in thread "main" org.springframework.beans.factory.BeanDefinitionStoreException: IOException parsing XML document from class path resource [Beans.xml]; nested exception is java.io.FileNotFoundException: class path resource [Beans.xml] cannot be opened because it does not exist
at org.springframework.beans.factory.xml.XmlBeanDefinitionReader.loadBeanDefinitions(XmlBeanDefinitionReader.java:342)
at org.springframework.beans.factory.xml.XmlBeanDefinitionReader.loadBeanDefinitions(XmlBeanDefinitionReader.java:310)
at org.springframework.beans.factory.support.AbstractBeanDefinitionReader.loadBeanDefinitions(AbstractBeanDefinitionReader.java:188)
at org.springframework.beans.factory.support.AbstractBeanDefinitionReader.loadBeanDefinitions(AbstractBeanDefinitionReader.java:224)
at org.springframework.beans.factory.support.AbstractBeanDefinitionReader.loadBeanDefinitions(AbstractBeanDefinitionReader.java:195)
at org.springframework.beans.factory.support.AbstractBeanDefinitionReader.loadBeanDefinitions(AbstractBeanDefinitionReader.java:257)
at org.springframework.context.support.AbstractXmlApplicationContext.loadBeanDefinitions(AbstractXmlApplicationContext.java:128)
at org.springframework.context.support.AbstractXmlApplicationContext.loadBeanDefinitions(AbstractXmlApplicationContext.java:94)
at org.springframework.context.support.AbstractRefreshableApplicationContext.refreshBeanFactory(AbstractRefreshableApplicationContext.java:130)
at org.springframework.context.support.AbstractApplicationContext.obtainFreshBeanFactory(AbstractApplicationContext.java:638)
at org.springframework.context.support.AbstractApplicationContext.refresh(AbstractApplicationContext.java:523)
at org.springframework.context.support.ClassPathXmlApplicationContext.<init>(ClassPathXmlApplicationContext.java:144)
at org.springframework.context.support.ClassPathXmlApplicationContext.<init>(ClassPathXmlApplicationContext.java:85)
at MainApp.main(MainApp.java:8)
Caused by: java.io.FileNotFoundException: class path resource [Beans.xml] cannot be opened because it does not exist
at org.springframework.core.io.ClassPathResource.getInputStream(ClassPathResource.java:180)
# 最后总结
搞定算法,面试字节再不怕,有需要文章中分享的这些**二叉树、链表、字符串、栈和队列等等各大面试高频知识点及解析**
最后再分享一份**终极手撕架构的大礼包(学习笔记):分布式+微服务+开源框架+性能优化**

nApp.java:8)
Caused by: java.io.FileNotFoundException: class path resource [Beans.xml] cannot be opened because it does not exist
at org.springframework.core.io.ClassPathResource.getInputStream(ClassPathResource.java:180)
# 最后总结
搞定算法,面试字节再不怕,有需要文章中分享的这些**二叉树、链表、字符串、栈和队列等等各大面试高频知识点及解析**
最后再分享一份**终极手撕架构的大礼包(学习笔记):分布式+微服务+开源框架+性能优化**
[外链图片转存中...(img-uszOMduq-1714299500660)]
> **本文已被[CODING开源项目:【一线大厂Java面试题解析+核心总结学习笔记+最新讲解视频+实战项目源码】](https://bbs.csdn.net/topics/618154847)收录**


 8568
8568


 被折叠的 条评论
为什么被折叠?
被折叠的 条评论
为什么被折叠?
 到【灌水乐园】发言


