


(1)创建实例对象Customer对象
在domain包下先创建
package com.itzheng.ssh.domain;
/*
- 客户管理的实体类、
CREATE TABLE cst_customer (
cust_id bigint(32) NOT NULL AUTO_INCREMENT COMMENT ‘客户编号(主键)’,
cust_name varchar(32) NOT NULL COMMENT ‘客户名称(公司名称)’,
cust_source varchar(32) DEFAULT NULL COMMENT ‘客户信息来源’,
cust_industry varchar(32) DEFAULT NULL COMMENT ‘客户所属行业’,
cust_level varchar(32) DEFAULT NULL COMMENT ‘客户级别’,
cust_phone varchar(64) DEFAULT NULL COMMENT ‘固定电话’,
cust_mobile varchar(16) DEFAULT NULL COMMENT ‘移动电话’,
PRIMARY KEY (cust_id)
) ENGINE=InnoDB AUTO_INCREMENT=1 DEFAULT CHARSET=utf8;
*/
public class Customer {
private Long cust_id;
private String cust_name;
private String cust_source;
private String cust_industry;
private String cust_level;
private String cust_phone;
private String cust_mobile;
public Long getCust_id() {
return cust_id;
}
public void setCust_id(Long cust_id) {
this.cust_id = cust_id;
}
public String getCust_name() {
return cust_name;
}
public void setCust_name(String cust_name) {
this.cust_name = cust_name;
}
public String getCust_source() {
return cust_source;
}
public void setCust_source(String cust_source) {
this.cust_source = cust_source;
}
public String getCust_industry() {
return cust_industry;
}
public void setCust_industry(String cust_industry) {
this.cust_industry = cust_industry;
}
public String getCust_level() {
return cust_level;
}
public void setCust_level(String cust_level) {
this.cust_level = cust_level;
}
public String getCust_phone() {
return cust_phone;
}
public void setCust_phone(String cust_phone) {
this.cust_phone = cust_phone;
}
public String getCust_mobile() {
return cust_mobile;
}
public void setCust_mobile(String cust_mobile) {
this.cust_mobile = cust_mobile;
}
public Customer() {
// TODO Auto-generated constructor stub
}
public Customer(Long cust_id, String cust_name, String cust_source, String cust_industry, String cust_level,
String cust_phone, String cust_mobile) {
super();
this.cust_id = cust_id;
this.cust_name = cust_name;
this.cust_source = cust_source;
this.cust_industry = cust_industry;
this.cust_level = cust_level;
this.cust_phone = cust_phone;
this.cust_mobile = cust_mobile;
}
@Override
public String toString() {
return “Customer [cust_id=” + cust_id + “, cust_name=” + cust_name + “, cust_source=” + cust_source
-
“, cust_industry=” + cust_industry + “, cust_level=” + cust_level + “, cust_phone=” + cust_phone
-
“, cust_mobile=” + cust_mobile + “]”;
}
}
(2)在web.action当中创建一个action
package com.itzheng.ssh.web.action;
import com.itzheng.ssh.domain.Customer;
import com.opensymphony.xwork2.ActionSupport;
import com.opensymphony.xwork2.ModelDriven;
/*
- 客户管理的action的类
*/
public class CustomerAction extends ActionSupport implements ModelDriven{
//模型驱动使用的对象
private Customer customer = new Customer();
@Override
public Customer getModel() {
// TODO Auto-generated method stub
return customer;
}
}
(3)创建CustomerService接口以及CustomerServiceImpl实现类(空的即可)
package com.itzheng.ssh.service;
/*
- 客户管理的业务层的接口
*/
public interface CustomerService {
}
package com.itzheng.ssh.service.impl;
import com.itzheng.ssh.service.CustomerService;
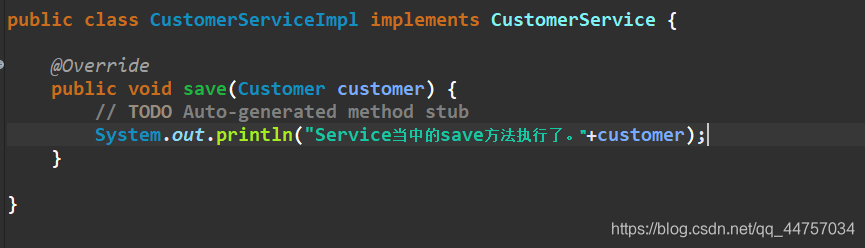
public class CustomerServiceImpl implements CustomerService {
}
(4)创建CustomerDao接口以及CustomerDaoImpl实现类(空的即可)
package com.itzheng.ssh.dao;
/*
- 客户管理DAO层的接口
*/
public interface CustomerDao {
}
package com.itzheng.ssh.dao.impl;
import com.itzheng.ssh.dao.CustomerDao;
/*
- 客户管理的DAO层的实现类
*/
public class CustomerDaoUmpl implements CustomerDao {
}
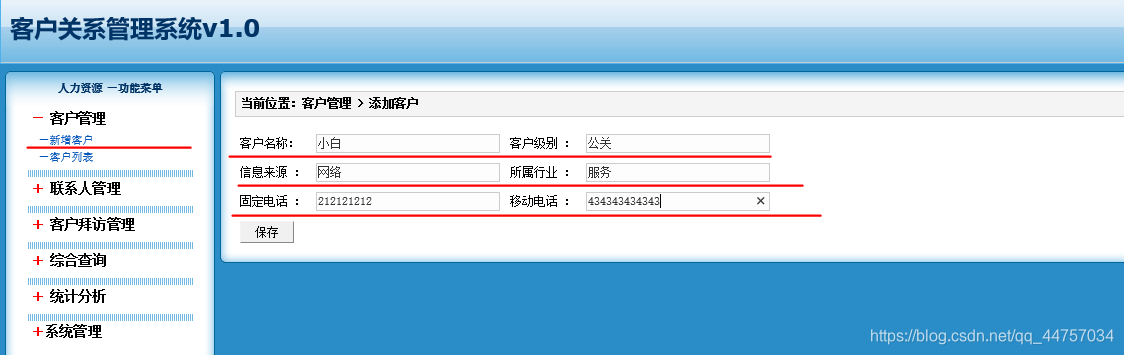
5、第五步:引入相关的页面
这里引入的是提前写好的jsp页面
页面下载链接:https://download.csdn.net/download/qq_44757034/12615556
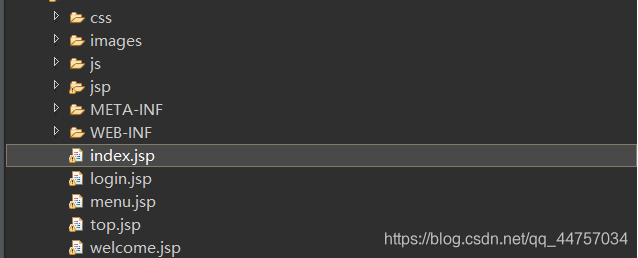
6、第六步:修改jsp页面
(1)修改menu.jsp


7、第七步:Spring整合Struts2方式一:Action由Struts2自身来创建的。
修改add.jsp页面,提交数据到action
(1)编写action
package com.itzheng.ssh.web.action;
import com.itzheng.ssh.domain.Customer;
import com.opensymphony.xwork2.ActionSupport;
import com.opensymphony.xwork2.ModelDriven;
/*
- 客户管理的action的类
*/
public class CustomerAction extends ActionSupport implements ModelDriven{
//模型驱动使用的对象
private Customer customer = new Customer();
@Override
public Customer getModel() {
// TODO Auto-generated method stub
return customer;
}
/*
- 保存客户的方法:save
*/
public String save() {
System.out.println(“Action当中的save方法执行类。。。。。”);
return NONE;
}
}
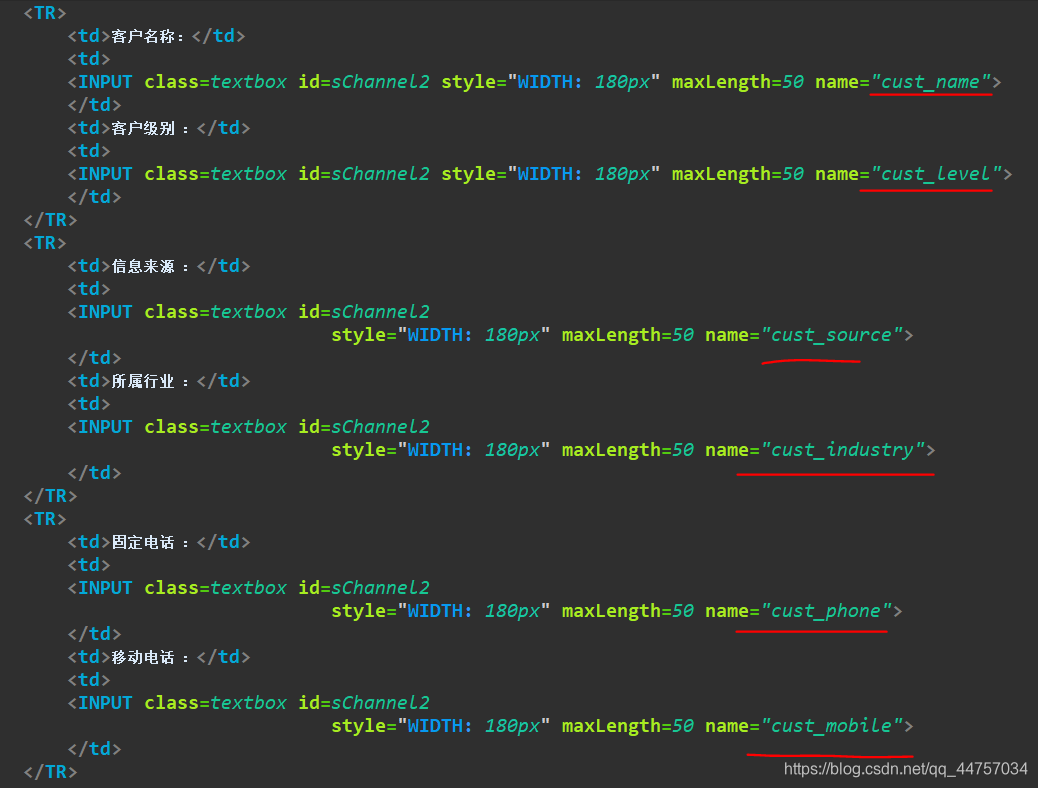
(2) 设置add.jsp表单当中属性

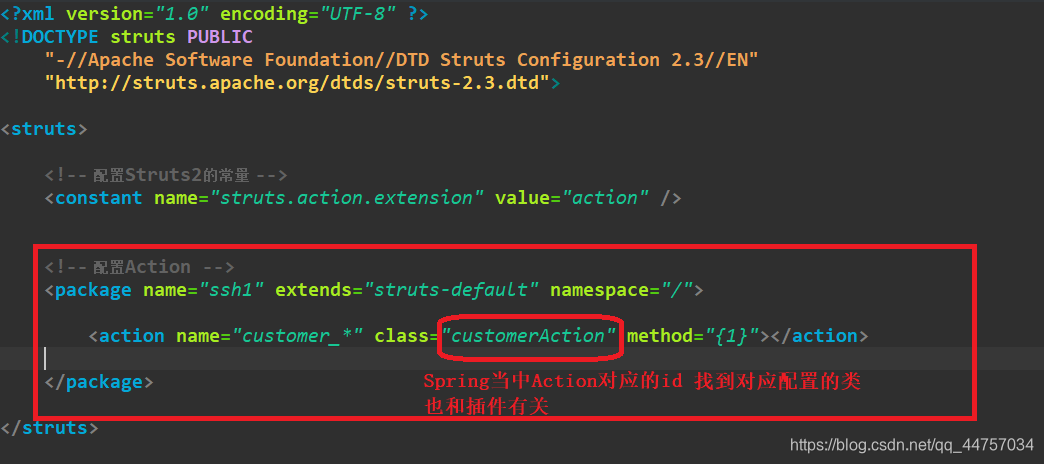
(3) 配置Action
在struts.xml当中配置

(4) 在Action当中引入service
- a、传统方式:
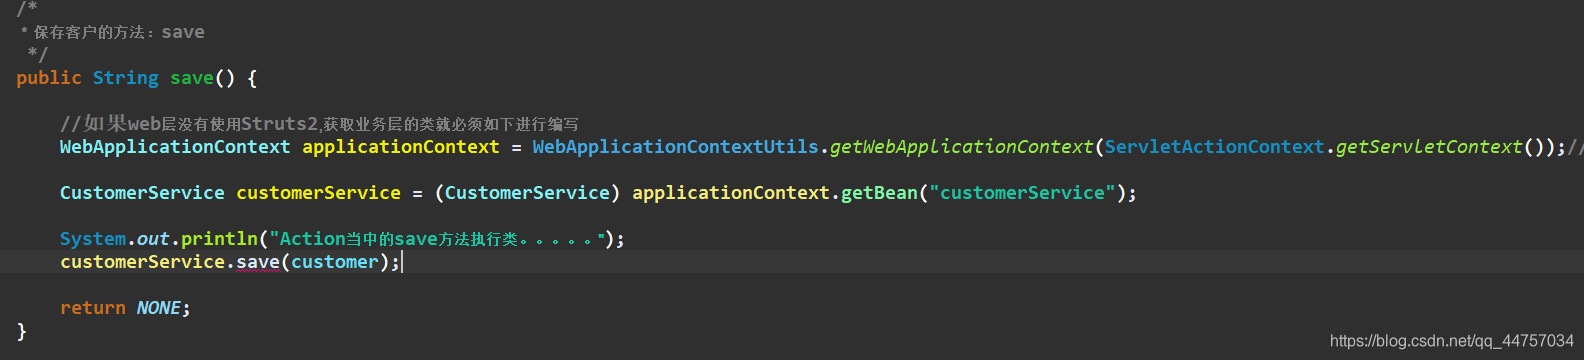
- b、进行Spring和Struts2的整合:
引入struts-spring-plugin.jar这个jar包
下面是包名称和包路径
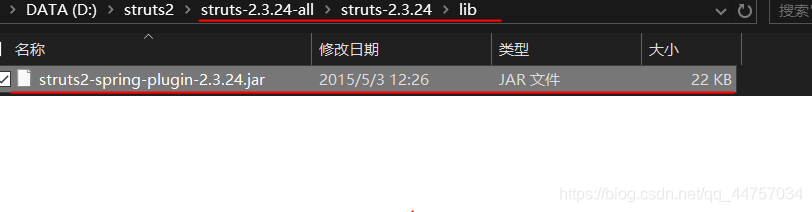
在这个插件包当有如下的一段配置:以下是jar当中配置文件位置
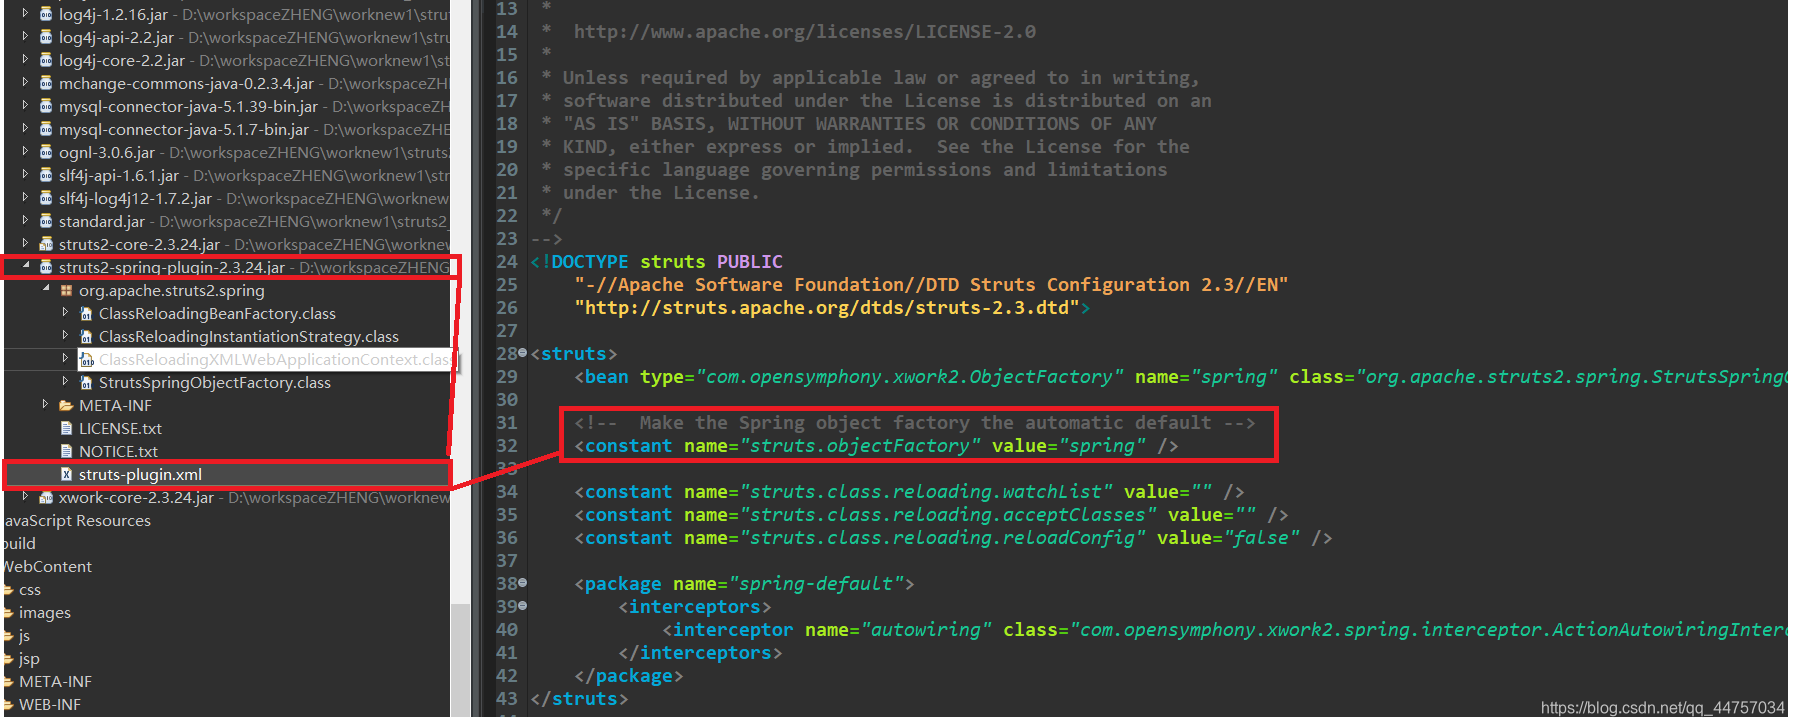
在struts-plugin.xml当中有这一段配置
以上的一段配置的作用是开启一个常量:在Struts中只有开启了这个常量就会引发下面的一些常量生效。
struts.objectFactory.Spring.autoWire = name:自动注入
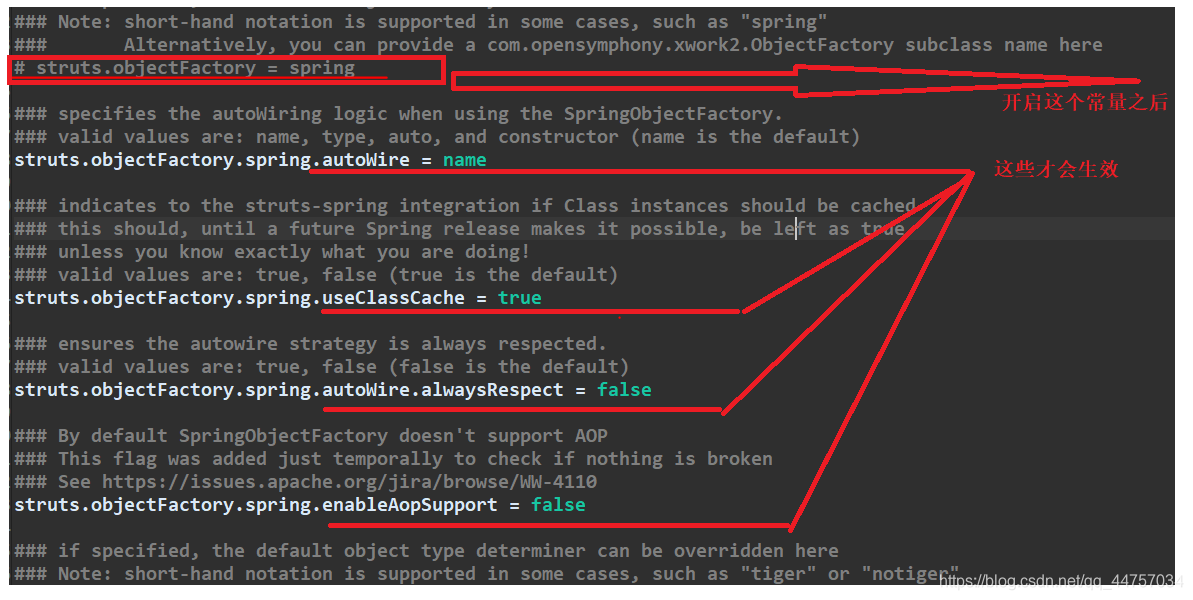
-
struts.objectFactory.Spring.autoWire = name:可以让Action自动完成Service的注入
-
c、将Service交给Spring管理
在applicationContext.xml当中

- d、Action注入Service在引入插件包之后,在配置文件当中将当前类交给Spring管理,然后只需要设置对应接口的的属性声明和set方法就可以实现属性的自动注入
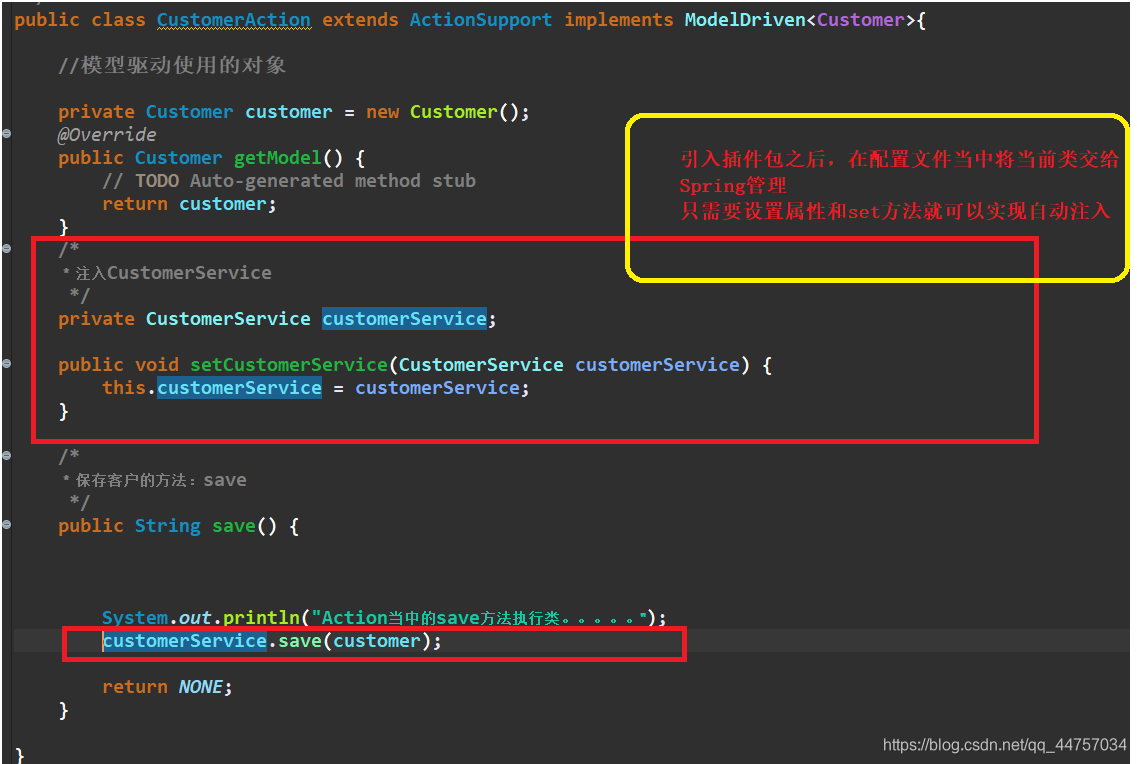
- d、测试:

8、第八步:Spring整合Struts2方式二:Action交给Spring管理(推荐)Spring管理的类可以进行AOP开发
(1)引入插件包
引入struts-spring-pligin.jar
(2)将Action交给Spring,在applicationContext.xml当中

(3)在struts.xml的配置文件当中配置Action,要让Struts使用Spring配置的Action
(4)注意:
- 需要配置Action为多例的;在applicationContext.xml当中

- 需要手动注入Service在applicationContext.xml当中

(5)测试:
9、第九步:Service调用DAO
(1)将DAO交给Spring管理
配置dao在applicationContext.xml当中

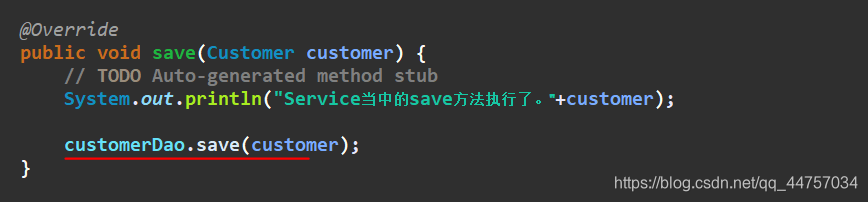
(2)在service注入DAO
- 在CustomerServiceImpl类当中设置CustomerDao属性和set方法

- 在applicationContext.xml当中将customerDao注入到CustomerServiceImpl的set方法当中

- 在CustomerServiceImpl类的save方法当中调用dao的save方法
10、第十步:Spring整合Hibernate框架
(1)创建数据库和表
CREATE DATABASE ssh1;
use ssh1;
CREATE TABLE cst_customer (
cust_id bigint(32) NOT NULL AUTO_INCREMENT COMMENT ‘客户编号(主键)’,
cust_name varchar(32) NOT NULL COMMENT ‘客户名称(公司名称)’,
cust_source varchar(32) DEFAULT NULL COMMENT ‘客户信息来源’,
cust_industry varchar(32) DEFAULT NULL COMMENT ‘客户所属行业’,
cust_level varchar(32) DEFAULT NULL COMMENT ‘客户级别’,
cust_phone varchar(64) DEFAULT NULL COMMENT ‘固定电话’,
cust_mobile varchar(16) DEFAULT NULL COMMENT ‘移动电话’,
PRIMARY KEY (cust_id)
) ENGINE=InnoDB AUTO_INCREMENT=1 DEFAULT CHARSET=utf8;
(2) 编写实体和映射
实体在上面已经创建过
- 创建映射在domain下创建Customer.hbm.xml文件
<class name=“com.itzheng.ssh.domain.Customer”
table=“cst_customer”>
- 在hibernate.cfg.xml当中引入映射文件

(3)Spring和Hibernate的整合
最后
分享一些系统的面试题,大家可以拿去刷一刷,准备面试涨薪。
这些面试题相对应的技术点:
- JVM
- MySQL
- Mybatis
- MongoDB
- Redis
- Spring
- Spring boot
- Spring cloud
- Kafka
- RabbitMQ
- Nginx
- …
大类就是:
- Java基础
- 数据结构与算法
- 并发编程
- 数据库
- 设计模式
- 微服务
- 消息中间件


)(3)Spring和Hibernate的整合
最后
分享一些系统的面试题,大家可以拿去刷一刷,准备面试涨薪。
这些面试题相对应的技术点:
- JVM
- MySQL
- Mybatis
- MongoDB
- Redis
- Spring
- Spring boot
- Spring cloud
- Kafka
- RabbitMQ
- Nginx
- …
大类就是:
- Java基础
- 数据结构与算法
- 并发编程
- 数据库
- 设计模式
- 微服务
- 消息中间件
[外链图片转存中…(img-fUMqN1Iv-1714476056132)]
[外链图片转存中…(img-IX8xqhxl-1714476056132)]
[外链图片转存中…(img-9SwkxhD2-1714476056132)]
[外链图片转存中…(img-9CP0iF6W-1714476056133)]
[外链图片转存中…(img-rypQ7UOg-1714476056133)]
[外链图片转存中…(img-sLBe6BjO-1714476056133)]
[外链图片转存中…(img-EoGr457J-1714476056133)]
[外链图片转存中…(img-XU6dwUdM-1714476056134)]
[外链图片转存中…(img-co8SJi3B-1714476056134)]


 563
563


 被折叠的 条评论
为什么被折叠?
被折叠的 条评论
为什么被折叠?
 到【灌水乐园】发言


