


先自我介绍一下,小编浙江大学毕业,去过华为、字节跳动等大厂,目前阿里P7
深知大多数程序员,想要提升技能,往往是自己摸索成长,但自己不成体系的自学效果低效又漫长,而且极易碰到天花板技术停滞不前!
因此收集整理了一份《2024年最新Android移动开发全套学习资料》,初衷也很简单,就是希望能够帮助到想自学提升又不知道该从何学起的朋友。


既有适合小白学习的零基础资料,也有适合3年以上经验的小伙伴深入学习提升的进阶课程,涵盖了95%以上Android开发知识点,真正体系化!
由于文件比较多,这里只是将部分目录截图出来,全套包含大厂面经、学习笔记、源码讲义、实战项目、大纲路线、讲解视频,并且后续会持续更新
如果你需要这些资料,可以添加V获取:vip204888 (备注Android)

正文
actual fun timeout(): Timeout
actual fun close()
}
actual interface Sink {
actual fun write(source: Buffer, byteCount: Long)
actual fun flush()
actual fun timeout(): Timeout
actual fun close()
}
这两个接口方法比较少,基本一个读一个写一个超时,没了。。
当然在实际使用中基本不需要你去实现这两个接口,我们可以通过Okio.source()和Okio.sink()来获取对应的输入流和输出流对象,其中Okio.source()可以接收File、InputStream以及Socket等作为输入源:
Okio.source(File file);
Okio.source(InputStream in);
Okio.source(Socket socket);
Okio.source(Path path, OpenOption… options);
类似的,Okio.sink()也接受这几种对象源生成对应输出流对象
Okio.sink(File file);
Okio.appendingSink(File file);//内容可追加
Okio.sink(OutputStream out);
Okio.sink(Socket socket);
Okio.sink(Path path, OpenOption… options);
看一下Okio.source()内部实现
fun File.source(): Source = inputStream().source()
fun InputStream.source(): Source = InputStreamSource(this, Timeout())
fun Socket.source(): Source {
val timeout = SocketAsyncTimeout(this)
val source = InputStreamSource(getInputStream(), timeout)
return timeout.source(source)
}
可以看到Okio.source()内部生成的是一个InputStreamSource对象,这个是啥呢?
private class InputStreamSource(
private val input: InputStream,
private val timeout: Timeout
) : Source {
override fun read(sink: Buffer, byteCount: Long): Long {
if (byteCount == 0L) return 0
require(byteCount >= 0) { “byteCount < 0: $byteCount” }
try {
timeout.throwIfReached()
val tail = sink.writableSegment(1)
val maxToCopy = minOf(byteCount, Segment.SIZE - tail.limit).toInt()
//从输入流读到sink buffer的尾节点segment对象中
val bytesRead = input.read(tail.data, tail.limit, maxToCopy)
if (bytesRead == -1) return -1
tail.limit += bytesRead
sink.size += bytesRead
return bytesRead.toLong()
} catch (e: AssertionError) {
if (e.isAndroidGetsocknameError) throw IOException(e)
throw e
}
}
override fun close() = input.close()
override fun timeout() = timeout
override fun toString() = “source($input)”
}
其实就是Source接口的一个内部实现类,同时具备输入源的InputStream对象和一个超时对象,然后内部是调用的是java的InputStream的read方法进行读取操作,类似的Okio.sink()内部也会返回一个实现Sink接口的内部实现类OutputStreamSink。
在我们通过Okio.source()和Okio.sink()获取了Souce和Sink对象后,一般不会直接使用,而是会再调用一次Okio.buffer()生成一个实现BufferedSource和BufferedSink接口的对象:
fun Source.buffer(): BufferedSource = RealBufferedSource(this)
fun Sink.buffer(): BufferedSink = RealBufferedSink(this)
内部分别返回的是RealBufferedSource和RealBufferedSink对象,他们分别实现了BufferedSource和BufferedSink接口,而这两个接口则是分别继承了Source和Sink接口的并基础上进行了方法扩展,提供了丰富的读写接口方法,几乎可以对各种基础数据类型进行读写。
为了更好的理解,直接来看一下Source和Sink家族类的UML关系图:
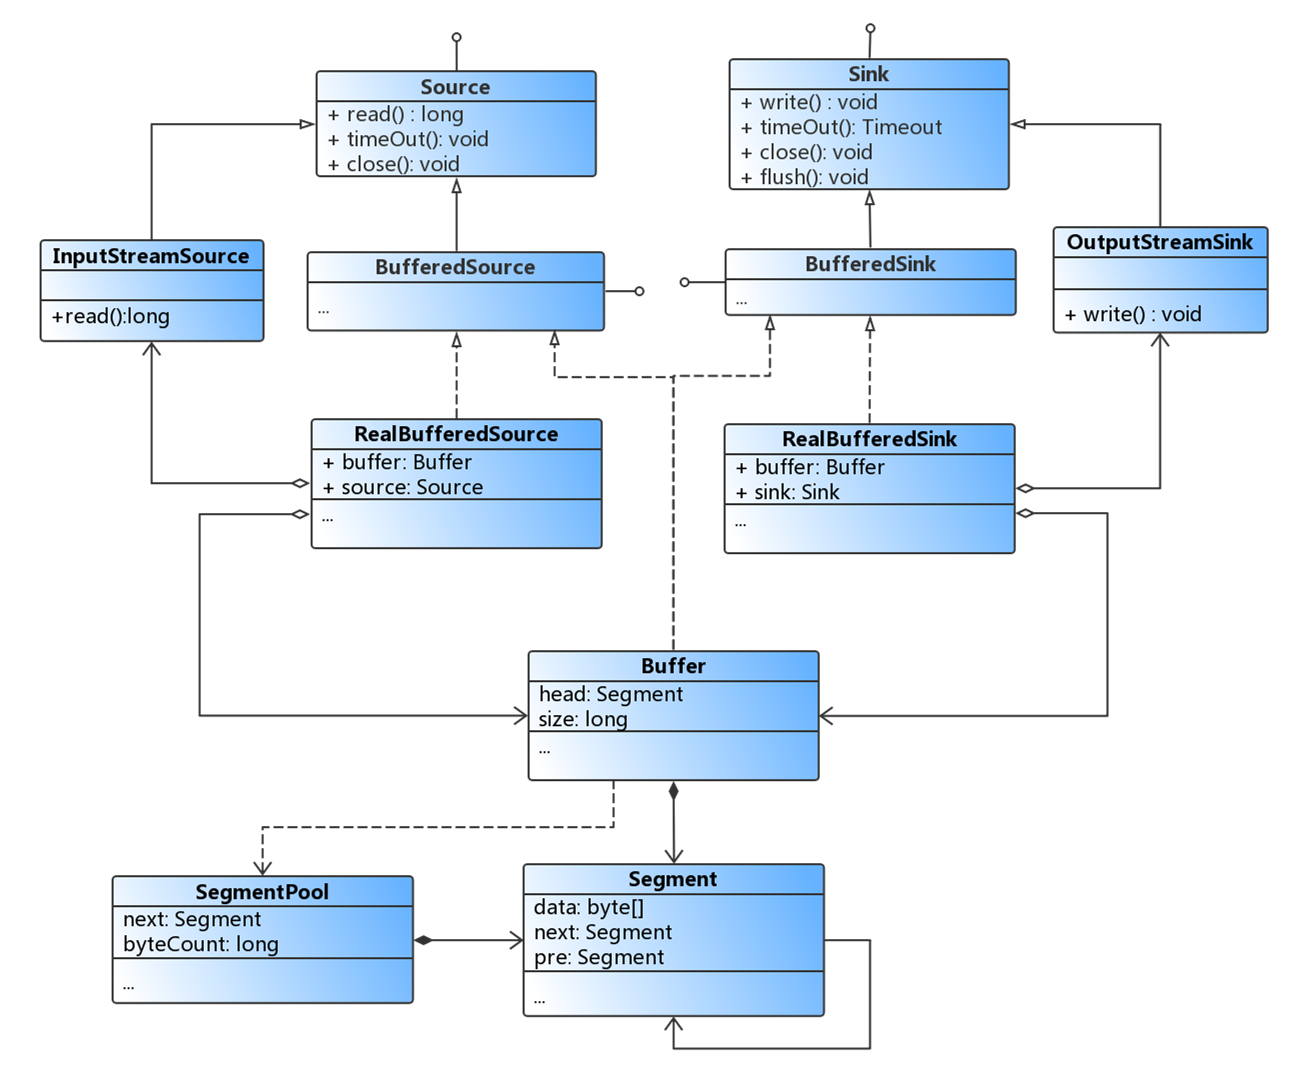
RealBufferedSource和RealBufferedSink其实就是两个装饰者对象,除了分别实现BufferedSource和BufferedSink接口外,内部还分别持有Source和Sink对象,另外这两个Real实现类中都持有了一个Okio的Buffer对象。我们拿到Okio.buffer()返回的BufferedSource和BufferedSink接口就可以进行实际的IO操作了。
而在RealBufferedSource和RealBufferedSink类中实现的read以及write等众多方法,内部则最终都是调用的buffer对象的方法:
override fun read(sink: ByteArray, offset: Int, byteCount: Int): Int {
checkOffsetAndCount(sink.size.toLong(), offset.toLong(), byteCount.toLong())
//如果buffer的数据为空,则先调用被装饰的对象(也就是InputStreamSource)将数据读到buffer当中
if (buffer.size == 0L) {
val read = source.read(buffer, Segment.SIZE.toLong())
if (read == -1L) return -1
}
val toRead = minOf(byteCount, buffer.size).toInt()
return buffer.read(sink, offset, toRead)
}
override fun write(source: ByteArray): BufferedSink {
check(!closed) { “closed” }
buffer.write(source)
return emitCompleteSegments()
}
此外,Sink和Source它门还各自有一个支持gzip压缩的实现类GzipSink和GzipSource;一个具有委托功能的抽象类ForwardingSink和ForwardingSource;还有一个实现类便是InflaterSource和DeflaterSink,这两个类主要用于压缩,为GzipSink和GzipSource服务,这里就不详细看了。Sink和Source还有其他的类,如HashingSink, HashingSource, 也是装饰者,这里就不一一列举了,其实Okio的Source和Sink装饰者家族类似于java的InputStream和OutStream家族。
Segment
在前面的RealBufferedSource和RealBufferedSink的读写方法中都是调用buffer对象进行操作的,但其实Buffer类的内部读写对象则最终是Segment对象,因此要想了解Buffer的机制首先要了解一下Segment,Segment是Buffer的核心依赖对象,也是Okio中最底层数据的持有者。
在Buffer中的每一个Segment都是双向循环链表中的一个节点,该节点分别拥有指向前驱节点的Segment对象引用以及指向后驱节点的Segment对象引用。而在Segment池中的Segment则是一个单向链表的节点,Segment池持有对下一个Segment节点对象的引用。如果Segment中的字节数据是在buffer和byte string间共享的,那么该Segment对象是不可以被回收的,也是不能修改其中的数据的,除非是它的持有者。
其实Segment的源码注释都写的很清楚了,直接贴出来看一下好了:
/**
-
A segment of a buffer.
-
Each segment in a buffer is a circularly-linked list node referencing the following and
-
preceding segments in the buffer.
-
Each segment in the pool is a singly-linked list node referencing the rest of segments in the
-
pool.
-
The underlying byte arrays of segments may be shared between buffers and byte strings. When a
-
segment’s byte array is shared the segment may not be recycled, nor may its byte data be changed.
-
The lone exception is that the owner segment is allowed to append to the segment, writing data at
-
{@code limit} and beyond. There is a single owning segment for each byte array. Positions,
-
limits, prev, and next references are not shared.
*/
final class Segment {
/** The size of all segments in bytes. */
static final int SIZE = 8192;
/** Segments will be shared when doing so avoids {@code arraycopy()} of this many bytes. */
static final int SHARE_MINIMUM = 1024;
final byte[] data;
/** The next byte of application data byte to read in this segment. */
int pos;
/** The first byte of available data ready to be written to. */
int limit;
/** True if other segments or byte strings use the same byte array. */
boolean shared;
/** True if this segment owns the byte array and can append to it, extending {@code limit}. */
boolean owner;
/** Next segment in a linked or circularly-linked list. */
Segment next;
/** Previous segment in a circularly-linked list. */
Segment prev;
Segment() {
this.data = new byte[SIZE];
this.owner = true;
this.shared = false;
}
Segment(Segment shareFrom) {
this(shareFrom.data, shareFrom.pos, shareFrom.limit);
shareFrom.shared = true;
}
Segment(byte[] data, int pos, int limit) {
this.data = data;
this.pos = pos;
this.limit = limit;
this.owner = false;
this.shared = true;
}
/**
-
Removes this segment of a circularly-linked list and returns its successor.
-
Returns null if the list is now empty.
*/
public @Nullable Segment pop() {
Segment result = next != this ? next : null;
prev.next = next;
next.prev = prev;
next = null;
prev = null;
return result;
}
/**
-
Appends {@code segment} after this segment in the circularly-linked list.
-
Returns the pushed segment.
*/
public Segment push(Segment segment) {
segment.prev = this;
segment.next = next;
next.prev = segment;
next = segment;
return segment;
}
/**
-
Splits this head of a circularly-linked list into two segments. The first
-
segment contains the data in {@code [pos…pos+byteCount)}. The second
-
segment contains the data in {@code [pos+byteCount…limit)}. This can be
-
useful when moving partial segments from one buffer to another.
-
Returns the new head of the circularly-linked list.
*/
public Segment split(int byteCount) {
if (byteCount <= 0 || byteCount > limit - pos) throw new IllegalArgumentException();
Segment prefix;
// We have two competing performance goals:
// - Avoid copying data. We accomplish this by sharing segments.
// - Avoid short shared segments. These are bad for performance because they are readonly and
// may lead to long chains of short segments.
// To balance these goals we only share segments when the copy will be large.
if (byteCount >= SHARE_MINIMUM) {
prefix = new Segment(this);
} else {
prefix = SegmentPool.take();
System.arraycopy(data, pos, prefix.data, 0, byteCount);
}
prefix.limit = prefix.pos + byteCount;
pos += byteCount;
prev.push(prefix);
return prefix;
}
/**
-
Call this when the tail and its predecessor may both be less than half
-
full. This will copy data so that segments can be recycled.
*/
public void compact() {
if (prev == this) throw new IllegalStateException();
if (!prev.owner) return; // Cannot compact: prev isn’t writable.
int byteCount = limit - pos;
int availableByteCount = SIZE - prev.limit + (prev.shared ? 0 : prev.pos);
if (byteCount > availableByteCount) return; // Cannot compact: not enough writable space.
writeTo(prev, byteCount);
pop();
SegmentPool.recycle(this);
}
/** Moves {@code byteCount} bytes from this segment to {@code sink}. */
public void writeTo(Segment sink, int byteCount) {
if (!sink.owner) throw new IllegalArgumentException();
if (sink.limit + byteCount > SIZE) {
// We can’t fit byteCount bytes at the sink’s current position. Shift sink first.
if (sink.shared) throw new IllegalArgumentException();
if (sink.limit + byteCount - sink.pos > SIZE) throw new IllegalArgumentException();
System.arraycopy(sink.data, sink.pos, sink.data, 0, sink.limit - sink.pos);
sink.limit -= sink.pos;
sink.pos = 0;
}
System.arraycopy(data, pos, sink.data, sink.limit, byteCount);
sink.limit += byteCount;
pos += byteCount;
}
}
首先,Segment中有几个成员变量:Segment.SIZE这个值是8192,也就是8kb, 是一个Segment对象能处理的数据的大小,byte[] data这个就是真正的存储数据的字节数组,pos这个是读取数据的起始位置,limit是写数据的起始位置,shared表示当前Segment的字节数组data是否可以共享的,owner表示当前Segment是否是data对象的持有者(只有data对象的持有者才能对data进行修改), 只有share为false即表示owner为true是当前的持有者。这里有个概念就是share “共享”,Segment中的data数组是可以在Buffer和ByteString对象之间共享的,怎么来确认这个共享呢,我们看到Segment对象有三个构造函数,其中有参的构造函数:
Segment(Segment shareFrom) {
this(shareFrom.data, shareFrom.pos, shareFrom.limit);
shareFrom.shared = true;
}
Segment(byte[] data, int pos, int limit) {
this.data = data;
this.pos = pos;
this.limit = limit;
this.owner = false;
this.shared = true;
}
也就是通过外部传递Segment对象和data数组的方式构造出来的Segment就是共享的,而默认的构造函数:
Segment() {
this.data = new byte[SIZE];
this.owner = true;
this.shared = false;
}
这样出来的就是不共享的Segment对象。
继续,next和prev就是分别代表后继节点和前驱节点的对象,并以此来形成双向链表,那么怎么形成的双向链表呢?就是通过调用push方法,具体先放着,后面看Buffer的时候再细看。Segment中的主要方法为pop()、push()、split()、compact(),其中pop()方法的作用是将当前的Segment对象从双向链表中移除,并返回链表中的下一个结点作为头结点,而push()方法的作用则是在双向链表中当前结点的后面插入一个新的Segment结点对象,并移动next指向新插入的结点。后面两个方法主要是对Segment进行分割和合并,
提到Segment,还有一个与之相关的类SegmentPool类:
/**
-
A collection of unused segments, necessary to avoid GC churn and zero-fill.
-
This pool is a thread-safe static singleton.
*/
final class SegmentPool {
/** The maximum number of bytes to pool. */
// TODO: Is 64 KiB a good maximum size? Do we ever have that many idle segments?
static final long MAX_SIZE = 64 * 1024; // 64 KiB.
/** Singly-linked list of segments. */
static @Nullable Segment next;
/** Total bytes in this pool. */
static long byteCount;
private SegmentPool() {
}
static Segment take() {
synchronized (SegmentPool.class) {
if (next != null) {
Segment result = next;
next = result.next;
result.next = null;
byteCount -= Segment.SIZE;
return result;
}
}
return new Segment(); // Pool is empty. Don’t zero-fill while holding a lock.
}
static void recycle(Segment segment) {
if (segment.next != null || segment.prev != null) throw new IllegalArgumentException();
if (segment.shared) return; // This segment cannot be recycled.
synchronized (SegmentPool.class) {
if (byteCount + Segment.SIZE > MAX_SIZE) return; // Pool is full.
byteCount += Segment.SIZE;
segment.next = next;
segment.pos = segment.limit = 0;
next = segment;
}
}
}
SegmentPool可以理解为一个缓存Segment的池,它只有两个方法,一个take(),一个recycle(),在SegmentPool中维护的是一个Segment 的单链表,并且它的最大值为MAX_SIZE = 64 * 1024也就是64kb即8个Segment的长度,next就是单链表中的头结点。
take()方法的作用是取出单链表的头结点Segment对象,然后将取出的对象与链表断开并将链表往后移动一个单位,如果是第一次调用take, next为null, 则会直接new一个Segment对象返回,并且这里创建的Segment是不共享的。
recycle()方法的作用则是回收一个Segment对象,被回收的Segment对象将会被插入到SegmentPool中的单链表的头部,以便后面继续复用,并且这里源码我们也可以看到如果是shared的对象是不处理的,如果是第一次调用recycle()方法则链表会由空变为拥有一个节点的链表, 每次回收就会插入一个到表头,直到超过最大容量。
Buffer
如果你只看Segment的话还是很难理解整个数据的读写流程,因为你只知道它是能够形成一个链表的东西,但是当你看完Buffer之后完整的流程就会清晰多了。
Buffer类是Okio中最核心并且最丰富的类了,前面分析发现最终的Source和Sink实现对象中,都是通过该类完成读写操作,而Buffer类同时实现了BufferedSource和BufferedSink接口,因此Buffer具备Okio中的读和写的所有方法,所以这个类的方法超多!我们只找一个读和写的方法来看一下实现好了。
写byte[]操作:
@Override
public Buffer write(byte[] source, int offset, int byteCount) {
if (source == null) throw new IllegalArgumentException(“source == null”);
// 检测参数的合法性
checkOffsetAndCount(source.length, offset, byteCount);
// 计算 source 要写入的最后一个字节的 index 值
int limit = offset + byteCount;
while (offset < limit) {
// 获取循环链表尾部的一个 Segment
Segment tail = writableSegment(1);
// 计算最多可写入的字节
int toCopy = Math.min(limit - offset, Segment.SIZE - tail.limit);
// 把 source 复制到 data 中
System.arraycopy(source, offset, tail.data, tail.limit, toCopy);
// 调整写入的起始位置
offset += toCopy;
// 调整尾部Segment 的 limit 位置
tail.limit += toCopy;
}
// 调整 Buffer 的 size 大小
size += byteCount;
return this;
}
写操作内部是调用System.arraycopy进行字节数组的复制,这里是写到tail对象,也就是循环链表的链尾Segment对象当中,而且这里会不断循环的获取链尾Segment对象进行写入。
看一下获取链尾的方法:
/**
-
Returns a tail segment that we can write at least {@code minimumCapacity}
-
bytes to, creating it if necessary.
*/
Segment writableSegment(int minimumCapacity) {
if (minimumCapacity < 1 || minimumCapacity > Segment.SIZE) throw new IllegalArgumentException();
// 如果链表的头指针为null,就会SegmentPool中取出一个
if (head == null) {
head = SegmentPool.take(); // Acquire a first segment.
return head.next = head.prev = head;
}
// 获取前驱结点,也就是尾部结点
Segment tail = head.prev;
// 如果能写的字节数限制超过了8192,或者不是拥有者
if (tail.limit + minimumCapacity > Segment.SIZE || !tail.owner) {
// 从SegmentPool中获取一个Segment,插入到循环双链表当前结点的后面
tail = tail.push(SegmentPool.take()); // Append a new empty segment to fill up.
}
return tail;
}
这里有个head对象,就是Segment链表的头结点的引用,这个方法中可以看到如果写的时候头结点head为空,则会调用 SegmentPool.take() 方法从Segment池中获取一个 Segment缓存对象,并以此形成一个双向链表的初始节点:
if (head == null) {
head = SegmentPool.take(); // Acquire a first segment.
return head.next = head.prev = head;
}
这时Segment中会形成下面这样的初始链表:
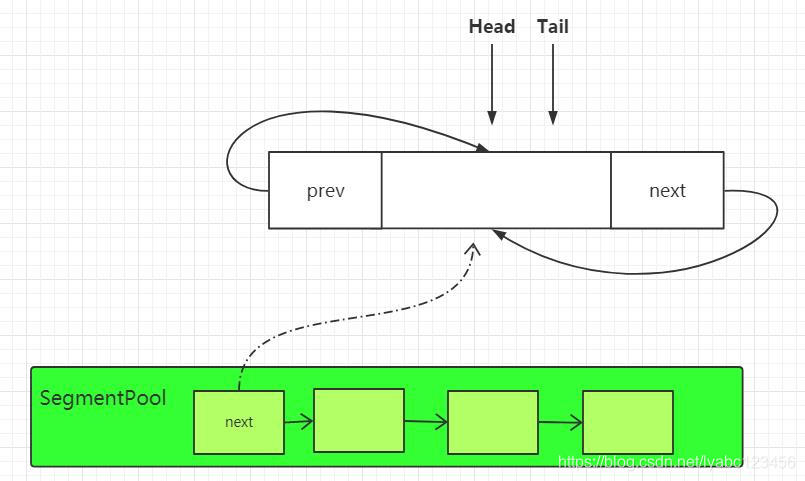
这时头结点和尾节点其实是同一个节点,然后取得head.prev也就是tail尾节点返回,但是如果此时tail能写的字节数限制超过了8k或者尾节点不是data的拥有者,就会调用tail.push(SegmentPool.take());也就是再调用一次SegmentPool.take()取到Segment池中下一个Segment. 通过tail. push() 方法插入到循环链表的尾部。这时Segment中的链表会变成下面这样:
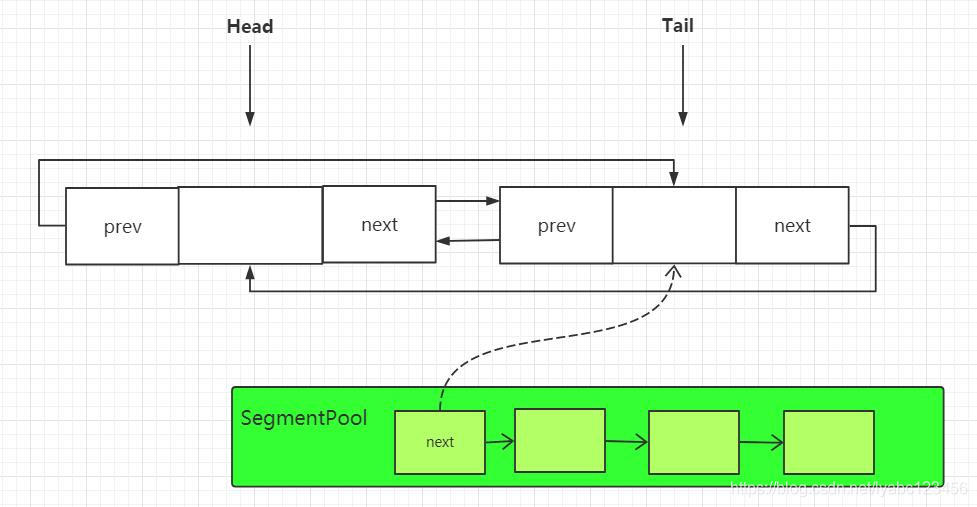
此时插入的节点会作为新的tail节点返回,下一次获取尾节点的时候就会取到它,每当tail进行push一次,就会将新push的节点作为新的尾节点:

读byte[]操作:
@Override
public int read(byte[] sink, int offset, int byteCount) {
checkOffsetAndCount(sink.length, offset, byteCount);
//取到Segment循环链表的表头
Segment s = head;
if (s == null) return -1;
// 计算最多可写入的字节
int toCopy = Math.min(byteCount, s.limit - s.pos);
//将数据拷贝到链头的data字节数组当中
System.arraycopy(s.data, s.pos, sink, offset, toCopy);
//调整链头的data数组的起始postion和Buffer的size
s.pos += toCopy;
size -= toCopy;
//pos等于limit的时候,从循环链表中移除该Segment并从SegmentPool中回收复用
if (s.pos == s.limit) {
head = s.pop();//移除的同时返回下一个Segment作为表头
SegmentPool.recycle(s);
}
return toCopy;
}
读操作内部也是调用System.arraycopy进行字节数组的复制,这里是直接对head头结点进行读取,也就是说Buffer在每次读数据的时候都是从链表的头部进行读取的,如果读取的头结点的pos等于limit, 这里就会调用s.pop()将头节点从链表中删除,并返回下一个节点作为新的头结点引用,然后将删除的节点通过SegmentPool.recycle(s)进行回收复用。这时链表中的变化如下:
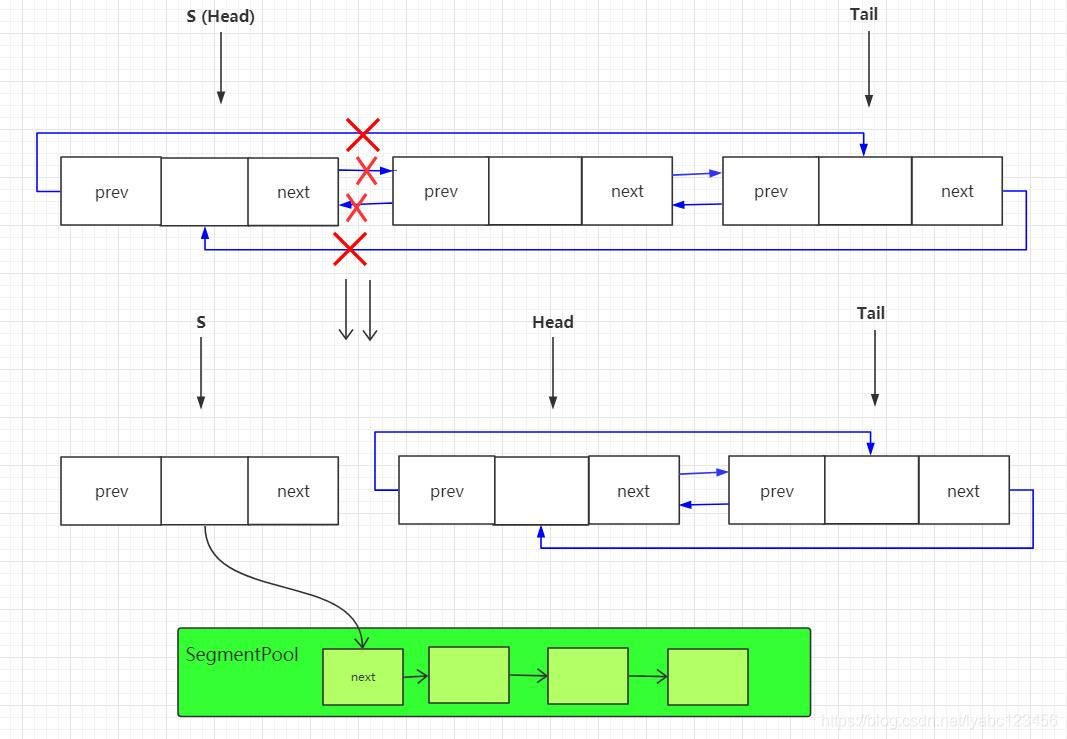
以上是读写字节数据的过程,读取其它数据类型如int、long、String,过程类似,所以简单的概括Buffer中读的过程就是不断取头结点的过程,而写的过程就是不断取尾节点的过程。
Buffer除了读写基础数据以外,还有一个比较重要的功能就是Buffer之间的数据交换, 还记得在官方对Buffer的介绍中写到的:
当您将数据从一个缓冲区移动到另一个缓冲区时,它会重新分配片段的持有关系,而不是跨片段复制数据。这对多线程特别有用:与网络交互的子线程可以与工作线程交换数据,而无需任何复制或多余的操作。
这里说在Buffer缓冲区之间移动数据的时候,是重新分配片段也就是Segment的持有关系,而不是跨片段的复制数据,那么它说的这个比较牛逼的过程是如何实现的呢, 来看一下实现的方法:
@Override
public void write(Buffer source, long byteCount) {
// Move bytes from the head of the source buffer to the tail of this buffer
// while balancing two conflicting goals: don’t waste CPU and don’t waste
// memory.
//
//
// Don’t waste CPU (ie. don’t copy data around).
//
// Copying large amounts of data is expensive. Instead, we prefer to
// reassign entire segments from one buffer to the other.
//
//
// Don’t waste memory.
//
// As an invariant, adjacent pairs of segments in a buffer should be at
// least 50% full, except for the head segment and the tail segment.
//
// The head segment cannot maintain the invariant because the application is
// consuming bytes from this segment, decreasing its level.
//
// The tail segment cannot maintain the invariant because the application is
// producing bytes, which may require new nearly-empty tail segments to be
// appended.
//
//
// Moving segments between buffers
//
// When writing one buffer to another, we prefer to reassign entire segments
// over copying bytes into their most compact form. Suppose we have a buffer
// with these segment levels [91%, 61%]. If we append a buffer with a
// single [72%] segment, that yields [91%, 61%, 72%]. No bytes are copied.
//
// Or suppose we have a buffer with these segment levels: [100%, 2%], and we
// want to append it to a buffer with these segment levels [99%, 3%]. This
// operation will yield the following segments: [100%, 2%, 99%, 3%]. That
// is, we do not spend time copying bytes around to achieve more efficient
// memory use like [100%, 100%, 4%].
//
// When combining buffers, we will compact adjacent buffers when their
// combined level doesn’t exceed 100%. For example, when we start with
// [100%, 40%] and append [30%, 80%], the result is [100%, 70%, 80%].
//
//
// Splitting segments
//
// Occasionally we write only part of a source buffer to a sink buffer. For
// example, given a sink [51%, 91%], we may want to write the first 30% of
// a source [92%, 82%] to it. To simplify, we first transform the source to
// an equivalent buffer [30%, 62%, 82%] and then move the head segment,
// yielding sink [51%, 91%, 30%] and source [62%, 82%].
if (source == null) throw new IllegalArgumentException(“source == null”);
if (source == this) throw new IllegalArgumentException(“source == this”);
checkOffsetAndCount(source.size, 0, byteCount);
while (byteCount > 0) {
// Is a prefix of the source’s head segment all that we need to move?
// 如果 Source Buffer 的头结点可用字节数大于要写出的字节数
if (byteCount < (source.head.limit - source.head.pos)) {
//取到当前buffer的尾节点
Segment tail = head != null ? head.prev : null;
// 如果尾部结点有足够空间可以写数据,并且这个结点是底层数组的拥有者
if (tail != null && tail.owner
&& (byteCount + tail.limit - (tail.shared ? 0 : tail.pos) <= Segment.SIZE)) {
// Our existing segments are sufficient. Move bytes from source’s head to our tail.
//source头结点的数据写入到当前尾节点中,然后就直接结束返回了
source.head.writeTo(tail, (int) byteCount);
source.size -= byteCount;
size += byteCount;
return;
} else {
// We’re going to need another segment. Split the source’s head
// segment in two, then move the first of those two to this buffer.
//如果尾节点空间不足或者不是持有者,这时就需要把 Source Buffer 的头结点分割为两个 Segment,
//然后将source的头指针更新为分割后的第一个Segment, 如[92%, 82%]变成[30%, 62%, 82%]这样
source.head = source.head.split((int) byteCount);
}
}
// Remove the source’s head segment and append it to our tail.
//从 Source Buffer 的链表中移除头结点, 并加入到当前Buffer的链尾
Segment segmentToMove = source.head;
long movedByteCount = segmentToMove.limit - segmentToMove.pos;
//移除操作,并移动更新source中的head
source.head = segmentToMove.pop();
// 如果当前buffer的头结点为 null,则头结点直接指向source的头结点,初始化双向链表
if (head == null) {
head = segmentToMove;
head.next = head.prev = head;
} else {
//否则就把Source Buffer的 head 加入到当前Buffer的链尾
Segment tail = head.prev;
tail = tail.push(segmentToMove);//压入链尾,并更新尾节点
tail.compact();//尾节点尝试合并,如果合并成功,则尾节点会被SegmentPool回收掉
}
source.size -= movedByteCount;
size += movedByteCount;
byteCount -= movedByteCount;
}
}
主要就是在这个write(Buffer source, long byteCount)方法中实现的,这个方法前面有大段的英文注释,我从源码中直接复制过来的,我们可以翻译过来理解一下说的是啥:
将字节数据从source buffer的头节点复制到当前buffer的尾节点中,这里主要需要平衡两个相互冲突的目标:CPU 和 内存。
不要浪费CPU(即不要复制全部的数据)。
复制大量数据代价昂贵。相反,我们更喜欢将整个段从一个缓冲区重新分配到另一个缓冲区。
不要浪费内存。
Segment作为一个不可变量,缓冲区中除了头节点和尾节点的片段以外,相邻的片段,至少应该保证
50%以上的数据负载量(指的是Segment中的data数据, Okio认为data数据量在50%以上才算是被有效利用的)。由于头结点中需要读取消耗字节数据,而尾节点中需要写入产生字节数据,因此头结点和尾节点是不能保持不变性的。
在缓冲区之间移动片段
在将一个缓冲区写入另一个缓冲区时,我们更喜欢重新分配整个段,将字节复制到最紧凑的形式。假设我们有一个缓冲区,其中的片段负载为
[91%,61%],如果我们要在这上面附加一个负载量为[72%]的单一片段,这样将产生的结果为[91%,61%,72%]。这期间不会进行任何的字节复制操作。(即空间换时间,牺牲内存,提供速度)
最后
对于很多初中级Android工程师而言,想要提升技能,往往是自己摸索成长。而不成体系的学习效果低效漫长且无助。时间久了,付出巨大的时间成本和努力,没有看到应有的效果,会气馁是再正常不过的。
所以学习一定要找到最适合自己的方式,有一个思路方法,不然不止浪费时间,更可能把未来发展都一起耽误了。
如果你是卡在缺少学习资源的瓶颈上,那么刚刚好我能帮到你。
网上学习资料一大堆,但如果学到的知识不成体系,遇到问题时只是浅尝辄止,不再深入研究,那么很难做到真正的技术提升。
需要这份系统化的资料的朋友,可以添加V获取:vip204888 (备注Android)

一个人可以走的很快,但一群人才能走的更远!不论你是正从事IT行业的老鸟或是对IT行业感兴趣的新人,都欢迎加入我们的的圈子(技术交流、学习资源、职场吐槽、大厂内推、面试辅导),让我们一起学习成长!
ount;
byteCount -= movedByteCount;
}
}
主要就是在这个write(Buffer source, long byteCount)方法中实现的,这个方法前面有大段的英文注释,我从源码中直接复制过来的,我们可以翻译过来理解一下说的是啥:
将字节数据从source buffer的头节点复制到当前buffer的尾节点中,这里主要需要平衡两个相互冲突的目标:CPU 和 内存。
不要浪费CPU(即不要复制全部的数据)。
复制大量数据代价昂贵。相反,我们更喜欢将整个段从一个缓冲区重新分配到另一个缓冲区。
不要浪费内存。
Segment作为一个不可变量,缓冲区中除了头节点和尾节点的片段以外,相邻的片段,至少应该保证
50%以上的数据负载量(指的是Segment中的data数据, Okio认为data数据量在50%以上才算是被有效利用的)。由于头结点中需要读取消耗字节数据,而尾节点中需要写入产生字节数据,因此头结点和尾节点是不能保持不变性的。
在缓冲区之间移动片段
在将一个缓冲区写入另一个缓冲区时,我们更喜欢重新分配整个段,将字节复制到最紧凑的形式。假设我们有一个缓冲区,其中的片段负载为
[91%,61%],如果我们要在这上面附加一个负载量为[72%]的单一片段,这样将产生的结果为[91%,61%,72%]。这期间不会进行任何的字节复制操作。(即空间换时间,牺牲内存,提供速度)
最后
对于很多初中级Android工程师而言,想要提升技能,往往是自己摸索成长。而不成体系的学习效果低效漫长且无助。时间久了,付出巨大的时间成本和努力,没有看到应有的效果,会气馁是再正常不过的。
所以学习一定要找到最适合自己的方式,有一个思路方法,不然不止浪费时间,更可能把未来发展都一起耽误了。
如果你是卡在缺少学习资源的瓶颈上,那么刚刚好我能帮到你。
网上学习资料一大堆,但如果学到的知识不成体系,遇到问题时只是浅尝辄止,不再深入研究,那么很难做到真正的技术提升。
需要这份系统化的资料的朋友,可以添加V获取:vip204888 (备注Android)
[外链图片转存中…(img-ZreZBY2z-1713568159557)]
一个人可以走的很快,但一群人才能走的更远!不论你是正从事IT行业的老鸟或是对IT行业感兴趣的新人,都欢迎加入我们的的圈子(技术交流、学习资源、职场吐槽、大厂内推、面试辅导),让我们一起学习成长!


 3662
3662


 被折叠的 条评论
为什么被折叠?
被折叠的 条评论
为什么被折叠?
 到【灌水乐园】发言


