


既有适合小白学习的零基础资料,也有适合3年以上经验的小伙伴深入学习提升的进阶课程,涵盖了95%以上软件测试知识点,真正体系化!
由于文件比较多,这里只是将部分目录截图出来,全套包含大厂面经、学习笔记、源码讲义、实战项目、大纲路线、讲解视频,并且后续会持续更新
《python运维脚本》: python运维脚本实践
《shell》:shell学习
《terraform》持续更新中:terraform_Aws学习零基础入门到最佳实战
《k8》暂未更新
《docker学习》暂未更新
《ceph学习》ceph日常问题解决分享
《日志收集》ELK+各种中间件
《运维日常》运维日常
《linux》运维面试100问
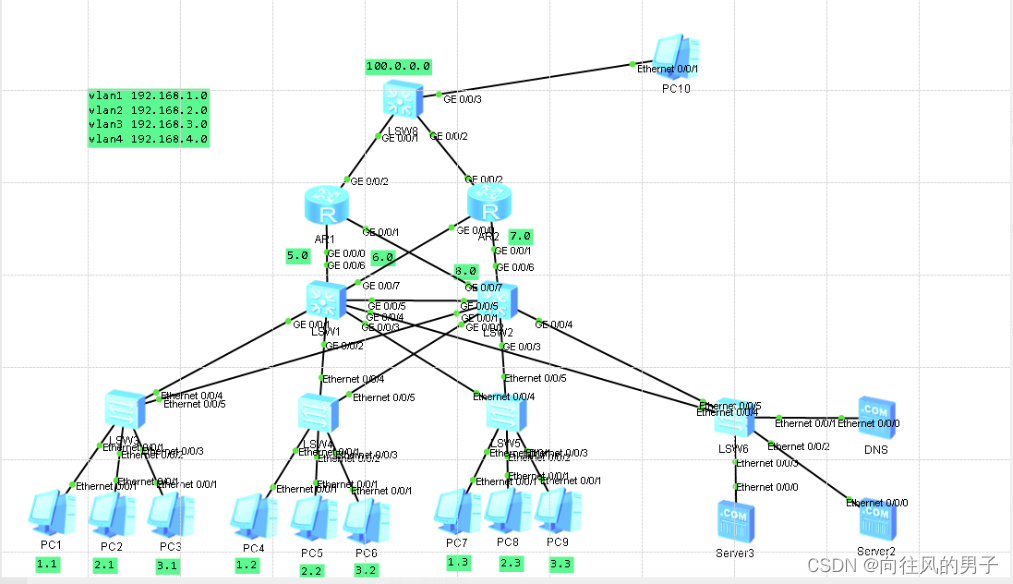
一、网络拓扑
1.网络架构
核心层:接入网络----路由器
汇聚层:vlan间通信
- 创建vlan —什么是vlan:虚拟局域网,在大型平面网络中,为了实现广播控制引入了vlan,可以根据功能或者部门等创建vlan,再把相关的端口加入到vlan.为了实现不用交换机上的相同vlan通信,需要配置中继,为了实现不同vlan间通信,需要配置三层交换
- 中继:实现不同交换机上的相同vlan通信,封装协议采用ieee802.1q
- 聚合链路, 以太通道
- 为了实现不同vlan互相通信,还需要配置三层交换
接入层:接入终端和服务器

交换机sw1上的配置:
<sw1>system-view 进入系统视图
[Huawei]sysname sw1 改设备名称
[sw1]vlan batch 1 2 3 创建vlan
或者[sw1]vlan batch 1 to 3 创建连续vlan
[sw1]display vlan summary 查看vlan
将端口加进vlan
[sw1]int e 0/0/1
[sw1-Ethernet0/0/1]port link-type access
[sw1-Ethernet0/0/1]port default vlan 1
[sw1]int e 0/0/3
[sw1-Ethernet0/0/1]port link-type access
[sw1-Ethernet0/0/1]port default vlan 2
[sw1]int e 0/0/4
[sw1-Ethernet0/0/1]port link-type access
[sw1-Ethernet0/0/1]port default vlan 3
[sw1]int e 0/0/2
[sw1-Ethernet0/0/2]port link-type trunk
[sw1-Ethernet0/0/2]port trunk allow-pass vlan all
sw2 同上
补充:
批量将端口加进vlan
[sw1]port-group 1
[sw1-port-group-1]group-member e0/0/1 e0/0/3 不连续的端口加进组里
[sw1-port-group-1]group-member e0/0/1 to e0/0/3 连续的端口加进组里
[sw1-port-group-1]port link-type access
[sw1-port-group-1]port default vlan 1
交换机之间需要配trunk口
[sw1-Ethernet0/0/2]port link-type trunk
[sw1-Ethernet0/0/2]port trunk allow-pass vlan all
三层交换机上的配置:
[3sw]vlan batch 1 2 3
[3sw]int Vlanif 1
[3sw-Vlanif4]ip address 192.168.1.254 24
[3sw]int Vlanif 2
[3sw-Vlanif4]ip address 192.168.2.254 24
[3sw]int Vlanif 3
[3sw-Vlanif4]ip address 192.168.3.254 24
[3sw]int g 0/0/1
[3sw-GigabitEthernet0/0/1]port link-type trunk
[3sw-GigabitEthernet0/0/1]port trunk allow-pass vlan all
[3sw]int g 0/0/2
[3sw-GigabitEthernet0/0/2]port link-type trunk
[3sw-GigabitEthernet0/0/2]port trunk allow-pass vlan all
三层交换机的路由功能默认是开着的,只需要将端口加进vlan中给其配IP即可
[3sw]int g 0/0/3
[3sw-GigabitEthernet0/0/3]port link-type access
[3sw-GigabitEthernet0/0/3]port default vlan 4
[3sw-GigabitEthernet0/0/3]q
[3sw]int Vlanif 4
[3sw-Vlanif4]ip address 192.168.4.2 24
动态路由ospf配置
[3sw]ospf 1
[3sw-ospf-1]area 0
[3sw-ospf-1-area-0.0.0.0]network 192.168.1.0 0.0.0.255
[3sw-ospf-1-area-0.0.0.0]network 192.168.2.0 0.0.0.255
[3sw-ospf-1-area-0.0.0.0]network 192.168.3.0 0.0.0.255
[3sw-ospf-1-area-0.0.0.0]network 192.168.4.0 0.0.0.255
[3sw]ip route-static 0.0.0.0 0.0.0.0 192.168.4.1 //默认静态指向R1的g0/0/0端口
R1的配置:
[R1]int g 0/0/0
[R1-GigabitEthernet0/0/0]ip address 192.168.4.1 24
[R1]int g 0/0/1
[R1-GigabitEthernet0/0/1]ip address 192.168.5.1 24
[R1]int g 0/0/2
[R1-GigabitEthernet0/0/2]ip address 192.168.6.1 24
[R1]ospf 1
[R1-ospf-1]area 0
[R1-ospf-1-area-0.0.0.0]network 192.168.4.0 0.0.0.255
[R1-ospf-1-area-0.0.0.0]network 192.168.5.0 0.0.0.255
[R1-ospf-1-area-0.0.0.0]network 192.168.6.0 0.0.0.255
R2的配置:
[R2]int g 0/0/0
[R2-GigabitEthernet0/0/0]ip address 192.168.5.1 24
[R1]ospf 1
[R1-ospf-1]area 0
[R1-ospf-1-area-0.0.0.0]network 192.168.5.0 0.0.0.255
R3的配置:
[R3]int g 0/0/0
[R3-GigabitEthernet0/0/0]ip address 192.168.6.1 24
[R3]ospf 1
[R3-ospf-1]area 0
[R3-ospf-1-area-0.0.0.0]network 192.168.6.0 0.0.0.255
删除自动跳出的信息提醒:
undo terminal debugging
undo terminal monitor
undo terminal logging
undo terminal trapping
sys
user-interface console 0
idle-timeout 0
查看端口状态命令:
[3SW1]display interface brief
查看路由状态:
[R1]display ip routing-table
[R1]display ip routing-table | include /24 //过滤只要/24网段的
二层交换机:
SW1:
[Huawei]sysname SW1
[SW1]port-group 1
[SW1-port-group-1]group-member Ethernet 0/0/4 Ethernet 0/0/5
[SW1-port-group-1]port link-type trunk
[SW1-port-group-1]port trunk allow-pass vlan all
[SW1-port-group-1]q
[SW1]vl batch 1 to 4
[SW1]int e 0/0/1
[SW1-Ethernet0/0/1]port link-type access
[SW1-Ethernet0/0/1]port default vlan 1
[SW1]int e 0/0/2
[SW1-Ethernet0/0/2]port link-type access
[SW1-Ethernet0/0/2]port default vlan 2
[SW1]int e 0/0/3
[SW1-Ethernet0/0/3]port link-type access
[SW1-Ethernet0/0/3]port default vlan 3
SW2 SW3 同上
SW4:
[SW4]port-group 1
[SW4-port-group-1]group-member Ethernet 0/0/4 Ethernet 0/0/5
[SW4-port-group-1]port link-type trunk
[SW4-port-group-1]port trunk allow-pass vlan all
[SW4]port-group 2
[SW4-port-group-2]group-member Ethernet 0/0/1 to Ethernet 0/0/3
[SW4-port-group-2]port link-type access
[SW4-port-group-2]port default vlan 4
三层交换机
3sw1:
[3SW1]port-group 1

**既有适合小白学习的零基础资料,也有适合3年以上经验的小伙伴深入学习提升的进阶课程,涵盖了95%以上软件测试知识点,真正体系化!**
**由于文件比较多,这里只是将部分目录截图出来,全套包含大厂面经、学习笔记、源码讲义、实战项目、大纲路线、讲解视频,并且后续会持续更新**
**[需要这份系统化的资料的朋友,可以戳这里获取](https://bbs.csdn.net/topics/618608311)**
*既有适合小白学习的零基础资料,也有适合3年以上经验的小伙伴深入学习提升的进阶课程,涵盖了95%以上软件测试知识点,真正体系化!**
**由于文件比较多,这里只是将部分目录截图出来,全套包含大厂面经、学习笔记、源码讲义、实战项目、大纲路线、讲解视频,并且后续会持续更新**
**[需要这份系统化的资料的朋友,可以戳这里获取](https://bbs.csdn.net/topics/618608311)**


 2万+
2万+


 被折叠的 条评论
为什么被折叠?
被折叠的 条评论
为什么被折叠?
 到【灌水乐园】发言


