


《一线大厂Java面试题解析+核心总结学习笔记+最新讲解视频+实战项目源码》,点击传送门,即可获取!
war
javax.servlet
servlet-api
2.4
org.apache.commons
commons-lang3
3.7
com.alibaba
fastjson
1.2.72
- 2、在
src/main下面新建文件夹webapp/WEB-INF,然后在WEB-INF下面新建一个web.xml文件:
<web-app xmlns:xsi=“http://www.w3.org/2001/XMLSchema-instance”
xmlns=“http://java.sun.com/xml/ns/j2ee” xmlns:javaee=“http://java.sun.com/xml/ns/javaee”
xmlns:web=“http://java.sun.com/xml/ns/javaee/web-app_2_5.xsd”
xsi:schemaLocation=“http://java.sun.com/xml/ns/j2ee http://java.sun.com/xml/ns/j2ee/web-app_2_4.xsd”
version=“2.4”>
Lonely Wolf Web Application
helloServlet
com.lonely.wolf.mini.spring.servlet.HelloServlet
helloServlet
/hello/*
这里面定义了 selvlet 和 servlet-mapping 两个标签,这两个标签必须一一对应,上面的标签定义了 servlet 的位置,而下面的 servlet-mapping 文件定义了路径的映射,这两个标签通过 servlet-name 标签对应。
- 3、新建一个
HelloServlet类继承HttpServlet:
package com.lonely.wolf.mini.spring.servlet;
import javax.servlet.ServletException;
import javax.servlet.http.HttpServlet;
import javax.servlet.http.HttpServletRequest;
import javax.servlet.http.HttpServletResponse;
import java.io.IOException;
/**
* 原始Servlet接口编写,一般需要实现GET和POST方法,其他方法可以视具体情况选择性继承
*/
public class HelloServlet extends HttpServlet {
@Override
protected void doGet(HttpServletRequest request, HttpServletResponse response) throws ServletException, IOException {
this.doPost(request,response);
}
@Override
protected void doPost(HttpServletRequest request, HttpServletResponse response) throws ServletException, IOException {
response.setContentType(“text/html;charset=utf-8”);
response.getWriter().write(“Hello:” + request.getParameter(“name”));
}
}
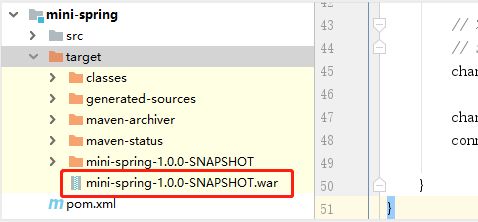
- 4、执行
maven打包命令,确认成功打包成war包:
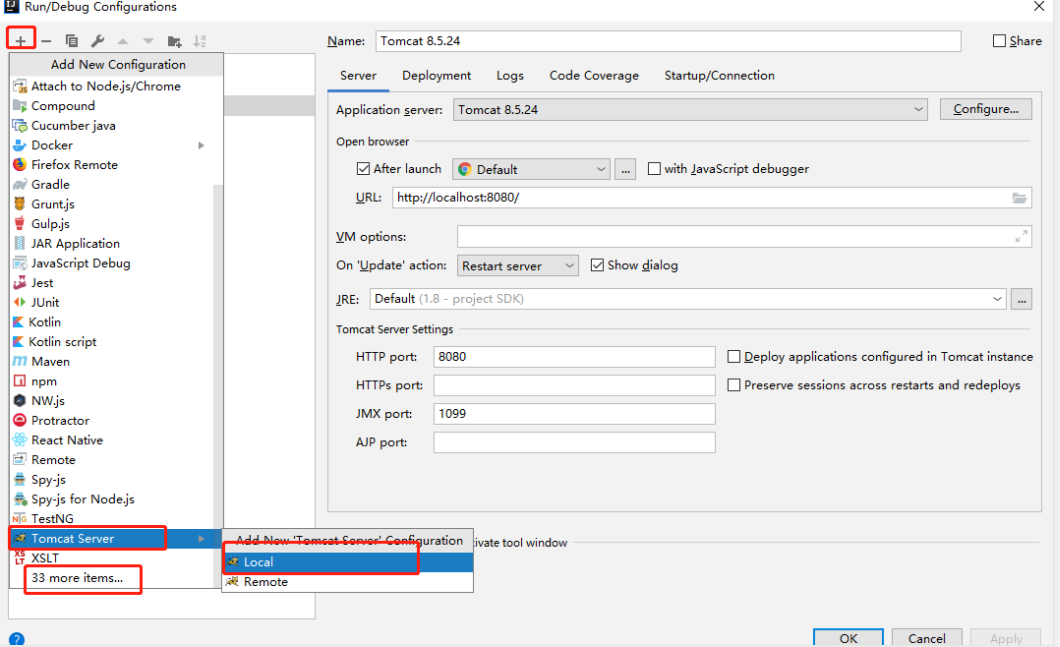
- 5、
RUN-->Edit Configurations,然后点击左上角的+号,新建一个Tomcat Server,如果是第一次配置,默认没有Tomcat Server选项,需要点击底部的xx more items...:
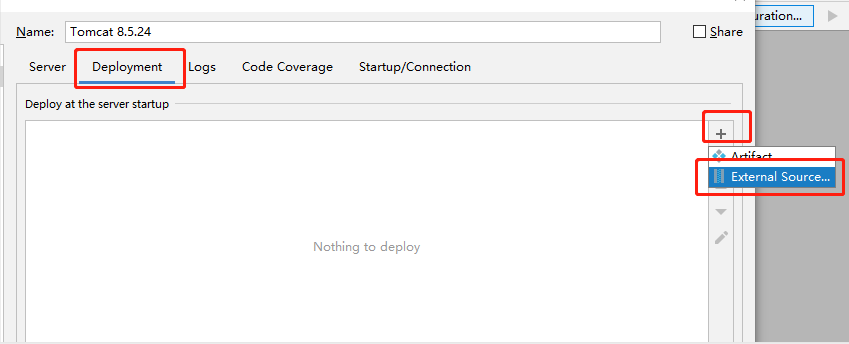
- 6、点击右边的
Deployment,然后按照下图依次点击,最后在弹框内找到上面打包好的war包文件:
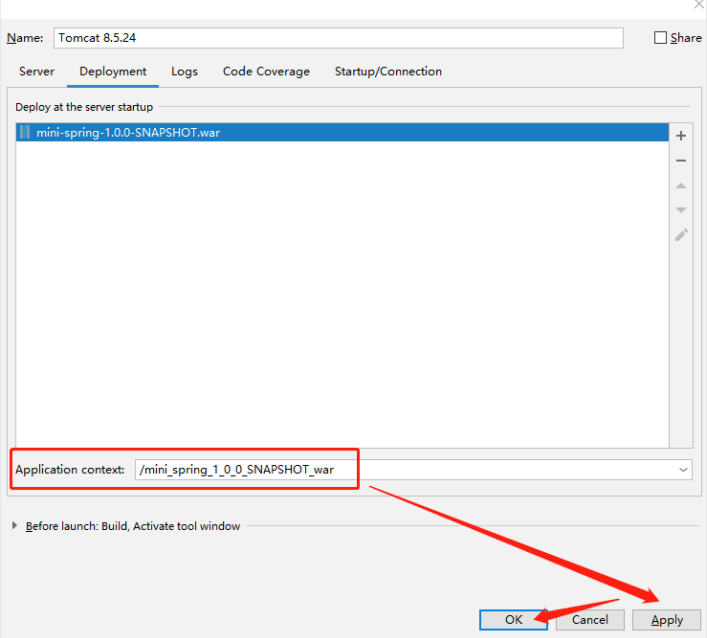
- 7、选中之后,需要注意的是,下面
Application Context默认会带上war包名,为了方便,我们需要把它删掉,即不用上下文路径,只保留一个根路径/(当然上下文也可以保留,但是每次请求都要带上这一部分), 再选择Apply,点击OK,即可完成部署:
- 8、最后我们在浏览器输入请求路径
http://localhost:8080/hello?name=双子孤狼,即可得到返回:Hello:双子孤狼。
上面我们就完成了一个简单的 基于Servlet 的接口开发,可以看到,配置非常麻烦,每增加一个 Servlet 都需要增加对应的配置,所以才会有许多框架的出现来帮我们简化开发,比如原来很流行的 Struts2 框架,当然现在除了一些比较老的项目,一般我们都很少使用,而更多的是选择 Spring 框架来进行开发。
模仿Spring
Spring 的源码体系非常庞大,大部分人对其源码都敬而远之。确实,Spring 毕竟经过了这么多年的迭代,功能丰富,项目庞大,不是一下子就能看懂的。虽然 Spring 难以理解,但是其最核心的思想仍然是我们上面介绍的几点,接下来就基于 Spring 最核心的部分来模拟,自己动手实现一个超级迷你版本的 Spring(此版本并不包含 AOP 功能)。
- 1、
pom依赖和上面保持不变,然后web.xml作如下改变,这里会拦截所有的接口/*,然后多配置了一个参数,这个参数其实也是为了更形象的模拟Spring:
myDispatcherServlet
com.lonely.wolf.mini.spring.v1.MyDispatcherServlet
defaultConfig
application.properties
myDispatcherServlet
/*
- 2、在
respurces下面新建一个配置文件application.properties,用来定义扫描的基本路径:
basePackages=com.lonely.wolf.mini.spring
- 3、创建一些相关的注解类:
package com.lonely.wolf.mini.spring.annotation;import java.lang.annotation.;@Target({ElementType.FIELD})@Retention(RetentionPolicy.RUNTIME)@Documentedpublic @interface WolfAutowired { String value() default “”;}package com.lonely.wolf.mini.spring.annotation;import java.lang.annotation.;@Target({ElementType.TYPE})@Retention(RetentionPolicy.RUNTIME)@Documentedpublic @interface WolfController { String value() default “”;}package com.lonely.wolf.mini.spring.annotation;import java.lang.annotation.;@Target({ElementType.METHOD})@Retention(RetentionPolicy.RUNTIME)@Documentedpublic @interface WolfGetMapping { String value() default “”;}package com.lonely.wolf.mini.spring.annotation;import java.lang.annotation.;@Target({ElementType.PARAMETER})@Retention(RetentionPolicy.RUNTIME)@Documentedpublic @interface WolfRequestParam { String value() default “”;}package com.lonely.wolf.mini.spring.annotation;import java.lang.annotation.*;@Target({ElementType.TYPE})@Retention(RetentionPolicy.RUNTIME)@Documentedpublic @interface WolfService { String value() default “”;}
- 4、这个时候最核心的逻辑就是
MyDispatcherServlet类了:
package com.lonely.wolf.mini.spring.v1;
import com.lonely.wolf.mini.spring.annotation.*;
import com.lonely.wolf.mini.spring.v1.config.MyConfig;
import org.apache.commons.lang3.StringUtils;
import javax.servlet.ServletConfig;
import javax.servlet.ServletException;
import javax.servlet.http.HttpServlet;
import javax.servlet.http.HttpServletRequest;
import javax.servlet.http.HttpServletResponse;
import java.io.File;
import java.io.IOException;
import java.io.InputStream;
import java.lang.annotation.Annotation;
import java.lang.reflect.Field;
import java.lang.reflect.Method;
import java.net.URL;
import java.util.*;
public class MyDispatcherServlet extends HttpServlet {
private MyConfig myConfig = new MyConfig();
private List classNameList = new ArrayList();
private Map<String,Object> iocContainerMap = new HashMap<>();
private Map<String,HandlerMapping> handlerMappingMap = new HashMap<>();
@Override
protected void doGet(HttpServletRequest request, HttpServletResponse response) throws ServletException, IOException {
this.doPost(request,response);
}
@Override
protected void doPost(HttpServletRequest request, HttpServletResponse response) throws ServletException, IOException {
try {
this.doDispatch(request, response);
} catch (Exception e) {
e.printStackTrace();
}
}
private void doDispatch(HttpServletRequest request, HttpServletResponse response) throws Exception{
String requestUrl = this.formatUrl(request.getRequestURI());
HandlerMapping handlerMapping = handlerMappingMap.get(requestUrl);
if (null == handlerMapping){
response.getWriter().write(“404 Not Found”);
return;
}
//获取方法中的参数类型
Class<?>[] paramTypeArr = handlerMapping.getMethod().getParameterTypes();
Object[] paramArr = new Object[paramTypeArr.length];
for (int i=0;i<paramTypeArr.length;i++){
Class<?> clazz = paramTypeArr[i];
//参数只考虑三种类型,其他不考虑
if (clazz == HttpServletRequest.class){
paramArr[i] = request;
}else if (clazz == HttpServletResponse.class){
paramArr[i] = response;
} else if (clazz == String.class){
Map<Integer,String> methodParam = handlerMapping.getMethodParams();
paramArr[i] = request.getParameter(methodParam.get(i));
}else{
System.out.println(“暂不支持的参数类型”);
}
}
//反射调用controller方法
handlerMapping.getMethod().invoke(handlerMapping.getTarget(), paramArr);
}
private String formatUrl(String requestUrl) {
requestUrl = requestUrl.replaceAll(“/+”,“/”);
if (requestUrl.lastIndexOf(“/”) == requestUrl.length() -1){
requestUrl = requestUrl.substring(0,requestUrl.length() -1);
}
return requestUrl;
}
@Override
public void init(ServletConfig config) throws ServletException {
//1.加载配置文件
try {
doLoadConfig(config.getInitParameter(“defaultConfig”));
} catch (Exception e) {
System.out.println(“加载配置文件失败”);
return;
}
//2.根据获取到的扫描路径进行扫描
doScanPacakge(myConfig.getBasePackages());
//3.将扫描到的类进行初始化,并存放到IOC容器
doInitializedClass();
//4.依赖注入
doDependencyInjection();
System.out.println(“DispatchServlet Init End…” );
}
private void doDependencyInjection() {
if (iocContainerMap.size() == 0){
return;
}
//循环IOC容器中的类
Iterator<Map.Entry<String,Object>> iterator = iocContainerMap.entrySet().iterator();
while (iterator.hasNext()){
Map.Entry<String,Object> entry = iterator.next();
Class<?> clazz = entry.getValue().getClass();
Field[] fields = clazz.getDeclaredFields();
//属性注入
for (Field field : fields){
//如果属性有WolfAutowired注解则注入值(暂时不考虑其他注解)
if (field.isAnnotationPresent(WolfAutowired.class)){
String value = toLowerFirstLetterCase(field.getType().getSimpleName());//默认bean的value为类名首字母小写
if (field.getType().isAnnotationPresent(WolfService.class)){
WolfService wolfService = field.getType().getAnnotation(WolfService.class);
value = wolfService.value();
}
field.setAccessible(true);
try {
Object target = iocContainerMap.get(beanName);
if (null == target){
System.out.println(clazz.getName() + “required bean:” + beanName + “,but we not found it”);
}
field.set(entry.getValue(),iocContainerMap.get(beanName));//初始化对象,后面注入
} catch (IllegalAccessException e) {
e.printStackTrace();
}
}
}
//初始化HanderMapping
String requestUrl = “”;
//获取Controller类上的请求路径
if (clazz.isAnnotationPresent(WolfController.class)){
requestUrl = clazz.getAnnotation(WolfController.class).value();
}
//循环类中的方法,获取方法上的路径
Method[] methods = clazz.getMethods();
for (Method method : methods){
//假设只有WolfGetMapping这一种注解
if(!method.isAnnotationPresent(WolfGetMapping.class)){
continue;
}
WolfGetMapping wolfGetMapping = method.getDeclaredAnnotation(WolfGetMapping.class);
requestUrl = requestUrl + “/” + wolfGetMapping.value();//拼成完成的请求路径
//不考虑正则匹配路径/xx/* 的情况,只考虑完全匹配的情况
if (handlerMappingMap.containsKey(requestUrl)){
System.out.println(“重复路径”);
continue;
}
Annotation[][] annotationArr = method.getParameterAnnotations();//获取方法中参数的注解
Map<Integer,String> methodParam = new HashMap<>();//存储参数的顺序和参数名
retryParam:
for (int i=0;i<annotationArr.length;i++){
for (Annotation annotation : annotationArr[i]){
if (annotation instanceof WolfRequestParam){
WolfRequestParam wolfRequestParam = (WolfRequestParam) annotation;
methodParam.put(i,wolfRequestParam.value());//存储参数的位置和注解中定义的参数名
continue retryParam;
}
}
}
requestUrl = this.formatUrl(requestUrl);//主要是防止路径多了/导致路径匹配不上
HandlerMapping handlerMapping = new HandlerMapping();
handlerMapping.setRequestUrl(requestUrl);//请求路径
handlerMapping.setMethod(method);//请求方法
handlerMapping.setTarget(entry.getValue());//请求方法所在controller对象
handlerMapping.setMethodParams(methodParam);//请求方法的参数信息
handlerMappingMap.put(requestUrl,handlerMapping);//存入hashmap
}
}
}
/**
* 初始化类,并放入容器iocContainerMap内
*/
private void doInitializedClass() {
if (classNameList.isEmpty()){
return;
}
for (String className : classNameList){
if (StringUtils.isEmpty(className)){
continue;
}
Class clazz;
try {
clazz = Class.forName(className);//反射获取对象
if (clazz.isAnnotationPresent(WolfController.class)){
String value = ((WolfController)clazz.getAnnotation(WolfController.class)).value();
//如果直接指定了value则取value,否则取首字母小写类名作为key值存储类的实例对象
iocContainerMap.put(StringUtils.isBlank(value) ? toLowerFirstLetterCase(clazz.getSimpleName()) : value,clazz.newInstance());
}else if(clazz.isAnnotationPresent(WolfService.class)){
String value = ((WolfService)clazz.getAnnotation(WolfService.class)).value();
iocContainerMap.put(StringUtils.isBlank(value) ? toLowerFirstLetterCase(clazz.getSimpleName()) : value,clazz.newInstance());
}else{
System.out.println(“不考虑其他注解的情况”);
}
} catch (Exception e) {
e.printStackTrace();
System.out.println(“初始化类失败,className为” + className);
}
}
}
/**
* 将首字母转换为小写
* @param className
* @return
*/
private String toLowerFirstLetterCase(String className) {
if (StringUtils.isBlank(className)){
return “”;
}
String firstLetter = className.substring(0,1);
return firstLetter.toLowerCase() + className.substring(1);
}
/**
* 扫描包下所有文件获取全限定类名
* @param basePackages
*/
private void doScanPacakge(String basePackages) {
if (StringUtils.isBlank(basePackages)){
return;
}
//把包名的.替换为/
String scanPath = “/” + basePackages.replaceAll(“\.”,“/”);
URL url = this.getClass().getClassLoader().getResource(scanPath);//获取到当前包所在磁盘的全路径
File files = new File(url.getFile());//获取当前路径下所有文件
for (File file : files.listFiles()){//开始扫描路径下的所有文件
if (file.isDirectory()){//如果是文件夹则递归
doScanPacakge(basePackages + “.” + file.getName());
}else{//如果是文件则添加到集合。因为上面是通过类加载器获取到的文件路径,所以实际上是class文件所在路径
classNameList.add(basePackages + “.” + file.getName().replace(“.class”,“”));
}
}
}
/**
* 加载配置文件
* @param configPath - 配置文件所在路径
*/
private void doLoadConfig(String configPath) {
InputStream inputStream = this.getClass().getClassLoader().getResourceAsStream(configPath);
Properties properties = new Properties();
try {
properties.load(inputStream);
} catch (IOException e) {
e.printStackTrace();
System.out.println(“加载配置文件失败”);
}
properties.forEach((k, v) -> {
try {
Field field = myConfig.getClass().getDeclaredField((String)k);
field.setAccessible(true);
field.set(myConfig,v);
} catch (Exception e) {
e.printStackTrace();
System.out.println(“初始化配置类失败”);
return;
}
});
}
}
- 5、这个
Servlet相比较于上面的HelloServlet多了一个init方法,这个方法中主要做了以下几件事情:
1)初始化配置文件,拿到配置文件中配置的参数信息(对应方法:doLoadConfig)。
2)拿到第 1 步加载出来的配置文件,获取到需要扫描的包路径,然后将包路径进行转换成实际的磁盘路径,并开始遍历磁盘路径下的所有 class 文件,最终经过转换之后得到扫描路径下的所有类的全限定类型,存储到全局变量 classNameList 中(对应方法:doScanPacakge)。
3)根据第 2 步中得到的全局变量 classNameList 中的类通过反射进行初始化(需要注意的是只会初始化加了指定注解的类)并将得到的对应关系存储到全局变量 iocContainerMap 中(即传说中的 IOC 容器),其中 key 值为注解中的 value 属性,如 value 属性为空,则默认取首字母小写的类名作为 key 值进行存储(对应方法:doInitializedClass)。
4)这一步比较关键,需要对 IOC 容器中的所有类的属性进行赋值并且需要对 Controller 中的请求路径进行映射存储,为了确保最后能顺利调用 Controller 中的方法,还需要将方法的参数进行存储 。对属性进行映射时只会对加了注解的属性进行映射,映射时会从 IOC 容器中取出第 3 步中已经初始化的实例对象进行赋值,最后将请求路径和 Controller 中方法的映射关系存入变量 handlerMappingMap,key 值为请求路径,value 为方法的相关信息 (对应方法:doDependencyInjection)。
- 6、存储请求路径和方法的映射关系时,需要用到
HandlerMapping类来进行存储:
总结
这份面试题几乎包含了他在一年内遇到的所有面试题以及答案,甚至包括面试中的细节对话以及语录,可谓是细节到极致,甚至简历优化和怎么投简历更容易得到面试机会也包括在内!也包括教你怎么去获得一些大厂,比如阿里,腾讯的内推名额!
某位名人说过成功是靠99%的汗水和1%的机遇得到的,而你想获得那1%的机遇你首先就得付出99%的汗水!你只有朝着你的目标一步一步坚持不懈的走下去你才能有机会获得成功!
成功只会留给那些有准备的人!

《一线大厂Java面试题解析+核心总结学习笔记+最新讲解视频+实战项目源码》,点击传送门,即可获取!
只会初始化加了指定注解的类)并将得到的对应关系存储到全局变量 iocContainerMap 中(即传说中的 IOC 容器),其中 key 值为注解中的 value 属性,如 value 属性为空,则默认取首字母小写的类名作为 key 值进行存储(对应方法:doInitializedClass)。
4)这一步比较关键,需要对 IOC 容器中的所有类的属性进行赋值并且需要对 Controller 中的请求路径进行映射存储,为了确保最后能顺利调用 Controller 中的方法,还需要将方法的参数进行存储 。对属性进行映射时只会对加了注解的属性进行映射,映射时会从 IOC 容器中取出第 3 步中已经初始化的实例对象进行赋值,最后将请求路径和 Controller 中方法的映射关系存入变量 handlerMappingMap,key 值为请求路径,value 为方法的相关信息 (对应方法:doDependencyInjection)。
- 6、存储请求路径和方法的映射关系时,需要用到
HandlerMapping类来进行存储:
总结
这份面试题几乎包含了他在一年内遇到的所有面试题以及答案,甚至包括面试中的细节对话以及语录,可谓是细节到极致,甚至简历优化和怎么投简历更容易得到面试机会也包括在内!也包括教你怎么去获得一些大厂,比如阿里,腾讯的内推名额!
某位名人说过成功是靠99%的汗水和1%的机遇得到的,而你想获得那1%的机遇你首先就得付出99%的汗水!你只有朝着你的目标一步一步坚持不懈的走下去你才能有机会获得成功!
成功只会留给那些有准备的人!
[外链图片转存中…(img-aLy9ixuw-1714752505445)]
《一线大厂Java面试题解析+核心总结学习笔记+最新讲解视频+实战项目源码》,点击传送门,即可获取!


 137
137


 被折叠的 条评论
为什么被折叠?
被折叠的 条评论
为什么被折叠?
 到【灌水乐园】发言


