


app.config[‘DEBUG’] = True
app.run()
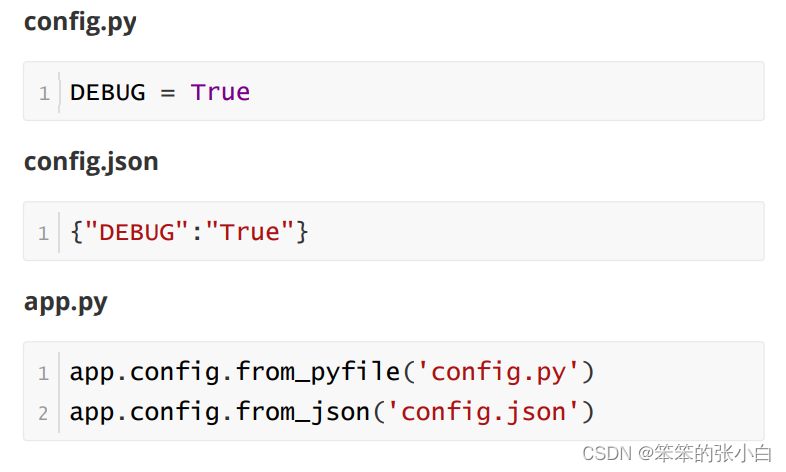
通过配置文件设置 config
### URL与函数的映射(动态路由)
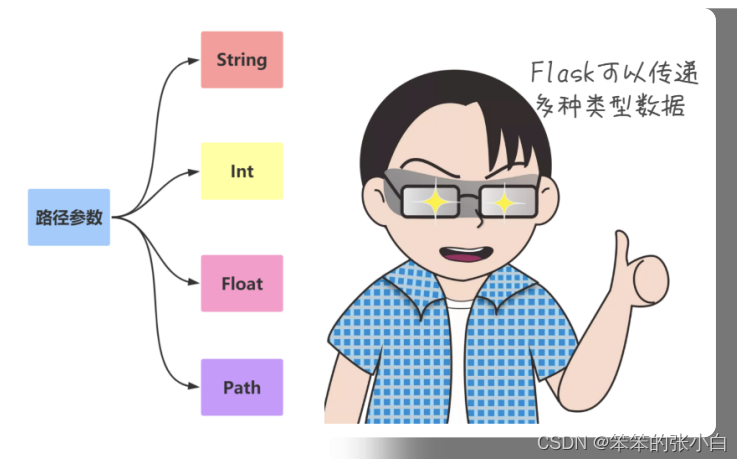
**URL路径参数**
比如,有一个请求访问的接口地址为 /users/11001 ,其中 11001 实际上为 具体的请求参数,表明请求 11001 号用户的信息。 此时如何从url中提取出 11001 的数据?
@app.route(‘/users/<user_id>’)
def user_info(user_id):
print(type(user_id))
return ‘hello user{}’.format(user_id)
其中 ,尖括号是固定写法,语法为 , variable 默认的 数据类型是字符串。 如果需要指定类型,则要写成 converter:variable ,其中 converter 就是类型名称,可以有以下几种:


1 string:如果没有指定具体的数据类型,那么默认就是使用 string 数据类型。


2 int:数据类型只能传递 int 类型。


3 float:数据类型只能传递 float 类型。


4 path:数据类型和 string 有点类似,都是可以接收任意的字符串,但是 path 可以接收路径,也就 是说可以包含斜杠。


5 uuid:数据类型只能接收符合 uuid 的字符串。 uuid 是一个全宇宙都唯一的字符串,一般可以用来 作为表的主键。


6 any:数据类型可以在一个 url 中指定多个路径。


将上面的例子以整型匹配数据,可以如下使用:
@app.route(‘/users/int:user_id’)
def user_info(user_id):
print(type(user_id))
return f’正在获取 ID {user_id} 的用户信息’
@app.route(‘/users/<int(min=1):user_id>’)
def user_info(user_id):
print(type(user_id))
return f’hello user {user_id}’
>
> **注意** 若是数据与设置的类型不能匹配,则会返回 Not Found
>
>
>
### PostMan的使用

Postman一款非常流行的API调试工具。其实,开发人员用的更多。 因为测试人员做接口测试会有更多选择,例如Jmeter、soapUI等。 不过,对于开发过程中去调试接口,Postman确实足够的简单方 便,而且功能强大。 官方网站:https://www.getpostman.com/
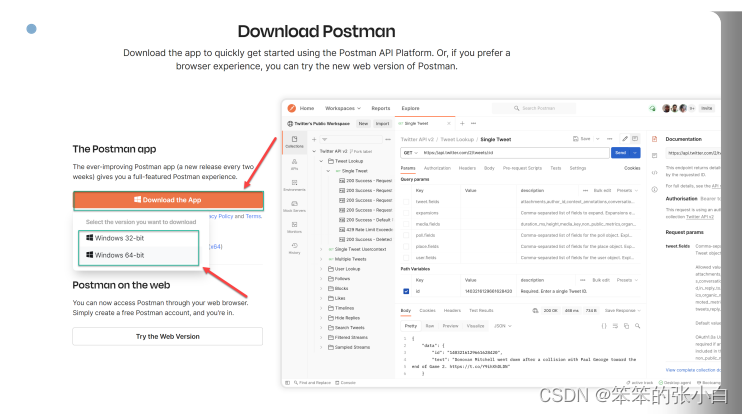
**安装**
1 Postman最早是作用chrome浏览器插件存在的,所以,你可以 到chrome商店搜索下载安装,因为部分原因,所以,大家都会 找别人共享的postman插件文件来安装。
2 Postman提供了独立的安装包,不再依赖于Chrome浏览器了。 同时支持MAC、Windows和Linux,推荐你使用这种方式安装。 https://www.postman.com/downloads/
### 查询参数的获取
例如要获取 [http://127.0.0.1:5000/test/?wd=python&ie=ok]( )的参数
from flask import Flask,request
app = Flask(name)
@app.route(‘/’)
def index():
wd = request.args.get(‘wd’)
ie = request.values.get(‘ie’)
return f"Hello! {wd} == {ie}"
if name == ‘main’:
app.run(debug=True)
>
> **使用总结**
>
>
> 如果你的这个页面的想要做 SEO 优化,就是被搜索引擎搜索到, 那么推荐使用第一种形式(path的形式)。 如果不在乎搜索引擎优化,那么就可以使用第二种(查询字符 串的形式)。
>
>
>
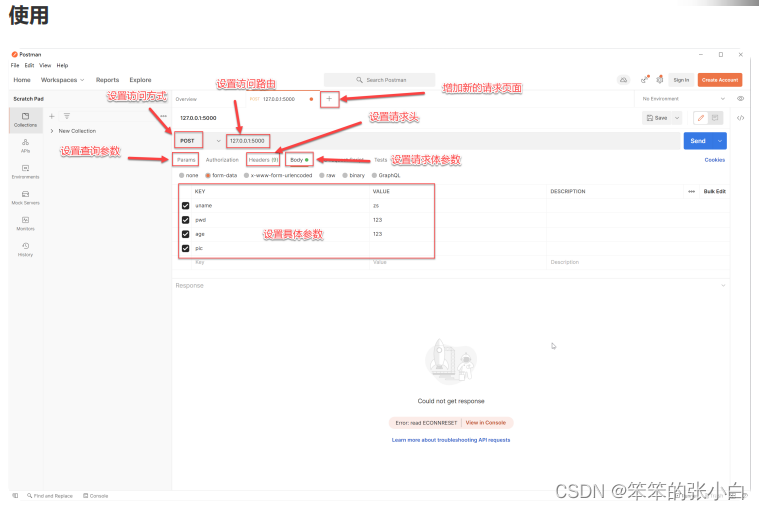
**请求体参数**
from flask import Flask,request
app = Flask(name)
@app.route(‘/’,methods=[‘POST’])
def index():
uname = request.form.get(‘uname’)
pwd = request.values.get(‘pwd’)
age = request.form.get(‘age’)
return f"Hello! {uname} == {pwd} == {age}"
if name == ‘main’:
app.run(debug=True)
### 上传文件

客户端上传图片到服务器,并保存到服务器中
from flask import request
@app.route(‘/upload’, methods=[‘POST’])
def upload_file():
f = request.files[‘pic’]
# with open(‘./demo.png’, ‘wb’) as new_file:
# new_file.write(f.read())
f.save(‘./demo.png’)
return ‘上传成功!’
### **其它参数**

如果想要获取其他地方传递的参数,可以通过Flask提供的request 对象来读取。 不同位置的参数都存放在request的不同属性中

from flask import Flask,request
app = Flask(name)
@app.route(‘/args’)
def args():
cookies = request.cookies.get(‘uid’)
headers = request.headers.get(‘ContentType’)
url = request.url
method = request.method
return f’上传成功!! {cookies} ==
{headers} =={url} == {method}’
if name ==‘main’:
app.run(debug=True)
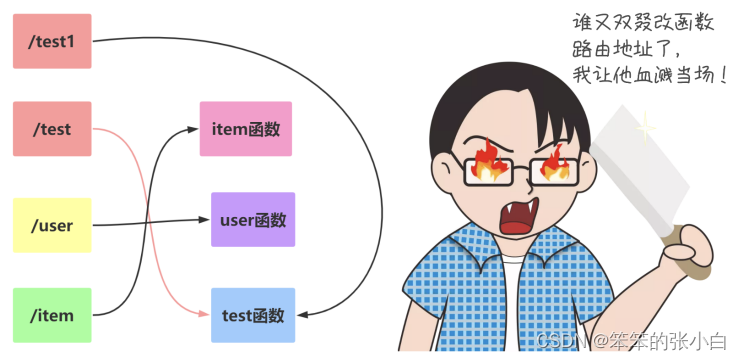
### url\_for 函数
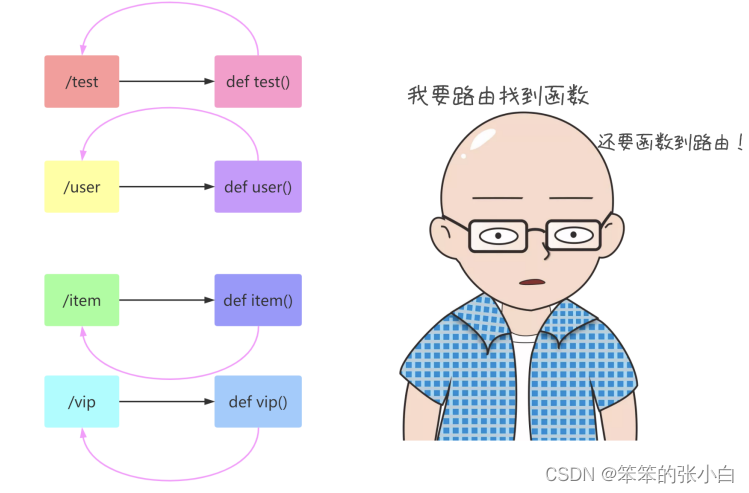
一般我们通过一个 URL就可以执行到某一个函数。 如果反过来,我们知道一个函数,怎么去获得这个 URL呢? url\_for 函数就可以帮我们实现这个功能。
>
> **注意**
>
>
> url\_for 函数可以接收1个及以上的参数,他接收函数名作为第 一个参数 如果还出现其他的参数,则会添加到 URL 的后面作为查询参 数。
>
>
>
@app.route(‘/post/list//’)
def my_list(page):
return ‘my list’
@app.route(‘/’)
def hello_world():
return url_for(‘my_list’,page=2,num=8)
# return “/post/list/2?num=8”
**使用url\_for函数原因**
>
> **问题** 为什么选择 url\_for 而不选择直接在代码中拼 URL 的原因有两点:
>
>
> **回答** 1 将来如果修改了 URL ,但没有修改该 URL 对应的函数名,就不用到处去替换URL 了 2 url\_for() 函数会转义一些特殊字符和 unicode 字符串,这些事情 url\_for 会自动的帮我们
>
>
>
@app.route(‘/login/’)
def login():
return ‘login’
@app.route(‘/’)
def hello_world():
return url_for(‘login’, next=‘/’)
# /login/?next=/
# 会自动的将/编码,不需要手动去处理。
# url=/login/?next=%2F
>
> **技巧**
>
>
> 在定义url的时候,一定要记得在最后加一个斜杠。 1. 如果不加斜杠,那么在浏览器中访问这个url的时候,如果最 后加了斜杠,那么就访问不到。这样用户体验不太好。 2. 搜索引擎会将不加斜杠的和加斜杠的视为两个不同的url。而 其实加和不加斜杠的都是同一个url,那么就会给搜索引擎造成 一个误解。加了斜杠,就不会出现没有斜杠的情况。
>
>
>


### 响应-重定向


**永久性重定向**:


http 的状态码是 301,多用于旧网址被废弃了要转到一个新的网 址确保用户的访问 比如:你输入 www.jingdong.com 的时候,会被重定向到 ww w.jd.com , 因为 jingdong.com 这个网址已经被废弃了,被改成 jd.com 所以这种情况下应该用永久重定向


**暂时性重定向**:


http 的状态码是 302,表示页面的暂时性跳转。 比如:访问一个需要权限的网址,如果当前用户没有登录,应 该重定向到登录页面, 这种情况下,应该用暂时性重定向。


**flask中重定向**


重定向是通过 redirect(location,code=302) 这个函数来实现的, location表示 需要重定向到的 URL, 应该配合之前讲的 url\_for() 函数来使用, code 表示采用哪个重定向,默认是 302 也即 暂时性重定向, 可以 修改成 301 来实现永久性重定向
from flask import
Flask,request,url_for,redirect
app = Flask(name)
@app.route(‘/’)
def hello_world():
return ‘Hello World!’
@app.route(‘/login/’)
def login():
return ‘这是登录页面’
#falsk中重定向
@app.route(‘/profile/’)
def proflie():
if request.args.get(‘name’):
return ‘个人中心页面’
else:
# return redirect(url_for(‘login’))
return redirect(url_for(‘login’),code=302)
if name == ‘main’:
app.run(debug=True)
### 响应-响应内容
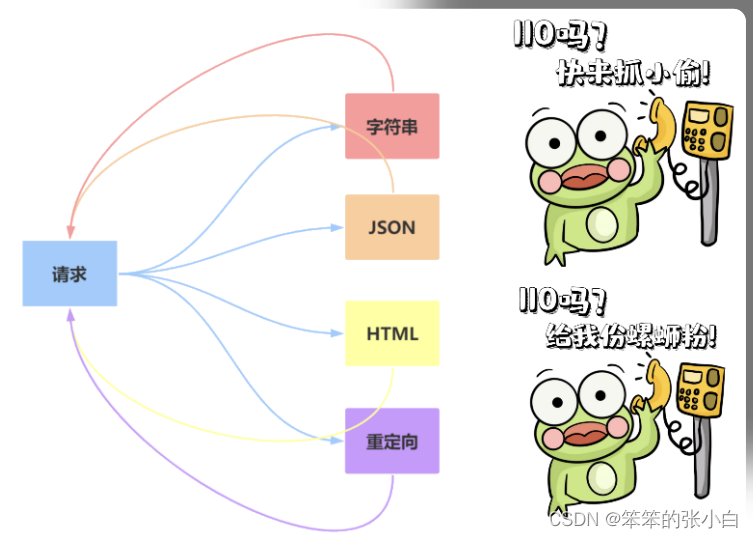**返回字符串**
from flask import redirectd
@app.route(‘/return_str’)
def return_str():
return “你好,少年”
**返回JSON**
from flask import jsonify
app.config[‘JSON_AS_ASCII’] = False
@app.route(‘/return_json1’)
def return_json1():
json_dict = {
“msg_int”: 10,
“msg_str”: “你好,少年”
}
return jsonify(json_dict)
@app.route(‘/return_json2’)
def return_json2():
json_dict = {
“msg_int”: 10,
“msg_str”: “你好,少年”
}
return json_dict
**元组方式**


可以返回一个元组,元组中必须至少包含一个项目,且项目应当由 (response, status) 、 (response, headers) 或者 (response, status, headers) 组成。 status 的值会重载状态代码, headers 是一个由额外头部值组成的列表 或字 典 status 值会覆盖状态代码, headers 可以是一个列表或字典,作 为额外的消息标头值。
@app.route(‘/demo1’)
def demo1():
# return ‘状态码为 666’, 666
# return ‘状态码为 666’, 666,[(‘itbaizhan’, ‘Python’)]
return ‘状态码为 666’, 666, {‘itbaizhan’: ‘Python’}
### 响应-自定义响应

**创建Response**
from flask import Response
@app.route(‘/return_str’)
def return_str():
return Response(“你好,少年”)
**make\_response方式**
@app.route(‘/demo2’)
def demo2():
resp = make_response(‘make response测试’)
resp.headers[‘itbaizhan’] = ‘Python’
resp.status = ‘404 not found’
return resp
## Flask模板
### 模板介绍

思考 : 网站如何向客户端返回一个漂亮的页面呢?
**提示** :
* 漂亮的页面需要 html 、 css 、 js .
* 可以把这一堆字段串全都写到视图中, 作为 HttpResponse() 的参数,响应给客户端
**问题**
* 视图部分代码臃肿, 耦合度高
* 这样定义的字符串是不会出任何效果和错误的
* 效果无法及时查看.有错也不容易及时发现
**解决问题**
模板 Template
* MVT 设计模式中的 T , Template
M全拼为Model,与MVC中的M功能相同,负责和数据库交 互,进行数据处理。
V全拼为View,与MVC中的C功能相同,接收请求,进行业务处 理,返回应答。
T全拼为Template,与MVC中的V功能相同,负责封装构造要返 回的html。

### 模板的使用
在 Flask中,配套的模板是 Jinja2,Jinja2的作者也是Flask的作者。 这个模板非常的强大,并且执行效率高。
**使用步骤**
* 创建模板
+ 在 应用 同级目录下创建模板文件夹 templates . 文件夹名称固定写法.
+ 在 templates 文件夹下, 创建 应用 同名文件夹. 例, Book
+ 在 应用 同名文件夹下创建 网页模板 文件. 例 : index.html
* 设置模板查找路径
* 模板处理数据
from flask import Flask,render_template
app = Flask(name)
@app.route(‘/test’)
def index():
return render_template(‘index.html’)
### 模板-传参


在使用 render\_template 渲染模版的时候,可以传递关键字参数(命名参 数)。
from flask import Flask,render_template
app = Flask(name)
@app.route(‘/’)
def hello_world():
return render_template(‘index.html’,uname=‘sxt’)
{{ uname}}
>
> **小技巧**
>
>
> 如果你的参数项过多,那么可以将所有的参数放到一个字典 中, 然后在传这个字典参数的时候,使用两个星号,将字典打散成 关键字参数(也叫命名参数)
>
>
>
@app.route(‘/’)
def hello_world():
context = {
‘uname’: ‘momo’,
‘age’: 18,
‘country’: ‘china’,
‘childrens’: {
‘name’: ‘mjz’,
‘height’: ‘62cm’
}
}
returnrender_template(‘index.html’,**context)
获取方式是: {{childrens.name}} 或者 {{childrens[‘name’]}}
### 模板使用url\_for函数
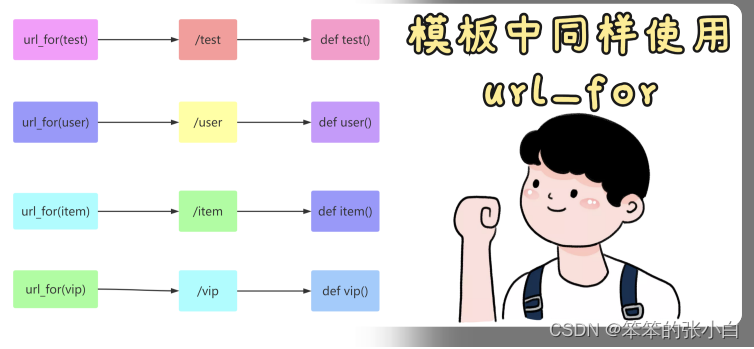
模版中也可使用 url\_for ,和后台视图函数中的 url\_for 使用起来基本是一 模一样的。
>
> **提示** 在模板中使用函数,需要在函数 左右两边加上2个 {} 例如: {{ url\_for(func) }}
>
>
>
@app.route(‘/accounts/login//’)
def login(name):
print(name)
return ‘通过URL_FOR定位过来的!!!’
>
> **注意** 无论是 路径参数 还是 查询式参数 都可以直接传递
>
>
>


### 过滤器介绍


有时候我们想要在模版中对一些变量进行处理,那么就必须需要类 似于Python中的函数一样,可以将这个值传到函数中,然后做一些 操作。 在模版中,过滤器相当于是一个函数,把当前的变量传入到过滤器 中,然后过滤器根据自己的功能,再返回相应的值,之后再将结果 渲染到页面中
@app.route(‘/’)
def hello_world():
return render_template(‘index.html’,postion=-1)
过滤器的基本使用
位置的绝对值为[未使用过滤器]:{{ postion}}
位置的绝对值为[使用过滤器]:{{ postion|abs}}
### Jinja模板自带过滤器
过滤器是通过管道符号 | 使用的,例如: { name|length }} 将返回name的 长度。 过滤器相当于是一个函数,把当前的变量传入到过滤器中,然后过 滤器根据自己的功能,再返回相应的值,之后再将结果渲染到页面 中。 Jinja2中内置了许多过滤器 https://jinja.palletsprojects.com/en/3.0.x/templates/#filters
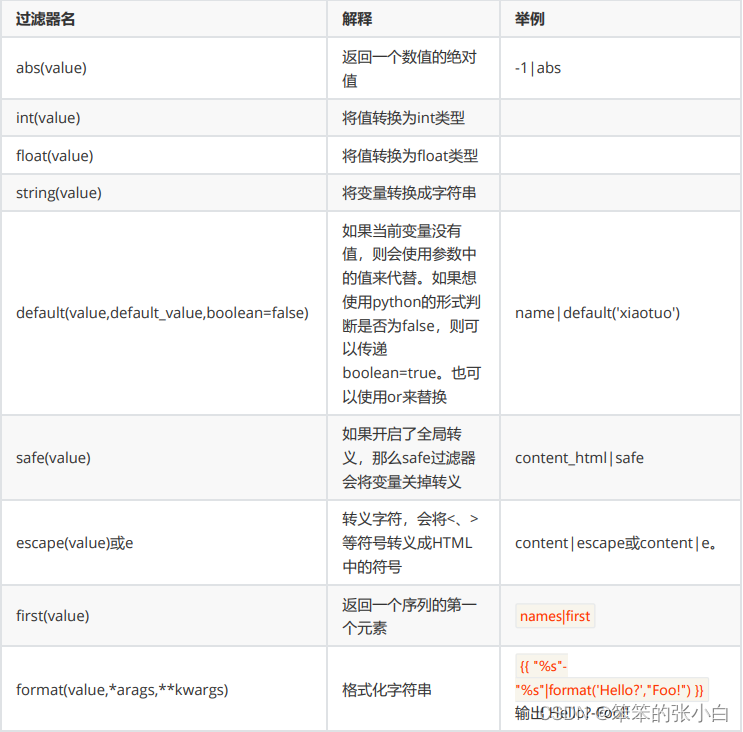
**defalut过滤器**
default过滤器
过滤前的昵称数据是:{{nick_name}}过滤后的昵称数据是:{{nick_name | default('用户1',boolean=true)}}
过滤后的昵称数据是:{{nick_name or '用户2'}}
**转义字符**
转义字符过滤器
转义前的数据是:{{ info | safe }} {% autoescape true %} {{info }} {% endautoescape %}
**其它过滤器**
其它过滤器
绝对值:{{ -6 | abs }}小数: {{ 6 | float }}
字符串:{{ 6 | string }}
格式化:{{'%s--%s' | format('我' , '你')}}
长度:{{'我是九,你是三,除了你,还是你'|length}}
最后一个:{{'我是九,你是三,除了你,还是你'|last}}
第一个:{{'我是九,你是三,除了你,还是你'|first}}
统计次数: {{'我是九,你是三,除了你,还是你' | wordcount }}
替换:{{'===我是九,你是三,除了你,还是你 ====' |replace('我是九,你是三,除了你,还是 你' ,'拿着,这个无限额度的黑卡,随便刷')}}
>
> **小提示**
>
>
> jinja2模板 默认全局开启了自动转义功能
>
>
> * safe 过滤器:可以关闭一个字符串的自动转义
> * escape 过滤器:对某一个字符串进行转义
> * autoescape 标签,可以对他包含的代码块关闭或开启自动转义
> 	+ {% autoescape true/false %} 代码块 {% endautoescape %
>
>
>


**自定义过滤器**


只有当系统提供的过滤器不符合需求后,才须自定义过滤器 过滤器本质上就是一个函数。 如果在模版中调用这个过滤器,那么就会将这个变量的值作为第一 个参数传给过滤器这个函数, 然后函数的返回值会作为这个过滤器的返回值。 需要使用到一个装饰器: @app.template\_filter(‘过滤器名称’)


**自定义数据替换过滤器**


例如:将新闻中出现的 所有“ 我是九你是三,除了你还是你” 换成 “你不用多好,我喜欢就好”
#将模版设置为自动加载模式
app.config[‘TEMPLATES_AUTO_RELOAD’]=True
@app.template_filter(‘cut’)
def cut(value):
value=value.replace(“我是九你是三,除了你还是你”,‘你不用多好,我喜欢就好’)
return value
使用自定义过滤器:{{新闻内容值|cut}}
**自定义时间过滤器**


例如:操作发布新闻 与现在的时间间隔
from datetime import datetime
#需求:操作发布新闻 与现在的时间间隔
@app.template_filter(‘handle_time’)
def handle_time(time):
“”"
time距离现在的时间间隔
1. 如果时间间隔小于1分钟以内,那么就显示“刚刚”
2. 如果是大于1分钟小于1小时,那么就显示“xx分钟前”
3. 如果是大于1小时小于24小时,那么就显示“xx小时前”
4. 如果是大于24小时小于30天以内,那么就显示“xx天前”
5. 否则就是显示具体的时间 2030/10/2016:15
“”"
if isinstance(time, datetime):
now = datetime.now()
timestamp = (now - time).total_seconds()
if timestamp < 60:
return “刚刚”
elif timestamp >= 60 and timestamp < 60 * 60:
minutes = timestamp / 60
return “%s分钟前” % int(minutes)
elif timestamp >= 60 * 60 and timestamp < 60 * 60 * 24:
hours = timestamp / (60 * 60)
return ‘%s小时前’ % int(hours)
elif timestamp >= 60 * 60 * 24 and timestamp < 60 * 60 * 24 * 30:
days = timestamp / (60 * 60 * 24)
return “%s天前” % int(days)
else:
return time.strftime(‘%Y/%m/%d %H:%M’)
else:
return time
发布时间:{{新闻创建时间|handle_time}}
### 流程控制-选择结构

所有的控制语句都是放在 {% … %} 中,并且有一个语句 {% endxxx %} 来进 行结束!
\*\*if:\*\*if语句和python中的类似,可以使用 >,=,==,!= 来进行判 断,也可以通过 and,or,not,() 来进行逻辑合并操作
{% if age >= 18 %}
{{ age }}岁,成年人,可以通宵打游戏
{% else %}
{{ age }}岁,未成年人,可以通宵学习
{% endif %}
>
> **注意**:
>
>
> if 条件判断语句必须放在 {% if statement %} 中间,并且还必须有结束 的标签 {% endif %} 。
>
>
>
### 流程控制-循环结构

for…in… for循环可以遍历任何一个序列包括列表、字典、元组。并且 可以进行反向遍历,以下将用几个例子进行解释:
**列表**
- {% for user in users%}
- {{ user}}
- {% endfor %}
**遍历字典**
如果序列中没有值的时候,进入else 反向遍历用过滤器 reverse:
- {% for user in users|reverse %}
- {{ user}}
- {% else %}
- 没有任何用户
- {% endfor %}
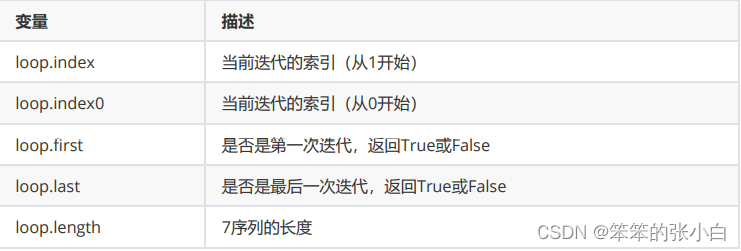
并且Jinja中的for循环还包含以下变量,可以用来获取当前的遍历状 态:
>
> **总结**
>
>
> 在 jinja2 中的 for 循环,跟 python 中的 for 循环基本上是一模一样的 也是 for…in… 的形式。并且也可以遍历所有的序列以及迭代器 唯一不同的是, jinja2 中的 for 循环没有 break 和 continue 语句
>
>
>
### 导入模板include

1. 这个标签相当于是直接将指定的模版中的代码复制粘贴到当前位 置。
2. include 标签,如果想要使用父模版中的变量,直接用就可以了,不 需要使用 with context 。
3. include 的路径,也是跟 import 一样,直接从 templates 根目录下去找, 不要以相对路径去找。
{% include "common/footer.html" %}
### set与with标签

**set的使用**
在模版中,可以使用 set 语句来定义变量
{% set uname=‘sxt’%}
用户名:{{ uname }}
一旦定义了这个变量,那么在后面的代码中,都可以使用这个变 量,就类似于Python的变量定义是一样的


**with语句**


with 语句定义的变量,只能在 with 语句块中使用,超过了这个代码 块,就不能再使用了
{% with classroom=‘python202’%}
班级:{{ classroom }}
{% endwith %}
>
> **注意**
>
>
> 关于定义的变量, with 语句也不一定要跟一个变量, 可以定义一个空的 with 语句, 需要在指定的区域才能使用的情况,可以set与with组合使用。
>
>
>
{% with %}
{% set pname=‘李思思’ %}
娱乐县县长:{{ pname }}
{% endwith %}
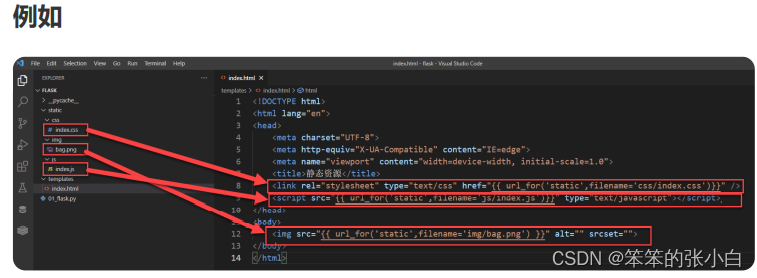
### 静态文件

**静态文件**:css文件 js文件 图片文件等文件
加载静态文件使用的是 url\_for 函数。然后第一个参数需要为 static ,第 二个参数需要为一个关键字参数 filename=‘路径’ 。
**语法**
{{ url_for(“static”,filename=‘xxx’) }}
>
> **注意** 路径查找,要以当前项目的 static 目录作为根目录
>
>
>
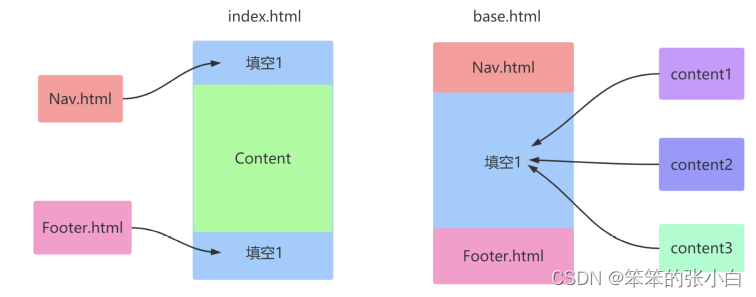
### 模板继承
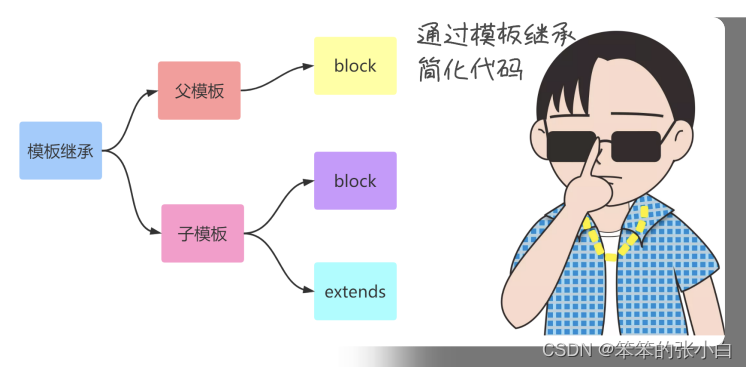
**为什么需要模版继承**
模版继承可以把一些**公用的代码**单独抽取出来放到一个父模板中 以后**子模板直接继承**就可以使用了。 这样可以**重复的利用代码**,并且以后**修改起来**也比较方便
**模版继承语法**
使用 extends 语句,来指明继承的父模板。父模板的路径,也是相对 于 templates 文件夹下的绝对路径
{% extends “base.html” %}
**block语法**


一般在父模版中,定义一些公共的代码。子模板可能要根据具体的 需求实现不同的代码。这时候父模版就应该有能力提供一个接口,让子模板来实现。从而 实现具体业务需求的功能。


**父模板**
{% block block的名字 %}
{% endblock %}
**子模板**
{% block block的名字 %}
子模板中的代码
{% endblock %}
**调用父模版代码block中的代码**


默认情况下,子模板如果实现了父模版定义的block。那么子模板 block中的代码就会覆盖掉父模板中的代码。 如果想要在子模板中仍然保持父模板中的代码,那么可以使用 {{ super( ) }} 来实现


**父模板**
{% block block_body %}
我是父模版block_body处的内容
{% endblock %}
**子模板**
{% block block_body%}
{{ super() }}
我是子模版block_body处的内容
{% endblock %}
**调用另外一个block中的代码**


如果想要在另外一个模版中使用其他模版中的代码。那么可以通过 {{ self.其他block名字() }} 就可以了
{% block title %}
sxt首页
{% endblock %}
{% block block_body%}
{{ self.title() }}
我是子模版block_body处的内容
{% endblock %}
>
> **注意**
>
>
> 1. 子模板中的代码,第一行,应该是 extends
>
>
> 2. 子模板中,如果要实现自己的代码,应该放到block中。如果 放到其他地方,那么就不会被渲染
>
>
>


## Flask视图


### **add\_url\_rule与app.route**


**add\_url\_rule**


add\_url\_rule(rule,endpoint=None,view\_func=None)


这个方法用来添加url与视图函数的映射。 如果没有填写 endpoint ,那么默认会使用 view\_func 的名字作为 endpoint 。 以后在使用 url\_for 的时候,就要看在映射的时候有没有传递 endpoint 参 数,如果传递了,那么就应该使用 endpoint 指定的字符串, 如果没有传递,那么就应该使用 view\_func 的名字。
def my_list():
return “我是列表页”
app.add_url_rule(‘/list/’,endpoint=‘sxt’,view_func=my_list)
**app.route原理剖析**


这个装饰器底层,其实也是使用 add\_url\_rule 来实现url与视图函数映射 的。
from flask import Flask,url_for
app = Flask(name)
@app.route(‘/’,endpoint=‘index’)
def index():
print(url_for(‘show’))
print(url_for(‘index’))
return “Hello”
def show_me():
return “这个介绍信息!!”
endpoint 没有设置,url_for中就写函数的名字,如果设置了,就写endpoint的值
app.add_url_rule(‘/show_me’,view_func=show_me,endpoint=‘show’)
@app.route 底层就是使用的 add_url_rule
if name ==‘main’:
app.run(debug=True)
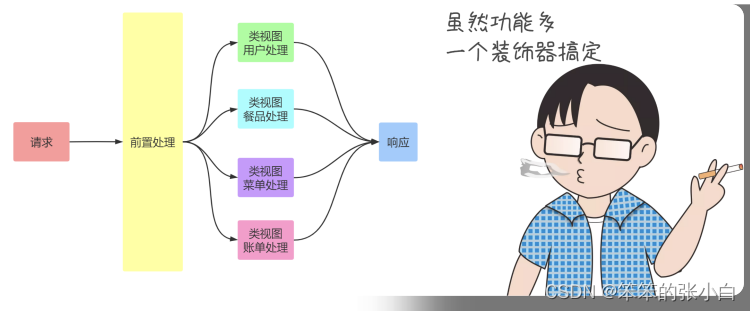
### 类视图

之前我们接触的视图都是函数,所以一般简称函数视图。 其实视图也可以基于类来实现,类视图的好处是支持继承, 但是类视图不能跟函数视图一样,写完类视图还需要通过 app.add\_url\_rule(url\_rule,view\_func) 来进行注册
**标准类视图使用步骤**
1. 标准类视图,必须继承自 flask.views.View
2. 必须实现 dispatch\_request 方法,以后请求过来后,都会执行这个方 法。 这个方法的返回值就相当于是之前的视图函数一样。也必须返回 Response 或者子类的对象,或者是字符串,或者是元组。
3. 必须通过 app.add\_url\_rule(rule,endpoint,view\_func) 来做url与视图的映射。 view\_func 这个参数,需要使用类视图下的 as\_view 类方法类转换: ListView.as\_view(‘list’) 。
4. 如果指定了 endpoint ,那么在使用 url\_for 反转的时候就必须使用 endpoint 指定的那个值。如果没有指定 endpoint ,那么就可以使用 as\_view(视图名字) 中指定的视图名字来作为反转。
from flask import Flask,url_for
from flask.views import View
app= Flask(name)
@app.route(‘/’)
def index():
# print(url_for(‘mylist’))
print(url_for(‘my’))
return ‘Hello’
class ListView(View):
def dispatch_request(self):
return ‘返回了一个List的内容!!’
app.add_url_rule(‘/list’,view_func=ListView.as_view(‘mylist’))
app.add_url_rule(‘/list’,endpoint=‘my’,view_func=ListView.as_view(‘mylist’))
用于测试
with app.test_request_context():
print(url_for(‘my’))
if name ==‘main’:
app.run(debug=True)
**类视图的好处**


1.可以继承,把一些共性的东西抽取出来放到父视图中,子视图直 接拿来用就可以了。


2.但是也不是说所有的视图都要使用类视图,这个要根据情况而 定。视图函数用得最多。
from flask import Flask,jsonify
from flask.views import View
app = Flask(name)
需求:返回的结果都必须是json数据
class BaseView(View):
def get_data(self):
raise NotImplementedError
def dispatch_request(self):
    return jsonify(self.get_data())
class JsonView(BaseView):
def get_data(self):
return {‘uname’:‘吕布’,‘age’:20}
class Json2View(BaseView):
def get_data(self):
return [
{‘name’:‘zs’,‘lua’:‘Python’},
{‘name’:‘lisi’,‘lua’:‘Python’},
]
app.add_url_rule(‘/base’,view_func=BaseView.as_view(‘base’))
app.add_url_rule(‘/json’,view_func=JsonView.as_view(‘json’))
app.add_url_rule(‘/json2’,view_func=Json2View.as_view(‘json2’))
if name ==‘main’:
app.run(debug=True)
### 基于调度方法的类视图

1. 基于方法的类视图,是根据请求的 method 来执行不同的方法的。 如果用户是发送的 get 请求,那么将会执行这个类的 get 方法。 如果用户发送的是 post 请求,那么将会执行这个类的 post 方法。其他 的method类似,比如 delete 、 put
2. 这种方式,可以让代码更加简洁。所有和 get 请求相关的代码都放 在 get 方法中,所有和 post 请求相关的代码都放在 post 方法中。就不 需要跟之前的函数一样,通过 request.method == ‘GET’
class LoginView(views.MethodView):
def get(self,error=None):
return
render_template(‘login.html’,error=error)
def post(self):
#模拟实现
#拿到前端页面传过来的 账号 和密码 去数据库做查询操作 查询到 (跳转主页面) ,反之跳转到login.html页面并给出错误提示信息
uname = request.form[‘uname’]
pwd = request.form[‘pwd’]
if uname==“sxt” and pwd ==“123”:
return render_template(‘index.html’)
else:
return self.get(error=“用户名或者密码错误”)
注册类视图
app.add_url_rule(‘/login/’,view_func=LoginVi
ew.as_view(‘my_login’))
HTML
| 账号: | |
| 密码: | |
| {# {{ error }}#} {# 优化写法 :判断 #} {% if error %} {{ error }} {% endif %} | |
### 装饰器
简言之,python装饰器就是用于拓展**原来函数功能**的一种函数,这 个**函数的特殊之处在于它的返回值也是一个函数**, 使用python装饰器的**好处**就是在不用更改原函数的代码前提下给函 数增加新的功能。
1. 在视图函数中使用自定义装饰器,那么自己定义的装饰器必须放 在 app.route 下面。 否则这个装饰器就起不到任何作用。
**案例1**
需求:查看设置个人信息时,只有检测到用户已经登录了才能查 看,若没有登录,则无法查看并给出提示信息
定义装饰器
def login_required(func):
@wraps(func)
def wrapper(*arg,**kwargs):
uname = request.args.get(‘uname’)
pwd = request.args.get(‘pwd’)
if uname == ‘zs’ and pwd == ‘123’:
logging.info(f’{uname}:登录成功’)
return func(*arg,**kwargs)
else:
logging.info(f’{uname}:尝试登录,但没成功’)
return ‘请先登录’
return wrapper
使用装饰器
@app.route(‘/settings/’)
@login_requierd
def settings():
return ‘这是设置界面’
2. 在类视图中使用装饰器,需要重写类视图的一个类属性 decorators , 这个类属性是一个列表或者元组都可以,里面装的就是所有的装饰 器。


**案例2**


**需求**: 查看设置个人信息时,只有检测到用户已经登录了才能查看, 若没有登录,则无法查看并给出提示信息


使用装饰器
class ProfileView(views.View):
decorators = [login_requierd]
def dispatch_request(self):
return ‘这是个人中心界面’
app.add_url_rule(‘/profile/’,view_func=ProfileView.as_view(‘profile’))
### **蓝图介绍**


在Flask中,使用蓝图Blueprint来分模块组织管理。 蓝图实际可以理解为是存储一组视图方法的容器对象,其具有如下 特点:


* 一个应用可以具有多个Blueprint
* 可以将一个Blueprint注册到任何一个未使用的URL下比如 “/user” 、 “/goods”
* Blueprint可以单独具有自己的模板、静态文件或者其它的通用操作方法,它并不是必须要实现应 用的视图和函数的
* 在一个应用初始化时,就应该要注册需要使用的Blueprint


>
> **注意**
>
>
> Blueprint并不是一个完整的应用,它不能独立于应用运行,而 必须要注册到某一个应用中
>
>
>


**使用方式**


使用蓝图可以分为三个步骤


* 1 创建一个蓝图对象
user_bp=Blueprint(‘user’,name)
* 在这个蓝图对象上,
@user_bp.route(‘/’)
def user_profile():
return ‘user_profile’
* 在应用对象上注册这个蓝图对象
app.register_blueprint(user_bp)
**指定蓝图的url前缀**


在应用中注册蓝图时使用 url\_prefix 参数指定
app.register_blueprint(user_bp,url_prefix=‘/user’)
app.register_blueprint(goods_bp,url_prefix=‘/goods’)
### 蓝图的目录结构


为了让项目代码更加清晰,可以通过将代码分在不同的文件里进行 管理


**根据功能模块**


对于一个打算包含多个文件的蓝图,通常将创建蓝图对象放到 Python包的 \_\_init\_\_.py 文件中
--------- project # 工程目录
|------ main.py # 启动文件
|------ user #用户蓝图
| |— init.py # 此处创建蓝图对象
| |— view.py
| |— …
|------ goods # 商品蓝图
| |— init.py
| |— …
|…
**根据技术模块**
--------- project # 工程目录
|------ main.py # 启动文件
|------ view #用户蓝图
| |— user.py # 此处创建蓝图对象
| |— item.py
| |— view.py
| |— …
|…
### 蓝图中模版文件

**寻找规则**
* 如果项目中的templates文件夹中有相应的模版文件,就直接使 用了。
* 如果项目中的templates文件夹中没有相应的模版文件,那么就 到在定义蓝图的时候指定的路径中寻找。
+ 并且蓝图中指定的路径可以为相对路径,相对的是当前这个蓝图文件所在的目录
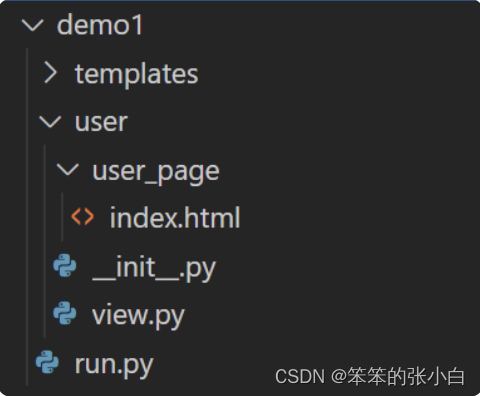
因为这个蓝图文件是在user/view.py,那么就会到blueprints这个 文件夹下的user\_page文件夹中寻找模版文件。
**小总结:** 常规:蓝图文件在查找模版文件时,会以templates为根目录进行 查找
>
> **注意**
>
>
> * 1 个性化coder喜欢在【创建蓝图对象的时候】 指定 模版文 件的查找路径,如下 news\_bp =Blueprint(‘news’,\_\_name\_\_,url\_prefix=‘/news’,template\_folder=‘news\_page’)
> * 2 只有确定templates目录下没有对应的 html文件名的时候, 才会去蓝图文件指定的目录下查找,指定才会生效
> * 3 若templates目录下,有一个与蓝图文件指定的目录下同名 的一个 html文件时,优先走templates目录下的东西
>
>
>
### **蓝图中静态文件**

蓝图内部静态文件 蓝图对象创建时不会默认注册静态目录的路由。需要我们在创建时 指定 static\_folder 参数。 下面的示例将蓝图所在目录下的 static\_admin 目录设置为静态目录:
user=Blueprint(“user”,name,static_folder=‘user_static’)
app.register_blueprint(admin,url_prefix=‘/user’)
也可通过 static\_url\_path 改变访问路径
user =Blueprint(‘user’,name,template_folder=‘user_page’,static_folder=‘user_static’,static_u
rl_path=‘/static’)
app.register_blueprint(user,url_prefix=‘/user’)
>
> **总结** 【掌握】查找方式1:查找静态文件时,正常情况下,会以 static为根目录进行查找 【了解】查找方式2:查找静态文件时,非正常情况下,需要用 url\_for(‘蓝图的名字.static’),然后会去蓝图对象在创建时指定的 静态文件夹目录下 去查找静态文件
>
>
>
### 蓝图url\_for函数

如果使用蓝图,那么以后想要反转蓝图中的视图函数为url,就应该 在使用url\_for的时候指定这个蓝图名字。 app类中、模版中、同一个蓝图类中都是如此。否则就找不到这个 endpoint
html文件中
新闻列表 OK写法
{# 新闻列表 no Ok写法#}
python文件中
from flask import
Blueprint,render_template,url_for
user_bp=Blueprint(‘news’,name,url_prefix=‘/user’,template_folder=‘user_page’,static_folder=‘user_static’)
@user_bp.route(‘/list/’)
def user_list():
#如下写法:才找得到 url_for(‘蓝图名称.方法名’)
print(url_for(‘user.user_list’)) #/user/list/
print(url_for(‘user.user_detail’)) #/user/detail/
return render_template(‘user_list.html’)
@user_bp.route(‘/detail/’)
def user_detail():
return ‘用户详情页面’
### 子域名实现


蓝图实现子域名:


1. 使用蓝图技术。


2. 在创建蓝图对象的时候,需要传递一个 subdomain 参数,来指定这 个子域名的前缀。
cms_bp=Blueprint(‘cms’,name,subdomain=‘cms’)
3. 需要在主app文件中,需要配置app.config的SERVER\_NAME参 数。例如:
app.config[‘SERVER_NAME’]=‘baidu.com:5000’
4. 在windows: C:\Windows\System32\drivers\etc 下,找到hosts文件,然后添 加域名与本机的映射。Linux: /etc/hosts 域名和子域名都需要做映射
>
> **注意** ip地址不能有子域名 localhost也不能有子域名
>
>
>
## Flask高级
### Flask设置Cookie

**设置**
设置cookie是在Response的对象上设置。 flask.Response 对象有一个 set\_cookie 方法,可以通过这个方法来设置 cookie 信息。
key,value形式设置信息
from flask import Flask, make_response
app = Flask(name)
@app.route(‘/cookie’)
def set_cookie():
resp = make_response(‘set cookie ok’)
resp.set_cookie(‘uname’, ‘itbaizhan’)
return resp
**查看Cookie**


在Chrome浏览器中查看cookie的方式:


方式1:借助于 开发调式工具进行查看


方式2:在Chrome的设置界面->高级设置->内容设置->所有 cookie->找到当前域名下的cookie。
from flask import request
@app.route(‘/get_cookie’)
def get_cookie():
resp = request.cookies.get(‘uname’)
return resp
**删除cookie**


方式1:通过 Response对象.delete\_cookie ,指定cookie的key,就可以删 除cookie了。
from flask import request
@app.route(‘/delete_cookie’)
def delete_cookie():
response = make_response(‘helloworld’)
response.delete_cookie(‘uname’)
return response
方式2:在客户端浏览器人为的删除(清除浏览器浏览历史记录 后,很多网站之前免密登录的都不好使了)


**Cookie的有效期**


**默认的过期时间**:如果没有显示的指定过期时间,那么这个cookie 将会在浏览器关闭后过期。 **max\_age**:以秒为单位,距离现在多少秒后cookie会过期。


**expires**:为datetime类型。这个时间需要设置为格林尼治时间, 相对北京时间来说 会自动+8小时 如果max\_age和expires都设置了,那么这时候以max\_age为标 准。


>
> **注意**
>
>
> max\_age在IE8以下的浏览器是不支持的。 expires虽然在新版的HTTP协议中是被废弃了,但是到目前为 止,所有的浏览器都还是能够支持,所以如果想要兼容IE8以下 的浏览器,那么应该使用expires,否则可以使用max\_age。
>
>
>
from flask import Flask,Response
app = Flask(name)
@app.route(‘/’)
def index():
return ‘Hello!!’
@app.route(‘/create_cookie/defualt/’)
def create_cookie1():
resp = Response(‘通过默认值,设置cookie有效期’)
如果没有设置有效期,默认会在浏览器关闭的时候,让cookie过期
resp.set_cookie(‘uname’,‘zs’)
return resp
@app.route(‘/create_cookie/max_age/’)
def create_cookie2():
resp = Response(‘通过max_age,设置cookie有效期’)
max_age以秒为单位设置cookie的有效期
age = 60602
resp.set_cookie(‘uname’,‘zs’,max_age=age)
return resp
from datetime import datetime
@app.route(‘/create_cookie/expires/’)
def create_cookie3():
resp = Response(‘通过expires,设置cookie有效期’)
expires 以指定时间为cookie的有效期
16+8 == 24
tmp_time = datetime(2021, 11,11,hour=18,minute=0,second=0)
resp.set_cookie(‘uname’,‘python’,expires=tmp_time)
return resp
from datetime import timedelta
@app.route(‘/create_cookie/expires2/’)
def create_cookie4():
resp = Response(‘通过expires,设置cookie有效期’)
expires 以指定时间为cookie的有效期
tmp_time = datetime.now() +timedelta(days=2)
resp.set_cookie(‘uname’,‘python_sql’,expires=tmp_time)
return resp
@app.route(‘/create_cookie/exp_max/’)
def create_cookie5():
resp = Response(‘通过expires与max_age,设置cookie有效期’)
expires 与max_age同时设置了,会以max_age为准
tmp_time = datetime.now() +timedelta(days=2)
resp.set_cookie(‘uname’,‘python_sql’,expires=tmp_time,max_age = 60602)
return resp
if name == ‘main’:
app.run(debug=True)
### Flask中使用Session

需要先设置SECRET\_KEY
class DefaultConfig(object):
SECRET_KEY = ‘fih9fh9eh9gh2’
app.config.from_object(DefaultConfig)
或者直接设置
app.secret_key=‘xihwidfw9efw’
**设置、修改**
from flask import session
@app.route(‘/set_session/’)
def set_session():
session[‘username’] = ‘zs’
return ‘set session ok’
**读取**
@app.route(‘/get_session/’)
def get_session():
username = session.get(‘username’)
return ‘get session username {}’.format(username)
**删除**
@app.route(‘/del_session/’)
def delete_session():
#删除指定的key的session
# session.pop(‘uname’)
#删除session中的所有的key 【删除所有】
session.clear()
return ‘删除成功’
**Flask设置Session的有效期**


如果没有设置session的有效期。那么默认就是浏览器关闭后过期。 如果设置session.permanent=True,那么就会默认在31天后过 期。 如果不想在31天后过期,按如下步骤操作。


1 session.permanent=True


2 可以设置 app.config[‘PERMANENT\_SESSION\_LIFETIME’] = timedelta(hour=2) 在两个小时后过期。
from flask import Flask,session
from datetime import timedelta
app = Flask(name)
app.secret_key = ‘sdfdfdsfsss’
app.config[‘PERMANENT_SESSION_LIFETIME’] = timedelta(days=2)
@app.route(‘/’)
def index():
return ‘Hello!!’
@app.route(‘/set_session/’)
def set_session():
# 设置session的持久化,默认是增加了31天
session.permanent = True
session[‘uname’] = ‘10001’
return ‘设置一个Session的信息’
@app.route(‘/get_session/’)
def get_session():
# 如果服务器关闭掉了,session的有效期,依然是之前系统保存日期
# 如果secret_key设置是一个固定的值,那么服务器重启不会影响session的有效器
# 如果secret_key设置不是一个固定的值,那么服务器之前设置的session将全部过期
return session.get(‘uname’)
if name == ‘main’:
app.run(debug=True)
### Session实战

**login.html**
| 账号: | |
| 密码: | |
| {% if msg %} {{ msg }} {% endif %} | |
from flask import Flask, session,
request,redirect,url_for,views,render_template
app = Flask(name)
定义一个基于方法调度的 类视图
class LoginView(views.MethodView):
def __jump(self,msg=None):
return render_template(‘login.html’,msg = msg)
def get(self):
msg = request.args.get(‘msg’)
return self.__jump(msg)
def post(self):
uname = request.form.get(‘uname’)
pwd = request.form.get(‘pwd’)
if uname == “zs” and pwd == “123”:
session[‘uname’] = uname
return render_template(‘index.html’)
else:
return self.__jump(msg=“用户名或者密码错误”)
@app.route(‘/index/’)
def index():
uname = session.get(‘uname’)
if uname:
return ‘这个是主页!!!’
return redirect(url_for(‘login’,msg=‘请先登录’))
注册类视图
app.add_url_rule(‘/login/’,view_func=LoginView.as_view(‘login’))
if name == ‘main’:
app.secret_key = ‘xihwidfw9efw’
app.run(debug=True)
### Local对象

**需求**
要实现并发效果, 每一个请求进来的时候我们都开启一个进程, 这显然是不合理的, 于是就可以使用 线程 那么线程中数据互相不隔离,存在修改数据的时候数据不安全的问题
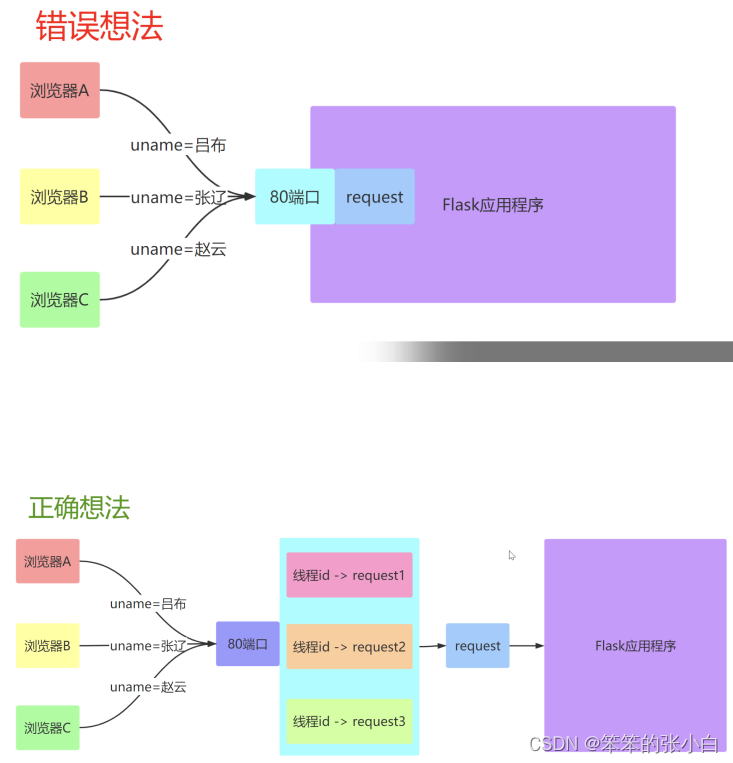
**Local对象**
在Flask中,类似于 request 对象,其实是绑定到了一个 werkzeug.local.Local 对象上。 这样,即使是同一个对象,那么在多个线程中都是隔离的。类似的 对象还有 session 对象。
**ThreadLocal变量**
Python提供了ThreadLocal 变量,它本身是一个全局变量, 但是每个线程却可以利用它来保存属于自己的私有数据, 这些私有数据对其他线程也是不可见的。
from threading import Thread,local
local =local()
local.request = ‘具体用户的请求对象’
class MyThread(Thread):
def run(self):
local.request = ‘zs’
print(‘子线程:’,local.request)
mythread = MyThread()
mythread.start()
mythread.join()
print(‘主线程:’,local.request)
from werkzeug.local import Local
local = Local()
local.request = ‘具体用户的请求对象’
class MyThread(Thread):
def run(self):
local.request = ‘sxt’
print(‘子线程:’,local.request)
mythread = MyThread()
mythread.start()
mythread.join()
print(‘主线程:’,local.request)
**总结**
只要满足绑定到"local"或"Local"对象上的属性,在每个线程中都是 隔离的,那么他就叫做 ThreadLocal 对象,也叫’ThreadLocal’变量。
### Flask\_app上下文
App上下文,也叫应用上下文
>
> **上下文**(感性的理解)
>
>
> 每一段程序都有很多外部变量,只有像add这种简单的函数才是 没有外部变量的。 一旦一段程序有了外部变量,这段程序就不 完整,不能独立运行。为了能让这段程序可以运行,就要给所 有的外部变量一个一个设置一些值。就些值所在的集合就是叫 上下文。 并且上下文这一概念在中断任务的场景下具有重大意义,其中 任务在被中断后,处理器保存上下文并提供中断处理,因些在 这之后,任务可以在同一个地方继续执行。(上下文越小,延迟 越小)
>
>
> **举例**
>
>
> 运行的Flask项目,每一个路由映射的内容片段,都不可以单独 拿出来使用.
>
>
> 当获取到了APP\_Context以后,就可以直接通过程序映射的地 址访问逻辑,并且可以重复使用。
>
>
>
上下文的一个典型应用场景就是用来缓存一些我们需要在发生请求 之前或者要使用的资源。举个例子,比如数据库连接。当我们在应 用上下文中来存储东西的时候你得选择一个唯一的名字,这是因为 应用上下文为 Flask 应用和扩展所共享。
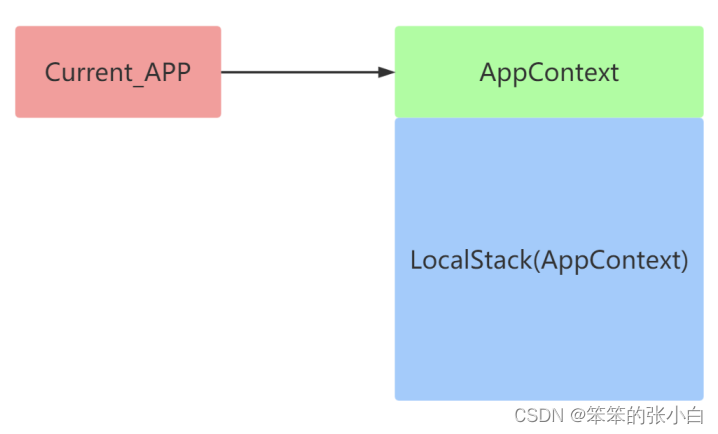
**应用上下文**:
应用上下文是存放到一个 LocalStack 的栈中。和应用app相关的操作就 必须要用到应用上下文
**比如**:
通过 current\_app 获取当前的这个 app 名字。
>
> **注意**
>
>
> 在视图函数中,不用担心应用上下文的问题。因为视图函数要 执行,那么肯定是通过访问url的方式执行的, 那么这种情况下,Flask底层就已经自动的帮我们把应用上下文 都推入到了相应的栈中。
>
>
> 如果想要在视图函数外面执行相关的操作, 比如: 获取当前的app名称,那么就必须要手动推入应用上下文
>
>
>
**第一种方式:便于理解的写法**
from flask import Flask,current_app
app = Flask(name)
#app上下文
app_context = app.app_context()
app_context.push()
print(current_app.name)
@app.route(‘/’)
def hello_world():
print(current_app.name) #获取应用的名称
return ‘Hello World!’
if name == ‘main’:
app.run(debug=True)
**第二种方式:用with语句**
from flask import Flask,current_app
app = Flask(name)
#app上下文
#换一种写法
with app.app_context():
print(current_app.name)
@app.route(‘/’)
def hello_world():
print(current_app.name) #获取应用的名称
return ‘Hello World!’
if name == ‘main’:
app.run(debug=True)
### Flask\_线程隔离的g对象

**保存为全局对象g对象的好处**:
g对象是在整个Flask应用运行期间都是可以使用的。 并且也跟request一样,是线程隔离的。 这个对象是专门用来存储开发者自己定义的一些数据,方便在整个 Flask程序中都可以使用。 一般使用就是,将一些经常会用到的数据绑定到上面,以后就直接 从g上面取就可以了,而不需要通过传参的形式,这样更加方便。
**g对象使用场景**:
有一个工具类utils.py 和 用户办理业务:
def funa(uname):
print(f’funa {uname}‘)
def funb(uname):
print(f’funb {uname}’)
def func(uname):
print(f’func {uname}')
**用户办理业务**
from flask import Flask,request
from utils import funa,funb,func
app = Flask(name)
#Flask_线程隔离的g对象使用详解
@app.route(“/profile/”)
def my_profile():
#从url中取参
uname = request.args.get(‘uname’)
#调用功能函数办理业务
funa(uname)
funb(uname)
func(uname)
#每次都得传参 麻烦,引入g对象进行优化
return “办理业务成功”
if name == ‘main’:
app.run(debug=True)
**优化工具类utils.py**
from flask import g
def funa():
print(f’funa {g.uname}‘)
def funb():
print(f’funb {g.uname}’)
def func():
print(f’func {g.uname}')
### **Flask\_钩子函数介绍**

**钩子函数概念**
在Flask中钩子函数是使用特定的装饰器装饰的函数。 为什么叫做钩子函数呢,是因为钩子函数可以在正常执行的代码 中,插入一段自己想要执行的代码。 那么这种函数就叫做钩子函数。
**常见的钩子函数**
* before\_first\_request:处理项目的第一次请求之前执行。
@app.before_first_request
def first_request():
print(‘first time request’)
* before\_request:在每次请求之前执行。通常可以用这个装饰 器来给视图函数增加一些变量。请求已经到达了Flask,但是还 没有进入到具体的视图函数之前调用。一般这个就是在视图函数 之前,我们可以把一些后面需要用到的数据先处理好,方便视图 函数使用。
@app.before_request
def before_request():
if not hasattr(g,‘glo1’):
setattr(g,‘glo1’,‘想要设置的’)
* teardown\_appcontext:不管是否有异常,注册的函数都会在 每次请求之后执行。
@app.teardown_appcontext
def teardown(exc=None):
if exc is None:
db.session.commit()
else:
db.session.rollback()
db.session.remove()
* template\_filter:在使用Jinja2模板的时候自定义过滤器。
@app.template_filter(“upper”)
def upper_filter(s):
return s.upper()
* context\_processor:上下文处理器。使用这个钩子函数,必须 返回一个字典。这个字典中的值在所有模版中都可以使用。这个 钩子函数的函数是,如果一些在很多模版中都要用到的变量,那 么就可以使用这个钩子函数来返回,而不用在每个视图函数中 的 render\_template 中去写,这样可以让代码更加简洁和好维护。
@app.context_processor
def context_processor():
if hasattr(g,‘user’):
return {“current_user”:g.user}
else:
return {}
* errorhandler:errorhandler接收状态码,可以自定义返回这 种状态码的响应的处理方法。在发生一些异常的时候,比如404 错误,比如500错误,那么如果想要优雅的处理这些错误,就可以 使用 errorhandler 来出来。
@app.errorhandler(404)
def page_not_found(error):
return ‘This page does not exist’,404
### Flask\_信号机制

**信号机制**
大白话来说,类似于两方属于敌对关系时,某人在敌对方阵营进行 交谈,一旦遇到特殊情况,某人便会发送信号,他的同伙接收(监 听)到他发的信号后,同伙便会做出一系列的应对策略(进攻|撤 退)。 flask中的信号使用的是一个第三方插件,叫做blinker。通过pip list看一下,如果没有安装,通过以下命令即可安装blinker
pip install blinker
**自定义信号步骤**


自定义信号可分为3步来完成。


第一是创建一个信号,第二是监听一个信号,第三是发送一个信 号。


以下将对这三步进行讲解:


创建信号:定义信号需要使用到blinker这个包的Namespace类来创建一个命名空间。比如定义一 个在访问了某个视图函数的时候的信号。示例代码如下:
Namespace的作用:为了防止多人开发的时候,信号名字
冲突的问题
from blinker import Namespace
mysignal = Namespace()
signal1 = mysignal.signal(‘信号名称’)
监听信号:监听信号使用signal1对象的connect方法,在这个方法中需要传递一个函数,用来监听 到这个信号后做该做的事情。示例代码如下:
def func1(sender,uname):
print(sender)
print(uname)
signal1.connect(func1)
发送信号:发送信号使用signal1对象的send方法,这个方法可以传递一些其他参数过去。示例代 码如下:
signal1.send(uname=‘momo’)
**Flask信号使用场景\_存储用户登录日志**


**信号使用场景**


定义一个登录的信号,以后用户登录进来以后 就发送一个登录信号,然后能够监听这个信号 在监听到这个信号以后,就记录当前这个用户登录的信息 用信号的方式,记录用户的登录信息即登录日志。


**编写一个signals.py文件创建登录信号**
from blinker import Namespace
from datetime import datetime
from flask import request,g
namespace = Namespace()
#创建登录信号
login_signal = namespace.signal(‘login’)
def login_log(sender):
# 用户名 登录时间 ip地址
now = datetime.now()
ip = request.remote_addr
log_data = “{uname}{now}{ip}”.format(uname=g.uname, now=now, ip=ip)
with open(‘login_log.txt’,‘a’) as f:
f.write(log_data + “\n”)
f.close()
#监听信号
login_signal.connect(login_log)
**使用信号存储用户登录日志**
from flask import Flask,request,g
from signals import login_signal
app = Flask(name)
@app.route(‘/login/’)
def login():
# 通过查询字符串的形式来传递uname这个参数
uname = request.args.get(‘uname’)
if uname:
g.uname = uname
# 发送信号
login_signal.send()
return ‘登录成功!’
else:
return ‘请输入用户名!’
if name == ‘main’:
app.run(debug=True)
### Flask\_内置信号
Flask内置了10个常用的信号:
1 template\_rendered:模版渲染完成后的信号。
2 before\_render\_template:模版渲染之前的信号。
3 request\_started:请求开始之前,在到达视图函数之前发送信号。
4 request\_finished:请求结束时,在响应发送给客户端之前发送信号。
5 request\_tearing\_down:请求对象被销毁时发送的信号,即使在请求过程中发生异常也会发送信 号。
6 got\_request\_exception:在请求过程中抛出异常时发送信号,异常本身会通过exception传递到订 阅(监听)的函数中。一般可以监听这个信号,来记录网站异常信息。
7 appcontext\_tearing\_down:应用上下文被销毁时发送的信号。
8 appcontext\_pushed:应用上下文被推入到栈上时发送的信号。
9 appcontext\_popped:应用上下文被推出栈时发送的信号。
10 message\_flashed:调用了Flask的 flash 方法时发送的信号。
### WTForms介绍和基本使用

**WTForms介绍**
这个插件库主要有两个作用。 第一个是做表单验证,将用户提交上来的数据进行验证是否符合系 统要求。 第二个是做模版渲染。 (了解即可) 官网:https://wtforms.readthedocs.io/en/latest/index.html
Flask-WTF是简化了WTForms操作的一个第三方库。WTForms表单 的两个主要功能是验证用户提交数据的合法性以及渲染模板。而 Flask-WTF还包括一些其他的功能:CSRF保护,文件上传等。 安装Flask-WTF默认也会安装WTForms,因此使用以下命令来安装 Flask-WTF和WTForms:
pip install flask-wtf
**WTForms表单验证的基本使用**


1 自定义一个表单类,继承自wtforms.Form类。


2 定义好需要验证的字段,字段的名字必须和模版中那些需要验证的input标签的name属性值保持一 致。


3 在需要验证的字段上,需要指定好具体的数据类型。


4 在相关的字段上,指定验证器。


5 以后在视图函数中,只需要使用这个表单类的对象,并且把需要验证的数据,也就是request.form 传给这个表单类,再调用表单类对象.validate()方法进行,如果返回True,那么代表用户输入的数 据都是符合格式要求的,Flase则代表用户输入的数据是有问题的。如果验证失败了,那么可以通 过表单类对象.errors来获取具体的错误信息。
from flask import
Flask,render_template,request
from wtforms import Form,StringField
from wtforms.validators import
Length,EqualTo
app = Flask(name)
@app.route(‘/’)
def index():
return ‘Hello! ’
class RegisterForm(Form):
uname = StringField(validators=[Length(min=2,max=10,message=‘用户名长度2-10之间’)])
pwd = StringField(validators=[Length(min=2,max=10)])
pwd2 = StringField(validators=[Length(min=2,max=10),EqualTo(‘pwd’,message=‘2次密码不一致’)])
@app.route(’/register/‘, methods=[‘GET’,‘POST’])
def register():
if request.method == ‘GET’:
return render_template(‘register.html’)
else:
form = RegisterForm(request.form)
if form.validate(): # 验证成功:True,失败:False
return ‘验证成功!’
else:
return f’验证失败!{form.errors}’
if name == ‘main’:
app.run(debug=True)
### WTForms常用验证器


页面把数据提交上来,需要经过表单验证,进而需要借助验证器来 进行验证,以下是常用的内置验证器:


1. Length:字符串长度限制,有min和max两个值进行限制。
username = StringField(validators=[Length(min=3,max=10,message=“用户名长度必须在3到10位之间”)])
2. EqualTo:验证数据是否和另外一个字段相等,常用的就是密码 和确认密码两个字段是否相等。
password_repeat = StringField(validators=[Length(min=6,max=10),EqualTo(“password”)])
3. Email:验证上传的数据是否为邮箱数据格式 如:223333@qq. com。
email = StringField(validators=[Email()])
4. InputRequired:验证该项数据为必填项,即要求该项非空。
username = StringField(validators=[input_required()])
5. NumberRange:数值的区间,有min和max两个值限制,如果 处在这两个数字之间则满足。
age = IntegerField(validators=[NumberRange(12,18)])
6. Regexp:定义正则表达式进行验证,如验证手机号码。
phone = StringField(validators=[Regexp(r’1[34578]\d{9}')])
7. URL:必须是URL的形式 如http://www.bjsxt.com。
home_page = StringField(validators=[URL()])
8. UUID:验证数据是UUID类型。
uuid = StringField(validators=[UUID()])
### WTForms自定义验证器


只有当WTForms内置的验证器不够使的时候,才需要使用自定义验 证器。 如果想要对表单中的某个字段进行更细化的验证,那么可以针对这 个字段进行单独的验证。


**自定义验证器步骤如下:**


1 定义一个方法,方法的名字规则是: validate\_字段名(self,field) 。


2 在方法中,使用 field.data 可以获取到这个字段的具体的值。


3 验证时,如果数据满足条件,那么可以什么都不做。如果验证失败,那么应该抛出一个 wtforms.validators.ValidationError 的异常,并且把验证失败 的信息传到这个异常类中。


**场景:验证码实现**


关键代码演示:(实现验证码 验证)
from flask import session
from wtforms import
Form,StringField,IntegerField
from wtforms.validators import
Length,EqualTo,Email,InputRequired,NumberRan
ge,Regexp,URL,UUID,ValidationError
class RegisterForm2(Form):
email = StringField(validators=[Email()])
uname = StringField(validators=[InputRequired()])
age = IntegerField(validators=[NumberRange(18,40)])
phone = StringField(validators=[Regexp(r’1[34578]\d{9}')])
phomepage = StringField(validators=[URL()])
uuid = StringField(validators=[UUID()])
code = StringField(validators=[Length(4,4)])
#取到的值 和服务器上 session上存储的值对比
def validate_code(self,field):
print(field.data,session.get(‘code’))
if field.data !=session.get(‘code’):
raise ValidationError(‘验证码不一致!’)
### Flask安全上传文件


**上传文件步骤**:


1. 在模版html中,表单需要指定 enctype=‘multipart/form-data’ 才能上传文 件。


2. 在后台如果想要获取上传的文件,那么应该使用 request.files.get(‘文件 名’) 来获取。


3. 保存文件之前,先要使用 werkzeug.utils.secure\_filename 来对上传上来的文 件名进行一个过滤。能保证不会有安全问题。


4. 获取到上传上来的文件后,使用 文件对象.save(路径) 方法来保存文件。 路径=完整路径=路径名+文件名


upload.html页面
| 头像: | |
| 描述: | |
app.py文件
from flask import
Flask,request,render_template
import os
from werkzeug.utils import secure_filename
app = Flask(name)
UPLOAD_PATH = os.path.join(os.path.dirname(file),‘images’)
@app.route(‘/upload/’,methods=[‘GET’,‘POST’])
def upload():
if request.method == ‘GET’:
return render_template(‘upload.html’)
else:
desc = request.form.get(“desc”)
pichead = request.files.get(“pichead”)
filename = secure_filename(pichead.filename) #包装一下 保证文件安全
#pichead.save(os.path.join(UPLOAD_PATH,pichead.filename)) #可优化
pichead.save(os.path.join(UPLOAD_PATH,filename)) #已优化
print(desc)
return ‘文件上传成功’
if name == ‘main’:
app.run(debug=True)
**访问文件**


从服务器上读取文件,应该定义一个url与视图函数,来获取指定的 文件。 在这个视图函数中,使用 send\_from\_directory(文件的目录,文件名) 来获取。
from flask import Flask
import os
from flask import send_from_directory
app = Flask(name)
UPLOAD_PATH = os.path.join(os.path.dirname(file),‘images’)
@app.route(‘/images//’)
def get_image(filename):
return send_from_directory(UPLOAD_PATH,filename)
if name == ‘main’:
app.run(debug=True)
### 利用flask-wtf验证上传的文件


**关键点**:


1 定义验证表单类的时候,对文件类型的字段,需要采用 FileField 这个类型,即wtforms.FileField 2 验证器需要从 flask\_wtf.file 中导入。 flask\_wtf.file.FileRequired 和 flask\_wtf.file.FileAllowed


3 flask\_wtf.file.FileRequired 是用来验证文件上传不能为空。


4 flask\_wtf.file.FileAllowed 用来验证上传的文件的后缀名, 如常见图片后缀 .jpg 和.png以及.gif等。


5 在视图函数中,需要使用 from werkzeug.datastructures import CombinedMultiDict 来把 request.form 与 request.files 来进行合并。


6 最后使用 表单验证对象.validate()进行验证。


**代码如下:**


upload.html页面
| 头像: | |
| 描述: | |
formscheck.py文件
from wtforms import
Form,FileField,StringField
from wtforms.validators import InputRequired
flask_wtf
from flask_wtf.file import FileRequired,FileAllowed
class UploadForm(Form):
pichead = FileField(validators= [FileRequired(),FileAllowed([‘jpg’,‘png’,‘gif’])])
desc = StringField(validators=[InputRequired()])
app.py文件
from flask import
Flask,request,render_template
import os
from werkzeug.utils import secure_filename
from formscheck import UploadForm
from werkzeug.datastructures import
CombinedMultiDict
app = Flask(name)
UPLOAD_PATH = os.path.join(os.path.dirname(file),‘images’)
#利用flask-wtf验证上传的文件
@app.route(‘/upload/’,methods=[‘GET’,‘POST’])
def upload():
if request.method == ‘GET’:
return render_template(‘upload.html’)
else:
form = UploadForm(CombinedMultiDict([request.form,request.files]))
if form.validate():
# desc = request.form.get(“desc”)
# pichead = request.files.get(“pichead”)
desc = form.desc.data
pichead = form.pichead.data
filename = secure_filename(pichead.filename)
pichead.save(os.path.join(UPLOAD_PATH,filename))
print(desc)
return ‘文件上传成功’
else:
print(form.errors)
return “文件上传失败”
if name == ‘main’:
app.run(debug=True)
### Restful介绍
**1.Restful接口规范**
REST 指的是一组架构约束条件和原则。满足这些约束条件和原则的 应用程序或设计就是 RESTful。 RESTful是一种软件架构风格、设计风格,而不是标准,只是提供了 一组设计原则和约束条件。 它主要用于客户端和服务器交互类的软件。基于这个风格设计的软 件可以更简洁,更有层次。 RESTful接口规范是用于在前端与后台进行通信的一套规范。使用这 个规范可以让前后端开发变得更加轻松。
\*\*2.适用场景:\*\*一个系统的数据库数据,展现的平台有PC端、移动 端、app端、ios端。 前端工程师:都遵循RESTful编程规范 后端工程师:都遵循RESTful编程规范 最终结果:开发效率高,便于管理。
\*\*3.协议:\*\*用http或者https协议。
**4.数据传输格式:** 数据传输的格式应该都用json格式。
\*\*5.url链接规则:\*\*url链接中,不能有动词,只能有名词。 并且对于一些名词,如果出现复数,那么应该在后面加s。 比如:获取新闻列表,应该使用 /news/ ,而不应该使用/get\_news/
**6.HTTP请求方式**: GET:从服务器上获取资源。 POST:在服务器上新增或者修改一个资源。 PUT:在服务器上更新资源。(客户端提供所有改变后的数据) PATCH:在服务器上更新资源。(客户端只提供需要改变的属性) DELETE:从服务器上删除资源。
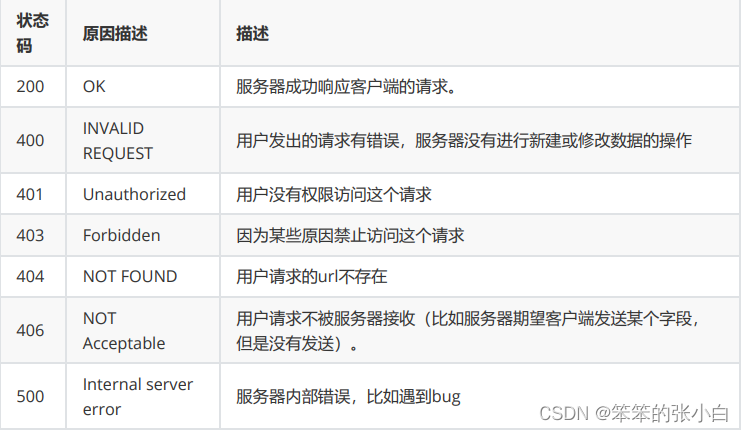
**7.状态码:**
### Restful的基本使用
**1.介绍:**
**优势**: Flask-Restful是一个专门用来写restful api的一个插件。 使用它可以快速的集成restful api接口功能。 在系统的纯api的后台中,这个插件可以帮助我们节省很多时间。
**缺点**: 如果在普通的网站中,这个插件就没有优势了,因为在普通的网站 开发中,是需要去渲染HTML代码的, 而Flask-Restful在每个请求中都是返回json格式的数据。
\*\*2.安装:\*\*pip install flask-restful
**3.基本使用**:
定义Restful的类视图:
1. 从 flask\_restful 中导入 Api ,来创建一个 api 对象。
2. 写一个类视图,让他继承自 Resource 类,然后在这个里面,使用 你想要的请求方式来定义相应的方法,比如你想要将这个类视图只 能采用 post 请求,那么就定义一个 post 方法。
3. 使用 api.add\_resource 来添加类视图与 url 。
from flask import Flask,url_for
pip install flask-restful
from flask_restful import Resource,Api
app = Flask(name)
建立Api对象,并绑定应用APP
api = Api(app)
class LoginView(Resource):
def get(self):
return {“flag”:True}
def post(self):
return {“flag”:False}
建立路由映射
api.add_resource(LoginView,‘/login/’)
api.add_resource(LoginView,‘/login/’,‘/login2/’,endpoint=‘login’)
with app.test_request_context():
# werkzeug.routing.BuildError: Could not build url for endpoint ‘LoginView’.
# Did you mean ‘loginview’ instead?
# 默认没有写endpoint反向url_for函数通过小写函数名
# 如果有多个url,会返回第1个URL
# print(url_for(‘loginview’))
print(url_for(‘login’))
if name == ‘main’:
app.run(debug=True)
>
> **注意**
>
>
> 1 如果你想返回json数据,那么就使用flask\_restful,如果你是想渲染模版,那么还是采用之前 的方式,就是 app.route 的方式。
>
>
> 2 url还是跟之前的一样,可以传递参数。也跟之前的不一样,可以指定多个url。
>
>
> 3 endpoint是用来给url\_for反转url的时候指定的。如果不写endpoint,那么将会使用视图的 名字的小写来作为endpoint。
>
>
> 4 add\_resource的第二个参数是访问这个视图函数的url,这个url可以跟之前的route一样,可 以传递参数,并且还有一点不同的是,这个方法可以传递多个url来指定这个视图函数。
>
>
>
### Flask\_RESTful参数验证

**参数验证**
参数验证也叫参数解析 Flask-Restful插件提供了类似WTForms来验证提交的数据是否合法 的包,叫做reqparse。
**基本用法**
1 通过 flask\_restful.reqparse 中 RequestParser 建立解析器
2 通过 RequestParser 中的 add\_argument 方法定义字段与解析规则
3 通过 RequestParser 中的 parse\_args 来解析参数
1 解析正确,返回正确参数

2 解析错误,返回错误信息给前端
from flask import Flask
from flask_restful import Api,Resource
from flask_restful.reqparse import
RequestParser
app = Flask(name)
api = Api(app)
class RegisterView(Resource):
def post(self):
# 建立解析器
parser = RequestParser()
# 定义数据的解析规则
parser.add_argument(‘uname’,type=str,required=True,help=‘用户名验证错误’,trim=True)
# 解析数据
args = parser.parse_args()
# 正确,直接获取参数
print(args)
# 错误,回馈到前端
    # 响应数据
    return {'msg':'注册成功!!'}
建立映射关系
api.add_resource(RegisterView,‘/register/’)
if name == ‘main’:
app.run(debug=True)
**add\_argument方法参数详解**


add\_argument方法可以指定这个字段的名字,这个字段的数据类 型等,验证错误提示信息等,具体如下:


\*\*1 default:\*\*默认值,如果这个参数没有值,那么将使用这个参数 指定的默认值。


**2 required**:是否必须。默认为False,如果设置为True,那么这 个参数就必须提交上来。


\*\*3 type:\*\*这个参数的数据类型,如果指定,那么将使用指定的数 据类型来强制转换提交上来的值。可以使用python自带的一些 数据类型(如str或者int),也可以使用flask\_restful.inputs下的一 些特定的数据类型来强制转换。
url:会判断这个参数的值是否是一个url,如果不是,那么就会抛出异常。

regex:正则表达式。

date:将这个字符串转换为datetime.date数据类型。如果转换不成功,则会抛出一个异常.
**4 choices**:固定选项。提交上来的值只有满足这个选项中的值才 符合验证通过,否则验证不通过。


**5 help**:错误信息。如果验证失败后,将会使用这个参数指定的 值作为错误信息。


\*\*6 trim:\*\*是否要去掉前后的空格
from flask import Flask
from flask_restful import
Api,Resource,inputs
from flask_restful.reqparse import
RequestParser
app = Flask(name)
api = Api(app)
class RegisterView(Resource):
def post(self):
# 建立解析器
parser = RequestParser()
# 定义解析规则
parser.add_argument(‘uname’,type=str,required=True,trim=True,help=‘用户名不符合规范’)
parser.add_argument(‘pwd’,type=str,help=‘密码错误’,default=‘123456’)
parser.add_argument(‘age’,type=int,help=‘年龄验证错误!’)
parser.add_argument(‘gender’,type=str,choices=[‘男’, ‘女’,‘保密’],help=‘性别验证错误’)
parser.add_argument(‘birthday’,type=inputs.date,help=‘生日验证错误’)
parser.add_argument(‘phone’,type=inputs.regex(‘^1[356789]\d{9}$’),help=‘电话验证错误’)
parser.add_argument(‘homepage’,type=inputs.url,help=‘个人主页验证错误’)
# 解析数据
args = parser.parse_args()
print(args)
return {‘msg’:‘注册成功!’}
api.add_resource(RegisterView,‘/register/’)
if name == ‘main’:
app.run(debug=True)
## Flask\_SQLAlchemy


### SQLAlchemy的使用


数据库是一个网站的基础。 比如MySQL、MongoDB、SQLite、PostgreSQL等,这里我们以 MySQL为例进行讲解。 SQLAlchemy是一个ORM框架。


>
> **对象关系映射**(英语:Object Relational Mapping,简称 ORM,或O/RM,或O/R mapping),是一种程序设计技术, 用于实现面向对象编程语言里不同类型系统的数据之间的转 换。 从效果上说,它其实是创建了一个可在编程语言里使用的“虚拟 对象数据库”。
>
>
> **大白话** 对象模型与数据库表的映射
>
>
>


**为什么要有SQLAlchemy?**


随着项目的越来越大,采用写原生SQL的方式在代码中会出现大量 重复的SQL语句,那么,问题就出现了:


1.SQL语句重复利用率不高,越复杂的SQL语句条件越多,代码越长,会出现很多相近的SQL语句。


2.很多SQL语句 是在业务逻辑中拼接出来的,如果数据库需要更改,就要去修改这些逻辑,这会容易 漏掉对某些SQL语句的修改。


3 写SQL时容易忽略web安全问题,造成隐患。


而ORM可以通过类的方式去操作数据库而不用再写原生的SQL语 句,通过把表映射成类,把行作为实例(一条数据),把字段作为属 性,ORM在执行对象操作的时候最终还是会把对象的操作转换为数 据库的原生语句,但使用ORM有许多**优点**:


1.易用性:使用ORM做数据库开发可以有效减少重复SQL语句的概率,写出来的模型也更加直观、清 晰


2.性能损耗小:ORM转换成底层数据库操作指令确实会有一些开销。但是从实际情况来看,这种性能 损耗很少(不足5%),只要不是针对性能有严苛的要求,综合考虑开发效率、代码阅读性,带来 的好处远大于性能损耗,而且项目越大作用越明显。


3 设计灵活:可以轻松的写出复杂的查询。


4.可移植性:SQLAlchemy封装了底层的数据库实现,支持多个关系数据库引擎,包括流行的 Mysql、PostgreSQL和SQLite,可以非常轻松的切换数据库。


**使用ORM操作数据库将变得非常简单!**
class Person:
name = ‘xx’
age = 18
country =‘xx’
Person类 -> 数据库中的一张表
Person类中的属性 -> 数据库中一张表字段
Person类的一个对象 -> 数据库中表的一条数据
p = Person(‘xx’,xx)
p.save()
insert into table values (‘xx’,xx)
我们会以 MySQL+ SQLAlchemy 组合进行讲解。


在操作数据库操作之前,先确保你已经安装了以下软件:


* mysql:如果是在windows上,到官网下载
* pymysql:pymysql是用Python来操作mysql的包 pip install pymysqlpip install pymysql
* SQLAlchemy:SQLAlchemy是一个数据库的ORM框架,我们在 后面会用到
pip install pymysql
pip install SQLAlchemy
### SQLAlchemy操作数据库

**连接数据库**
from sqlalchemy import create_engine
def conn_db1():
# 数据库的变量
HOST = ‘192.168.30.151’ # 127.0.0.1/localhost
PORT = 3306
DATA_BASE = ‘flask_db’
USER = ‘root’
PWD = ‘123’
# DB_URI = f’数据库的名+驱动名://{USER}:{PWD}@{HOST}:{PORT}/{DATA_BASE}’
DB_URI = f’mysql+pymysql://{USER}:{PWD}@{HOST}:{PORT}/{DATA_BASE}’
engine = create_engine(DB_URI)
# 执行一个SQL
sql = ‘select 2;’
conn = engine.connect()
rs = conn.execute(sql)
print(rs.fetchone())
**执行原生SQL**
def conn_db2():
# 数据库的变量
HOST = ‘192.168.30.151’ # 127.0.0.1/localhost
PORT = 3306
DATA_BASE = ‘flask_db’
USER = ‘root’
PWD = ‘123’
# DB_URI = f’数据库的名+驱动名://{USER}:{PWD}@{HOST}:{PORT}/{DATA_BASE}’
DB_URI = f’mysql+pymysql://{USER}:{PWD}@{HOST}:{PORT}/{DATA_BASE}’
‘’’
创建一个引擎,专门链接数据库用的
engine = create_engine(DB_URI)
sql = ‘create table t_user(id int primary key auto_increment, name varchar(32));’
链接数据库
conn = engine.connect()
执行SQL即可
conn.execute(sql)
‘’’
def conn_db3():
# 数据库的变量
HOST = ‘192.168.30.151’ # 127.0.0.1/localhost
PORT = 3306
DATA_BASE = ‘flask_db’
USER = ‘root’
PWD = ‘123’
# DB_URI = f’数据库的名+驱动名://{USER}:{PWD}@{HOST}:{PORT}/{DATA_BASE}’
DB_URI = f’mysql+pymysql://{USER}:{PWD}@{HOST}:{PORT}/{DATA_BASE}’
# 创建一个引擎,专门链接数据库用的
engine = create_engine(DB_URI)
sql = ‘create table t_user1(id int primary key auto_increment, name varchar(32));’
# 链接数据库
with engine.connect() as conn:
# 执行SQL即可
conn.execute(sql)
### ORM模型映射到数据库中


* 用 declarative\_base 根据 engine 创建一个ORM基类
from sqlalchemy.ext.declarative import declarative_base
engine = create_engine(DB_URI)
Base = declarative_base(engine)
* 用这个 Base 类作为基类来写自己的ORM类。要定义 \_\_tablename\_\_ 类 属性,来指定这个模型映射到数据库中的表名
class Person(Base):
tablename =‘t_person’
* 创建属性来映射到表中的字段,所有需要映射到表中的属性都应 该为Column类型
class Person(Base):
tablename =‘t_person’
# 在这个ORM模型中创建一些属性,来跟表中的字段进行一一映射。
# 这些属性必须是sqlalchemy给我们提供好的数据类型
id = Column(Integer,primary_key=True,autoincrement=True)
name = Column(String(50))
age = Column(Integer)
country = Column(String(50))
* 使用 Base.metadata.create\_all() 来将模型映射到数据库中
Base.metadata.create_all()
>
> **注意**
>
>
> 一旦使用 Base.metadata.create\_all() 将模型映射到数据库中后,即使改变 了模型的字段,也不会重新映射了
>
>
>
### SQLAlchemy对数据的增删改查操作

**构建session对象**
>
> 所有和数据库的ORM操作都必须通过一个叫做 session 的会话对象 来实现,通过以下代码来获取会话对象
>
>
>
from sqlalchemy.orm import sessionmaker
engine = create_engine(DB_URI)
Base = declarative_base(engine)
session = sessionmaker(engine)()
**添加对象**
def create_data_one():
with Session() as session:
p1 = Person(name = ‘刘备’,age = 6 ,country=‘北京’)
session.add(p1)
session.commit()
def create_data_many():
with Session() as session:
p2 = Person(name = ‘吕布’,age = 19 ,country=‘北京’)
p3 = Person(name = ‘貂蝉’,age = 18 ,country=‘北京’)
session.add_all([p2,p3])
session.commit()
**查找对象**
def query_data_all():
with Session() as session:
all_person = session.query(Person).all()
for p in all_person:
print(p.name)
def query_data_one():
with Session() as session:
p1 = session.query(Person).first()
print(p1.name)
def query_data_by_params():
with Session() as session:
# p1 = session.query(Person).filter_by(name=‘吕布’).first()
p1 = session.query(Person).filter(Person.name == ‘吕布’).first()
print(p1.age)
**修改对象**
def update_data():
with Session() as session:
p1 = session.query(Person).filter(Person.name == ‘吕布’).first()
p1.age = 20
# 提交事务
session.commit()
**删除对象**


将需要删除的数据从数据库中查找出来,然后使用 session.delete 方法将 这条数据从session中删除,最后做commit操作就可以了
def delete_data():
with Session() as session:
p1 = session.query(Person).filter(Person.name == ‘貂蝉’).first()
session.delete(p1)
session.commit()
### SQLAlchemy常用数据类型


**Integer**:整形,映射到数据库中是int类型。


**Float**:浮点类型,映射到数据库中是float类型。他占据的32 位。


**Double**:双精度浮点类型,映射到数据库中是double类型,占 据64位 (SQLALCHEMY中没有)。 **String**:可变字符类型,映射到数据库中是varchar类型.


**Boolean**:布尔类型,映射到数据库中的是tinyint类型。


**DECIMAL**:定点类型。是专门为了解决浮点类型精度丢失的问 题的。在存储钱相关的字段的时候建议大家都使用这个数据类 型。


* 这个类型使用的时候需要传递两个参数,第一个参数是用来标记这个字段总能能存储多少个数 字,第二个参数表示小数点后有多少位。


**Enum**:枚举类型。指定某个字段只能是枚举中指定的几个值, 不能为其他值。在ORM模型中,使用Enum来作为枚举,示例代 码如下:
class News(Base):
tablename = ‘t_news’
tag = Column(Enum(“python”,‘flask’,‘django’))
在Python3中,已经内置了enum这个枚举的模块,我们也可以 使用这个模块去定义相关的字段。示例代码如下:
class TagEnum(enum.Enum):
python = “python”
flask = “flask”
django = “django”
class News(Base):
tablename = ‘t_news’
id = Column(Integer,primary_key=True,autoincrement=True)
tag = Column(Enum(TagEnum))
**Date**:存储时间,只能存储年月日。映射到数据库中是date类 型。在Python代码中,可以使用 datetime.date 来指定。


**DateTime**:存储时间,可以存储年月日时分秒毫秒等。映射到 数据库中也是datetime类型。在Python代码中,可以使用 datetime.datetime 来指定。


**Time**:存储时间,可以存储时分秒。映射到数据库中也是time 类型。在Python代码中,可以使用 datetime.time 来至此那个。示例 代码如下:
class News(Base):
tablename = ‘t_news’
create_time = Column(Time)
news =News(create_time=time(hour=11,minute=11,second=11))
**Text**:存储长字符串。一般可以存储6W多个字符。如果超出了 这个范围,可以使用LONGTEXT类型。映射到数据库中就是text 类型。


**LONGTEXT**:长文本类型,映射到数据库中是longtext类型。
from sqlalchemy import create_engine,Column,Integer,String,Float,Enum,Boolean,DECIMAL,Text,Date,DateTime,Time
from sqlalchemy.ext.declarative import declarative_base
from sqlalchemy.dialects.mysql import LONGTEXT
from sqlalchemy.orm import sessionmaker
import enum
from datetime import date
from datetime import datetime
from datetime import time
准备数据库的一堆信息 ip port user pwd 数据库的名称 按要求组织格式
HOSTNAME = ‘127.0.0.1’
PORT = ‘3306’
DATABASE = ‘first_sqlalchemy’
USERNAME = ‘root’
PASSWORD = ‘root’
dialect+driver://username:password@host:port/database?charset=utf8
按照上述的格式来 组织数据库信息
DB_URI =“mysql+pymysql://{username}:{password}@{host}:{port}/{db}?charset=utf8”.format(username=USERNAME,password=PASSWORD,
host=HOSTNAME,port=PORT,db=DATABASE)
创建数据库引擎
engine = create_engine(DB_URI)
创建会话对象
session = sessionmaker(engine)()
定义一个枚举类
class TagEnum(enum.Enum):
python=“PYHTON2”
flask=“FLASK2”
django =“DJANGO”
创建一个ORM模型 说明基于sqlalchemy 映射到mysql数据库的常用字段类型有哪些?
Base = declarative_base(engine)
class News(Base):
tablename=‘news’
id = Column(Integer,primary_key=True,autoincrement=True)
price1 = Column(Float) #存储数据时存在精度丢失问题
price2 = Column(DECIMAL(10,4))
title = Column(String(50))
is_delete =Column(Boolean)
tag1 =Column(Enum(‘PYTHON’,‘FLASK’,‘DJANGO’)) # 枚举常规写法
tag2 =Column(Enum(TagEnum)) #枚举另一种写法
create_time1=Column(Date)
create_time2=Column(DateTime)
create_time3=Column(Time)
content1 =Column(Text)
content2 =Column(LONGTEXT)
Base.metadata.drop_all()
Base.metadata.create_all()
新增数据到表news中
a1 = News(price1=1000.0078,price2=1000.0078,title =‘测试数据’,is_delete=True,tag1=“PYTHON”,tag2=TagEnum.flask,
create_time1=date(2018,12,12),create_time2=datetime(2019,2,20,12,12,30),create_time3=time(hour=11,minute=12,second=13),
content1=“hello”,content2=“hello hi nihao”)
a1 = News(price1=1000.0078,price2=1000.0078,title=‘测试数据’
,is_delete=False,tag1=“PYTHON”,tag2=TagEnum.python,
create_time1=date(2018,12,12),create_time2=datetime(2019,2,20,12,12,30),create_time3=time(hour=11,minute=12,second=13),
content1=“hello”,content2=“hello hi nihao”)
session.add(a1)
session.commit()
**Column常用参数**


**primary\_key**:True设置某个字段为主键。


**autoincrement**:True设置这个字段为自动增长的。


**default**:设置某个字段的默认值。在发表时间这些字段上面经 常用。


**nullable**:指定某个字段是否为空。默认值是True,就是可以为 空。


**unique**:指定某个字段的值是否唯一。默认是False。


**onupdate**:在数据更新的时候会调用这个参数指定的值或者函 数。在第一次插入这条数据的时候,不会用onupdate的值,只 会使用default的值。常用于是 update\_time 字段(每次更新数据的 时候都要更新该字段值)。


**name**:指定ORM模型中某个属性映射到表中的字段名。如果不 指定,那么会使用这个属性的名字来作为字段名。如果指定了, 就会使用指定的这个值作为表字段名。这个参数也可以当作位置 参数,在第1个参数来指定。
title = Column(String(50),name=‘title’,nullable=False)
title = Column(‘my_title’,String(50),nullable=False)
from datetime import datetime
from sqlalchemy import
Column,Integer,DateTime,String
from db_util import Base,Session
class News(Base):
tablename = ‘t_news2’
id = Column(Integer,primary_key = True,autoincrement = True)
phone = Column(String(11),unique = True)
title = Column(String(32),nullable = False)
read_count = Column(Integer,default=1)
create_time = Column(DateTime,default = datetime.now)
update_time = Column(DateTime,default = datetime.now, onupdate =datetime.now ) # 当数据更新后,参数的内容才会更改
def create_data():
new1 = News(phone=‘16866666666’,title=‘测试列参数’)
with Session() as session:
session.add(new1)
session.commit()
def create_data2():
# new1 = News(phone=‘16866666666’,title=‘测试列参数’) # 不允许重复
# new1 = News(phone=‘16866666668’) # title不能为空
# with Session() as session:
# session.add(new1)
# session.commit()
with Session() as session:
new1 = session.query(News).first()
new1.read_count = 2
session.commit()
if name == ‘main’:
# Base.metadata.create_all()
# create_data()
create_data2()
### query函数的使用

* 模型名。指定查找这个模型中所有的属性(对应查询表为全表查 询)
* 模型中的属性。可以指定只查找某个模型的其中几个属性
* 聚合函数
+ func.count:统计行的数量。
+ func.avg:求平均值。
+ func.max:求最大值。
+ func.min:求最小值。
+ func.sum:求和。
>
> **提示**
>
>
> func 上,其实没有任何聚合函数。但是因为他底层做了一些 魔术,只要mysql中有的聚合函数,都可以通过func调用
>
>
>
from random import randint
from sqlalchemy import
Column,Integer,String,func
from db_util import Base,Session
class Item(Base):
tablename = ‘t_item’
id = Column(Integer,primary_key = True,autoincrement = True)
title = Column(String(32))
price = Column(Integer)
def create_data():
with Session() as ses:
for i in range(10):
item = Item(title = f’产品:{i+1}',price=randint(1,100))
ses.add(item)
ses.commit()
def query_model_name():
# 获取所有的字段
with Session() as ses:
rs = ses.query(Item).all()
for r in rs:
print(r.title)
def query_model_attr():
# 获取指定的字段
with Session() as ses:
rs = ses.query(Item.title,Item.price).all()
for r in rs:
print(r.price)
def query_by_func():
# 统计指定的列数据
with Session() as ses:
# rs =ses.query(func.count(Item.id)).first()
# rs =ses.query(func.max(Item.price)).first()
# rs =ses.query(func.avg(Item.price)).first()
rs =ses.query(func.sum(Item.price)).first()
print(rs)
if name ==‘main’:
# Base.metadata.create_all()
# create_data()
# query_model_name()
# query_model_attr()
query_by_func()
### filter过滤数据

过滤是数据提取的一个很重要的功能,以下对一些常用的过滤条件 进行解释,并且这些过滤条件都是只能通过filter方法实现的:
* equals
news=session.query(News).filter(News.title ==“title1”).first()
* not equals
query(User).filter(User.name != ‘ed’)
* like & ilike [不区分大小写]
query(User).filter(User.name.like(‘%ed%’))
* in
query(User).filter(User.name.in_([‘ed’,‘wendy’,‘jack’]))
* not in
query(User).filter(~User.name.in_([‘ed’,‘wendy’,‘jack’]))
* is null
query(User).filter(User.name==None)
或者是 query(User).filter(User.name.is_(None))
* is not null
query(User).filter(User.name != None)
或者是query(User).filter(User.name.isnot(None))
* and
query(User).filter(and_(User.name==‘ed’,User.fullname==‘Ed Jones’))
或者是传递多个参数
query(User).filter(User.name==‘ed’,User.fullname==‘Ed Jones’)
或者是通过多次filter操作
query(User).filter(User.name==‘ed’).filter(User.fullname==‘Ed Jones’)
* or
query(User).filter(or_(User.name==‘ed’,User.name==‘wendy’))
如果想要查看orm底层转换的sql语句,可以在filter方法后面不要再 执行任何方法直接打印就可以看到了。比如:
news =session.query(News).filter(or_(News.title==‘abc’,News.content==‘abc’))
print(news)
from random import randint
from uuid import uuid4
from sqlalchemy import
Column,Integer,String,Float,Text,and_,or_
from db_util import Base,Session
class Article(Base):
tablename = ‘t_article’
id =Column(Integer,primary_key=True,autoincrement=True)
title =Column(String(50),nullable=False)
price = Column(Float,nullable=False)
content = Column(Text)
def __repr__(self):
    return f"<Article(title:{self.title} price:{self.price} content:{self.content})>"
def create_data():
with Session() as ses:
for i in range(10):
if i%2 == 0:
art = Article(title =f’title{i+1}‘,price=randint(1,100),content= uuid4())
else:
art = Article(title =f’TITLE{i+1}’,price=randint(1,100))
ses.add(art)
ses.commit()
def query_data():
with Session() as ses:
# rs =ses.query(Article).filter_by(id=1).first()
rs =ses.query(Article).filter(Article.id 1).first()
print(rs)
def query_data_equal():
with Session() as ses:
rs =ses.query(Article).filter(Article.title ‘title2’).first()
print(rs)
def query_data_not_equal():
with Session() as ses:
rs =ses.query(Article).filter(Article.title !=‘title2’).all()
print(rs)
def query_data_like():
with Session() as ses:
# select * from t_article wheretitle like ‘title%’;
rs =ses.query(Article).filter(Article.title.like(‘title%’)).all()
for r in rs:
print®
def query_data_in():
with Session() as ses:
rs=ses.query(Article).filter(Article.title.in_([‘title1’,‘title3’,‘title6’])).all()
for r in rs:
print®
def query_data_not_in():
with Session() as ses:
rs=ses.query(Article).filter(~Article.title.in_([‘title1’,‘title3’,‘title6’])).all()
for r in rs:
print®
def query_data_null():
with Session() as ses:
rs =ses.query(Article).filter(Article.content None).all()
for r in rs:
print®
def query_data_not_null():
with Session() as ses:
rs =ses.query(Article).filter(Article.content!= None).all()
for r in rs:
print®
def query_data_and():
with Session() as ses:
# rs =ses.query(Article).filter(Article.title!=‘title4’ and Article.price>8).all()
# rs =ses.query(Article).filter(Article.title!=‘title4’,Article.price >50 ).all()
rs =ses.query(Article).filter(and_(Article.title !=‘title4’,Article.price >50)).all()
for r in rs:
print®
def query_data_or():
with Session() as ses:
rs =ses.query(Article).filter(or_(Article.title’title4’,Article.price >50) ).all()
for r in rs:
print®
if name == ‘main’:
# Base.metadata.create_all()
# create_data()
# query_data()
# query_data_equal()
自我介绍一下,小编13年上海交大毕业,曾经在小公司待过,也去过华为、OPPO等大厂,18年进入阿里一直到现在。
深知大多数HarmonyOS鸿蒙开发工程师,想要提升技能,往往是自己摸索成长或者是报班学习,但对于培训机构动则几千的学费,着实压力不小。自己不成体系的自学效果低效又漫长,而且极易碰到天花板技术停滞不前!
因此收集整理了一份《2024年HarmonyOS鸿蒙开发全套学习资料》,初衷也很简单,就是希望能够帮助到想自学提升又不知道该从何学起的朋友,同时减轻大家的负担。


既有适合小白学习的零基础资料,也有适合3年以上经验的小伙伴深入学习提升的进阶课程,基本涵盖了95%以上HarmonyOS鸿蒙开发知识点,真正体系化!
由于文件比较大,这里只是将部分目录大纲截图出来,每个节点里面都包含大厂面经、学习笔记、源码讲义、实战项目、讲解视频,并且会持续更新
如果你觉得这些内容对你有帮助,可以添加VX:vip204888 (备注鸿蒙获取)

一个人可以走的很快,但一群人才能走的更远。不论你是正从事IT行业的老鸟或是对IT行业感兴趣的新人,都欢迎扫码加入我们的的圈子(技术交流、学习资源、职场吐槽、大厂内推、面试辅导),让我们一起学习成长!
* or
query(User).filter(or_(User.name==‘ed’,User.name==‘wendy’))
如果想要查看orm底层转换的sql语句,可以在filter方法后面不要再 执行任何方法直接打印就可以看到了。比如:
news =session.query(News).filter(or_(News.title==‘abc’,News.content==‘abc’))
print(news)
from random import randint
from uuid import uuid4
from sqlalchemy import
Column,Integer,String,Float,Text,and_,or_
from db_util import Base,Session
class Article(Base):
tablename = ‘t_article’
id =Column(Integer,primary_key=True,autoincrement=True)
title =Column(String(50),nullable=False)
price = Column(Float,nullable=False)
content = Column(Text)
def __repr__(self):
    return f"<Article(title:{self.title} price:{self.price} content:{self.content})>"
def create_data():
with Session() as ses:
for i in range(10):
if i%2 == 0:
art = Article(title =f’title{i+1}‘,price=randint(1,100),content= uuid4())
else:
art = Article(title =f’TITLE{i+1}’,price=randint(1,100))
ses.add(art)
ses.commit()
def query_data():
with Session() as ses:
# rs =ses.query(Article).filter_by(id=1).first()
rs =ses.query(Article).filter(Article.id 1).first()
print(rs)
def query_data_equal():
with Session() as ses:
rs =ses.query(Article).filter(Article.title ‘title2’).first()
print(rs)
def query_data_not_equal():
with Session() as ses:
rs =ses.query(Article).filter(Article.title !=‘title2’).all()
print(rs)
def query_data_like():
with Session() as ses:
# select * from t_article wheretitle like ‘title%’;
rs =ses.query(Article).filter(Article.title.like(‘title%’)).all()
for r in rs:
print®
def query_data_in():
with Session() as ses:
rs=ses.query(Article).filter(Article.title.in_([‘title1’,‘title3’,‘title6’])).all()
for r in rs:
print®
def query_data_not_in():
with Session() as ses:
rs=ses.query(Article).filter(~Article.title.in_([‘title1’,‘title3’,‘title6’])).all()
for r in rs:
print®
def query_data_null():
with Session() as ses:
rs =ses.query(Article).filter(Article.content None).all()
for r in rs:
print®
def query_data_not_null():
with Session() as ses:
rs =ses.query(Article).filter(Article.content!= None).all()
for r in rs:
print®
def query_data_and():
with Session() as ses:
# rs =ses.query(Article).filter(Article.title!=‘title4’ and Article.price>8).all()
# rs =ses.query(Article).filter(Article.title!=‘title4’,Article.price >50 ).all()
rs =ses.query(Article).filter(and_(Article.title !=‘title4’,Article.price >50)).all()
for r in rs:
print®
def query_data_or():
with Session() as ses:
rs =ses.query(Article).filter(or_(Article.title’title4’,Article.price >50) ).all()
for r in rs:
print®
if name == ‘main’:
# Base.metadata.create_all()
# create_data()
# query_data()
# query_data_equal()
自我介绍一下,小编13年上海交大毕业,曾经在小公司待过,也去过华为、OPPO等大厂,18年进入阿里一直到现在。
深知大多数HarmonyOS鸿蒙开发工程师,想要提升技能,往往是自己摸索成长或者是报班学习,但对于培训机构动则几千的学费,着实压力不小。自己不成体系的自学效果低效又漫长,而且极易碰到天花板技术停滞不前!
因此收集整理了一份《2024年HarmonyOS鸿蒙开发全套学习资料》,初衷也很简单,就是希望能够帮助到想自学提升又不知道该从何学起的朋友,同时减轻大家的负担。
[外链图片转存中…(img-jufkatd5-1712935820073)]
[外链图片转存中…(img-315wmTtQ-1712935820074)]
[外链图片转存中…(img-6GxYkc6Z-1712935820074)]
既有适合小白学习的零基础资料,也有适合3年以上经验的小伙伴深入学习提升的进阶课程,基本涵盖了95%以上HarmonyOS鸿蒙开发知识点,真正体系化!
由于文件比较大,这里只是将部分目录大纲截图出来,每个节点里面都包含大厂面经、学习笔记、源码讲义、实战项目、讲解视频,并且会持续更新
如果你觉得这些内容对你有帮助,可以添加VX:vip204888 (备注鸿蒙获取)
[外链图片转存中…(img-Ma2rrVw9-1712935820074)]
一个人可以走的很快,但一群人才能走的更远。不论你是正从事IT行业的老鸟或是对IT行业感兴趣的新人,都欢迎扫码加入我们的的圈子(技术交流、学习资源、职场吐槽、大厂内推、面试辅导),让我们一起学习成长!


 6万+
6万+


 被折叠的 条评论
为什么被折叠?
被折叠的 条评论
为什么被折叠?
 到【灌水乐园】发言


