


自我介绍一下,小编13年上海交大毕业,曾经在小公司待过,也去过华为、OPPO等大厂,18年进入阿里一直到现在。
深知大多数HarmonyOS鸿蒙开发工程师,想要提升技能,往往是自己摸索成长或者是报班学习,但对于培训机构动则几千的学费,着实压力不小。自己不成体系的自学效果低效又漫长,而且极易碰到天花板技术停滞不前!
因此收集整理了一份《2024年HarmonyOS鸿蒙开发全套学习资料》,初衷也很简单,就是希望能够帮助到想自学提升又不知道该从何学起的朋友,同时减轻大家的负担。

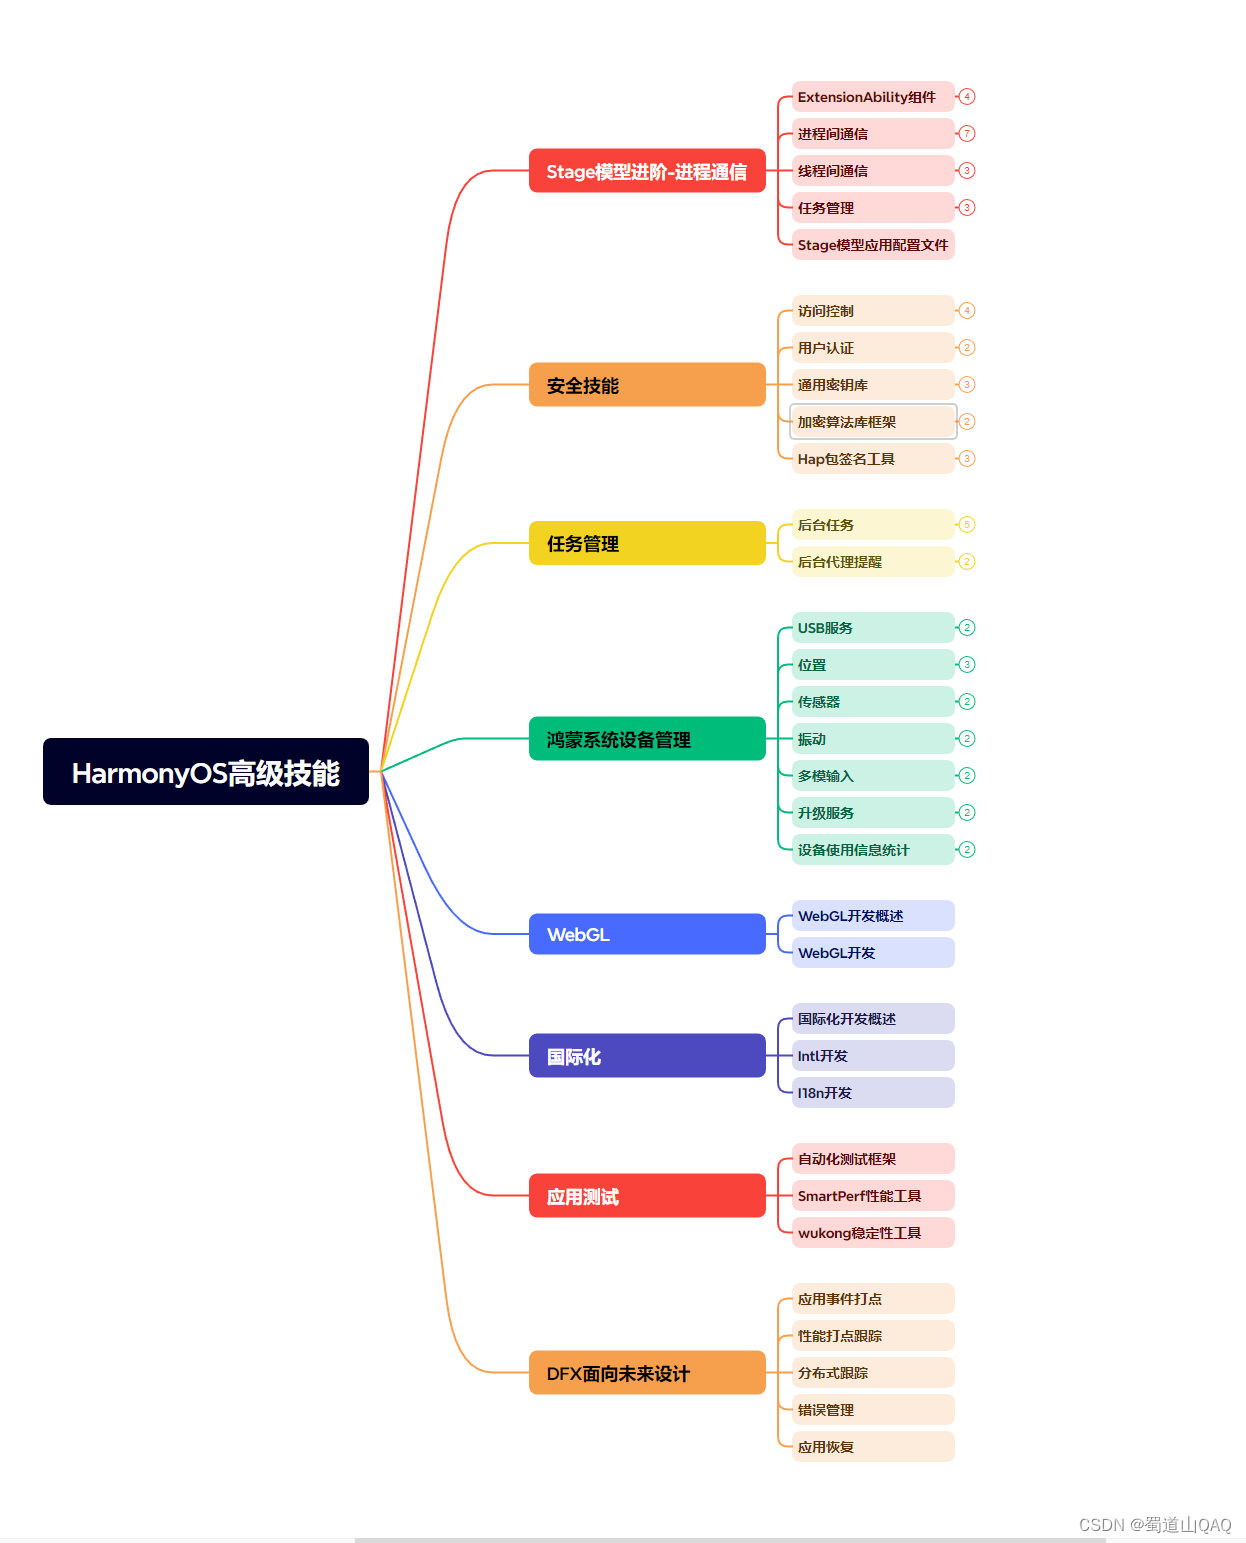
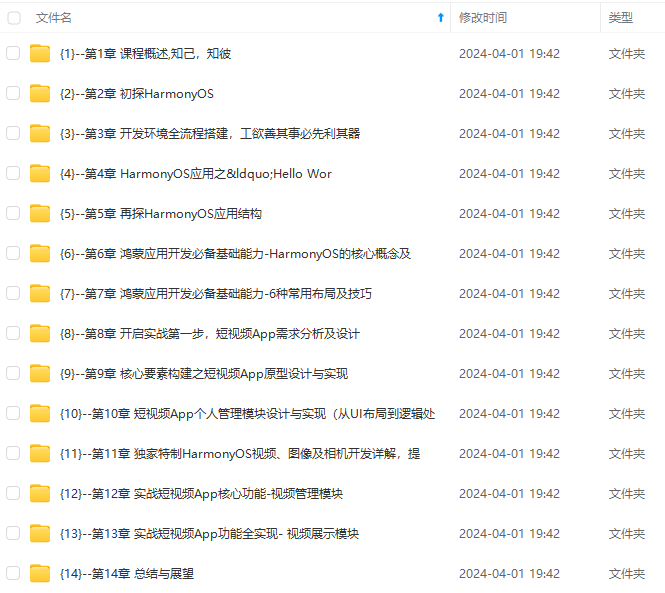
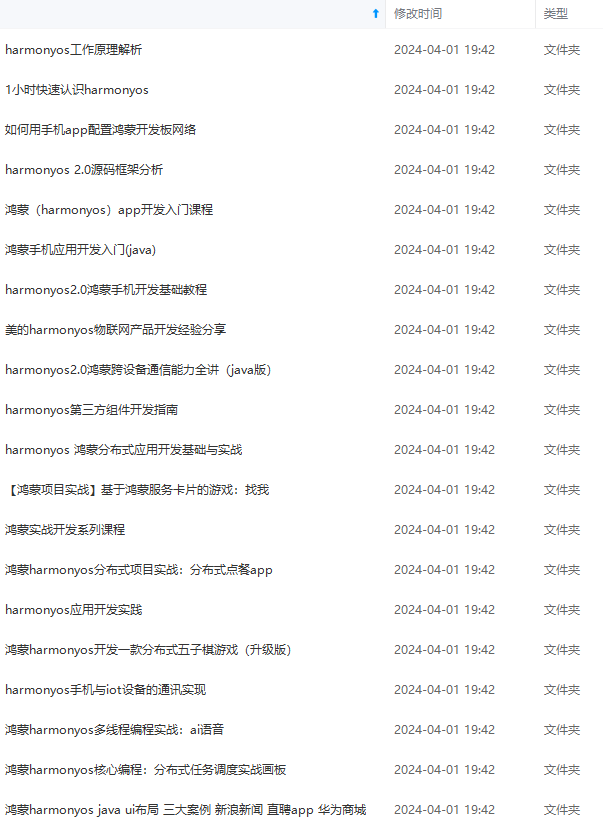
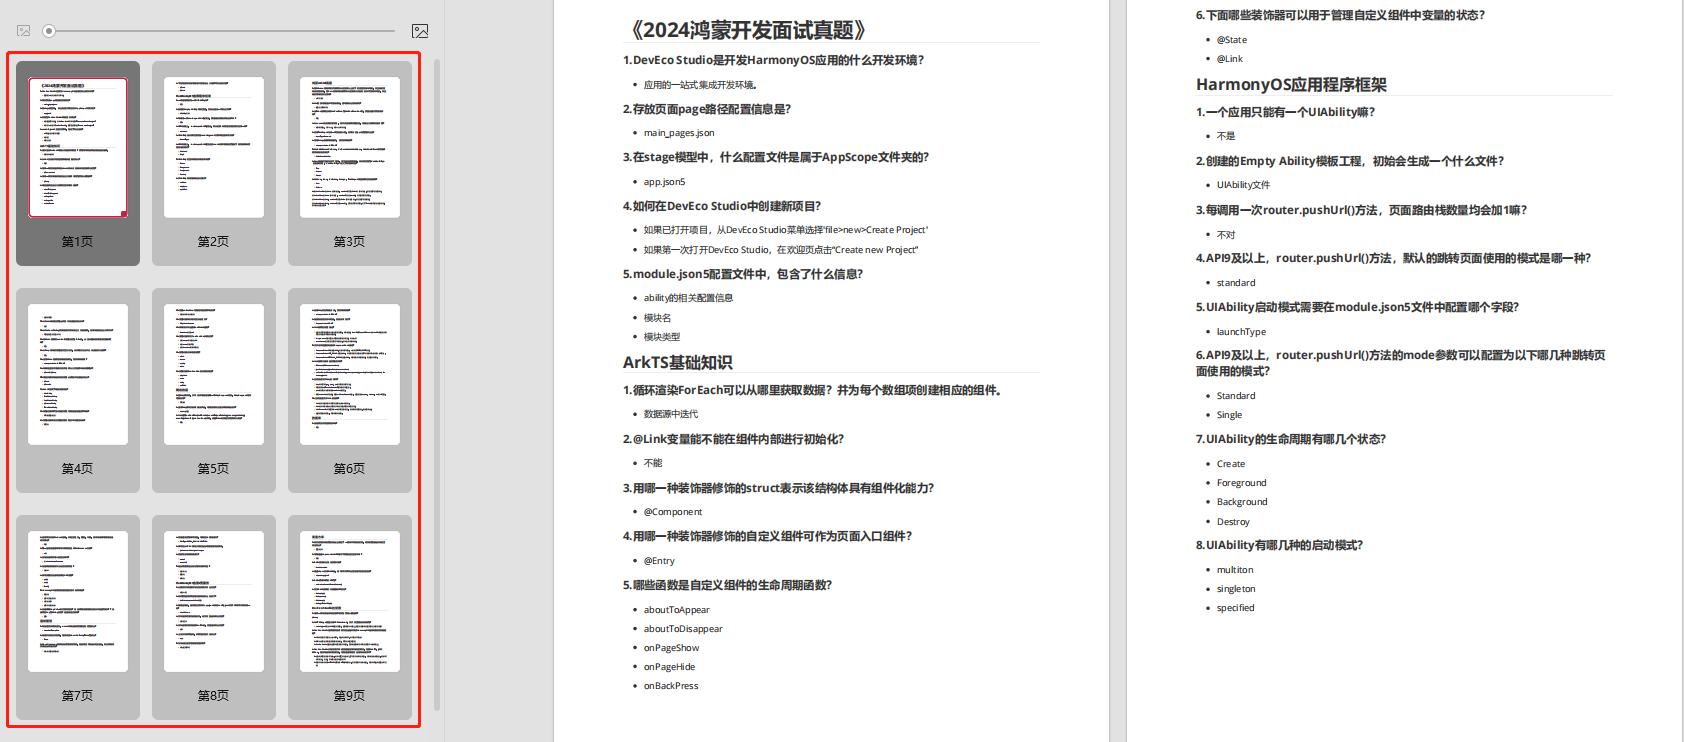
既有适合小白学习的零基础资料,也有适合3年以上经验的小伙伴深入学习提升的进阶课程,基本涵盖了95%以上HarmonyOS鸿蒙开发知识点,真正体系化!
由于文件比较大,这里只是将部分目录大纲截图出来,每个节点里面都包含大厂面经、学习笔记、源码讲义、实战项目、讲解视频,并且会持续更新
如果你觉得这些内容对你有帮助,可以添加VX:vip204888 (备注鸿蒙获取)

一个人可以走的很快,但一群人才能走的更远。不论你是正从事IT行业的老鸟或是对IT行业感兴趣的新人,都欢迎扫码加入我们的的圈子(技术交流、学习资源、职场吐槽、大厂内推、面试辅导),让我们一起学习成长!

	Row() {
          Button("-")
            .onClick(async event => {
              const newValue = this.frequency - this.step // 1. 把当前的频率减掉预设的步进
              this.frequency = Math.max(newValue, 0) // 2. 控制频率大于0
              this.updateFrequency() // 3. 让播放器更新频率
            })
            .fontSize(60)
            .fontColor(this.mainColor)
            .backgroundColor("opaque")

          Text(`${this.frequency} Hz`)
            .fontSize(50)
            .fontWeight(FontWeight.Bold)
            .fontColor(this.mainColor)

          Button("+")
            .onClick(async event => {
              const newValue = this.frequency + this.step // 4. 把当前的频率增加预设的步进
              this.frequency = Math.min(newValue, 30000) // 5. 控制频率小于三万
              this.updateFrequency() // 6. 让播放器更新频率
            })
            .fontSize(60)
            .fontColor(this.mainColor)
            .backgroundColor("opaque")
        }
        .margin({ top: "30%" })
- 频率下方加入一些使用提示

	Text("上下滑动屏幕\n以调整频率")
          .fontColor(this.subtitleColor)
          .textAlign(TextAlign.Center)
          .margin({ top: 20 })

	Text(this.readmeRecord ? "使用说明" : "使用必读!")
          .fontColor(this.readmeRecord ? "#2A1EB1" : Color.Red)
          .fontSize(this.readmeRecord ? 16 : 24)
          .margin({ top: 20 })
          .onClick(() => {
            router.pushUrl({ url: 'pages/ReadmePage' }) // 1. 跳转readme界面
            this.readmeRecord = true // 2. 首次使用的时候会使跳转按钮更显眼,跳转过以后就恢复正常UI。用一个state变量来控制显示状态
            preferences.getPreferences(getContext(this), "default").then((preference) => {
              preference.put("readmeRecord", true) // 3. 记录到preference
              preference.flush()
            })
          })
- 界面底部的播放/停止按钮

	Button(this.playing ? "停止" : "播放")
        .fontColor(this.bgColor)
        .fontSize(30)
        .height(60)
        .backgroundColor(this.mainColor)
        .width("100%")
        .type(ButtonType.Normal)
        .onClick(() => {
          this.playing ? this.stop() : this.play()
          this.playing = !this.playing
        })
至此,软件的基本功能就架设完成了。接下来还可以加一点实用功能。
- 选择波形。由于没有找到类似iOS中的segment组件,这里直接用Text来做手动布局。

  @Builder
  waveTypeSelector() {
    Row() {
      ForEach(this.waveOptions, (item: string, index: number) => {
        Image(index === this.index ? item[0] : item[1])
          .width(50)
          .height(50)
          .backgroundColor(index === this.index ? this.selectedBgColor : this.mainColor)
          .padding(2)
          .borderRadius({
            topLeft: index === 0 ? 20 : 0, // 1. 第一个选项左边做圆角
            bottomLeft: index === 0 ? 20 : 0,
            topRight: index === this.waveOptions.length - 1 ? 20 : 0, // 2. 最后一个选项右边做圆角
            bottomRight: index === this.waveOptions.length - 1 ? 20 : 0
          })
          .onClick(() => {
            this.setIndex(index)
          })
      }, (item: string) => item)
    }
    .margin({ top: 20 })
  }
这是一个独立的模块,最后集成到build()方法里
this.waveTypeSelector()
- 管理预设的频率和波形

@Builder
presets() {
Row() {
ForEach(this.presetsData, (item: PresetModel, index: number) => {
Column() {
if (this.isEditMode) {
Badge({ // 1. 如果是编辑模式,需要在图标右上角加一个badge,用于删除预设
value: "X",
style: {
badgeColor: Color.Red
}
}) {
this.presetItemImage(this.waveImageFromWaveType(item.waveType))
}
.onClick(event => {
if (event.x > 32 && event.y < 16) { // 2. 右上角的badge不能设置点击,需要在整个badge控件上做点击位置判断,如果在badge图标的范围内,就删除预设数组相应位置的数据。
this.presetsData.splice(index, 1)
}
})
} else { // 3. 如果不是编辑模式,直接显示图片
Flex() {
this.presetItemImage(this.waveImageFromWaveType(item.waveType))
}
.width(50)
.height(50)
.onClick(() => {
this.index = item.waveType // 4. 不是编辑模式的时候,点击图片,设置当前的波形和频率
this.frequency = item.frequency
})
}
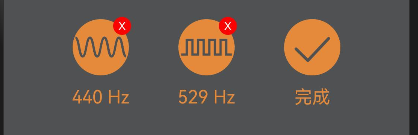
Text(`${item.frequency} Hz`)
.fontColor(this.mainColor)
.fontSize(16)
.margin({ top: 10 })
}
.width(64)
.height(80)
.margin({ right:
index < this.presetsData.length - 1 ? 30 :
this.isEditMode ? 30 :
this.isPresetFull() ? 0 : 30 })
}, (item: string) => item)
Column() { // 5. 预设数组右边放置一个添加/完成按钮
Image(this.isEditMode ? $r("app.media.prst_check") : $r("app.media.prst_add"))
.width(50)
.height(50)
.backgroundColor(this.isEditMode ? this.mainColor : this.bgColor)
.borderColor(this.mainColor)
.borderWidth(4)
.borderRadius(25)
.onClick(() => {
if (this.isEditMode) { // 6. 编辑模式的时候点击退出编辑模式
this.isEditMode = false
} else { // 7. 非编辑模式的时候点击添加预设,添加之后把预设数组写入preference
if (this.isPresetFull()) {
return
}
this.presetsData.push({ waveType: this.index, frequency: this.frequency })
preferences.getPreferences(getContext(this), "default").then((preference) => {
preference.put("presets", JSON.stringify(this.presetsData))
preference.flush()
})
}
})
Text(this.isEditMode ? "完成" : "添加预设")
.fontSize(16)
.fontColor(this.mainColor)
.margin({ top: 10 })
}
.width(64)
.height(80)
.visibility(this.isEditMode ? Visibility.Visible :
this.isPresetFull() ? Visibility.None : Visibility.Visible) // 8. 预设数量有上限,达到上限以后不显示增加按钮
}
.margin({ top: 20 })
}
@Builder
presetItemImage(image: Resource) {
Image(image)
.width(50)
.height(50)
.backgroundColor(this.mainColor)
.borderRadius(25)
.gesture(LongPressGesture()
.onAction(() => {
this.isEditMode = true
})
)
}
生成声波
思路(可以跳过)
形成声波并播放是这个App的核心功能,如何实现这个功能,属实走了很多弯路。起初认为这是一个计算密集任务,在网上查到了一个生成正弦波并输出wav文件的C语言实现,并开了一个C工程来验证功能。可以成功调整声波频率,并生成wav文件。
#include <stdio.h>
#include <stdlib.h>
#include <math.h>
#include "sndfile.h"

#define SAMPLE_RATE 44100  // Sample rate in Hz
#define DURATION 5.0       // Duration in seconds
#define AMPLITUDE 0.5      // Amplitude of the sine wave
#define FREQUENCY 440.0    // Frequency in Hz

int main() {
    // Calculate the number of samples
    int num_samples = (int)(SAMPLE_RATE * DURATION);

    // Open the output file for writing
    SF_INFO sfinfo;
    sfinfo.samplerate = SAMPLE_RATE;
    sfinfo.channels = 1;  // Mono
    sfinfo.format = SF_FORMAT_WAV | SF_FORMAT_PCM_16;
    SNDFILE* outfile = sf_open("sine_wave.wav", SFM_WRITE, &sfinfo);

    if (!outfile) {
        printf("Error: Unable to open output file\n");
        return 1;
    }

    // Generate and write the sine wave to the file
    double phase = 0.0;
    for (int i = 0; i < num_samples; i++) {
        double value = AMPLITUDE * sin(2.0 * M_PI * FREQUENCY * i / SAMPLE_RATE);
        if (sf_writef_double(outfile, &value, 1) != 1) {
            printf("Error writing to file\n");
            return 1;
        }
    }

    // Close the output file
    sf_close(outfile);

    printf("Sine wave generated and saved to 'sine_wave.wav'\n");

    return 0;
}
可以看到这段代码里面依赖三方库sndfile。所以起初为了把这段C代码放进App里,在native包上面研究了很久。包括怎么处理三方库sndfile的依赖,以及sndfile对其他库的依赖。尝试过直接集成源码,也尝试过编译不同处理器架构的so文件。但发现工作量太大,另外涉及到的技术栈不熟悉,花太多精力搞这个功能。之后换了个思路,找了一份不依赖三方库生成正弦波的C代码。
#include <stdio.h>
#include <stdint.h>
#include <math.h>

#define SAMPLE_RATE 44100   // Sample rate in Hz
#define DURATION 1          // Duration of the sine wave in seconds
#define AMPLITUDE 0.5       // Amplitude of the sine wave
#define FREQUENCY 440.0     // Frequency of the sine wave in Hz
#define NUM_CHANNELS 1      // Number of audio channels (1 for mono, 2 for stereo)

// Function to write a 16-bit PCM sample to a file
void write_sample(FILE *file, int16_t sample) {
    fwrite(&sample, sizeof(int16_t), 1, file);
}

int main() {
e sine wave
#define FREQUENCY 440.0     // Frequency of the sine wave in Hz
#define NUM_CHANNELS 1      // Number of audio channels (1 for mono, 2 for stereo)

// Function to write a 16-bit PCM sample to a file
void write_sample(FILE *file, int16_t sample) {
    fwrite(&sample, sizeof(int16_t), 1, file);
}

int main() {


 被折叠的 条评论
为什么被折叠?
被折叠的 条评论
为什么被折叠?
 到【灌水乐园】发言


