


import org.apache.hadoop.hbase.client.ConnectionFactory;
import org.apache.hadoop.hbase.client.Put;
import org.apache.hadoop.hbase.client.Table;
public class main {
public static Configuration configuration;
public static Connection connection;
public static Admin admin;
public static void main(String[] args) {
// TODO Auto-generated method stub
configuration = HBaseConfiguration.create();
configuration.set("hbase.rootdir","hdfs://127.0.0.1:8020/hbase");
try{
connection = ConnectionFactory.createConnection(configuration);
admin = connection.getAdmin();
}catch (IOException e){
e.printStackTrace();
}
try {
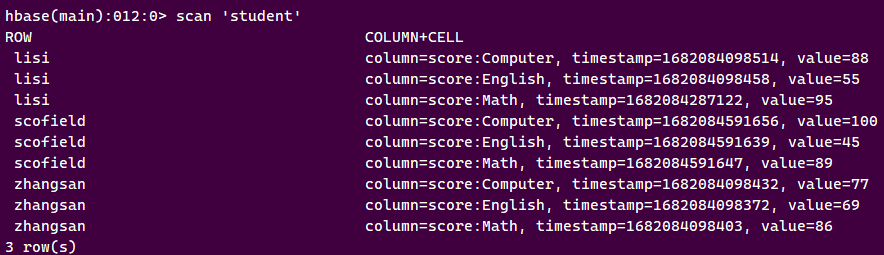
insertRow("student","scofield","score","English","45");
insertRow("student","scofield","score","Math","89");
insertRow("student","scofield","score","Computer","100");
} catch (IOException e) {
// TODO Auto-generated catch block
e.printStackTrace();
}
close();
}
public static void insertRow(String tableName,String rowKey,String colFamily,
String col,String val) throws IOException {
Table table = connection.getTable(TableName.valueOf(tableName));
Put put = new Put(rowKey.getBytes());
put.addColumn(colFamily.getBytes(), col.getBytes(), val.getBytes());
table.put(put);
table.close();
}
public static void close(){
try{
if(admin != null){
admin.close();
}
if(null != connection){
connection.close();
}
}catch (IOException e){
e.printStackTrace();
}
}
}
运行结果
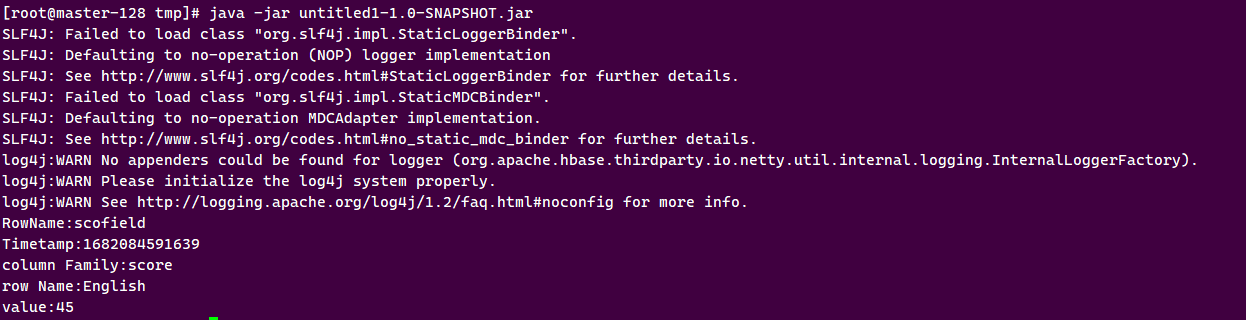
(2)获取 scofield 的 English 成绩信息
package Main;
import java.io.IOException;
import org.apache.hadoop.conf.Configuration;
import org.apache.hadoop.hbase.Cell;
import org.apache.hadoop.hbase.CellUtil;
import org.apache.hadoop.hbase.HBaseConfiguration;
import org.apache.hadoop.hbase.TableName;
import org.apache.hadoop.hbase.client.Admin;
import org.apache.hadoop.hbase.client.Connection;
import org.apache.hadoop.hbase.client.ConnectionFactory;
import org.apache.hadoop.hbase.client.Get;
import org.apache.hadoop.hbase.client.Put;
import org.apache.hadoop.hbase.client.Result;
import org.apache.hadoop.hbase.client.Table;
public class main {
public static Configuration configuration;
public static Connection connection;
public static Admin admin;

public static void main(String[] args) {
    // TODO Auto-generated method stub
    configuration = HBaseConfiguration.create();

    configuration.set("hbase.rootdir", "hdfs://127.0.0.1:8020/hbase");

    try {
        connection = ConnectionFactory.createConnection(configuration);
        admin = connection.getAdmin();
    } catch (IOException e) {
        e.printStackTrace();
    }
    try {
        getData("student", "scofield", "score", "English");
    } catch (IOException e) {
        // TODO Auto-generated catch block
        e.printStackTrace();
    }
    close();
}

public static void getData(String tableName, String rowKey, String colFamily,
                           String col) throws IOException {
    Table table = connection.getTable(TableName.valueOf(tableName));
    Get get = new Get(rowKey.getBytes());
    get.addColumn(colFamily.getBytes(), col.getBytes());
    Result result = table.get(get);
    showCell(result);
    table.close();
}

public static void showCell(Result result) {
    Cell[] cells = result.rawCells();
    for (Cell cell : cells) {
        System.out.println("RowName:" + new String(CellUtil.cloneRow(cell)) + " ");
        System.out.println("Timetamp:" + cell.getTimestamp() + " ");
        System.out.println("column Family:" + new String(CellUtil.cloneFamily(cell)) + " ");
        System.out.println("row Name:" + new String(CellUtil.cloneQualifier(cell)) + " ");
        System.out.println("value:" + new String(CellUtil.cloneValue(cell)) + " ");
    }
}

public static void close() {
    try {
        if (admin != null) {
            admin.close();
        }
        if (null != connection) {
            connection.close();
        }
    } catch (IOException e) {
        e.printStackTrace();
    }
}
}
运行结果
##### Redis 数据库操作
Student 键值对如下:
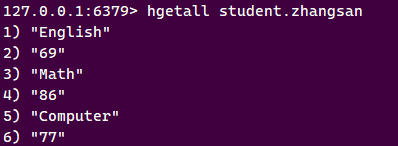
zhangsan:{
English: 69
Math: 86
Computer: 77
}
lisi:{
English: 55
Math: 100
Computer: 88
}
##### 根据上面给出的键值对,完成如下操作:
(1)用 Redis 的哈希结构设计出学生表 Student(键值可以用 student.zhangsan 和student.lisi 来表示两个键值属于同一个表);

(2)用 hgetall 命令分别输出 zhangsan 和 lisi 的成绩信息;
(3)用 hget 命令查询 zhangsan 的 Computer 成绩;

(4)修改 lisi 的 Math 成绩,改为 95

##### 根据上面已经设计出的学生表 Student,用 Redis 的 JAVA 客户端编程(jedis),实现如下操作:
(1)添加数据:English:69 Math:86 Computer:77
scofield:{
English: 69
Math: 86
Computer: 77
}
package Main;
import java.util.Map;
import redis.clients.jedis.Jedis;
public class main {
/\*\*
* @param args
*/
public static void main(String[] args) {
Jedis jedis = new Jedis(“127.0.0.1:6379”);
jedis.hset(“student.scofield”, “English”,“45”);
jedis.hset(“student.scofield”, “Math”,“89”);
jedis.hset(“student.scofield”, “Computer”,“100”);
Map<String,String> value = jedis.hgetAll(“student.scofield”);
for(Map.Entry<String, String> entry:value.entrySet())
{
System.out.println(entry.getKey()+“:”+entry.getValue());
}
}
}
(2)获取 scofield 的 English 成绩信息
package Main;
import java.util.Map;
import redis.clients.jedis.Jedis;
public class main {
/\*\*
* @param args
*/
public static void main(String[] args) {
Jedis jedis = new Jedis(“localhost”);
jedis.hset(“student.scofield”, “English”,“45”);
jedis.hset(“student.scofield”, “Math”,“89”);
jedis.hset(“student.scofield”, “Computer”,“100”);
Map<String,String> value = jedis.hgetAll(“student.scofield”);
for(Map.Entry<String, String> entry:value.entrySet())
{
System.out.println(entry.getKey()+“:”+entry.getValue());
}
}
}
##### (四)MongoDB 数据库操作
Student 文档如下:
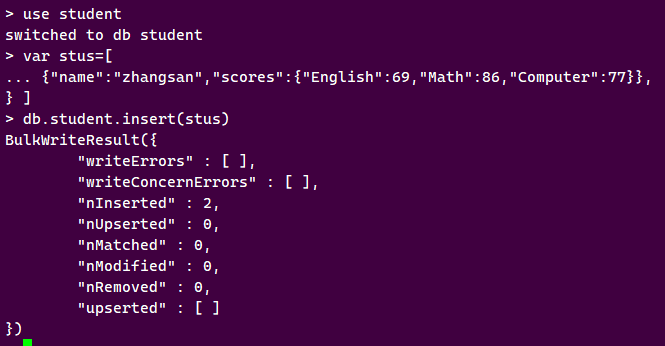
{
“name”: “zhangsan”, “score”: {“English”: 69, “Math”: 86, “Computer”: 77}
}
{
“name”: “lisi”, “score”: {“English”: 55, “Math”: 100,“Computer”: 88}
}
##### 根据上面给出的文档,完成如下操作:
(1)用 MongoDB Shell 设计出 student 集合;
(2)用 find()方法输出两个学生的信息;
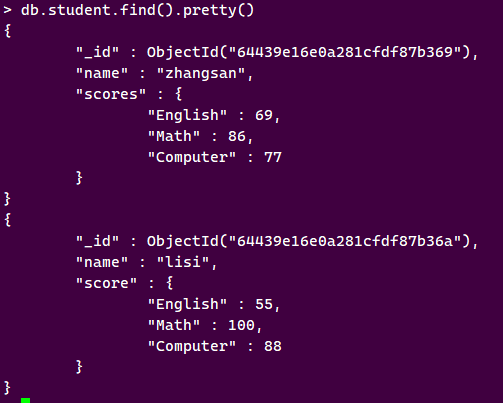
(3)用 find 函数查询 zhangsan 的所有成绩(只显示 score 列)

(4)修改 lisi 的 Math 成绩,改为 95。

##### 根据上面已经设计出的 Student 集合,用 MongoDB 的 Java 客户端编程,实现如下操作:
(1)添加数据:English:45 Math:89 Computer:100
与上述数据对应的文档形式如下:
“name”: “scofield”,
“score”: {“English”: 45,“Math”: 89, “Computer”: 100}
package Main;
import java.util.ArrayList;
import java.util.List;
import org.bson.Document;
import com.mongodb.MongoClient;
import com.mongodb.client.MongoCollection;
import com.mongodb.client.MongoDatabase;
public class main {
public static void main(String[] args) {

    MongoClient mongoClient = new MongoClient("localhost", 27017);

    MongoDatabase mongoDatabase = mongoClient.getDatabase("student");

    MongoCollection<Document> collection = mongoDatabase.getCollection("student");

    Document document = new Document("name", "scofield").
            append("score", new Document("English", 45).
                    append("Math", 89).
                    append("Computer", 100));
    List<Document> documents = new ArrayList<Document>();
    documents.add(document);
    collection.insertMany(documents);
    System.out.println("文档插入成功");
}
}

(2)获取 scofield 的所有成绩成绩信息(只显示core)
package Main;
import com.mongodb.MongoClient;
import com.mongodb.client.MongoCollection;
import com.mongodb.client.MongoCursor;
import com.mongodb.client.MongoDatabase;
import org.bson.Document;
public class main {
public static void main(String[] args) {

    MongoClient  mongoClient=new MongoClient("localhost",27017);

    MongoDatabase mongoDatabase = mongoClient.getDatabase("student");

    MongoCollection<Document> collection = mongoDatabase.getCollection("student");

    MongoCursor<Document>  cursor=collection.find( new Document("name","scofield")).
            projection(new Document("score",1).append("\_id", 0)).iterator();
    while(cursor.hasNext())
        System.out.println(cursor.next().toJson());
}
}


**既有适合小白学习的零基础资料,也有适合3年以上经验的小伙伴深入学习提升的进阶课程,涵盖了95%以上大数据知识点,真正体系化!**
**由于文件比较多,这里只是将部分目录截图出来,全套包含大厂面经、学习笔记、源码讲义、实战项目、大纲路线、讲解视频,并且后续会持续更新**
**[需要这份系统化资料的朋友,可以戳这里获取](https://bbs.csdn.net/topics/618545628)**
d1fab17cef6.png#pic_center)
[外链图片转存中...(img-FjKIa07m-1714296393202)]
[外链图片转存中...(img-c9zEYdh4-1714296393202)]
[外链图片转存中...(img-5xhPrIhc-1714296393203)]
**既有适合小白学习的零基础资料,也有适合3年以上经验的小伙伴深入学习提升的进阶课程,涵盖了95%以上大数据知识点,真正体系化!**
**由于文件比较多,这里只是将部分目录截图出来,全套包含大厂面经、学习笔记、源码讲义、实战项目、大纲路线、讲解视频,并且后续会持续更新**
**[需要这份系统化资料的朋友,可以戳这里获取](https://bbs.csdn.net/topics/618545628)**


 804
804

 被折叠的 条评论
为什么被折叠?
被折叠的 条评论
为什么被折叠?
 到【灌水乐园】发言


