


前言:
1:配置好的项目在最后已上传仓库,项目地址下载
此外还有公网地址基于配置好的模板写的后台管理系统:地址:后台管理项目 —— 预览
pnpm:
例如,npm 默认会将每个依赖项安装在项目的 node_modules 目录下,并在该目录中创建软链接,以便在多个依赖项之间共享相同的模块。而 pnpm 则使用硬链接或者拷贝文件的方式来安装依赖项,以减少磁盘空间和网络带宽的占用。
pnpm与其他包管理器(如npm和Yarn)的不同之处在于它使用一种称为“硬链接”的独特安装方法。当你使用PNPM安装一个包时,它并不会重复的去下载每个项目的node_modules依赖,而是在一个中心存储位置创建硬链接。这意味着多个项目可以共享同一个包文件,从而节省磁盘空间并减少安装时间。
不同的包管理工具(例如 npm 和 pnpm)在处理依赖项版本时可能会有所不同,因此可能会影响依赖版本冲突。这是因为每个包管理器都有自己的算法来解析依赖树、处理依赖关系和安装依赖项。
因此,在使用不同的包管理工具时,可能会导致依赖版本之间的冲突或者不兼容问题。为了避免这种情况,建议在项目中只使用一个包管理工具,并且确保所有开发人员都使用相同的工具和版本。
pnpm可能会缓存,比如修改了一些配置还是使用之前的依赖,可能会导致缓存没生效类似问题,解决方法:
- 清除pnpm缓存:可以使用 **
pnpm cache clean**命令来清除pnpm的缓存,这样可以确保使用最新的依赖。- 强制重新安装依赖:可以使用
**pnpm install --force**命令来强制重新安装依赖,这样可以确保使用最新的配置和依赖。- 检查依赖版本:如果依赖版本不匹配,可能会导致缓存无法生效,因此需要检查依赖的版本是否正确。
- 使用
--no-cache选项:在执行命令时,可以使用--no-cache选项来禁用缓存,这样可以确保使用最新的依赖和配置。- 更新pnpm:如果你的pnpm版本过旧,可能会导致一些缓存问题,因此需要更新到最新版本。可以使用
pnpm config set registry https://registry.npm.taobao.org/ 命令来更新pnpm镜像包。
pnpm还支持一种称为“虚拟包”的特性,它允许你为包创建别名。虚拟包可用于同时安装多个版本的包,或者在不改变其他包的依赖关系的情况下替换一个包。
pnpm旨在快速高效,它的开发者声称在某些情况下可以比npm或yarn快10倍。它还支持广泛的包锁定文件格式,包括npm、yarn使用的格式。
Vite:
Vite 不需要提前将所有的代码打包成一个或多个静态文件。相反,Vite 会在浏览器请求资源时动态地编译和提供所需的模块,并在内存中生成对应的静态文件。这种方式可以提高开发体验和构建速度。它还支持热更新和代码分割等功能,使得开发者能够更快地进行开发、调试和部署。
比如有a、b、c三个页面,a页面是错误的,只要不在首屏加载调用,它只会在项目启动了,进入a页面,提示报错
正文开始
1 创建项目:
pnpm create vite my-vue-app --template vue-ts
创建项目非常简单、Vite也很快
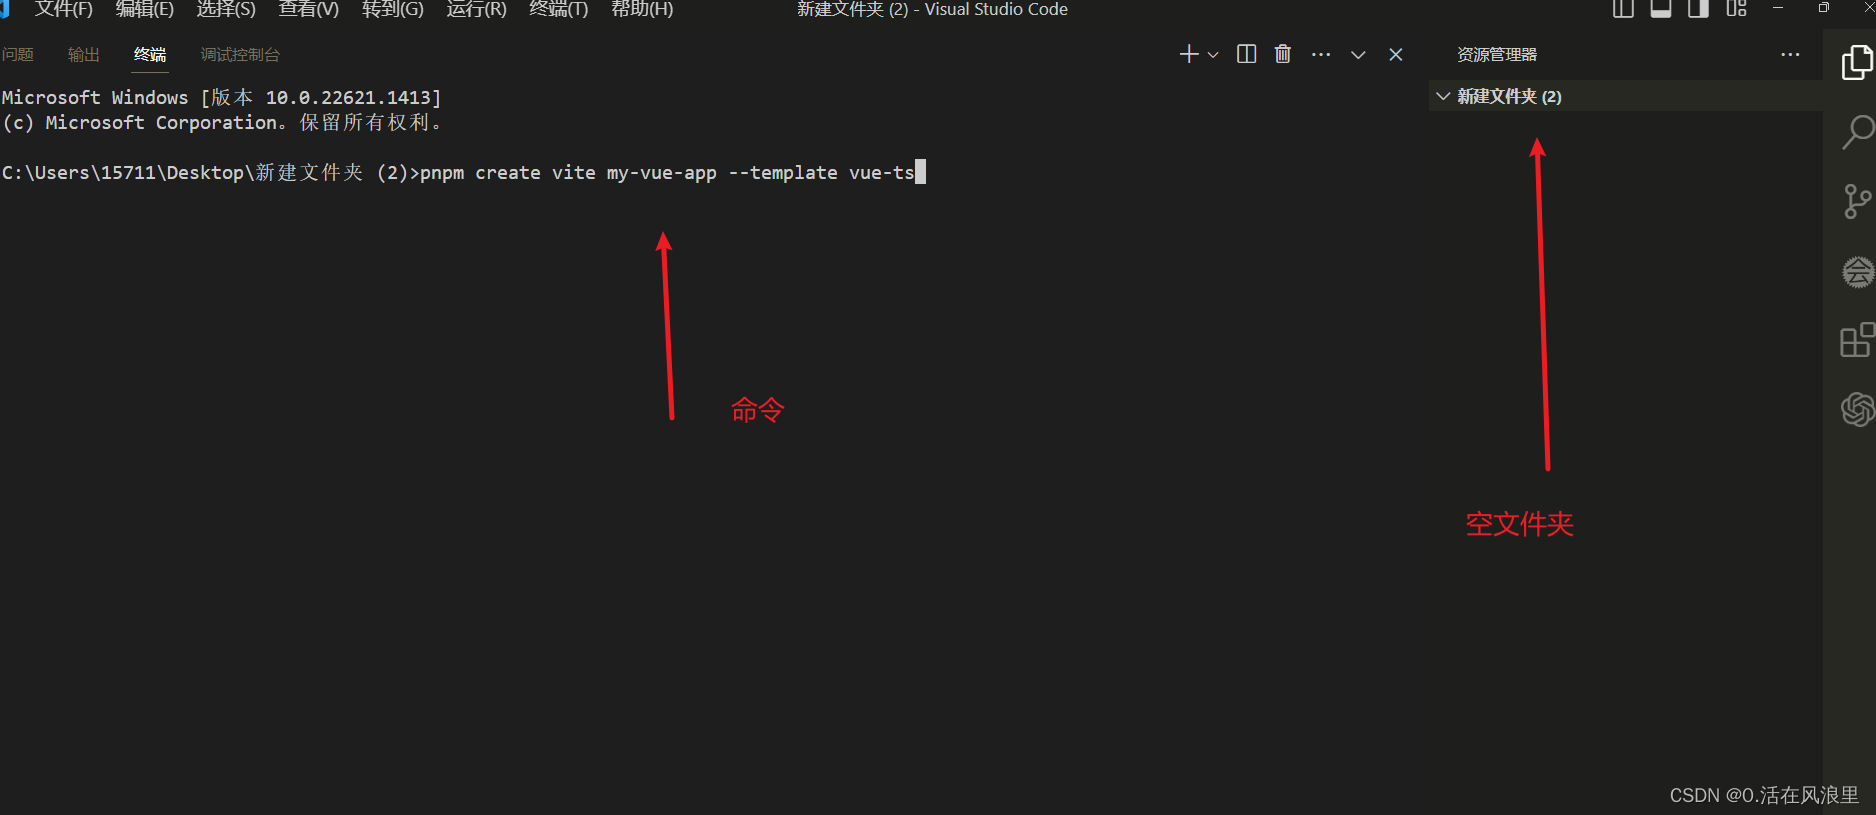
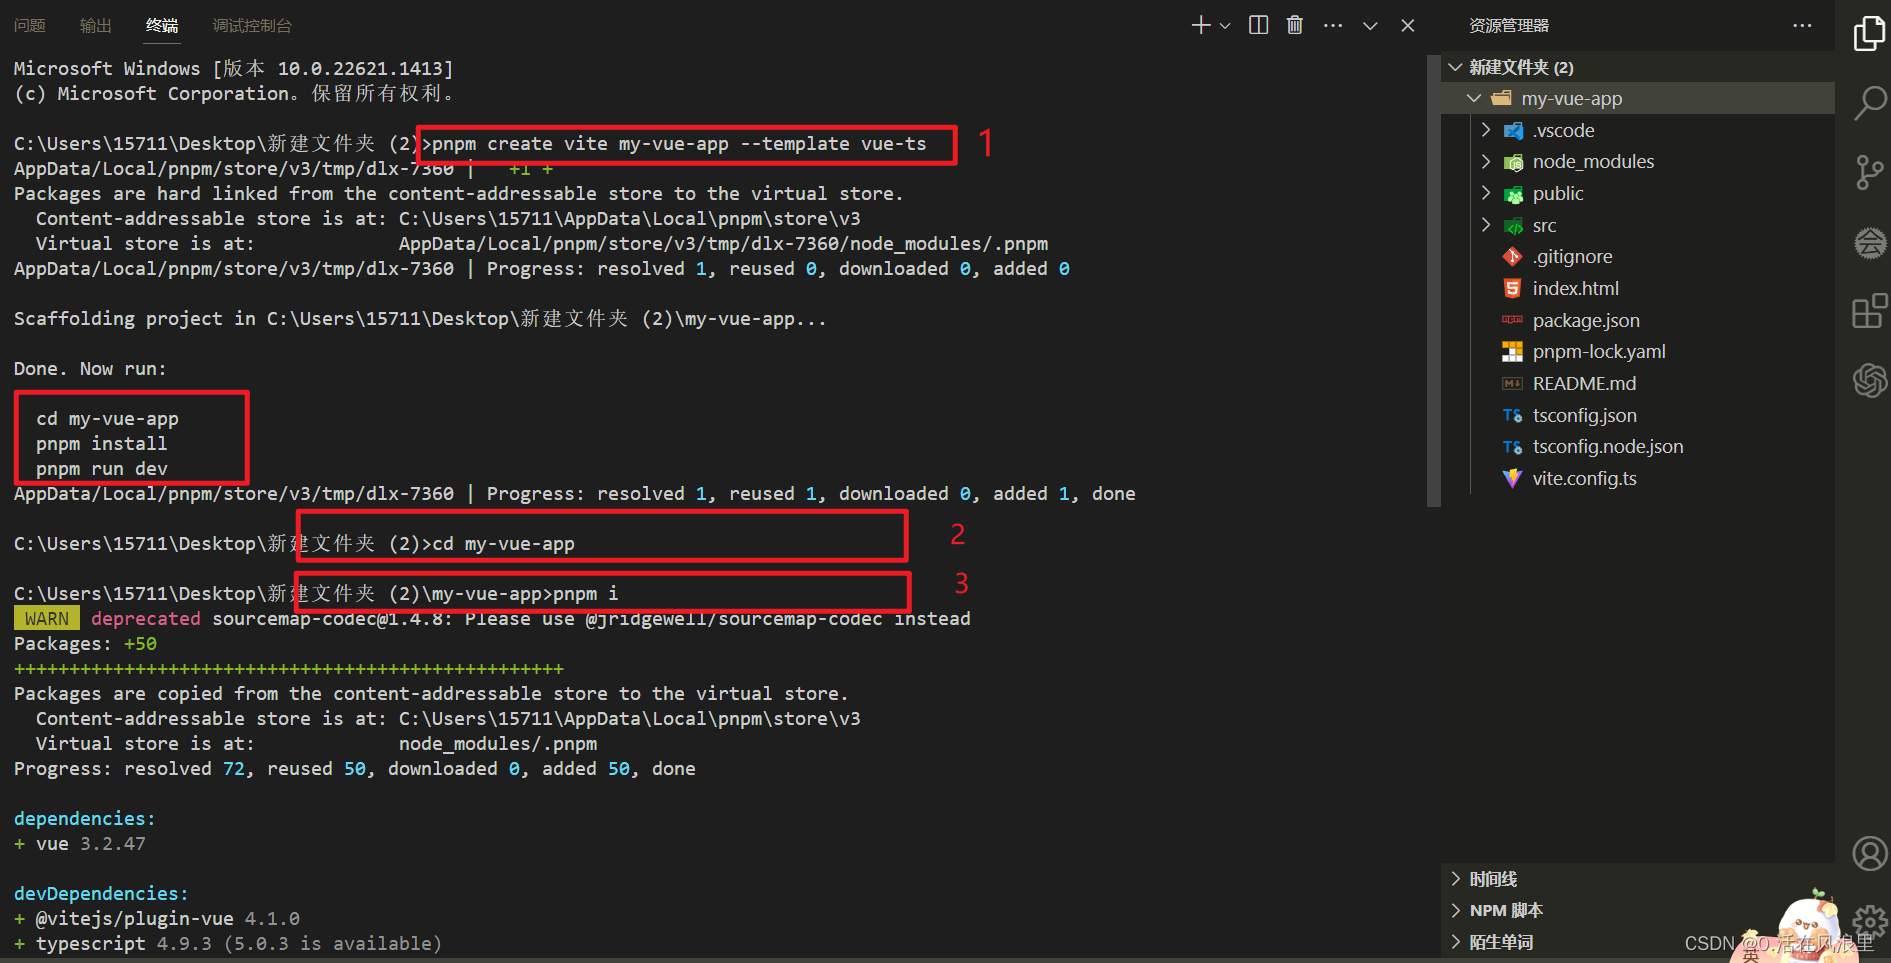
—————————————————— 创建项目完 ———————————————————
**eslint可以保证项目的质量,prettier**可以保证项目的统一格式、风格。
2 配置eslint:
执行安装命令
pnpm add eslint -D
执行eslint初始化命令
pnpm eslint --init
依次选择初始化选项:
图片描述:
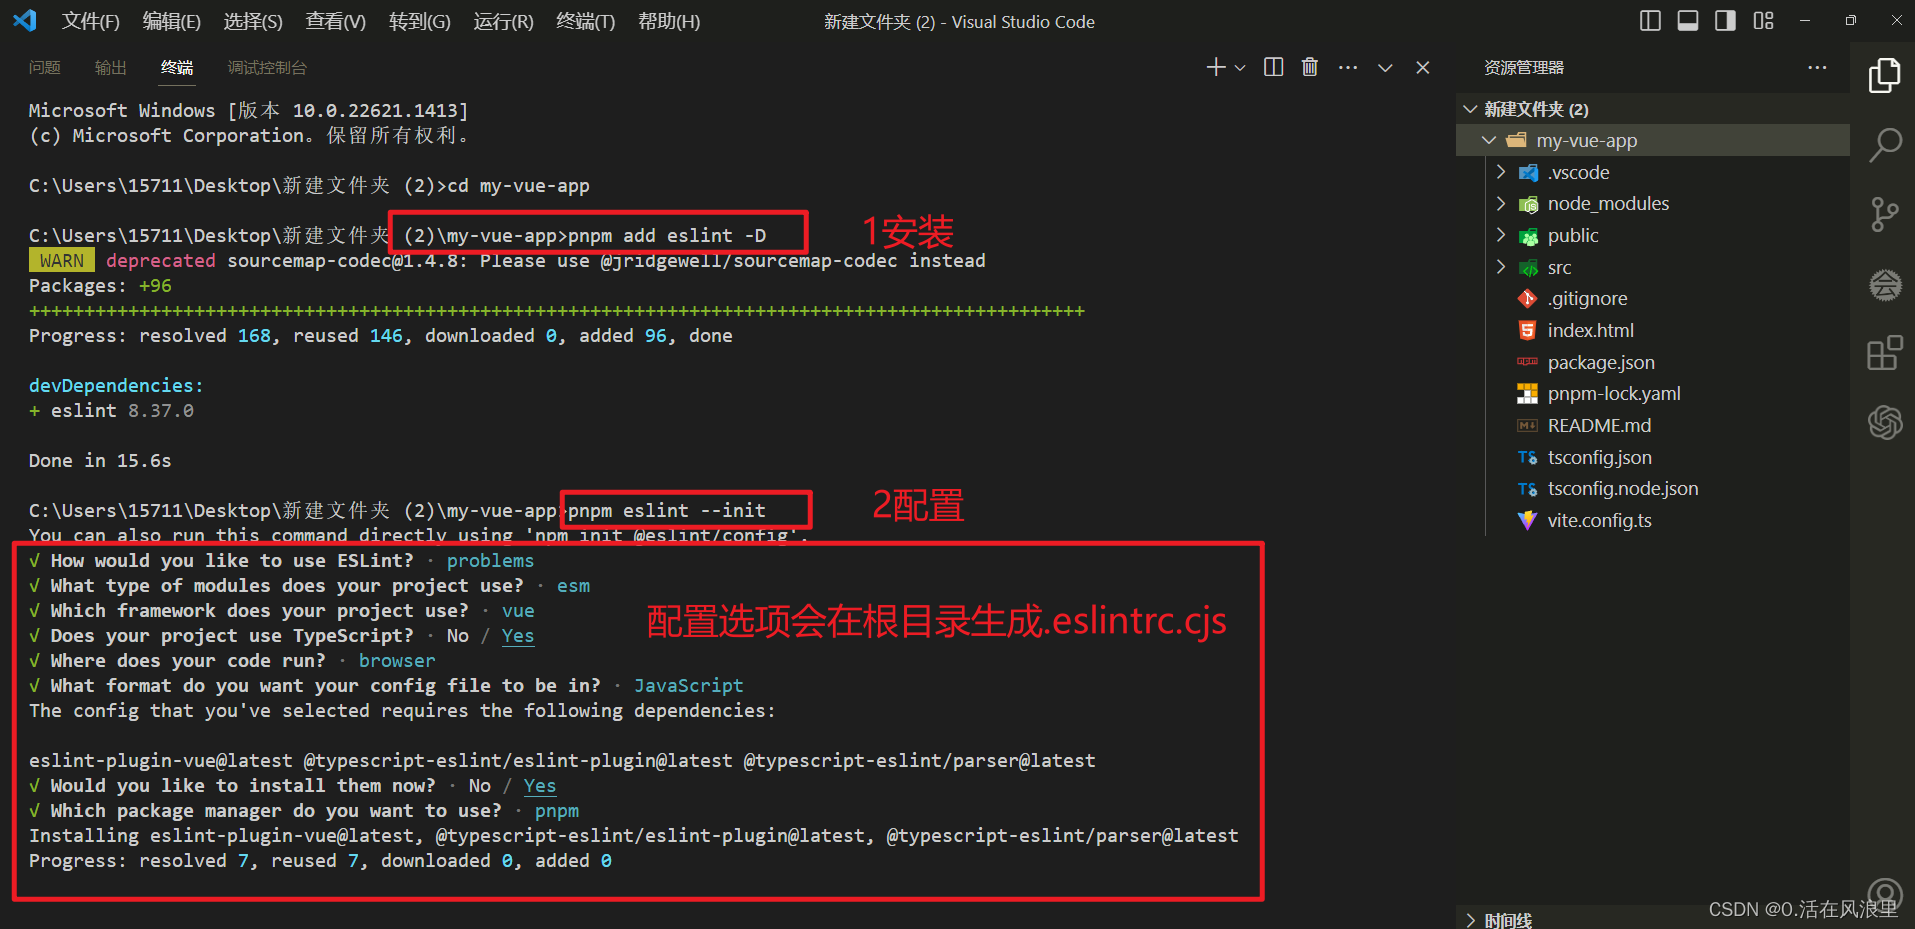
具体选项描述
(1) How would you like to use ESLint?
选择:To check syntax and find problems

(2) What type of modules does your project use?
选择:JavaScript modules (import/export)

(3) Which framework does your project use?
选择:Vue.js

(4) Does your project use TypeScript?
选择:Yes

(5) Where does your code run?
选择:Browser

(6) What format do you want your config file to be in?
选择:JavaScript

(7) Would you like to install them now?
选择:Yes

(8) Which package manager do you want to use?
选择:pnpm
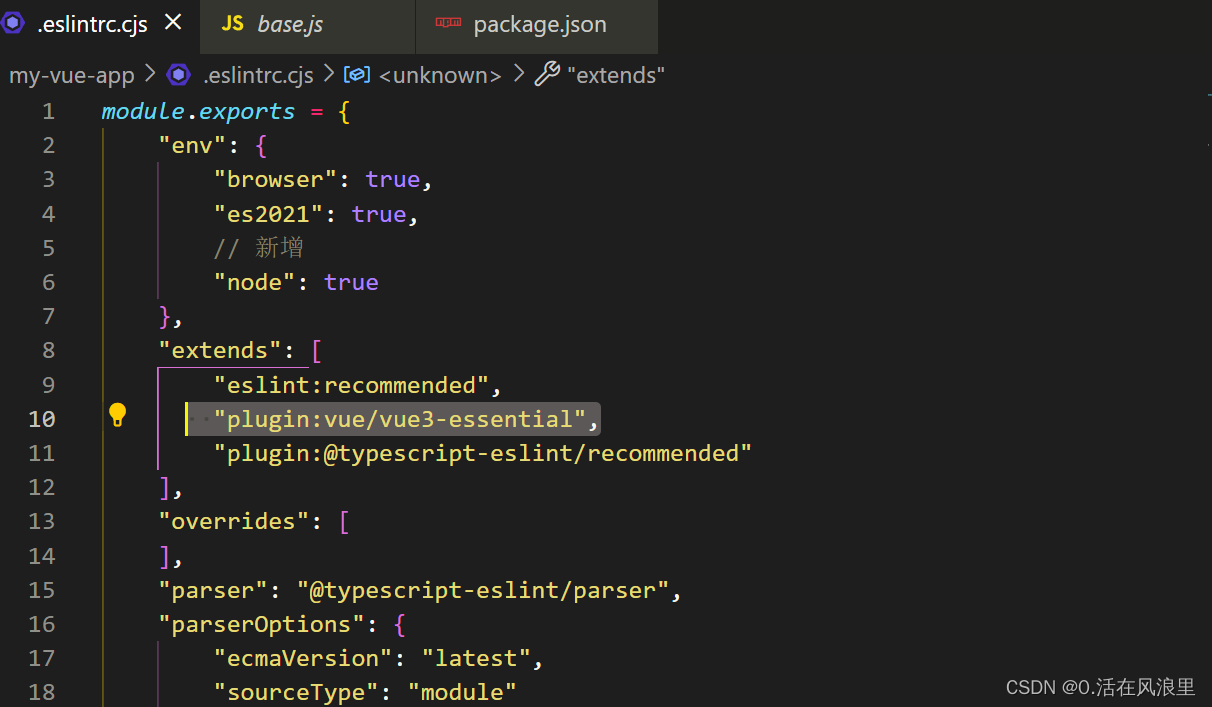
依赖安装完成后,会生成**.eslintrc.cjs** (因为你选择的是:JavaScript modules (import/export))配置文件 ,此时打开**.eslintrc.cjs配置文件会出现一个报错,需要再 env字段中增加node: true配置以解决eslint找不到module的报错**
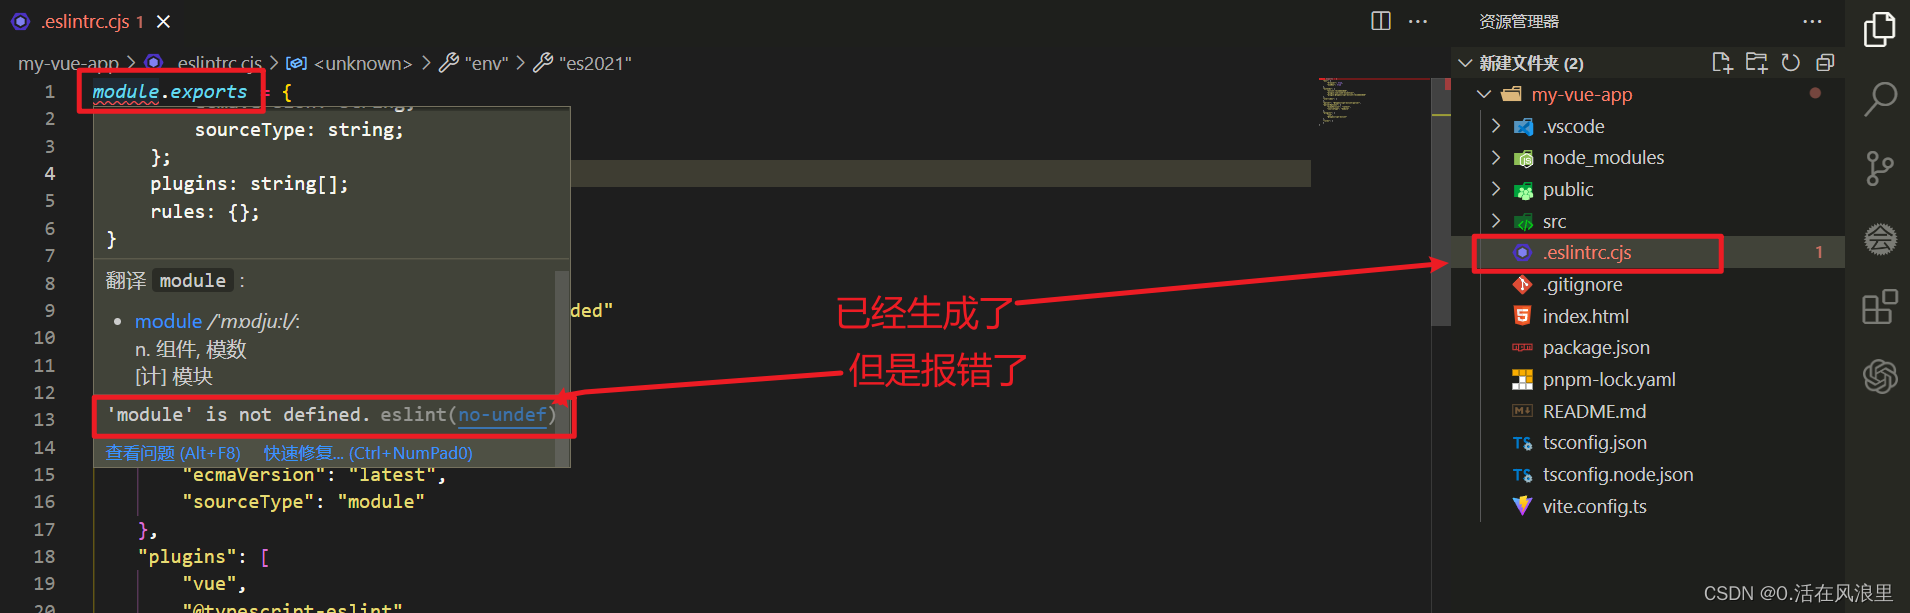
修改如下:
module.exports = {
    "env": {
        "browser": true,
        "es2021": true,
        // 新增
        "node": true
    },
    "extends": [
        "eslint:recommended",
        "plugin:vue/vue3-essential",
        "plugin:@typescript-eslint/recommended"
    ],
    "parserOptions": {
        "ecmaVersion": "latest",
        "parser": "@typescript-eslint/parser",
        "sourceType": "module"
    },
    "plugins": [
        "vue",
        "@typescript-eslint"
    ],
    "rules": {
    }
}
在 package.json文件中的 script中添加ESlint:check命令
{
    "scripts": {
        // eslint . 为指定lint当前项目中的文件
        // --ext 为指定lint哪些后缀的文件
        // --fix 开启自动修复
        "ESlint:check": "eslint . --ext .vue,.js,cjs,mjs,.ts,.cts,.mts,.jsx,.tsx --fix",

    }
}
执行**ESlint:check**命令
pnpm ESlint:check
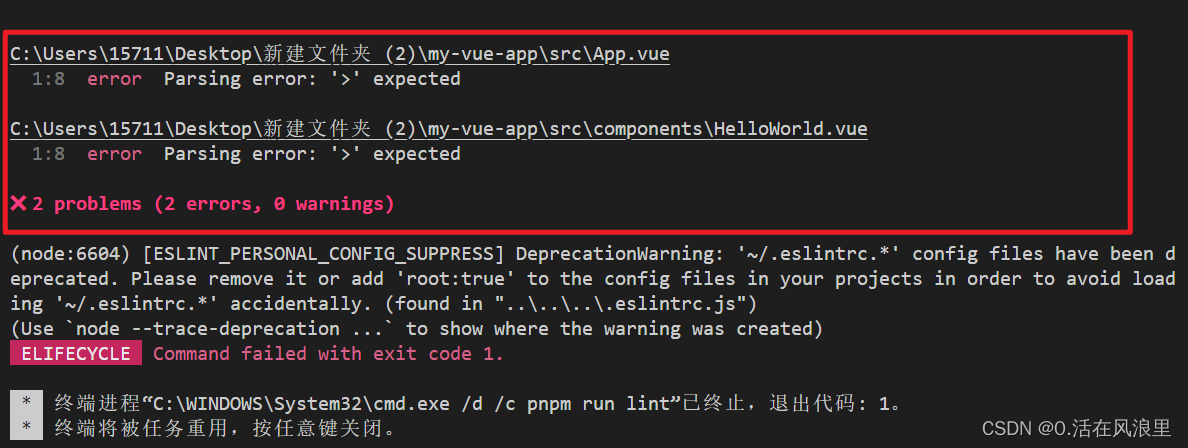
发现报错了,执行不了,
报错原因:
eslint默认是不会解析.vue后缀文件的。因此,需要一个额外的解析器来解析.vue后缀文件。
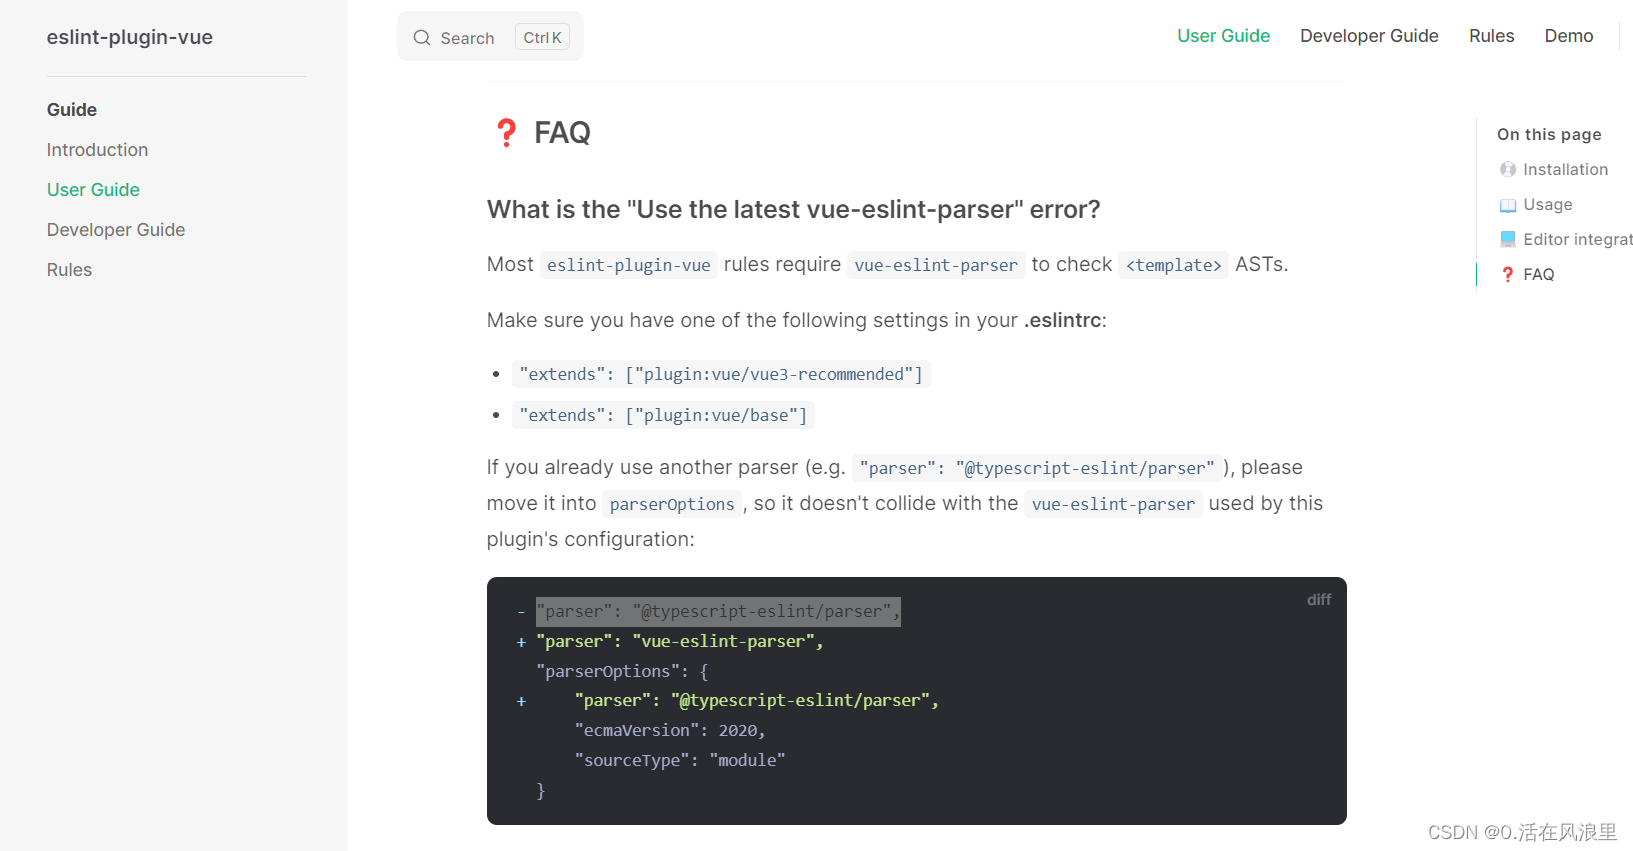
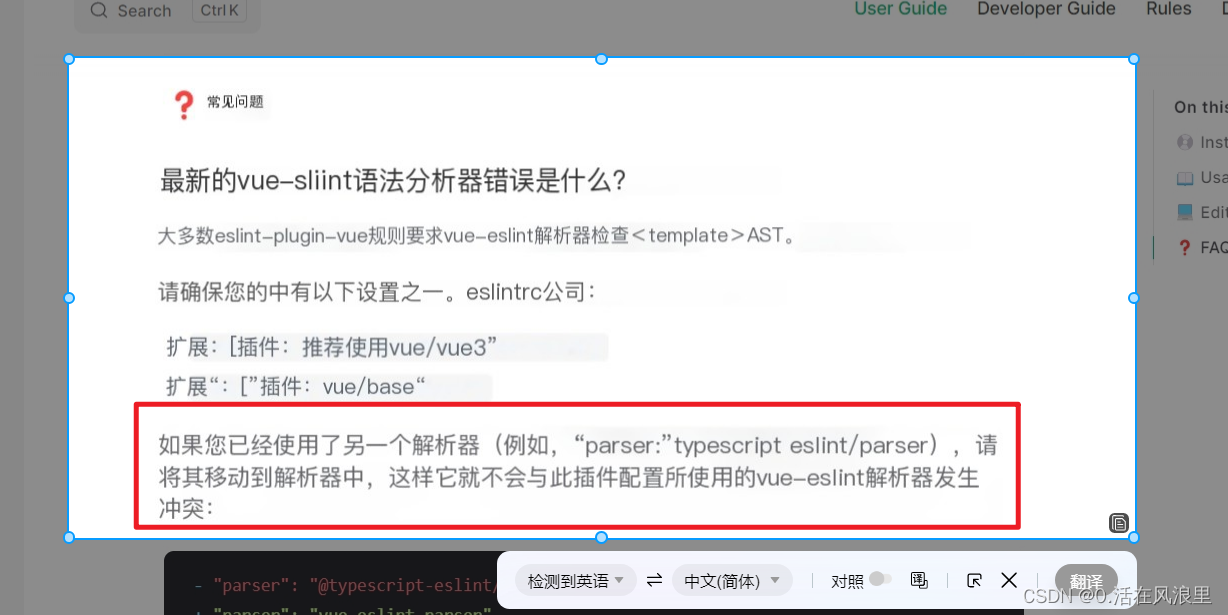
查看官网解释如下:
User Guide | eslint-plugin-vue
排错思路:
但是我们查看.eslintrc.cjs文件中的extends会发现已经有继承"plugin:vue/vue3-essential"的配置。
然后在node_modules中可以找到eslint-plugin-vue/lib/cinfigs/essential,里面配置了extends是继承于同级目录下的base.js,
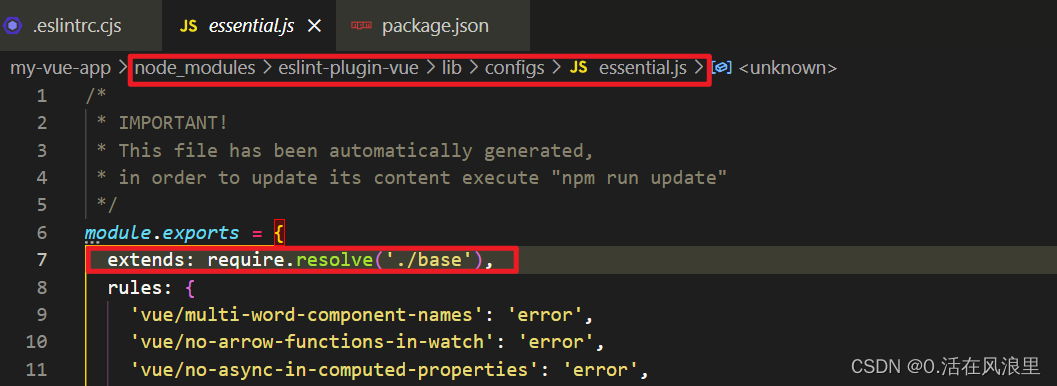
在base.js里面会发现parser: require.resolve('vue-eslint-parser')这个配置。因此,按道理来说应该是会解析.vue后缀文件的。
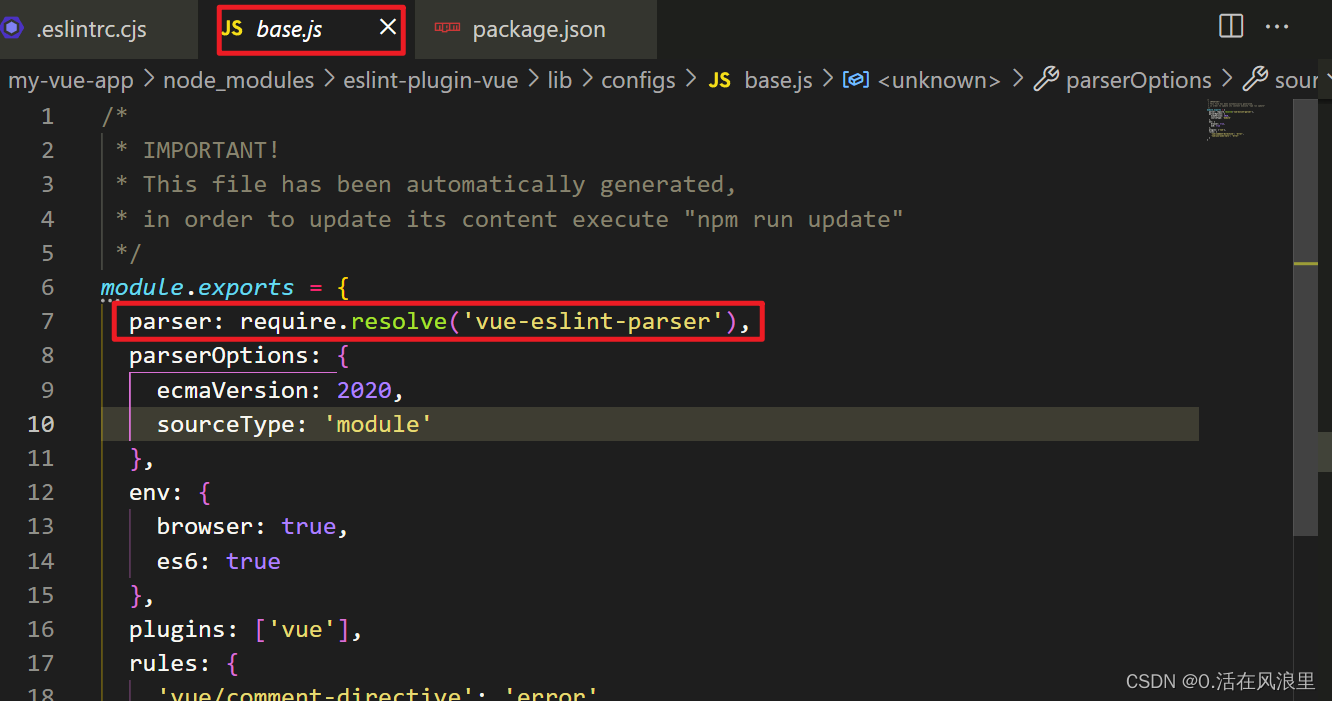
继续往下看.eslintrc.cjs文件中的extends会发现,extends中还有一个"plugin:@typescript-eslint/recommended",
它是来自于/node_modules/@typescript-eslint/eslint-plugin/dist/configs/recommended.js,
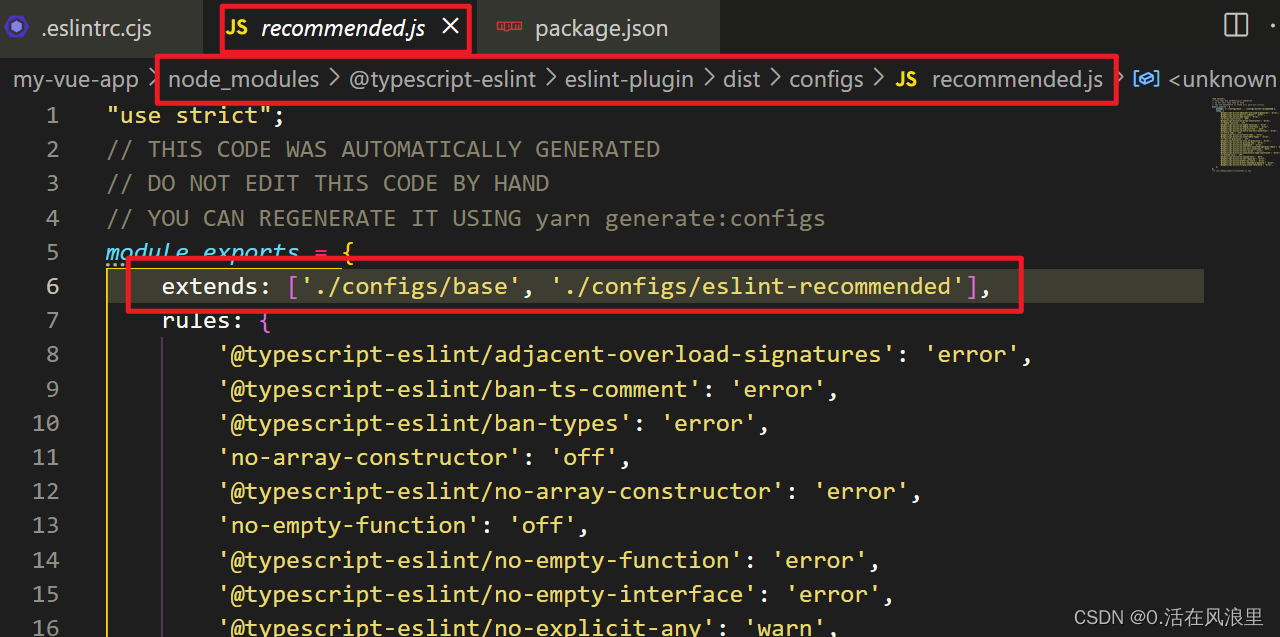
查看该文件会发现最终继承于同级目录下的base.js文件。从该文件中可以发现parser: '@typescript-eslint/parser',配置。
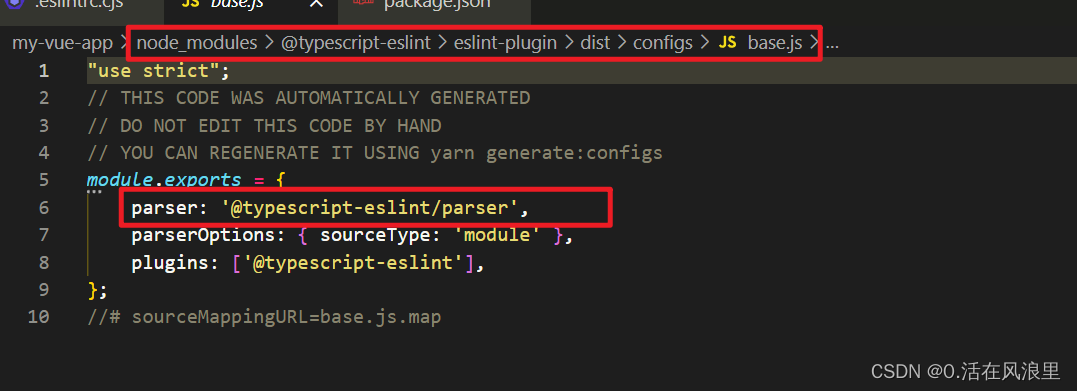
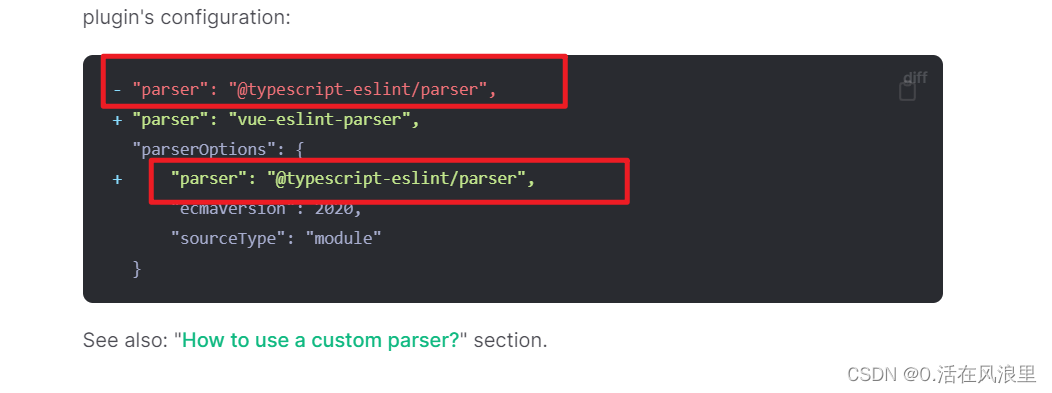
按照.eslintrc.cjs文件中的extends配置的顺序可知,最终导致报错的原因就是**@typescript-eslint/parser把vue-eslint-parser覆盖了**。
如果已经使用了另外的解析器(例如"parser": "@typescript-eslint/parser"),则需要将其移至**parseOptions,这样才不会与vue-eslint-parser冲突**。
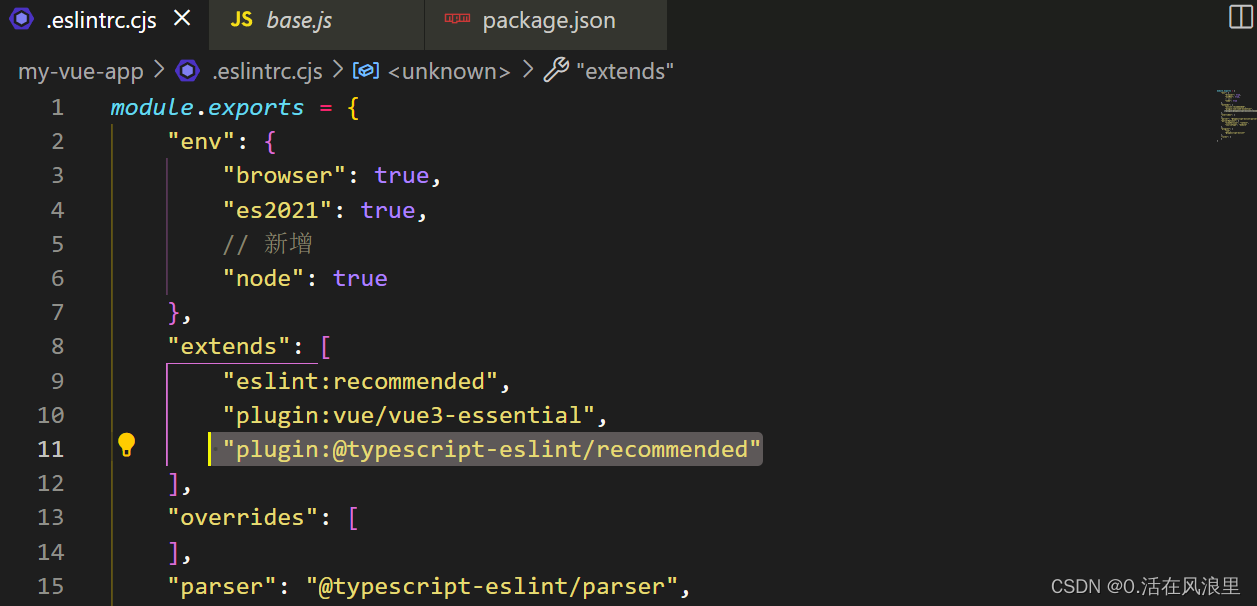
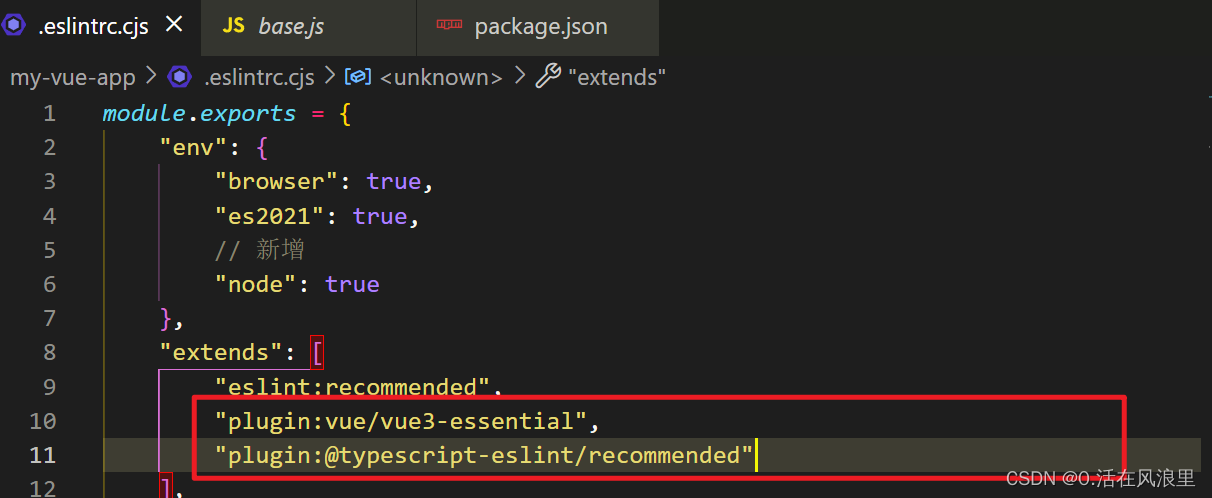
修改.eslintrc.cjs文件
module.exports = {
  env: {
    browser: true,
    es2021: true,
    // 新增
    node: true
  },
  extends: [
    'eslint:recommended',
    'plugin:vue/vue3-essential',
    'plugin:@typescript-eslint/recommended'
  ],
  // 新增
  parser: 'vue-eslint-parser',
  parserOptions: {
    ecmaVersion: 'latest',
    parser: '@typescript-eslint/parser',
    sourceType: 'module'
  },
  plugins: ['vue', '@typescript-eslint'],
  rules: {}
};
此时,再执行 pnpm lint,就会发现校验通过了。但是出现警告了

该警告建议你更新配置文件以避免意外加载~/.eslintrc.*,可以在项目的ESLint配置文件中添加root:true选项来解决该问题。
你可以在.eslintrc.cjs文件中添加以下内容:
{
  "root": true,
 // 自定义规则
	rules: {
		// http://eslint.cn/docs/rules/
		// https://eslint.vuejs.org/rules/
		// https://typescript-eslint.io/rules/no-unused-vars/
		// 函数的复杂度是指函数中控制流程的复杂程度,例如条件语句、循环语句、嵌套等。复杂度越高,函数的可读性和可维护性可能越差。
		complexity: ['error', 12], //圈复杂度
		// "off" 表示禁用了 '@typescript-eslint/ban-ts-ignore' 规则。这意味着在 TypeScript 代码中,你可以继续使用 "@ts-ignore" 注释来忽略编译器的警告或错误。
		'@typescript-eslint/ban-ts-ignore': 'off',
		// 关闭模板中 v-for 的 key提示警告
		'vue/no-v-for-template-key': 'off',
		// 关闭强制函数显式返回类型的规则
		'@typescript-eslint/explicit-function-return-type': 'off',
		// 关闭禁止使用 any 类型的规则 warn error
		'@typescript-eslint/no-explicit-any': 'off',
		// 关闭禁止使用 require() 函数的规则
		'@typescript-eslint/no-var-requires': 'off',
		// 关闭禁止空函数的规则
		'@typescript-eslint/no-empty-function': 'off',
		// 关闭禁止定义前使用的规则
		'@typescript-eslint/no-use-before-define': 'off',
		// 关闭禁止使用 @ts-comment 的规则
		'@typescript-eslint/ban-ts-comment': 'off',
		// 关闭禁止使用特定类型的规则
		'@typescript-eslint/ban-types': 'off',
		// 关闭非空断言运算符的规则
		'@typescript-eslint/no-non-null-assertion': 'off',
		// 关闭在导出函数和类之外导出的规则
		'@typescript-eslint/explicit-module-boundary-types': 'off',
		// 禁止重复声明变量的规则
		'@typescript-eslint/no-redeclare': 'error',
		// 关闭短路表达式中可能导致不可选链访问的规则
		'@typescript-eslint/no-non-null-asserted-optional-chain': 'off',
		// 检测未使用变量的规则,error 代表检测出未使用变量时会抛出错误
		'@typescript-eslint/no-unused-vars': [2],

		// 关闭自定义事件名大小写的规则
		'vue/custom-event-name-casing': 'off',
		// 关闭属性排序的规则
		'vue/attributes-order': 'off',
		// 关闭每个文件只导出一个组件的规则
		'vue/one-component-per-file': 'off',
		// 关闭 HTML 遇到 > 换行的规则
		'vue/html-closing-bracket-newline': 'off',
		// 关闭 HTML 属性使用换行的规则
		'vue/max-attributes-per-line': 'off',
		// 关闭多行 HTML 元素内容换行的规则
		'vue/multiline-html-element-content-newline': 'off',
		// 关闭单行 HTML 元素内容换行的规则
		'vue/singleline-html-element-content-newline': 'off',
		// 关闭 HTML 属性名称中使用连字符的规则
		'vue/attribute-hyphenation': 'off',
		// 关闭 HTML 没有内容的标签必须以 /> 结尾的规则
		'vue/html-self-closing': 'off',
		// 关闭模板中只包含一个根元素的规则
		'vue/no-multiple-template-root': 'off',
		// 关闭要求给默认的 prop 赋初始值的规则
		'vue/require-default-prop': 'off',
		// 关闭 v-model 指令中的参数规则
		'vue/no-v-model-argument': 'off',
		// 关闭 watch 函数不能使用箭头函数的规则
		'vue/no-arrow-functions-in-watch': 'off',
		// 关闭禁止在 template 标签上使用 key 属性的规则
		'vue/no-template-key': 'off',
		// 关闭禁止使用 v-html 指令的规则
		'vue/no-v-html': 'off',
		// 关闭注释中的特定关键字规则
		'vue/comment-directive': 'off',
		// 关闭模板中的语法错误规则
		'vue/no-parsing-error': 'off',
		// 关闭已经被废弃的 v-on:NativeModifier 规则
		'vue/no-deprecated-v-on-native-modifier': 'off',
		// 关闭多单词组件名称的规则
		'vue/multi-word-component-names': 'off',

		// 关闭无用的转义字符的规则
		'no-useless-escape': 'off',
		// 关闭稀疏数组的规则
		'no-sparse-arrays': 'off',
		// 关闭禁止使用原型对象上的内置属性的规则
		'no-prototype-builtins': 'off',
		// 关闭禁止在 if 或者循环中出现常量条件的规则
		'no-constant-condition': 'off',
		// 关闭定义前使用的规则
		'no-use-before-define': 'off',
		// 关闭限制使用特定全局变量的规则
		'no-restricted-globals': 'off',
		// 关闭指定语法的规则
		'no-restricted-syntax': 'off',
		// 关闭生成器前后空格的规则
		'generator-star-spacing': 'off',
		// 关闭不可达代码的规则
		'no-unreachable': 'off',
		// 关闭模板中只包含一个根元素的规则
		'no-multiple-template-root': 'off',
		// 检测未使用变量的规则,error 代表检测出未使用变量时会抛出错误
		'no-unused-vars': 'error',
		// 关闭 v-model 指令中的参数规则
		'no-v-model-argument': 'off',
		// 关闭在 switch 语句中缺少 default 分支的规则
		'no-case-declarations': 'off',
		// 禁用 console 输出
		// 'no-console': 'error',
		// 重复声明变量视为错误
		'no-redeclare': 'error',
	},
}
如果使用的是旧版本的ESLint,则可能需要将其升级到支持’root’属性的最新版本。
此外,如果你不需要在全局范围内使用ESLint配置文件,请删除位于用户主目录下的~/.eslintrc.*文件,以避免被意外加载。
修改.eslintrc.cjs文件
module.exports = {
  env: {
    browser: true,
    es2021: true,
    // 新增
    node: true
  },
  extends: [
    'eslint:recommended',
    'plugin:vue/vue3-essential',
    'plugin:@typescript-eslint/recommended'
  ],
  // 新增
  parser: 'vue-eslint-parser',
  parserOptions: {
    ecmaVersion: 'latest',
    parser: '@typescript-eslint/parser',
    sourceType: 'module'
  },
  plugins: ['vue', '@typescript-eslint'],
  // 新增
  "root": true,
  rules: {}
};
再次运行如下:

创建忽略文件:.eslintignore这样在eslint在进行代码检查时会忽略这些文件
node_modules/
dist/
扩展解释``.eslintrc.cjs文件
注意:eslint 只会自动修复 .eslintrc.cjs 里对应的 rules,其它的只能手动修复
module.exports = { ... }:将这个对象作为模块的输出结果,以便其他模块可以引用它。env: { ... }:指定代码运行的环境,这里是在浏览器和Node.js环境下运行,以及ES6语法的支持。extends: [ ... ]:继承其他配置的规则,这里包括了ESLint官方推荐的规则,Vue.js 3必需的规则和TypeScript推荐的规则。parser: 'vue-eslint-parser':指定解析器,这里是vue-eslint-parser,它可以解析Vue单文件组件中的代码。parserOptions: { ... }:指定解析器选项,这里包括ECMAScript版本,解析器和代码类型。plugins: ['vue', '@typescript-eslint']:指定插件,这里包括了Vue.js和TypeScript的插件。"root": true:指定这是根目录的配置文件,不再向上查找其他配置文件。rules: {}:指定规则,这里没有指定任何规则,使用默认规则。ESLint默认规则是指在没有明确配置规则的情况下,ESLint所使用的一组默认规则。这些规则通常是开发中常见的错误或最佳实践,例如:不允许使用未声明的变量、不允许使用eval()函数等。
具体来说,ESLint默认规则包括:
- Possible Errors:可能的错误,如使用未声明的变量、使用eval()函数等。
- Best Practices:最佳实践,如避免使用eval()函数、避免在循环中使用函数等。
- Strict Mode:严格模式,如不允许使用arguments.callee等。
- Variables:变量定义,如不允许重复定义变量等。
- Node.js and CommonJS:Node.js和CommonJS规则,如不允许使用未定义的模块等。
- Stylistic Issues:风格问题,如缩进、分号等。
- ECMAScript 6:ES6规则,如箭头函数、let和const等。
如果没有明确配置规则,ESLint将使用这些默认规则。但是这些规则并不一定适用于所有项目,需要根据项目的具体情况进行调整。
——————————————— 配置ESLint完 ——————————————————
3 安装vscode插件ESlint
如果写一行代码就要执行一遍lint命令,这效率就太低了。所以我们可以配合vscode的ESLint插件,实现每次保存代码时,自动执行lint命令来修复代码的错误。
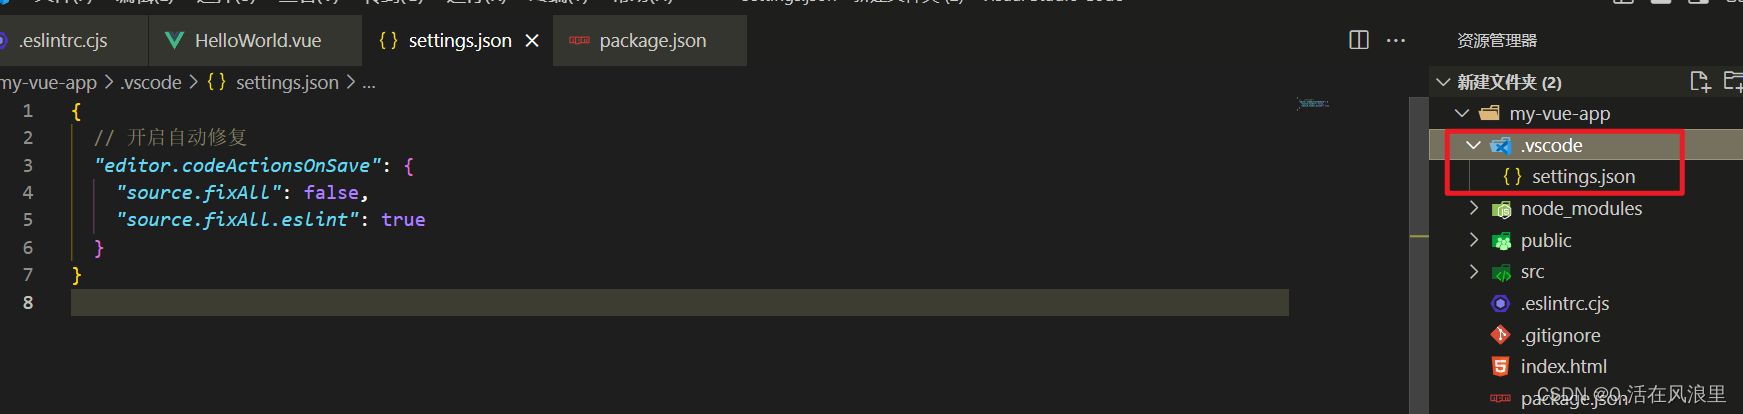
在项目中新建.vscode/settings.json文件,然后在其中加入以下配置
{
    // 开启自动修复
    "editor.codeActionsOnSave": {
        "source.fixAll": false,
        "source.fixAll.eslint": true
    }
}
—————————————— 安装vscode插件ESlint完 —————————————————
4 配置prettier
执行安装命令
pnpm add prettier -D
在根目录下新建prettierrc.cjs
添加以下配置,更多配置可查看官方文档
module.exports = {
// 一行最多多少个字符
printWidth: 80,
// 指定每个缩进级别的空格数
tabWidth: 2,
// 使用制表符而不是空格缩进行
useTabs: true,
// 在语句末尾打印分号
semi: true,
// 使用单引号而不是双引号
singleQuote: true,
// 更改引用对象属性的时间 可选值"<as-needed|consistent|preserve>"
quoteProps: 'as-needed',
// 在JSX中使用单引号而不是双引号
jsxSingleQuote: false,
// 多行时尽可能打印尾随逗号。(例如,单行数组永远不会出现逗号结尾。) 可选值"<none|es5|all>",默认none
trailingComma: 'es5',
// 在对象文字中的括号之间打印空格
bracketSpacing: true,
// jsx 标签的反尖括号需要换行
jsxBracketSameLine: false,
// 在单独的箭头函数参数周围包括括号 always:(x) => x \ avoid:x => x
arrowParens: 'always',
// 这两个选项可用于格式化以给定字符偏移量(分别包括和不包括)开始和结束的代码
rangeStart: 0,
rangeEnd: Infinity,
// 指定要使用的解析器,不需要写文件开头的 @prettier
requirePragma: false,
// 不需要自动在文件开头插入 @prettier
insertPragma: false,
// 使用默认的折行标准 always\never\preserve
proseWrap: 'preserve',
// 指定HTML文件的全局空格敏感度 css\strict\ignore
htmlWhitespaceSensitivity: 'css',
// Vue文件脚本和样式标签缩进
vueIndentScriptAndStyle: false,
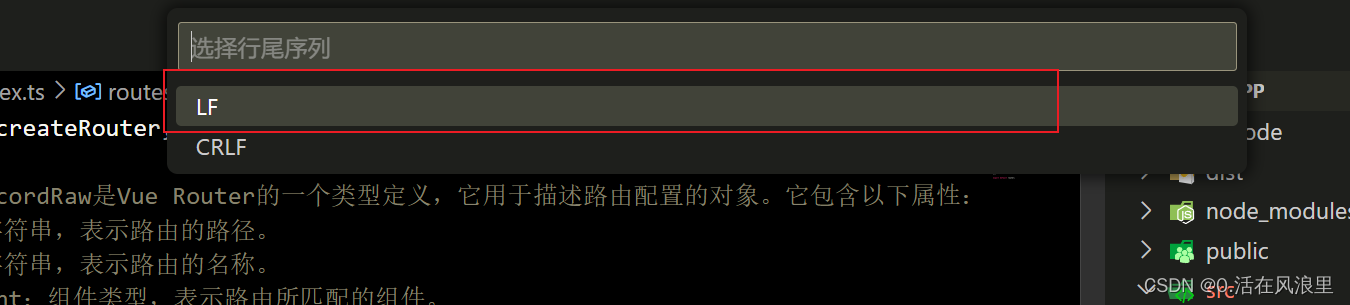
// 换行符使用 lf 结尾是 可选值"<auto|lf|crlf|cr>"
endOfLine: 'lf',
};
在package.json中的script中添加以下命令
{
    "scripts": {
            "Prettier:check": "prettier --write \"./**/*.{html,vue,ts,cts,mts,js,mjs,cjs,json,md,scss}\"",

    }
}
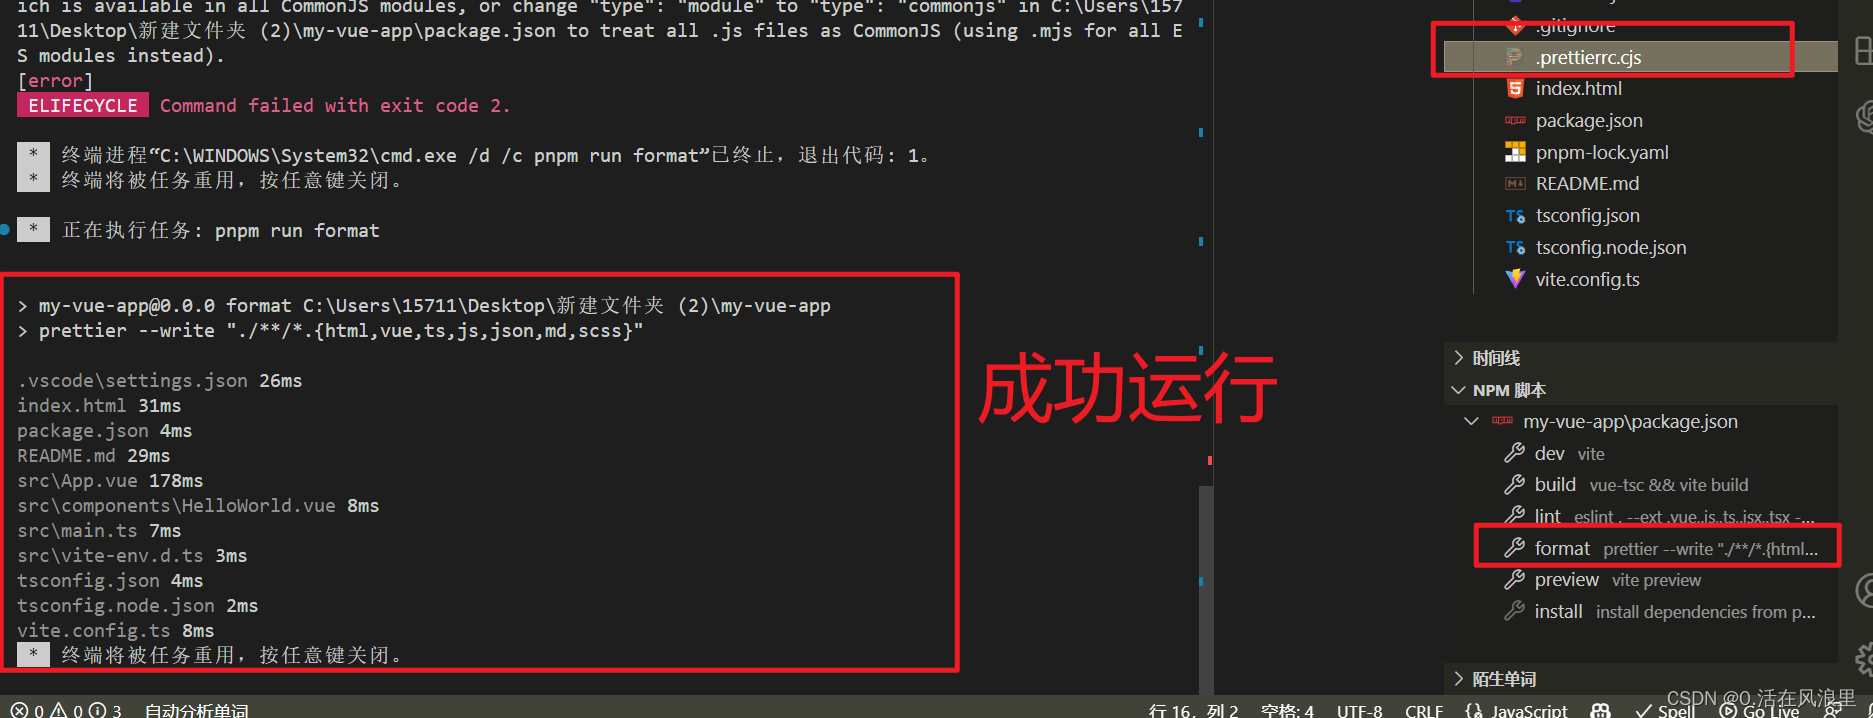
运行该命令,会将我们项目中的文件都格式化一遍,后续如果添加其他格式的文件,可在该命令中添加,例如:.less后缀的文件
扩展解释**:.prettierrc.js**
如果你的文件建立错了就会报错 比如建立.prettierrc.js,

问题描述:
错误信息提示 .prettierrc.js 配置文件存在问题。似乎该文件被视为 ES 模块文件。
怎么解决:
可以尝试以下几种解决方法:
- 将
.prettierrc.js文件重命名为.prettierrc.cjs,以明确指示该文件为 CommonJS 模块。- 修改引用该文件的代码,使用动态
import()。这种方法适用于所有的 CommonJS 模块。- 在
package.json中将"type": "module"修改为"type": "commonjs",以将所有的.js文件都视为 CommonJS 模块。如果需要使用 ES 模块,则可以使用.mjs文件扩展名。- 升级到 Prettier 2.3.2 或更高版本,该版本已经支持
.prettierrc.js文件的 ES 模块语法。
本次采用第一种方式
—————————————— 配置prettier完 —————————————————
5 配置sass
要在 Vite 项目中使用 Sass,需要安装 sass 和 sass-loader 依赖。然后,在 vite.config.ts 文件中进行如下配置:
pnpm install sass sass-loader --save-dev
import { defineConfig } from 'vite'
import vue from '@vitejs/plugin-vue'

export default defineConfig({
  plugins: [vue()],
  css: {
    preprocessorOptions: {
      scss: {
        // 这里可以添加全局的 Sass 变量、Mixin等。首先你的有这个文件
        // additionalData: `
        //   @import "@/styles/variables.scss";
        //   @import "@/styles/mixins.scss";
        // `,
      }
    }
  }
})
其中,additionalData 属性可以用来引入全局的 Sass 变量和 Mixin 等,并且会在每个 .scss 文件中自动注入。
在 Vue 组件中,可以直接使用 lang="scss" 来编写 Sass 样式:(前提你的有这个文件并且里面写有这个变量)
<template>
  <div class="example">
    <h1>{{ msg }}</h1>
  </div>
</template>

<style lang="scss">
.example {
  h1 {
    font-size: 32px;
    color: $primary-color;
  }
}
</style>
—————————————— 配置sass完 —————————————————
6 安装Prettier - Code formatter插件
安装该插件的目的是,让该插件在我们保存的时候自动完成格式化
在.vscode/settings.json中添加一下规则
{
    // 保存的时候自动格式化
    "editor.formatOnSave": true,
    // 默认格式化工具选择prettier
    "editor.defaultFormatter": "esbenp.prettier-vscode"
}
6.1 解决**eslint与prettier**的冲突
在理想的状态下,**
eslint与prettier应该各司其职。eslint负责我们的代码质量,prettier负责我们的代码格式。但是在使用的过程中会发现,由于我们开启了自动化的eslint修复与自动化的根据prettier**来格式化代码。所以我们已保存代码,会出现屏幕闪一起后又恢复到了报错的状态。这其中的根本原因就是**
eslint有部分规则与prettier**冲突了,所以保存的时候显示运行了eslint的修复命令,然后再运行prettier格式化,所以就会出现屏幕闪一下然后又恢复到报错的现象。这时候你可以检查一下是否存在冲突的规则。查阅资料会发现,社区已经为我们提供了一个非常成熟的方案,即**
eslint-config-prettier+eslint-plugin-prettier。**
- eslint-plugin-prettier: 基于 prettier 代码风格的 eslint 规则,即eslint使用pretter规则来格式化代码。
- eslint-config-prettier: 禁用所有与格式相关的 eslint 规则,解决 prettier 与 eslint 规则冲突,确保将其放在 extends 队列最后,这样它将覆盖其他配置
安装依赖
pnpm add eslint-config-prettier eslint-plugin-prettier -D
在 **.eslintrc.cjs**中 **extends**的最后添加一个配置
{
    extends: [
    'eslint:recommended',
    'plugin:vue/vue3-essential',
    'plugin:@typescript-eslint/recommended',
      // 新增,必须放在最后面
     'plugin:prettier/recommended'
  ],
}
以上所有配置 完整 的.eslintrc.cjs
module.exports = {
  env: {
    browser: true,
    es2021: true,
    // 新增
    node: true
  },
  extends: [
    'eslint:recommended',
    'plugin:vue/vue3-essential',
    'plugin:@typescript-eslint/recommended',
    // 新增,必须放在最后面
    'plugin:prettier/recommended'
  ],
  // 新增
  parser: 'vue-eslint-parser',
  parserOptions: {
    ecmaVersion: 'latest',
    parser: '@typescript-eslint/parser',
    sourceType: 'module'
  },
  plugins: ['vue', '@typescript-eslint'],
  // 新增
  root: true,
 // 对某些文件进行单独配置(这里针对 TypeScript 文件)
	overrides: [
		{
			files: ['*.ts', '*.tsx', '*.vue'],
			rules: {
				'no-undef': 'off', // 在 TypeScript 中没有必要使用 no-undef 规则
			},
		},
	],
	// 自定义规则
	rules: {
		// http://eslint.cn/docs/rules/
		// https://eslint.vuejs.org/rules/
		// https://typescript-eslint.io/rules/no-unused-vars/
		// 函数的复杂度是指函数中控制流程的复杂程度,例如条件语句、循环语句、嵌套等。复杂度越高,函数的可读性和可维护性可能越差。
		complexity: ['error', 12], //圈复杂度
		// "off" 表示禁用了 '@typescript-eslint/ban-ts-ignore' 规则。这意味着在 TypeScript 代码中,你可以继续使用 "@ts-ignore" 注释来忽略编译器的警告或错误。
		'@typescript-eslint/ban-ts-ignore': 'off',
		// 关闭强制函数显式返回类型的规则
		'@typescript-eslint/explicit-function-return-type': 'off',
		// 关闭禁止使用 any 类型的规则 warn error
		'@typescript-eslint/no-explicit-any': 'off',
		// 关闭禁止使用 require() 函数的规则
		'@typescript-eslint/no-var-requires': 'off',
		// 关闭禁止空函数的规则
		'@typescript-eslint/no-empty-function': 'off',
		// 关闭禁止定义前使用的规则
		'@typescript-eslint/no-use-before-define': 'off',
		// 关闭禁止使用 @ts-comment 的规则
		'@typescript-eslint/ban-ts-comment': 'off',
		// 关闭禁止使用特定类型的规则
		'@typescript-eslint/ban-types': 'off',
		// 关闭非空断言运算符的规则
		'@typescript-eslint/no-non-null-assertion': 'off',
		// 关闭在导出函数和类之外导出的规则
		'@typescript-eslint/explicit-module-boundary-types': 'off',
		// 禁止重复声明变量的规则
		'@typescript-eslint/no-redeclare': 'error',
		// 关闭短路表达式中可能导致不可选链访问的规则
		'@typescript-eslint/no-non-null-asserted-optional-chain': 'off',
		// 检测未使用变量的规则,error 代表检测出未使用变量时会抛出错误
		'@typescript-eslint/no-unused-vars': [2],

		// 关闭自定义事件名大小写的规则
		'vue/custom-event-name-casing': 'off',
		// 关闭属性排序的规则
		'vue/attributes-order': 'off',
		// 关闭每个文件只导出一个组件的规则
		'vue/one-component-per-file': 'off',
		// 关闭 HTML 遇到 > 换行的规则
		'vue/html-closing-bracket-newline': 'off',
		// 关闭 HTML 属性使用换行的规则
		'vue/max-attributes-per-line': 'off',
		// 关闭多行 HTML 元素内容换行的规则
		'vue/multiline-html-element-content-newline': 'off',
		// 关闭单行 HTML 元素内容换行的规则
		'vue/singleline-html-element-content-newline': 'off',
		// 关闭 HTML 属性名称中使用连字符的规则
		'vue/attribute-hyphenation': 'off',
		// 关闭 HTML 没有内容的标签必须以 /> 结尾的规则
		'vue/html-self-closing': 'off',
		// 关闭模板中只包含一个根元素的规则
		'vue/no-multiple-template-root': 'off',
		// 关闭要求给默认的 prop 赋初始值的规则
		'vue/require-default-prop': 'off',
		// 关闭 v-model 指令中的参数规则
		'vue/no-v-model-argument': 'off',
		// 关闭 watch 函数不能使用箭头函数的规则
		'vue/no-arrow-functions-in-watch': 'off',
		// 关闭禁止在 template 标签上使用 key 属性的规则
		'vue/no-template-key': 'off',
		// 关闭禁止使用 v-html 指令的规则
		'vue/no-v-html': 'off',
		// 关闭注释中的特定关键字规则
		'vue/comment-directive': 'off',
		// 关闭模板中的语法错误规则
		'vue/no-parsing-error': 'off',
		// 关闭已经被废弃的 v-on:NativeModifier 规则
		'vue/no-deprecated-v-on-native-modifier': 'off',
		// 关闭多单词组件名称的规则
		'vue/multi-word-component-names': 'off',

		// 关闭无用的转义字符的规则
		'no-useless-escape': 'off',
		// 关闭稀疏数组的规则
		'no-sparse-arrays': 'off',
		// 关闭禁止使用原型对象上的内置属性的规则
		'no-prototype-builtins': 'off',
		// 关闭禁止在 if 或者循环中出现常量条件的规则
		'no-constant-condition': 'off',
		// 关闭定义前使用的规则
		'no-use-before-define': 'off',
		// 关闭限制使用特定全局变量的规则
		'no-restricted-globals': 'off',
		// 关闭指定语法的规则
		'no-restricted-syntax': 'off',
		// 关闭生成器前后空格的规则
		'generator-star-spacing': 'off',
		// 关闭不可达代码的规则
		'no-unreachable': 'off',
		// 关闭模板中只包含一个根元素的规则
		'no-multiple-template-root': 'off',
		// 检测未使用变量的规则,error 代表检测出未使用变量时会抛出错误
		'no-unused-vars': 'error',
		// 关闭 v-model 指令中的参数规则
		'no-v-model-argument': 'off',
		// 关闭在 switch 语句中缺少 default 分支的规则
		'no-case-declarations': 'off',
		// 禁用 console 输出
		// 'no-console': 'error',
		// 重复声明变量视为错误
		'no-redeclare': 'error',
	},
}
—————————————— 冲突解决完 —————————————————
7 按需引入element-plus 和 自动引入Vue3APi 与 组件
pnpm install element-plus
Volar 支持
如果您使用 Volar,请在 tsconfig.json 中通过 compilerOptions.type 指定全局组件类型。
// tsconfig.json
{
  "compilerOptions": {
    // ...
    "types": ["element-plus/global"]
  }
}
自动导入
pnpm install -D unplugin-vue-components unplugin-auto-import
vite.config.ts
// 导入 vite 插件
import { defineConfig } from "vite";
// 导入 vue 插件
import vue from "@vitejs/plugin-vue";
// 导入自动导入插件
import AutoImport from "unplugin-auto-import/vite";
// 导入自动注册组件的插件
import Components from "unplugin-vue-components/vite";
import { ElementPlusResolver } from "unplugin-vue-components/resolvers";
import * as path from "path";
export default defineConfig({
// 配置打包后的相对路径
base: "./",
//配置别名
resolve: {
// 需要在tsconfig.json的compilerOptions中配置paths
alias: {
"@": path.resolve("./src"), // @代替src
"~": path.resolve("./src/components"), // @代替src/components
},
},
// 配置全局样式
css: {
preprocessorOptions: {
scss: {
// 这里可以添加全局的 Sass 变量、Mixin等。首先你的有这个文件
// additionalData: `
// @import "@/styles/variables.scss";
// @import "@/styles/mixins.scss";
// `,
},
},
},
// plugins插件
plugins: [
vue(), //vue
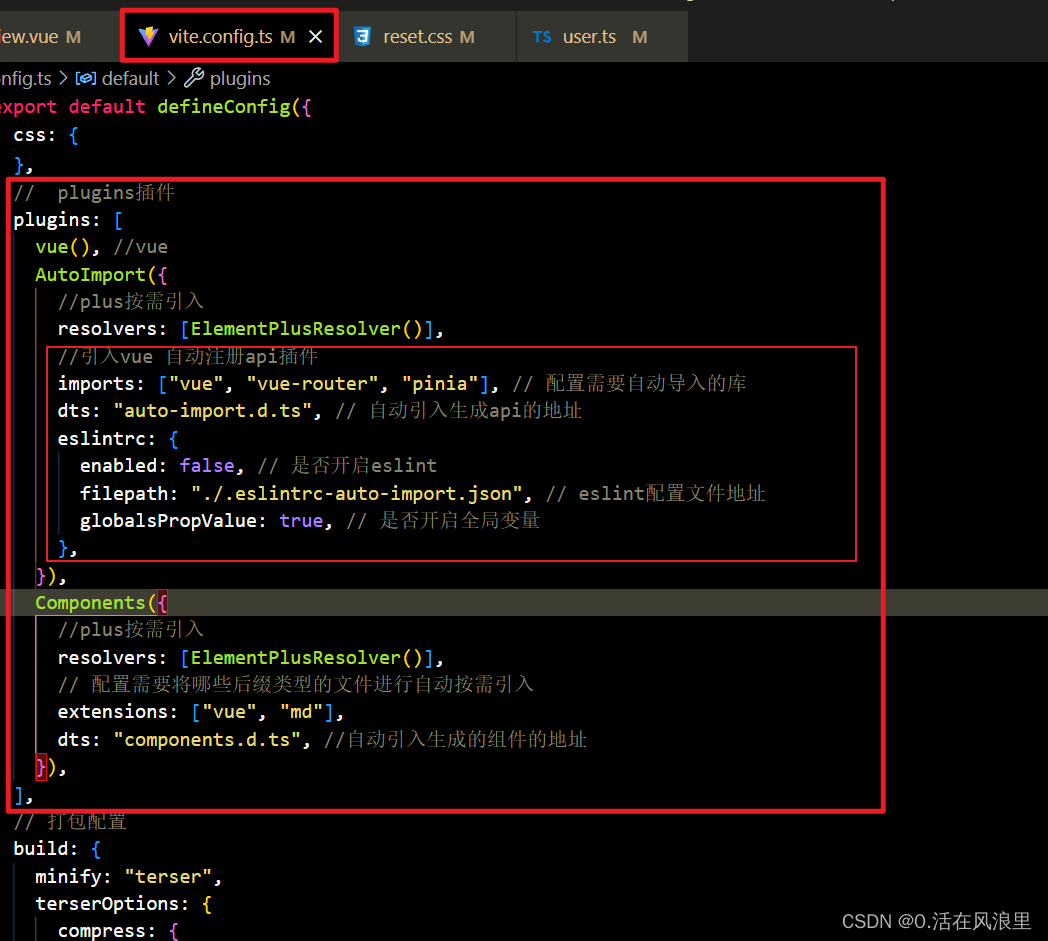
AutoImport({
//plus按需引入
resolvers: [ElementPlusResolver()],
//引入vue 自动注册api插件
imports: ["vue", "vue-router", "pinia"], // 配置需要自动导入的库
dts: "types/auto-import.d.ts", // 自动引入生成api的地址
eslintrc: {
enabled: false, // 是否开启eslint
filepath: "./.eslintrc-auto-import.json", // eslint配置文件地址
globalsPropValue: true, // 是否开启全局变量
},
}),
Components({
//plus按需引入
resolvers: [ElementPlusResolver()],
// 配置需要将哪些后缀类型的文件进行自动按需引入
extensions: ["vue", "md"],
dts: "types/components.d.ts", //自动引入生成的组件的地址
}),
],
// 打包配置
build: {
minify: "terser",
terserOptions: {
compress: {
//生产环境时移除console
drop_console: true,
drop_debugger: true,
},
},
},
// 跨域
server: {
//使用IP能访问
host: "0.0.0.0",
port: 8888,
// 热更新
hmr: true,
//自定义代理规则
proxy: {
// 选项写法
"/api": {
// target: "https://admin.ccc.com",
// changeOrigin: true,
// rewrite: (path) => path.replace(/^\/api/, ""),
},
},
},
});
Ts 报红
配置完之后会出现
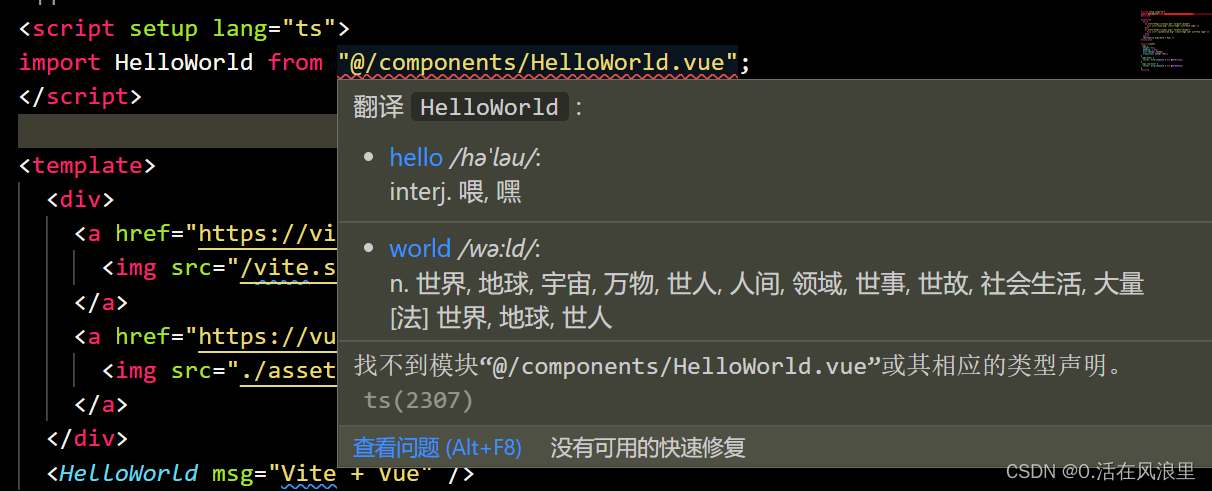
1:项目根目录新建 env.d.ts
/// <reference types="vite/client" />
// 三斜线引用告诉编译器在编译过程中用types形式引入的额外的文件vite/client.d.ts,
// 此文件里面是vite帮我们定义的各种常用类型定义,比如css,图片等。

declare module "*.vue" {
  import type { DefineComponent } from "vue";
  // eslint-disable-next-line @typescript-eslint/no-explicit-any, @typescript-eslint/ban-types
  const component: DefineComponent<{}, {}, any>;
  export default component;
}
2:修改 tsconfig.json
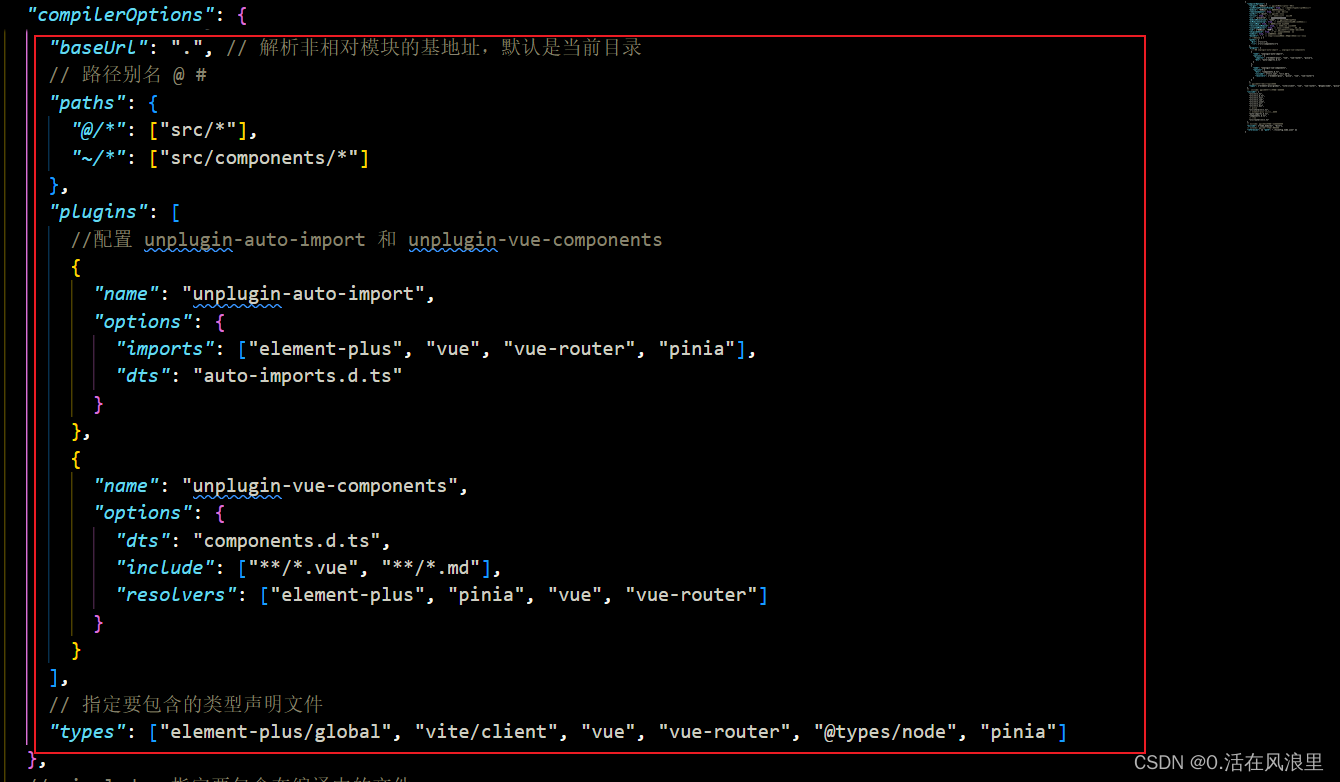

tsconfig.json
{
"compilerOptions": {
"target": "ESNext", // 指定ECMAScript目标版本
"useDefineForClassFields": true, // 是否校验TypeScript数据类型
"module": "ESNext", // 生成代码的模板标准
"removeComments": true, // 是否删除注释
"outDir": "./dist", // 指定输出目录
"strict": true, // 启用所有严格类型检查选项
"jsx": "preserve", // 指定JSX代码生成
"moduleResolution": "node", // 指定模块解析策略
"esModuleInterop": true, // 允许从CommonJS模块导入默认导出
"sourceMap": true, // 生成相应的.map文件
"resolveJsonModule": true, // 允许导入.json文件
"isolatedModules": true, // 仅对每个文件进行一次转换
"lib": ["ESNext", "DOM"], // 指定要包含在编译中的库文件
"skipLibCheck": true, // 跳过对声明文件的检查
"noEmit": true, // 不生成输出文件
"baseUrl": ".", // 解析非相对模块的基地址,默认是当前目录
// 路径别名 @ #
"paths": {
"@/*": ["src/*"],
"~/*": ["src/components/*"]
},
"plugins": [
//配置 unplugin-auto-import 和 unplugin-vue-components
{
"name": "unplugin-auto-import",
"options": {
"imports": ["element-plus", "vue", "vue-router", "pinia", "echarts"],
"dts": "auto-imports.d.ts"
}
},
{
"name": "unplugin-vue-components",
"options": {
"dts": "components.d.ts",
"include": ["**/*.vue", "**/*.md"],
"resolvers": ["element-plus", "pinia", "vue", "vue-router", "echarts"]
}
}
],
// 指定要包含的类型声明文件
"types": [
"element-plus/global",
"vite/client",
"vue",
"vue-router",
"@types/node",
"pinia",
"echarts"
]
},
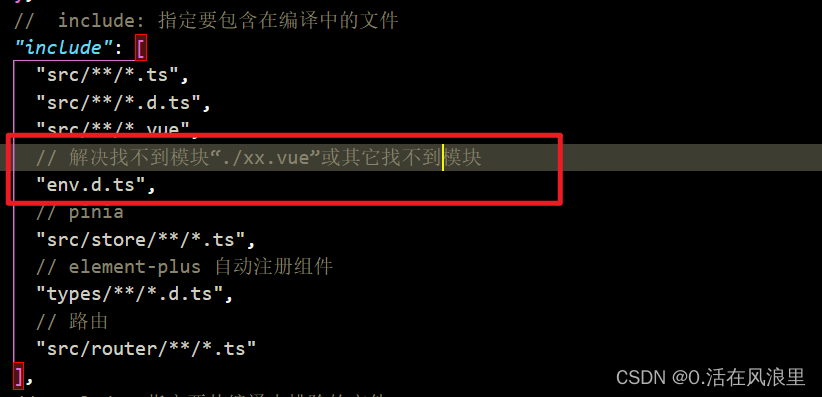
// include: 指定要包含在编译中的文件
"include": [
"src/**/*.ts",
"src/**/*.d.ts",
"src/**/*.vue",
// 解决找不到模块“./xx.vue”或其它找不到模块
"env.d.ts",
// pinia
"src/store/**/*.ts",
// element-plus 自动注册组件
"types/**/*.d.ts",
// 路由
"src/router/**/*.ts"
],
// exclude: 指定要从编译中排除的文件
"exclude": ["node_modules", "dist"],
// extends: 指定要继承的配置文件
"references": [{ "path": "./tsconfig.node.json" }]
}
Eslint 报红
比如使用了ref没有引入 eslint 爆红没引入问题,主要解决方式如下面两张图,完整的vite.config.ts在上面
在 main.ts 引入全局样式
import { createApp } from "vue";
import App from "./App.vue";
//按需引入element-plus只引入了需要的组件,但是样式文件是全局的
import "element-plus/dist/index.css";
createApp(App).mount("#app");
—————————————— 按需、自动引入 完 —————————————————
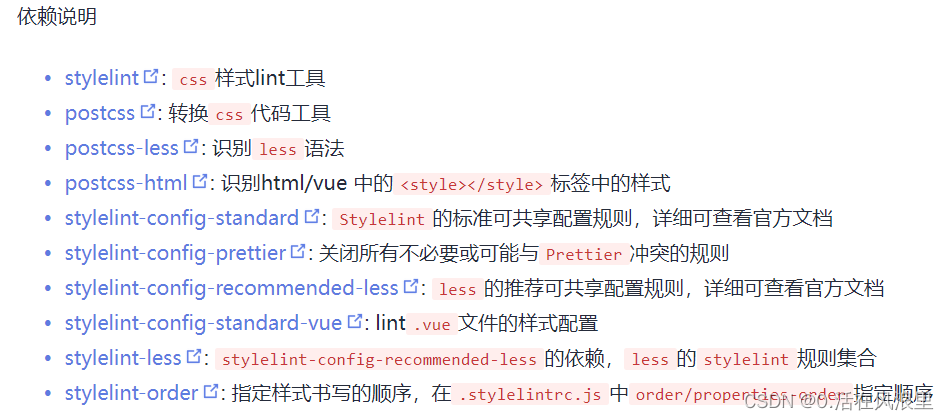
8 配置styleling
stylelint 为css的lint工具。可格式化css代码,检查css语法错误与不合理的写法,指定css书写顺序等…
由于我的项目使用的sass预处理器,因此配置的为sass相关的,项目中使用其他预处理器的可以按照该配置方法改一下就好
安装依赖
less:
pnpm install stylelint stylelint-config-prettier@8.0.2 stylelint-config-recommended-less stylelint-config-standard stylelint-config-standard-vue stylelint-order stylelint-less --save-dev
scss :
pnpm install stylelint stylelint-config-prettier@8.0.2 stylelint-config-recommended-scss stylelint-config-standard stylelint-config-standard-vue stylelint-order stylelint-scss --save-dev
增加 .stylelintrc.cjs配置文件
less:
module.exports = {
  extends: [
    "stylelint-config-standard",
    "stylelint-config-prettier",
    "stylelint-config-recommended-less",
    "stylelint-config-standard-vue",
  ],
  plugins: ["stylelint-order"],
  // 不同格式的文件指定自定义语法
  overrides: [
    {
      files: ["**/*.(less|css)"],
      customSyntax: "postcss-less",
    },
    {
      files: ["**/*.(html|vue)"],
      customSyntax: "postcss-html",
    },
  ],
  // 忽略的文件
  ignoreFiles: [
    "**/*.js",
    "**/*.jsx",
    "**/*.tsx",
    "**/*.ts",
    "**/*.json",
    "**/*.md",
    "**/*.yaml",
    "node_modules/**/*",
    ".vscode/**/*",
    "dist/**/*",
    // 忽略src/assets/css下的less文件
    "src/assets/css/**/*.less",
    // 404页面
    "src/views/errors-view/not-found.vue",
  ],
  rules: {
    "no-descending-specificity": null, // 禁止在具有较高优先级的选择器后出现被其覆盖的较低优先级的选择器
    "less/at-import-partial-extension": "always", // 禁止省略导入文件的扩展名
    "selector-pseudo-element-no-unknown": [
      true,
      {
        ignorePseudoElements: ["v-deep"],
      },
    ],
    "selector-pseudo-class-no-unknown": [
      true,
      {
        ignorePseudoClasses: ["deep"],
      },
    ],
    // 指定样式的排序
    "order/properties-order": [
      "position",
      "top",
      "right",
      "bottom",
      "left",
      "z-index",
      "display",
      "justify-content",
      "align-items",
      "float",
      "clear",
      "overflow",
      "overflow-x",
      "overflow-y",
      "padding",
      "padding-top",
      "padding-right",
      "padding-bottom",
      "padding-left",
      "margin",
      "margin-top",
      "margin-right",
      "margin-bottom",
      "margin-left",
      "width",
      "min-width",
      "max-width",
      "height",
      "min-height",
      "max-height",
      "font-size",
      "font-family",
      "text-align",
      "text-justify",
      "text-indent",
      "text-overflow",
      "text-decoration",
      "white-space",
      "color",
      "background",
      "background-position",
      "background-repeat",
      "background-size",
      "background-color",
      "background-clip",
      "border",
      "border-style",
      "border-width",
      "border-color",
      "border-top-style",
      "border-top-width",
      "border-top-color",
      "border-right-style",
      "border-right-width",
      "border-right-color",
      "border-bottom-style",
      "border-bottom-width",
      "border-bottom-color",
      "border-left-style",
      "border-left-width",
      "border-left-color",
      "border-radius",
      "opacity",
      "filter",
      "list-style",
      "outline",
      "visibility",
      "box-shadow",
      "text-shadow",
      "resize",
      "transition",
    ],
  },
};
scss:
module.exports = {
  extends: [
    "stylelint-config-standard",
    "stylelint-config-prettier",
    "stylelint-config-recommended-scss",
    "stylelint-config-standard-vue",
  ],
  plugins: ["stylelint-order"],
  // 不同格式的文件指定自定义语法
  overrides: [
    {
      files: ["**/*.(scss|css)"],
      customSyntax: "postcss-scss",
    },
    {
      files: ["**/*.(html|vue)"],
      customSyntax: "postcss-html",
    },
  ],
  // 忽略的文件
  ignoreFiles: [
    "**/*.js",
    "**/*.jsx",
    "**/*.tsx",
    "**/*.ts",
    "**/*.json",
    "**/*.md",
    "**/*.yaml",
    "node_modules/**/*",
    ".vscode/**/*",
    "dist/**/*",
    // 忽略src/assets/css下的scss文件
    "src/assets/css/**/*.scss",
    // 404页面
    "src/views/errors-view/not-found.vue",
  ],
  rules: {
    "no-descending-specificity": null, // 禁止在具有较高优先级的选择器后出现被其覆盖的较低优先级的选择器
    "scss/at-import-partial-extension": "always", // 禁止省略导入文件的扩展名
    "selector-pseudo-element-no-unknown": [
      true,
      {
        ignorePseudoElements: ["v-deep"],
      },
    ],
    "selector-pseudo-class-no-unknown": [
      true,
      {
        ignorePseudoClasses: ["deep"],
      },
    ],
    // 指定样式的排序
    "order/properties-order": [
      "position",
      "top",
      "right",
      "bottom",
      "left",
      "z-index",
      "display",
      "justify-content",
      "align-items",
      "float",
      "clear",
      "overflow",
      "overflow-x",
      "overflow-y",
      "padding",
      "padding-top",
      "padding-right",
      "padding-bottom",
      "padding-left",
      "margin",
      "margin-top",
      "margin-right",
      "margin-bottom",
      "margin-left",
      "width",
      "min-width",
      "max-width",
      "height",
      "min-height",
      "max-height",
      "font-size",
      "font-family",
      "text-align",
      "text-justify",
      "text-indent",
      "text-overflow",
      "text-decoration",
      "white-space",
      "color",
      "background",
      "background-position",
      "background-repeat",
      "background-size",
      "background-color",
      "background-clip",
      "border",
      "border-style",
      "border-width",
      "border-color",
      "border-top-style",
      "border-top-width",
      "border-top-color",
      "border-right-style",
      "border-right-width",
      "border-right-color",
      "border-bottom-style",
      "border-bottom-width",
      "border-bottom-color",
      "border-left-style",
      "border-left-width",
      "border-left-color",
      "border-radius",
      "opacity",
      "filter",
      "list-style",
      "outline",
      "visibility",
      "box-shadow",
      "text-shadow",
      "resize",
      "transition",
    ],
  },
};
package.json增加命令 StyleLint:check,并增加CheckAll命令(合并检查eslint、prettier、styleLint,一键运行可以检查三个配置)
"scripts": {
    "pnpm:": "pnpm install",
    "dev": "vite --open",
    "build": "vue-tsc && npm run ESlint:check && npm run Prettier:check && npm run StyleLint:check && vite build",
    "CheckAll": "vue-tsc && npm run ESlint:check && npm run Prettier:check && npm run StyleLint:check",
    "ESlint:check": "eslint . --ext .vue,.js,cjs,mjs,.ts,.cts,.mts,.jsx,.tsx --fix",
    "Prettier:check": "prettier --write \"./**/*.{html,vue,ts,cts,mts,js,mjs,cjs,json,md,scss}\"",

    "StyleLint:check": "stylelint \"./**/*.{css,scss,less,vue,html}\" --fix",
  },
安装vscode的Stylelint插件
安装该插件可在我们保存代码时自动执行stylelint
在.vscode/settings.json中添加一下规则
基于以上配置完整 settings.json``如下:
{
    // 开启自动修复
    "editor.codeActionsOnSave": {
        "source.fixAll": true,
        "source.fixAll.eslint": true,
        "source.fixAll.stylelint": true
    },
    // 保存的时候自动格式化
    "editor.formatOnSave": true,
    // 默认格式化工具选择prettier
    "editor.defaultFormatter": "esbenp.prettier-vscode",
    // 设置为 false,表示使用制表符进行缩进。有助于减少文件大小,空格比制表符大 4 倍
    "editor.insertSpaces": false,
    // 设置制表符宽度为 4。请确保.prettierrc.js中的tabWidth设置为4,和vscode 制表符设置一致
    "editor.tabSize": 4,
    // 启用 ESLint 插件。这意味着在 VSCode 中将会对代码进行 ESLint 检查。
    "eslint.enable": true,
    // 表示在保存文件时运行 ESLint 检查。每当您保存文件时,VSCode 将会自动运行 ESLint 并检查代码中的错误和警告。
    "eslint.run": "onSave",
    // stylelint校验的文件格式
    "stylelint.validate": [
        "css",
        "less",
        "scss"
    ]
}
—————————————— styleLint 完 —————————————————
9 vue-router 分模块
安装:
pnpm i vue-router -S
使用 :
新建 src/router/index.ts (路由主页)
import { createRouter, createWebHashHistory, RouteRecordRaw } from "vue-router";
/* createWebHistory 与 createWebHashHistory 的区别
createWebHistory:使用 HTML5 History API 的路由模式。注意:这种模式要玩好,还需要后台配置支持。后台不配置你本地开发没问题,一旦部署上线,刷新就会出现 404。
createWebHashHistory:使用 URL hash 值来作路由。支持所有浏览器,包括不支持 HTML5 History API 的浏览器。
详细来说,createWebHistory 是基于 HTML5 History API 的,而 createWebHashHistory 是基于 URL 的 hash 值的。
在 Vue3 中,你可以通过调用 createWebHistory 或 createWebHashHistory 函数来创建路由。
createWebHistory 监听浏览器的 history.pushState 和 history.replaceState 事件,并使用 HTML5 的 history API 来管理路由。拥有更简单的 URL,不包含 "#" 符号。
createWebHashHistory 使用浏览器的 window.location.hash 属性来管理路由。在 URL 中将使用 "#" 符号,例如:`http://localhost:300/#/about`。变化时无需向服务器发送请求,对于只需要处理前端路由的应用程序来说,使用 Hash 模式足以满足需求。Hash 模式在传输数据量方面更小,而且兼容性最好。
在选择使用哪种模式之前,你应该考虑以下因素:
- **历史访问记录管理**:createWebHistory 可以管理浏览历史记录,使浏览器的后退/前进按钮可用,而 createWebHashHistory 不支持这些功能。
- **URL 文本可读性**:createWebHistory 生成的 URL 更具可读性,不包含任何无用信息,通常比 createWebHashHistory 生成的 URL 更优。
- **部署环境**:如果你的应用程序必须在较旧的浏览器上运行(如 IE 11 等),则应使用 createWebHashHistory。由于旧版浏览器不支持 HTML5 history API,使用 createWebHistory 可能会导致问题。
- **服务器配置**:在使用 createWebHistory 时需要确保你的服务器(例如,Apache 或 Nginx)已正确配置,以避免服务端路由失败的问题。createWebHashHistory 不需要服务器配置,因为 URL 中的哈希符号是在客户端处理的,不会向服务器发送任何请求。
因此,如果你的应用程序仅使用前端路由,无需后退/前进按钮,或者你专注于支持现代浏览器,则应使用 createWebHistory。否则,如果应用程序部署在旧的浏览器上,则应使用 createWebHashHistory。
*/
/*
RouteRecordRaw是Vue Router的一个类型定义,它用于描述路由配置的对象。它包含以下属性:
path:字符串,表示路由的路径。
name:字符串,表示路由的名称。
component:组件类型,表示路由所匹配的组件。
children:子路由配置数组,用于描述嵌套路由。
meta:对象,用于存储额外的路由元数据,例如需要验证用户权限的信息。
*/
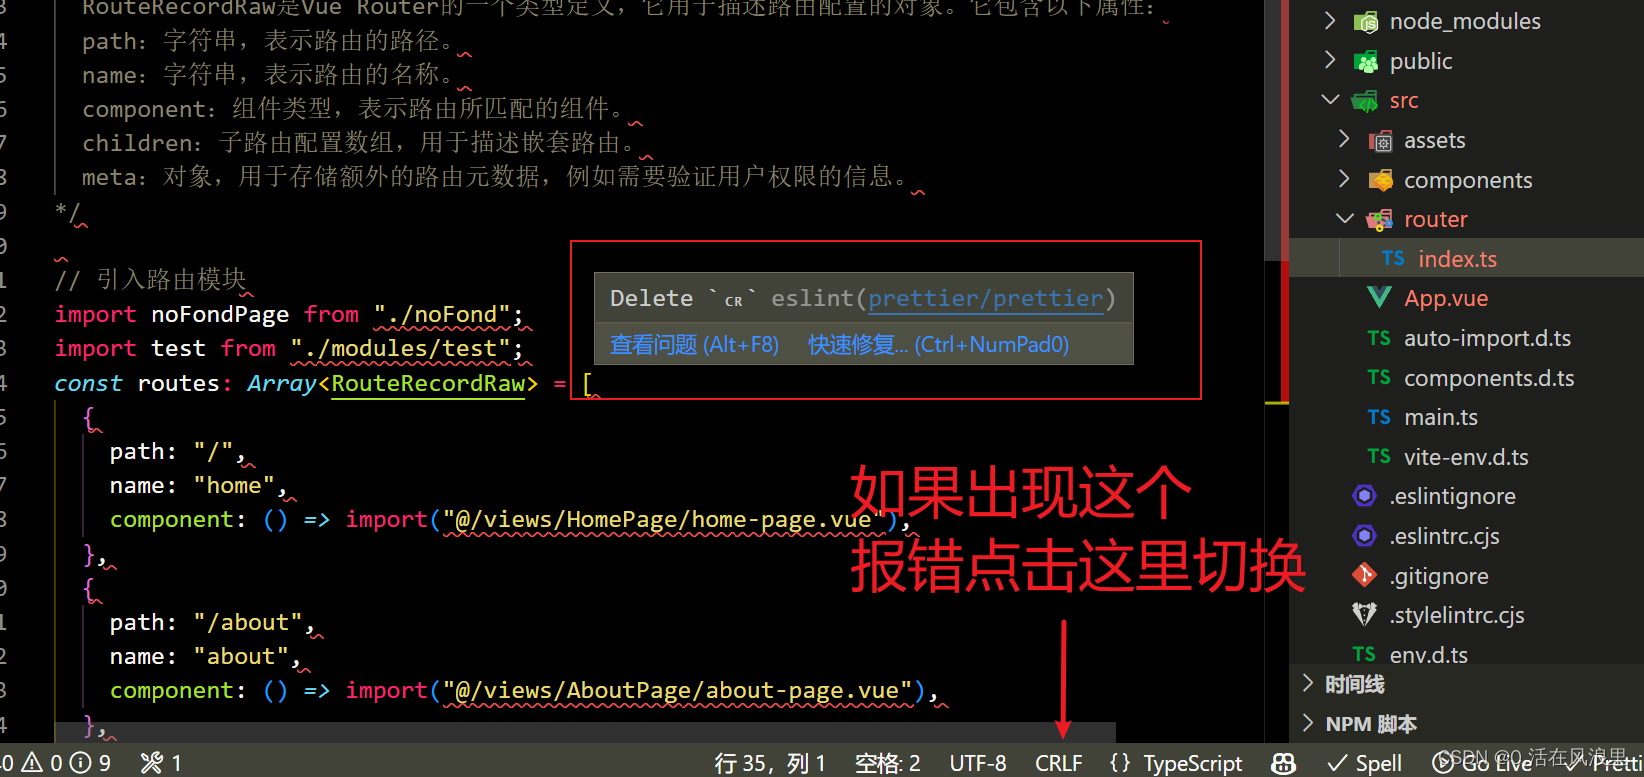
//引入main.ts
import app from "../main";
// 引入路由模块
import noFondPage from "./not-found";
// 测试路由
import test from "./modules/test";
// pinia路由
import pinia from "./modules/pinia-store";
const routes: Array<RouteRecordRaw> = [
{
path: "/",
redirect: "/home",
},
{
path: "/home",
name: "home",
meta: {
loading: true,
},
component: () => import("@/views/home-page/home-page.vue"),
},
{
path: "/about",
name: "about",
meta: {
loading: true,
},
component: () => import("@/views/about-page/about-page.vue"),
},
...test,
pinia,
// 404页面需要放在最后!
noFondPage,
];
const router = createRouter({
history: createWebHashHistory(),
routes,
});
// Vue3 router守卫
// 在路由跳转之前,开启loading,路由跳转之后,关闭loading
router.beforeEach((to, from, next) => {
if (to.meta.loading) {
app.config.globalProperties.$loading.showLoading();
next();
} else {
next();
}
});
router.afterEach((to) => {
if (to.meta.loading) {
app.config.globalProperties.$loading.hideLoading();
}
});
export default router;
现在主页面新建好了,需要建立分模块的页面和404页面
src\router\modules\test.ts (路由分模块测试页面)
export default [
  {
    path: "/test1",
    name: "test1",
    component: () => import("@/views/test/index-test1.vue"),
  },
  {
    path: "/test2",
    name: "test2",
    component: () => import("@/views/test/index-test2.vue"),
  },
  {
    path: "/test3",
    name: "test3",
    component: () => import("@/views/test/index-test3.vue"),
  },
];
noFond.ts (404路由页面)
/**
 * 404路由模块
 */
export default {
  // 路由分模块
  // 如果url找不到就会报404,必须放在路由页面最下面
  path: "/:pathMatch(.*)",
  component: () => import("@/views/NotFound.vue"),
};
路由结构如下图
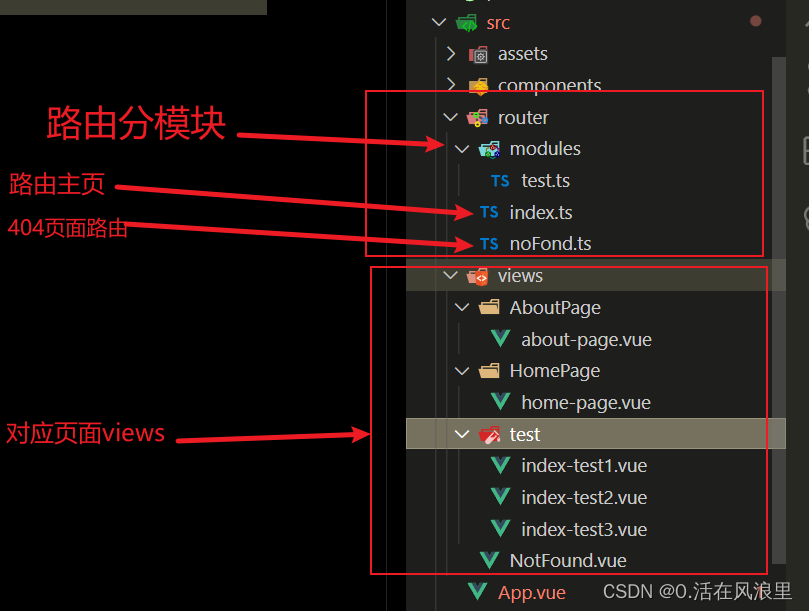
分模块路由建立好了,也要建立对应的views页面
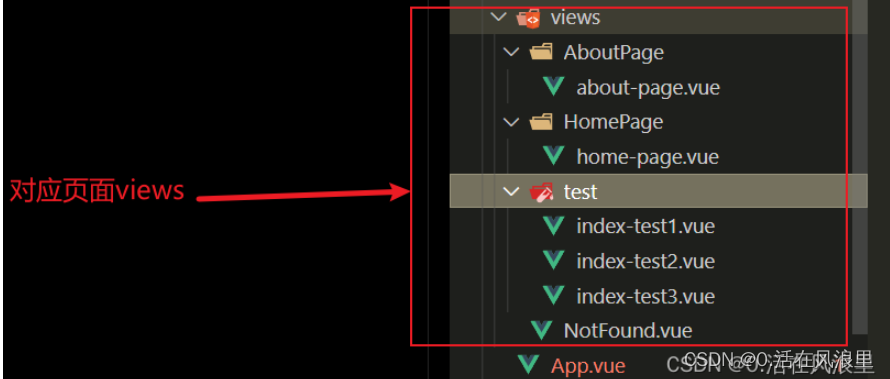
src\views\AboutPage\about-page.vue
<template>
  <div>
    <!-- about page -->
    <h1>关于我们</h1>
  </div>
</template>
src\views\HomePage\home-page.vue
<template>
  <div>
    <!-- home page -->
    <h1>首页</h1>
  </div>
</template>
src\views\test\index-test1.vue
<template>
  <div>
    <!-- test1 page -->
    <h2>test1</h2>
  </div>
</template>
src\views\test\index-test2.vue
<template>
  <div>
    <!-- test2 page -->
    <h2>test2</h2>
  </div>
</template>
src\views\test\index-test3.vue
<template>
  <div>
    <!-- test3 page -->
    <h2>test3</h2>
  </div>
</template>
src\views\NotFound.vue
<template>
  <div>
    <!-- 404 page -->
    <h1>404</h1>
  </div>
</template>
在main.js中引入并使用
import { createApp } from "vue";
import App from "./App.vue";
// 引入element-plus并使用中文语言包
import ElementPlus from "element-plus";
import zhCn from "element-plus/lib/locale/lang/zh-cn";
// 引入路由配置文件
import router from "./router/index";
// 引入element-plus样式
import "element-plus/dist/index.css";
const app = createApp(App);
app
  .use(ElementPlus, {
    locale: zhCn,
  })
  .use(router)
  .mount("#app");
在App.vue中添加路由出口
<template>
  <router-link to="/">首页 </router-link>
  <router-link to="/about">关于我们 </router-link>
  <router-link to="/test1">测试1 </router-link>
  <router-link to="/test2">测试2 </router-link>
  <router-link to="/test3">测试3 </router-link>
  <el-button type="primary">按钮</el-button>
  <router-view></router-view>
</template>

<script setup lang="ts">
// 占位
</script>

<style scoped lang="scss">
// 测试 styleLint
router-link {
  position: fixed;
  color: red;
}
</style>
—————————————— 路由分模块 完 —————————————————
以上是静态路由分模块,下面是动态路由,(根据接口动态生成,一般后台管理权限菜单使用较多)
/*
 *  createWebHistory 与 createWebHashHistory 的区别
 *    createWebHistory:使用 HTML5 History API 的路由模式。注意:这种模式要玩好,还需要后台配置支持。后台不配置你本地开发没问题,
 *    一旦部署上线,刷新就会出现 404。
 *    createWebHashHistory:使用 URL hash 值来作路由。支持所有浏览器,包括不支持 HTML5 History API 的浏览器。
 *
 *    详细来说,createWebHistory 是基于 HTML5 History API 的,而 createWebHashHistory 是基于 URL 的 hash 值的。
 *    在 Vue3 中,你可以通过调用 createWebHistory 或 createWebHashHistory 函数来创建路由。
 *
 *  createWebHistory 监听浏览器的 history.pushState 和 history.replaceState 事件,并使用 HTML5 的 history API 来管理路由。
 *  拥有更简单的 URL,不包含 "#" 符号。
 *
 *  createWebHashHistory 使用浏览器的 window.location.hash 属性来管理路由。在 URL 中将使用 "#" 符号,例如:`http://localhost:300/#/about`。
 *  变化时无需向服务器发送请求,对于只需要处理前端路由的应用程序来说,使用 Hash 模式足以满足需求。Hash 模式在传输数据量方面更小,而且兼容性最好。
 *
 *  在选择使用哪种模式之前,你应该考虑以下因素:
 *
 *  - **历史访问记录管理**:createWebHistory 可以管理浏览历史记录,使浏览器的后退/前进按钮可用,而 createWebHashHistory 不支持这些功能。
 *  - **URL 文本可读性**:createWebHistory 生成的 URL 更具可读性,不包含任何无用信息,通常比 createWebHashHistory 生成的 URL 更优。
 *  - **部署环境**:如果你的应用程序必须在较旧的浏览器上运行(如 IE 11 等),则应使用 createWebHashHistory。
 *  由于旧版浏览器不支持 HTML5 history API,使用 createWebHistory 可能会导致问题。
 *  - **服务器配置**:在使用 createWebHistory 时需要确保你的服务器(例如,Apache 或 Nginx)已正确配置,以避免服务端路由失败的问题。
 *  createWebHashHistory 不需要服务器配置,因为 URL 中的哈希符号是在客户端处理的,不会向服务器发送任何请求。
 *
 *  因此,如果你的应用程序仅使用前端路由,无需后退/前进按钮,或者你专注于支持现代浏览器,则应使用 createWebHistory。
 *  否则,如果应用程序部署在旧的浏览器上,则应使用 createWebHashHistory。
 */

/*
  RouteRecordRaw是Vue Router的一个类型定义,它用于描述路由配置的对象。它包含以下属性:
  path:字符串,表示路由的路径。
  name:字符串,表示路由的名称。
  component:组件类型,表示路由所匹配的组件。
  children:子路由配置数组,用于描述嵌套路由。
  meta:对象,用于存储额外的路由元数据,例如需要验证用户权限的信息。
*/

import { createRouter, createWebHashHistory, RouteRecordRaw } from "vue-router";
//引入main.ts中的app
import app from "../main";
// pinia路由
import pinia from "./modules/pinia-store";
// 默认静态路由,不需要权限的路由
const routes: Array<RouteRecordRaw> = [
  {
    path: "/",
    redirect: "/home",
  },
  {
    path: "/home",
    name: "home",
    meta: {
      loading: true,
    },
    component: () => import("@/views/home-page/home-page.vue"),
  },
  {
    path: "/about",
    name: "about",
    meta: {
      loading: true,
    },
    component: () => import("@/views/about-page/about-page.vue"),
  },
  pinia,
  {
    // vue-router4动态加载的模式下,当我们在当前页面刷新浏览器时,会出现一个警告
    // [Vue Router warn]: No match found for location with path
    // 解决方法: 在路由配置中添加一个通配符的路由,用来匹配所有的路由地址 404
    // 如果url找不到就会报404,必须放在路由页面最下面
    path: "/:catchAll(.*)",
    component: () => import("@/views/errors-view/not-found.vue"),
  },
];

const router = createRouter({
  history: createWebHashHistory(),
  routes,
});

let isRoutesGenerated = false; // 添加一个标志位,用来判断是否已经生成了动态路由

router.beforeEach((to, from, next) => {
  if (to.meta.loading) app.config.globalProperties.$Loading.showLoading();
  //先执行的是 isRoutesGenerated,然后再取反。
  if (!isRoutesGenerated) {
    // 判断是否已经生成了动态路由
    try {
      // 从后台获取菜单 axios.get('/api/menu')
      const menu: Array<RouteRecordRaw> = [
        {
          path: "/test1",
          name: "test1",
          meta: {
            loading: true,
          },
          component: () => import("@/views/dynamic-routing/index-test1.vue"),
        },
        {
          path: "/test2",
          name: "test2",
          meta: {
            loading: true,
          },
          component: () => import("@/views/dynamic-routing/index-test2.vue"),
        },
        {
          path: "/test3",
          name: "test3",
          meta: {
            loading: true,
          },
          component: () => import("@/views/dynamic-routing/index-test3.vue"),
        },
      ];
      //  生成动态路由
      generateRoutes(menu);
      isRoutesGenerated = true; // 设置标志位为true,表示已经生成了动态路由
      // 添加404页面
      // router.addRoute(notFoundPage);
      // 重新跳转到目标路由
      next({ ...to, replace: true });
    } catch (error) {
      console.error("无法获取菜单数据:", error);
    }
  } else {
    next();
  }
});

// 根据菜单数据动态生成路由
function generateRoutes(menu: any) {
  for (let i = 0; i < menu.length; i++) {
    const item = menu[i];
    const route: any = {
      path: item.path,
      name: item.name,
      meta: {
        loading: item.meta.loading,
      },
      component: item.component,
    };

    // 递归生成子路由
    if (item.children && item.children.length > 0) {
      route.children = generateRoutes(item.children);
    }

    // 追加在404页面前面
    routes.splice(routes.length - 1, 0, route);
    // 在路由中添加新路由
    router.addRoute(route);
  }
  // console.log("!这里输出 🚀 ==>:", routes);
}
router.afterEach((to) => {
  if (to.meta.loading) app.config.globalProperties.$Loading.hideLoading();
});
export default router;
10 配置husky
前言
虽然上面已经配置好了**
eslint、preitter与stylelint**,但是还是存在以下问题。对于不使用**
vscode的,或者没有安装eslint、preitter与stylelint**插件的同学来说,就不能实现在保存的时候自动的去修复与和格式化代码。这样提交到**
git仓库的代码还是不符合要求的。因此需要引入强制的手段来保证提交到git**仓库的代码时符合我们的要求的。
husky是一个用来管理git hook的工具,git hook即在我们使用git提交代码的过程中会触发的钩子。
husky
在介绍
husky之前,首先要理解什么是 hook(钩子),在前端 Vue 框架中提供了 beforCreated、created、beforeMounted、mounted 等函数、这些函数都是钩子,也常被称为‘生命周期钩子函数’,它们会在 Vue 实例化过程中有序地执行。在 Git 中也存在一些钩子,其中较常用的有
pre-push、pre-commit、commit-msg,其中pre-commit钩子会在 commit 前触发,pre-push会在 push 前触发。(提示:所有钩子默认情况下是禁用的)这些钩子可以用来干嘛?
比方我们可以利用
pre-commit钩子在 commit 时对代码先进行 eslint 检查,如果不合格就不给 commit,
不过使用 git 钩子稍微麻烦,于是就有了husky,它能让我们使用 git 钩子变得更加容易。
安装依赖:
首先确保你的根目录下有.git文件
pnpm add husky -D
npx husky install
npx husky add .husky/pre-commit
npx husky add .husky/commit-msg
会在项目根目录出现,以上命令将会下载初始化 husky 并新增 pre-commit 钩子文件
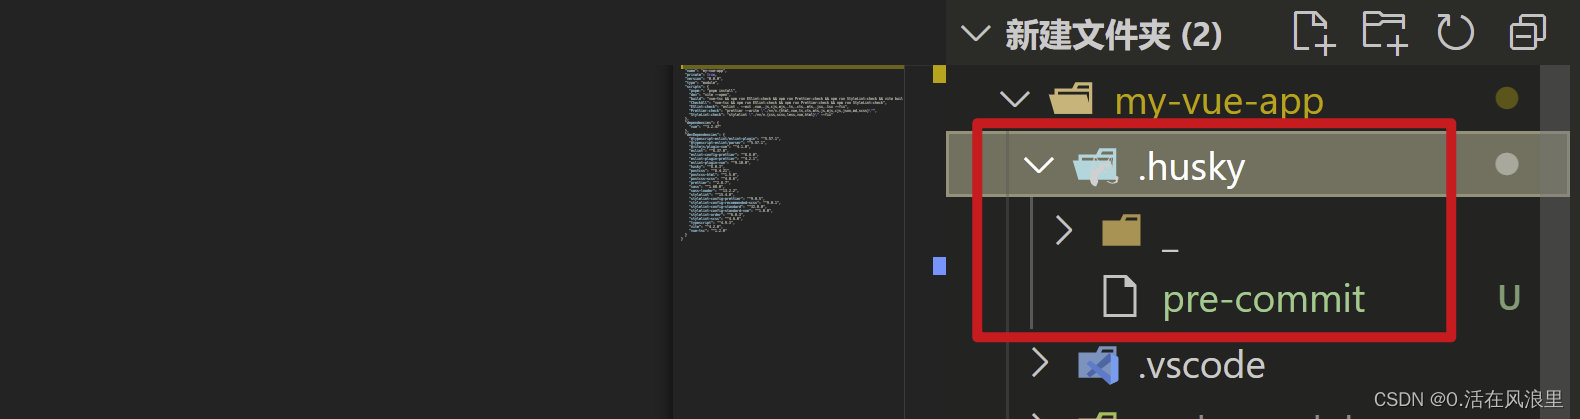
下面只需在 pre-commit 文件自定义命令,即可在 commit 前触发,就这样,是不是很简单?
比如:
自我介绍一下,小编13年上海交大毕业,曾经在小公司待过,也去过华为、OPPO等大厂,18年进入阿里一直到现在。
深知大多数大数据工程师,想要提升技能,往往是自己摸索成长或者是报班学习,但对于培训机构动则几千的学费,着实压力不小。自己不成体系的自学效果低效又漫长,而且极易碰到天花板技术停滞不前!
因此收集整理了一份《2024年大数据全套学习资料》,初衷也很简单,就是希望能够帮助到想自学提升又不知道该从何学起的朋友。


既有适合小白学习的零基础资料,也有适合3年以上经验的小伙伴深入学习提升的进阶课程,基本涵盖了95%以上大数据开发知识点,真正体系化!
由于文件比较大,这里只是将部分目录大纲截图出来,每个节点里面都包含大厂面经、学习笔记、源码讲义、实战项目、讲解视频,并且后续会持续更新
如果你觉得这些内容对你有帮助,可以添加VX:vip204888 (备注大数据获取)

router.afterEach((to) => {
if (to.meta.loading) app.config.globalProperties.$Loading.hideLoading();
});
export default router;
### 10 配置husky
**前言**
>
> 虽然上面已经配置好了**`eslint`、`preitter`**与**`stylelint`**,但是还是存在以下问题。
>
>
> 对于不使用**`vscode`**的,或者没有安装**`eslint`、`preitter`**与**`stylelint`**插件的同学来说,就不能实现在保存的时候自动的去修复与和格式化代码。
>
>
> 这样提交到**`git`**仓库的代码还是不符合要求的。因此需要引入强制的手段来保证提交到**`git`**仓库的代码时符合我们的要求的。
>
>
> **`husky`**是一个用来管理**`git hook`**的工具,**`git hook`**即在我们使用**`git`提交代码的过程中会触发的钩子。**
>
>
>
**husky**
>
> 在介绍 `husky` 之前,首先要理解什么是 hook(钩子),在前端 Vue 框架中提供了 beforCreated、created、beforeMounted、mounted 等函数、这些函数都是钩子,也常被称为‘生命周期钩子函数’,它们会在 Vue 实例化过程中有序地执行。
>
>
> 在 Git 中也存在一些钩子,其中较常用的有 `pre-push、pre-commit` 、commit-msg,其中 `pre-commit` 钩子会在 commit 前触发,`pre-push` 会在 push 前触发。(提示:所有钩子默认情况下是禁用的)
>
>
> 这些钩子可以用来干嘛?
>
>
> 比方我们可以利用`pre-commit` 钩子在 commit 时对代码先进行 eslint 检查,如果不合格就不给 commit,
> 不过使用 git 钩子稍微麻烦,于是就有了 `husky` ,它能让我们使用 git 钩子变得更加容易。
>
>
>
**安装依赖:**
首先确保你的根目录下有.git文件

pnpm add husky -D
npx husky install
npx husky add .husky/pre-commit
npx husky add .husky/commit-msg
会在项目根目录出现,以上命令将会下载初始化 husky 并新增 **`pre-commit`** 钩子文件

下面只需在 **`pre-commit`** 文件自定义命令,**即可在 commit 前触发**,就这样,是不是很简单?
**比如:**
**自我介绍一下,小编13年上海交大毕业,曾经在小公司待过,也去过华为、OPPO等大厂,18年进入阿里一直到现在。**
**深知大多数大数据工程师,想要提升技能,往往是自己摸索成长或者是报班学习,但对于培训机构动则几千的学费,着实压力不小。自己不成体系的自学效果低效又漫长,而且极易碰到天花板技术停滞不前!**
**因此收集整理了一份《2024年大数据全套学习资料》,初衷也很简单,就是希望能够帮助到想自学提升又不知道该从何学起的朋友。**
[外链图片转存中...(img-QBqEZV8l-1712879196468)]
[外链图片转存中...(img-iyFVkJuV-1712879196468)]
[外链图片转存中...(img-ZftxBuQf-1712879196469)]
[外链图片转存中...(img-1M9qefvp-1712879196469)]
[外链图片转存中...(img-abY1fWyc-1712879196469)]
**既有适合小白学习的零基础资料,也有适合3年以上经验的小伙伴深入学习提升的进阶课程,基本涵盖了95%以上大数据开发知识点,真正体系化!**
**由于文件比较大,这里只是将部分目录大纲截图出来,每个节点里面都包含大厂面经、学习笔记、源码讲义、实战项目、讲解视频,并且后续会持续更新**
**如果你觉得这些内容对你有帮助,可以添加VX:vip204888 (备注大数据获取)**
[外链图片转存中...(img-UpfBHcMq-1712879196469)]


 1616
1616


 被折叠的 条评论
为什么被折叠?
被折叠的 条评论
为什么被折叠?
 到【灌水乐园】发言


