网上学习资料一大堆,但如果学到的知识不成体系,遇到问题时只是浅尝辄止,不再深入研究,那么很难做到真正的技术提升。
一个人可以走的很快,但一群人才能走的更远!不论你是正从事IT行业的老鸟或是对IT行业感兴趣的新人,都欢迎加入我们的的圈子(技术交流、学习资源、职场吐槽、大厂内推、面试辅导),让我们一起学习成长!
x_resampled,y_resampled = rus.fit_resample(x,y)
查看欠采样后的数据形状
x.shape,y.shape
((61878, 93), (61878,))
x_resampled.shape,y_resampled.shape
((17361, 93), (17361,))
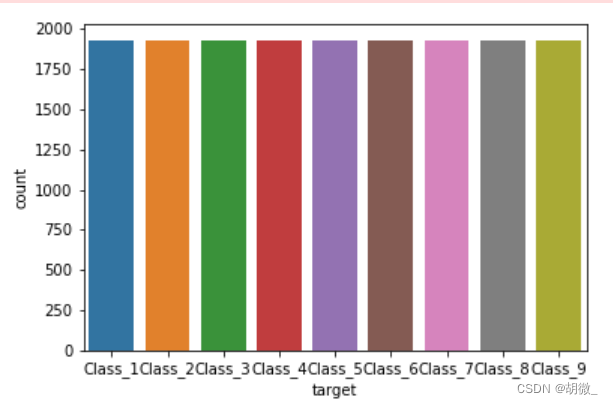
查看数据经过欠采样之后类别是否平衡
sns.countplot(y_resampled)
plt.show()
(3)把标签值转换为数字
y_resampled
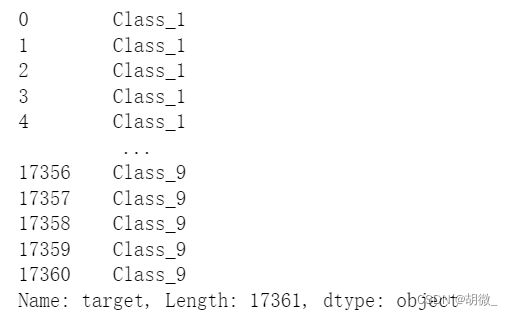
from sklearn.preprocessing import LabelEncoder
le = LabelEncoder()
y_resampled = le.fit_transform(y_resampled)
y_resampled

(4)分割数据
from sklearn.model_selection import train_test_split
x_train,x_test,y_train,y_test = train_test_split(x_resampled,y_resampled,test_size=0.2)
### 4.3 模型训练
from sklearn.ensemble import RandomForestClassifier
estimator = RandomForestClassifier(oob_score=True)
estimator.fit(x_train,y_train)
### 4.4 模型评估


本题要求使用logloss进行模型评估
y_pre = estimator.predict(x_test)
y_test,y_pre

>
> 需要注意的是:logloss在使用过程中,必须要求将输出用one-hot表示
>
>
>
from sklearn.preprocessing import OneHotEncoder
one_hot = OneHotEncoder(sparse=False)
y_pre = one_hot.fit_transform(y_pre.reshape(-1,1))
y_test = one_hot.fit_transform(y_test.reshape(-1,1))
y_test,y_pre
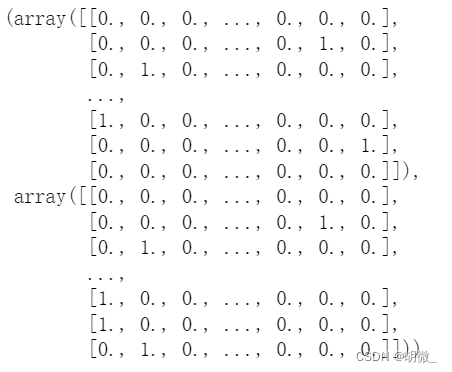
from sklearn.metrics import log_loss
log_loss(y_test,y_pre,eps=1e-15,normalize=True)
7.637713870225003
改变预测值的输出模式,让输出结果为可能性的百分占比,降低logloss值
y_pre_proba = estimator.predict_proba(x_test)
y_pre_proba
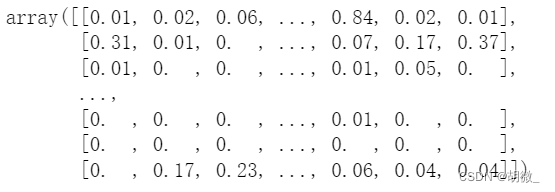
log_loss(y_test,y_pre_proba,eps=1e-15,normalize=True)
0.7611795612521034
由此可见,log\_loss值下降了许多


### 4.5 模型调优


(1)确定最优的n\_estimators
确定n_estimators的取值范围
tuned_parameters = range(10,200,10)
创建添加accuracy的一个numpy
accuracy_t = np.zeros(len(tuned_parameters))
创建添加error的一个numpy
error_t = np.zeros(len(tuned_parameters))
调优过程实现
for i,one_parameter in enumerate(tuned_parameters):
estimator = RandomForestClassifier(n_estimators=one_parameter,
max_depth=10,
max_features=10,
min_samples_leaf=10,
oob_score=True,
random_state=0,
n_jobs=-1)
estimator.fit(x_train,y_train)
# 输出accuracy
accuracy_t[i] = estimator.oob_score_

# 输出log\_loss
y_pre = estimator.predict_proba(x_test)
error_t[i] = log_loss(y_test,y_pre,eps=1e-15,normalize=True)
优化结果过程可视化
fig,axes = plt.subplots(nrows=1,ncols=2,figsize=(20,4),dpi=100)
axes[0].plot(tuned_parameters,accuracy_t)
axes[1].plot(tuned_parameters,error_t)
axes[0].set_xlabel(“n_estimators”)
axes[0].set_ylabel(“accuracy_t”)
axes[1].set_xlabel(“n_estimators”)
axes[1].set_ylabel(“error_t”)
axes[0].grid()
axes[1].grid()

经过图像展示,最后确定n\_estimators=175时,效果不错
(2)确定最优的max\_depth
确定max_depth的取值范围
tuned_parameters = range(10,100,10)
创建添加accuracy的一个numpy
accuracy_t = np.zeros(len(tuned_parameters))
创建添加error的一个numpy
error_t = np.zeros(len(tuned_parameters))
调优过程实现
for i,one_parameter in enumerate(tuned_parameters):
estimator = RandomForestClassifier(n_estimators=175,
max_depth=one_parameter,
max_features=10,
min_samples_leaf=10,
oob_score=True,
random_state=0,
n_jobs=-1)
estimator.fit(x_train,y_train)
# 输出accuracy
accuracy_t[i] = estimator.oob_score_

# 输出log\_loss
y_pre = estimator.predict_proba(x_test)
error_t[i] = log_loss(y_test,y_pre,eps=1e-15,normalize=True)
优化结果过程可视化
fig,axes = plt.subplots(nrows=1,ncols=2,figsize=(20,4),dpi=100)
axes[0].plot(tuned_parameters,accuracy_t)
axes[1].plot(tuned_parameters,error_t)
axes[0].set_xlabel(“max_depth”)
axes[0].set_ylabel(“accuracy_t”)
axes[1].set_xlabel(“max_depth”)
axes[1].set_ylabel(“error_t”)
axes[0].grid()
axes[1].grid()

经过图像展示,最后确定max\_depth=30时,效果不错
(3)确定最优的max\_features
确定max_features取值范围
tuned_parameters = range(5,40,5)
创建添加accuracy的一个numpy
accuracy_t = np.zeros(len(tuned_parameters))
创建添加error的一个numpy
error_t = np.zeros(len(tuned_parameters))
调优过程实现
for i,one_parameter in enumerate(tuned_parameters):
estimator = RandomForestClassifier(n_estimators=175,
max_depth=30,
max_features=one_parameter,
min_samples_leaf=10,
oob_score=True,
random_state=0,
n_jobs=-1)
estimator.fit(x_train,y_train)
# 输出accuracy
accuracy_t[i] = estimator.oob_score_

# 输出log\_loss
y_pre = estimator.predict_proba(x_test)
error_t[i] = log_loss(y_test,y_pre,eps=1e-15,normalize=True)
优化结果过程可视化
fig,axes = plt.subplots(nrows=1,ncols=2,figsize=(20,4),dpi=100)
axes[0].plot(tuned_parameters,accuracy_t)
axes[1].plot(tuned_parameters,error_t)
axes[0].set_xlabel(“max_features”)
axes[0].set_ylabel(“accuracy_t”)
axes[1].set_xlabel(“max_features”)
axes[1].set_ylabel(“error_t”)
axes[0].grid()
axes[1].grid()

经过图像展示,最后确定max\_features=15时,效果不错
(4)确定最优的min\_samples\_leaf
确定n_estimators的取值范围
tuned_parameters = range(1,10,2)
创建添加accuracy的一个numpy
accuracy_t = np.zeros(len(tuned_parameters))
创建添加error的一个numpy
error_t = np.zeros(len(tuned_parameters))
调优过程实现
for i,one_parameter in enumerate(tuned_parameters):
estimator = RandomForestClassifier(n_estimators=175,
max_depth=30,
max_features=15,
min_samples_leaf=one_parameter,
oob_score=True,
random_state=0,
n_jobs=-1)
estimator.fit(x_train,y_train)
# 输出accuracy
accuracy_t[i] = estimator.oob_score_

# 输出log\_loss
y_pre = estimator.predict_proba(x_test)
error_t[i] = log_loss(y_test,y_pre,eps=1e-15,normalize=True)
优化结果过程可视化
fig,axes = plt.subplots(nrows=1,ncols=2,figsize=(20,4),dpi=100)
axes[0].plot(tuned_parameters,accuracy_t)
axes[1].plot(tuned_parameters,error_t)
网上学习资料一大堆,但如果学到的知识不成体系,遇到问题时只是浅尝辄止,不再深入研究,那么很难做到真正的技术提升。
一个人可以走的很快,但一群人才能走的更远!不论你是正从事IT行业的老鸟或是对IT行业感兴趣的新人,都欢迎加入我们的的圈子(技术交流、学习资源、职场吐槽、大厂内推、面试辅导),让我们一起学习成长!
,error_t)
[外链图片转存中…(img-49uNzHL7-1715481879367)]
[外链图片转存中…(img-buIDv2lC-1715481879368)]
网上学习资料一大堆,但如果学到的知识不成体系,遇到问题时只是浅尝辄止,不再深入研究,那么很难做到真正的技术提升。
一个人可以走的很快,但一群人才能走的更远!不论你是正从事IT行业的老鸟或是对IT行业感兴趣的新人,都欢迎加入我们的的圈子(技术交流、学习资源、职场吐槽、大厂内推、面试辅导),让我们一起学习成长!


 被折叠的 条评论
为什么被折叠?


