


#…
#---------------------------------------------
5.5. 添加后台管理账户(只需一台操作,集群之间同步)
rabbitmqctl add_user xiaosen xiaosen123
#---------
Adding user “xiaosen” …
#--------
#设置该用户为管理员
rabbitmqctl set_user_tags xiaosen administrator
#-------
#Setting tags for user “xiaosen” to [administrator] …
#------
#设置访问权限
rabbitmqctl set_permissions -p / xiaosen “.*” “.*” “.*”
#------
#Setting permissions for user “xiaosen” in vhost “/” …
#-------
#设置镜像模式
rabbitmqctl set_policy ha-all “^” ‘{“ha-mode”:“all”}’
#-----------
#Setting policy “ha-all” for pattern “^” to “{“ha-mode”:“all”}” with priority “0” for vhost “/” …
#------------
#### 6.访问rabbitmq管理平台:http://{ip}:15672 账号密码为5.5设置的


至此集群搭建完成
 一些mq的使用命令
当前窗口启动 rabbitmq
rabbitmq-server
后台启动 rabbitmq
rabbitmq-server -detached
停止 rabbitmq
rabbitmqctl stop
查看所有队列
rabbitmqctl list_queues
查看所有虚拟主机
rabbitmqctl list_vhosts
在Erlang VM运行的情况下启动RabbitMQ应用
rabbitmqctl start_app
rabbitmqctl stop_app
查看节点状态
rabbitmqctl status
查看所有可用的插件
rabbitmq-plugins list
启用插件
rabbitmq-plugins enable
停用插件
rabbitmq-plugins disable
添加用户
rabbitmqctl add_user username password
列出所有用户
rabbitmqctl list_users
删除用户
rabbitmqctl delete_user username
清除用户权限
rabbitmqctl clear_permissions -p vhostpath username
列出用户权限
rabbitmqctl list_user_permissions username
修改密码
rabbitmqctl change_password username newpassword
设置用户权限
rabbitmqctl set_permissions -p vhostpath username “.*” “.*” “.*”
创建虚拟主机
rabbitmqctl add_vhost vhostpath
列出虚拟主机上的所有权限
rabbitmqctl list_permissions -p vhostpath
删除虚拟主机
rabbitmqctl delete_vhost vhost vhostpath
移除所有数据,要在 rabbitmqctl stop_app 之后使用
rabbitmqctl reset
---
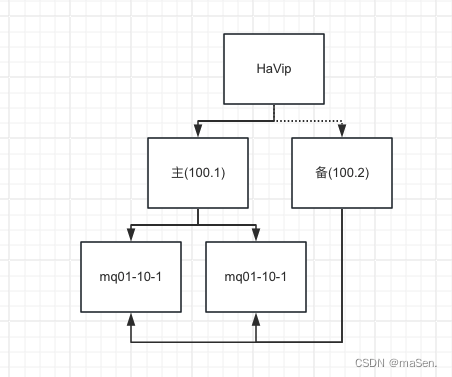
为了保证rabbitmq的高可用性,我们可以在这基础上部署haproxy及keepalived来保证服务的高可用性
配合阿里云的havip(高可用虚拟IP,设ip为:172.16.100.100)来进行搭建。实现主备切换功能。主宕机了由备来替补
如图:
##### 1. 安装haproxy(主及备都需要安装)
yum -y install haproxy keepalived
cd /etc/haproxy/
cp haproxy.cfg haproxy.cfg.old
vim haproxy.cfg
配置如下:
global
log 127.0.0.1 local2 info
chroot /var/lib/haproxy
pidfile /var/run/haproxy.pid
maxconn 4000
user haproxy
group haproxy
daemon
# turn on stats unix socket
stats socket /var/lib/haproxy/stats
defaults
mode tcp
log global
option tcplog
option dontlognull
option http-server-close
option redispatch
retries 3
timeout http-request 10s
timeout queue 90s
timeout connect 90s
timeout client 120s
timeout server 120s
timeout http-keep-alive 10s
timeout check 10s
maxconn 3000
listen private_monitoring
bind 0.0.0.0:5100
mode http
option httplog
stats enable
stats uri /stats
stats refresh 30s
# 查看haproxy状态的登录账号及密码 可访问:http://{HaVip}:5100/stats进行查看
stats auth admin:mg_admin
stats realm welcome login\ Haproxy
stats hide-version
listen rabbitmq_cluster
bind 0.0.0.0:5672
timeout client 3h
timeout server 3h
mode tcp
option tcplog
balance roundrobin
#mq的地址
server mq001 172.16.10.1:5672 check inter 2000 rise 2 fall 2
server mq002 172.16.10.2:5672 check inter 2000 rise 2 fall 2
listen rabbitmq_admin
bind 0.0.0.0:15672
#mq管理后台的地址
server mq001 172.16.10.1:15672
server mq002 172.16.10.2:15672
#(UDP配置取消注释,添加local0的haproxy日志)
vim /etc/rsyslog.conf
Provides UDP syslog reception
$ModLoad imudp
$UDPServerRun 514
Save haproxy log
local2.* /var/log/haproxy/haproxy.log
vim /etc/sysconfig/rsyslog
#SYSLOGD_OPTIONS=“”
SYSLOGD_OPTIONS=“-r -m 0 -c 2”
重启日志服务
systemctl restart rsyslog.service
开机自启动
systemctl enable haproxy
启动服务
systemctl start haproxy
重启
systemctl restart haproxy
查看状态
systemctl status haproxy
##### 2.配置keepalived主从
配置主节点的keepalived.conf
vim /etc/keepalived/keepalived.conf
global_defs {
router_id HA115
script_user root
enable_script_security
}
vrrp_script chk_haproxy
{
script “/etc/keepalived/scripts/haproxy_check.sh”
interval 1
timeout 1
fall 2
}
vrrp_instance haproxy {
state MASTER
interface eth0
virtual_router_id 115
# 开启抢占模式 主机宕机后再恢复需要再次回到主
preempt yes
# 优先级 主机要比备机的优先级高
priority 150
unicast_src_ip 172.16.10.3
unicast_peer {
172.16.10.4
}
virtual_ipaddress {
172.16.10.100
}
track_script {
chk_haproxy
}
notify_master “/etc/keepalived/scripts/haproxy_master.sh”
}
配置备节点的keepalived.conf
vim /etc/keepalived/keepalived.conf
global_defs {
router_id HA115
script_user root
enable_script_security
}
vrrp_script chk_haproxy
{
script “/etc/keepalived/scripts/haproxy_check.sh”
interval 1
timeout 1
fall 2
}
vrrp_instance haproxy {
state BACKUP
interface eth0
virtual_router_id 115
# 开启抢占模式 主机宕机后再恢复需要再次回到主
preempt yes
# 优先级 备机要主机的优先级低
priority 100
unicast_src_ip 172.16.10.4
unicast_peer {
172.16.10.3
}
virtual_ipaddress {
172.16.10.100
}
track_script {
chk_haproxy
}
notify_master “/etc/keepalived/scripts/haproxy_master.sh”
}
配置检测脚本haproxy_check.sh 两台服务器都需要配置
cd /etc/keepalived && mkidr scripts && vim haproxy_check.sh
#!/bin/bash
LOGFILE=“/var/log/keepalived-haproxy-state.log”
date >> $LOGFILE
if [ ps -C haproxy --no-header |wc -l -eq 0 ];then
echo “fail: check_haproxy status” >> $LOGFILE
exit 1
else
echo “success: check_haproxy status” >> $LOGFILE
exit 0
fi
配置检测脚本haproxy_master.sh 两台服务器都需要配置
cd /etc/keepalived && mkidr scripts && vim haproxy_master.sh
LOGFILE=“/var/log/keepalived-haproxy-state.log”
echo “Being Master …” >> $LOGFILE
#设置可执行权限 必须设置700权限,若权限过大,keepalived会认为不安全,从而导致运行失败


网上学习资料一大堆,但如果学到的知识不成体系,遇到问题时只是浅尝辄止,不再深入研究,那么很难做到真正的技术提升。
一个人可以走的很快,但一群人才能走的更远!不论你是正从事IT行业的老鸟或是对IT行业感兴趣的新人,都欢迎加入我们的的圈子(技术交流、学习资源、职场吐槽、大厂内推、面试辅导),让我们一起学习成长!
mg-W369lV3J-1714780830400)]
[外链图片转存中…(img-SH0MFf9a-1714780830400)]
网上学习资料一大堆,但如果学到的知识不成体系,遇到问题时只是浅尝辄止,不再深入研究,那么很难做到真正的技术提升。
一个人可以走的很快,但一群人才能走的更远!不论你是正从事IT行业的老鸟或是对IT行业感兴趣的新人,都欢迎加入我们的的圈子(技术交流、学习资源、职场吐槽、大厂内推、面试辅导),让我们一起学习成长!


 9804
9804


 被折叠的 条评论
为什么被折叠?
被折叠的 条评论
为什么被折叠?
 到【灌水乐园】发言


