


SeqListPushBack(&sl, 3);
SeqListPushBack(&sl, 4);
SeqListPushBack(&sl, 5);
SeqListPrint(&sl); //打印

SeqListPopBack(&sl);
SeqListPopBack(&sl);
SeqListPopBack(&sl);
SeqListPopBack(&sl);
SeqListPopBack(&sl);
SeqListPopBack(&sl);
SeqListPopBack(&sl);
SeqListPrint(&sl); //打印

SeqListPushBack(&sl, 10);
SeqListPushBack(&sl, 20);
SeqListPrint(&sl); //打印

SeqListDestory(&sl); //销毁
}
>
> 🚩 运行结果如下:
>
>
>
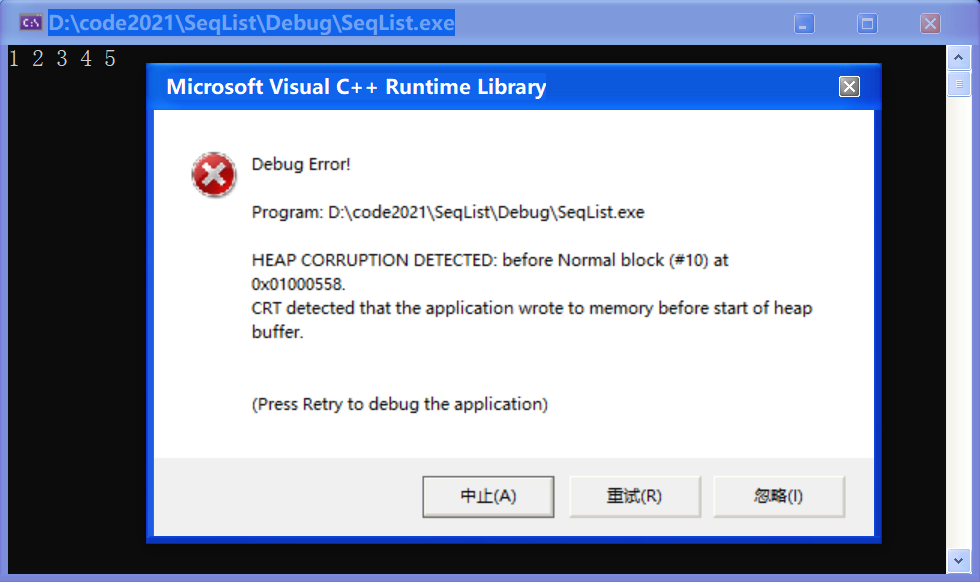
(吐槽:这时候一打印,就爆炸了。以为写的很完美的尾插,一直以为它是不会翻车的,就,就,爆炸了,碎成了片片,我同情它甚至超过了同情我自己。)
🐞 不慌,我们来调试看看!

💡 解决方案:添加 SeqListPopBack 限制条件
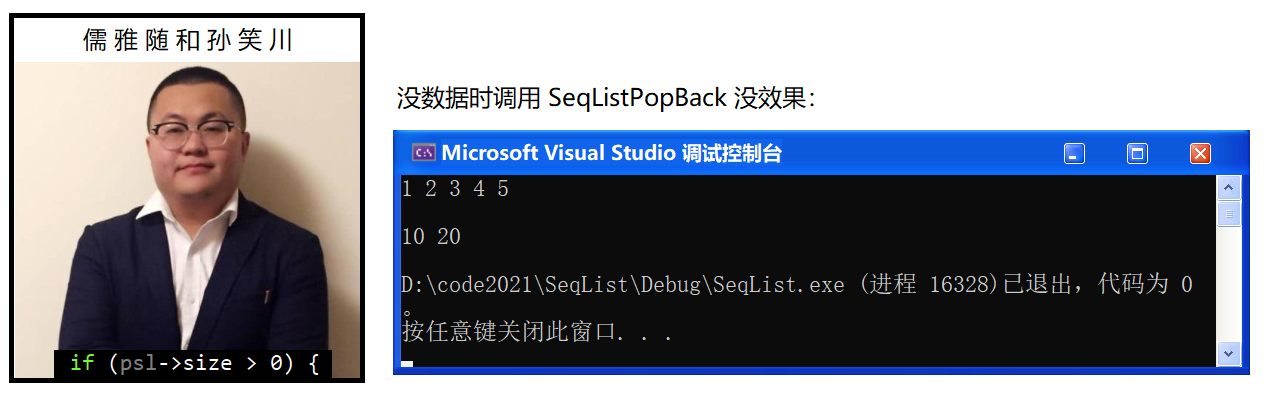
方式一:如果没有数据了,使调用 SeqListPopBack 没效果(儒雅随和的方式)
💬 SeqList.c:
/* 尾删 /
void SeqListPopBack(SL psl) {
if (psl->size > 0) {
// psl->array[psl->size - 1] = 0;
psl->size–; //实际有效个数-1
}
}
方式二:使用断言,直接不允许你做类似这样的动作。你在调用这个接口之前你必须确定它是有数据的,如果没有数据就不能调了,调了就给你报错。
💬 SeqList.h:使用断言需引入 assert.h
#pragma once
#include <stdio.h>
#include <stdlib.h>
#include <assert.h>
···
💬 SeqList.c:
/* 尾删 /
void SeqListPopBack(SL psl) {
//if (psl->size > 0) {
// // psl->array[psl->size - 1] = 0;
// psl->size–; //实际有效个数-1
//}
assert(psl->size > 0);
psl->size--;
}
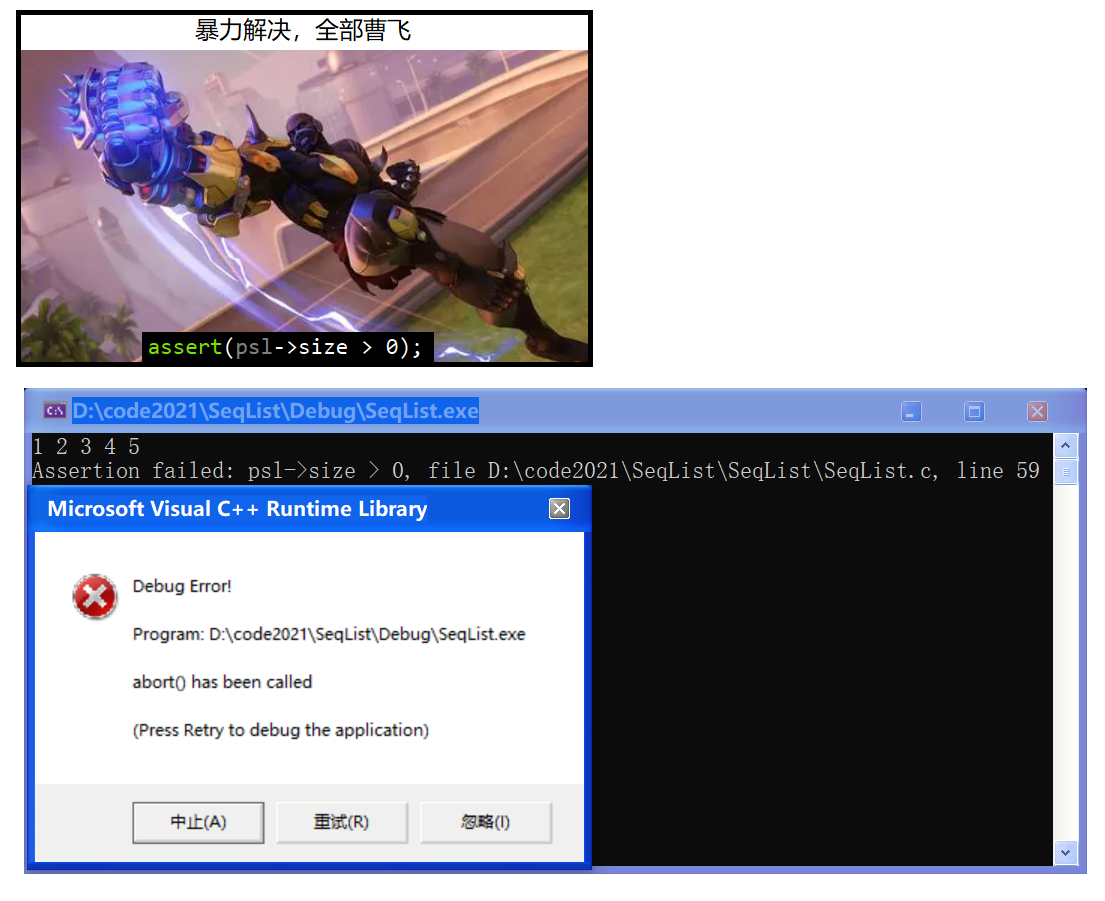
🔺 至于选择儒雅随和的方式还是暴力解决的方式,就看你自己喜好了。
#### 0x06 头插(SeqListPushFront)和检查是否需要增容(SeqListCheckCapacity)
📚 顺序表要求数据是连续存储的,且必须是从头开始存储。所以,对于顺序表而言如果要实现头插,就需要把数据往后挪动。不能从前往后挪,如果从前往后挪就挪就会把后面的数据覆盖掉。
💬 SeqList.h:
void SeqListPushFront(SL* psl, SLDataType x); //头插
💬 SeqList.c:
/* 头插 /
void SeqListPushFront(SL psl, SLDataType x) {
// 挪动数据
int end = psl->size - 1; // 因为指向的是数据的下标,所以要 -1
while (end >= 0) {
psl->array[end + 1] = psl->array[end];
end–; //让end指向下一个要移的数据
}
// 此时第一个位置已经被腾出来了,可以插入了
psl->array[0] = x;
psl->size++;
}
🔑 解读:首先创建一个 end 变量用来指向要移动的数据,因为指向的是数据的下标,所以是 **size** 要减 1 。随后进入 while 循环,如果 end >= 0 说明还没有移动完,就会进入循环。循环体内利用下标,进行向后移动操作,移动结束后再 end-- ,进行下一个数据的向后移动。挪动数据成功后,就可以插入了。此时顺序表第一个位置就被腾出来了,就可以在下标0位置插入欲插入的数据 **x** 了。最后记得 size++ 。


💬 Test.c:测试头插


我们之前用的 TestSeqList1 测试函数里东西太多了很乱,现在我们再创建一个 TestSeqList2 函数来继续测试。现在就能体现出不在 main 函数内直接测试而是通过函数来测试的好处了,我们可以选择性地测试一部分代码,互相之间不干扰。
void TestSeqList2() {
SL sl;
SeqListInit(&sl);
SeqListPushBack(&sl, 1);
SeqListPushBack(&sl, 2);
SeqListPushBack(&sl, 3);
SeqListPushBack(&sl, 4);
SeqListPushBack(&sl, 5);
SeqListPrint(&sl); //打印

SeqListPushFront(&sl, -1);
SeqListPushFront(&sl, -2);
SeqListPushFront(&sl, -3);
SeqListPrint(&sl); //打印

SeqListDestory(&sl); //销毁
}
int main() {
// TestSeqList1();
TestSeqList2();
return 0;
}
>
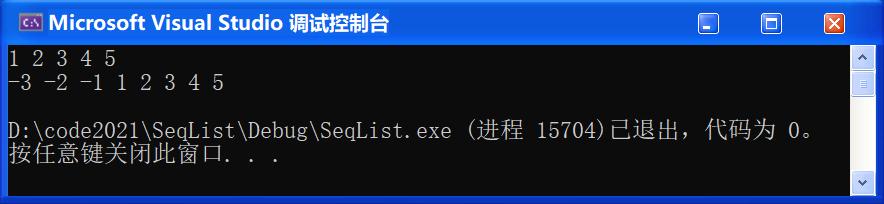
> 🚩 运行结果如下:(先插入了12345,又在12345前面头插了 -1、-2、-3)
>
>
>
❓ 我们是不是少了点啥?
💡 我们还需要检查是否需要扩容,和尾插一样。
📚 我们之前在完成 SeqListPushBack 尾插的时候就已经写好了,我们不妨把它抽取出来写成一个函数,方便以后多次调用:
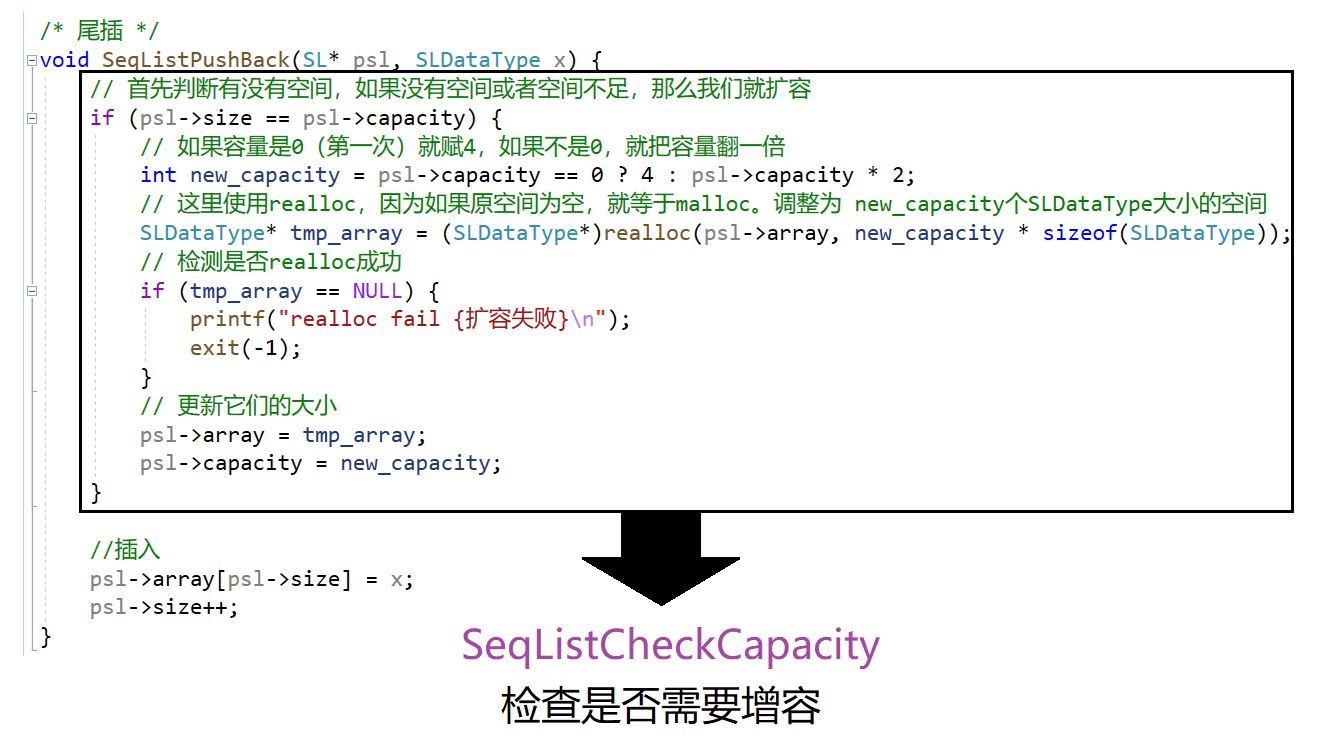
💬 SeqList.c:检查是否需要增容函数
/* 检查是否需要扩容 /
void SeqListCheckCapacity(SL psl) {
// 首先判断有没有空间,如果没有空间或者空间不足,那么我们就扩容
if (psl->size == psl->capacity) {
// 如果容量是0(第一次)就赋4,如果不是0,就把容量翻一倍
int new_capacity = psl->capacity == 0 ? 4 : psl->capacity * 2;
// 这里使用realloc,因为如果原空间为空,就等于malloc。调整为 new_capacity个SLDataType大小的空间
SLDataType* tmp_array = (SLDataType*)realloc(psl->array, new_capacity * sizeof(SLDataType));
// 检测是否realloc成功
if (tmp_array == NULL) {
printf(“realloc fail {扩容失败}\n”);
exit(-1);
}
// 更新它们的大小
psl->array = tmp_array;
psl->capacity = new_capacity;
}
}
🔑 解读:我们把之前写在 SeqListPushBack 中的检查增容的代码直接复制粘贴过来就可以了,这样一来,我们需要检查是否需要增容时直接调用 SeqListCheckCapacity 函数就可以了!


 💬 SeqList.c:更新下尾插函数
/* 尾插 /
void SeqListPushBack(SL psl, SLDataType x) {
//检查增容
SeqListCheckCapacity(psl);
//插入
psl->array[psl->size] = x;
psl->size++;
}
💬 SeqList.c:更新下头插函数
/* 头插 /
void SeqListPushFront(SL psl, SLDataType x) {
//检查增容
SeqListCheckCapacity(psl);
// 挪动数据
int end = psl->size - 1; // 因为指向的是数据的下标,所以要 -1
while (end >= 0) {
	psl->array[end + 1] = psl->array[end];
	end--; //让end指向下一个要移的数据
}

// 此时第一个位置已经被腾出来了,可以插入了
psl->array[0] = x;
psl->size++;
}
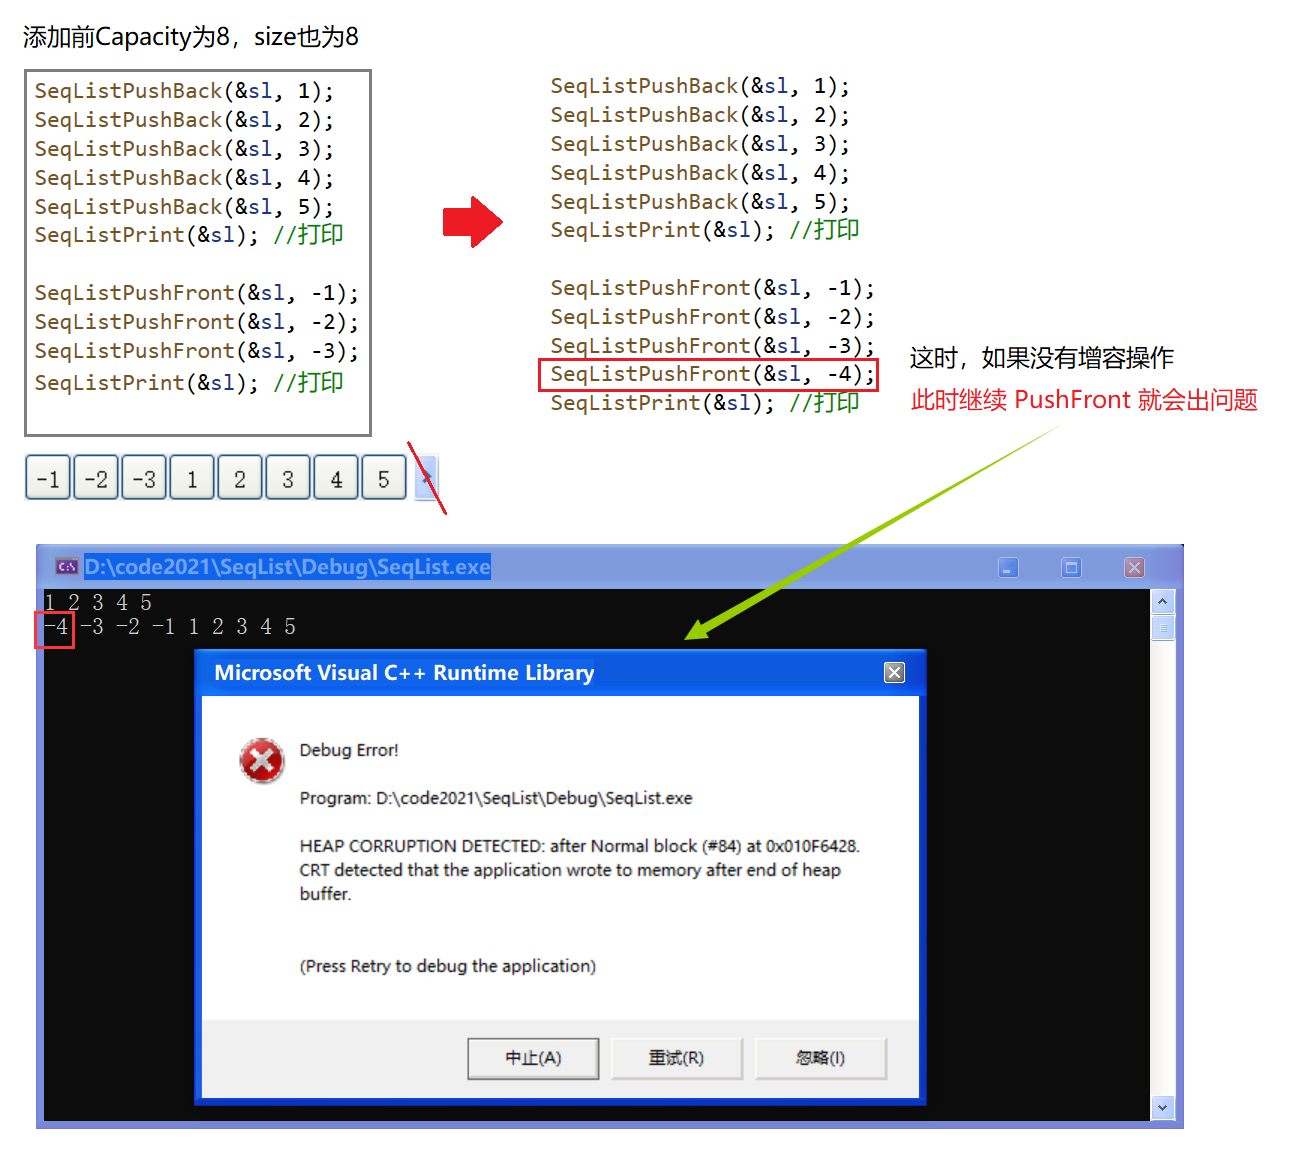
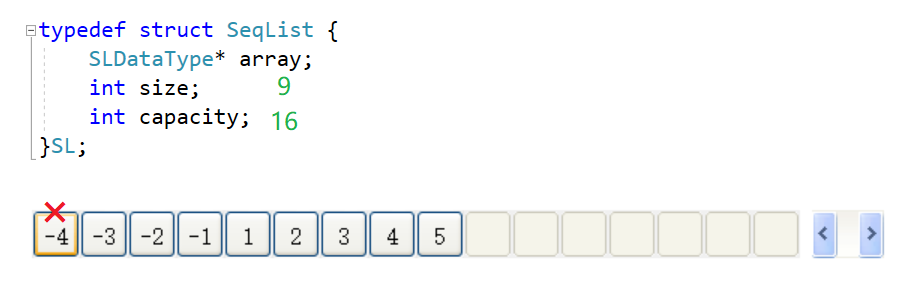
📌 如果不扩容,继续往下添加会造成的后果:【不感兴趣可跳过】


💬 Test.c:把尾插函数内的  SeqListCheckCapacity(psl);  注释掉
void TestSeqList2() {
SL sl;
SeqListInit(&sl);
SeqListPushBack(&sl, 1);
SeqListPushBack(&sl, 2);
SeqListPushBack(&sl, 3);
SeqListPushBack(&sl, 4);
SeqListPushBack(&sl, 5);
SeqListPrint(&sl); //打印

SeqListPushFront(&sl, -1);
SeqListPushFront(&sl, -2);
SeqListPushFront(&sl, -3);
SeqListPushFront(&sl, -4); //继续添加
SeqListPrint(&sl); //打印

SeqListDestory(&sl); //销毁
}
#### 0x07 头删(SeqListPopFront)
📚 如果我们想把第一个数据删除,用尾删的方法直接把 size-- 显然是没有用的了。因为顺序表数据是从头开始存且有顺序的, size-- 无效的也只是最后一个数据。所以要想实现头删,我们不得不把数据先往前挪动,然后再 --size 。
💬 SeqList.h:
···
void SeqListPopFront(SL* psl); //头删
💬 SeqList.c:
/* 头删 /
void SeqListPopFront(SL psl) {
assert(psl->size > 0);
//挪动数据
int begin = 1;
while (begin < psl->size) {
	psl->array[begin - 1] = psl->array[begin];
	begin++;
}

//int begin = 0;
//while (begin < psl->size - 1) {
//	psl->array[begin] = psl->array[begin + 1];
//	begin++;
//}

psl->size--; //实际有效个数-1
}
🔑 解读:首先断言顺序表有数据,这个前面讲过了这里就不再赘述了。然后开始挪动数据,创建一个 begin 变量并赋个 1,然后进入循环。只要 size 大于 begin 就会进入循环。每次进入循环后将下标 begin -1 上的数据赋给下标 begin 上的数据,这样就达到了右向左移动的目的。最后 begin++ 移动下一个(如果满足条件的话)。移动完毕后,第一个数据就被第二个数据覆盖掉了,而第二个数据被第三个数据覆盖掉了……最后多出来的一块我们再用 size-- 解决掉,实际容量减1 。此时,就实现了头删。
💬 Test.c:测试代码
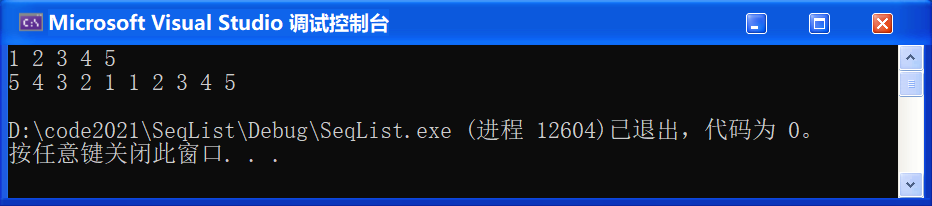
void TestSeqList2() {
SL sl;
SeqListInit(&sl);
SeqListPushBack(&sl, 1);
SeqListPushBack(&sl, 2);
SeqListPushBack(&sl, 3);
SeqListPushBack(&sl, 4);
SeqListPushBack(&sl, 5);
SeqListPrint(&sl); //打印

SeqListPushFront(&sl, -1);
SeqListPushFront(&sl, -2);
SeqListPushFront(&sl, -3);
SeqListPushFront(&sl, -4);
SeqListPrint(&sl); //打印

SeqListPopFront(&sl);
SeqListPopFront(&sl);
SeqListPrint(&sl); //打印

SeqListDestory(&sl); //销毁
}
>
> 🚩 运行结果如下:
>
>
>

#### 0x08 查找位置(SeqListFind)
📚 查找顺序表中某值的位置,如果找到了就返回该值的下标,没有找到我们就返回 -1 。
💬 SeqList.h:
···
int SeqListFind(SL* psl, SLDataType x); //查找
💬 SeqList.c:查找
/* 查找 /
int SeqListFind(SL psl, SLDataType x) {
int i = 0;
for (i = 0; i < psl->size; i++) {
if (psl->array[i] == x) {
return i;
}
}
// 没找到
return -1;
}
🔑 解读:首先遍历整个顺序表,如果 psl->**array**[i] == **x** 就返回 i 接,没找到就返回 -1。这里我们用的方法就是简单粗暴的 ***O(N)*** Find 暴力求解,当然你还可以试着用二分查找做,排序一下,写一个二分查找的接口。


💬 Test.c:
void TestSeqList3() {
SL sl;
SeqListInit(&sl);
SeqListPushBack(&sl, 1);
SeqListPushBack(&sl, 2);
SeqListPushBack(&sl, 3);
SeqListPushBack(&sl, 4);
SeqListPushBack(&sl, 5);
SeqListPrint(&sl); //打印

int ret = SeqListFind(&sl, 3);
if (ret != -1)
	printf("找到了,下标为%d\n", ret);
else
	printf("没找到!\n");


SeqListDestory(&sl); //销毁
}
int main() {
// TestSeqList1();
// TestSeqList2();
TestSeqList3();
return 0;
}
>
> 🚩 运行结果如下
>
>
>
#### 0x09 在指定的下标位置插入(SeqListInsert)
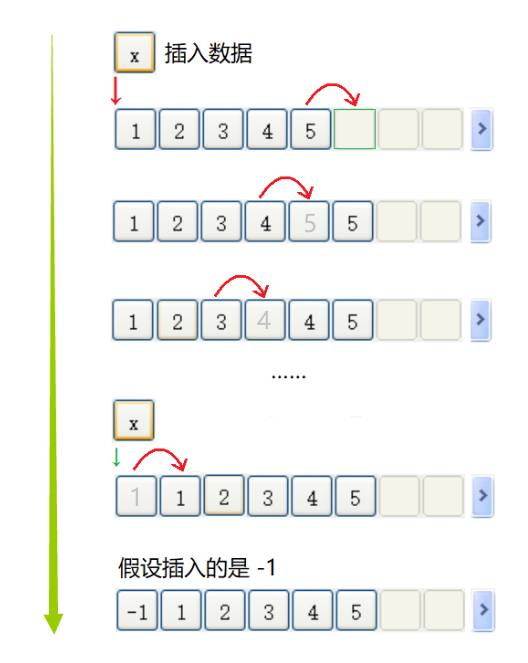
📚 顺序表要求数据从第一个开始放并且数据是连续存储的,所以我们就要注意下指定指定的下标位置 **pos** 的位置了!有些位置并不可以,所以我们需要进行一些检查。
💬 SeqList.h:
int SeqListInsert(SL* psl, int pos, SLDataType x); //指定位置插入
💬 SeqList.c:
/* 指定位置插入 /
int SeqListInsert(SL psl, int pos, SLDataType x) {
//if (pos > psl->size || pos < 0) {
// printf(“pos invalid {pos非法}\n”);
// return;
//}
assert(pos >= 0 && pos <= psl->size);

//检查增容
SeqListCheckCapacity(psl);

int end = psl->size - 1;
while (end >= pos) {
	psl->array[end + 1] = psl->array[end];
	end--;
}

//插入
psl->array[pos] = x;
psl->size++;
}
🔑 解读:首先添加 **pos** 位置的限定条件,可以根据自己的喜好选择是儒雅随和的处理方式,还是暴力处理方式。这里我的选择是简单粗暴地使用断言解决,限定 **pos**>= 0 并且 **pos** <= psl->size 从而保证 **pos** 合法。然后,因为是插入所以免不了要检查增容,直接调用之前写好的检查增容的函数即可。检查完后就可以开始移动了,和头插差不多,我们创建一个变量 end 记录最后一个的下标(psl->size-1),并通过它来指向要移动的数据。最后进入 while 循环,以 end >= pos 作为条件。移动完后,**x** 的位置就腾出来了,再把 **x** 插入进去,最后再 size++,就完成了。


💬 Test.c:
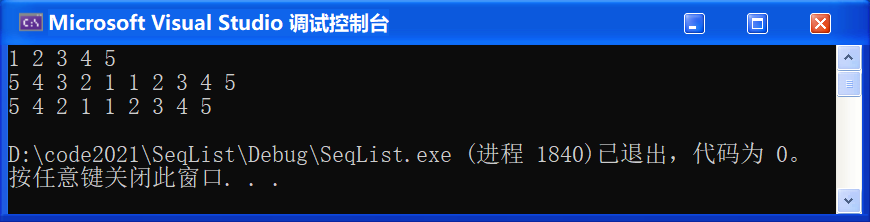
void TestSeqList3() {
SL sl;
SeqListInit(&sl);
SeqListPushBack(&sl, 1);
SeqListPushBack(&sl, 2);
SeqListPushBack(&sl, 3);
SeqListPushBack(&sl, 4);
SeqListPushBack(&sl, 5);
SeqListPrint(&sl); //打印

SeqListInsert(&sl, 2, 30);
SeqListPrint(&sl); //打印

int pos = SeqListFind(&sl, 4);
if (pos != -1) {
	SeqListInsert(&sl, pos, 40);
}
SeqListPrint(&sl); //打印

SeqListInsert(&sl, 0, -10);
SeqListPrint(&sl); //打印

SeqListInsert(&sl, 8, 80);
SeqListPrint(&sl); //打印


SeqListDestory(&sl); //销毁
}
int main() {
// TestSeqList1();
// TestSeqList2();
TestSeqList3();
return 0;
}
🔑 解读:这里为了防止有问题,我们不妨多测测试。
>
> 🚩 运行结果如下:
>
>
>
⚡ 头插函数和尾插函数的修改:
我们都把功能这么强的 SeqListInsert 写出来了,我们之前写的头插和尾插接口函数是不是可以直接复用下 SeqListInsert ?
💬 SeqList.c:尾插复用 SeqListInsert
/* 尾插 /
void SeqListPushBack(SL psl, SLDataType x) {
SeqListInsert(psl, psl->size, x);
}
💬 SeqList.c:头插复用 SeqListInsert
/* 头插 /
void SeqListPushFront(SL psl, SLDataType x) {
SeqListInsert(psl, 0, x);
}
💬 Test.c:测试下有没有问题,先尾插12345,再头插12345
void TestSeqList4() {
SL sl;
SeqListInit(&sl);
SeqListPushBack(&sl, 1);
SeqListPushBack(&sl, 2);
SeqListPushBack(&sl, 3);
SeqListPushBack(&sl, 4);
SeqListPushBack(&sl, 5);
SeqListPrint(&sl); //打印
SeqListPushFront(&sl, 1);
SeqListPushFront(&sl, 2);
SeqListPushFront(&sl, 3);
SeqListPushFront(&sl, 4);
SeqListPushFront(&sl, 5);
SeqListPrint(&sl); //打印


SeqListDestory(&sl); //销毁
}
int main() {
// TestSeqList1();
// TestSeqList2();
// TestSeqList3();
TestSeqList4();
return 0;
}
>
> 🚩 运行结果如下:
>
>
>
🔺 我们把 Insert 写好了,就可以直接复用到前面的写的尾插和头插了。其实只要写好 SeqListInsert 任意位置插入,头尾就都能控制了。
#### 0x10 删除指定位置的数据(SeqListErase)
📚 删除指定位置的数据,我们仍然要限制 **pos** 的位置。限制条件部分和 SeqListInsert 不同的是,因为 psl->**size** 这个位置没有效数据,所以删除的位置不能是 psl->**size**!
💬 SeqList.h:
···
int SeqListEarse(SL* psl, int pos); //指定位置删除
💬 SeqList.c:
/* 指定位置删除 /
int SeqListEarse(SL psl, int pos) {
assert(pos >= 0 && pos < psl->size);
int begin = pos + 1;
while (begin < psl->size) {
	psl->array[begin - 1] = psl->array[begin];
	begin++;
}

psl->size--;
}
💬 Test.c:测试下代码
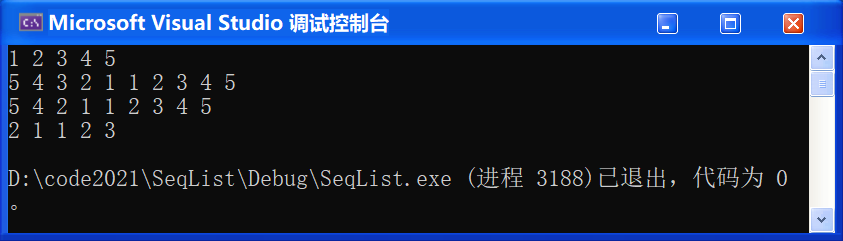
void TestSeqList4() {
SL sl;
SeqListInit(&sl);
SeqListPushBack(&sl, 1);
SeqListPushBack(&sl, 2);
SeqListPushBack(&sl, 3);
SeqListPushBack(&sl, 4);
SeqListPushBack(&sl, 5);
SeqListPrint(&sl); //打印
SeqListPushFront(&sl, 1);
SeqListPushFront(&sl, 2);
SeqListPushFront(&sl, 3);
SeqListPushFront(&sl, 4);
SeqListPushFront(&sl, 5);
SeqListPrint(&sl); //打印

SeqListEarse(&sl, 2);
SeqListPrint(&sl); //打印


SeqListDestory(&sl); //销毁
}
int main() {
// TestSeqList1();
// TestSeqList2();
// TestSeqList3();
TestSeqList4();
return 0;
}
>
> 🚩 运行结果如下:
>
>
>
⚡ 对应的,和上面一样。头删尾删都可以复用 SeqListEarse 了
💬 SeqList.c:头删复用 SeqListEarse
/* 头删 /
void SeqListPopFront(SL psl) {
SeqListEarse(psl, 0);
}
💬 SeqList.c:尾删复用 SeqListEarse
/* 尾删 /
void SeqListPopBack(SL psl) {
/*
//if (psl->size > 0) {
// psl->array[psl->size - 1] = 0;
// psl->size–; //实际有效个数-1
//}
assert(psl->size > 0);
psl->size--;
*/

SeqListEarse(psl, psl->size - 1);
}
💬 Test.c:测试下代码
void TestSeqList4() {
SL sl;
SeqListInit(&sl);
SeqListPushBack(&sl, 1);
SeqListPushBack(&sl, 2);
SeqListPushBack(&sl, 3);
SeqListPushBack(&sl, 4);
SeqListPushBack(&sl, 5);
SeqListPrint(&sl); //打印
SeqListPushFront(&sl, 1);
SeqListPushFront(&sl, 2);
SeqListPushFront(&sl, 3);
SeqListPushFront(&sl, 4);
SeqListPushFront(&sl, 5);
SeqListPrint(&sl); //打印

SeqListEarse(&sl, 2);
SeqListPrint(&sl); //打印

SeqListPopBack(&sl);
SeqListPopBack(&sl);
SeqListPopFront(&sl);
SeqListPopFront(&sl);
SeqListPrint(&sl); //打印


SeqListDestory(&sl); //销毁
}
int main() {
// TestSeqList1();
// TestSeqList2();
// TestSeqList3();
TestSeqList4();
return 0;
}
>
> 🚩 运行结果如下:
>
>
>
### 四、完整代码
💬 SeqList.h:头文件以及函数申明
#pragma once
#include <stdio.h>
#include <stdlib.h>
#include <assert.h>
typedef int SLDataType;
/* 动态顺序表 /
typedef struct SeqList {
SLDataType array;
int size; //有效数据个数
int capacity; //数组实际能存数据的空间容量是多大
}SL;
/* 接口函数 /
void SeqListInit(SL psl); //初始化
void SeqListDestory(SL* psl); //销毁
void SeqListCheckCapacity(SL* psl); //检查是否需要增容
void SeqListPushBack(SL* psl, SLDataType x); //尾插
void SeqListPrint(SL* psl); //打印
void SeqListPushFront(SL* psl, SLDataType x); //头插
void SeqListPopBack(SL* psl); //尾删
void SeqListPopFront(SL* psl); //头删
int SeqListFind(SL* psl, SLDataType x); //查找
int SeqListInsert(SL* psl, int pos, SLDataType x); //指定位置插入
int SeqListEarse(SL* psl, int pos); //指定位置删除
💬 SeqList.c:接口实现
#include “SeqList.h”
/* 初始化 /
void SeqListInit(SL psl) {
psl->array = NULL;
psl->size = psl->capacity = 0;
}
/* 销毁 /
void SeqListDestory(SL psl) {
//首先把空间还给操作系统
free(psl->array);
psl->array = NULL; //置空防止空指针
psl->capacity = psl->size = 0; //空间置0
}
/* 打印 /
void SeqListPrint(SL psl) {
int i = 0;
for (i = 0; i < psl->size; i++) {
printf(“%d “, psl->array[i]);
}
printf(”\n”);
}
/* 检查是否需要扩容 /
void SeqListCheckCapacity(SL psl) {
if (psl->size == psl->capacity) {
// 如果容量是0(第一次)就赋4,如果不是0,就把容量翻一倍
int new_capacity = psl->capacity == 0 ? 4 : psl->capacity * 2;
// 这里使用realloc,因为如果原空间为空,就等于malloc。调整为 new_capacity个SLDataType大小的空间
SLDataType* tmp_array = (SLDataType*)realloc(psl->array, new_capacity * sizeof(SLDataType));
// 检测是否realloc成功
if (tmp_array == NULL) {
printf(“realloc fail {扩容失败}\n”);
exit(-1);
}
// 更新它们的大小
psl->array = tmp_array;
psl->capacity = new_capacity;
}
}
/* 尾插 /
void SeqListPushBack(SL psl, SLDataType x) {
/*
//检查增容
SeqListCheckCapacity(psl);
//插入
psl->array[psl->size] = x;
psl->size++;
*/

SeqListInsert(psl, psl->size, x);
}
/* 尾删 /
void SeqListPopBack(SL psl) {
/*
//if (psl->size > 0) {
// psl->array[psl->size - 1] = 0;
// psl->size–; //实际有效个数-1
//}
assert(psl->size > 0);
psl->size--;
*/

SeqListEarse(psl, psl->size - 1);
}
/* 头插 /
void SeqListPushFront(SL psl, SLDataType x) {
/*
//检查增容
SeqListCheckCapacity(psl);
// 挪动数据
int end = psl->size - 1; // 因为指向的是数据的下标,所以要 -1
while (end >= 0) {
	psl->array[end + 1] = psl->array[end];
	end--; //让end指向下一个要移的数据
}

// 此时第一个位置已经被腾出来了,可以插入了
psl->array[0] = x;
psl->size++;
*/

SeqListInsert(psl, 0, x);
}
/* 头删 /
void SeqListPopFront(SL psl) {
assert(psl->size > 0);
/*
// 挪动数据
int begin = 1;
while (begin < psl->size) {
psl->array[begin - 1] = psl->array[begin];
begin++;
}
psl->size--; //实际有效个数-1
*/

SeqListEarse(psl, 0);
}
/* 查找 /
int SeqListFind(SL psl, SLDataType x) {
int i = 0;
for (i = 0; i < psl->size; i++) {
if (psl->array[i] == x) {
return i;
}
}
// 没找到
return -1;
}
/* 指定位置插入 /
int SeqListInsert(SL psl, int pos, SLDataType x) {
//if (pos > psl->size || pos < 0) {
// printf(“pos invalid {pos非法}\n”);
// return;
//}
assert(pos >= 0 && pos <= psl->size);

//检查增容
SeqListCheckCapacity(psl);

int end = psl->size - 1;
while (end >= pos) {
	psl->array[end + 1] = psl->array[end];
	end--;
}

//插入
psl->array[pos] = x;
psl->size++;
}
/* 指定位置删除 /
int SeqListEarse(SL psl, int pos) {
assert(pos >= 0 && pos < psl->size);
int begin = pos + 1;
while (begin < psl->size) {
	psl->array[begin - 1] = psl->array[begin];
	begin++;
}

psl->size--;
}
💬 Test.c:测试用例
#include “SeqList.h”
void TestSeqList1() {
SL sl;
SeqListInit(&sl);
SeqListPushBack(&sl, 1);
SeqListPushBack(&sl, 2);
SeqListPushBack(&sl, 3);
SeqListPushBack(&sl, 4);
SeqListPushBack(&sl, 5);
SeqListPrint(&sl); //打印

SeqListPopBack(&sl);
SeqListPopBack(&sl);
SeqListPopBack(&sl);
SeqListPopBack(&sl);
SeqListPopBack(&sl);
SeqListPopBack(&sl);
SeqListPopBack(&sl);
SeqListPrint(&sl); //打印

SeqListPushBack(&sl, 10);
SeqListPushBack(&sl, 20);
SeqListPrint(&sl); //打印

SeqListDestory(&sl); //销毁
}
void TestSeqList2() {
SL sl;
SeqListInit(&sl);
SeqListPushBack(&sl, 1);
SeqListPushBack(&sl, 2);
SeqListPushBack(&sl, 3);
SeqListPushBack(&sl, 4);
SeqListPushBack(&sl, 5);
SeqListPrint(&sl); //打印

SeqListPushFront(&sl, -1);
SeqListPushFront(&sl, -2);
SeqListPushFront(&sl, -3);
SeqListPushFront(&sl, -4);
SeqListPrint(&sl); //打印

SeqListPopFront(&sl);
SeqListPopFront(&sl);
SeqListPrint(&sl); //打印

SeqListDestory(&sl); //销毁
}
void TestSeqList3() {
SL sl;
SeqListInit(&sl);
SeqListPushBack(&sl, 1);
SeqListPushBack(&sl, 2);
SeqListPushBack(&sl, 3);
SeqListPushBack(&sl, 4);
SeqListPushBack(&sl, 5);
SeqListPrint(&sl); //打印

int ret = SeqListFind(&sl, 3);
if (ret != -1)
	printf("找到了,下标为%d\n", ret);
//else
	printf("没找到!\n");

SeqListInsert(&sl, 2, 30);
本人从事网路安全工作12年,曾在2个大厂工作过,安全服务、售后服务、售前、攻防比赛、安全讲师、销售经理等职位都做过,对这个行业了解比较全面。
最近遍览了各种网络安全类的文章,内容参差不齐,其中不伐有大佬倾力教学,也有各种不良机构浑水摸鱼,在收到几条私信,发现大家对一套完整的系统的网络安全从学习路线到学习资料,甚至是工具有着不小的需求。
最后,我将这部分内容融会贯通成了一套282G的网络安全资料包,所有类目条理清晰,知识点层层递进,需要的小伙伴可以点击下方小卡片领取哦!下面就开始进入正题,如何从一个萌新一步一步进入网络安全行业。
学习路线图
其中最为瞩目也是最为基础的就是网络安全学习路线图,这里我给大家分享一份打磨了3个月,已经更新到4.0版本的网络安全学习路线图。
相比起繁琐的文字,还是生动的视频教程更加适合零基础的同学们学习,这里也是整理了一份与上述学习路线一一对应的网络安全视频教程。

网络安全工具箱
当然,当你入门之后,仅仅是视频教程已经不能满足你的需求了,你肯定需要学习各种工具的使用以及大量的实战项目,这里也分享一份我自己整理的网络安全入门工具以及使用教程和实战。
项目实战
最后就是项目实战,这里带来的是SRC资料&HW资料,毕竟实战是检验真理的唯一标准嘛~
面试题
归根结底,我们的最终目的都是为了就业,所以这份结合了多位朋友的亲身经验打磨的面试题合集你绝对不能错过!
网上学习资料一大堆,但如果学到的知识不成体系,遇到问题时只是浅尝辄止,不再深入研究,那么很难做到真正的技术提升。
一个人可以走的很快,但一群人才能走的更远!不论你是正从事IT行业的老鸟或是对IT行业感兴趣的新人,都欢迎加入我们的的圈子(技术交流、学习资源、职场吐槽、大厂内推、面试辅导),让我们一起学习成长!


 被折叠的 条评论
为什么被折叠?
被折叠的 条评论
为什么被折叠?
 到【灌水乐园】发言


