


学习路线:
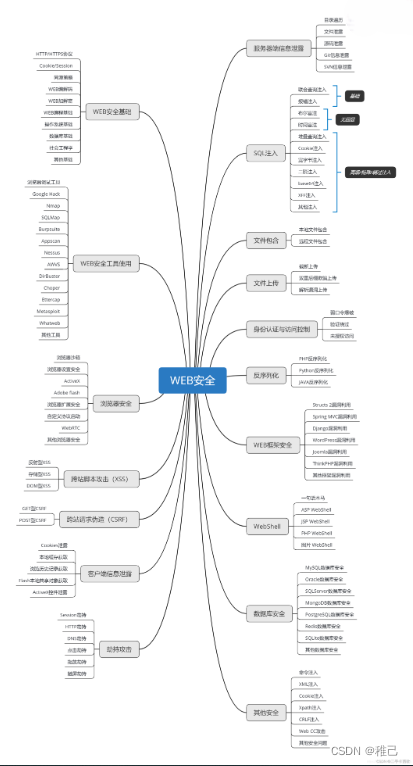
这个方向初期比较容易入门一些,掌握一些基本技术,拿起各种现成的工具就可以开黑了。不过,要想从脚本小子变成黑客大神,这个方向越往后,需要学习和掌握的东西就会越来越多以下是网络渗透需要学习的内容:
需要体系化学习资料的朋友,可以加我V获取:vip204888 (备注网络安全)
网上学习资料一大堆,但如果学到的知识不成体系,遇到问题时只是浅尝辄止,不再深入研究,那么很难做到真正的技术提升。
一个人可以走的很快,但一群人才能走的更远!不论你是正从事IT行业的老鸟或是对IT行业感兴趣的新人,都欢迎加入我们的的圈子(技术交流、学习资源、职场吐槽、大厂内推、面试辅导),让我们一起学习成长!
一、简介
超文本传输协议(HTTP)可能是当今Internet上使用的最重要的协议。Web服务,具有网络功能的设备以及网络计算的增长继续将HTTP协议的作用扩展到用户驱动的Web浏览器之外,同时增加了需要HTTP支持的应用程序的数量。尽管java.net 软件包提供了用于通过HTTP访问资源的基本功能,但它并未提供许多应用程序所需的全部灵活性或功能。Jakarta Commons HttpClient 组件试图通过提供高效,最新且功能丰富的程序包来实现此空白,以实现最新HTTP标准和建议的客户端。
Commons HttpClient项目现已停产,并且不再开发。它已被其HttpClient和HttpCore模块中的Apache HttpComponents项目取代。
二、项目搭建
tips:本项目案例是基于SpringBoot+SpringDataJPA环境搭建的
2.1 导入依赖:
<dependencies>

    <!-- web场景 -->
    <dependency>
        <groupId>org.springframework.boot</groupId>
        <artifactId>spring-boot-starter-web</artifactId>
    </dependency>

    <!-- jpa场景 -->
    <dependency>
        <groupId>org.springframework.boot</groupId>
        <artifactId>spring-boot-starter-data-jpa</artifactId>
    </dependency>

    <!-- mysql驱动 -->
    <dependency>
        <groupId>mysql</groupId>
        <artifactId>mysql-connector-java</artifactId>
        <version>8.0.18</version>
    </dependency>

    <!-- 单元测试 -->
    <dependency>
        <groupId>org.springframework.boot</groupId>
        <artifactId>spring-boot-starter-test</artifactId>
        <scope>test</scope>
    </dependency>

    <!-- HttpClient的依赖(httpmime依赖包含了httpclient以及httpcore) -->
    <dependency>
        <groupId>org.apache.httpcomponents</groupId>
        <artifactId>httpmime</artifactId>
    </dependency>

    <!-- 早期引入如下两个依赖 -->
<!--
 <dependency>
 <groupId>org.apache.httpcomponents</groupId>
 <artifactId>httpcore</artifactId>
 </dependency>
 <dependency>
 <groupId>org.apache.httpcomponents</groupId>
 <artifactId>httpclient</artifactId>
 </dependency>
-->

    <!-- 文件上传下载 -->
    <dependency>
        <groupId>commons-fileupload</groupId>
        <artifactId>commons-fileupload</artifactId>
        <version>1.3.3</version>
    </dependency>
</dependencies>
2.2 application.properties:
server.port=8080

# 数据源配置
spring.datasource.username=root
spring.datasource.password=admin
spring.datasource.driver-class-name=com.mysql.jdbc.Driver
spring.datasource.url=jdbc:mysql://127.0.0.1:3306/test?serverTimezone=GMT%2b8

# jpa配置
spring.jpa.show-sql=true
spring.jpa.database=mysql
2.3 实体类:
@Entity
@Table(name = "user")
public class User implements Serializable {

    @Id
    @GeneratedValue(strategy = GenerationType.IDENTITY)
    private Integer id;

    @Column
    private String username;

    @Column
    private Date birthday;

    @Column
    private String pic;

	// 省略get/set....
}
2.4 dao:
public interface UserDao extends JpaRepository<User,Integer> {
}
2.5 controller:
@RestController
@RequestMapping("/user")
public class UserController {

    @Autowired
    private UserDao userDao;

    /\*\*
 \* 添加用户
 \* @param user
 \* @return
 \* @throws Exception
 \*/
    @PostMapping
    public Map save(@RequestBody User user) throws Exception {
        user.setBirthday(new Date());
        userDao.save(user);
        Map returnMap = new HashMap<>();
        returnMap.put("message", "添加成功");

        return returnMap;
    }

    /\*\*
 \* 删除用户
 \* @param id
 \* @return
 \*/
    @DeleteMapping("/{id}")
    public Map delete(@PathVariable Integer id) {

        userDao.deleteById(id);

        Map returnMap = new HashMap<>();
        returnMap.put("message", "删除成功");
        return returnMap;
    }

    /\*\*
 \* 修改用户
 \* @param id
 \* @param user
 \* @return
 \*/
    @PutMapping("/{id}")
    public Map update(@PathVariable Integer id, @RequestBody User user) {

        user.setId(id);
        userDao.save(user);

        Map returnMap = new HashMap<>();
        returnMap.put("message", "修改成功");
        return returnMap;
    }

    /\*\*
 \* 根据id查询用户
 \* @param id
 \* @return
 \*/
    @GetMapping("/{id}")
    public User findById(@PathVariable Integer id) {
        return userDao.findById(id).get();
    }

    /\*\*
 \* 查询全部用户
 \* @return
 \*/
    @GetMapping
    public List<User> findAll() {
        return userDao.findAll();
    }

	/\*\*
 \* 上传头像
 \*
 \* @param pic
 \* @param username
 \* @return
 \* @throws Exception
 \*/
	@PostMapping("/upload")
	// 如果上传了多个文件使用:List<MultipartFile> pic
	public Map upload(MultipartFile pic, String username) throws Exception {

	    pic.transferTo(new File("D:\\", UUID.randomUUID().toString() + ".png"));

	    Map returnMap = new HashMap<>();
	    returnMap.put("message", "上传成功");
	    returnMap.put("data", username);
	    return returnMap;
	}
}
2.6 启动类:
@SpringBootApplication
public class HttpclientApplication {

    public static void main(String[] args) {
        SpringApplication.run(HttpclientApplication.class, args);
    }

}
数据库脚本如下:
CREATE TABLE `user`  (
  `id` int(11) NOT NULL AUTO\_INCREMENT,
  `username` varchar(255) CHARACTER SET utf8 COLLATE utf8_general_ci NULL DEFAULT NULL,
  `birthday` datetime(0) NULL DEFAULT NULL,
  `pic` varchar(255) CHARACTER SET utf8 COLLATE utf8_general_ci NULL DEFAULT NULL,
  PRIMARY KEY (`id`) USING BTREE
) ENGINE = InnoDB AUTO\_INCREMENT = 1 CHARACTER SET = utf8 COLLATE = utf8_general_ci ROW_FORMAT = Dynamic;
本人已亲测,controller所有接口均可用。大家可以跟我一样,先把环境搭建好
三、HttpClient快速入门
3.1 Get 请求
3.1.1 普通Get请求
@Test
public void test1() throws Exception{

    // 获取HttpClient实例
    CloseableHttpClient httpClient = HttpClients.createDefault();

    // 创建一个HttpGet请求
    HttpGet httpGet = new HttpGet("http://localhost:8080/user");

    // 发送请求,获取响应结果
    CloseableHttpResponse response = httpClient.execute(httpGet);

    // 获取响应实体
    HttpEntity responseEntity = response.getEntity();

    System.out.println("响应状态: " + response.getStatusLine());
    if (responseEntity != null) {
        System.out.println("响应内容长度为:" + responseEntity.getContentLength());
        System.out.println("响应内容为:" + EntityUtils.toString(responseEntity));
    }
}

3.1.2 Get请求带参数
- 请求代码:
@Test
public void test2() throws Exception {
    // 获取HttpClient实例
    CloseableHttpClient httpClient = HttpClients.createDefault();

    // 请求参数
    StringBuilder params = new StringBuilder();
    params.append("?");
    // 字符数据最好encoding一下;这样一来,某些特殊字符才能传过去(如:username就是"&",不encoding的话,解析时,会认为要拼接下一个参数username就为空)
    params.append("username=" + URLEncoder.encode("admin", "UTF8"));

    HttpGet httpGet = new HttpGet("http://localhost:8080/user/testGet" + params);

    // 发送请求,获取响应结果
    CloseableHttpResponse response = httpClient.execute(httpGet);

    // 获取响应实体
    HttpEntity responseEntity = response.getEntity();

    System.out.println("响应状态: " + response.getStatusLine());
    if (responseEntity != null) {
        System.out.println("响应内容长度为:" + responseEntity.getContentLength());
        System.out.println("响应内容为:" + EntityUtils.toString(responseEntity));
    }
}
- 新增接口:
@GetMapping("/testGet")
public Map testGet(String username) throws Exception{

    Map returnMap = new HashMap<>();
    returnMap.put("message", "请求成功");
    returnMap.put("data", username);
    return returnMap;
}
3.1.3 GET请求使用URI方式
使用URIBuilder()来构建一个uri对象用于传递参数使用。
URIBuilder()中有如下方法
setParameters(List<NameValuePair> params):用于构建多个键值对,使用List,单个NameValuePair用于封装一个键值对setParameter(String key,String val):自己手动添加键值对
// GET请求(使用URI获取HttpGet)
@Test
public void test3() throws Exception {
    // 获取HttpClient实例
    CloseableHttpClient httpClient = HttpClients.createDefault();

    // 将参数放入键值对类NameValuePair中,再放入集合中
    List<NameValuePair> params = new ArrayList<>();
    params.add(new BasicNameValuePair("username", "admin"));

    // 设置uri信息,并将参数集合放入uri;
    // 注:这里也支持一个键值对一个键值对地往里面放setParameter(String key, String value)
    URI uri = new URIBuilder().setScheme("http").setHost("localhost")
            .setPort(8080).setPath("/user/testGet")
            .setParameters(params).build();

    HttpGet httpGet = new HttpGet(uri);

    print(httpClient, httpGet);
}
3.1.4 抽取打印方法
/\*\*
 \* 抽取打印方法
 \*
 \* @param httpClient
 \* @param http
 \* @throws Exception
 \*/
private void print(CloseableHttpClient httpClient, HttpRequestBase http) throws Exception {
    // 发送请求,获取响应结果
    CloseableHttpResponse response = httpClient.execute(http);

    // 获取响应实体
    HttpEntity responseEntity = response.getEntity();

    System.out.println("响应状态: " + response.getStatusLine());
    if (responseEntity != null) {
        System.out.println("响应内容长度为:" + responseEntity.getContentLength());

		// 设置响应内容的编码(默认为UTF8)
        System.out.println("响应内容为:" + EntityUtils.toString(responseEntity, "UTF8"));
    }

    response.close();
    httpClient.close();
}
3.2 Post请求
3.2.1 普通Post请求
- 请求代码:
@Test
public void test4() throws Exception {
    // 获取HttpClient实例
    CloseableHttpClient httpClient = HttpClients.createDefault();

    HttpPost httpPost = new HttpPost("http://localhost:8080/user/testPost");

    print(httpClient, httpPost);

}
- 请求接口:
@PostMapping("/testPost")
public Map testPost() throws Exception {

    Map returnMap = new HashMap<>();
    returnMap.put("message", "普通方式post请求成功");
    return returnMap;
}
3.2.2 Post请求带参数
- 请求代码:
@Test
public void test5() throws Exception {
    // 获取HttpClient实例
    CloseableHttpClient httpClient = HttpClients.createDefault();

    HttpPost httpPost = new HttpPost("http://localhost:8080/user/testPost?username=admin");

    print(httpClient, httpPost);

}
- 新增接口
@PostMapping("/testPost2")
public Map testPost2(String username) throws Exception {

    Map returnMap = new HashMap<>();
    returnMap.put("message", "普通方式post请求成功");
    returnMap.put("data", username);
    return returnMap;
}
3.2.3 Post请求提交对象
@Test
public void test6() throws Exception {
    // 获取HttpClient实例
    CloseableHttpClient httpClient = HttpClients.createDefault();

    User user=new User();
    user.setUsername("王五");

    // json转换工具
    ObjectMapper om = new ObjectMapper();
    StringEntity entity = new StringEntity(om.writeValueAsString(user), "utf-8");

    HttpPost httpPost = new HttpPost("http://localhost:8080/user");

    // post请求是将参数放在请求体里面传过去的;这里将entity放入post请求体中
    httpPost.setEntity(entity);

    // 设置请求头
    httpPost.setHeader("Content-Type", "application/json;charset=utf8");
    httpClient.execute(httpPost);

    print(httpClient, httpPost);

}
3.2.4 Post请求对象+参数
- 请求代码:
@Test
public void test7() throws Exception {
// 获取HttpClient实例
CloseableHttpClient httpClient = HttpClients.createDefault();
User user=new User();
user.setUsername("赵六");
// json转换工具
ObjectMapper om = new ObjectMapper();
StringEntity entity = new StringEntity(om.writeValueAsString(user), "utf-8");
// 构建uri
URI uri = new URIBuilder().setScheme("http").setHost("localhost")
.setPort(8080).setPath("/user/testPost")
.setParameter("flag", "测试post请求带参哦!") //使用setParameter设置单个参数
.build();
HttpPost httpPost = new HttpPost(uri);
// post请求是将参数放在请求体里面传过去的;这里将entity放入post请求体中
httpPost.setEntity(entity);
// 设置请求头
httpPost.setHeader("Content-Type", "application/json;charset=utf8");
httpClient.execute(httpPost);
print(httpClient, httpPost);
### 给大家的福利
**零基础入门**
对于从来没有接触过网络安全的同学,我们帮你准备了详细的学习成长路线图。可以说是最科学最系统的学习路线,大家跟着这个大的方向学习准没问题。
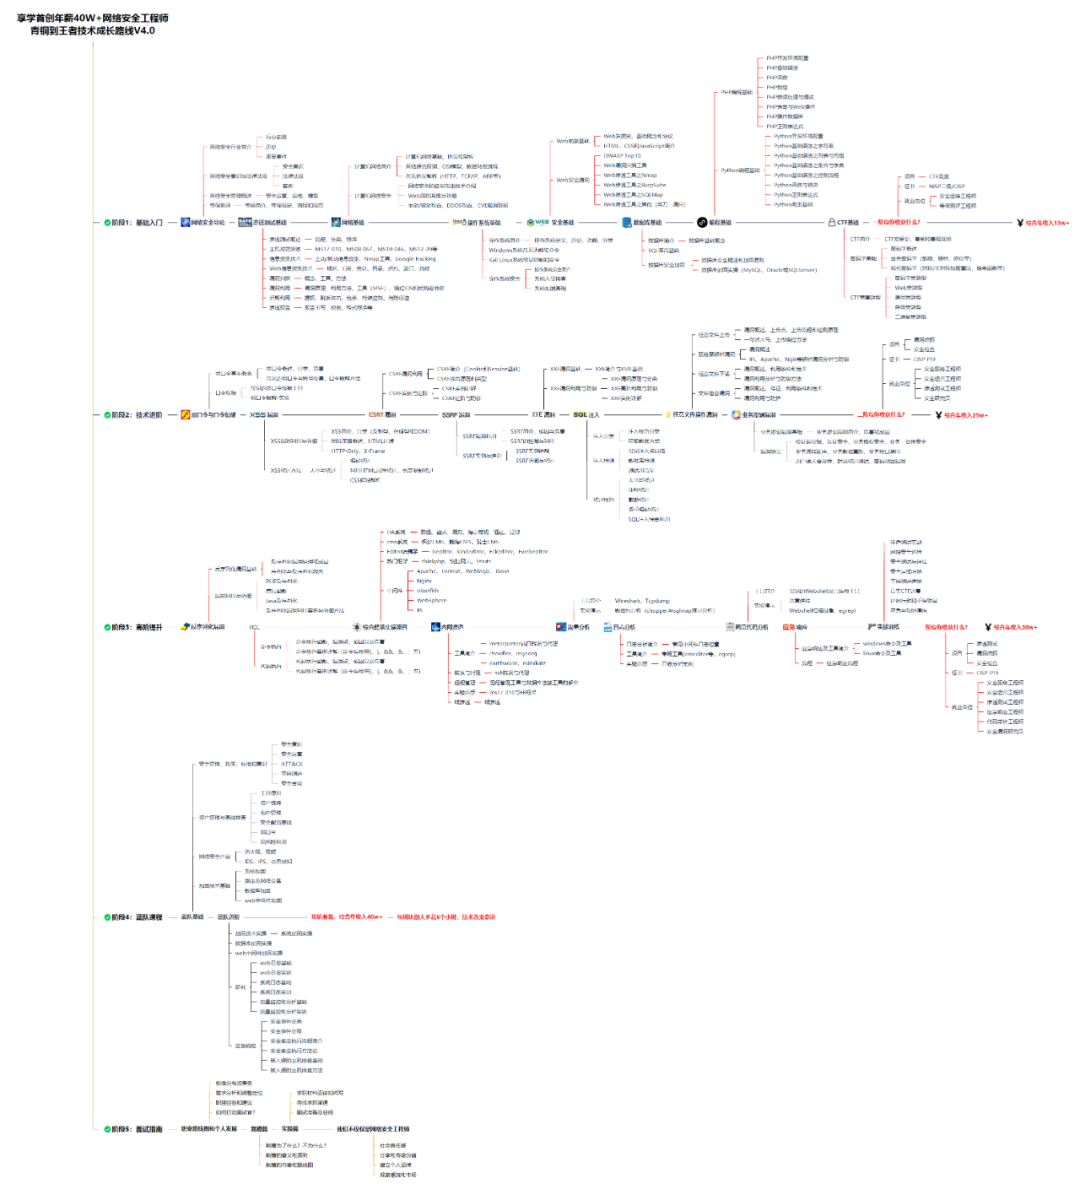
同时每个成长路线对应的板块都有配套的视频提供:

因篇幅有限,仅展示部分资料
**需要体系化学习资料的朋友,可以加我V获取:vip204888 (备注网络安全)**
**网上学习资料一大堆,但如果学到的知识不成体系,遇到问题时只是浅尝辄止,不再深入研究,那么很难做到真正的技术提升。**
**[需要这份系统化资料的朋友,可以点击这里获取](https://bbs.csdn.net/topics/618540462)**
**一个人可以走的很快,但一群人才能走的更远!不论你是正从事IT行业的老鸟或是对IT行业感兴趣的新人,都欢迎加入我们的的圈子(技术交流、学习资源、职场吐槽、大厂内推、面试辅导),让我们一起学习成长!**


 55万+
55万+

 被折叠的 条评论
为什么被折叠?
被折叠的 条评论
为什么被折叠?
 到【灌水乐园】发言


