


USART简介
USART(Universal Synchronous/Asynchronous Receiver/Transmitter)通用同步/异步收发器
USART是STM32内部集成的硬件外设,可根据数据寄存器的一个字节数据自动生成数据帧时序,从TX引脚发送出去,也可自动接收RX引脚的数据帧时序,拼接为一个字节数据,存放在数据寄存器里
自带波特率发生器,最高达4.5Mbits/s
可配置数据位长度(8/9)、停止位长度(0.5/1/1.5/2)
可选校验位(无校验/奇校验/偶校验)
支持同步模式、硬件流控制、DMA、智能卡、IrDA、LIN
STM32F103C8T6 USART资源: USART1、 USART2、 USART3
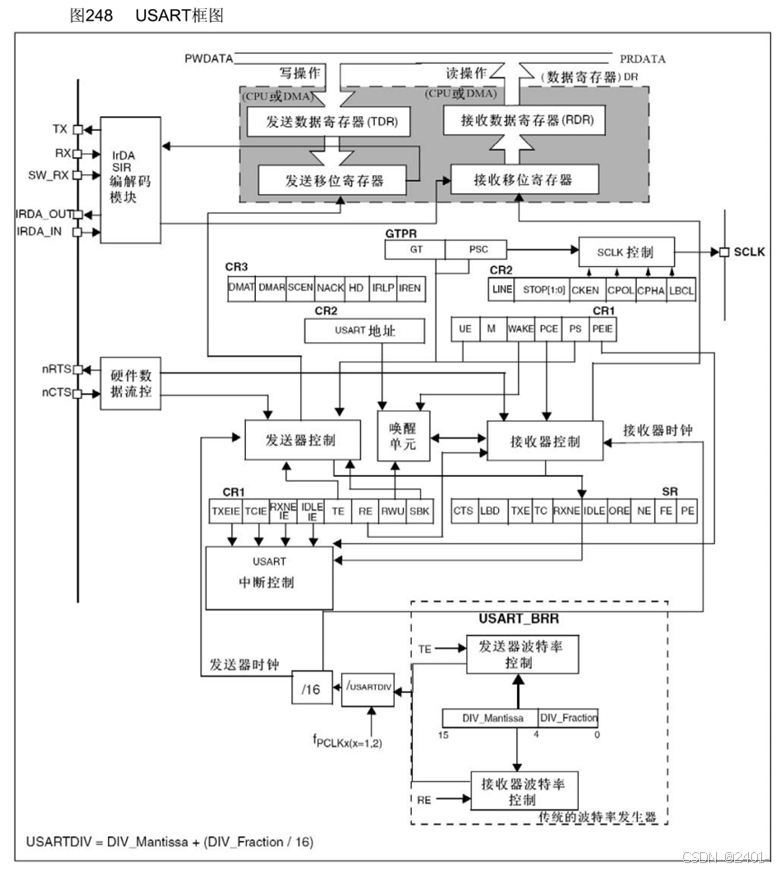
USART框图
USART基本结构
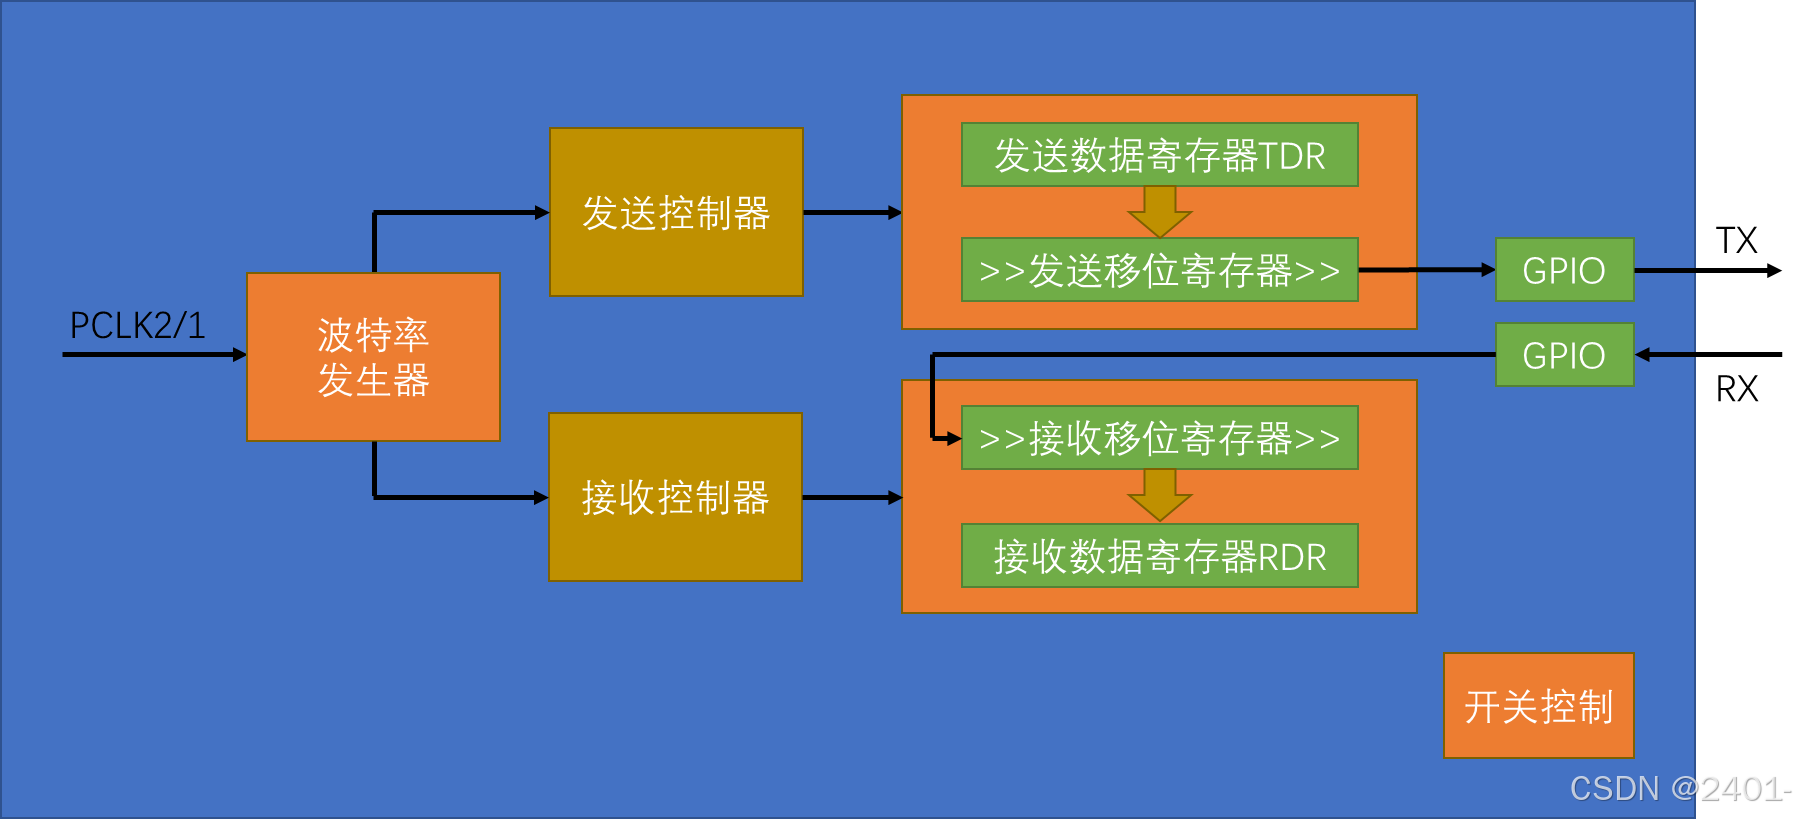
波特率发生器
发送器和接收器的波特率由波特率寄存器BRR里的DIV确定
计算公式:波特率 = fPCLK2/1 / (16 * DIV)
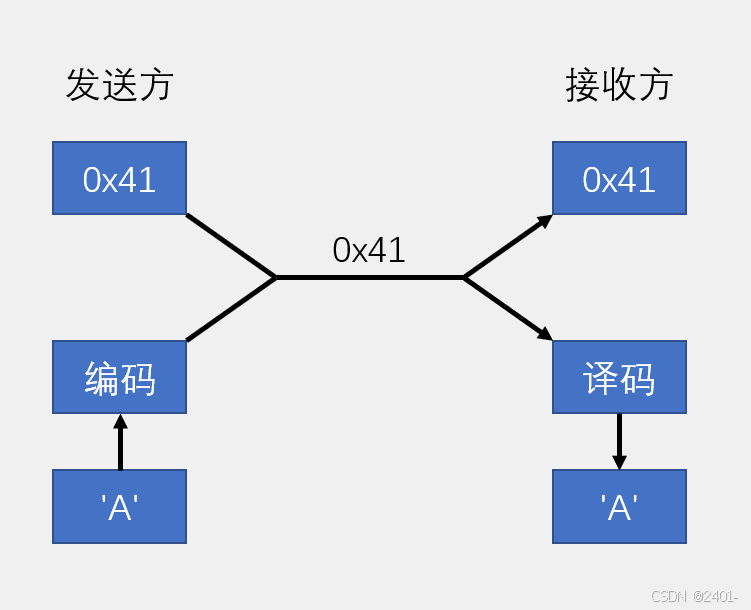
数据模式
HEX模式/十六进制模式/二进制模式:以原始数据的形式显示
文本模式/字符模式:以原始数据编码后的形式显示
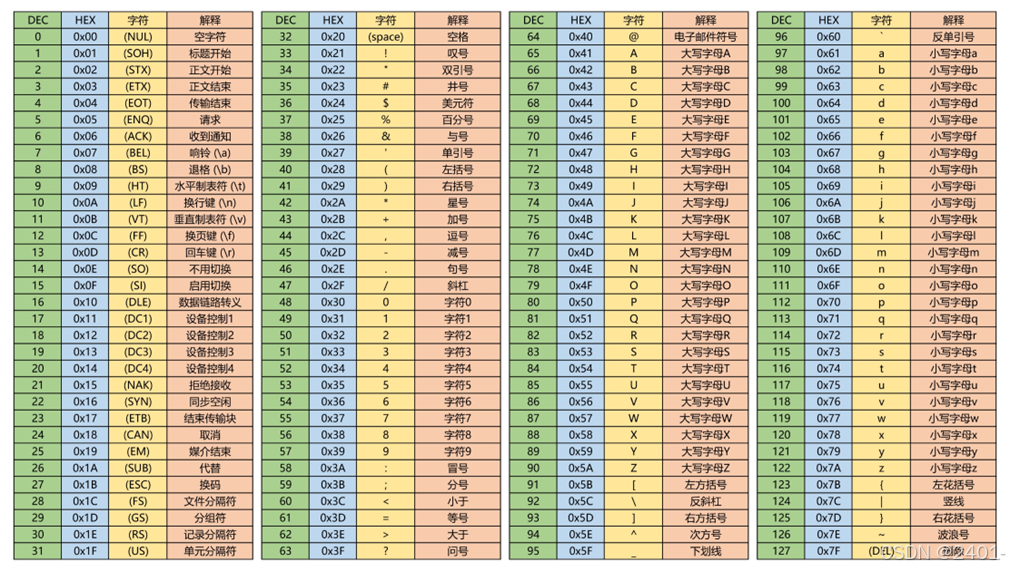
ASCII码表:
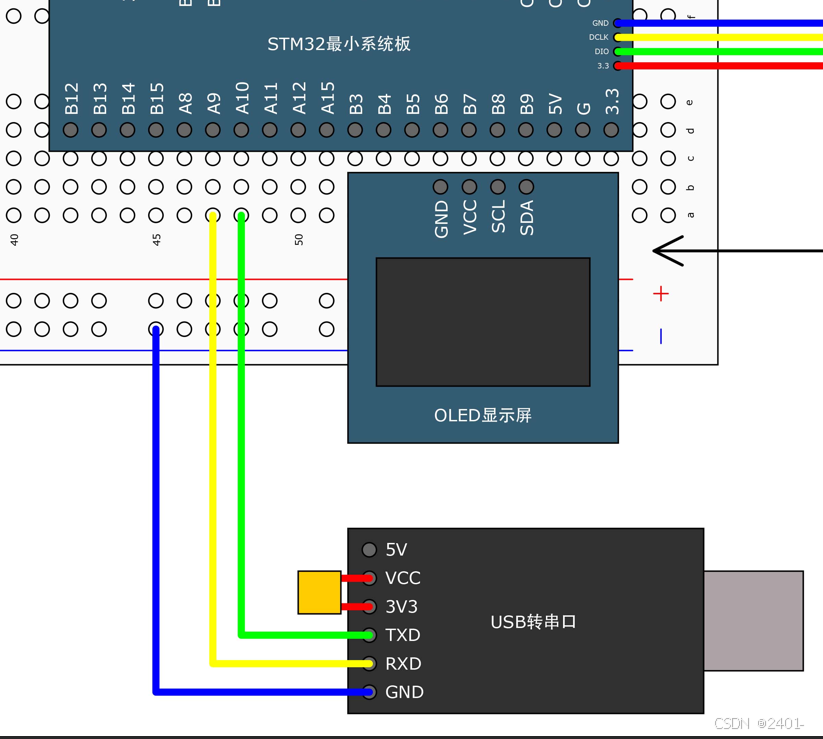
接线图
函数介绍
这两个函数是用来配置同步时钟输出的,包括时钟是不是要输出,时钟的极性相位等参数
void USART_ClockInit(USART_TypeDef* USARTx, USART_ClockInitTypeDef* USART_ClockInitStruct);
void USART_ClockStructInit(USART_ClockInitTypeDef* USART_ClockInitStruct);
这个可以开启USART到DMA的触发通道
void USART_DMACmd(USART_TypeDef* USARTx, uint16_t USART_DMAReq, FunctionalState NewState);下面两个函数是发送数据和接收数据,这两个函数在我们发送和接收的时候会用到(这两个函数很重要)SendData就是写DR寄存器,ReceviceData就是读DR寄存器,DR寄存器有四个寄存器控制发送和接受
void USART_SendData(USART_TypeDef* USARTx, uint16_t Data);
uint16_t USART_ReceiveData(USART_TypeDef* USARTx);
代码配置
串口发送功能
1.定义结构体变量
//定义结构体变量
GPIO_InitTypeDef GPIO_InitStructure;//定义GPIO结构体变量
USART_InitTypeDef USART_InitStructure;//定义USART1结构体变量
2.开启时钟
把需要的USART和GPIO的时钟打开
//开启时钟
RCC_APB2PeriphClockCmd(RCC_APB2Periph_USART1, ENABLE);//开启USART1的时钟
RCC_APB2PeriphClockCmd(RCC_APB2Periph_GPIOA, ENABLE);//开启GPIO A族的时钟
3.GPIO初始化
把TX配置成复用输出,RX配置成输入
//配置GPIO
GPIO_InitStructure.GPIO_Mode = GPIO_Mode_AF_PP;//这里选择复用推挽输出
GPIO_InitStructure.GPIO_Pin = GPIO_Pin_9;//只需要发送 所以只配置PA9引脚
GPIO_InitStructure.GPIO_Speed = GPIO_Speed_50MHz;//速率

GPIO_Init(GPIOA, &GPIO_InitStructure);
4.配置USART
用结构体配置参数
//配置USART

USART_InitStructure.USART_BaudRate = 9600;//波特率
USART_InitStructure.USART_HardwareFlowControl = USART_HardwareFlowControl_None;//硬件流控制
USART_InitStructure.USART_Mode = USART_Mode_Tx;//串口模式 TX发送 RX接受 这里选择发送模式
USART_InitStructure.USART_Parity = USART_Parity_No;//校验位 这里选择无校验
USART_InitStructure.USART_StopBits = USART_StopBits_1;//停止位
USART_InitStructure.USART_WordLength = USART_WordLength_8b;//字长
USART_Init(USART1, &USART_InitStructure);
5.开启USART
//开启USART
USART_Cmd(USART1, ENABLE);//使能USART1
完整函数
void USART_Config(void)
{
	//定义结构体变量
	GPIO_InitTypeDef GPIO_InitStructure;//定义GPIO结构体变量
	USART_InitTypeDef USART_InitStructure;//定义USART1结构体变量

	//开启时钟
	RCC_APB2PeriphClockCmd(RCC_APB2Periph_USART1, ENABLE);//开启USART1的时钟
	RCC_APB2PeriphClockCmd(RCC_APB2Periph_GPIOA, ENABLE);//开启GPIO A族的时钟


	//配置GPIO
	GPIO_InitStructure.GPIO_Mode = GPIO_Mode_AF_PP;//这里选择复用推挽输出
	GPIO_InitStructure.GPIO_Pin = GPIO_Pin_9;//只需要发送 所以只配置PA9引脚
	GPIO_InitStructure.GPIO_Speed = GPIO_Speed_50MHz;//速率

	GPIO_Init(GPIOA, &GPIO_InitStructure);

	//配置USART

	USART_InitStructure.USART_BaudRate = 9600;//波特率
	USART_InitStructure.USART_HardwareFlowControl = USART_HardwareFlowControl_None;//硬件流控制
	USART_InitStructure.USART_Mode = USART_Mode_Tx;//串口模式 TX发送 RX接受 这里选择发送模式
	USART_InitStructure.USART_Parity = USART_Parity_No;//校验位 这里选择无校验
	USART_InitStructure.USART_StopBits = USART_StopBits_1;//停止位
	USART_InitStructure.USART_WordLength = USART_WordLength_8b;//字长
	USART_Init(USART1, &USART_InitStructure);

	//开启USART
	USART_Cmd(USART1, ENABLE);//使能USART1


}
功能函数
//发送数据
void Serial_SendByte(uint8_t Byte)
{
	USART_SendData(USART1, Byte);
	//等待发送完成
	while(USART_GetFlagStatus(USART1, USART_FLAG_TXE) == RESET);

}
主函数
#include "USART.h"
int main(void)
{
USART_Config();
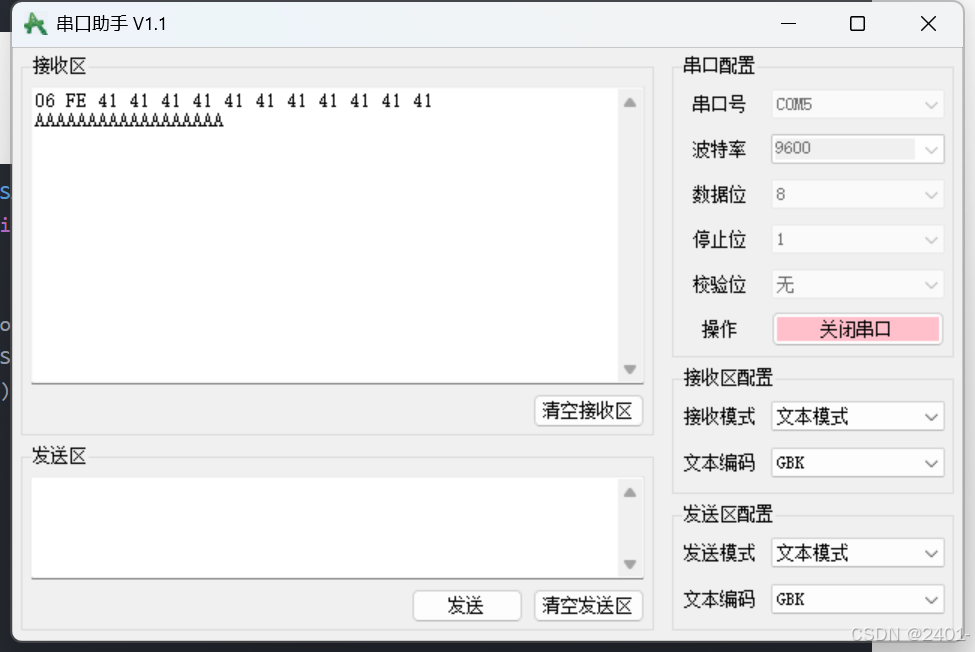
Serial_SendByte('A');//也可以写成 Serial_SendByte(0x41);
while(1)
{
}
}
功能函数封装
发送数组
//发送数组
void Serial_SendArray(uint8_t *Array, uint16_t Length)
{
	uint16_t i;
	for(i = 0; i < Length; i++)
	{
		Serial_SendByte(Array[i]);
	}

}
主函数
#include "USART.h"
int main(void)
{
USART_Config();
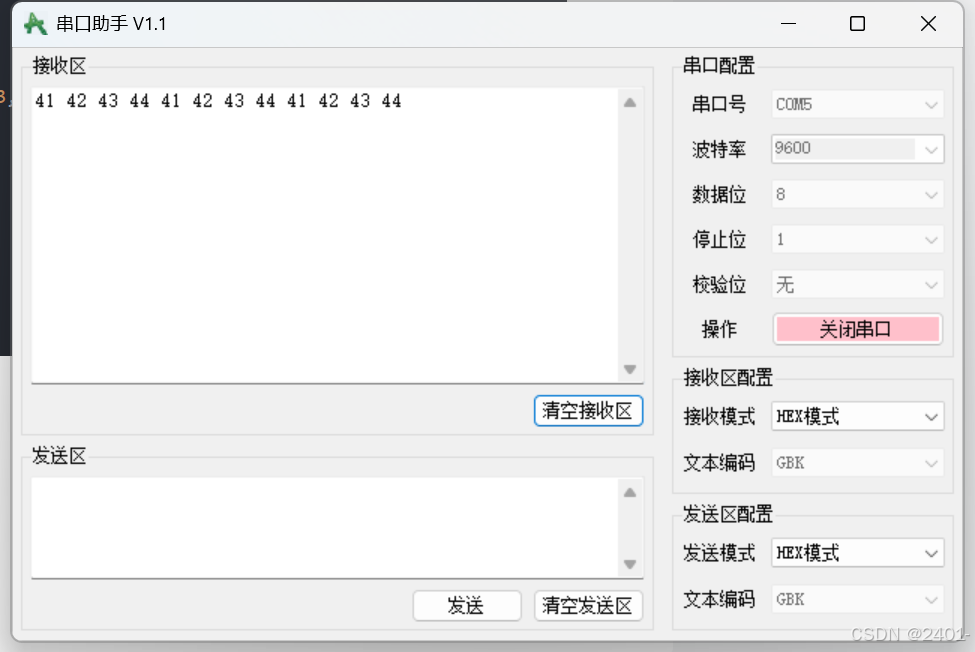
uint8_t arr[4] = {0x41, 0x42, 0x43, 0x44};
Serial_SendArray(arr, 4);
while(1)
{
}
}
发送字符串
//发送字符串
void Serial_SendString(char *String)
{

	uint8_t i;
	for(i = 0; String[i] != '\0'; i++)
	{
		Serial_SendByte(String[i]);
	}

}
主函数
#include "USART.h"
int main(void)
{
USART_Config();
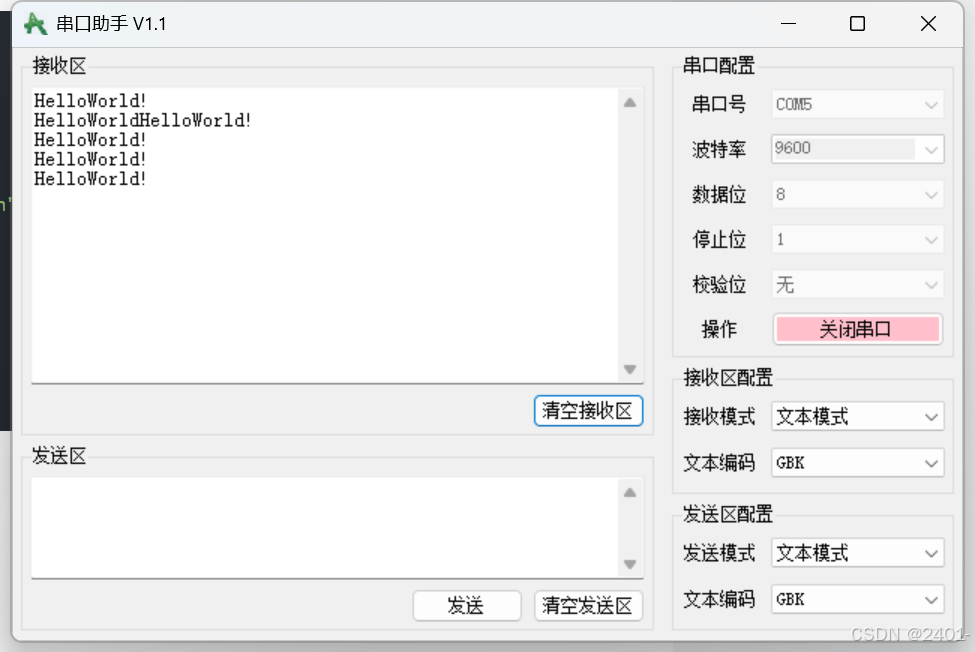
Serial_SendString("HelloWorld!\r\n");
while(1)
{
}
}
发送字符形式的数字
uint32_t Serial_Pow(uint32_t x, uint32_t y)
{
	uint32_t Result = 1;
	while(y--)
	{
		Result *= x;

	}
	return Result;
}

//发送字符形式的数字
void Serial_SendNum(uint32_t Number, uint8_t Length)
{
	uint8_t i;
	for(i = 0; i < Length; i++)
	{

		Serial_SendByte(Number / Serial_Pow(10, Length - i - 1) % 10 + '0');

	}

}
主函数
#include "USART.h"
int main(void)
{
USART_Config();
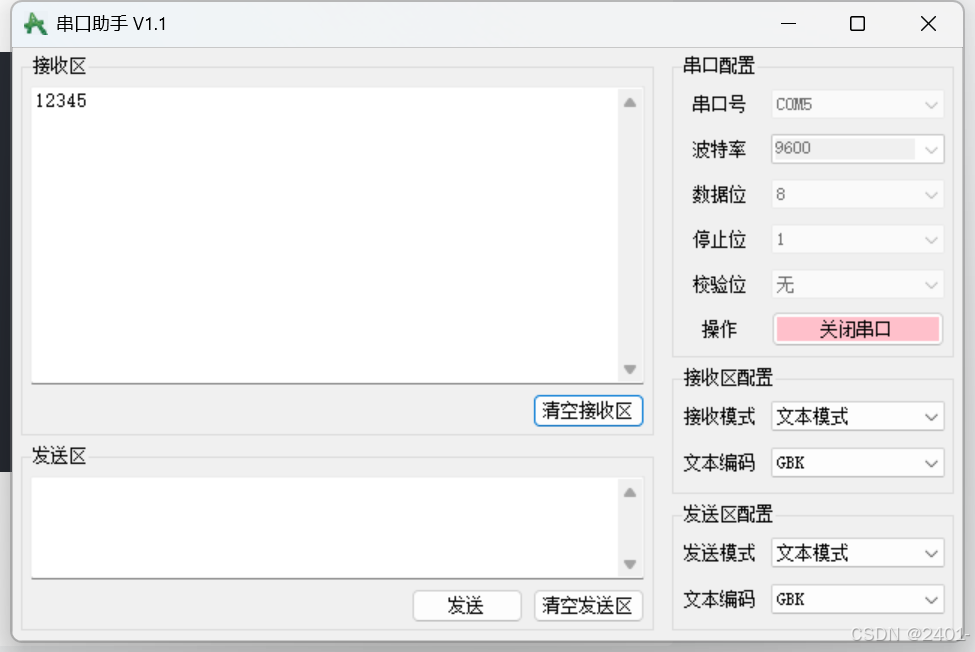
Serial_SendNum(12345, 5);
while(1)
{
}
}
printf函数在串口中的应用
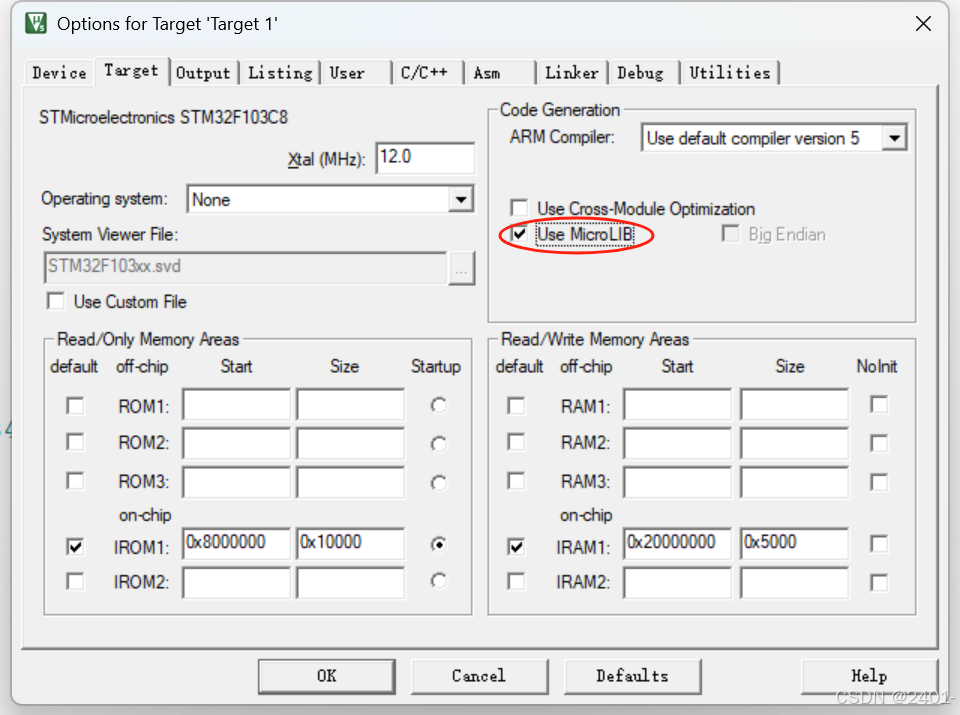
使用printf函数需要把Use Micr LIB勾选上 MicroLIB是Keil为嵌入式平台优化的精简库。
将printf函数进行重定向,因为printf函数是输出到屏幕,单片机没有屏幕,所以我们需要将printf函数打印的东西输出到串口。
方法一
重写fputc函数,fputc函数是printf函数的底层,printf函数在打印的时候,就是不断调用fputc函数一个一个打印的,我们把fputc函数重定向到串口,那么printf自然就输出到串口了。
int fputc(int ch, FILE *f)
{
Serial_SendByte(ch);
return ch;
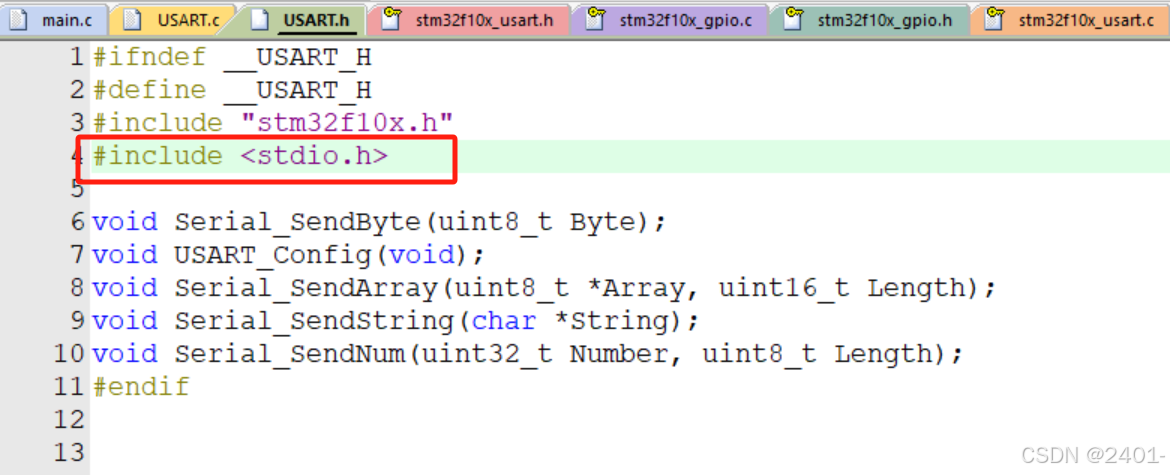
}这里需要在头文件中声明stdio.h
主函数
#include "USART.h"
int main(void)
{
USART_Config();
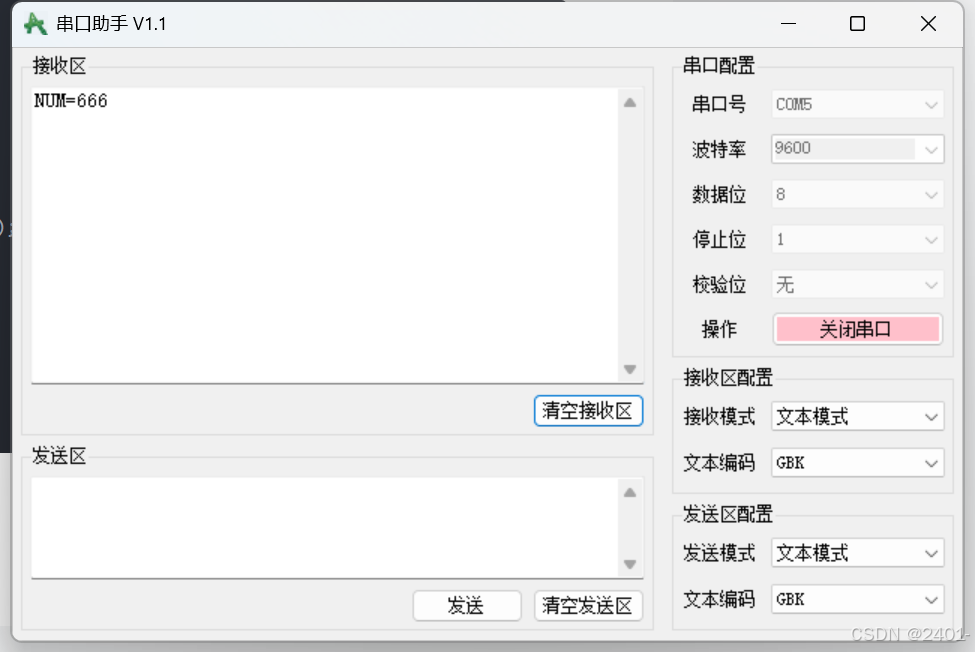
printf("NUM=%d\r\n", 666);
while(1)
{
}
}
这种方法只能一个串口使用,重定向串口1了,串口2就用不了
方法二
如果多个串口想用printf函数,可以用sprintf,sprintf可以指定打印的位置,不涉及重定向的东西,所以每个串口都可以使用sprintf进行格式化打印
主函数
#include "USART.h"
int main(void)
{

	USART_Config();
	char String[100];
	sprintf(String, "NUM=%d\r\n", 666);
	Serial_SendString(String);
	while(1)
	{

	}
}
方法三
封装sprintf函数,首先先添加头文件,#include <Stdarg.h>
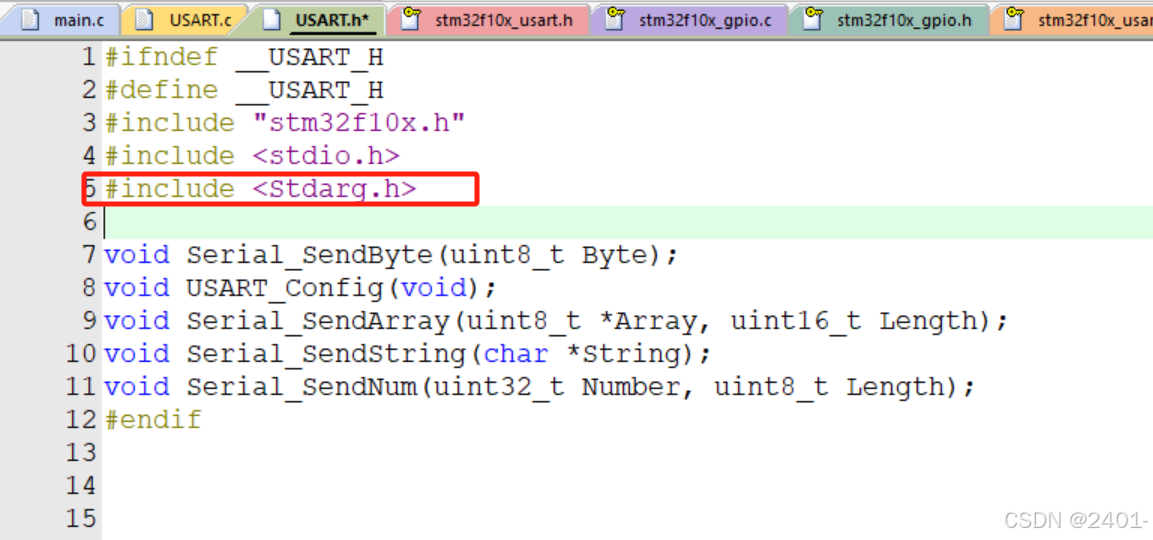
char* format 这个参数用来接收格式化字符串,... 用来接收后面的可变参数列表,在函数里面首先定义输出的字符串,然后定义一个参数列表变量va_list arg,va_list是一个类型名,arg是变量名。然后接收参数表,放在arg里面,之后vsprintf打印可变参数,然后释放参数表,最后发送字符串。
//封装sprintf
//char* format 这个参数用来接收格式化字符串
//... 用来接收后面的可变参数列表
void Serial_Printf(char* format, ...)
{
char String[100];//定义输出字符串
va_list arg;//定义一个参数列表变量
va_start(arg, format);//从format位置开始接收参数表,放在arg里面
vsprintf(String, format, arg);
va_end(arg);//释放参数表
Serial_SendString(String);
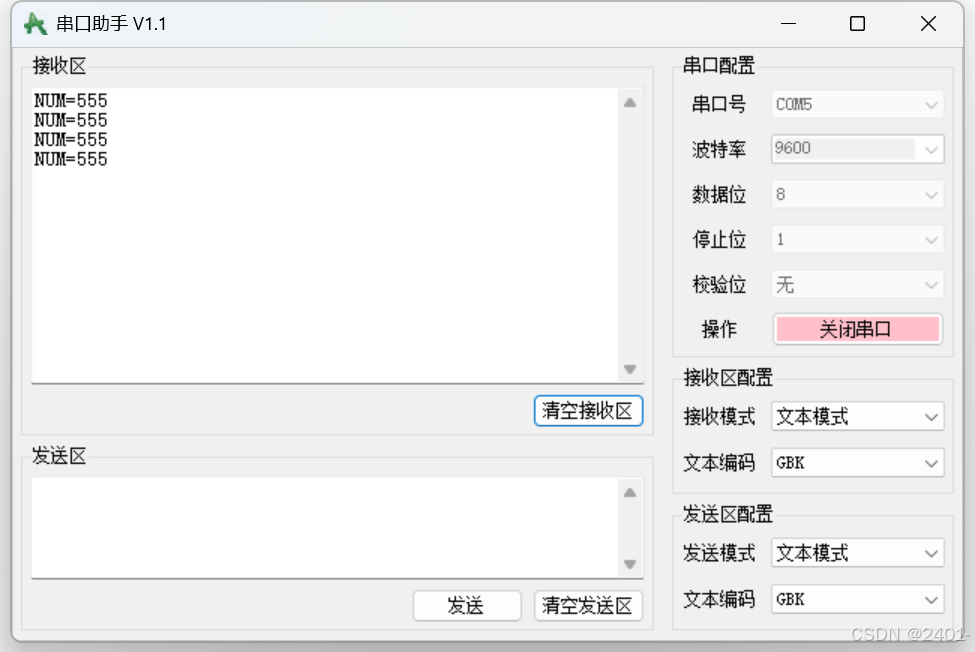
}主函数
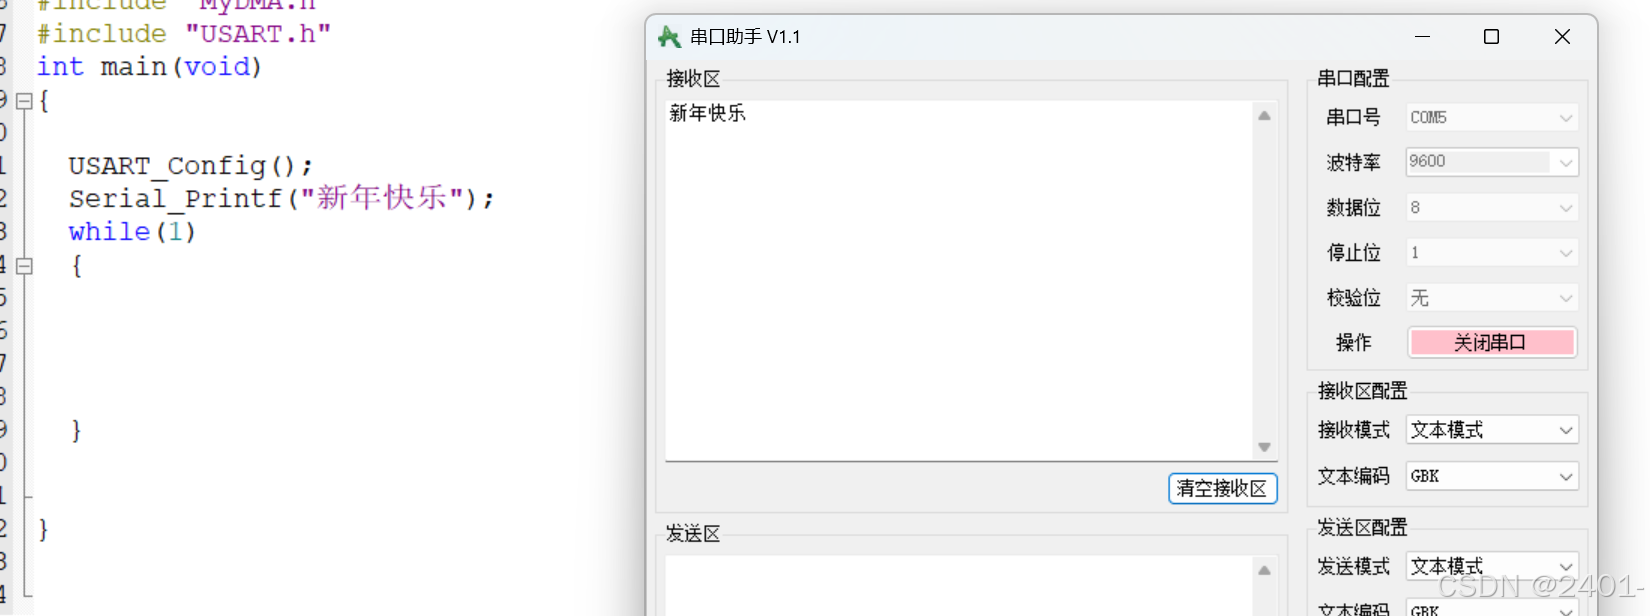
#include "USART.h"
int main(void)
{

	USART_Config();
	Serial_Printf("NUM=%d\r\n", 555);
	while(1)
	{

	}

}
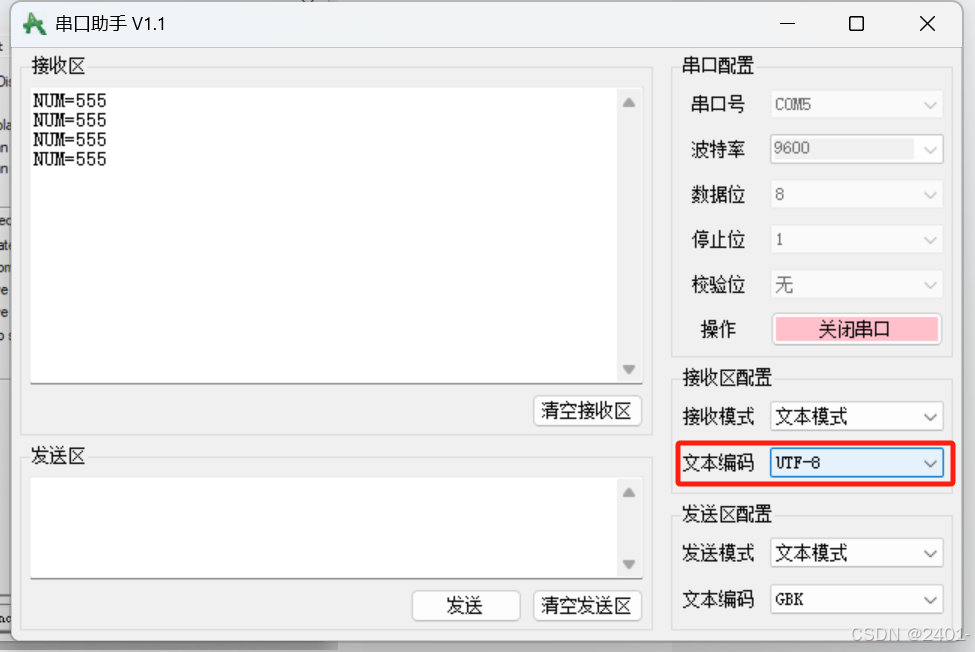
printf显示汉字的方法
UTF8的方法
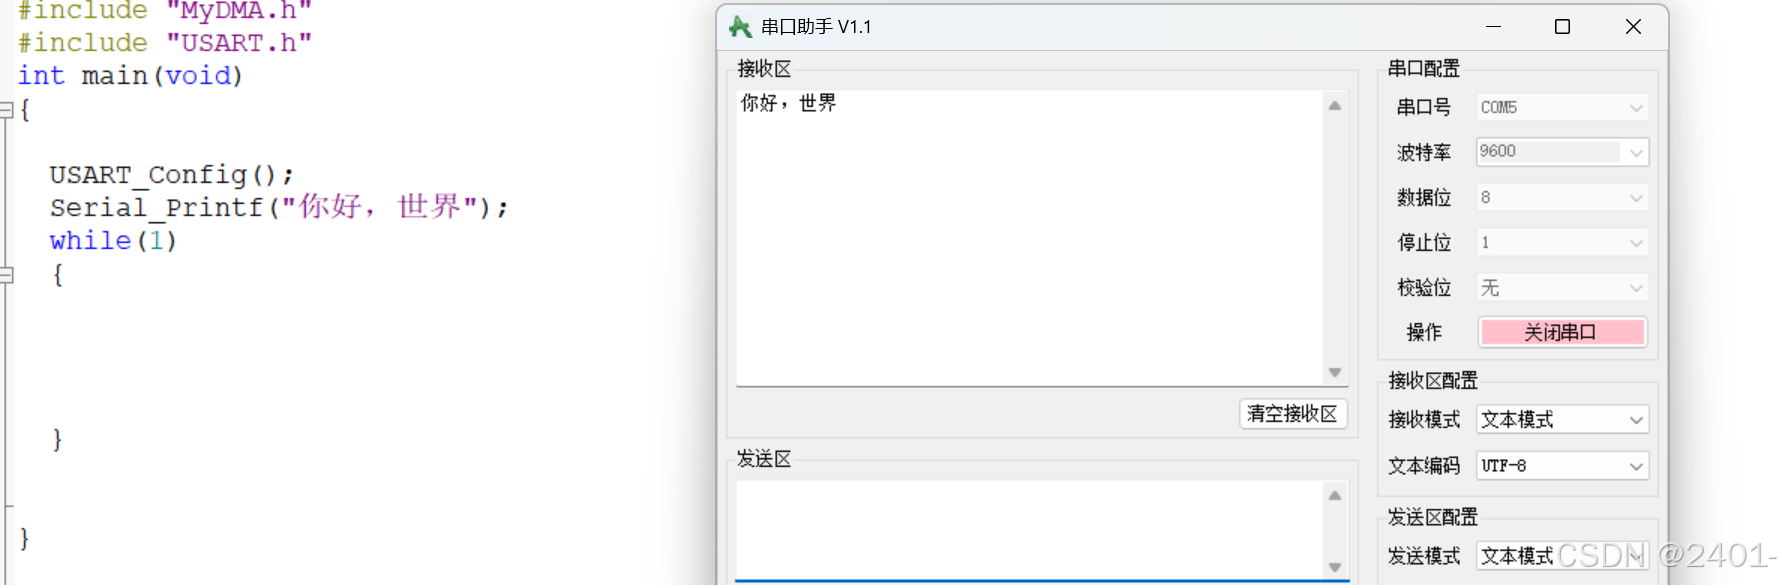
如果这个位置选择的是UTF8
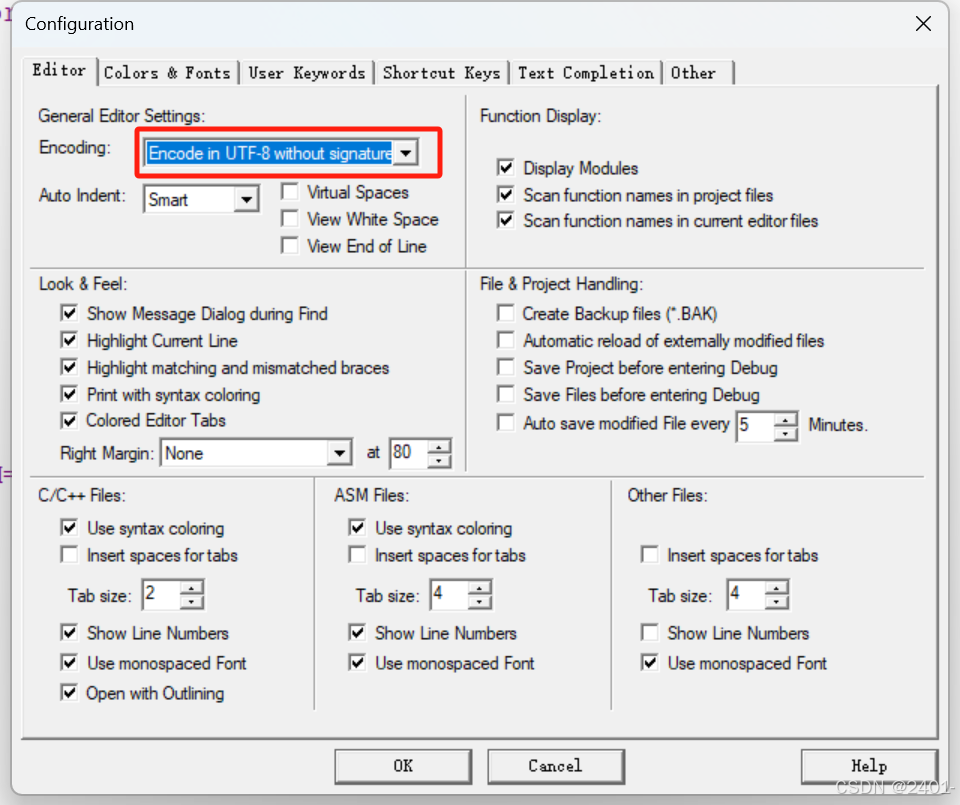
串口助手里需要选择UTF8
在C/C++配置里的Misc Controls 加上--no-multibyte-chars
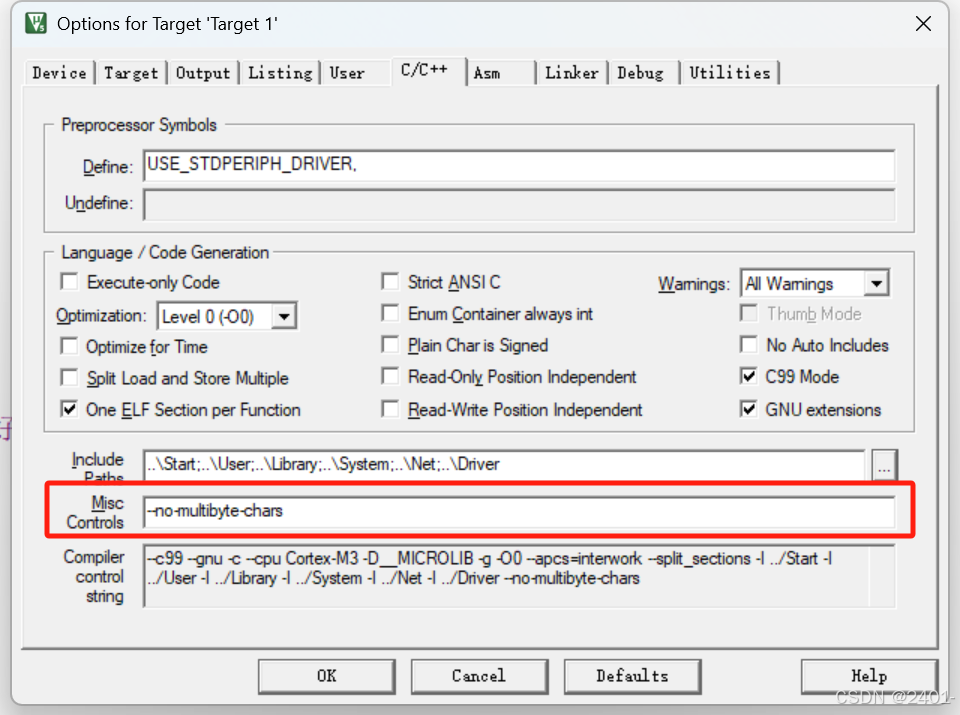
打印你好世界
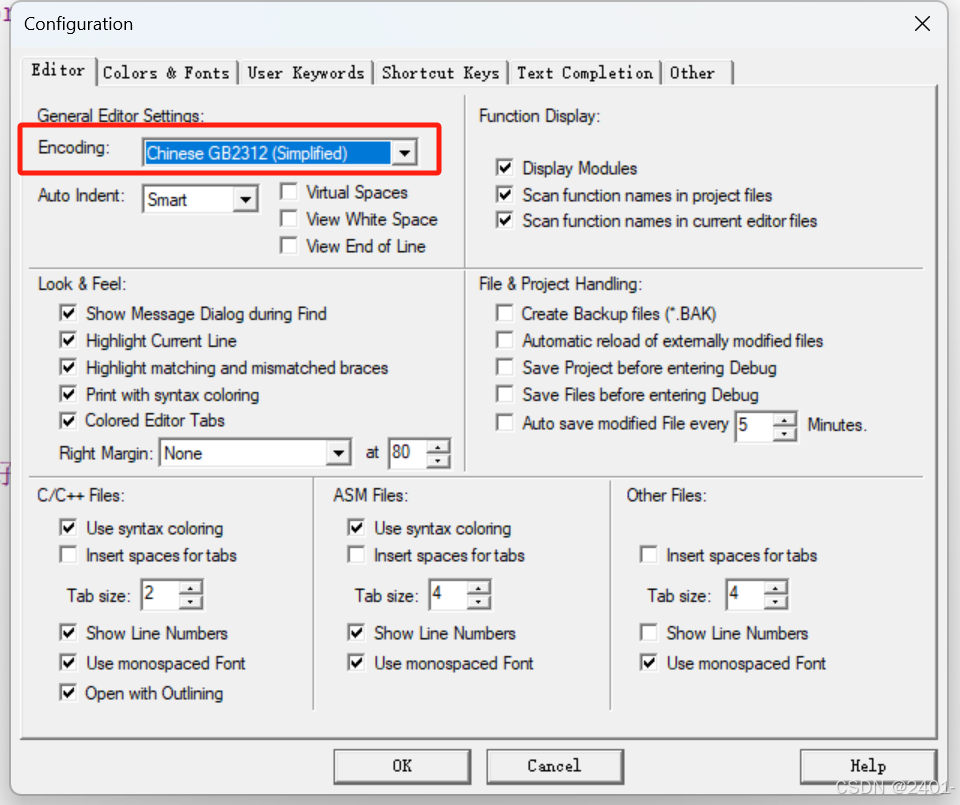
GB2312的方法
这里为GB2312
串口助手需要选择GBK
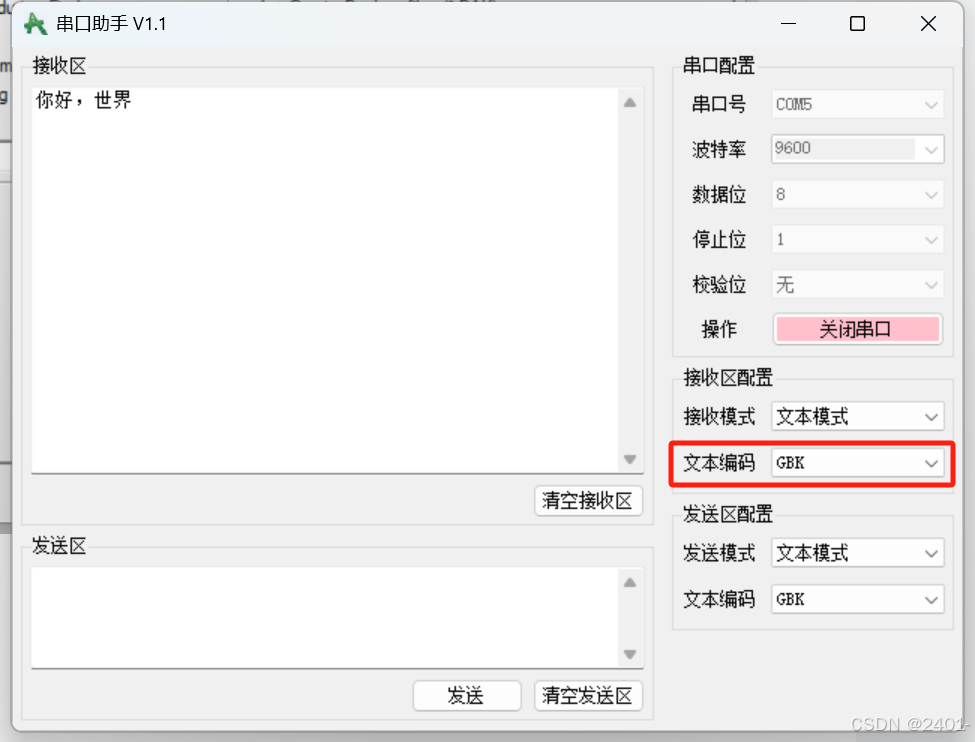
打印


 被折叠的 条评论
为什么被折叠?
被折叠的 条评论
为什么被折叠?
 到【灌水乐园】发言


