


先自我介绍一下,小编浙江大学毕业,去过华为、字节跳动等大厂,目前阿里P7
深知大多数程序员,想要提升技能,往往是自己摸索成长,但自己不成体系的自学效果低效又漫长,而且极易碰到天花板技术停滞不前!
因此收集整理了一份《2024年最新Java开发全套学习资料》,初衷也很简单,就是希望能够帮助到想自学提升又不知道该从何学起的朋友。


既有适合小白学习的零基础资料,也有适合3年以上经验的小伙伴深入学习提升的进阶课程,涵盖了95%以上Java开发知识点,真正体系化!
由于文件比较多,这里只是将部分目录截图出来,全套包含大厂面经、学习笔记、源码讲义、实战项目、大纲路线、讲解视频,并且后续会持续更新
如果你需要这些资料,可以添加V获取:vip1024b (备注Java)

正文
-
- resources
| 没什么好说的,好像也很少用到,但这个是maven的规范。 |
我先新建好几个必要的包,并为大家讲解一下每个包的作用,顺便理清一下后台的思路~
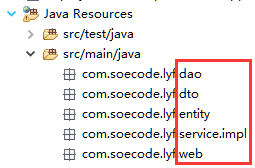
| 包名 | 名称 | 作用 |
| — | — | — |
| dao | 数据访问层(接口) | 与数据打交道,可以是数据库操作,也可以是文件读写操作,甚至是redis缓存操作,总之与数据操作有关的都放在这里,也有人叫做dal或者数据持久层都差不多意思。为什么没有daoImpl,因为我们用的是mybatis,所以可以直接在配置文件中实现接口的每个方法。 |
| entity | 实体类 | 一般与数据库的表相对应,封装dao层取出来的数据为一个对象,也就是我们常说的pojo,一般只在dao层与service层之间传输。 |
| dto | 数据传输层 | 刚学框架的人可能不明白这个有什么用,其实就是用于service层与web层之间传输,为什么不直接用entity(pojo)?其实在实际开发中发现,很多时间一个entity并不能满足我们的业务需求,可能呈现给用户的信息十分之多,这时候就有了dto,也相当于vo,记住一定不要把这个混杂在entity里面,答应我好吗? |
| service | 业务逻辑(接口) | 写我们的业务逻辑,也有人叫bll,在设计业务接口时候应该站在“使用者”的角度。额,不要问我为什么这里没显示!IDE调皮我也拿它没办法~ |
| serviceImpl | 业务逻辑(实现) | 实现我们业务接口,一般事务控制是写在这里,没什么好说的。 |
| web | 控制器 | springmvc就是在这里发挥作用的,一般人叫做controller控制器,相当于struts中的action。 |
还有最后一步基础工作,导入我们相应的jar包,我使用的是maven来管理我们的jar,所以只需要在poom.xml中加入相应的依赖就好了,如果不使用maven的可以自己去官网下载相应的jar,放到项目WEB-INF/lib目录下。关于maven的学习大家可以看慕课网的视频教程,这里就不展开了。我把项目用到的jar都写在下面,版本都不是最新的,大家有经验的话可以自己调整版本号。另外,所有jar都会与项目一起打包放到我的github上,喜欢的给个star吧~
poom.xml
<project xmlns="http://maven.apache.org/POM/4.0.0" xmlns:xsi="http://www.w3.org/2001/XMLSchema-instance" xsi:schemaLocation="http://maven.apache.org/POM/4.0.0 http://maven.apache.org/maven-v4_0_0.xsd"> <modelVersion>4.0.0</modelVersion> <groupId>com.soecode.ssm</groupId> <artifactId>ssm</artifactId> <packaging>war</packaging> <version>0.0.1-SNAPSHOT</version> <name>ssm Maven Webapp</name> <url>http://github.com/liyifeng1994/ssm</url> <dependencies> <!-- 单元测试 --> <dependency> <groupId>junit</groupId> <artifactId>junit</artifactId> <version>4.11</version> </dependency> <!-- 1.日志 --> <!-- 实现slf4j接口并整合 --> <dependency> <groupId>ch.qos.logback</groupId> <artifactId>logback-classic</artifactId> <version>1.1.1</version> </dependency> <!-- 2.数据库 --> <dependency> <groupId>mysql</groupId> <artifactId>mysql-connector-java</artifactId> <version>5.1.37</version> <scope>runtime</scope> </dependency> <dependency> <groupId>c3p0</groupId> <artifactId>c3p0</artifactId> <version>0.9.1.2</version> </dependency> <!-- DAO: MyBatis --> <dependency> <groupId>org.mybatis</groupId> <artifactId>mybatis</artifactId> <version>3.3.0</version> </dependency> <dependency> <groupId>org.mybatis</groupId> <artifactId>mybatis-spring</artifactId> <version>1.2.3</version> </dependency> <!-- 3.Servlet web --> <dependency> <groupId>taglibs</groupId> <artifactId>standard</artifactId> <version>1.1.2</version> </dependency> <dependency> <groupId>jstl</groupId> <artifactId>jstl</artifactId> <version>1.2</version> </dependency> <dependency> <groupId>com.fasterxml.jackson.core</groupId> <artifactId>jackson-databind</artifactId> <version>2.5.4</version> </dependency> <dependency> <groupId>javax.servlet</groupId> <artifactId>javax.servlet-api</artifactId> <version>3.1.0</version> </dependency> <!-- 4.Spring --> <!-- 1)Spring核心 --> <dependency> <groupId>org.springframework</groupId> <artifactId>spring-core</artifactId> <version>4.1.7.RELEASE</version> </dependency> <dependency> <groupId>org.springframework</groupId> <artifactId>spring-beans</artifactId> <version>4.1.7.RELEASE</version> </dependency> <dependency> <groupId>org.springframework</groupId> <artifactId>spring-context</artifactId> <version>4.1.7.RELEASE</version> </dependency> <!-- 2)Spring DAO层 --> <dependency> <groupId>org.springframework</groupId> <artifactId>spring-jdbc</artifactId> <version>4.1.7.RELEASE</version> </dependency> <dependency> <groupId>org.springframework</groupId> <artifactId>spring-tx</artifactId> <version>4.1.7.RELEASE</version> </dependency> <!-- 3)Spring web --> <dependency> <groupId>org.springframework</groupId> <artifactId>spring-web</artifactId> <version>4.1.7.RELEASE</version> </dependency> <dependency> <groupId>org.springframework</groupId> <artifactId>spring-webmvc</artifactId> <version>4.1.7.RELEASE</version> </dependency> <!-- 4)Spring test --> <dependency> <groupId>org.springframework</groupId> <artifactId>spring-test</artifactId> <version>4.1.7.RELEASE</version> </dependency> <!-- redis客户端:Jedis --> <dependency> <groupId>redis.clients</groupId> <artifactId>jedis</artifactId> <version>2.7.3</version> </dependency> <dependency> <groupId>com.dyuproject.protostuff</groupId> <artifactId>protostuff-core</artifactId> <version>1.0.8</version> </dependency> <dependency> <groupId>com.dyuproject.protostuff</groupId> <artifactId>protostuff-runtime</artifactId> <version>1.0.8</version> </dependency> <!-- Map工具类 --> <dependency> <groupId>commons-collections</groupId> <artifactId>commons-collections</artifactId> <version>3.2</version> </dependency> </dependencies> <build> <finalName>ssm</finalName> </build> </project>
-
1
-
2
-
3
-
4
-
5
-
6
-
7
-
8
-
9
-
10
-
11
-
12
-
13
-
14
-
15
-
16
-
17
-
18
-
19
-
20
-
21
-
22
-
23
-
24
-
25
-
26
-
27
-
28
-
29
-
30
-
31
-
32
-
33
-
34
-
35
-
36
-
37
-
38
-
39
-
40
-
41
-
42
-
43
-
44
-
45
-
46
-
47
-
48
-
49
-
50
-
51
-
52
-
53
-
54
-
55
-
56
-
57
-
58
-
59
-
60
-
61
-
62
-
63
-
64
-
65
-
66
-
67
-
68
-
69
-
70
-
71
-
72
-
73
-
74
-
75
-
76
-
77
-
78
-
79
-
80
-
81
-
82
-
83
-
84
-
85
-
86
-
87
-
88
-
89
-
90
-
91
-
92
-
93
-
94
-
95
-
96
-
97
-
98
-
99
-
100
-
101
-
102
-
103
-
104
-
105
-
106
-
107
-
108
-
109
-
110
-
111
-
112
-
113
-
114
-
115
-
116
-
117
-
118
-
119
-
120
-
121
-
122
-
123
-
124
-
125
-
126
-
127
-
128
-
129
-
130
-
131
-
132
-
133
-
134
-
135
-
136
-
137
-
138
-
139
-
140
-
141
-
142
-
143
-
144
-
145
-
146
-
147
下面真的要开始进行编码工作了,坚持到这里辛苦大家了~
第一步:我们先在spring文件夹里新建spring-dao.xml文件,因为spring的配置太多,我们这里分三层,分别是dao service web。
-
读入数据库连接相关参数(可选)
-
配置数据连接池
-
配置连接属性,可以不读配置项文件直接在这里写死
-
配置c3p0,只配了几个常用的
-
配置SqlSessionFactory对象(mybatis)
-
扫描dao层接口,动态实现dao接口,也就是说不需要daoImpl,sql和参数都写在xml文件上
spring-dao.xml
<?xml version="1.0" encoding="UTF-8"?> <beans xmlns="http://www.springframework.org/schema/beans" xmlns:xsi="http://www.w3.org/2001/XMLSchema-instance" xmlns:context="http://www.springframework.org/schema/context" xsi:schemaLocation="http://www.springframework.org/schema/beans http://www.springframework.org/schema/beans/spring-beans.xsd http://www.springframework.org/schema/context http://www.springframework.org/schema/context/spring-context.xsd"> <!-- 配置整合mybatis过程 --> <!-- 1.配置数据库相关参数properties的属性:${url} --> <context:property-placeholder location="classpath:jdbc.properties" /> <!-- 2.数据库连接池 --> <bean id="dataSource" class="com.mchange.v2.c3p0.ComboPooledDataSource"> <!-- 配置连接池属性 --> <property name="driverClass" value="${jdbc.driver}" /> <property name="jdbcUrl" value="${jdbc.url}" /> <property name="user" value="${jdbc.username}" /> <property name="password" value="${jdbc.password}" /> <!-- c3p0连接池的私有属性 --> <property name="maxPoolSize" value="30" /> <property name="minPoolSize" value="10" /> <!-- 关闭连接后不自动commit --> <property name="autoCommitOnClose" value="false" /> <!-- 获取连接超时时间 --> <property name="checkoutTimeout" value="10000" /> <!-- 当获取连接失败重试次数 --> <property name="acquireRetryAttempts" value="2" /> </bean> <!-- 3.配置SqlSessionFactory对象 --> <bean id="sqlSessionFactory" class="org.mybatis.spring.SqlSessionFactoryBean"> <!-- 注入数据库连接池 --> <property name="dataSource" ref="dataSource" /> <!-- 配置MyBaties全局配置文件:mybatis-config.xml --> <property name="configLocation" value="classpath:mybatis-config.xml" /> <!-- 扫描entity包 使用别名 --> <property name="typeAliasesPackage" value="com.soecode.lyf.entity" /> <!-- 扫描sql配置文件:mapper需要的xml文件 --> <property name="mapperLocations" value="classpath:mapper/*.xml" /> </bean> <!-- 4.配置扫描Dao接口包,动态实现Dao接口,注入到spring容器中 --> <bean class="org.mybatis.spring.mapper.MapperScannerConfigurer"> <!-- 注入sqlSessionFactory --> <property name="sqlSessionFactoryBeanName" value="sqlSessionFactory" /> <!-- 给出需要扫描Dao接口包 --> <property name="basePackage" value="com.soecode.lyf.dao" /> </bean> </beans>
-
1
-
2
-
3
-
4
-
5
-
6
-
7
-
8
-
9
-
10
-
11
-
12
-
13
-
14
-
15
-
16
-
17
-
18
-
19
-
20
-
21
-
22
-
23
-
24
-
25
-
26
-
27
-
28
-
29
-
30
-
31
-
32
-
33
-
34
-
35
-
36
-
37
-
38
-
39
-
40
-
41
-
42
-
43
-
44
-
45
-
46
-
47
-
48
-
49
-
50
因为数据库配置相关参数是读取配置文件,所以在resources文件夹里新建一个jdbc.properties文件,存放我们4个最常见的数据库连接属性,这是我本地的,大家记得修改呀~还有喜欢传到github上“大头虾们”记得删掉密码,不然别人就很容易得到你服务器的数据库配置信息,然后干一些羞羞的事情,你懂的!!
jdbc.properties
jdbc.driver=com.mysql.jdbc.Driver jdbc.url=jdbc:mysql://localhost:3307/ssm?useUnicode=true&characterEncoding=utf8 jdbc.username=root jdbc.password=
-
1
-
2
-
3
-
4
友情提示:配置文件中的jdbc.username,如果写成username,可能会与系统环境中的username变量冲突,所以到时候真正连接数据库的时候,用户名就被替换成系统中的用户名(有得可能是administrator),那肯定是连接不成功的,这里有个小坑,我被坑了一晚上!!
因为这里用到了mybatis,所以需要配置mybatis核心文件,在recources文件夹里新建mybatis-config.xml文件。
-
使用自增主键
-
使用列别名
-
开启驼峰命名转换 create_time -> createTime
mybatis-config.xml
<?xml version="1.0" encoding="UTF-8" ?> <!DOCTYPE configuration PUBLIC "-//mybatis.org//DTD Config 3.0//EN" "http://mybatis.org/dtd/mybatis-3-config.dtd"> <configuration> <!-- 配置全局属性 --> <settings> <!-- 使用jdbc的getGeneratedKeys获取数据库自增主键值 --> <setting name="useGeneratedKeys" value="true" /> <!-- 使用列别名替换列名 默认:true --> <setting name="useColumnLabel" value="true" /> <!-- 开启驼峰命名转换:Table{create_time} -> Entity{createTime} --> <setting name="mapUnderscoreToCamelCase" value="true" /> </settings> </configuration>
-
1
-
2
-
3
-
4
-
5
-
6
-
7
-
8
-
9
-
10
-
11
-
12
-
13
-
14
-
15
-
16
-
17
第二步:刚弄好dao层,接下来到service层了。在spring文件夹里新建spring-service.xml文件。
-
扫描service包所有注解 @Service
-
配置事务管理器,把事务管理交由spring来完成
-
配置基于注解的声明式事务,可以直接在方法上@Transaction
spring-service.xml
<?xml version="1.0" encoding="UTF-8"?> <beans xmlns="http://www.springframework.org/schema/beans" xmlns:xsi="http://www.w3.org/2001/XMLSchema-instance" xmlns:context="http://www.springframework.org/schema/context" xmlns:tx="http://www.springframework.org/schema/tx" xsi:schemaLocation="http://www.springframework.org/schema/beans http://www.springframework.org/schema/beans/spring-beans.xsd http://www.springframework.org/schema/context http://www.springframework.org/schema/context/spring-context.xsd http://www.springframework.org/schema/tx http://www.springframework.org/schema/tx/spring-tx.xsd"> <!-- 扫描service包下所有使用注解的类型 --> <context:component-scan base-package="com.soecode.lyf.service" /> <!-- 配置事务管理器 --> <bean id="transactionManager" class="org.springframework.jdbc.datasource.DataSourceTransactionManager"> <!-- 注入数据库连接池 --> <property name="dataSource" ref="dataSource" /> </bean> <!-- 配置基于注解的声明式事务 --> <tx:annotation-driven transaction-manager="transactionManager" /> </beans>
-
1
-
2
-
3
-
4
-
5
-
6
-
7
-
8
-
9
-
10
-
11
-
12
-
13
-
14
-
15
-
16
-
17
-
18
-
19
-
20
-
21
-
22
-
23
-
24
第三步:配置web层,在spring文件夹里新建spring-web.xml文件。
-
开启SpringMVC注解模式,可以使用@RequestMapping,@PathVariable,@ResponseBody等
-
对静态资源处理,如js,css,jpg等
-
配置jsp 显示ViewResolver,例如在controller中某个方法返回一个string类型的”login”,实际上会返回”/WEB-INF/login.jsp”
-
扫描web层 @Controller
spring-web.xml
<?xml version="1.0" encoding="UTF-8"?> <beans xmlns="http://www.springframework.org/schema/beans" xmlns:xsi="http://www.w3.org/2001/XMLSchema-instance" xmlns:context="http://www.springframework.org/schema/context" xmlns:mvc="http://www.springframework.org/schema/mvc" xsi:schemaLocation="http://www.springframework.org/schema/beans http://www.springframework.org/schema/beans/spring-beans.xsd http://www.springframework.org/schema/context http://www.springframework.org/schema/context/spring-context.xsd http://www.springframework.org/schema/mvc http://www.springframework.org/schema/mvc/spring-mvc-3.0.xsd"> <!-- 配置SpringMVC --> <!-- 1.开启SpringMVC注解模式 --> <!-- 简化配置: (1)自动注册DefaultAnootationHandlerMapping,AnotationMethodHandlerAdapter (2)提供一些列:数据绑定,数字和日期的format @NumberFormat, @DateTimeFormat, xml,json默认读写支持 --> <mvc:annotation-driven /> <!-- 2.静态资源默认servlet配置 (1)加入对静态资源的处理:js,gif,png (2)允许使用"/"做整体映射 --> <mvc:default-servlet-handler/> <!-- 3.配置jsp 显示ViewResolver --> <bean class="org.springframework.web.servlet.view.InternalResourceViewResolver"> <property name="viewClass" value="org.springframework.web.servlet.view.JstlView" /> <property name="prefix" value="/WEB-INF/jsp/" /> <property name="suffix" value=".jsp" /> </bean> <!-- 4.扫描web相关的bean --> <context:component-scan base-package="com.soecode.lyf.web" /> </beans>
-
1
-
2
-
3
-
4
-
5
-
6
-
7
-
8
-
9
-
10
-
11
-
12
-
13
-
14
-
15
-
16
-
17
-
18
-
19
-
20
-
21
-
22
-
23
-
24
-
25
-
26
-
27
-
28
-
29
-
30
-
31
-
32
-
33
-
34
-
35
第四步:最后就是修改web.xml文件了,它在webapp的WEB-INF下。
web.xml
<web-app xmlns="http://xmlns.jcp.org/xml/ns/javaee" xmlns:xsi="http://www.w3.org/2001/XMLSchema-instance" xsi:schemaLocation="http://xmlns.jcp.org/xml/ns/javaee http://xmlns.jcp.org/xml/ns/javaee/web-app_3_1.xsd" version="3.1" metadata-complete="true"> <!-- 如果是用mvn命令生成的xml,需要修改servlet版本为3.1 --> <!-- 配置DispatcherServlet --> <servlet> <servlet-name>seckill-dispatcher</servlet-name> <servlet-class>org.springframework.web.servlet.DispatcherServlet</servlet-class> <!-- 配置springMVC需要加载的配置文件 spring-dao.xml,spring-service.xml,spring-web.xml Mybatis - > spring -> springmvc --> <init-param> <param-name>contextConfigLocation</param-name> <param-value>classpath:spring/spring-*.xml</param-value> </init-param> </servlet> <servlet-mapping> <servlet-name>seckill-dispatcher</servlet-name> <!-- 默认匹配所有的请求 --> <url-pattern>/</url-pattern> </servlet-mapping> </web-app>
-
1
-
2
-
3
-
4
-
5
-
6
-
7
-
8
-
9
-
10
-
11
-
12
-
13
-
14
-
15
-
16
-
17
-
18
-
19
-
20
-
21
-
22
-
23
-
24
-
25
我们在项目中经常会使用到日志,所以这里还有配置日志xml,在resources文件夹里新建logback.xml文件,所给出的日志输出格式也是最基本的控制台s呼出,大家有兴趣查看logback官方文档。
logback.xml
<?xml version="1.0" encoding="UTF-8"?> <configuration debug="true"> <appender name="STDOUT" class="ch.qos.logback.core.ConsoleAppender"> <!-- encoders are by default assigned the type ch.qos.logback.classic.encoder.PatternLayoutEncoder --> <encoder> <pattern>%d{HH:mm:ss.SSS} [%thread] %-5level %logger{36} - %msg%n</pattern> </encoder> </appender> <root level="debug"> <appender-ref ref="STDOUT" /> </root> </configuration>
-
1
-
2
-
3
-
4
-
5
-
6
-
7
-
8
-
9
-
10
-
11
-
12
-
13
到目前为止,我们一共写了7个配置文件,我们一起来看下最终的配置文件结构图。
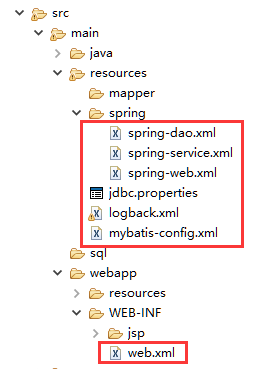
SSM框架应用实例(图书管理系统)
一开始想就这样结束教程,但是发现其实很多人都还不会把这个SSM框架用起来,特别是mybatis部分。那我现在就以最常见的“图书管理系统”中【查询图书】和【预约图书】业务来做一个demo吧!
首先新建数据库名为ssm,再创建两张表:图书表book和预约图书表appointment,并且为book表初始化一些数据,sql如下。
schema.sql
-- 创建图书表 CREATE TABLE `book` ( `book_id` bigint(20) NOT NULL AUTO_INCREMENT COMMENT '图书ID', `name` varchar(100) NOT NULL COMMENT '图书名称', `number` int(11) NOT NULL COMMENT '馆藏数量', PRIMARY KEY (`book_id`) ) ENGINE=InnoDB AUTO_INCREMENT=1000 DEFAULT CHARSET=utf8 COMMENT='图书表' -- 初始化图书数据 INSERT INTO `book` (`book_id`, `name`, `number`) VALUES (1000, 'Java程序设计', 10), (1001, '数据结构', 10), (1002, '设计模式', 10), (1003, '编译原理', 10) -- 创建预约图书表 CREATE TABLE `appointment` ( `book_id` bigint(20) NOT NULL COMMENT '图书ID', `student_id` bigint(20) NOT NULL COMMENT '学号', `appoint_time` timestamp NOT NULL DEFAULT CURRENT_TIMESTAMP ON UPDATE CURRENT_TIMESTAMP COMMENT '预约时间' , PRIMARY KEY (`book_id`, `student_id`), INDEX `idx_appoint_time` (`appoint_time`) ) ENGINE=InnoDB DEFAULT CHARSET=utf8 COMMENT='预约图书表'
-
1
-
2
-
3
-
4
-
5
-
6
-
7
-
8
-
9
-
10
-
11
-
12
-
13
-
14
-
15
-
16
-
17
-
18
-
19
-
20
-
21
-
22
-
23
-
24
在entity包中添加两个对应的实体,图书实体Book.java和预约图书实体Appointment.java。
Book.java
package com.soecode.lyf.entity; public class Book { private long bookId;// 图书ID private String name;// 图书名称 private int number;// 馆藏数量 // 省略构造方法,getter和setter方法,toString方法 }
-
1
-
2
-
3
-
4
-
5
-
6
-
7
-
8
-
9
-
10
-
11
-
12
-
13
Appointment.java
package com.soecode.lyf.entity; import java.util.Date; /** * 预约图书实体 */ public class Appointment { private long bookId;// 图书ID private long studentId;// 学号 private Date appointTime;// 预约时间 // 多对一的复合属性 private Book book;// 图书实体 // 省略构造方法,getter和setter方法,toString方法 }
-
1
-
2
-
3
-
4
-
5
-
6
-
7
-
8
-
9
-
10
-
11
-
12
-
13
-
14
-
15
-
16
-
17
-
18
-
19
-
20
-
21
在dao包新建接口BookDao.java和Appointment.java
BookDao.java
package com.soecode.lyf.dao; import java.util.List; import com.soecode.lyf.entity.Book; public interface BookDao { /** * 通过ID查询单本图书 * * @param id * @return */ Book queryById(long id); /** * 查询所有图书 * * @param offset 查询起始位置 * @param limit 查询条数 * @return */ List<Book> queryAll(@Param("offset") int offset, @Param("limit") int limit); /** * 减少馆藏数量 * * @param bookId * @return 如果影响行数等于>1,表示更新的记录行数 */ int reduceNumber(long bookId); }
-
1
-
2
-
3
-
4
-
5
-
6
-
7
-
8
-
9
-
10
-
11
-
12
-
13
-
14
-
15
-
16
-
17
-
18
-
19
-
20
-
21
-
22
-
23
-
24
-
25
-
26
-
27
-
28
-
29
-
30
-
31
-
32
-
33
-
34
AppointmentDao.java
package com.soecode.lyf.dao; import org.apache.ibatis.annotations.Param; import com.soecode.lyf.entity.Appointment; public interface AppointmentDao { /** * 插入预约图书记录 * * @param bookId * @param studentId * @return 插入的行数 */ int insertAppointment(@Param("bookId") long bookId, @Param("studentId") long studentId); /** * 通过主键查询预约图书记录,并且携带图书实体 * * @param bookId * @param studentId * @return */ Appointment queryByKeyWithBook(@Param("bookId") long bookId, @Param("studentId") long studentId); }
-
1
-
2
-
3
-
4
-
5
-
6
-
7
-
8
-
9
-
10
-
11
-
12
-
13
-
14
-
15
-
16
-
17
-
18
-
19
-
20
-
21
-
22
-
23
-
24
-
25
-
26
-
27
提示:这里为什么要给方法的参数添加@Param注解呢?是因为该方法有两个或以上的参数,一定要加,不然mybatis识别不了。上面的BookDao接口的queryById方法和reduceNumber方法只有一个参数book_id,所以可以不用加 @Param注解,当然加了也无所谓~
注意,这里不需要实现dao接口不用编写daoImpl, mybatis会给我们动态实现,但是我们需要编写相应的mapper。
在mapper目录里新建两个文件BookDao.xml和AppointmentDao.xml,分别对应上面两个dao接口,代码如下。
BookDao.xml
<?xml version="1.0" encoding="UTF-8"?> <!DOCTYPE mapper PUBLIC "-//mybatis.org//DTD Mapper 3.0//EN" "http://mybatis.org/dtd/mybatis-3-mapper.dtd"> <mapper namespace="com.soecode.lyf.dao.BookDao"> <!-- 目的:为dao接口方法提供sql语句配置 --> <select id="queryById" resultType="Book" parameterType="long"> <!-- 具体的sql --> SELECT book_id, name, number FROM book WHERE book_id = #{bookId} </select> <select id="queryAll" resultType="Book"> SELECT book_id, name, number FROM book ORDER BY book_id LIMIT #{offset}, #{limit} </select> <update id="reduceNumber"> UPDATE book SET number = number - 1 WHERE book_id = #{bookId} AND number > 0 </update> </mapper>
-
1
-
2
-
3
-
4
-
5
-
6
-
7
-
8
-
9
-
10
-
11
-
12
-
13
-
14
-
15
-
16
-
17
-
18
-
19
-
20
-
21
-
22
-
23
-
24
-
25
-
26
-
27
-
28
-
29
-
30
-
31
-
32
-
33
-
34
-
35
-
36
-
37
-
38
AppointmentDao.xml
<?xml version="1.0" encoding="UTF-8"?> <!DOCTYPE mapper PUBLIC "-//mybatis.org//DTD Mapper 3.0//EN" "http://mybatis.org/dtd/mybatis-3-mapper.dtd"> <mapper namespace="com.soecode.lyf.dao.AppointmentDao"> <insert id="insertAppointment"> <!-- ignore 主键冲突,报错 --> INSERT ignore INTO appointment (book_id, student_id) VALUES (#{bookId}, #{studentId}) </insert> <select id="queryByKeyWithBook" resultType="Appointment"> <!-- 如何告诉MyBatis把结果映射到Appointment同时映射book属性 --> <!-- 可以自由控制SQL --> SELECT a.book_id, a.student_id, a.appoint_time, b.book_id "book.book_id", b.`name` "book.name", b.number "book.number" FROM appointment a INNER JOIN book b ON a.book_id = b.book_id WHERE a.book_id = #{bookId} AND a.student_id = #{studentId} </select> </mapper>
-
1
-
2
-
3
-
4
-
5
-
6
-
7
-
8
-
9
-
10
-
11
-
12
-
13
-
14
-
15
-
16
-
17
-
18
-
19
-
20
-
21
-
22
-
23
-
24
-
25
-
26
-
27
-
28
-
29
mapper总结:namespace是该xml对应的接口全名,select和update中的id对应方法名,resultType是返回值类型,parameterType是参数类型(这个其实可选),最后#{...}中填写的是方法的参数,看懂了是不是很简单!!我也这么觉得~ 还有一个小技巧要交给大家,就是在返回Appointment对象包含了一个属性名为book的Book对象,那么可以使用"book.属性名"的方式来取值,看上面queryByKeyWithBook方法的sql。
dao层写完了,接下来test对应的package写我们测试方法吧。
因为我们之后会写很多测试方法,在测试前需要让程序读入spring-dao和mybatis等配置文件,所以我这里就抽离出来一个BaseTest类,只要是测试方法就继承它,这样那些繁琐的重复的代码就不用写那么多了~
BaseTest.java
package com.soecode.lyf; import org.junit.runner.RunWith; import org.springframework.test.context.ContextConfiguration; import org.springframework.test.context.junit4.SpringJUnit4ClassRunner; /** * 配置spring和junit整合,junit启动时加载springIOC容器 spring-test,junit */ @RunWith(SpringJUnit4ClassRunner.class) // 告诉junit spring配置文件 @ContextConfiguration({ "classpath:spring/spring-dao.xml", "classpath:spring/spring-service.xml" }) public class BaseTest { }
-
1
-
2
-
3
-
4
-
5
-
6
-
7
-
8
-
9
-
10
-
11
-
12
-
13
-
14
-
15
-
16
因为spring-service在service层的测试中会时候到,这里也一起引入算了!
新建BookDaoTest.java和AppointmentDaoTest.java两个dao测试文件。
BookDaoTest.java
package com.soecode.lyf.dao; import java.util.List; import org.junit.Test; import org.springframework.beans.factory.annotation.Autowired; import com.soecode.lyf.BaseTest; import com.soecode.lyf.entity.Book; public class BookDaoTest extends BaseTest { @Autowired private BookDao bookDao; @Test public void testQueryById() throws Exception { long bookId = 1000; Book book = bookDao.queryById(bookId); System.out.println(book); } @Test public void testQueryAll() throws Exception { List<Book> books = bookDao.queryAll(0, 4); for (Book book : books) { System.out.println(book); } } @Test public void testReduceNumber() throws Exception { long bookId = 1000; int update = bookDao.reduceNumber(bookId); System.out.println("update=" + update); } }
-
1
-
2
-
3
-
4
-
5
-
6
-
7
-
8
-
9
-
10
-
11
-
12
-
13
-
14
-
15
-
16
-
17
-
18
-
19
-
20
-
21
-
22
-
23
-
24
-
25
-
26
-
27
-
28
-
29
-
30
-
31
-
32
-
33
-
34
-
35
-
36
-
37
-
38
BookDaoTest测试结果
testQueryById
testQueryAll

testReduceNumber

AppointmentDaoTest.java
package com.soecode.lyf.dao; import org.junit.Test; import org.springframework.beans.factory.annotation.Autowired; import com.soecode.lyf.BaseTest; import com.soecode.lyf.entity.Appointment; public class AppointmentDaoTest extends BaseTest { @Autowired private AppointmentDao appointmentDao; @Test public void testInsertAppointment() throws Exception { long bookId = 1000; long studentId = 12345678910L; int insert = appointmentDao.insertAppointment(bookId, studentId); System.out.println("insert=" + insert); } @Test public void testQueryByKeyWithBook() throws Exception { long bookId = 1000; long studentId = 12345678910L; Appointment appointment = appointmentDao.queryByKeyWithBook(bookId, studentId); System.out.println(appointment); System.out.println(appointment.getBook()); } }
-
1
-
2
-
3
-
4
-
5
-
6
-
7
-
8
-
9
总结
这份面试题几乎包含了他在一年内遇到的所有面试题以及答案,甚至包括面试中的细节对话以及语录,可谓是细节到极致,甚至简历优化和怎么投简历更容易得到面试机会也包括在内!也包括教你怎么去获得一些大厂,比如阿里,腾讯的内推名额!
某位名人说过成功是靠99%的汗水和1%的机遇得到的,而你想获得那1%的机遇你首先就得付出99%的汗水!你只有朝着你的目标一步一步坚持不懈的走下去你才能有机会获得成功!
成功只会留给那些有准备的人!

网上学习资料一大堆,但如果学到的知识不成体系,遇到问题时只是浅尝辄止,不再深入研究,那么很难做到真正的技术提升。
需要这份系统化的资料的朋友,可以添加V获取:vip1024b (备注Java)

一个人可以走的很快,但一群人才能走的更远!不论你是正从事IT行业的老鸟或是对IT行业感兴趣的新人,都欢迎加入我们的的圈子(技术交流、学习资源、职场吐槽、大厂内推、面试辅导),让我们一起学习成长!
tQueryById
[外链图片转存中…(img-yOfzTvuh-1713708497747)]
testQueryAll
[外链图片转存中…(img-LoS4obY5-1713708497747)]
testReduceNumber
[外链图片转存中…(img-WCp9iPBA-1713708497748)]
AppointmentDaoTest.java
package com.soecode.lyf.dao; import org.junit.Test; import org.springframework.beans.factory.annotation.Autowired; import com.soecode.lyf.BaseTest; import com.soecode.lyf.entity.Appointment; public class AppointmentDaoTest extends BaseTest { @Autowired private AppointmentDao appointmentDao; @Test public void testInsertAppointment() throws Exception { long bookId = 1000; long studentId = 12345678910L; int insert = appointmentDao.insertAppointment(bookId, studentId); System.out.println("insert=" + insert); } @Test public void testQueryByKeyWithBook() throws Exception { long bookId = 1000; long studentId = 12345678910L; Appointment appointment = appointmentDao.queryByKeyWithBook(bookId, studentId); System.out.println(appointment); System.out.println(appointment.getBook()); } }
-
1
-
2
-
3
-
4
-
5
-
6
-
7
-
8
-
9
总结
这份面试题几乎包含了他在一年内遇到的所有面试题以及答案,甚至包括面试中的细节对话以及语录,可谓是细节到极致,甚至简历优化和怎么投简历更容易得到面试机会也包括在内!也包括教你怎么去获得一些大厂,比如阿里,腾讯的内推名额!
某位名人说过成功是靠99%的汗水和1%的机遇得到的,而你想获得那1%的机遇你首先就得付出99%的汗水!你只有朝着你的目标一步一步坚持不懈的走下去你才能有机会获得成功!
成功只会留给那些有准备的人!
[外链图片转存中…(img-REPrPmQA-1713708497748)]
网上学习资料一大堆,但如果学到的知识不成体系,遇到问题时只是浅尝辄止,不再深入研究,那么很难做到真正的技术提升。
需要这份系统化的资料的朋友,可以添加V获取:vip1024b (备注Java)
[外链图片转存中…(img-EsZl8Ac9-1713708497749)]
一个人可以走的很快,但一群人才能走的更远!不论你是正从事IT行业的老鸟或是对IT行业感兴趣的新人,都欢迎加入我们的的圈子(技术交流、学习资源、职场吐槽、大厂内推、面试辅导),让我们一起学习成长!


 2558
2558


 被折叠的 条评论
为什么被折叠?
被折叠的 条评论
为什么被折叠?
 到【灌水乐园】发言


