


基础面试题
开源分享:【大厂前端面试题解析+核心总结学习笔记+真实项目实战+最新讲解视频】
主要内容包括:HTML,CSS,JavaScript,浏览器,性能优化等等

// 初始化自定义事件
initEvents(vm);
// 初始化渲染
initRender(vm);
// 执行 beforeCreate 生命周期
callHook(vm, “beforeCreate”);
// 在初始化 state/props 之前初始化注入 inject
initInjections(vm); // resolve injections before data/props
// 初始化 state/props 的数据双向绑定
initState(vm);
// 在初始化 state/props 之后初始化 provide
initProvide(vm); // resolve provide after data/props
// 执行 created 生命周期
callHook(vm, “created”);
/* istanbul ignore if */
if (process.env.NODE_ENV !== “production” && config.performance && mark) {
vm._name = formatComponentName(vm, false);
mark(endTag);
measure(vue ${vm._name} init, startTag, endTag);
}
// 挂载到 dom 元素
if (vm.$options.el) {
vm. m o u n t ( v m . mount(vm. mount(vm.options.el);
}
};
}
小结
❝
综上,可总结出,
new Vue(options)具体做了如下事情:
- 执行构造函数;
- 上下文转移到 vm;
- 如果
options._isComponent为 true,则初始化内部组件实例;否则合并配置参数,并挂载到vm.$options上面;
- 初始化生命周期函数、初始化事件相关、初始化渲染相关;
- 执行
beforeCreate生命周期函数;
- 在初始化
state/props之前初始化注入inject;
- 初始化
state/props的数据双向绑定;
- 在初始化
state/props之后初始化provide;
- 执行
created生命周期函数;
- 挂载到
dom元素
其实
vue还在生产环境中记录了初始化的时间,用于性能分析;
❞
2. Vue.use 做了什么?
use
❝
直接查看
src/core/global-api/use.js, 如下
❞
import { toArray } from “…/util/index”;
export function initUse(Vue: GlobalAPI) {
Vue.use = function (plugin: Function | Object) {
// 插件缓存数组
const installedPlugins =
this._installedPlugins || (this._installedPlugins = []);
// 已注册则跳出
if (installedPlugins.indexOf(plugin) > -1) {
return this;
}
// 附加参数处理,截取第1个参数之后的参数
const args = toArray(arguments, 1);
// 第一个参数塞入 this 上下文
args.unshift(this);
// 执行 plugin 这里遵循定义规则
if (typeof plugin.install === “function”) {
// 插件暴露 install 方法
plugin.install.apply(plugin, args);
} else if (typeof plugin === “function”) {
// 插件本身若没有 install 方法,则直接执行
plugin.apply(null, args);
}
// 添加到缓存数组中
installedPlugins.push(plugin);
return this;
};
}
小结
❝
综上,可以总结
Vue.use做了如下事情:
- 检查插件是否注册,若已注册,则直接跳出;
- 处理入参,将第一个参数之后的参数归集,并在首部塞入 this 上下文;
- 执行注册方法,调用定义好的 install 方法,传入处理的参数,若没有 install 方法并且插件本身为 function 则直接进行注册;
❞
3. vue 的响应式?
Observer
❝
上代码,直接查看
src/core/observer/index.js,classObserver,这个方法使得对象/数组可响应
❞
export class Observer {
value: any;
dep: Dep;
vmCount: number; // number of vms that have this object as root $data
constructor(value: any) {
this.value = value;
this.dep = new Dep();
this.vmCount = 0;
def(value, “ob”, this);
if (Array.isArray(value)) {
// 数组则通过扩展原生方法形式使其可响应
if (hasProto) {
protoAugment(value, arrayMethods);
} else {
copyAugment(value, arrayMethods, arrayKeys);
}
this.observeArray(value);
} else {
this.walk(value);
}
}
/**
* Walk through all properties and convert them into
* getter/setters. This method should only be called when
* value type is Object.
*/
walk(obj: Object) {
const keys = Object.keys(obj);
for (let i = 0; i < keys.length; i++) {
defineReactive(obj, keys[i]);
}
}
/**
* Observe a list of Array items.
*/
observeArray(items: Array) {
for (let i = 0, l = items.length; i < l; i++) {
observe(items[i]);
}
}
}
defineReactive
❝
上代码,直接查看
src/core/observer/index.js,核心方法defineReactive,这个方法使得对象可响应,给对象动态添加 getter 和 setter
❞
// 使对象中的某个属性可响应
export function defineReactive(
obj: Object,
key: string,
val: any,
customSetter?: ?Function,
shallow?: boolean
) {
// 初始化 Dep 对象,用作依赖收集
const dep = new Dep();
const property = Object.getOwnPropertyDescriptor(obj, key);
if (property && property.configurable === false) {
return;
}
// cater for pre-defined getter/setters
const getter = property && property.get;
const setter = property && property.set;
if ((!getter || setter) && arguments.length === 2) {
val = obj[key];
}
let childOb = !shallow && observe(val);
// 响应式对象核心,定义对象某个属性的 get 和 set 监听
Object.defineProperty(obj, key, {
enumerable: true,
configurable: true,
get: function reactiveGetter() {
const value = getter ? getter.call(obj) : val;
// 监测 watcher 是否存在
if (Dep.target) {
// 依赖收集
dep.depend();
if (childOb) {
childOb.dep.depend();
if (Array.isArray(value)) {
dependArray(value);
}
}
}
return value;
},
set: function reactiveSetter(newVal) {
const value = getter ? getter.call(obj) : val;
/* eslint-disable no-self-compare */
if (newVal === value || (newVal !== newVal && value !== value)) {
return;
}
/* eslint-enable no-self-compare */
if (process.env.NODE_ENV !== “production” && customSetter) {
customSetter();
}
// #7981: for accessor properties without setter
if (getter && !setter) return;
if (setter) {
setter.call(obj, newVal);
} else {
val = newVal;
}
childOb = !shallow && observe(newVal);
// 通知更新
dep.notify();
},
});
}
Dep
❝
依赖收集,我们需要看一下
Dep的代码,它依赖收集的核心,在src/core/observer/dep.js中:
❞
import type Watcher from “./watcher”;
import { remove } from “…/util/index”;
import config from “…/config”;
let uid = 0;
/**
* A dep is an observable that can have multiple
* directives subscribing to it.
*/
export default class Dep {
// 静态属性,全局唯一 Watcher
// 这里比较巧妙,因为在同一时间只能有一个全局的 Watcher 被计算
static target: ?Watcher;
id: number;
// watcher 数组
subs: Array;
constructor() {
this.id = uid++;
this.subs = [];
}
addSub(sub: Watcher) {
this.subs.push(sub);
}
removeSub(sub: Watcher) {
remove(this.subs, sub);
}
depend() {
if (Dep.target) {
// Watcher 中收集依赖
Dep.target.addDep(this);
}
}
notify() {
// stabilize the subscriber list first
const subs = this.subs.slice();
if (process.env.NODE_ENV !== “production” && !config.async) {
// subs aren’t sorted in scheduler if not running async
// we need to sort them now to make sure they fire in correct
// order
subs.sort((a, b) => a.id - b.id);
}
// 遍历所有的 subs,也就是 Watcher 的实例数组,然后调用每一个 watcher 的 update 方法
for (let i = 0, l = subs.length; i < l; i++) {
subs[i].update();
}
}
}
// The current target watcher being evaluated.
// This is globally unique because only one watcher
// can be evaluated at a time.
// 全局唯一的 Watcher
Dep.target = null;
const targetStack = [];
export function pushTarget(target: ?Watcher) {
targetStack.push(target);
Dep.target = target;
}
export function popTarget() {
targetStack.pop();
Dep.target = targetStack[targetStack.length - 1];
}
Watcher
❝
Dep 是对 Watcher 的一种管理,下面我们来看一下 Watcher, 在
src/core/observer/watcher.js中
❞
let uid = 0;
/**
* 一个 Watcher 分析一个表达式,收集依赖项, 并在表达式值更改时触发回调。
* 用于 $watch() api 和指令
*/
export default class Watcher {
vm: Component;
expression: string;
cb: Function;
id: number;
deep: boolean;
user: boolean;
lazy: boolean;
sync: boolean;
dirty: boolean;
active: boolean;
deps: Array;
newDeps: Array;
depIds: SimpleSet;
newDepIds: SimpleSet;
before: ?Function;
getter: Function;
value: any;
constructor(
vm: Component,
expOrFn: string | Function,
cb: Function,
options?: ?Object,
isRenderWatcher?: boolean
) {
this.vm = vm;
if (isRenderWatcher) {
vm._watcher = this;
}
vm._watchers.push(this);
// options
if (options) {
this.deep = !!options.deep;
this.user = !!options.user;
this.lazy = !!options.lazy;
this.sync = !!options.sync;
this.before = options.before;
} else {
this.deep = this.user = this.lazy = this.sync = false;
}
this.cb = cb;
this.id = ++uid; // uid for batching
this.active = true;
this.dirty = this.lazy; // for lazy watchers
this.deps = [];
this.newDeps = [];
this.depIds = new Set();
this.newDepIds = new Set();
this.expression =
process.env.NODE_ENV !== “production” ? expOrFn.toString() : “”;
// parse expression for getter
if (typeof expOrFn === “function”) {
this.getter = expOrFn;
} else {
this.getter = parsePath(expOrFn);
if (!this.getter) {
this.getter = noop;
process.env.NODE_ENV !== “production” &&
warn(
Failed watching path: "${expOrFn}" +
"Watcher only accepts simple dot-delimited paths. " +
“For full control, use a function instead.”,
vm
);
}
}
this.value = this.lazy ? undefined : this.get();
}
// 评估getter,并重新收集依赖项。
get() {
// 实际上就是把 Dep.target 赋值为当前的渲染 watcher 并压栈(为了恢复用)。
pushTarget(this);
let value;
const vm = this.vm;
try {
// this.getter 对应就是 updateComponent 函数,这实际上就是在执行:
// 这里需要追溯 new Watcher 执行的地方,是在
value = this.getter.call(vm, vm);
} catch (e) {
if (this.user) {
handleError(e, vm, getter for watcher "${this.expression}");
} else {
throw e;
}
} finally {
// “touch” every property so they are all tracked as
// dependencies for deep watching
// 递归深度遍历每一个属性,使其都可以被依赖收集
if (this.deep) {
traverse(value);
}
// 出栈
popTarget();
// 清理依赖收集
this.cleanupDeps();
}
return value;
}
// 添加依赖
// 在 Dep 中会调用
addDep(dep: Dep) {
const id = dep.id;
// 避免重复收集
if (!this.newDepIds.has(id)) {
this.newDepIds.add(id);
this.newDeps.push(dep);
if (!this.depIds.has(id)) {
// 把当前的 watcher 订阅到这个数据持有的 dep 的 subs 中
// 目的是为后续数据变化时候能通知到哪些 subs 做准备
dep.addSub(this);
}
}
}
// 清理依赖
// 每次添加完新的订阅,会移除掉旧的订阅,所以不会有任何浪费
cleanupDeps() {
let i = this.deps.length;
// 首先遍历 deps,移除对 dep.subs 数组中 Wathcer 的订阅
while (i–) {
const dep = this.deps[i];
if (!this.newDepIds.has(dep.id)) {
dep.removeSub(this);
}
}
let tmp = this.depIds;
this.depIds = this.newDepIds;
this.newDepIds = tmp;
this.newDepIds.clear();
tmp = this.deps;
this.deps = this.newDeps;
this.newDeps = tmp;
this.newDeps.length = 0;
}
// 发布接口
// 依赖更新的时候触发
update() {
/* istanbul ignore else */
if (this.lazy) {
// computed 数据
this.dirty = true;
} else if (this.sync) {
// 同步数据更新
this.run();
} else {
// 正常数据会经过这里
// 派发更新
queueWatcher(this);
}
}
// 调度接口,用于执行更新
run() {
if (this.active) {
const value = this.get();
if (
value !== this.value ||
// Deep watchers and watchers on Object/Arrays should fire even
// when the value is the same, because the value may
// have mutated.
isObject(value) ||
this.deep
) {
// 设置新的值
const oldValue = this.value;
this.value = value;
if (this.user) {
try {
this.cb.call(this.vm, value, oldValue);
} catch (e) {
handleError(
e,
this.vm,
callback for watcher "${this.expression}"
);
}
} else {
this.cb.call(this.vm, value, oldValue);
}
}
}
}
/**
* Evaluate the value of the watcher.
* This only gets called for lazy watchers.
*/
evaluate() {
this.value = this.get();
this.dirty = false;
}
/**
* Depend on all deps collected by this watcher.
*/
depend() {
let i = this.deps.length;
while (i–) {
this.deps[i].depend();
}
}
/**
* Remove self from all dependencies’ subscriber list.
*/
teardown() {
if (this.active) {
// remove self from vm’s watcher list
// this is a somewhat expensive operation so we skip it
// if the vm is being destroyed.
if (!this.vm._isBeingDestroyed) {
remove(this.vm._watchers, this);
}
let i = this.deps.length;
while (i–) {
this.deps[i].removeSub(this);
}
this.active = false;
}
}
}
小结
❝
综上响应式核心代码,我们可以描述响应式的执行过程:
- 根据数据类型来做不同处理,如果是对象则
Object.defineProperty()监听数据属性的get来进行数据依赖收集,再通过get来完成数据更新的派发;如果是数组如果是数组则通过覆盖 该数组原型的⽅法,扩展它的 7 个变更⽅法(push/pop/shift/unshift/splice/reverse/sort),通过监听这些方法可以做到依赖收集和派发更新;
Dep是主要做依赖收集,收集的是当前上下文作为Watcher,全局有且仅有一个Dep.target,通过Dep可以做到控制当前上下文的依赖收集和通知Watcher派发更新;
Watcher连接表达式和值,说白了就是 watcher 连接视图层的依赖,并可以触发视图层的更新,与Dep紧密结合,通过Dep来控制其对视图层的监听
❞
4. vue3 为何用 proxy 替代了 Object.defineProperty?
traverse
❝
截取上面 Watcher 中部分代码
❞
if (this.deep) {
// 这里其实递归遍历属性用作依赖收集
traverse(value);
}
❝
再查看
src/core/observer/traverse.js中traverse的实现,如下:
❞
const seenObjects = new Set();
// 递归遍历对象,将所有属性转换为 getter
// 使每个对象内嵌套属性作为依赖收集项
export function traverse(val: any) {
_traverse(val, seenObjects);
seenObjects.clear();
}
function _traverse(val: any, seen: SimpleSet) {
let i, keys;
const isA = Array.isArray(val);
if (
(!isA && !isObject(val)) ||
Object.isFrozen(val) ||
val instanceof VNode
) {
return;
}
if (val.ob) {
const depId = val.ob.dep.id;
if (seen.has(depId)) {
return;
}
seen.add(depId);
}
if (isA) {
i = val.length;
while (i–) _traverse(val[i], seen);
} else {
keys = Object.keys(val);
i = keys.length;
while (i–) _traverse(val[keys[i]], seen);
}
}
小结
❝
再综上一题代码实际了解,其实我们看到一些弊端:
- Watcher 监听 对属性做了递归遍历,这里可能会造成性能损失;
- defineReactive 遍历属性对当前存在的属性
Object.defineProperty()作依赖收集,但是对于不存在,或者删除属性,则监听不到;从而会造成 对新增或者删除的属性无法做到响应式,只能通过 Vue.set/delete 这类 api 才可以做到;
- 对于 es6 中新产⽣的
Map、Set这些数据结构不⽀持
❞
5. vue 双向绑定,Model 怎么改变 View,View 怎么改变 Model?
❝
其实这个问题需要承接上述第三题,再结合下图
❞
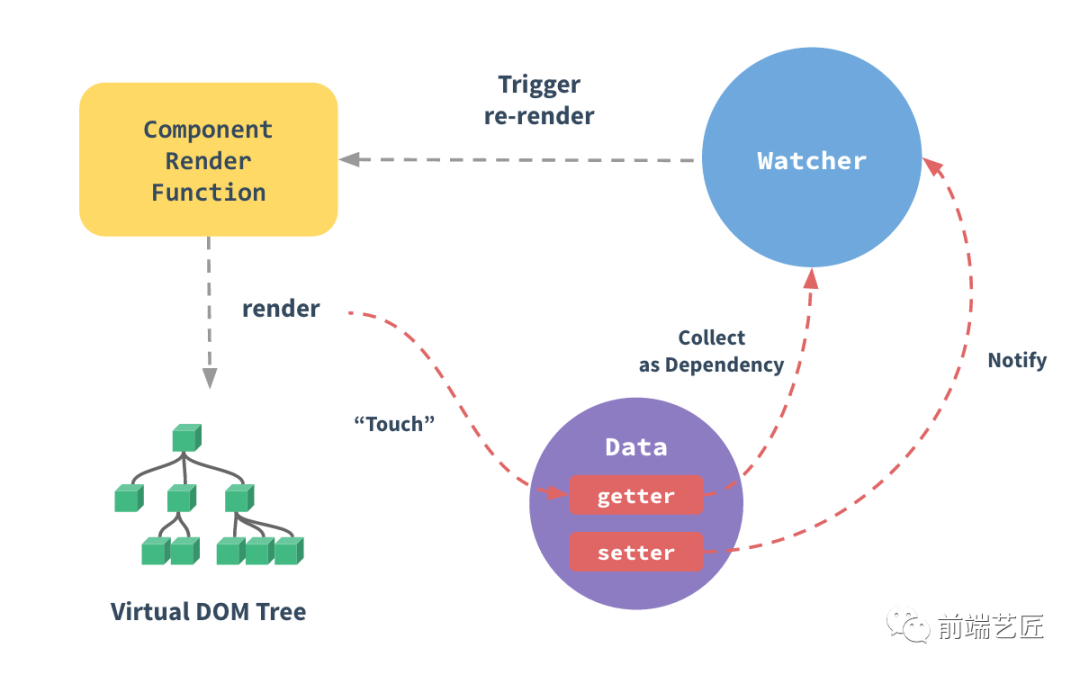
响应式原理
❝
Model 改变 View:
- defineReactive 中通过 Object.defineProperty 使 data 可响应;
- Dep 在 getter 中作依赖收集,在 setter 中作派发更新;
- dep.notify() 通知 Watcher 更新,最终调用
vm._render()更新 UI;
View 改变 Model: 其实同上理,View 与 data 的数据关联在了一起,View 通过事件触发 data 的变化,从而触发了 setter,这就构成了一个双向循环绑定了;
❞
6. vue 如何对数组方法进行变异?例如 push、pop、slice 等;
❝
这个问题,我们直接从源码找答案,这里我们截取上面 Observer 部分源码,先来追溯一下,Vue 怎么实现数组的响应:
❞
constructor(value: any) {
this.value = value;
this.dep = new Dep();
this.vmCount = 0;
def(value, “ob”, this);
if (Array.isArray(value)) {
// 数组则通过扩展原生方法形式使其可响应
if (hasProto) {
protoAugment(value, arrayMethods);
} else {
copyAugment(value, arrayMethods, arrayKeys);
}
this.observeArray(value);
} else {
this.walk(value);
}
}
arrayMethods
❝
这里需要查看一下 arrayMethods 这个对象,在
src/core/observer/array.js中
❞
import { def } from “…/util/index”;
const arrayProto = Array.prototype;
// 复制数组原型链,并创建一个空对象
// 这里使用 Object.create 是为了不污染 Array 的原型
export const arrayMethods = Object.create(arrayProto);
const methodsToPatch = [
“push”,
“pop”,
“shift”,
“unshift”,
“splice”,
“sort”,
“reverse”,
];
// 拦截突变方法并发出事件
// 拦截了数组的 7 个方法
methodsToPatch.forEach(function (method) {
// cache original method
const original = arrayProto[method];
// 使其可响应
def(arrayMethods, method, function mutator(…args) {
const result = original.apply(this, args);
const ob = this.ob;
let inserted;
switch (method) {
case “push”:
case “unshift”:
inserted = args;
break;
case “splice”:
inserted = args.slice(2);
break;
}
if (inserted) ob.observeArray(inserted);
// notify change
// 派发更新
ob.dep.notify();
return result;
});
});
def
❝
def 使对象可响应,在
src/core/util/lang.js
❞
export function def(obj: Object, key: string, val: any, enumerable?: boolean) {
Object.defineProperty(obj, key, {
value: val,
enumerable: !!enumerable,
writable: true,
configurable: true,
});
}
小结
❝
Object.create(Array.prototype)复制Array原型链为新的对象;
- 拦截了数组的 7 个方法的执行,并使其可响应,7 个方法分别为:
push,pop,shift,unshift,splice,sort,reverse;
- 当数组调用到这 7 个方法的时候,执行
ob.dep.notify()进行派发通知Watcher更新;
❞
附加思考
❝
不过,vue 对数组的监听还是有限制的,如下:
- 数组通过索引改变值的时候监听不到,比如:
array[2] = newObj
- 数组长度变化无法监听
这些操作都需要通过
Vue.set/del去操作才行;
❞
7. computed 如何实现?
initComputed
❝
这个方法用于初始化
options.computed对象, 这里还是上源码,在src/core/instance/state.js中,这个方法是在initState中调用的
❞
const computedWatcherOptions = { lazy: true };
function initComputed(vm: Component, computed: Object) {
// $flow-disable-line
// 创建一个空对象
const watchers = (vm._computedWatchers = Object.create(null));
// computed properties are just getters during SSR
const isSSR = isServerRendering();
for (const key in computed) {
// 遍历拿到每个定义的 userDef
const userDef = computed[key];
const getter = typeof userDef === “function” ? userDef : userDef.get;
// 没有 getter 则 warn
if (process.env.NODE_ENV !== “production” && getter == null) {
warn(Getter is missing for computed property "${key}"., vm);
}
if (!isSSR) {
// 为每个 computed 属性创建 watcher
// create internal watcher for the computed property.
watchers[key] = new Watcher(
vm,
getter || noop,
noop,
computedWatcherOptions // {lazy: true}
);
}
// component-defined computed properties are already defined on the
// component prototype. We only need to define computed properties defined
// at instantiation here.
if (!(key in vm)) {
// 定义 vm 中未定义的计算属性
defineComputed(vm, key, userDef);
} else if (process.env.NODE_ENV !== “production”) {
if (key in vm.$data) {
// 判断 key 是不是在 data
warn(The computed property "${key}" is already defined in data., vm);
} else if (vm.KaTeX parse error: Expected 'EOF', got '&' at position 15: options.props &̲& key in vm.options.props) {
// 判断 key 是不是在 props 中
warn(
The computed property "${key}" is already defined as a prop.,
vm
);
}
}
}
}
defineComputed
❝
这个方法用作定义 computed 中的属性,继续看代码:
❞
export function defineComputed(
target: any,
key: string,
userDef: Object | Function
) {
const shouldCache = !isServerRendering();
if (typeof userDef === “function”) {
sharedPropertyDefinition.get = shouldCache
? createComputedGetter(key)
: createGetterInvoker(userDef);
sharedPropertyDefinition.set = noop;
} else {
sharedPropertyDefinition.get = userDef.get
? shouldCache && userDef.cache !== false
? createComputedGetter(key)
: createGetterInvoker(userDef.get)
: noop;
sharedPropertyDefinition.set = userDef.set || noop;
}
if (
process.env.NODE_ENV !== “production” &&
sharedPropertyDefinition.set === noop
) {
sharedPropertyDefinition.set = function () {
warn(
Computed property "${key}" was assigned to but it has no setter.,
this
);
};
}
// 定义计算属性的 get / set
Object.defineProperty(target, key, sharedPropertyDefinition);
}
// 返回计算属性对应的 getter
function createComputedGetter(key) {
return function computedGetter() {
const watcher = this._computedWatchers && this._computedWatchers[key];
if (watcher) {
if (watcher.dirty) {
// watcher 检查是 computed 属性的时候 会标记 dirty 为 true
// 这里是 computed 的取值逻辑, 执行 evaluate 之后 则 dirty false,直至下次触发
// 其实这里就可以说明 computed 属性其实是触发了 getter 属性之后才进行计算的,而触发的媒介便是 computed 引用的其他属性触发 getter,再触发 dep.update(), 继而 触发 watcher 的 update
watcher.evaluate();
// --------------------------- Watcher --------------------------------
// 这里截取部分 Watcher 的定义
// update 定义
// update () {
// /* istanbul ignore else */
// if (this.lazy) {
// // 触发更新的时候标记计算属性
// this.dirty = true
// } else if (this.sync) {
// this.run()
// } else {
// queueWatcher(this)
// }
// }
// evaluate 定义
// evaluate () {
// this.value = this.get()
// // 取值后标记 取消
// this.dirty = false
// }
// ------------------------- Watcher ----------------------------------
}
if (Dep.target) {
// 收集依赖
watcher.depend();
}
return watcher.value;
}
};
}
function createGetterInvoker(fn) {
return function computedGetter() {
return fn.call(this, this);
};
}
小结
❝
综上代码分析过程,总结 computed 属性的实现过程如下(以下分析过程均忽略了 ssr 情况):
Object.create(null)创建一个空对象用作缓存computed属性的watchers,并缓存在vm._computedWatchers中;
- 遍历计算属性,拿到用户定义的
userDef,为每个属性定义Watcher,标记Watcher属性lazy: true;
- 定义
vm中未定义过的computed属性,defineComputed(vm, key, userDef),已存在则判断是在data或者props中已定义并相应警告;
- 接下来就是定义
computed属性的getter和setter,这里主要是看createComputedGetter里面的定义:当触发更新则检测 watcher 的 dirty 标记,则执行watcher.evaluate()方法执行计算,然后依赖收集;
- 这里再追溯
watcher.dirty属性逻辑,在watcher.update中 当遇到 computed 属性时候被标记为dirty:false,这里其实可以看出computed属性的计算前提必须是引用的正常属性的更新触发了Dep.update(),继而触发对应watcher.update进行标记dirty:true,继而在计算属性getter的时候才会触发更新,否则不更新;
以上便是计算属性的实现逻辑,部分代码逻辑需要追溯上面第三题响应式的部分
Dep/Watcher的触发逻辑;
❞
8. computed 和 watch 的区别在哪里?
initWatch
❝
这里还是老样子,上代码,在
src/core/instance/state.js中:
❞
function initWatch(vm: Component, watch: Object) {
// 遍历 watch 对象属性
for (const key in watch) {
const handler = watch[key];
// 数组则进行遍历创建 watcher
if (Array.isArray(handler)) {
for (let i = 0; i < handler.length; i++) {
createWatcher(vm, key, handler[i]);
}
} else {
createWatcher(vm, key, handler);
}
}
}
// 创建 watcher 监听
function createWatcher(
vm: Component,
expOrFn: string | Function,
handler: any,
options?: Object
) {
if (isPlainObject(handler)) {
options = handler;
handler = handler.handler;
}
// handler 传入字符串,则直接从 vm 中获取函数方法
if (typeof handler === “string”) {
handler = vm[handler];
}
// 创建 watcher 监听
return vm.$watch(expOrFn, handler, options);
}
$watch
❝
我们还需要看一下
$watch的逻辑,在src/core/instance/state.js中:
❞
Vue.prototype.$watch = function (
expOrFn: string | Function,
cb: any,
options?: Object
): Function {
const vm: Component = this
if (isPlainObject(cb)) {
return createWatcher(vm, expOrFn, cb, options)
}
options = options || {}
options.user = true
// 创建 watch 属性的 Watcher 实例
const watcher = new Watcher(vm, expOrFn, cb, options)
if (options.immediate) {
try {
cb.call(vm, watcher.value)
} catch (error) {
handleError(error, vm, callback for immediate watcher "${watcher.expression}")
}
}
// 用作销毁
return function unwatchFn () {
// 移除 watcher 的依赖
watcher.teardown()
}
}
}
小结
❝
综上代码分析,先看来看一下
watch属性的实现逻辑:
- 遍历
watch属性分别创建属性的Watcher监听,这里可以看出其实该属性并未被Dep收集依赖;
- 可以分析
watch监听的属性 必然是已经被Dep收集依赖的属性了(data/props中的属性),进行对应属性触发更新的时候才会触发watch属性的监听回调;
这里就可以分析 computed 与 watch 的异同:
computed属性的更新需要依赖于其引用属性的更新触发标记dirty: true,进而触发computed属性getter的时候才会触发其本身的更新,否则其不更新;
watch属性则是依赖于本身已被Dep收集依赖的部分属性,即作为data/props中的某个属性的尾随watcher,在监听属性更新时触发watcher的回调;否则监听则无意义;
这里再引申一下使用场景:
- 如果一个数据依赖于其他数据,那么就使用
computed属性;
- 如果你需要在某个数据变化时做一些事情,使用
watch来观察这个数据变化;
❞
9. 计算属性和普通属性的区别?
❝
这个题目跟上题类似,区别如下:
- 普通属性都是基于
getter和setter的正常取值和更新;
computed属性是依赖于内部引用普通属性的setter变更从而标记watcher中dirty标记为true,此时才会触发更新;
❞
10. v-if/v-show/v-html 的原理是什么,它是如何封装的?
v-if
❝
先来看一下
v-if的实现,首先 vue 编译 template 模板的时候会先生成 ast 静态语法树,然后进行标记静态节点,再之后生成对应的 render 函数,这里就直接看下genIf的代码,在src/compiler/codegen/index.js中:
❞
export function genIf(
el: any,
state: CodegenState,
altGen?: Function,
altEmpty?: string
): string {
el.ifProcessed = true; // 标记避免递归,标记已经处理过
return genIfConditions(el.ifConditions.slice(), state, altGen, altEmpty);
}
function genIfConditions(
conditions: ASTIfConditions,
state: CodegenState,
altGen?: Function,
altEmpty?: string
): string {
if (!conditions.length) {
return altEmpty || “_e()”;
}
const condition = conditions.shift();
// 这里返回的是一个三元表达式
if (condition.exp) {
return `( c o n d i t i o n . e x p ) ? {condition.exp})? condition.exp)?{genTernaryExp(
condition.block
)}😒{genIfConditions(conditions, state, altGen, altEmpty)}`;
} else {
return ${genTernaryExp(condition.block)};
}
// v-if with v-once should generate code like (a)?_m(0):_m(1)
function genTernaryExp(el) {
return altGen
? altGen(el, state)
: el.once
? genOnce(el, state)
: genElement(el, state);
}
}
❝
v-if 在 template 生成 ast 之后 genIf 返回三元表达式,在渲染的时候仅渲染表达式生效部分;
❞
v-show
❝
这里截取 v-show 指令的实现逻辑,在
src/platforms/web/runtime/directives/show.js中:
❞
export default {
bind(el: any, { value }: VNodeDirective, vnode: VNodeWithData) {
vnode = locateNode(vnode);
const transition = vnode.data && vnode.data.transition;
const originalDisplay = (el.__vOriginalDisplay =
el.style.display === “none” ? “” : el.style.display);
if (value && transition) {
vnode.data.show = true;
enter(vnode, () => {
el.style.display = originalDisplay;
});
} else {
el.style.display = value ? originalDisplay : “none”;
}
},
update(el: any, { value, oldValue }: VNodeDirective, vnode: VNodeWithData) {
/* istanbul ignore if */
if (!value === !oldValue) return;
vnode = locateNode(vnode);
const transition = vnode.data && vnode.data.transition;
if (transition) {
vnode.data.show = true;
if (value) {
enter(vnode, () => {
el.style.display = el.__vOriginalDisplay;
});
} else {
leave(vnode, () => {
el.style.display = “none”;
});
}
} else {
el.style.display = value ? el.__vOriginalDisplay : “none”;
最后前端到底应该怎么学才好?
如果你打算靠自己摸索自学,那么你首先要了解学习前端的基本大纲,这是你将要学习的主要内容,理解以及掌握好这些内容,便可以找到一份初级的前端开发工作。你还需要有一套完整的前端学习教程,作为初学者最好的方式就是看视频教程学习,初学者容易理解接受。
不要选择买书学习,这样的方式没有几个人能学会,基本都是看不下去书,也看不懂书。如果喜欢看书的学弟,可以买一些经典的书籍作为辅助即可,主要还是以看教程为主。每天抽出固定几个小时学习,做好长期学习的准备。学习编程并不是每天光看视频,你学习编程最重要的目的是为了编写软件产品,提供给大众使用,所以用手写出代码实现功能才是我们要做的事情。
开源分享:【大厂前端面试题解析+核心总结学习笔记+真实项目实战+最新讲解视频】


这里截取 v-show 指令的实现逻辑,在 src/platforms/web/runtime/directives/show.js 中:
❞
export default {
bind(el: any, { value }: VNodeDirective, vnode: VNodeWithData) {
vnode = locateNode(vnode);
const transition = vnode.data && vnode.data.transition;
const originalDisplay = (el.__vOriginalDisplay =
el.style.display === “none” ? “” : el.style.display);
if (value && transition) {
vnode.data.show = true;
enter(vnode, () => {
el.style.display = originalDisplay;
});
} else {
el.style.display = value ? originalDisplay : “none”;
}
},
update(el: any, { value, oldValue }: VNodeDirective, vnode: VNodeWithData) {
/* istanbul ignore if */
if (!value === !oldValue) return;
vnode = locateNode(vnode);
const transition = vnode.data && vnode.data.transition;
if (transition) {
vnode.data.show = true;
if (value) {
enter(vnode, () => {
el.style.display = el.__vOriginalDisplay;
});
} else {
leave(vnode, () => {
el.style.display = “none”;
});
}
} else {
el.style.display = value ? el.__vOriginalDisplay : “none”;
最后前端到底应该怎么学才好?
如果你打算靠自己摸索自学,那么你首先要了解学习前端的基本大纲,这是你将要学习的主要内容,理解以及掌握好这些内容,便可以找到一份初级的前端开发工作。你还需要有一套完整的前端学习教程,作为初学者最好的方式就是看视频教程学习,初学者容易理解接受。
不要选择买书学习,这样的方式没有几个人能学会,基本都是看不下去书,也看不懂书。如果喜欢看书的学弟,可以买一些经典的书籍作为辅助即可,主要还是以看教程为主。每天抽出固定几个小时学习,做好长期学习的准备。学习编程并不是每天光看视频,你学习编程最重要的目的是为了编写软件产品,提供给大众使用,所以用手写出代码实现功能才是我们要做的事情。
开源分享:【大厂前端面试题解析+核心总结学习笔记+真实项目实战+最新讲解视频】


 被折叠的 条评论
为什么被折叠?
被折叠的 条评论
为什么被折叠?
 到【灌水乐园】发言


