


最后
对于很多Java工程师而言,想要提升技能,往往是自己摸索成长,不成体系的学习效果低效漫长且无助。
整理的这些资料希望对Java开发的朋友们有所参考以及少走弯路,本文的重点是你有没有收获与成长,其余的都不重要,希望读者们能谨记这一点。
再分享一波我的Java面试真题+视频学习详解+技能进阶书籍

这里为了做演示,把用户名、密码和所属角色都写在代码里了,正式环境中,这里应该是从数据库或者其他地方根据用户名将加密后的密码及所属角色查出来的。账号 admin ,密码 123456,稍后在换取 token 的时候会用到。并且给这个用户设置 “ROLE_ADMIN” 角色。
5、OAuth2 配置文件
创建一个配置文件继承自 AuthorizationServerConfigurerAdapter.
@Configuration
@EnableAuthorizationServer
public class OAuth2Config extends AuthorizationServerConfigurerAdapter {
@Autowired
public PasswordEncoder passwordEncoder;
@Autowired
public UserDetailsService kiteUserDetailsService;
@Autowired
private AuthenticationManager authenticationManager;
@Autowired
private TokenStore redisTokenStore;
@Override
public void configure(final AuthorizationServerEndpointsConfigurer endpoints) throws Exception {
/**
- redis token 方式
*/
endpoints.authenticationManager(authenticationManager)
.userDetailsService(kiteUserDetailsService)
.tokenStore(redisTokenStore);
}
@Override
public void configure(ClientDetailsServiceConfigurer clients) throws Exception {
clients.inMemory()
.withClient(“order-client”)
.secret(passwordEncoder.encode(“order-secret-8888”))
.authorizedGrantTypes(“refresh_token”, “authorization_code”, “password”)
.accessTokenValiditySeconds(3600)
.scopes(“all”)
.and()
.withClient(“user-client”)
.secret(passwordEncoder.encode(“user-secret-8888”))
.authorizedGrantTypes(“refresh_token”, “authorization_code”, “password”)
.accessTokenValiditySeconds(3600)
.scopes(“all”);
}
@Override
public void configure(AuthorizationServerSecurityConfigurer security) throws Exception {
security.allowFormAuthenticationForClients();
security.checkTokenAccess(“isAuthenticated()”);
security.tokenKeyAccess(“isAuthenticated()”);
}
}
有三个 configure 方法的重写。
AuthorizationServerEndpointsConfigurer参数的重写
endpoints.authenticationManager(authenticationManager)
.userDetailsService(kiteUserDetailsService)
.tokenStore(redisTokenStore);
复制代码
authenticationManage() 调用此方法才能支持 password 模式。
userDetailsService() 设置用户验证服务。
tokenStore() 指定 token 的存储方式。
redisTokenStore Bean 的定义如下:
@Configuration
public class RedisTokenStoreConfig {
@Autowired
private RedisConnectionFactory redisConnectionFactory;
@Bean
public TokenStore redisTokenStore (){
return new RedisTokenStore(redisConnectionFactory);
}
}
ClientDetailsServiceConfigurer参数的重写,在这里定义各个端的约束条件。包括
ClientId、Client-Secret:这两个参数对应请求端定义的 cleint-id 和 client-secret
authorizedGrantTypes 可以包括如下几种设置中的一种或多种:
-
authorization_code:授权码类型。
-
implicit:隐式授权类型。
-
password:资源所有者(即用户)密码类型。
-
client_credentials:客户端凭据(客户端ID以及Key)类型。
-
refresh_token:通过以上授权获得的刷新令牌来获取新的令牌。
accessTokenValiditySeconds:token 的有效期
scopes:用来限制客户端访问的权限,在换取的 token 的时候会带上 scope 参数,只有在 scopes 定义内的,才可以正常换取 token。
上面代码中是使用 inMemory 方式存储的,将配置保存到内存中,相当于硬编码了。正式环境下的做法是持久化到数据库中,比如 mysql 中。
具体的做法如下:
- 在数据库中增加表,并插入数据
create table oauth_client_details (
client_id VARCHAR(256) PRIMARY KEY,
resource_ids VARCHAR(256),
client_secret VARCHAR(256),
scope VARCHAR(256),
authorized_grant_types VARCHAR(256),
web_server_redirect_uri VARCHAR(256),
authorities VARCHAR(256),
access_token_validity INTEGER,
refresh_token_validity INTEGER,
additional_information VARCHAR(4096),
autoapprove VARCHAR(256)
);
INSERT INTO oauth_client_details
(client_id, client_secret, scope, authorized_grant_types,
web_server_redirect_uri, authorities, access_token_validity,
refresh_token_validity, additional_information, autoapprove)
VALUES
(‘user-client’, ‘$2a 10 10 10o2l5kA7z.Caekp72h5kU7uqdTDrlamLq.57M1F6ulJln9tRtOJufq’, ‘all’,
‘authorization_code,refresh_token,password’, null, null, 3600, 36000, null, true);
INSERT INTO oauth_client_details
(client_id, client_secret, scope, authorized_grant_types,
web_server_redirect_uri, authorities, access_token_validity,
refresh_token_validity, additional_information, autoapprove)
VALUES
(‘order-client’, ‘$2a 10 10 10GoIOhjqFKVyrabUNcie8d.ADX.qZSxpYbO6YK4L2gsNzlCIxEUDlW’, ‘all’,
‘authorization_code,refresh_token,password’, null, null, 3600, 36000, null, true);
注意: client_secret 字段不能直接是 secret 的原始值,需要经过加密。因为是用的 BCryptPasswordEncoder,所以最终插入的值应该是经过 BCryptPasswordEncoder.encode()之后的值。
- 然后在配置文件 application.yml 中添加关于数据库的配置
spring:
datasource:
url: jdbc:mysql://localhost:3306/spring_cloud?characterEncoding=UTF-8&useSSL=false
username: root
password: password
hikari:
connection-timeout: 30000
idle-timeout: 600000
max-lifetime: 1800000
maximum-pool-size: 9
Spring Boot 2.0 之后默认使用 hikari 作为数据库连接池。如果使用其他连接池需要引入相关包,然后对应的增加配置。
- 在 OAuth2 配置类(OAuth2Config)中增加 DataSource 的注入
@Autowired
private DataSource dataSource;
- 将 public void configure(ClientDetailsServiceConfigurer clients)重写方法修改为如下:
@Override
public void configure(ClientDetailsServiceConfigurer clients) throws Exception {
JdbcClientDetailsServiceBuilder jcsb = clients.jdbc(dataSource);
jcsb.passwordEncoder(passwordEncoder);
}
还有一个重写的方法 public void configure(AuthorizationServerSecurityConfigurer security),这个方法限制客户端访问认证接口的权限。
security.allowFormAuthenticationForClients();
security.checkTokenAccess(“isAuthenticated()”);
security.tokenKeyAccess(“isAuthenticated()”);
第一行代码是允许客户端访问 OAuth2 授权接口,否则请求 token 会返回 401。
第二行和第三行分别是允许已授权用户访问 checkToken 接口和获取 token 接口。
完成之后,启动项目,如果你用的是 IDEA 会在下方的 Mapping 窗口中看到 oauth2 相关的 RESTful 接口。
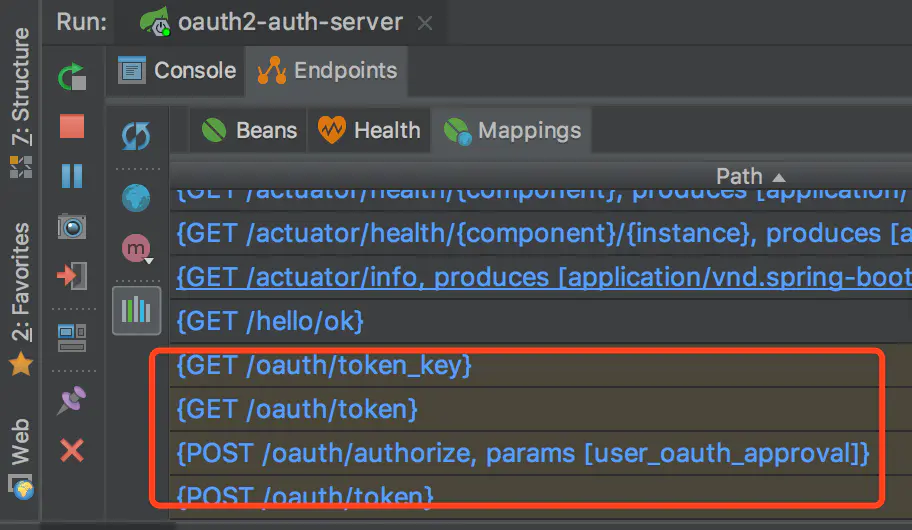
主要有如下几个:
POST /oauth/authorize 授权码模式认证授权接口
GET/POST /oauth/token 获取 token 的接口
POST /oauth/check_token 检查 token 合法性接口
创建用户客户端项目
上面创建完成了认证服务端,下面开始创建一个客户端,对应到我们系统中的业务相关的微服务。我们假设这个微服务项目是管理用户相关数据的,所以叫做用户客户端。
1、引用相关的 maven 包
org.springframework.boot
spring-boot-starter-web
org.springframework.cloud
spring-cloud-starter-oauth2
org.springframework.boot
spring-boot-starter-data-redis
2、application.yml 配置文件
spring:
application:
name: client-user
redis:
database: 2
host: localhost
port: 32768
password: 1qaz@WSX
jedis:
pool:
max-active: 8
max-idle: 8
min-idle: 0
timeout: 100ms
server:
port: 6101
servlet:
context-path: /client-user
security:
oauth2:
client:
client-id: user-client
client-secret: user-secret-8888
user-authorization-uri: http://localhost:6001/oauth/authorize
access-token-uri: http://localhost:6001/oauth/token
resource:
id: user-client
user-info-uri: user-info
authorization:
check-token-access: http://localhost:6001/oauth/check_token
上面是常规配置信息以及 redis 配置,重点是下面的 security 的配置,这里的配置稍有不注意就会出现 401 或者其他问题。
client-id、client-secret 要和认证服务中的配置一致,如果是使用 inMemory 还是 jdbc 方式。
user-authorization-uri 是授权码认证方式需要的,下一篇文章再说。
access-token-uri 是密码模式需要用到的获取 token 的接口。
authorization.check-token-access 也是关键信息,当此服务端接收到来自客户端端的请求后,需要拿着请求中的 token 到认证服务端做 token 验证,就是请求的这个接口
3、资源配置文件
在 OAuth2 的概念里,所有的接口都被称为资源,接口的权限也就是资源的权限,所以 Spring Security OAuth2 中提供了关于资源的注解 @EnableResourceServer,和 @EnableWebSecurity的作用类似。
@Configuration
@EnableResourceServer
@EnableGlobalMethodSecurity(prePostEnabled = true)
public class ResourceServerConfig extends ResourceServerConfigurerAdapter {
@Value(“${security.oauth2.client.client-id}”)
private String clientId;
@Value(“${security.oauth2.client.client-secret}”)
private String secret;
@Value(“${security.oauth2.authorization.check-token-access}”)
private String checkTokenEndpointUrl;
@Autowired
private RedisConnectionFactory redisConnectionFactory;
@Bean
public TokenStore redisTokenStore (){
return new RedisTokenStore(redisConnectionFactory);
}
@Bean
public RemoteTokenServices tokenService() {
RemoteTokenServices tokenService = new RemoteTokenServices();
tokenService.setClientId(clientId);
tokenService.setClientSecret(secret);
tokenService.setCheckTokenEndpointUrl(checkTokenEndpointUrl);
return tokenService;
}
@Override
public void configure(ResourceServerSecurityConfigurer resources) throws Exception {
resources.tokenServices(tokenService());
}
}
因为使用的是 redis 作为 token 的存储,所以需要特殊配置一下叫做 tokenService 的 Bean,通过这个 Bean 才能实现 token 的验证。
4、最后,添加一个 RESTful 接口
@Slf4j
@RestController
public class UserController {
@GetMapping(value = “get”)
//@PreAuthorize(“hasAuthority(‘ROLE_ADMIN’)”)
@PreAuthorize(“hasAnyRole(‘ROLE_ADMIN’)”)
public Object get(Authentication authentication){
//Authentication authentication = SecurityContextHolder.getContext().getAuthentication();
authentication.getCredentials();
OAuth2AuthenticationDetails details = (OAuth2AuthenticationDetails)authentication.getDetails();
String token = details.getTokenValue();
return token;
}
}
一个 RESTful 方法,只有当访问用户具有 ROLE_ADMIN 权限时才能访问,否则返回 401 未授权。
通过 Authentication 参数或者 SecurityContextHolder.getContext().getAuthentication() 可以拿到授权信息进行查看。
测试认证功能
1、启动认证服务端,启动端口为 6001
2、启动用户服务客户端,启动端口为6101
3、请求认证服务端获取 token
我是用 REST Client 来做访问请求的,请求格式如下:
POST http://localhost:6001/oauth/token?grant_type=password&username=admin&password=123456&scope=all
Accept: /
Cache-Control: no-cache
Authorization: Basic dXNlci1jbGllbnQ6dXNlci1zZWNyZXQtODg4OA==
假设咱们在一个 web 端使用,grant_type 是 password,表明这是使用 OAuth2 的密码模式。
username=admin 和 password=123456 就相当于在 web 端登录界面输入的用户名和密码,我们在认证服务端配置中固定了用户名是 admin 、密码是 123456,而线上环境中则应该通过查询数据库获取。
scope=all 是权限有关的,在认证服务的 OAuthConfig 中指定了 scope 为 all 。
Authorization 要加在请求头中,格式为 Basic 空格 base64(clientId:clientSecret),这个微服务客户端的 client-id 是 user-client,client-secret 是 user-secret-8888,将这两个值通过冒号连接,并使用 base64 编码(user-client:user-secret-8888)之后的值为 dXNlci1jbGllbnQ6dXNlci1zZWNyZXQtODg4OA==,可以通过 https://www.sojson.com/base64.html 在线编码获取。

运行请求后,如果参数都正确的话,获取到的返回内容如下,是一段 json 格式
{
“access_token”: “9f958300-5005-46ea-9061-323c9e6c7a4d”,
“token_type”: “bearer”,
“refresh_token”: “0f5871f5-98f1-405e-848e-80f641bab72e”,
“expires_in”: 3599,
“scope”: “all”
}
access_token : 就是之后请求需要带上的 token,也是本次请求的主要目的 token_type:为 bearer,这是 access token 最常用的一种形式 refresh_token:之后可以用这个值来换取新的 token,而不用输入账号密码 expires_in:token 的过期时间(秒)
4、用获取到的 token 请求资源接口
我们在用户客户端中定义了一个接口 http://localhost:6101/client-user/get,现在就拿着上一步获取的 token 来请求这个接口。
GET http://localhost:6101/client-user/get
Accept: /
Cache-Control: no-cache
Authorization: bearer ce334918-e666-455a-8ecd-8bd680415d84
同样需要请求头 Authorization,格式为 bearer + 空格 + token,正常情况下根据接口的逻辑,会把 token 原样返回。
5、token 过期后,用 refresh_token 换取 access_token
一般都会设置 access_token 的过期时间小于 refresh_token 的过期时间,以便在 access_token 过期后,不用用户再次登录的情况下,获取新的 access_token。
换取 access_token
POST http://localhost:6001/oauth/token?grant_type=refresh_token&refresh_token=706dac10-d48e-4795-8379-efe8307a2282
Accept: /
Cache-Control: no-cache
Authorization: Basic dXNlci1jbGllbnQ6dXNlci1zZWNyZXQtODg4OA==
grant_type 设置为 refresh_token。
refresh_token 设置为请求 token 时返回的 refresh_token 的值。
请求头加入 Authorization,格式依然是 Basic + 空格 + base64(client-id:client-secret)
请求成功后会返回和请求 token 同样的数据格式。
用 JWT 替换 redisToken
上面 token 的存储用的是 redis 的方案,Spring Security OAuth2 还提供了 jdbc 和 jwt 的支持,jdbc 的暂不考虑,现在来介绍用 JWT 的方式来实现 token 的存储。
用 JWT 的方式就不用把 token 再存储到服务端了,JWT 有自己特殊的加密方式,可以有效的防止数据被篡改,只要不把用户密码等关键信息放到 JWT 里就可以保证安全性。
认证服务端改造
先把有关 redis 的配置去掉。
添加 JwtConfig 配置类
@Configuration
public class JwtTokenConfig {
@Bean
public TokenStore jwtTokenStore() {
return new JwtTokenStore(jwtAccessTokenConverter());
}
@Bean
public JwtAccessTokenConverter jwtAccessTokenConverter() {
JwtAccessTokenConverter accessTokenConverter = new JwtAccessTokenConverter();
accessTokenConverter.setSigningKey(“dev”);
return accessTokenConverter;
}
}
JwtAccessTokenConverter是为了做 JWT 数据转换,这样做是因为 JWT 有自身独特的数据格式。如果没有了解过 JWT ,可以搜索一下先了解一下。
更改 OAuthConfig 配置类
@Autowired
private TokenStore jwtTokenStore;
@Autowired
private JwtAccessTokenConverter jwtAccessTokenConverter;
@Override
public void configure(final AuthorizationServerEndpointsConfigurer endpoints) throws Exception {
/**
- 普通 jwt 模式
*/
endpoints.tokenStore(jwtTokenStore)
.accessTokenConverter(jwtAccessTokenConverter)
.userDetailsService(kiteUserDetailsService)
/**
- 支持 password 模式
*/
.authenticationManager(authenticationManager);
}
注入 JWT 相关的 Bean,然后修改 configure(final AuthorizationServerEndpointsConfigurer endpoints) 方法为 JWT 存储模式。
改造用户客户端
修改 application.yml 配置文件
security:
oauth2:
client:
client-id: user-client
client-secret: user-secret-8888
user-authorization-uri: http://localhost:6001/oauth/authorize
access-token-uri: http://localhost:6001/oauth/token
resource:
jwt:
key-uri: http://localhost:6001/oauth/token_key
key-value: dev
注意认证服务端 JwtAccessTokenConverter设置的 SigningKey 要和配置文件中的 key-value 相同,不然会导致无法正常解码 JWT ,导致验证不通过。
ResourceServerConfig 类的配置
@Configuration
@EnableResourceServer
@EnableGlobalMethodSecurity(prePostEnabled = true)
public class ResourceServerConfig extends ResourceServerConfigurerAdapter {
@Bean
public TokenStore jwtTokenStore() {
return new JwtTokenStore(jwtAccessTokenConverter());
}
@Bean
public JwtAccessTokenConverter jwtAccessTokenConverter() {
JwtAccessTokenConverter accessTokenConverter = new JwtAccessTokenConverter();
accessTokenConverter.setSigningKey(“dev”);
accessTokenConverter.setVerifierKey(“dev”);
return accessTokenConverter;
}
更多:Java进阶核心知识集
包含:JVM,JAVA集合,网络,JAVA多线程并发,JAVA基础,Spring原理,微服务,Zookeeper,Kafka,RabbitMQ,Hbase,MongoDB,Cassandra,设计模式,负载均衡,数据库,一致性哈希,JAVA算法,数据结构,加密算法,分布式缓存等等

高效学习视频
sourceServerConfig 类的配置
@Configuration
@EnableResourceServer
@EnableGlobalMethodSecurity(prePostEnabled = true)
public class ResourceServerConfig extends ResourceServerConfigurerAdapter {
@Bean
public TokenStore jwtTokenStore() {
return new JwtTokenStore(jwtAccessTokenConverter());
}
@Bean
public JwtAccessTokenConverter jwtAccessTokenConverter() {
JwtAccessTokenConverter accessTokenConverter = new JwtAccessTokenConverter();
accessTokenConverter.setSigningKey(“dev”);
accessTokenConverter.setVerifierKey(“dev”);
return accessTokenConverter;
}
更多:Java进阶核心知识集
包含:JVM,JAVA集合,网络,JAVA多线程并发,JAVA基础,Spring原理,微服务,Zookeeper,Kafka,RabbitMQ,Hbase,MongoDB,Cassandra,设计模式,负载均衡,数据库,一致性哈希,JAVA算法,数据结构,加密算法,分布式缓存等等
[外链图片转存中…(img-aPUv4vs7-1715709548221)]


 2978
2978

 被折叠的 条评论
为什么被折叠?
被折叠的 条评论
为什么被折叠?
 到【灌水乐园】发言


