


既有适合小白学习的零基础资料,也有适合3年以上经验的小伙伴深入学习提升的进阶课程,涵盖了95%以上软件测试知识点,真正体系化!
由于文件比较多,这里只是将部分目录截图出来,全套包含大厂面经、学习笔记、源码讲义、实战项目、大纲路线、讲解视频,并且后续会持续更新
openstack service list
openstack domain create --description “Default Domain” default
openstack project create --domain default \
--description “Admin Project” admin
openstack user create --domain default \
--password admin admin
openstack role create admin
openstack role add --project admin --user admin admin
openstack project create --domain default \
--description “Service Project” service
openstack project create --domain default \
--description “Demo Project” demo
openstack user create --domain default \
--password demo demo
openstack role create user
openstack role add --project demo --user demo user
参考
https://docs.openstack.org/mitaka/zh_CN/install-guide-rdo/keystone-users.html
下面参考桑面的 -verify
unset OS_TOKEN OS_URL
openstack --os-auth-url http://controller:35357/v3 \
--os-project-domain-name default --os-user-domain-name default \
--os-project-name admin --os-username admin token issue
admin
vim admin-openrc
export OS_PROJECT_DOMAIN_NAME=default
export OS_USER_DOMAIN_NAME=default
export OS_PROJECT_NAME=admin
export OS_USERNAME=admin
export OS_PASSWORD=admin
export OS_AUTH_URL=http://controller:35357/v3
export OS_IDENTITY_API_VERSION=3
export OS_IMAGE_API_VERSION=2
vim demo-openrc
export OS_PROJECT_DOMAIN_NAME=default
export OS_USER_DOMAIN_NAME=default
export OS_PROJECT_NAME=demo
export OS_USERNAME=demo
export OS_PASSWORD=demo
export OS_AUTH_URL=http://controller:5000/v3
export OS_IDENTITY_API_VERSION=3
export OS_IMAGE_API_VERSION=2
grep -v ^# /etc/keystone/keystone.conf |uniq
/[token]
下面看你如何使用 如果用管理员使用下面第一个命令
source admin-openrc
source demo-openrc
##############################
. admin-openrc
[root@controller ~]# openstack token issue
±-----------±---------------------------------------------------------------------------------+
| Field | Value |
±-----------±---------------------------------------------------------------------------------+
| expires | 2019-04-14T04:43:56.179535Z |
| id | gAAAAABcsqx8nWMvP64e9qV6MuFh5Xx02GXnC8iavmPpEGoBJ3wlvqo7UOIbjWGILuPbXBOQAWuZT41O |
| | AnDY7b1C1VPZ9fe1-FbhXU8aE_C6aMSuZX6xvo3CHBc2mYprjTn5eJ5BIuibXidvMNkM0UtzEoYIMZsq |
| | rz_S_bYYGwXmv1A01z6DU1g |
| project_id | 384460d6ae4d4c69b598262b081836d0 |
| user_id | 54dd35e3bed048b995994371d7d4ba93
创建glance
MariaDB [(none)]> CREATE DATABASE glance;
Query OK, 1 row affected (0.00 sec)
MariaDB [(none)]> GRANT ALL PRIVILEGES ON glance.* TO ‘glance’@‘localhost’ \
IDENTIFIED BY ‘glance’;
Query OK, 0 rows affected (0.00 sec)
MariaDB [(none)]> GRANT ALL PRIVILEGES ON glance.* TO ‘glance’@‘%’ IDENTIFIED BY ‘glance’; Query OK, 0 rows affected (0.00 sec)
openstack user create --domain default --password glance glance
openstack role add --project service --user glance admin
openstack role add --project service --user glance admin
openstack service create --name glance \
  --description "OpenStack Image" image
openstack endpoint create --region RegionOne \
  image public http://controller:9292
openstack endpoint create --region RegionOne \
  image internal http://controller:9292
openstack endpoint create --region RegionOne \
  image admin http://controller:9292
yum install openstack-glance -y
vim /etc/glance/glance-api.conf
[database]
connection = mysql+pymysql://glance:glance@controller/glance
[keystone_authtoken]
auth_uri = http://controller:5000
auth_url = http://controller:35357
memcached_servers = controller:11211
auth_type = password
project_domain_name = default
user_domain_name = default
project_name = service
username = glance
password = glance
[paste_deploy]
flavor = keystone
[glance_store]
stores = file,http
default_store = file
filesystem_store_datadir = /var/lib/glance/images/
vim /etc/glance/glance-registry.conf
[database]
connection = mysql+pymysql://glance:glance@controller/glance
[keystone_authtoken]
auth_uri = http://controller:5000
auth_url = http://controller:35357
memcached_servers = controller:11211
auth_type = password
project_domain_name = default
user_domain_name = default
project_name = service
username = glance
password = glance
[paste_deploy]

flavor = keystone
su -s /bin/sh -c “glance-manage db_sync” glance
get cirros-0.3.5-x86_64-disk.img
systemctl enable openstack-glance-api.service \
  openstack-glance-registry.service
systemctl start openstack-glance-api.service \
  openstack-glance-registry.service
openstack image create "cirros" \
  --file cirros-0.3.5-x86_64-disk.img \
  --disk-format qcow2 --container-format bare \
  --public
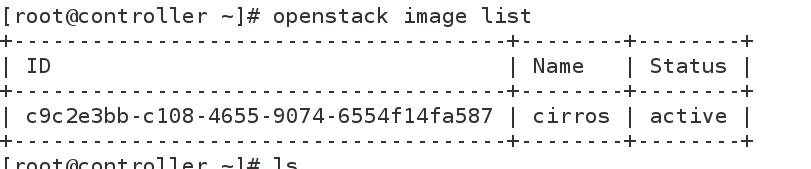
[root@controller ~]# openstack image list
±-------------------------------------±-------±-------+
| ID | Name | Status |
±-------------------------------------±-------±-------+
| c9c2e3bb-c108-4655-9074-6554f14fa587 | cirros | active |
±-------------------------------------±-------±-------+
计算节点
https://docs.openstack.org/mitaka/zh_CN/install-guide-rdo/common/get_started_compute.html
https://docs.openstack.org/mitaka/zh_CN/install-guide-rdo/nova-controller-install.html
mysql -u root -p
CREATE DATABASE nova_api;
CREATE DATABASE nova;
MariaDB [(none)]> CREATE DATABASE nova_api;
Query OK, 1 row affected (0.00 sec)
MariaDB [(none)]> CREATE DATABASE nova;
Query OK, 1 row affected (0.00 sec)
MariaDB [(none)]> GRANT ALL PRIVILEGES ON nova_api.* TO ‘nova’@‘localhost’ IDENTIFIED BY ‘nova’;
Query OK, 0 rows affected (0.00 sec)
MariaDB [(none)]> GRANT ALL PRIVILEGES ON nova_api.* TO ‘nova’@‘%’ IDENTIFIED BY ‘nova’;
Query OK, 0 rows affected (0.00 sec)
MariaDB [(none)]> GRANT ALL PRIVILEGES ON nova.* TO ‘nova’@‘localhost’ IDENTIFIED BY ‘nova’;
Query OK, 0 rows affected (0.00 sec)
MariaDB [(none)]> GRANT ALL PRIVILEGES ON nova.* TO ‘nova’@‘%’ IDENTIFIED BY ‘nova’;
Query OK, 0 rows affected (0.00 sec)
. admin-openrc
openstack user create --domain default --password nova nova
openstack role add --project service --user nova admin
openstack service create --name nova \
  --description "OpenStack Compute" compute
openstack endpoint create --region RegionOne \
  compute public http://controller:8774/v2.1/%\(tenant_id\)s
openstack endpoint create --region RegionOne \
  compute internal http://controller:8774/v2.1/%\(tenant_id\)s
 openstack endpoint create --region RegionOne \
  compute admin http://controller:8774/v2.1/%\(tenant_id\)s
yum install openstack-nova-api openstack-nova-conductor \
  openstack-nova-console openstack-nova-novncproxy \
  openstack-nova-scheduler
 -y
vim /etc/nova/nova.conf
[vnc]
vncserver_listen = $my_ip
vncserver_proxyclient_address = $my_ip
[oslo_messaging_rabbit]
rabbit_host = controller
rabbit_userid = openstack
rabbit_password = openstack
[oslo_concurrency]
lock_path = /var/lib/nova/tmp
[keystone_authtoken]
auth_uri = http://controller:5000
auth_url = http://controller:35357
memcached_servers = controller:11211
auth_type = password
project_domain_name = default
user_domain_name = default
project_name = service
username = nova
password = nova
[glance]
api_servers = http://controller:9292
[database]
connection = mysql+pymysql://nova:nova@controller/nova
[api_database]
connection = mysql+pymysql://nova:nova@controller/nova_api
[DEFAULT]
enabled_apis = osapi_compute,metadata
rpc_backend = rabbit
auth_strategy = keystone
my_ip = 172.25.11.1
su -s /bin/sh -c "nova-manage api_db sync" nova
su -s /bin/sh -c "nova-manage db sync" nova
systemctl enable openstack-nova-api.service \
  openstack-nova-consoleauth.service openstack-nova-scheduler.service \
  openstack-nova-conductor.service openstack-nova-novncproxy.service
systemctl start openstack-nova-api.service \
  openstack-nova-consoleauth.service openstack-nova-scheduler.service \
  openstack-nova-conductor.service openstack-nova-novncproxy.service
安装和配置计算节点
server2 (compute1) 进行如下操作
yum install openstack-nova-compute -y
yum upgrade
vim /etc/nova/nova.conf
[DEFAULT]
rpc_backend = rabbit
auth_strategy = keystone
my_ip = 172.25.11.2              #自身compute1的IP
use_neutron = True
firewall_driver = nova.virt.firewall.NoopFirewallDriver
[oslo_messaging_rabbit]
rabbit_host = controller
rabbit_userid = openstack
rabbit_password = openstack

[keystone_authtoken]
auth_uri = http://controller:5000
auth_url = http://controller:35357
memcached_servers = controller:11211
auth_type = password
project_domain_name = default
user_domain_name = default
project_name = service
username = nova
password = nova
[vnc]
...
enabled = True
vncserver_listen = 0.0.0.0
vncserver_proxyclient_address = $my_ip
novncproxy_base_url = http://controller:6080/vnc_auto.html
[glance]
...
api_servers = http://controller:9292
[oslo_concurrency]
...
lock_path = /var/lib/nova/tmp
egrep -c '(vmx|svm)' /proc/cpuinfo
如果这个命令返回了 one or greater 的值,那么你的计算节点支持硬件加速且不需要额外的配置。
如果这个命令返回了 zero 值,那么你的计算节点不支持硬件加速。你必须配置 libvirt 来使用 QEMU 去代替 KVM
- 在 /etc/nova/nova.conf 文件的 [libvirt] 区域做出如下的编辑:
[libvirt]
...
virt_type = qemu
systemctl enable libvirtd.service openstack-nova-compute.service
systemctl start libvirtd.service openstack-nova-compute.service
[root@controller ~]# . admin-openrc
[root@controller ~]# openstack compute service list

网络服务
参考
https://docs.openstack.org/mitaka/zh_CN/install-guide-rdo/common/get_started_networking.html
controller上
CREATE DATABASE neutron;
GRANT ALL PRIVILEGES ON neutron.* TO 'neutron'@'localhost' \
  IDENTIFIED BY 'neutron';
GRANT ALL PRIVILEGES ON neutron.* TO 'neutron'@'%' \
  IDENTIFIED BY 'neutron';
. admin-openrc
openstack user create --domain default --password neutron neutron
openstack role add --project service --user neutron admin
openstack service create --name neutron \
  --description "OpenStack Networking" network
openstack endpoint create --region RegionOne \
  network public http://controller:9696
openstack endpoint create --region RegionOne \
  network internal http://controller:9696
openstack endpoint create --region RegionOne \
  network admin http://controller:9696
yum install openstack-neutron -y
vim /etc/neutron/metadata_agent.ini
[DEFAULT]
...
nova_metadata_ip = controller
metadata_proxy_shared_secret = westos
这里选择公共网络
yum install openstack-neutron openstack-neutron-ml2 \
  openstack-neutron-linuxbridge ebtables -y
vim /etc/neutron/neutron.conf
[database]
...
connection = mysql+pymysql://neutron:neutron@controller/neutron
[DEFAULT]
core_plugin = ml2
service_plugins =
rpc_backend = rabbit
auth_strategy = keystone
notify_nova_on_port_status_changes = True
notify_nova_on_port_data_changes = True
[oslo_messaging_rabbit]
...
rabbit_host = controller
rabbit_userid = openstack
rabbit_password = openstack

[keystone_authtoken]
...
auth_uri = http://controller:5000
auth_url = http://controller:35357
memcached_servers = controller:11211
auth_type = password
project_domain_name = default
user_domain_name = default
project_name = service
username = neutron
password = neutron

[nova]
...
auth_url = http://controller:35357
auth_type = password
project_domain_name = default
user_domain_name = default
region_name = RegionOne
project_name = service
username = nova
password = nova
[oslo_concurrency]
...
lock_path = /var/lib/neutron/tmp
vim /etc/neutron/plugins/ml2/ml2_conf.ini
[ml2]
type_drivers = flat,vlan
tenant_network_types =
mechanism_drivers = linuxbridge
extension_drivers = port_security
[ml2_type_flat]
...
flat_networks = provider
[securitygroup]
...
enable_ipset = True
vim /etc/neutron/plugins/ml2/linuxbridge_agent.ini
[linux_bridge]
physical_interface_mappings = provider:eth1    #这里选择eth1
[vxlan]
enable_vxlan = False
[securitygroup]
...
enable_security_group = True
firewall_driver = neutron.agent.linux.iptables_firewall.IptablesFirewallDriver
vim /etc/neutron/dhcp_agent.ini
[DEFAULT]
...
interface_driver = neutron.agent.linux.interface.BridgeInterfaceDriver
dhcp_driver = neutron.agent.linux.dhcp.Dnsmasq
enable_isolated_metadata = True
为计算节点配置网络服务
compute1
vim  /etc/nova/nova.conf
[neutron]
url = http://controller:9696
auth_url = http://controller:35357
auth_type = password
project_domain_name = default
user_domain_name = default
region_name = RegionOne
project_name = service
username = neutron
password = neutron

service_metadata_proxy = True
metadata_proxy_shared_secret = westos
controller
ln -s /etc/neutron/plugins/ml2/ml2_conf.ini /etc/neutron/plugin.ini
su -s /bin/sh -c "neutron-db-manage --config-file /etc/neutron/neutron.conf \
  --config-file /etc/neutron/plugins/ml2/ml2_conf.ini upgrade head" neutron
systemctl restart openstack-nova-api.service
systemctl enable neutron-server.service \
  neutron-linuxbridge-agent.service neutron-dhcp-agent.service \
  neutron-metadata-agent.service

systemctl start neutron-server.service \
  neutron-linuxbridge-agent.service neutron-dhcp-agent.service \
  neutron-metadata-agent.service
neutron agent-list


neutron ext-list

https://docs.openstack.org/mitaka/zh_CN/install-guide-rdo/launch-instance-networks-selfservice.html
https://docs.openstack.org/mitaka/zh_CN/install-guide-rdo/launch-instance-networks-provider.html
计算节点的网络配置
https://docs.openstack.org/mitaka/zh_CN/install-guide-rdo/neutron-compute-install.html
yum install openstack-neutron-linuxbridge ebtables ipset -y
yum install openstack-neutron openstack-neutron-ml2 openstack-neutron-linuxbridge ebtables -y
vim /etc/neutron/plugins/ml2/linuxbridge_agent.ini
[linux_bridge]
physical_interface_mappings = provider:eth1
[vxlan]
enable_vxlan = False
[securitygroup]
...
enable_security_group = True
firewall_driver = neutron.agent.linux.iptables_firewall.IptablesFirewallDriver
vim /etc/neutron/neutron.conf
[DEFAULT]
...
rpc_backend = rabbit

[oslo_messaging_rabbit]
...
rabbit_host = controller
rabbit_userid = openstack
rabbit_password = openstack
[DEFAULT]
...
auth_strategy = keystone

[keystone_authtoken]
...
auth_uri = http://controller:5000
auth_url = http://controller:35357
memcached_servers = controller:11211
auth_type = password
project_domain_name = default
user_domain_name = default
project_name = service
username = neutron
password = neutron
[oslo_concurrency]
...
lock_path = /var/lib/neutron/tmp
vim /etc/nova/nova.conf
[neutron]
...
url = http://controller:9696
auth_url = http://controller:35357
auth_type = password
project_domain_name = default
user_domain_name = default
region_name = RegionOne
project_name = service
username = neutron
password = neutron
systemctl restart openstack-nova-compute.service
# systemctl enable neutron-linuxbridge-agent.service
# systemctl start neutron-linuxbridge-agent.service
控制节点上
https://docs.openstack.org/mitaka/zh_CN/install-guide-rdo/launch-instance-networks-provider.html
neutron net-create --shared --provider:physical_network provider \
  --provider:network_type flat provider
neutron subnet-create --name provider \
  --allocation-pool start=172.25.11.100,end=172.25.11.200 \
  --dns-nameserver 114.114.114.114 --gateway=172.25.11.250 \
  provider 172.25.11.0/24
openstack flavor create --id 0 --vcpus 1 --ram 64 --disk 1 m1.nano

. demo-openrc
ssh-keygen -q -N ""
openstack keypair create --public-key ~/.ssh/id_rsa.pub mykey
openstack keypair list
openstack security group rule create --proto icmp default
openstack security group rule create --proto tcp --dst-port 22 default
openstack flavor list

[root@controller ~]# openstack image list
±-------------------------------------±-------±-------+
| ID | Name | Status |
±-------------------------------------±-------±-------+
| c9c2e3bb-c108-4655-9074-6554f14fa587 | cirros | active |
±-------------------------------------±-------±-------+
[root@controller ~]# openstack network list
±-------------------------------------±---------±-------------------------------------+
| ID | Name | Subnets |
±-------------------------------------±---------±-------------------------------------+
| 3404c6a4-0fea-4e1a-9da9-a229001ae746 | provider | fcc4e120-5673-478a-a43b-ad5cc39f1d6b |
±-------------------------------------±---------±-------------------------------------+
[root@controller ~]# openstack security group list
±-------------------------------------±--------±-----------------------±---------------------------------+
| ID | Name | Description | Project |
±-------------------------------------±--------±-----------------------±---------------------------------+
| 1bec09c1-4fc9-4092-b14d-40ca612b5a42 | default | Default security group | b5df2514678d41f58b20788d14968f93 |
±-------------------------------------±--------±-----------------------±---------------------------------+
更新虚拟机qemu版本
[root@compute1 qemu]# ls
libcacard-2.5.2-2.1.el7.x86_64.rpm qemu-kvm-common-ev-2.6.0-28.el7.10.1.x86_64.rpm
qemu-img-ev-2.6.0-28.el7.10.1.x86_64.rpm qemu-kvm-ev-2.6.0-28.el7.10.1.x86_64.rpm
compute1:
vim /etc/nova/nova.conf
[libvirt]
cpu_mode = none
systemctl restart openstack-nova-compute
net-id选择 openstack network list 的
openstack server create --flavor m1.nano --image cirros --nic net-id=1bec09c1-4fc9-4092-b14d-40ca612b5a42 --security-group default --key-name mykey server1
https://docs.openstack.org/mitaka/zh_CN/install-guide-rdo/launch-instance.html
openstack server stop server1
openstack console url show server1
openstack server list
帐号密码
cirros
cubswin:)
controller上免密
ssh cirros@172.25.11.101
使用图形 dashboard
参考

既有适合小白学习的零基础资料,也有适合3年以上经验的小伙伴深入学习提升的进阶课程,涵盖了95%以上软件测试知识点,真正体系化!
由于文件比较多,这里只是将部分目录截图出来,全套包含大厂面经、学习笔记、源码讲义、实战项目、大纲路线、讲解视频,并且后续会持续更新
-----±---------------------------------+
更新虚拟机qemu版本
[root@compute1 qemu]# ls
libcacard-2.5.2-2.1.el7.x86_64.rpm qemu-kvm-common-ev-2.6.0-28.el7.10.1.x86_64.rpm
qemu-img-ev-2.6.0-28.el7.10.1.x86_64.rpm qemu-kvm-ev-2.6.0-28.el7.10.1.x86_64.rpm
compute1:
vim /etc/nova/nova.conf
[libvirt]
cpu_mode = none
systemctl restart openstack-nova-compute
net-id选择 openstack network list 的
openstack server create --flavor m1.nano --image cirros --nic net-id=1bec09c1-4fc9-4092-b14d-40ca612b5a42 --security-group default --key-name mykey server1
https://docs.openstack.org/mitaka/zh_CN/install-guide-rdo/launch-instance.html
openstack server stop server1
openstack console url show server1
openstack server list
帐号密码
cirros
cubswin:)
controller上免密
ssh cirros@172.25.11.101
使用图形 dashboard
参考
[外链图片转存中…(img-6vnDi6w6-1715811772598)]
[外链图片转存中…(img-Bh5pRMV3-1715811772599)]
[外链图片转存中…(img-mZVX0e0E-1715811772599)]
既有适合小白学习的零基础资料,也有适合3年以上经验的小伙伴深入学习提升的进阶课程,涵盖了95%以上软件测试知识点,真正体系化!
由于文件比较多,这里只是将部分目录截图出来,全套包含大厂面经、学习笔记、源码讲义、实战项目、大纲路线、讲解视频,并且后续会持续更新


 1504
1504


 被折叠的 条评论
为什么被折叠?
被折叠的 条评论
为什么被折叠?
 到【灌水乐园】发言


