


网上学习资料一大堆,但如果学到的知识不成体系,遇到问题时只是浅尝辄止,不再深入研究,那么很难做到真正的技术提升。
一个人可以走的很快,但一群人才能走的更远!不论你是正从事IT行业的老鸟或是对IT行业感兴趣的新人,都欢迎加入我们的的圈子(技术交流、学习资源、职场吐槽、大厂内推、面试辅导),让我们一起学习成长!
请求参数:
输入参数:mobileCode = 字符串(手机号码,最少前7位数字),userID = 字符串(商业用户ID)
免费用户为空字符串;返回数据:字符串(手机号码:省份 城市 手机卡类型)。

1.2Post请求
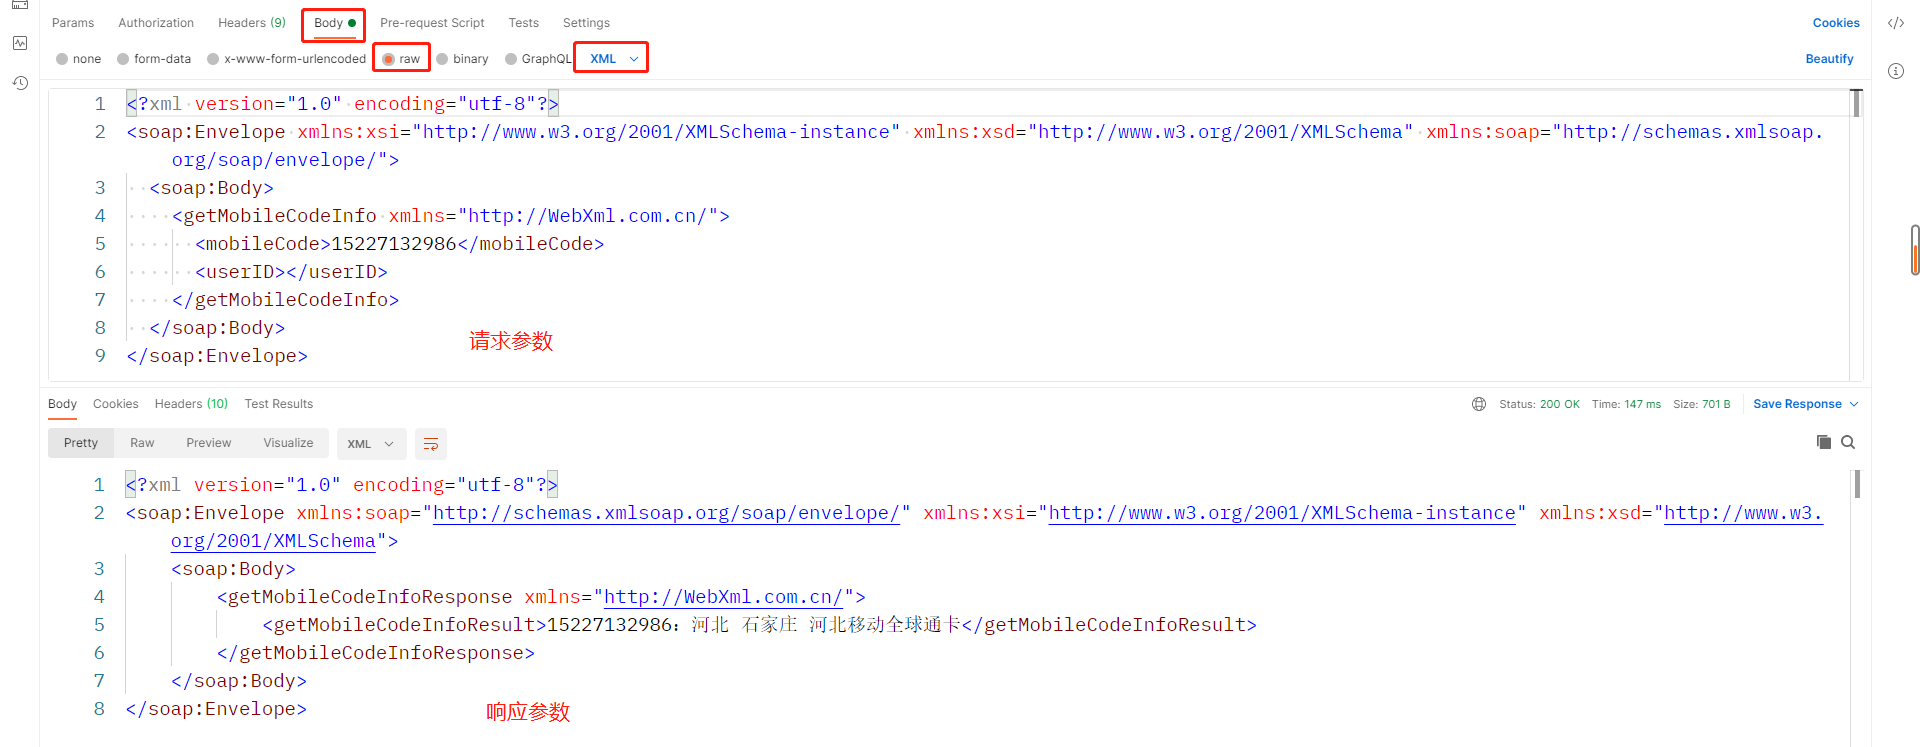
1.2.1请求数据为xml格式
请求文档地址
http://ws.webxml.com.cn/WebServices/MobileCodeWS.asmx?op=getMobileCodeInfo
请求文档
请求方法&请求头&请求地址
POST /WebServices/MobileCodeWS.asmx HTTP/1.1
Host: ws.webxml.com.cn
Content-Type: text/xml; charset=utf-8
Content-Length: length
SOAPAction: "http://WebXml.com.cn/getMobileCodeInfo"
请求参数
<?xml version="1.0" encoding="utf-8"?>
<soap:Envelope xmlns:xsi="http://www.w3.org/2001/XMLSchema-instance" xmlns:xsd="http://www.w3.org/2001/XMLSchema" xmlns:soap="http://schemas.xmlsoap.org/soap/envelope/">
  <soap:Body>
    <getMobileCodeInfo xmlns="http://WebXml.com.cn/">
      <mobileCode>string</mobileCode>
      <userID>string</userID>
    </getMobileCodeInfo>
  </soap:Body>
</soap:Envelope>
HTTP/1.1 200 OK
Content-Type: text/xml; charset=utf-8
Content-Length: length
响应参数
<?xml version="1.0" encoding="utf-8"?>
<soap:Envelope xmlns:xsi="http://www.w3.org/2001/XMLSchema-instance" xmlns:xsd="http://www.w3.org/2001/XMLSchema" xmlns:soap="http://schemas.xmlsoap.org/soap/envelope/">
  <soap:Body>
    <getMobileCodeInfoResponse xmlns="http://WebXml.com.cn/">
      <getMobileCodeInfoResult>string</getMobileCodeInfoResult>
    </getMobileCodeInfoResponse>
  </soap:Body>
</soap:Envelope>

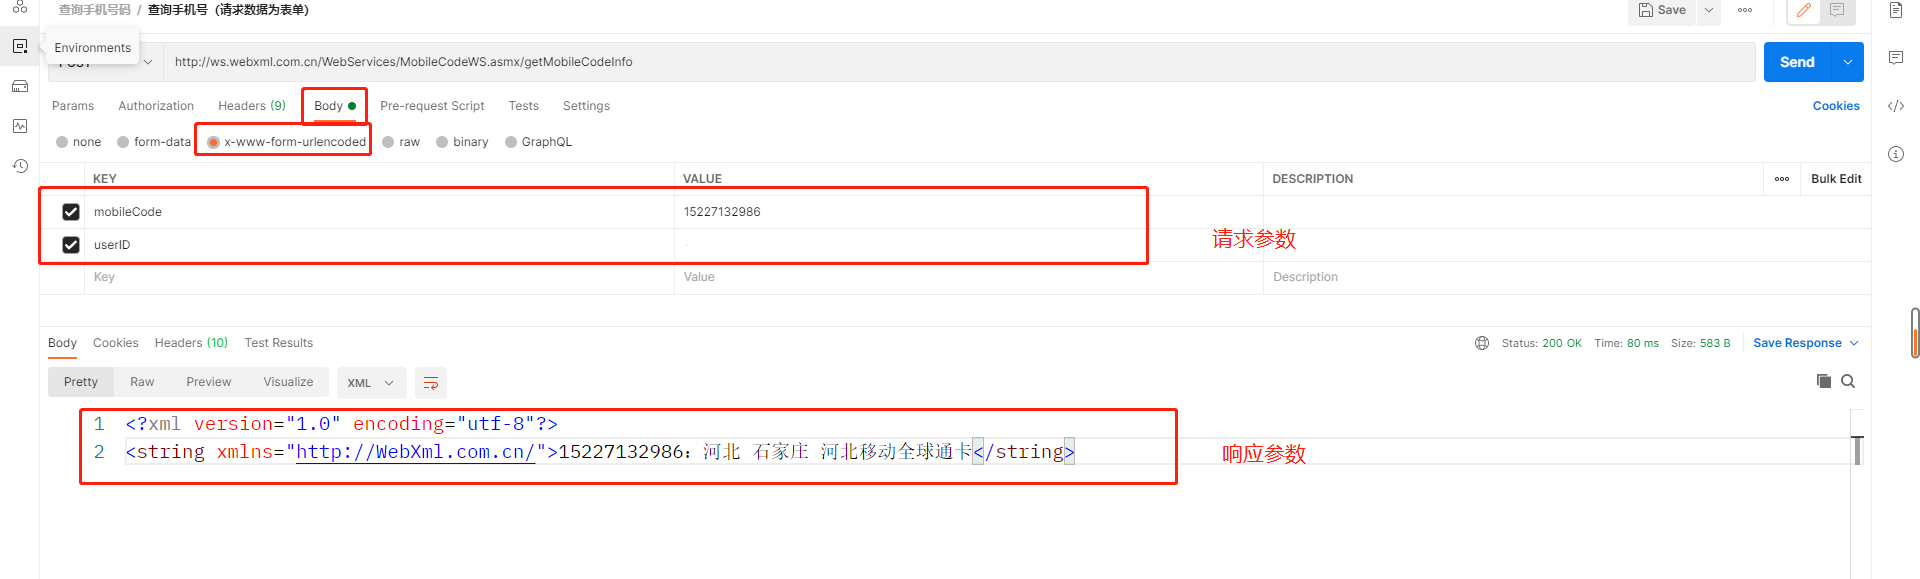
1.2.2请求数据为表单格式
接口文档地址
接口文档
请求方法&请求地址&请求头

POST /WebServices/MobileCodeWS.asmx/getMobileCodeInfo HTTP/1.1
Host: ws.webxml.com.cn
Content-Type: application/x-www-form-urlencoded
Content-Length: length
请求参数

mobileCode=string&userID=string
HTTP/1.1 200 OK
Content-Type: text/xml; charset=utf-8
Content-Length: length
响应参数:

<?xml version="1.0" encoding="utf-8"?>
<string xmlns="http://WebXml.com.cn/">string</string>

2.Postman的使用
2.1Postman添加合集
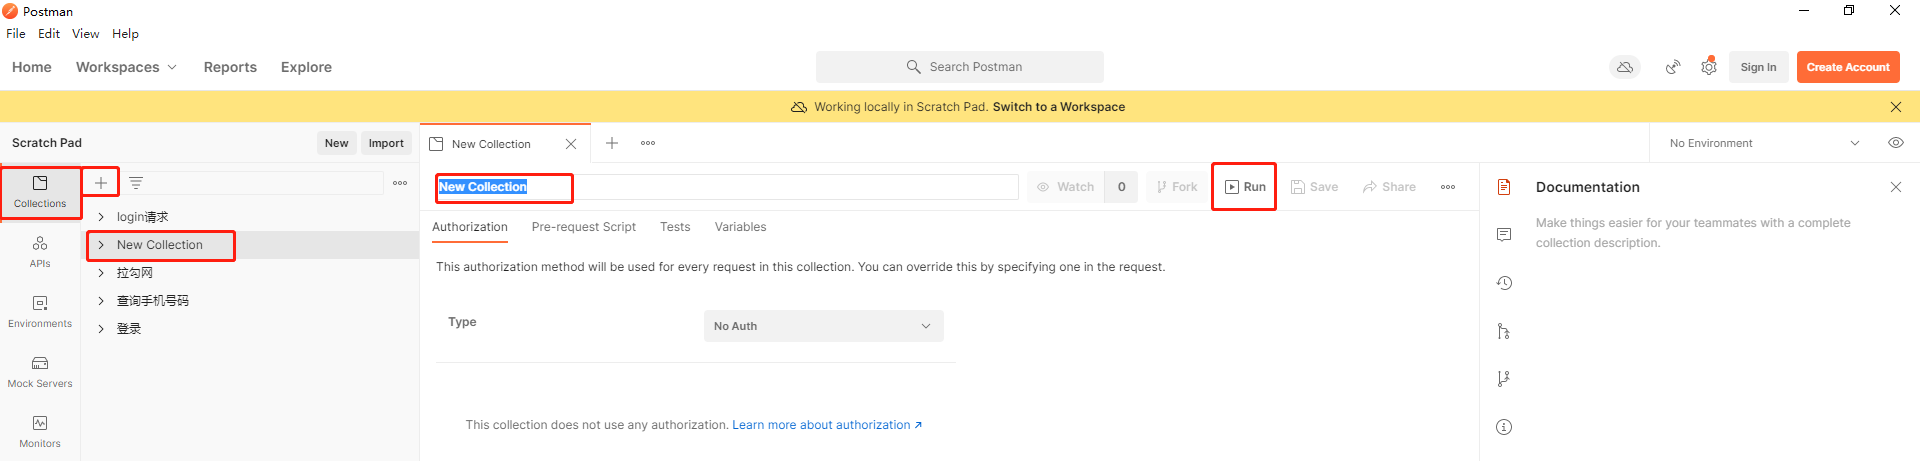
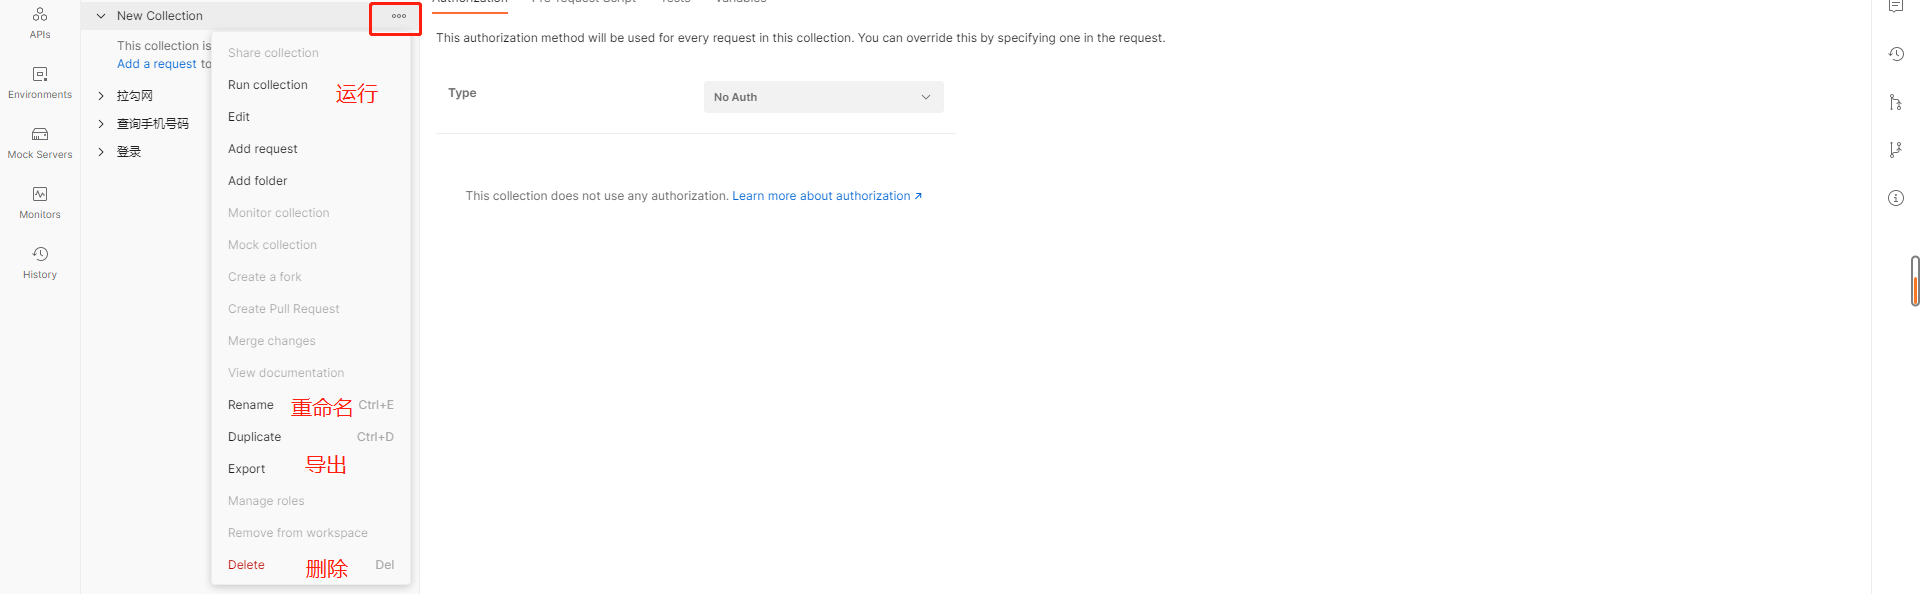
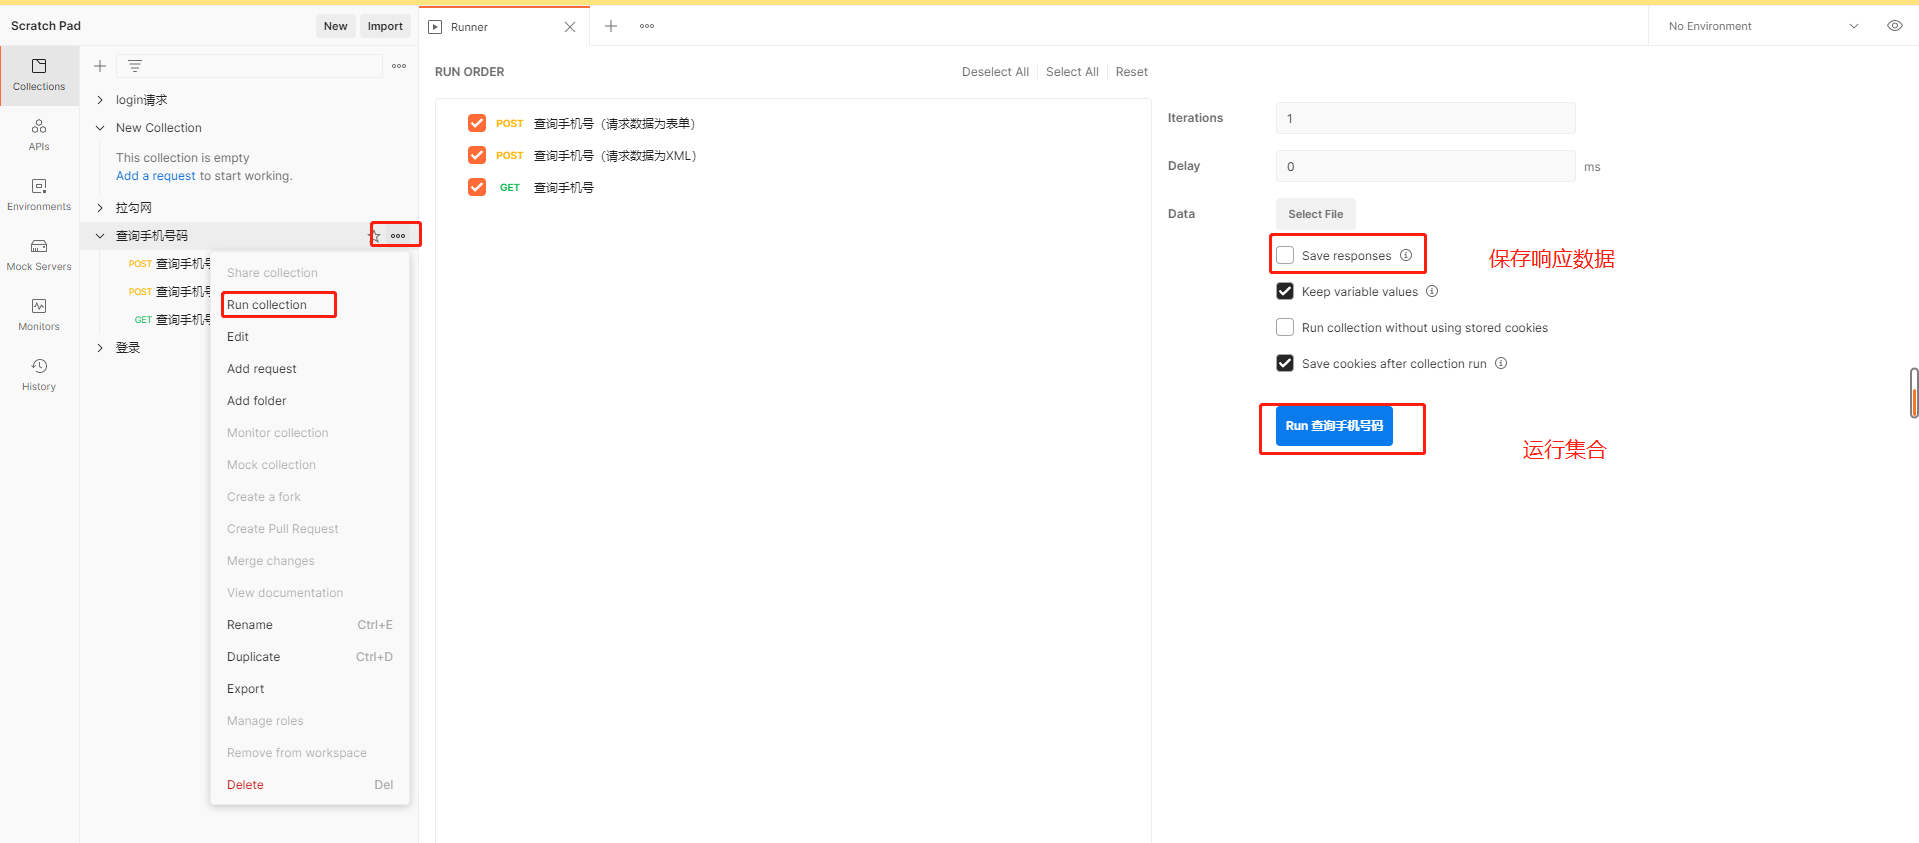
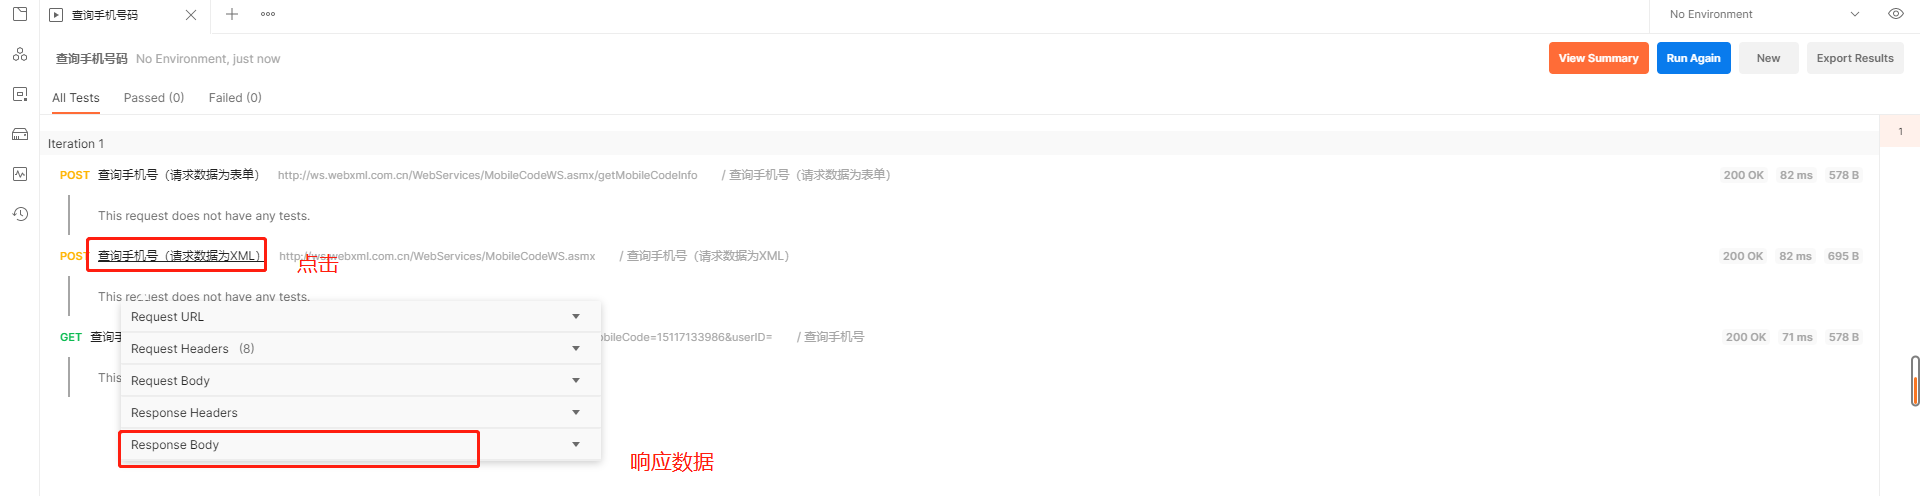
2.2运行集合
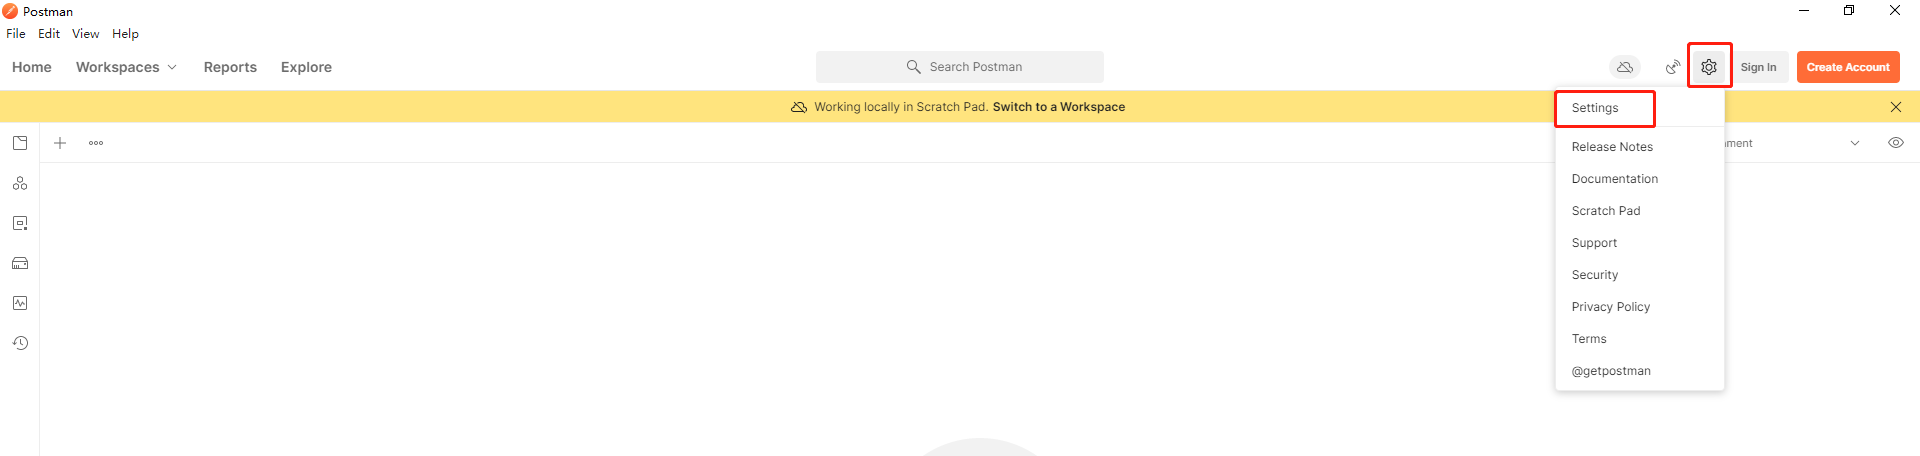
2.3Postman字体大小设置

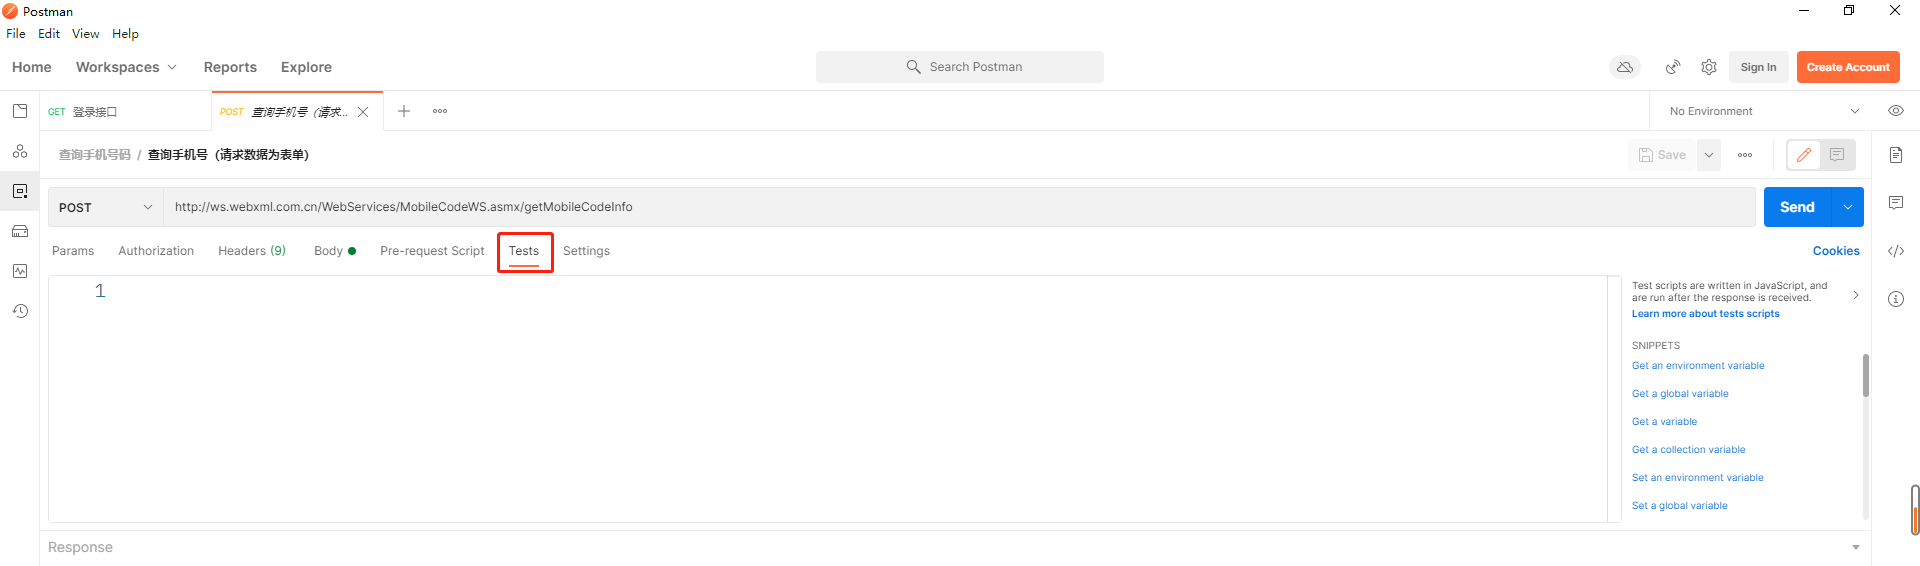
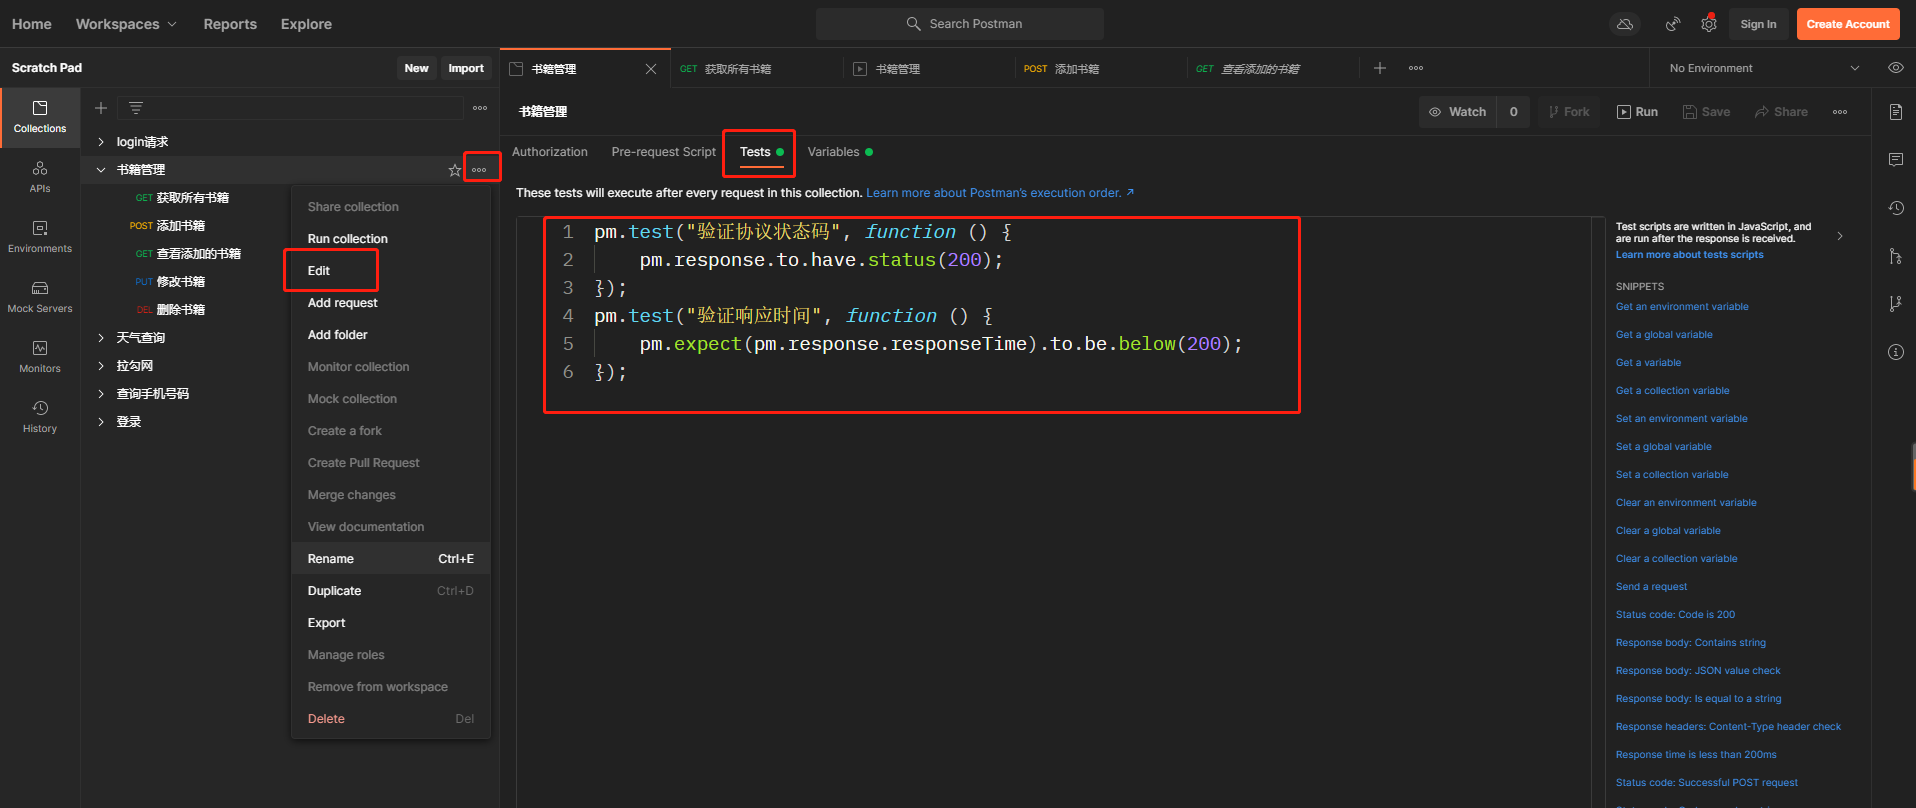
3.Postman断言
测试用例都需要加断言来判断测试的结果
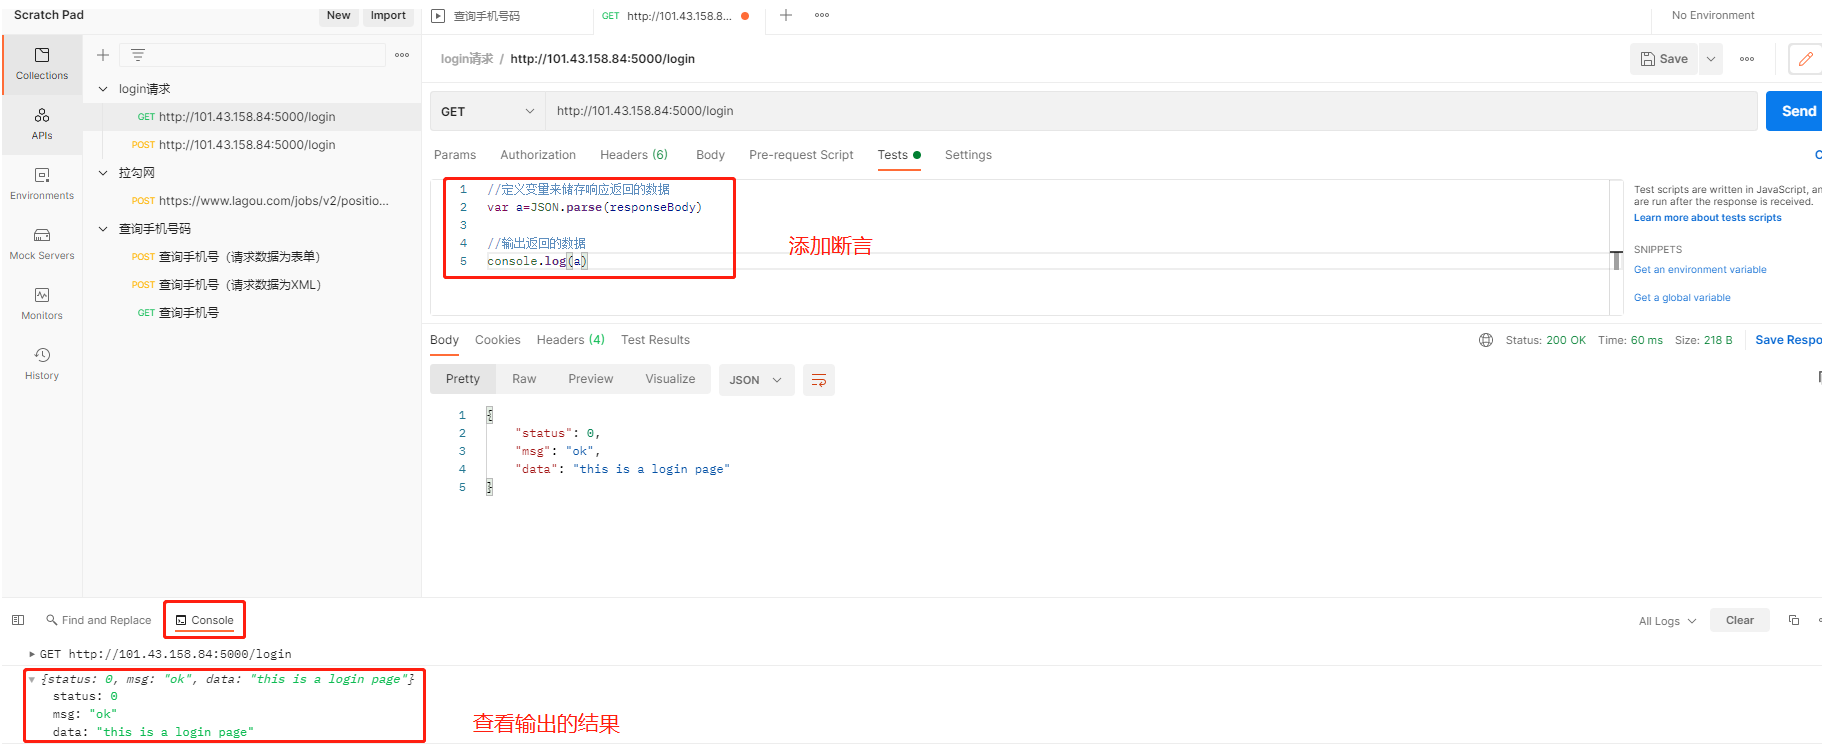
在postman里面,编写断言使用的语言是:javascript,简称JS,编写的地方是在测试用例的tests区域
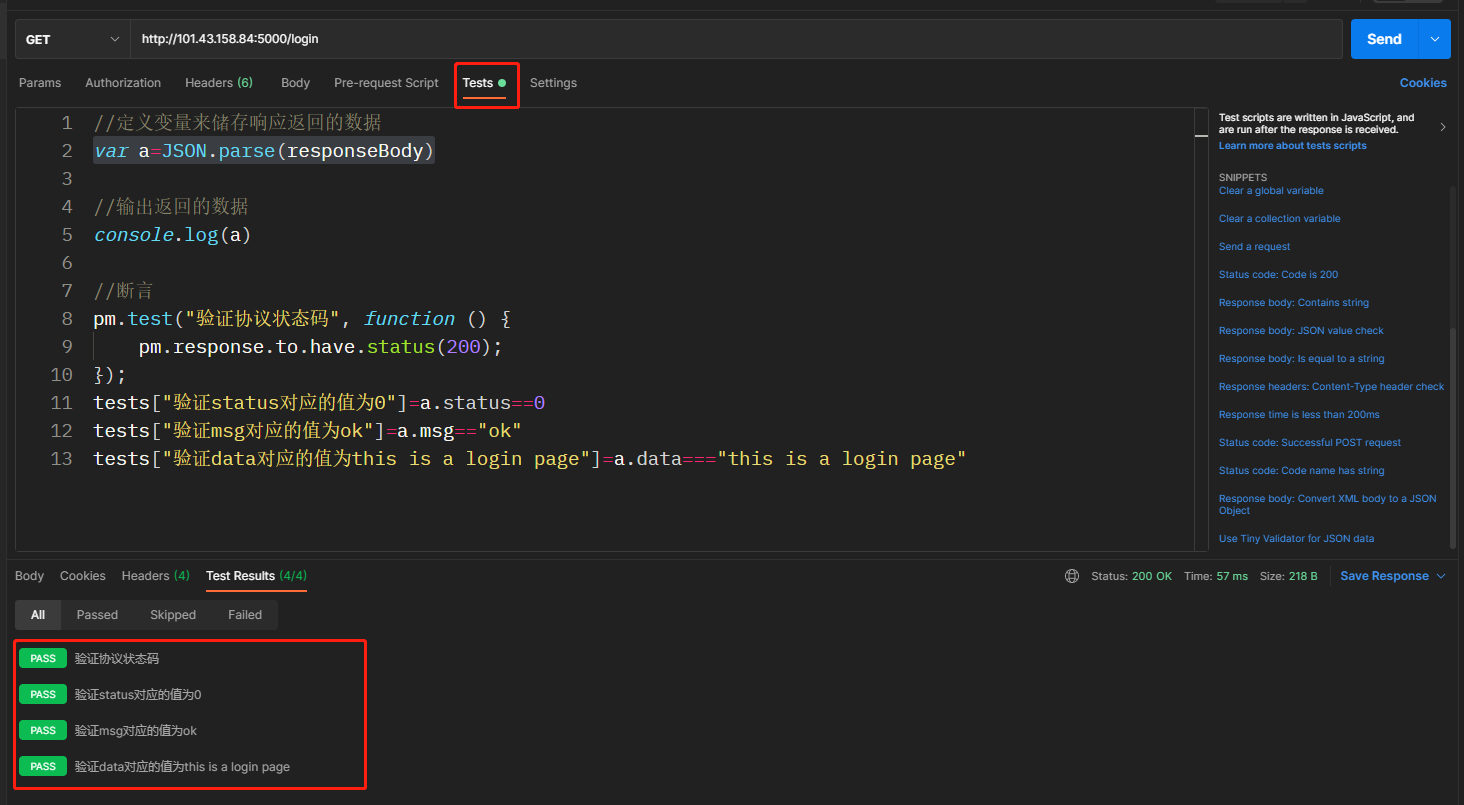
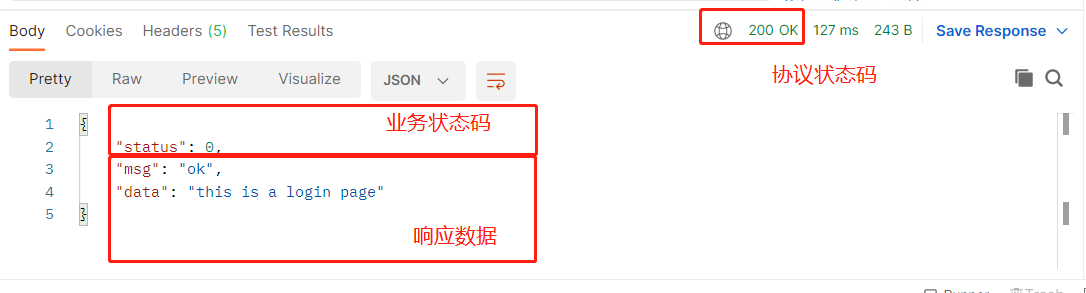
验证api测试用例,必须三个维度来验证,三个关系是并且的关系
    1、协议状态码
    2、业务状态码
    3、响应数据
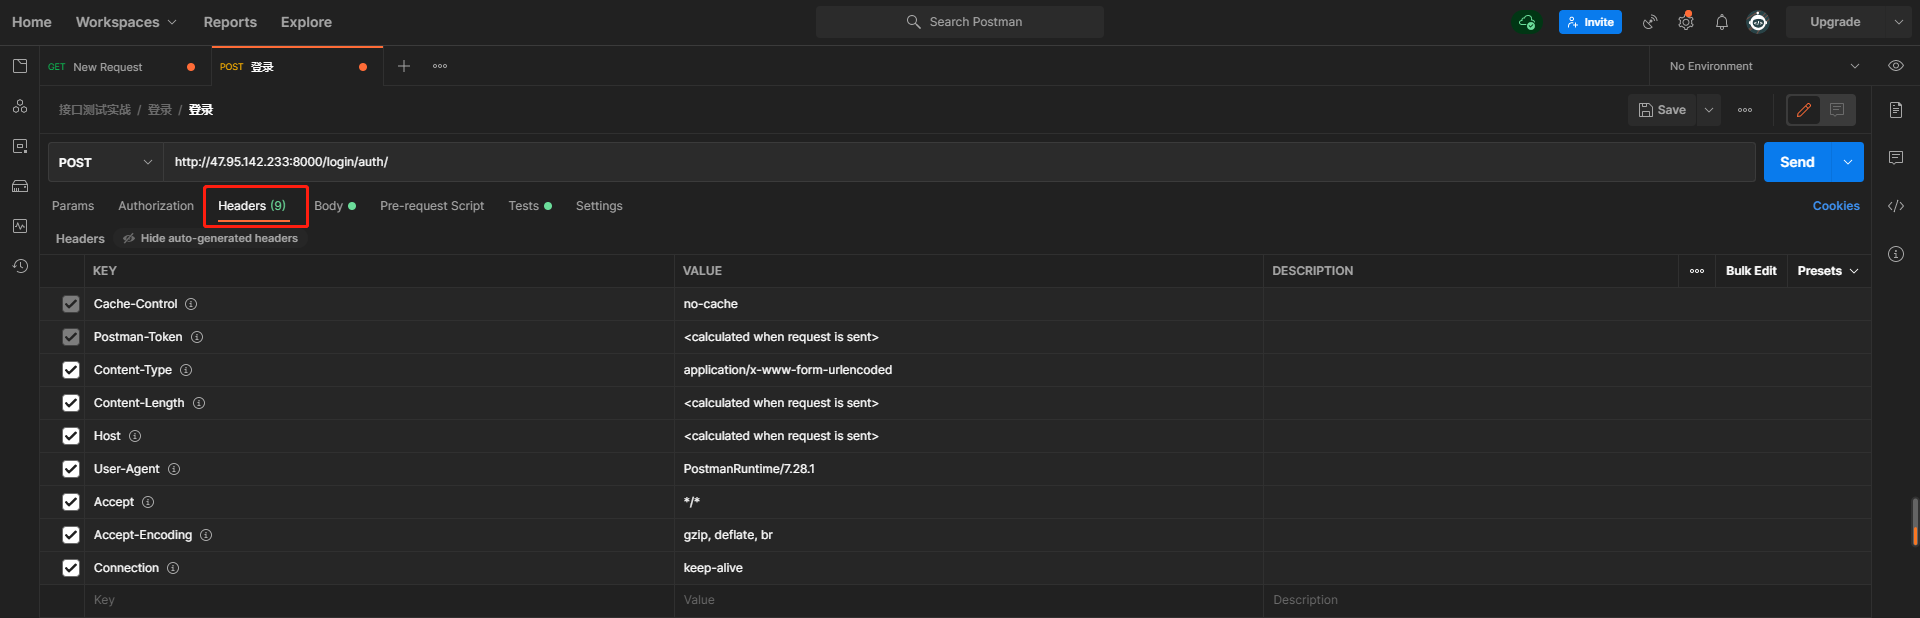
4.Postman中关于token请求的测试
4.1token请求流程:
1.客户端使用账号密码登录到服务端
2.服务端将账号密码储存到服务端并返回一个令牌给客户端
3.客服端再有其他请求需要发送令牌给服务端
4.2动态参数(关联)的解决思路
1.首先通过登录的接口登录成功
2.通过响应数据拿到返回的授权
3.在需要授权登录的接口中定义变量(返回的授权)
4.在登录的接口中添加请求头调用变量,获取到登录接口拿到的授权
postman中调用变量名称,使用的是{{}}
5.先执行需要授权登录的接口,在执行登录接口
动态参数(关联)/上个接口的输出是下个输出的输入
1、授权登录接口输出了响应数据“授权登录令牌”
2、该“授权登录令牌”是登录接口的输入
6.必须要在集合中来执行接口,不能单独执行需要授权的接口
1、通过接口http://101.43.158.84:5000/auth,登录成功
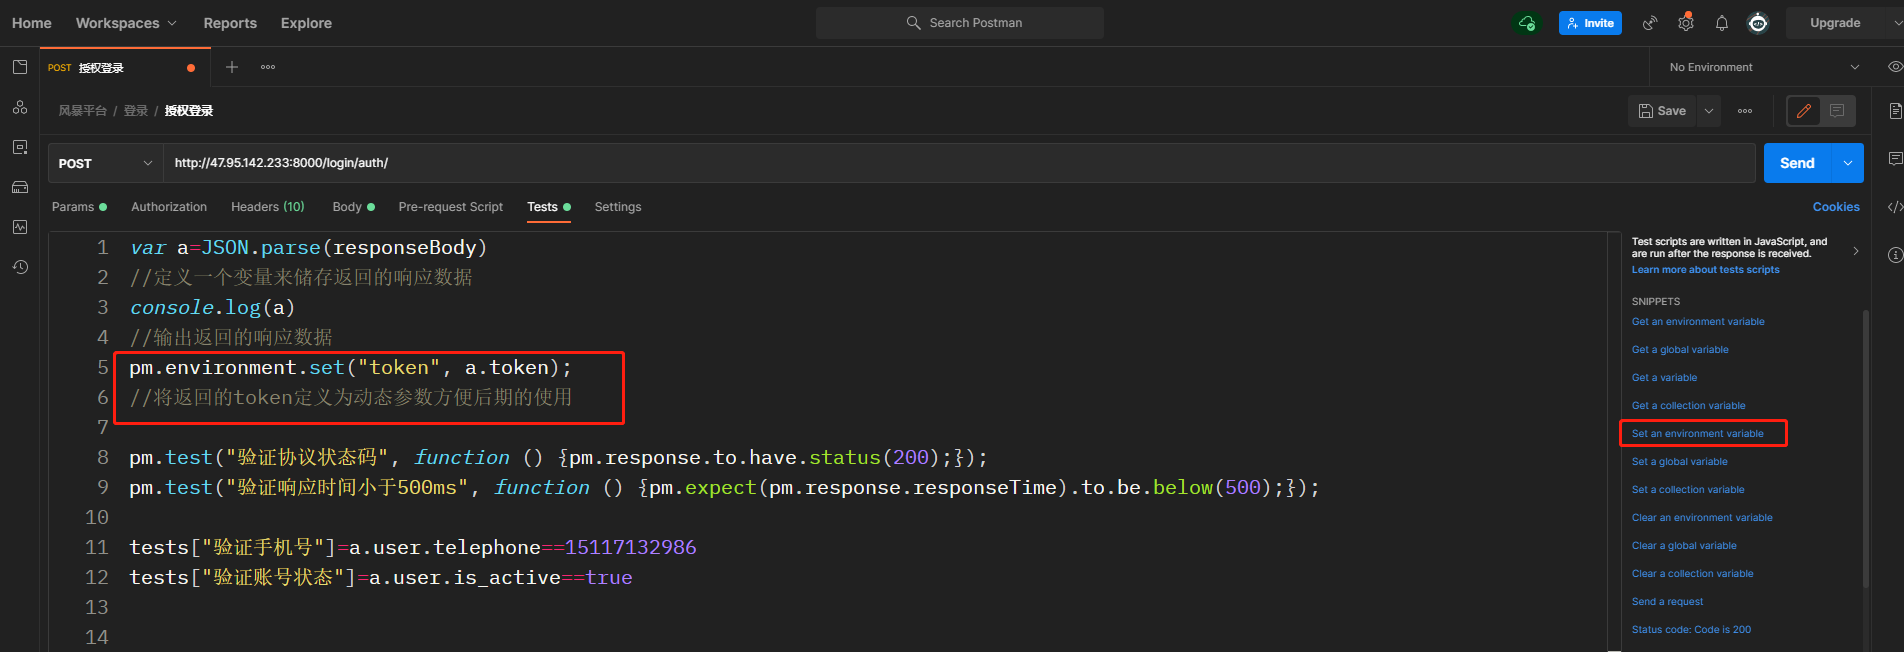
2、登录成功后,在响应数据中返回认证授权
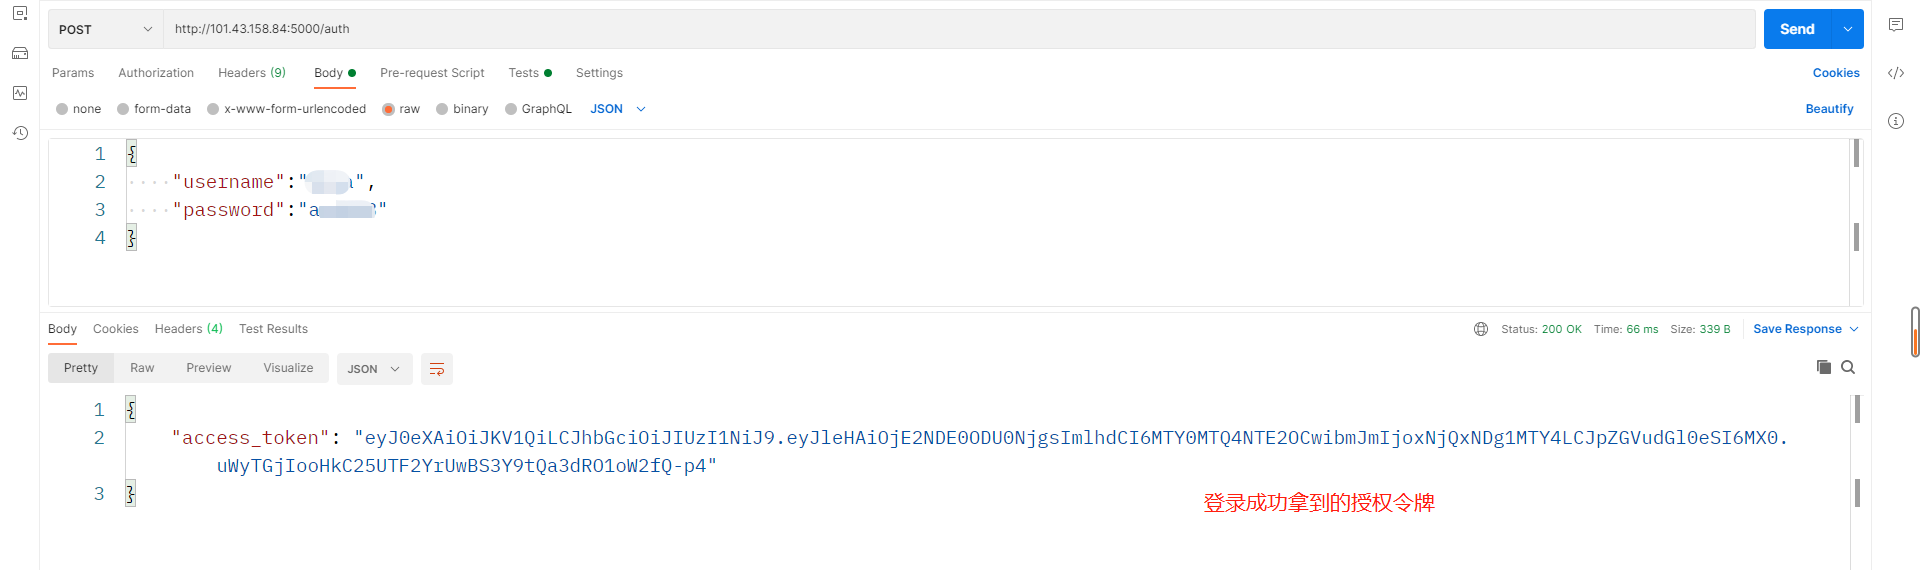
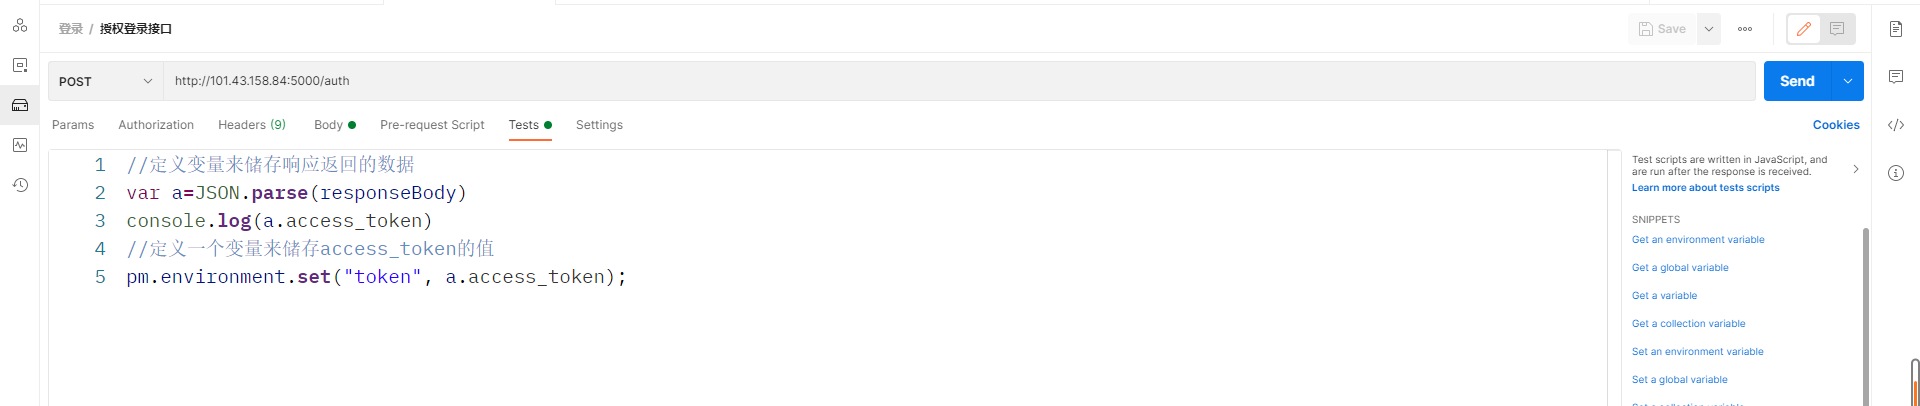
3、在该http://101.43.158.84:5000/auth的接口的tests中,定义变量获取access_token(授权的令牌)
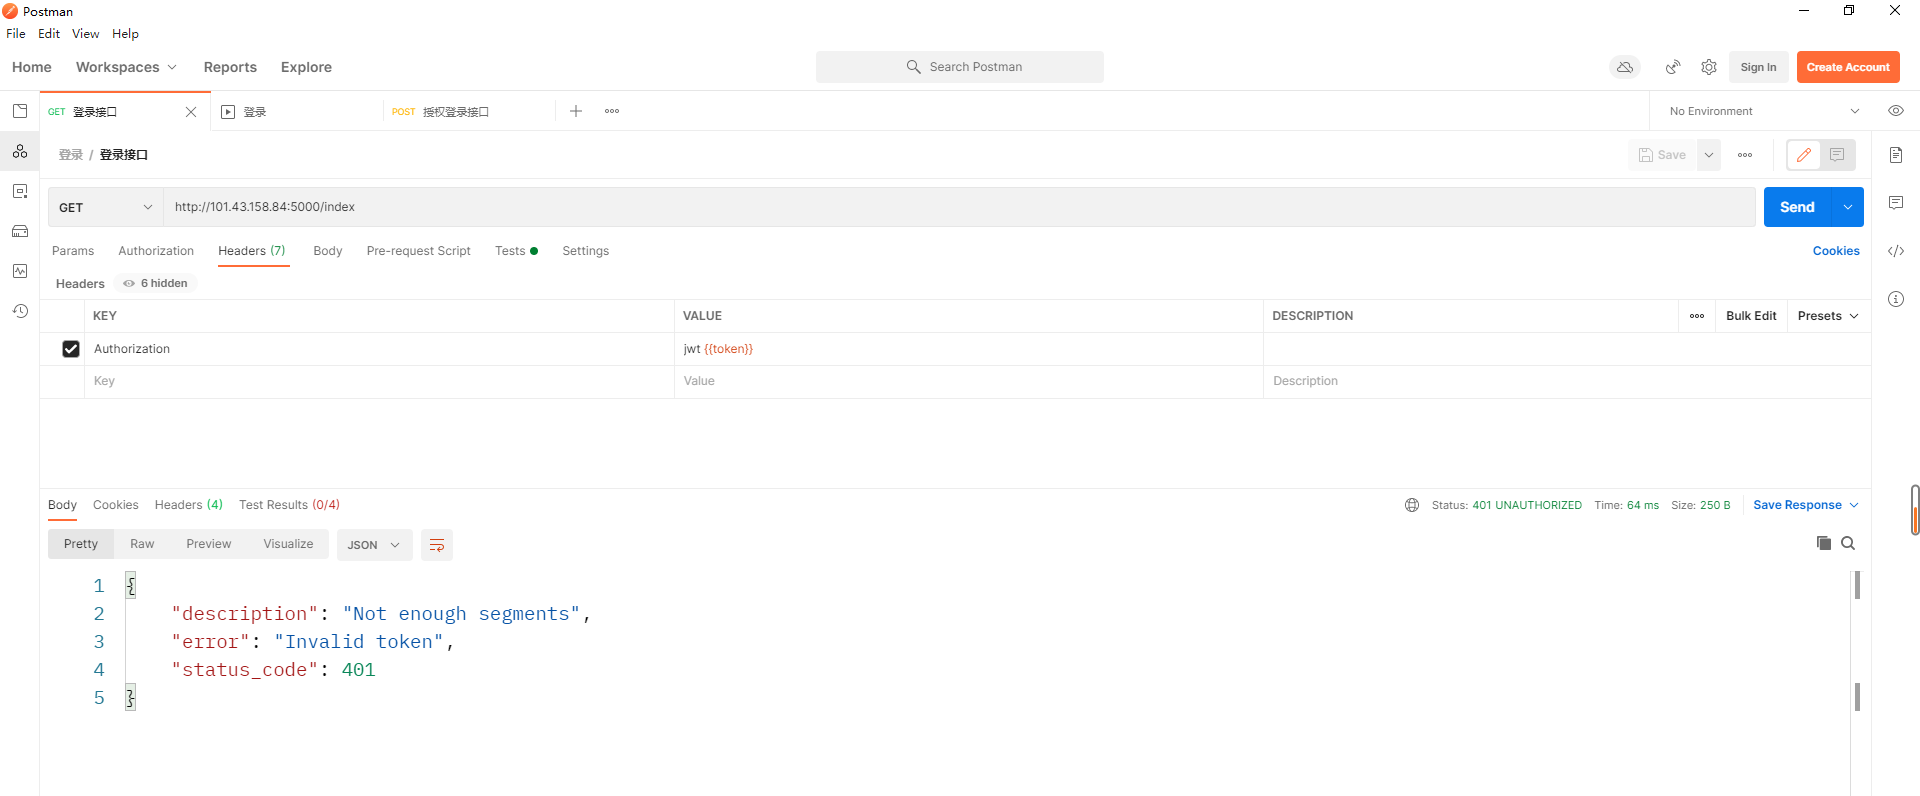
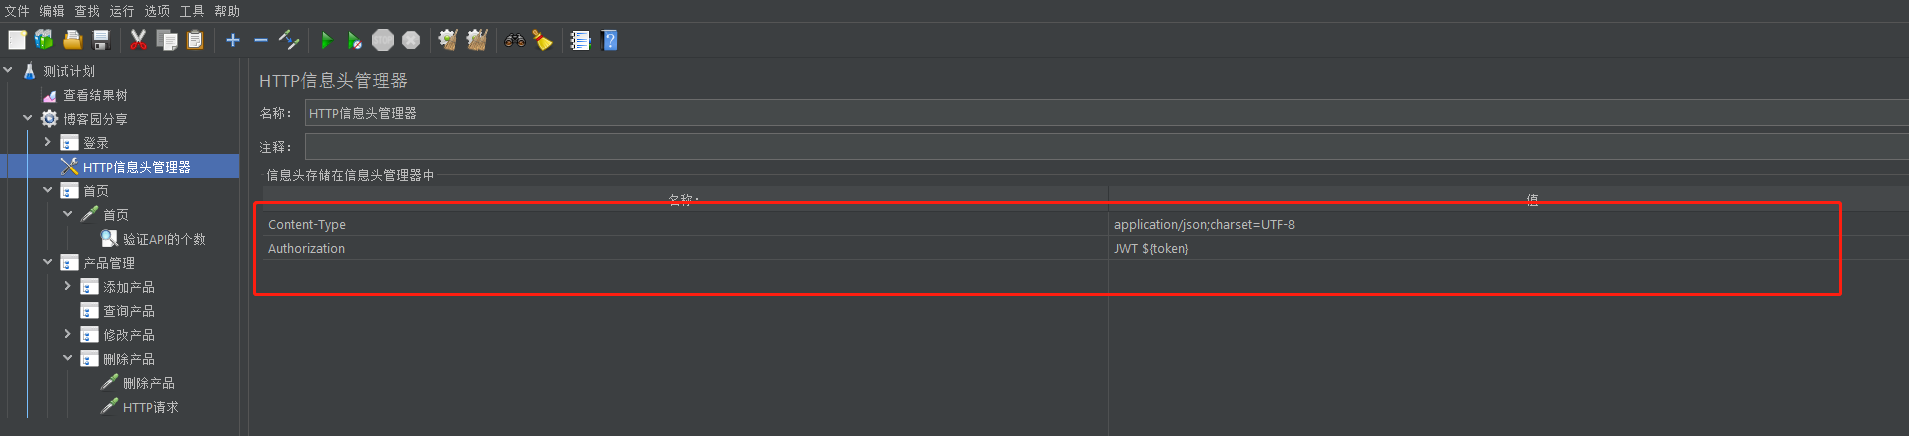
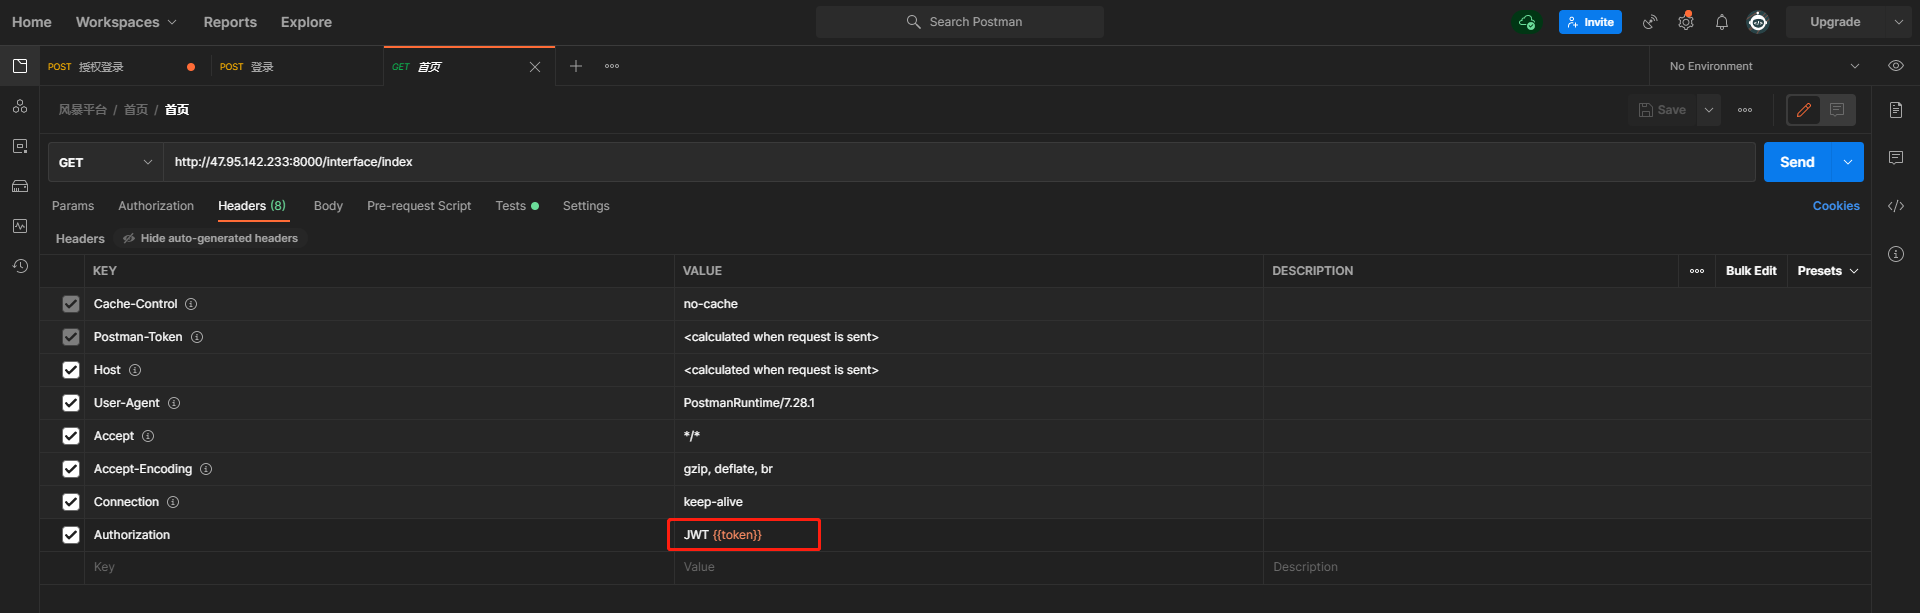
4、下来在接口http://101.43.158.84:5000/index的请求中添加请求头,key为Authorization value为:jwt 获取到的授权的令牌,如Authorization:jwt {{token}}

5、下来执行的顺序必须是:
       先执行登录授权的接口http://101.43.158.84:5000/auth
       再执行http://101.43.158.84:5000/index的接口,这样就能够获取到调用变量的值
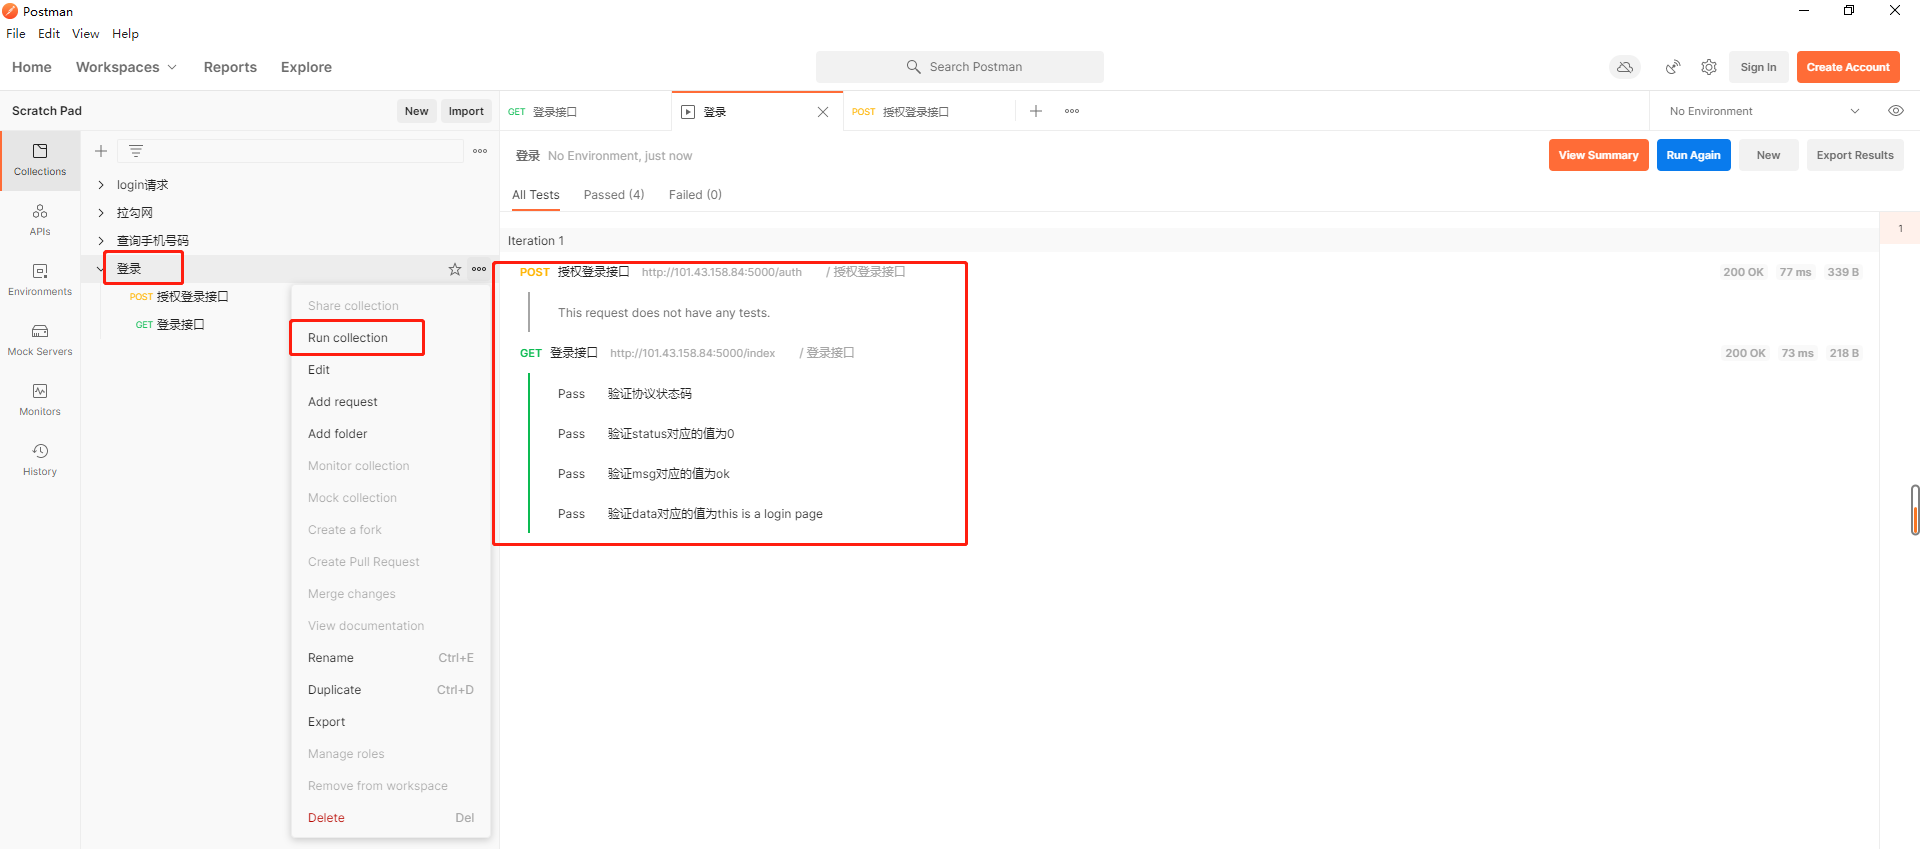
6、必须是在collection中执行,不能单独的执行http://101.43.158.84:5000/index接口,如果单独执行,依然是401,没授权
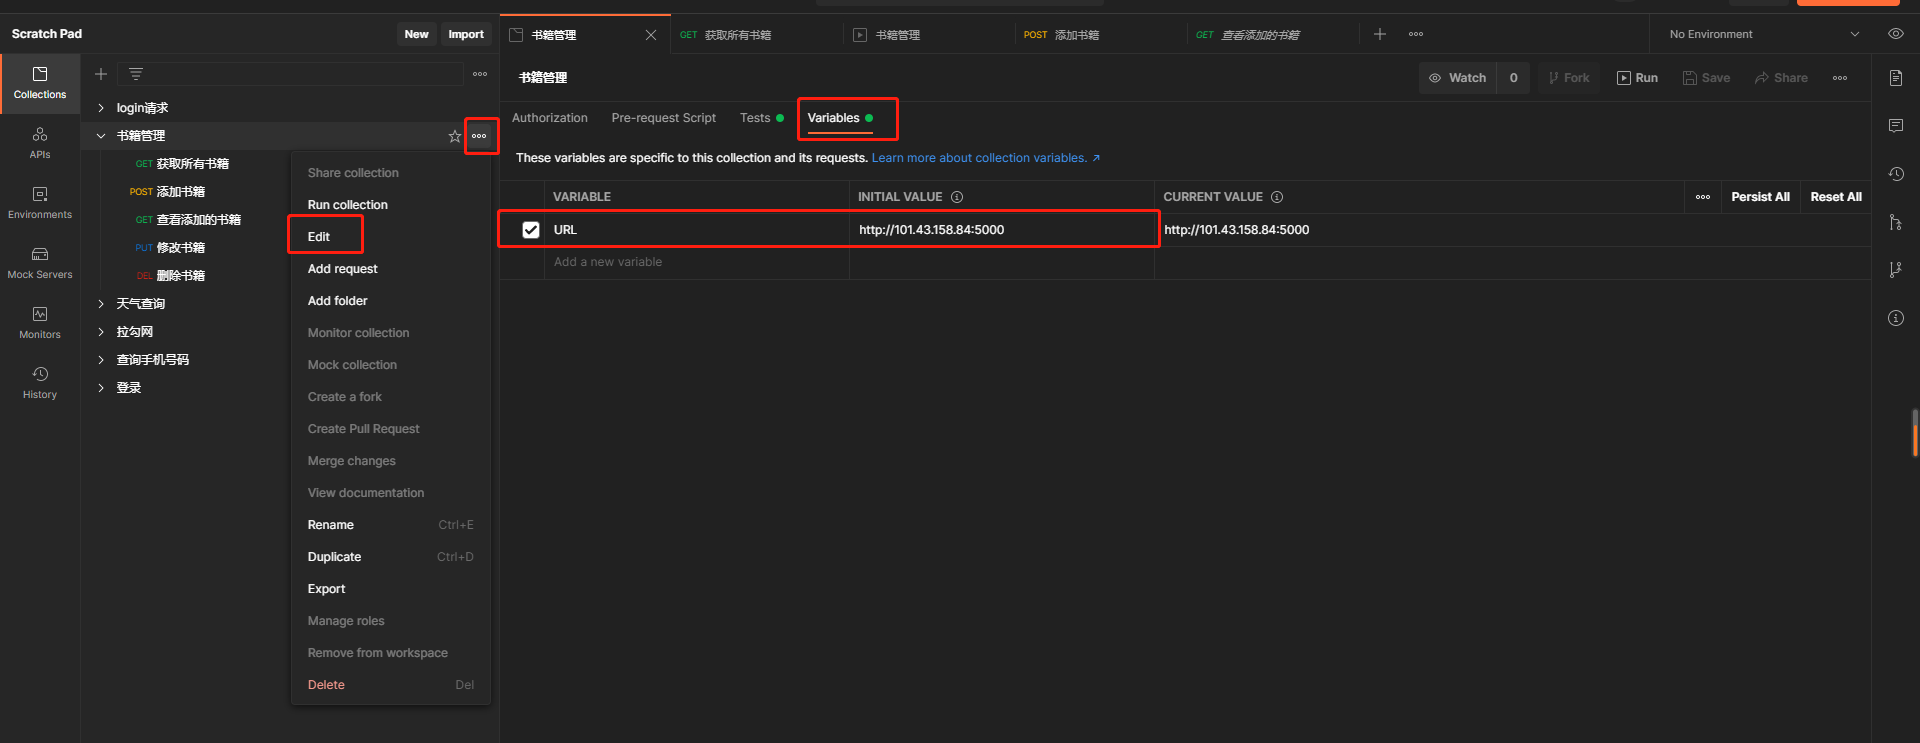
5.Postman数据驱动
那么在自动化测试中(工具&代码),把共有的数据分离出来,这个思想就是数据驱动的思想,如请求地址,那么我们可以把请求地址分离出来,
不管你的请求地址怎么变化,我只需要在一个地方进行维护
有一个书籍管理的业务
查看所有书籍:http://101.43.158.84:5000/v1/api/books
添加书籍:http://101.43.158.84:5000/v1/api/books
{
"author": "wuya",
"done": true,
"name": "Python接口自动化测试实战"
}
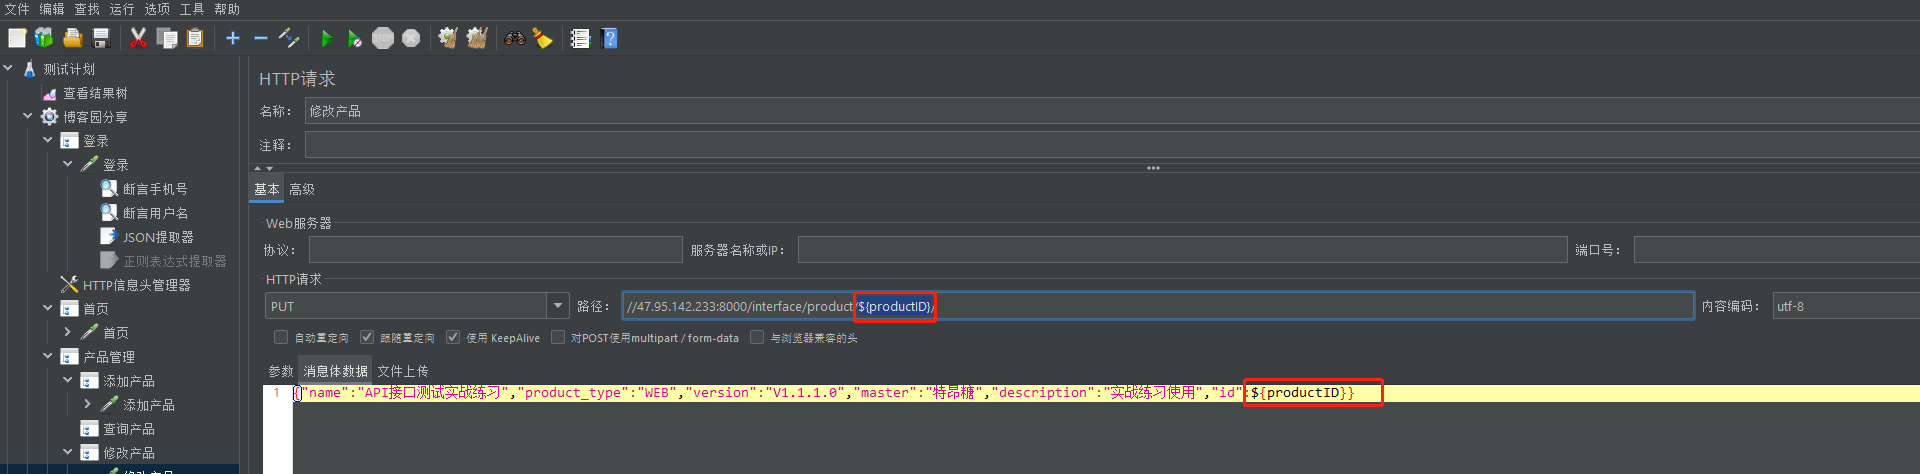
查看具体的书:http://101.43.158.84:5000/v1/api/book/{{bookID}}
删除书籍信息:http://101.43.158.84:5000/v1/api/book/{{bookID}}
我们可以发现他们的请求地址是相同的,那么我们就可以把他们的请求地址分离出来,这样不管后期请求地址怎么变换,我们只需要再一个地方管理就可以
断言的数据分离
6.Postman测试报告的生成
我们使用工具newman就可以生成测试报告(自动化测试的结果)
使用newman的前提是需要安装node.js,通过node.js来安装newman的工具
安装newman的命令:
npm install -g newman --registry=https://registry.npm.taobao.org
检验是否安装成功
C:\Users\000>npm
npm <command>

Usage:

npm install        install all the dependencies in your project
npm install <foo>  add the <foo> dependency to your project
npm test           run this project's tests
npm run <foo>      run the script named <foo>
npm <command> -h   quick help on <command>
npm -l             display usage info for all commands
npm help <term>    search for help on <term> (in a browser)
npm help npm       more involved overview (in a browser)

All commands:

    access, adduser, audit, bin, bugs, cache, ci, completion,
    config, dedupe, deprecate, diff, dist-tag, docs, doctor,
    edit, exec, explain, explore, find-dupes, fund, get, help,
    hook, init, install, install-ci-test, install-test, link,
    ll, login, logout, ls, org, outdated, owner, pack, ping,
    pkg, prefix, profile, prune, publish, rebuild, repo,
    restart, root, run-script, search, set, set-script,
    shrinkwrap, star, stars, start, stop, team, test, token,
    uninstall, unpublish, unstar, update, version, view, whoami

Specify configs in the ini-formatted file:
    C:\Users\000\.npmrc
or on the command line via: npm <command> --key=value

More configuration info: npm help config
Configuration fields: npm help 7 config

npm@8.1.2 D:\Ruanjian\node_modules\npm
C:\Users\特昂糖>npm install -g newman --registry=https://registry.npm.taobao.org
npm WARN deprecated har-validator@5.1.5: this library is no longer supported
npm WARN deprecated uuid@3.4.0: Please upgrade  to version 7 or higher.  Older versions may use Math.random() in certain circumstances, which is known to be problematic.  See https://v8.dev/blog/math-random for details.
npm WARN deprecated uuid@3.4.0: Please upgrade  to version 7 or higher.  Older versions may use Math.random() in certain circumstances, which is known to be problematic.  See https://v8.dev/blog/math-random for details.
npm WARN deprecated uuid@3.4.0: Please upgrade  to version 7 or higher.  Older versions may use Math.random() in certain circumstances, which is known to be problematic.  See https://v8.dev/blog/math-random for details.

added 128 packages in 13s
npm notice
npm notice New minor version of npm available! 8.1.2 -> 8.3.0
npm notice Changelog: https://github.com/npm/cli/releases/tag/v8.3.0
npm notice Run npm install -g npm@8.3.0 to update!
npm notice
验证是否安装成功
C:\特昂糖>newman

Usage: newman [options] [command]

Options:
  -v, --version               output the version number
  -h, --help                  display help for command

Commands:
  run [options] <collection>  Initiate a Postman Collection run from a given URL or path

To get available options for a command:
  newman <command> -h
-
生成测试报告
- 导出测试数据
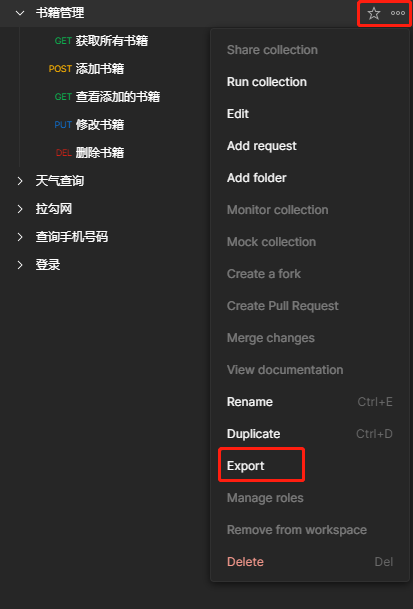
- 进入测试数据所在本地磁盘
C:\Users\000>cd D:\Zhuomian C:\Users\000>d: D:\Zhuomian>dir 驱动器 D 中的卷是 本地磁盘 卷的序列号是 60B8-2ACA D:\Zhuomian 的目录 2022/01/08 23:45 <DIR> . 2022/01/08 23:45 <DIR> .. 2022/01/05 11:50 <DIR> a 2022/01/05 09:39 143,171,304 charlesproxy.rar 2022/01/07 16:35 28,020,736 node-v16.13.1-x64.msi 2022/01/08 23:45 26,442,630 node-v16.13.1-x64.rar 2022/01/05 14:56 116,785,528 Postman-win64-8.7.0-Setup.exe 2021/12/21 09:15 <DIR> python 2022/01/07 17:06 5,443 书籍管理.postman_collection.json 2021/10/13 22:35 <DIR> 头像 2022/01/04 17:37 <DIR> 红包 5 个文件 314,425,641 字节 6 个目录 95,791,566,848 可用字节- 生成测试报告
View Code
2.1请求方法

2.2请求地址

2.3请求头
2.4请求参数
2.4.1GET请求的请求参数(GET请求的请求参数与请求头中的请求参数格式没有任何关系)
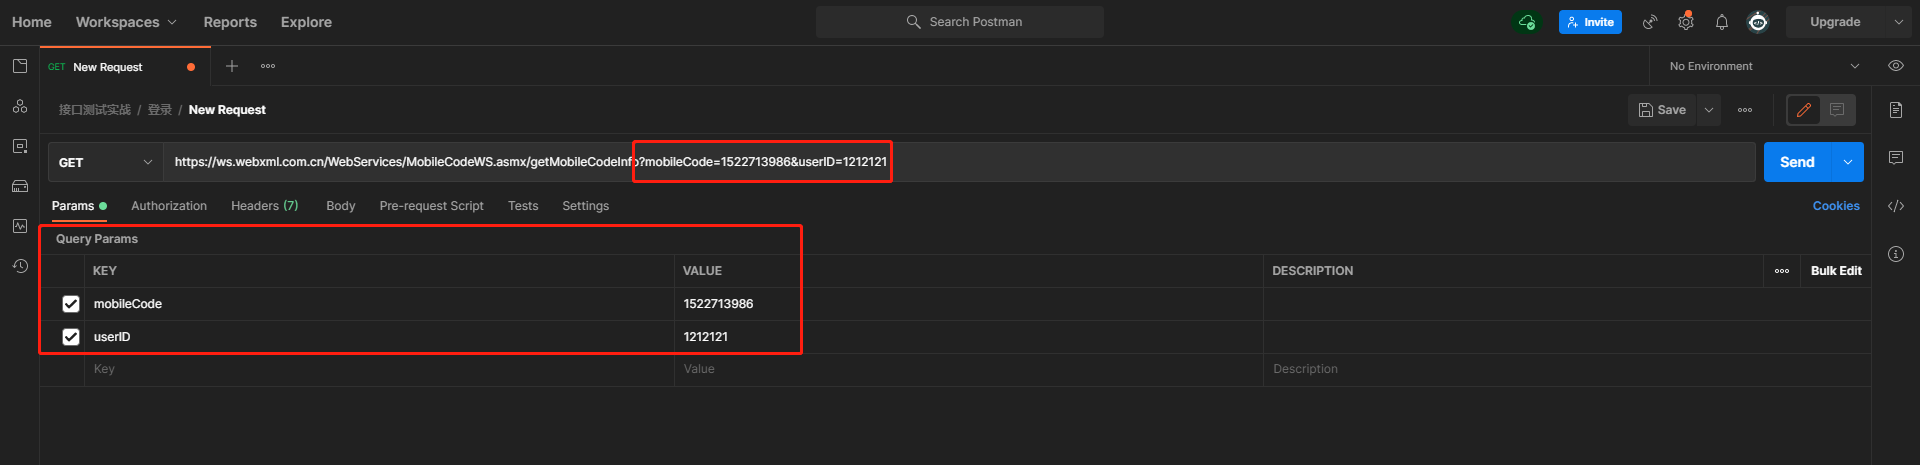
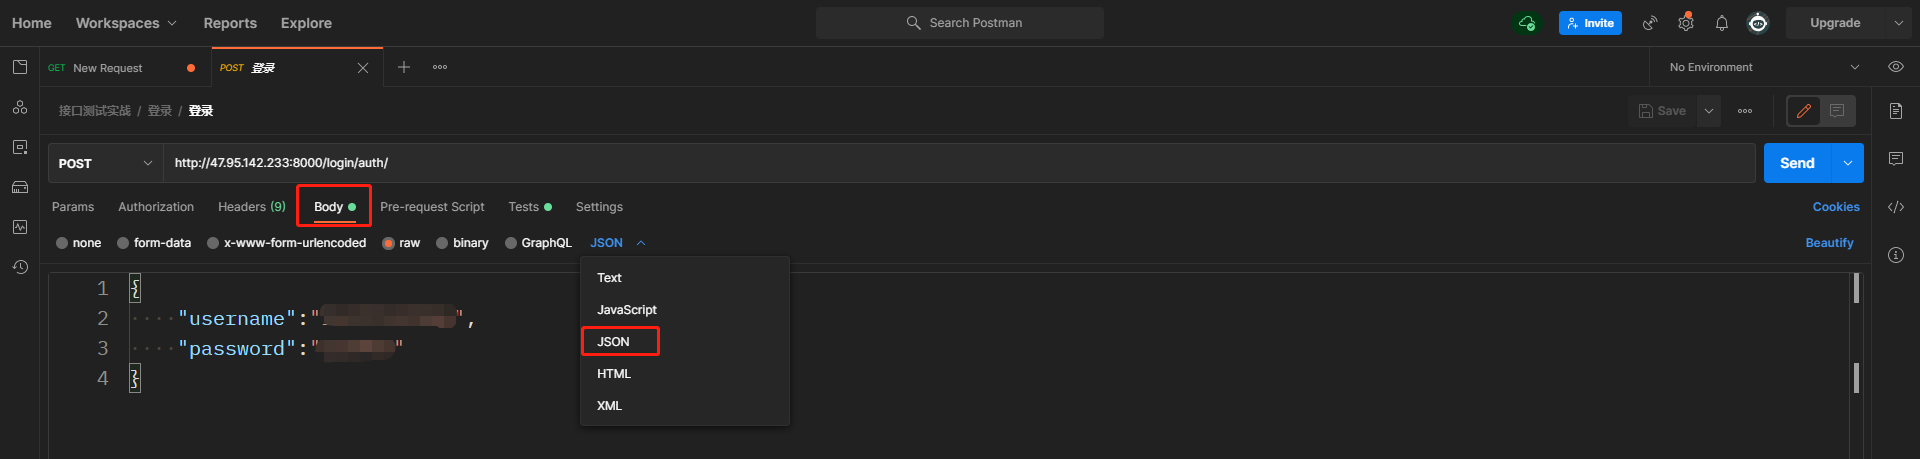
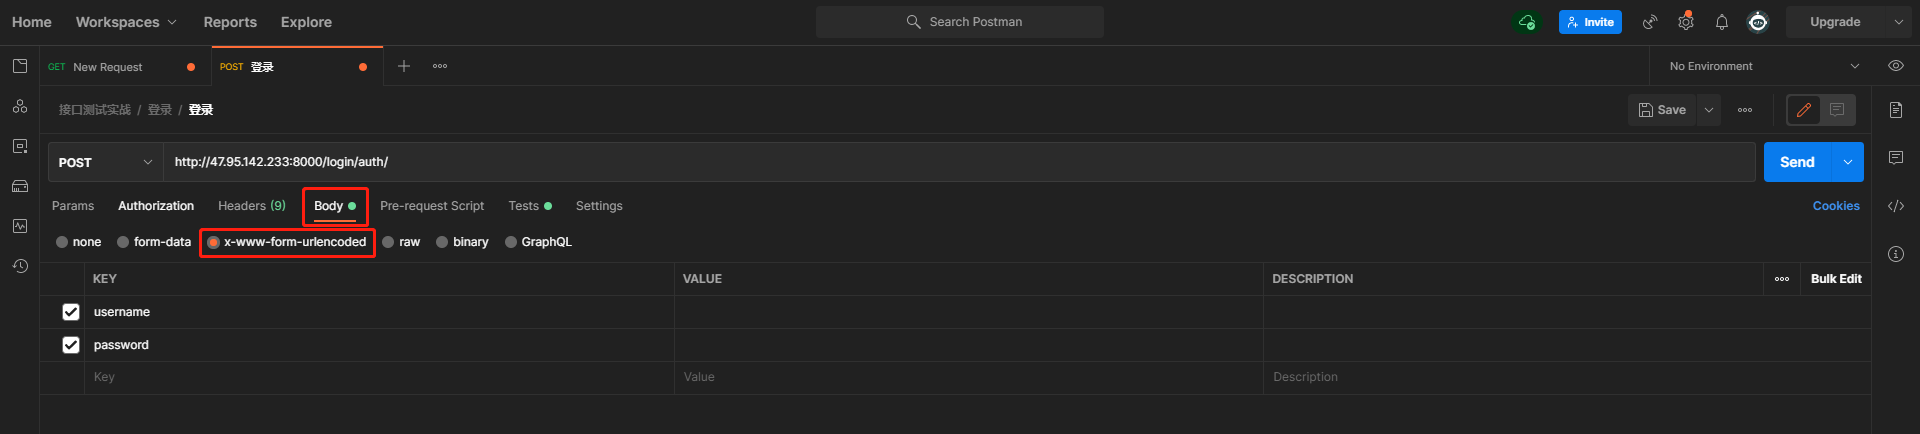
2.4.2POST请求的请求参数
- JSON格式请求参数
- 表单格式请求参数
2.5Postman测试断言

3.接口测试工具JMeter的使用
3.1项目的创建
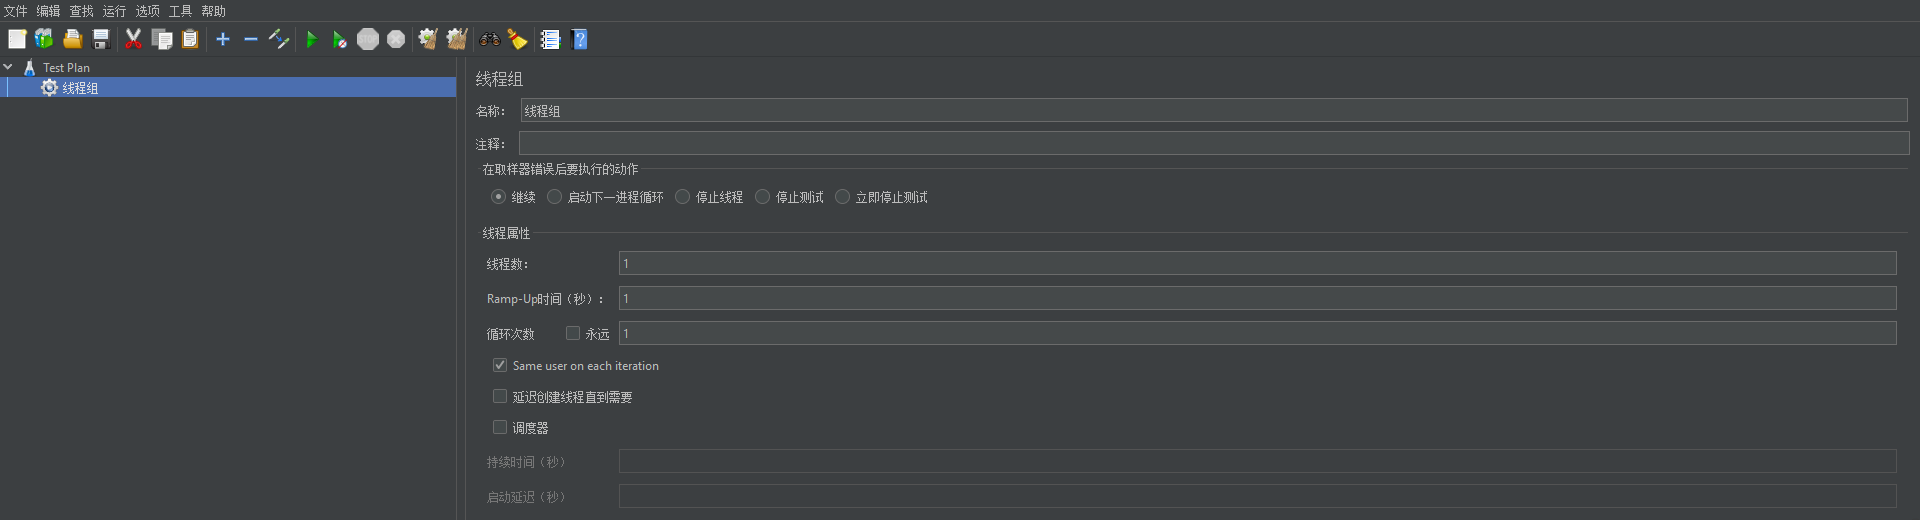
3.1.1线程组
相当于文件夹,在这个文件夹下可以创建新的测试用例或者新的文件夹

3.1.2简单控制器:实现分组
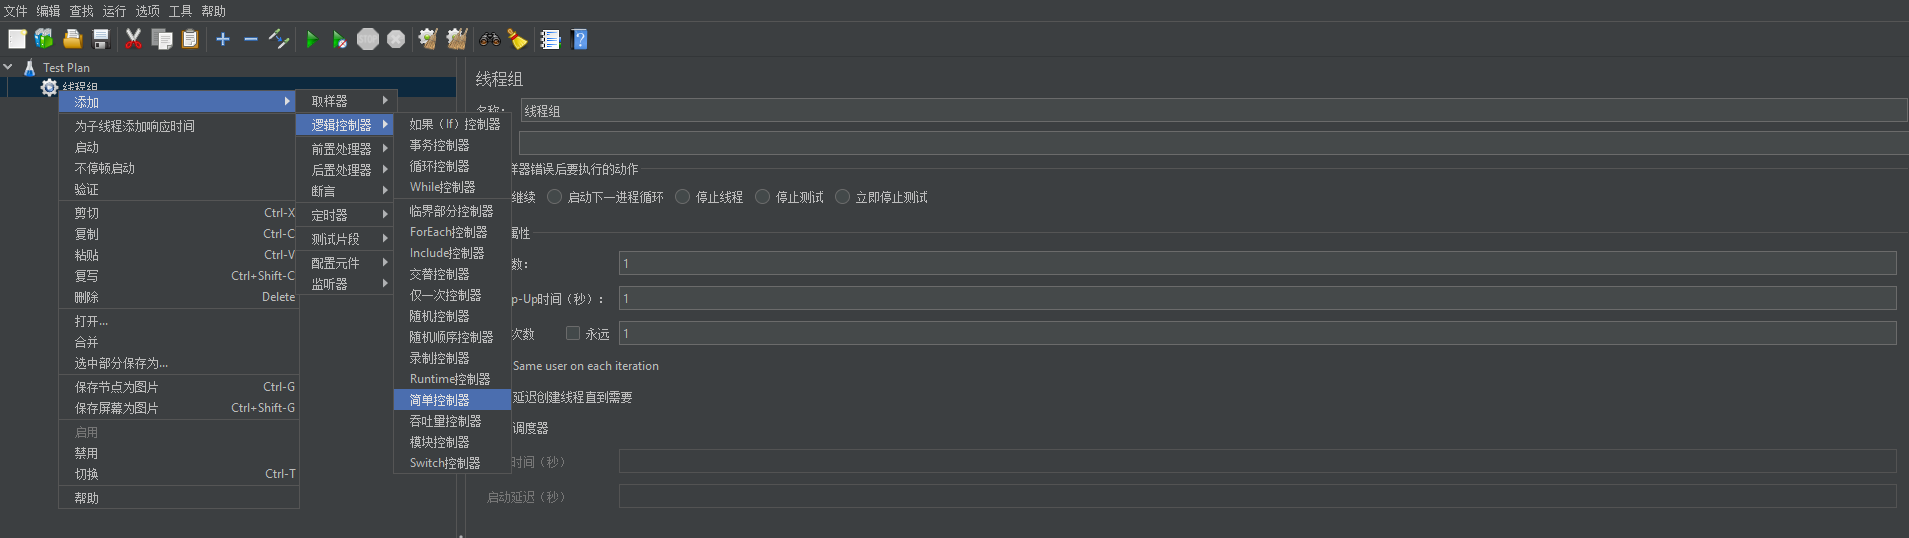

3.1.3测试用例的添加
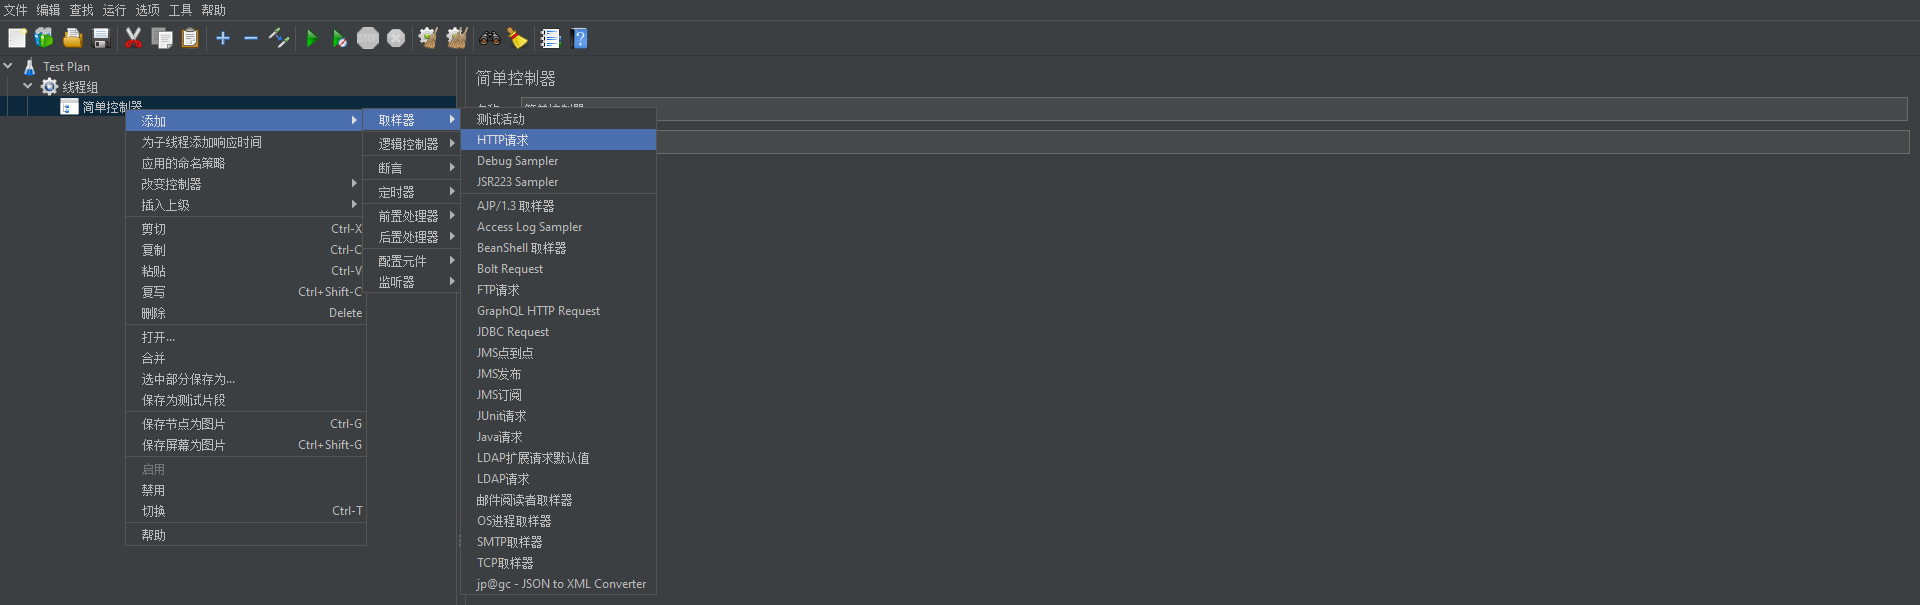
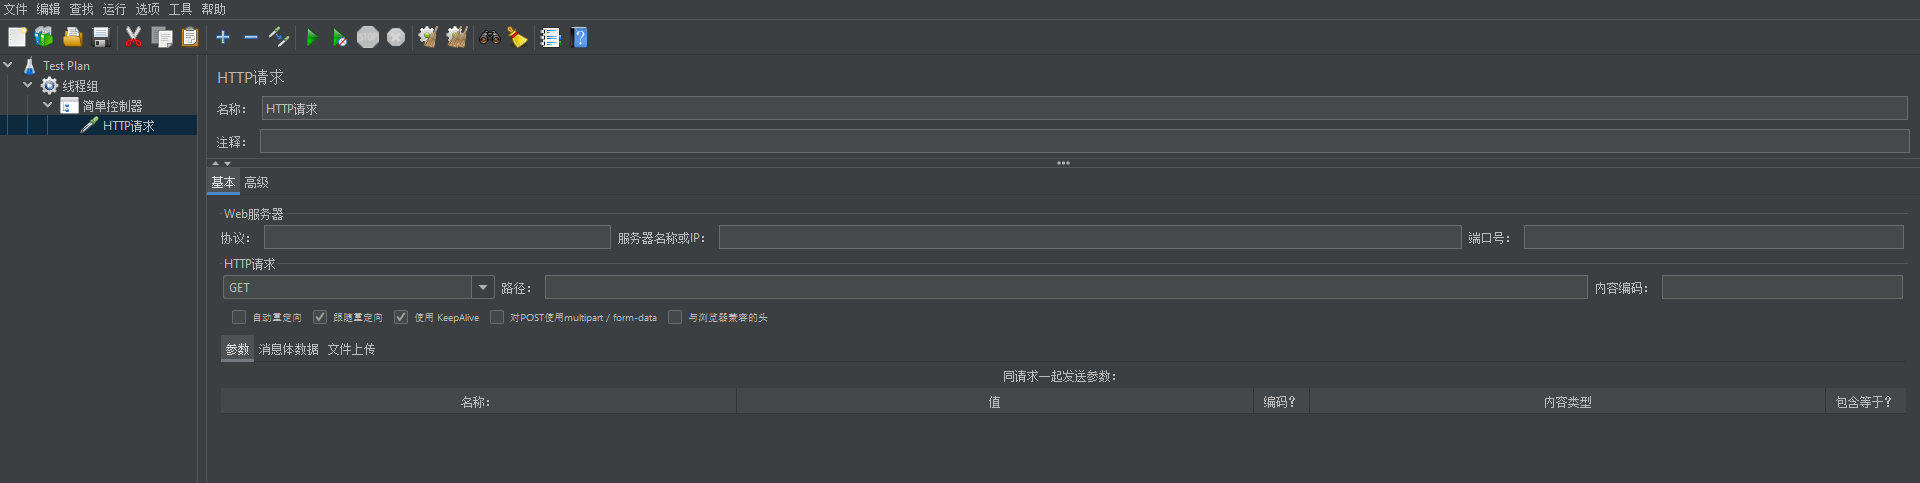
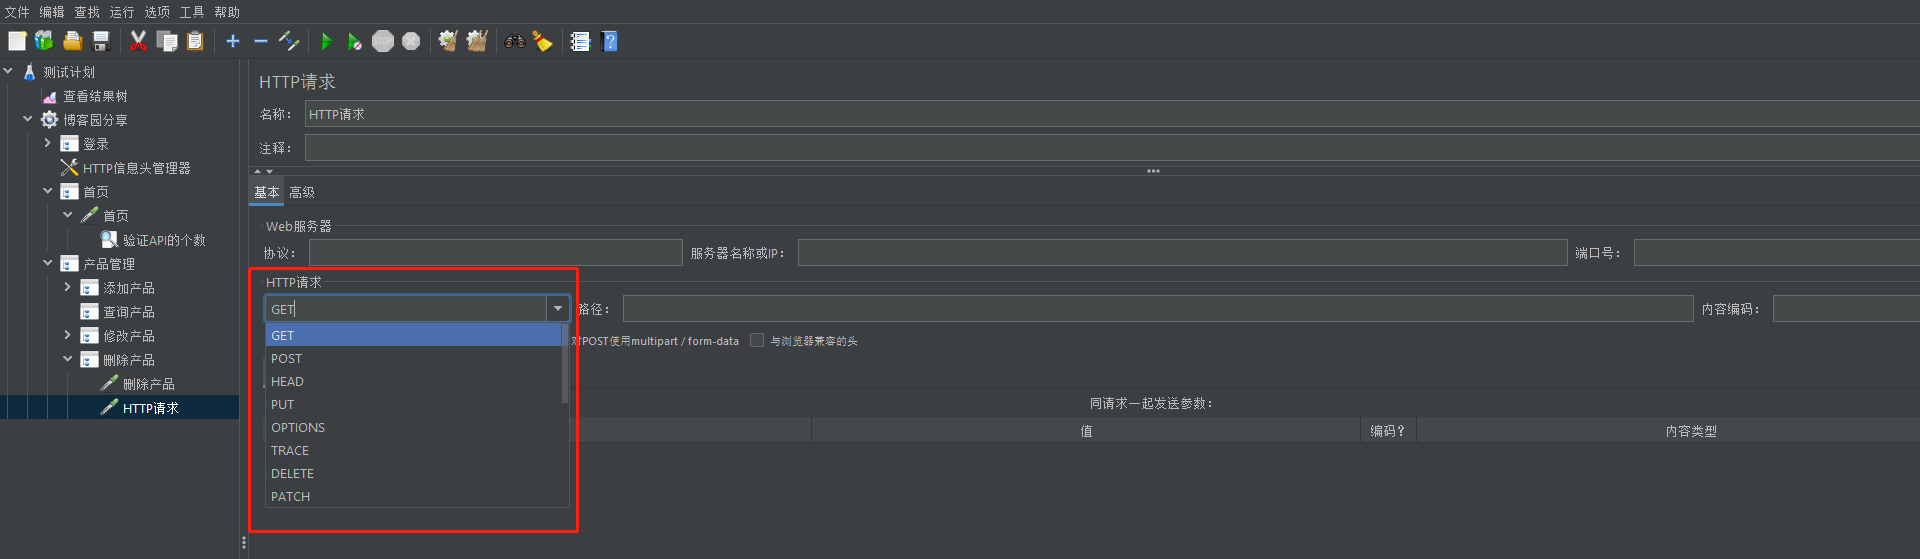
3.2请求方法
3.2 请求地址
不需要写http,可以全部写到路径那里
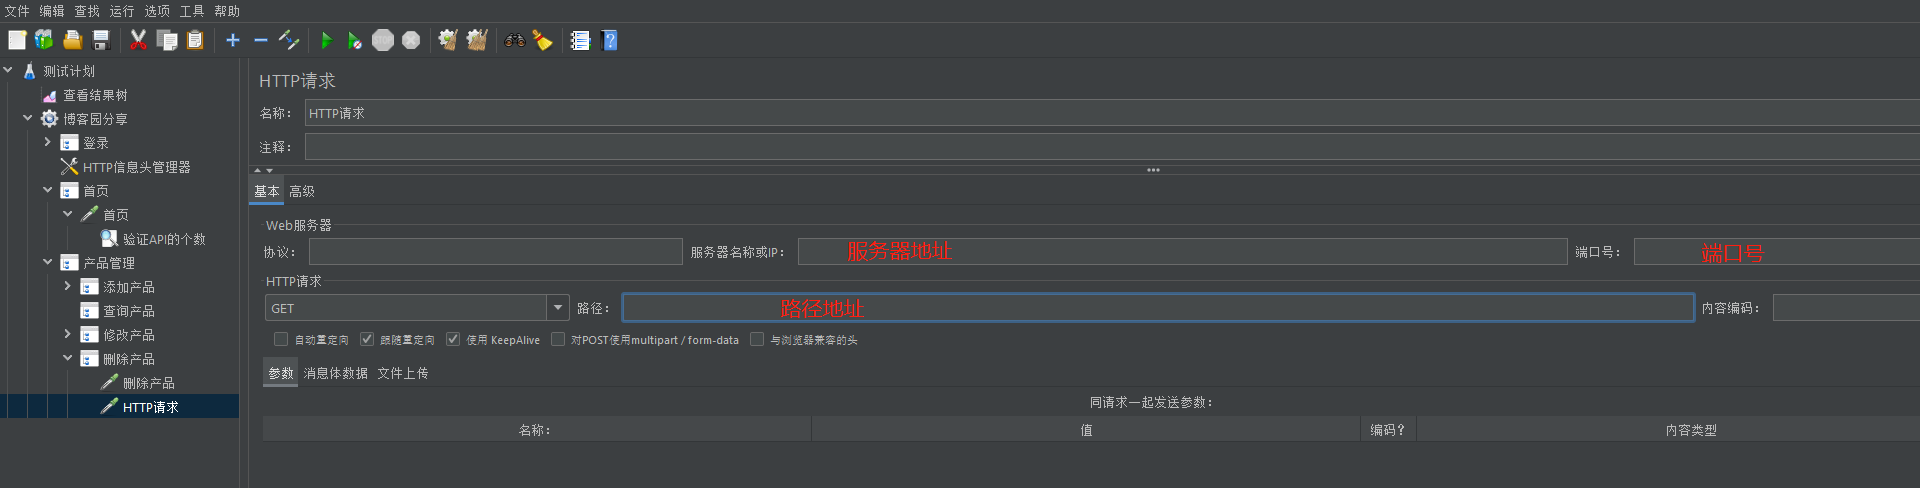
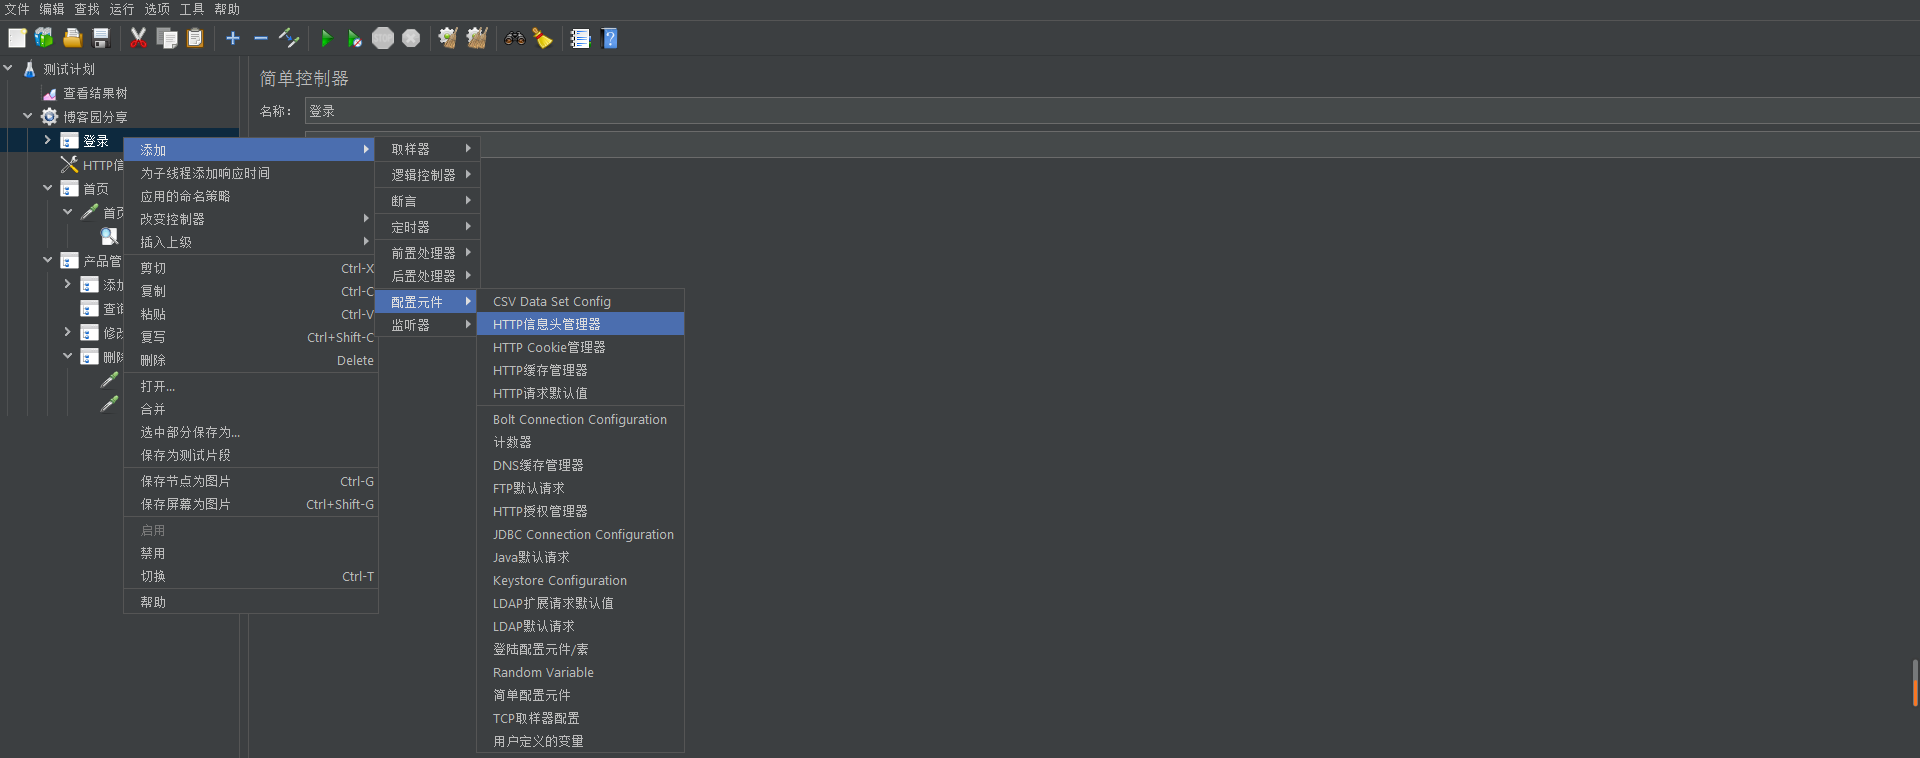
3.3请求头
控制元件---HTTP信息头管理器
3.4请求数据
3.4.1 GET请求的请求数据
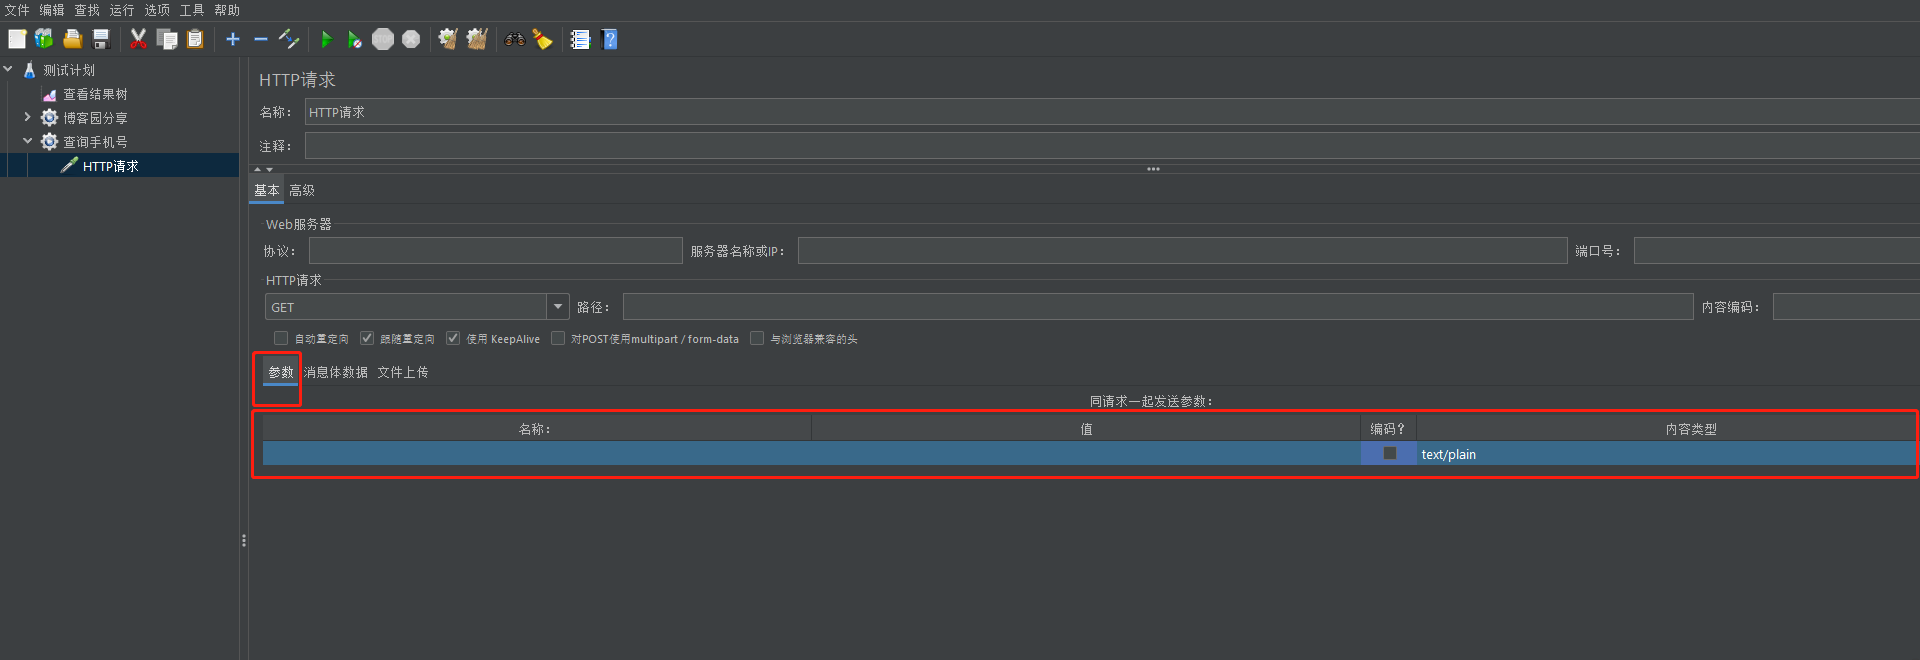
3.4.2 POST请求的请求数据
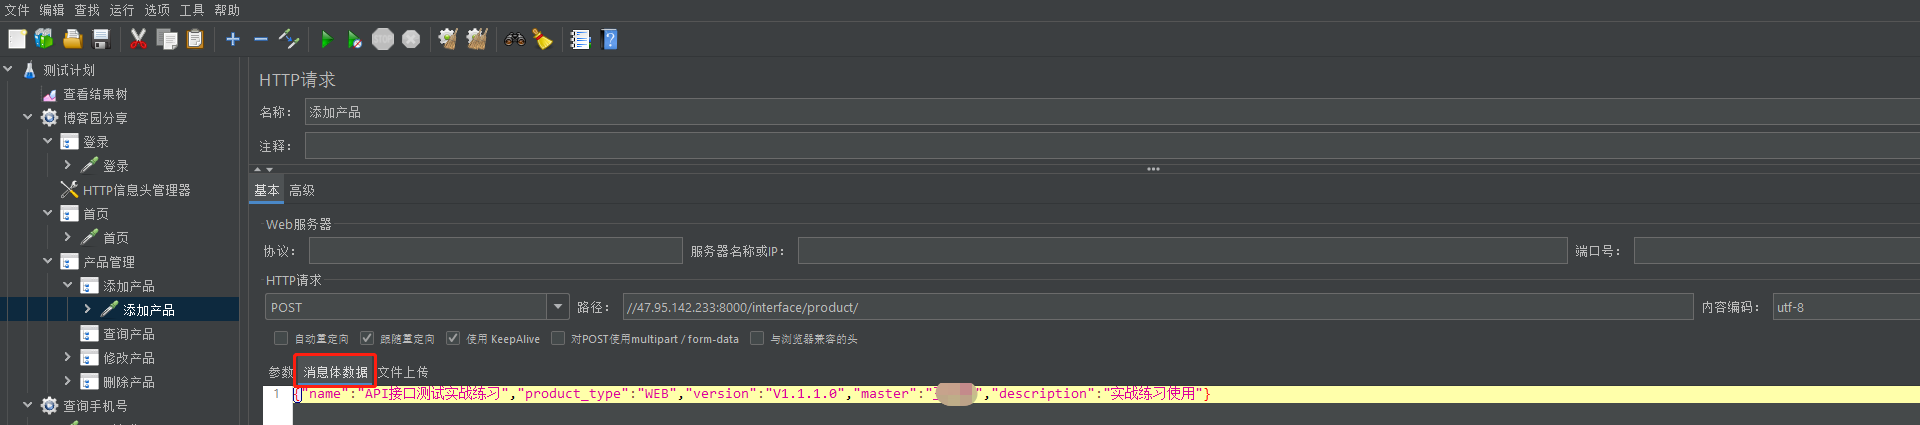
3.4.2.1JSON格式请求数据

3.4.2.2表单格式请求数据
3.4.2.3xml格式请求数据
4.Postman与JMeter处理动态参数的步骤
4.1Postman处理动态参数
4.2JMeter处理动态参数
5.API测试报告的生成
5.1Postman测试报告
我们使用工具newman就可以生成测试报告(自动化测试的结果)
使用newman的前提是需要安装node.js,通过node.js来安装newman的工具

安装newman的命令:
npm install -g newman --registry=https://registry.npm.taobao.org
1.安装node.js
下载地址:Download | Node.js 下载适合自己电脑的版本,这里我们使用Windows平台
安装:只需双击即可完成安装,在这里建议不要将路径放到C盘,这是一种安装软件的共识。并且在安装的过程中,安装向导已经帮我们完成了环境变量的注册,我们可以通过环境变量来查看
验证是否配置成功:控制台输入npm,如果显示以下数据则表示安装并且配置成功
C:\Users\000>npm
npm <command>

Usage:

npm install        install all the dependencies in your project
npm install <foo>  add the <foo> dependency to your project
npm test           run this project's tests
npm run <foo>      run the script named <foo>
npm <command> -h   quick help on <command>
npm -l             display usage info for all commands
npm help <term>    search for help on <term> (in a browser)
npm help npm       more involved overview (in a browser)

All commands:

    access, adduser, audit, bin, bugs, cache, ci, completion,
    config, dedupe, deprecate, diff, dist-tag, docs, doctor,
    edit, exec, explain, explore, find-dupes, fund, get, help,
    hook, init, install, install-ci-test, install-test, link,
    ll, login, logout, ls, org, outdated, owner, pack, ping,
    pkg, prefix, profile, prune, publish, rebuild, repo,
    restart, root, run-script, search, set, set-script,
    shrinkwrap, star, stars, start, stop, team, test, token,
    uninstall, unpublish, unstar, update, version, view, whoami

Specify configs in the ini-formatted file:
    C:\Users\000\.npmrc
or on the command line via: npm <command> --key=value

More configuration info: npm help config
Configuration fields: npm help 7 config

npm@8.1.2 D:\Ruanjian\node_modules\npm   #这里显示的是软件所在本地磁盘路径
2.安装newman
node.js配置成功后我们就可以安装newman了,安装newman的命令为:npm install -g newman --registry=https://registry.npm.taobao.org
C:\Users\000>npm install -g newman --registry=https://registry.npm.taobao.org
npm WARN deprecated har-validator@5.1.5: this library is no longer supported
npm WARN deprecated uuid@3.4.0: Please upgrade  to version 7 or higher.  Older versions may use Math.random() in certain circumstances, which is known to be problematic.  See https://v8.dev/blog/math-random for details.
npm WARN deprecated uuid@3.4.0: Please upgrade  to version 7 or higher.  Older versions may use Math.random() in certain circumstances, which is known to be problematic.  See https://v8.dev/blog/math-random for details.
npm WARN deprecated uuid@3.4.0: Please upgrade  to version 7 or higher.  Older versions may use Math.random() in certain circumstances, which is known to be problematic.  See https://v8.dev/blog/math-random for details.

added 128 packages in 13s
npm notice
npm notice New minor version of npm available! 8.1.2 -> 8.3.0
npm notice Changelog: https://github.com/npm/cli/releases/tag/v8.3.0
npm notice Run npm install -g npm@8.3.0 to update!
npm notice
验证是否安装成功:
C:\000>newman

Usage: newman [options] [command]

Options:
  -v, --version               output the version number
  -h, --help                  display help for command

Commands:
  run [options] <collection>  Initiate a Postman Collection run from a given URL or path

To get available options for a command:
  newman <command> -h
3.控制台生成测试报告
这里以我的为例,下载地址:[https://files.cnblogs.com/files/blogs/713119/%E9%A3%8E%E6%9A%B4%E5%B9%B3%E5%8F%B0.postman\_collection.json]( )
newman run +导出的测试数据文件名称
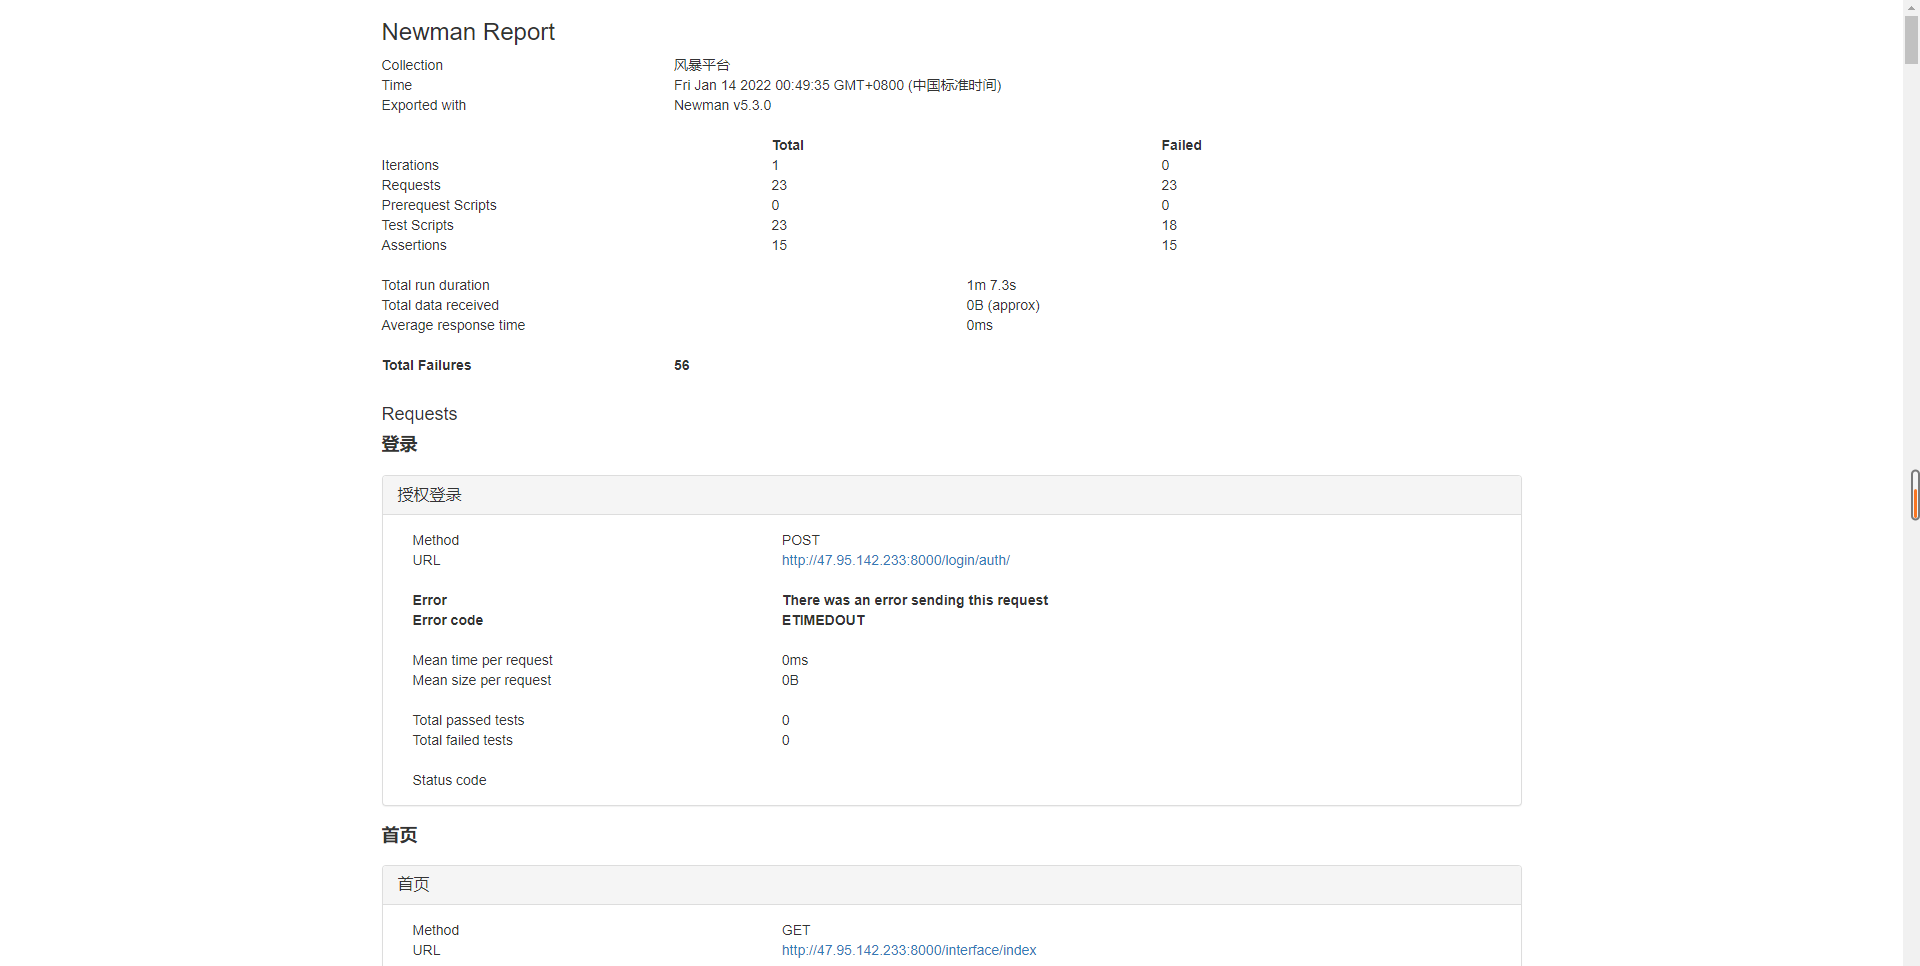
4.生成HTML的测试报告
newman 支持四种格式报告文件:cli,json,html,junit
生成 html 报告时需要安装html套件,命令行中执行:
npm install -g newman-reporter-html
     输出报告时使用的命令:
    -r html,json,junit         指定生成html,json,xml形式的测试报告
    --reporter-json-export jsonReport.json          生成json格式的测试报告
    --reporter-junit-export xmlReport.xml            生成xml格式的测试报告
    --reporter-html-export htmlReport.html          生成html格式的测试报告
    默认生成的测试报告保存在当前目录下,如果文件名前加上路径,则保存在指定的目录下

  例:输出json和html文件报告
输出命令:
       newman run 风暴平台.postman_collection.json -r html
输出结果展示
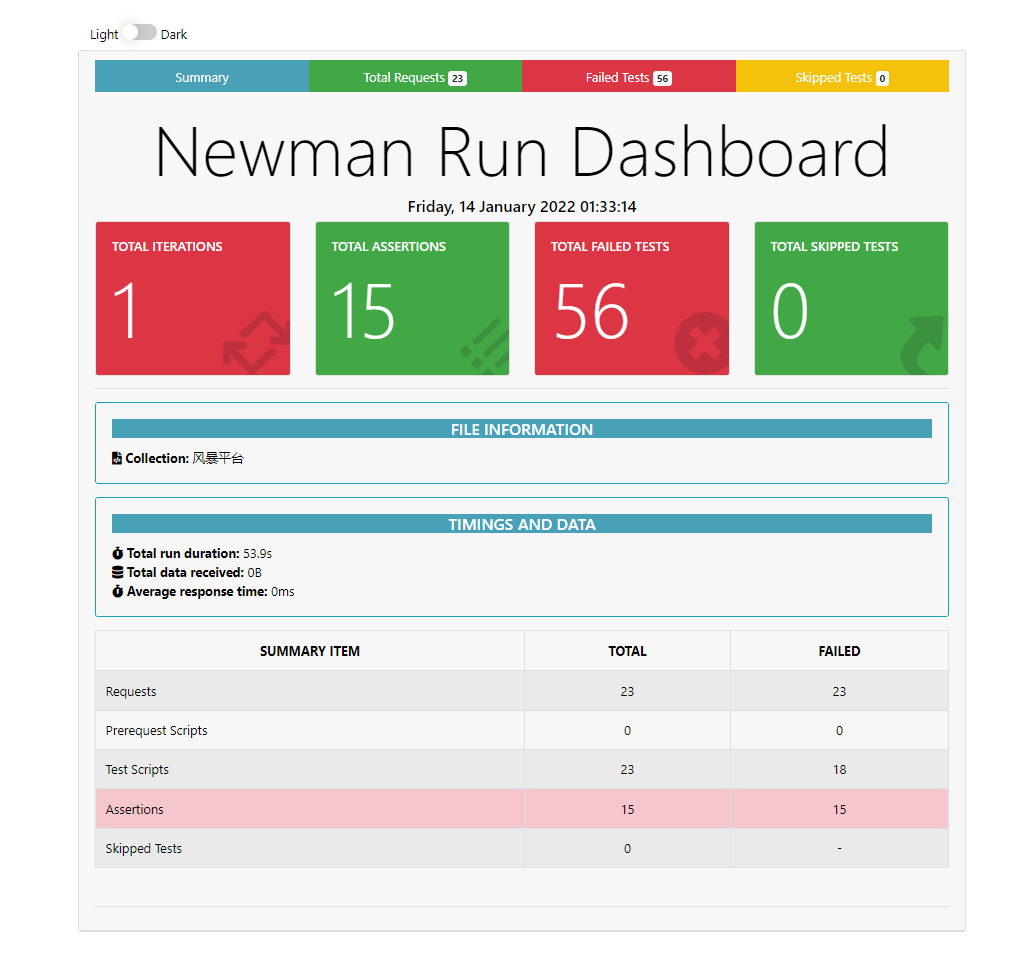
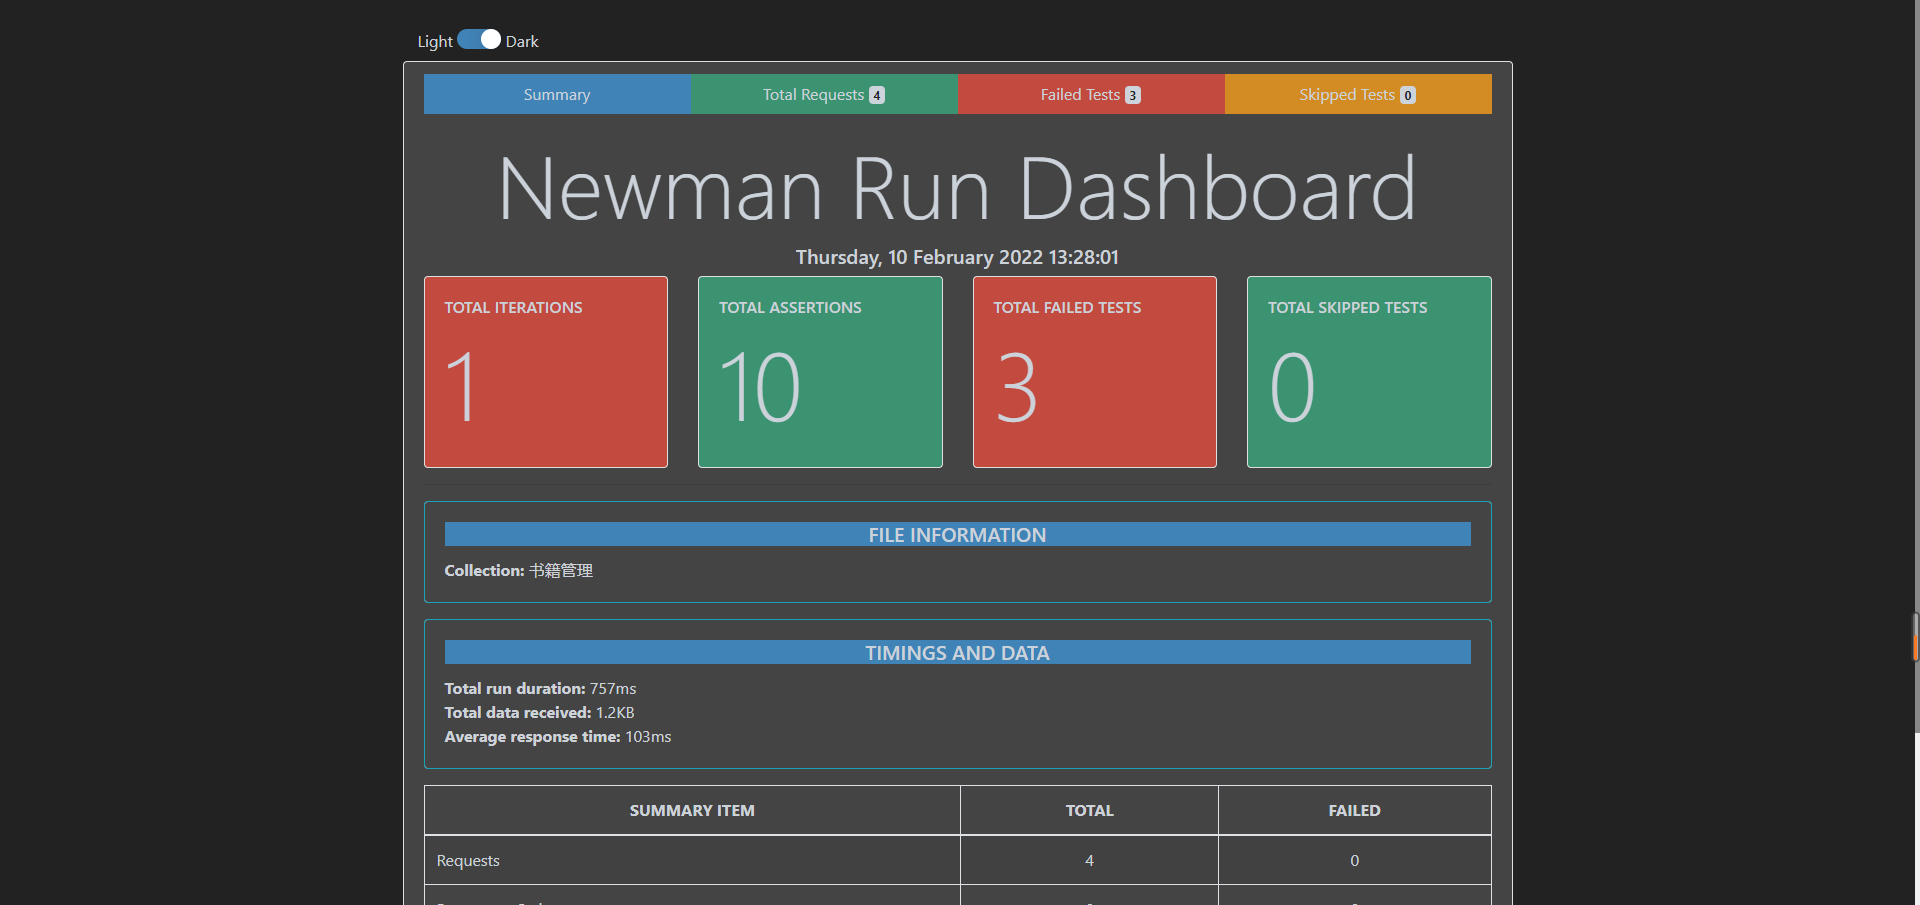
5.输出htmlextra报告
npm install -g newman-reporter-htmlextra
newman run 风暴平台.postman_collection.json -r htmlextra
npm install -g newman-reporter-html
5.2JMeter测试报告的生成
.配置ant
1.1认识ant
ant下载地址:https://ant.apache.org/bindownload.cgi
   ant翻译过来是蚂蚁的意思,是优秀的Java构建工具。Apache Ant是一个Java库和命令行工具,其任务是驱动构建文件中描述为
相互依赖的目标和扩展点的进程。Ant 的主要已知用途是构建 Java 应用程序。Ant 提供了许多内置任务,允许编译、组装、测试和
运行 Java 应用程序。Ant 还可以有效地用于构建非 Java 应用程序,例如 C 或 C++ 应用程序。更一般地说,Ant可用于试验任
何类型的过程,这些过程可以用目标和任务来描述。再简单点,就是jmeter整合ant可以生成HTML的测试报告
1.2ant的环境搭建
解压zip压缩包,将压缩包放置你要放置的目录。我这里放置在D:\Ruanjian\apache-ant-1.10.1,目录结构如下:
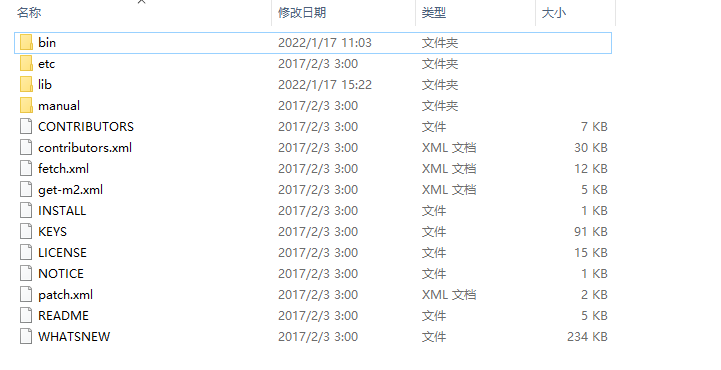
然后将bin目录配置到Path环境变量中:

1.2.1验证环境变量
C:>ant
Buildfile: build.xml does not exist!
Build failed

C:>ant -version
Apache Ant(TM) version 1.10.1 compiled on February 2 2017
2.配置buid.xml文件
这里演示的是使用sina邮箱发送,QQ邮箱接收
可以将账号这些换成自己的
<?xml version="1.0" encoding="UTF8"?>
<project name="ant-jmeter-test" default="run" basedir=".">
<!--jmeter所在本地磁盘路径-->
<property name="jmeterPath" value="D:\Ruanjian\apache-jmeter-5.4.3"/>
<!--邮箱的配置-->
<property name="mailhost" value="smtp.sina.cn"/>
<!--发送邮件的邮箱账号-->
<property name="username" value="******@sina.com"/>
<!--发送邮件的邮箱密码-->
<property name="password" value="*****"/>
<!--发送邮件的账号-->
<property name="mailfrom" value="******@sina.com"/>
<!--接收邮件的邮箱账号-->
<property name="mail_to" value="******41@qq.com"/>
<!--发送邮件的主题-->
<property name="mailsubject" value="API测试报告"/>
<!--sina邮箱的端口-->
<property name="mail_port" value="25"/>
<!--发送邮件的正文-->
<property name="message" value="Hi!请查收API测试报告,如有任何疑问,请联系我!"/>
<tstamp>
<format property="time" pattern="yyyyMMddhhmm" />
</tstamp>
<property name="jmeter.home" value="${jmeterPath}" />
<property name="jmeter.result.jtl.dir" value="${jmeterPath}\tests\report\jtl" />
<property name="jmeter.result.html.dir" value="${jmeterPath}\tests\report\html" />
<property name="htmlReportNameSummary" value="testReport" />
<property name="jmeter.result.jtlName" value="${jmeter.result.jtl.dir}/${htmlReportNameSummary}${time}.jtl" />
<property name="jmeter.result.htmlName" value="${jmeter.result.html.dir}/${htmlReportNameSummary}${time}.html" />
<target name="run">
<antcall target="test" />
<antcall target="report" />
<antcall target="sendEmail" />
</target>
<!--执行接口测试-->
<target name="test">
<echo>执行接口自动化测试</echo>
<taskdef name="jmeter" classname="org.programmerplanet.ant.taskdefs.jmeter.JMeterTask" />
<jmeter jmeterhome="${jmeter.home}" resultlog="${jmeter.result.jtlName}">
<!--要执行的测脚本的路径与文件名-->
<testplans dir="${jmeterPath}\tests\script" includes="TestDev.jmx" />
<property name="jmeter.save.saveservice.output_format" value="xml"/>
</jmeter>
</target>
<!--解决报告中NAN字段显示问题-->
<path id="xslt.classpath">
<fileset dir="${jmeter.home}/lib" includes="xalan-2.7.2.jar"/>
<fileset dir="${jmeter.home}/lib" includes="serializer-2.7.2.jar"/>
</path>
<!--生成HTML测试报告-->
<target name="report">
<echo>生成接口自动测试报告</echo>
<xslt classpathref="xslt.classpath"
force="true"
in="${jmeter.result.jtlName}" out="${jmeter.result.htmlName}"
style="${jmeter.home}/extras/jmeter-results-detail-report_21.xsl" />
<!--复制图片-->
<copy todir="${jmeter.result.html.dir}">
<fileset dir="${jmeter.home}/extras">
<include name="collapse.png" />
<include name="expand.png" />
</fileset>
</copy>
</target>
<!--自动发送邮件-->
<target name="sendEmail">
<echo>发送自动化测试报告</echo>
<mail mailhost="${mailhost}"
ssl="ture"
user="${username}"
password="${password}"
mailport="${mail_port}"
subject="${mailsubject}"
messagemimetype="text/html"
tolist="${mail_to}">
<from address="${mailfrom}" />
<attachments>
<fileset dir="${jmeter.result.html.dir}">
<include name="${htmlReportNameSummary}${time}.html"/>
<include name="collapse.png" />
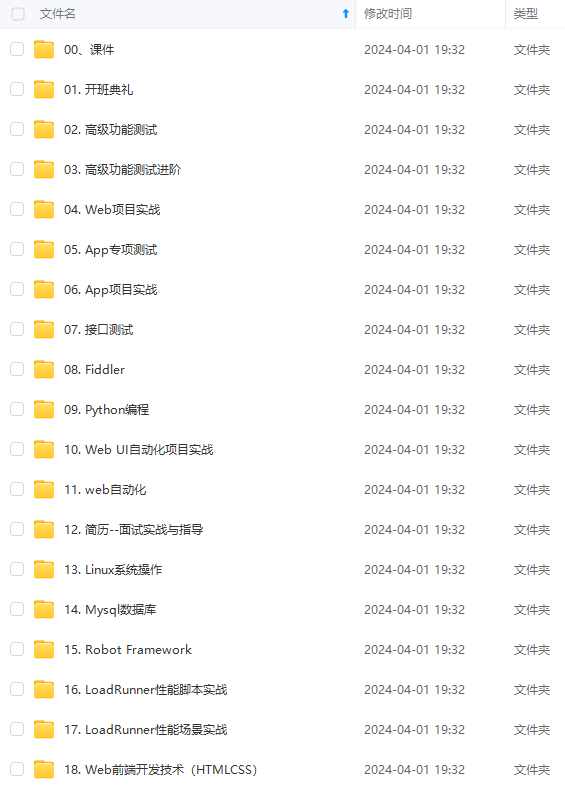
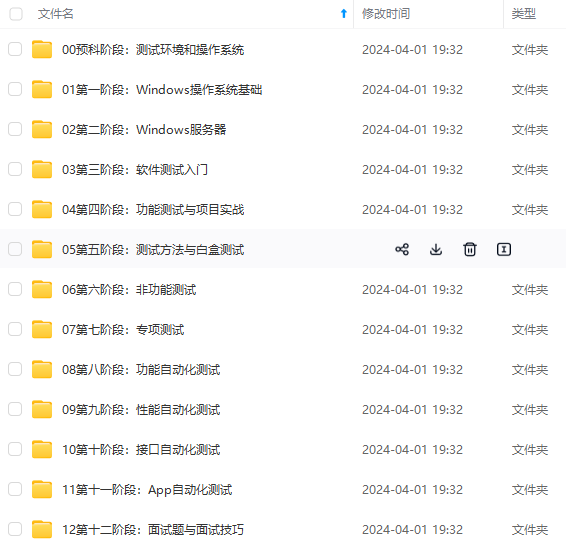
**既有适合小白学习的零基础资料,也有适合3年以上经验的小伙伴深入学习提升的进阶课程,涵盖了95%以上软件测试知识点,真正体系化!**
**由于文件比较多,这里只是将部分目录截图出来,全套包含大厂面经、学习笔记、源码讲义、实战项目、大纲路线、讲解视频,并且后续会持续更新**
**[需要这份系统化的资料的朋友,可以戳这里获取](https://bbs.csdn.net/topics/618608311)**
<include name="collapse.png" />
<include name="expand.png" />
</fileset>
</copy>
</target>
<!--自动发送邮件-->
<target name="sendEmail">
<echo>发送自动化测试报告</echo>
<mail mailhost="${mailhost}"
ssl="ture"
user="${username}"
password="${password}"
mailport="${mail_port}"
subject="${mailsubject}"
messagemimetype="text/html"
tolist="${mail_to}">
<from address="${mailfrom}" />
<attachments>
<fileset dir="${jmeter.result.html.dir}">
<include name="${htmlReportNameSummary}${time}.html"/>
<include name="collapse.png" />
[外链图片转存中...(img-gcU80Rgw-1714850229639)]
[外链图片转存中...(img-oczLlrsx-1714850229640)]
[外链图片转存中...(img-7r0lv42C-1714850229640)]
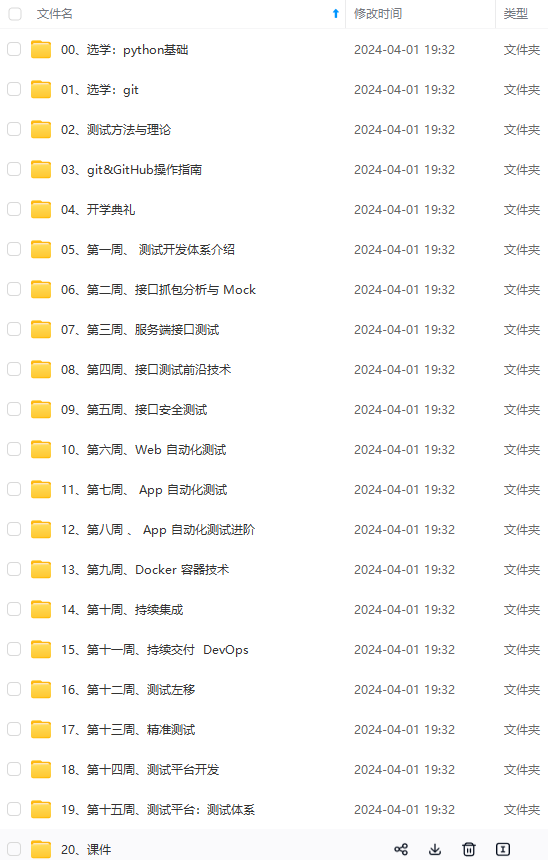
**既有适合小白学习的零基础资料,也有适合3年以上经验的小伙伴深入学习提升的进阶课程,涵盖了95%以上软件测试知识点,真正体系化!**
**由于文件比较多,这里只是将部分目录截图出来,全套包含大厂面经、学习笔记、源码讲义、实战项目、大纲路线、讲解视频,并且后续会持续更新**
**[需要这份系统化的资料的朋友,可以戳这里获取](https://bbs.csdn.net/topics/618608311)**


 359
359

 被折叠的 条评论
为什么被折叠?
被折叠的 条评论
为什么被折叠?
 到【灌水乐园】发言


