


网上学习资料一大堆,但如果学到的知识不成体系,遇到问题时只是浅尝辄止,不再深入研究,那么很难做到真正的技术提升。
一个人可以走的很快,但一群人才能走的更远!不论你是正从事IT行业的老鸟或是对IT行业感兴趣的新人,都欢迎加入我们的的圈子(技术交流、学习资源、职场吐槽、大厂内推、面试辅导),让我们一起学习成长!
}
public class App17 {
/**
* AtomicReference
* 1、原子更新引用类型
* 2、AtomicReference是对对象进行原子操作,保证多线程操作同一个对象时候的线程安全性
*/
public static void main(String[] args) throws InterruptedException {
//1. 创建原子更新引用类型,保证多线程操作对象的原子性
AtomicReference atomicReference = new AtomicReference<>();
CartItem cartItem = new CartItem(1L,100L);
//2. 存入对象
atomicReference.set(cartItem);
//3. 原子方式更新对象,会与set时候存入的对象进行对比,如果是同一个对象更新成功返回true
boolean result = atomicReference.compareAndSet(cartItem, new CartItem(2L, 200L));
System.out.println("result = " + result);
System.out.println(atomicReference.get());
}
}
### AtomicLongFieldUpdater
/**
* AtomicLongFieldUpdater
* 1、原子更新字段类型
* 2、保证对象属性原子操作线程安全
*/
public static void main(String[] args) throws InterruptedException {
AtomicLongFieldUpdater atomicIntegerFieldUpdater =
AtomicLongFieldUpdater.newUpdater(CartItem.class,“num”);
CartItem user = new CartItem(1L,100L);
boolean flag = atomicIntegerFieldUpdater.compareAndSet(user, user.getNum(), 101);
System.out.println("flag = " + flag);
System.out.println(“原子更新后的值:”+atomicIntegerFieldUpdater.get(user));
}
要求字段必须式: public volatile long(基本类型)


### ABA问题


ABA问题: 如果另一个线程修改V值假设原来是A,先修改成B,再修改回成A。当前线程的CAS操作无法分辨当前V值是否发生过变化。


危害:


小明在提款机,提取了50元,因为提款机问题,有两个线程,同时把余额从100变为50
 线程1(提款机):获取当前值100,期望更新为50,
 线程2(提款机):获取当前值100,期望更新为50,
 线程1成功执行,线程2某种原因block了,这时,某人给小明汇款50
 线程3(默认):获取当前值50,期望更新为100,
 这时候线程3成功执行,余额变为100,
 线程2从Block中恢复,获取到的也是100,compare之后,继续更新余额为50!!!
 此时可以看到,实际余额应该为100(100-50+50),但是实际上变为了50(100-50+50-50)这就是ABA问题带来的成功提交。


**解决方法**: 在变量前面加上版本号,每次变量更新的时候变量的**版本号都`+1`**,即`A->B->A`就变成了`1A->2B->3A`。
public static void main(String[] args) throws InterruptedException {
AtomicStampedReference asr = new AtomicStampedReference<>(50,0);
Thread thread1 = new Thread(()->{
asr.compareAndSet(50,100,asr.getStamp(),asr.getStamp()+1);
try {
Thread.sleep(1);
} catch (InterruptedException e) {
e.printStackTrace();
}
asr.compareAndSet(100,50,asr.getStamp(),asr.getStamp()+1);
});
Thread thread2 = new Thread(()->{
int stamp = asr.getStamp();
System.out.println("thread2获取版本 = " + stamp);
boolean result = asr.compareAndSet(50, 200, stamp, asr.getStamp() + 1);
System.out.println("result = " + result);
},“thread2”);
thread1.start();
thread2.start();
}
单独测试:
public class App20 {
public static void main(String[] args) throws InterruptedException {
Integer num1 = 1000;
Integer num2 = 2000;
Integer num3 = 3000;
Integer num4 = 4000;
AtomicStampedReference asr = new AtomicStampedReference<>(num1, 0);
boolean b3 = asr.compareAndSet(num1, num2, asr.getStamp(), asr.getStamp()+1);
boolean b2 = asr.compareAndSet(num2, num3, asr.getStamp(), asr.getStamp()+1);
boolean b = asr.compareAndSet(num3, num4, asr.getStamp(), asr.getStamp()+1);
System.out.println("b = " + b);
System.out.println(asr.getReference());
}
}
## 创建线程有几种方式?


### 方式1:继承Thread创建线程
public class MyThread extends Thread {
@Override
public void run() {
for (int i = 0; i < 20; i++) {
System.out.println(Thread.currentThread().getName() + “:” + i);
}
}
public static void main(String[] args) {
MyThread t1 = new MyThread();
t1.start();
MyThread t2 = new MyThread();
t2.start();
}
}
### 方式2:通过Runnable
public class App2 {
public static void main(String[] args) {
new Thread(()->{
for (int i = 0; i < 20; i++) {
System.out.println("i = " + i);
}
}).start();
}
}
### 方式3:通过Callable创建线程


一个可取消的异步计算。FutureTask提供了对Future的基本实现,可以调用方法去开始和取消一个计算,可以查询计算是否完成并且获取计算结果。只有当计算完成时才能获取到计算结果,一旦计算完成,计算将不能被重启或者被取消,除非调用runAndReset方法。


总的来说,如果你需要在线程任务执行完毕后获取返回结果,或者需要在任务中处理受检查异常,那么你应该使用 `Callable` 接口。如果你只需要执行一个简单的线程任务而不关心返回结果,那么使用 `Runnable` 接口更加合适。
package cn.test;
import java.util.concurrent.*;
public class App3 {
public static void main(String[] args) {
//1、计算任务,实现Callable接口
Callable callable = ()->{
int sum = 0;
for (int i = 0; i < 20; i++) {
sum += i;
// 耗时操作
Thread.sleep(100);
}
return “计算结果:” + sum;
};
//2、创建FutureTask,传入callable对象
FutureTask futureTask = new FutureTask<>(callable);
//3、创建启动线程
Thread thread = new Thread(futureTask);
thread.start();
try {
String result = futureTask.get(1, TimeUnit.SECONDS);
System.out.println("result = " + result);
} catch (InterruptedException e) {
e.printStackTrace();
} catch (ExecutionException e) {
e.printStackTrace();
} catch (TimeoutException e) {
e.printStackTrace();
// 超时中断执行
futureTask.cancel(true);
System.out.println(“超时中断执行”);
}
}
}
### 方式4:通过线程池


#### 概述


线程过多会带来额外的开销,频繁创建和销毁大量线程需要占用系统资源,消耗大量时间。其中包括创建销毁线程的开销、调度线程的开销等等,同时也降低了计算机的整体性能。线程池维护多个线程,等待监督管理者分配可并发执行的任务。这种做法,一方面避免了处理任务时创建销毁线程开销的代价,另一方面避免了线程数量膨胀导致的过分调度问题,保证了对内核的充分利用。


#### ThreadPoolExecutor API
public ThreadPoolExecutor(int corePoolSize,
int maximumPoolSize,
long keepAliveTime,
TimeUnit unit,
BlockingQueue workQueue,
ThreadFactory threadFactory,
RejectedExecutionHandler handler) {
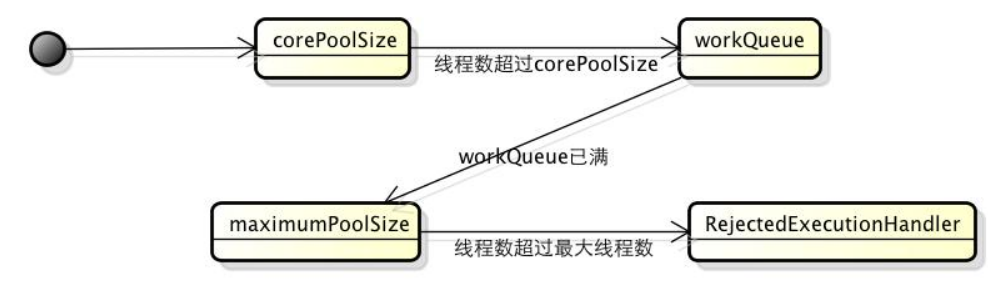
`corePoolSize` :核心池的大小,如果调用了prestartAllCoreThreads()或者prestartCoreThread()方法,会直接预先创建corePoolSize指定大小的线程,否则当有任务来之后,就会创建一个线程去执行任务,当线程池中的线程数目达到corePoolSize后,就会把到达的任务放到缓存队列当中;这样做的好处是,如果任务量很小,那么甚至就不需要缓存任务,corePoolSize的线程就可以应对;


`maximumPoolSize`:线程池最大线程数,表示在线程池中最多能创建多少个线程,如果运行中的线程超过了这个数字,那么相当于线程池已满,新来的任务会使用RejectedExecutionHandler 进行处理;


`keepAliveTime`:表示线程没有任务执行时最多保持多久时间会终止,然后线程池的数目维持在corePoolSize 大小;


`unit`:参数keepAliveTime的时间单位;


`workQueue`:一个阻塞队列,用来存储等待执行的任务,如果当前对线程的需求超过了corePoolSize大小,才会放在这里;


`threadFactory`:线程工厂,主要用来创建线程,比如可以指定线程的名字;


`handler`:如果线程池已满,新的任务的处理方式


#### 代码实现
public class App4 {
// 线程池的核心线程数
private static final int CORE_POOL_SIZE = 5;
// 线程池的最大线程数
private static final int MAX_POOL_SIZE = 10;
// 当线程数大于核心线程数时,多余的空闲线程存活的最长时间
private static final int KEEP_ALLOW_TIME = 100;
// 任务队列大小,用来存储等待执行任务的队列
private static final int QUEUE_CAPACITY = 100;
public static void main(String[] args) {
// handler 指定拒绝策略,当提交的任务过多不能及时处理,我们通过定制的策略处理任务
ThreadPoolExecutor executor = new ThreadPoolExecutor(
CORE_POOL_SIZE,
MAX_POOL_SIZE,
KEEP_ALLOW_TIME,
TimeUnit.SECONDS,
new ArrayBlockingQueue<>(QUEUE_CAPACITY),
new ThreadPoolExecutor.CallerRunsPolicy()
);
//executor.prestartAllCoreThreads();
for (int i = 0; i < 10; i++) {
Runnable runnable = () -> {
System.out.println(Thread.currentThread().getName() + “:start”);
try {
Thread.sleep(3000);
} catch (InterruptedException e) {
e.printStackTrace();
}
System.out.println(Thread.currentThread().getName() + “:end”);
};
// 运行线程
executor.execute(runnable);
}
// 终止线程池
executor.shutdown();
while (!executor.isTerminated()) {}
System.out.println(“Finish All”);
}
}
#### 源码分析
/*The main pool control state, ctl, is an atomic integer packing
* two conceptual fields
* workerCount, indicating the effective number of threads
* runState, indicating whether running, shutting down etc
*/
// 存放线程池的线程池内有效线程的数量 (workerCount)和运行状态 (runState)
private final AtomicInteger ctl = new AtomicInteger(ctlOf(RUNNING, 0));
private static int workerCountOf(int c) {
return c & CAPACITY;
}
private final BlockingQueue workQueue;
public void execute(Runnable command) {
// 如果任务为null,则抛出异常。
if (command == null)
throw new NullPointerException();
// ctl 中保存的线程池当前的一些状态信息
int c = ctl.get();
// 下面会涉及到 3 步 操作
// 1.首先判断当前线程池中之行的任务数量是否小于 corePoolSize
// 如果小于的话,通过addWorker(command, true)新建一个线程,并将任务(command)添加到该线程中;然后,启动该线程从而执行任务。
if (workerCountOf© < corePoolSize) {
if (addWorker(command, true))
return;
c = ctl.get();
}
// 2.如果当前之行的任务数量大于等于 corePoolSize 的时候就会走到这里
// 通过 isRunning 方法判断线程池状态,线程池处于 RUNNING 状态才会被并且队列可以加入任务,该任务才会被加入进去
if (isRunning© && workQueue.offer(command)) {
int recheck = ctl.get();
// 再次获取线程池状态,如果线程池状态不是 RUNNING 状态就需要从任务队列中移除任务,并尝试判断线程是否全部执行完毕。同时执行拒绝策略。
if (!isRunning(recheck) && remove(command))
reject(command);
// 如果当前线程池为空就新创建一个线程并执行。
else if (workerCountOf(recheck) == 0)
addWorker(null, false);
}
//3. 通过addWorker(command, false)新建一个线程,并将任务(command)添加到该线程中;然后,启动该线程从而执行任务。
//如果addWorker(command, false)执行失败,则通过reject()执行相应的拒绝策略的内容。
else if (!addWorker(command, false))
reject(command);
}
#### 工作原理:
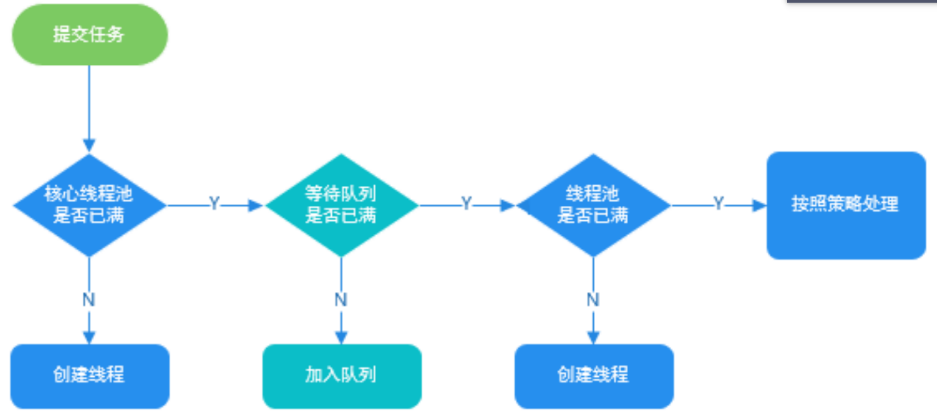
1. 线程池刚创建时,里面没有一个线程。任务队列是作为参数传进来的。不过,就算队列里面有任务,线程池也不会马上执行它们。
2. 当调用 execute() 方法添加一个任务时,线程池会做如下判断:
* 如果正在运行的线程数量小于 corePoolSize,那么马上创建线程运行这个任务;
* 如果正在运行的线程数量大于或等于 corePoolSize,那么将这个任务放入队列。
* 如果这时候队列满了,而且正在运行的线程数量小于 maximumPoolSize,那么还是要创建线程运行这个任务;
* 如果队列满了,而且正在运行的线程数量大于或等于 maximumPoolSize,那么线程池会抛出异常,告诉调用者“我不能再接受任务了”。
3,当一个线程完成任务时,它会从[队列]( )中取下一个任务来执行。
4,当一个线程无事可做,超过一定的时间(keepAliveTime)时,线程池会判断,如果当前运行的线程数大于 corePoolSize,那么这个线程就被停掉。所以线程池的所有任务完成后,它最终会收缩到 corePoolSize 的大小。
这样的过程说明,并不是先加入任务就一定会先执行。假设队列大小为 10,corePoolSize 为 3,maximumPoolSize 为 6,那么当加入 20 个任务时,执行的顺序就是这样的:首先执行任务 1、2、3,然后任务 4~13 被放入队列。这时候队列满了,任务 14、15、16 会被马上执行,而任务 17~20 则会抛出异常。最终顺序是:1、2、3、14、15、16、4、5、6、7、8、9、10、11、12、13。
##### 线程池的阻塞队列选择
如果线程数超过了corePoolSize,则开始把线程先放到阻塞队列里,相当于生产者消费者的一个数据通道,有以下一些阻塞队列可供选择:
1. ArrayBlockingQueue
ArrayBlockingQueue是一个有边界的阻塞队列,它的内部实现是一个数组。有边界的意思是它的容量是有限的,我们必须在其初始化的时候指定它的容量大小,容量大小一旦指定就不可改变。
2. DelayQueue
DelayQueue阻塞的是其内部元素,DelayQueue中的元素必须实现 java.util.concurrent.Delayed接口,该接口只有一个方法就是long getDelay(TimeUnit unit),返回值就是队列元素被释放前的保持时间,如果返回0或者一个负值,就意味着该元素已经到期需要被释放,此时DelayedQueue会通过其take()方法释放此对象,DelayQueue可应用于定时关闭连接、缓存对象,超时处理等各种场景;
3. LinkedBlockingQueue
LinkedBlockingQueue阻塞队列大小的配置是可选的,如果我们初始化时指定一个大小,它就是有边界的,如果不指定,它就是无边界的。说是无边界,其实是采用了默认大小为Integer.MAX\_VALUE的容量 。它的内部实现是一个链表。
4. PriorityBlockingQueue
PriorityBlockingQueue是一个没有边界的队列,它的排序规则和 java.util.PriorityQueue一样。需要注意,PriorityBlockingQueue中允许插入null对象。所有插入PriorityBlockingQueue的对象必须实现 java.lang.Comparable接口,队列优先级的排序规则就是按照我们对这个接口的实现来定义的。
5. SynchronousQueue
SynchronousQueue队列内部仅允许容纳一个元素。当一个线程插入一个元素后会被阻塞,除非这个元素被另一个线程消费。
使用的最多的应该是LinkedBlockingQueue,注意一般情况下要配置一下队列大小,设置成有界队列,否则JVM内存会被撑爆!
##### 线程池已满又有新任务?
>
> 如果线程池已经满了可是还有新的任务提交怎么办?
>
>
>
线程池已满的定义,是指运行线程数==maximumPoolSize,并且workQueue是有界队列并且已满(如果是无界队列当然永远不会满);
这时候再提交任务怎么办呢?线程池会将任务传递给最后一个参数RejectedExecutionHandler来处理,比如打印报错日志、抛出异常、存储到Mysql/redis用于后续处理等等,线程池默认也提供了几种处理方式,详见下一章:
##### 拒绝策略
拒绝策略指的就是线程池已满情况下任务的处理策略,默认有以下几种:
1、ThreadPoolExecutor.AbortPolicy 中,处理程序遭到拒绝将抛出运行时RejectedExecutionException。
/\*\*
* A handler for rejected tasks that throws a
* {@code RejectedExecutionException}.
*/
public static class AbortPolicy implements RejectedExecutionHandler {
/**
* Creates an {@code AbortPolicy}.
*/
public AbortPolicy() { }
/**
* Always throws RejectedExecutionException.
*
* @param r the runnable task requested to be executed
* @param e the executor attempting to execute this task
* @throws RejectedExecutionException always
*/
public void rejectedExecution(Runnable r, ThreadPoolExecutor e) {
throw new RejectedExecutionException("Task " + r.toString() +
" rejected from " +
e.toString());
}
}
2、在 ThreadPoolExecutor.CallerRunsPolicy,交给线程池调用所在的线程进行处理。
/**
* A handler for rejected tasks that runs the rejected task
* directly in the calling thread of the {@code execute} method,
* unless the executor has been shut down, in which case the task
* is discarded.
*/
public static class CallerRunsPolicy implements RejectedExecutionHandler {
/**
* Creates a {@code CallerRunsPolicy}.
*/
public CallerRunsPolicy() { }
/**
* Executes task r in the caller’s thread, unless the executor
* has been shut down, in which case the task is discarded.
*
* @param r the runnable task requested to be executed
* @param e the executor attempting to execute this task
*/
public void rejectedExecution(Runnable r, ThreadPoolExecutor e) {
if (!e.isShutdown()) {
r.run();
}
}
}
3、在 ThreadPoolExecutor.DiscardPolicy 中,直接丢弃后来的任务
/**
* A handler for rejected tasks that silently discards the
* rejected task.
*/
public static class DiscardPolicy implements RejectedExecutionHandler {
/**
* Creates a {@code DiscardPolicy}.
*/
public DiscardPolicy() { }
/**
* Does nothing, which has the effect of discarding task r.
*
* @param r the runnable task requested to be executed
* @param e the executor attempting to execute this task
*/
public void rejectedExecution(Runnable r, ThreadPoolExecutor e) {
}
}
4、在 ThreadPoolExecutor.DiscardOldestPolicy 丢弃队列里最老的任务,将当前这个任务继续提交给线程池。
/**
* A handler for rejected tasks that discards the oldest unhandled
* request and then retries {@code execute}, unless the executor
* is shut down, in which case the task is discarded.
*/
public static class DiscardOldestPolicy implements RejectedExecutionHandler {
/**
* Creates a {@code DiscardOldestPolicy} for the given executor.
*/
public DiscardOldestPolicy() { }
/**
* Obtains and ignores the next task that the executor
* would otherwise execute, if one is immediately available,
* and then retries execution of task r, unless the executor
* is shut down, in which case task r is instead discarded.
*
* @param r the runnable task requested to be executed
* @param e the executor attempting to execute this task
*/
public void rejectedExecution(Runnable r, ThreadPoolExecutor e) {
if (!e.isShutdown()) {
e.getQueue().poll();
e.execute®;
}
}
}
5、当然也可以自己实现处理策略类,继承RejectedExecutionHandler接口即可,该接口只有一个方法:
void rejectedExecution(Runnable r, ThreadPoolExecutor executor);
#### 如何优化线程池配置?


**既有适合小白学习的零基础资料,也有适合3年以上经验的小伙伴深入学习提升的进阶课程,涵盖了95%以上软件测试知识点,真正体系化!**
**由于文件比较多,这里只是将部分目录截图出来,全套包含大厂面经、学习笔记、源码讲义、实战项目、大纲路线、讲解视频,并且后续会持续更新**
**[需要这份系统化的资料的朋友,可以戳这里获取](https://bbs.csdn.net/topics/618631832)**
e.execute(r);
}
}
}
5、当然也可以自己实现处理策略类,继承RejectedExecutionHandler接口即可,该接口只有一个方法:
void rejectedExecution(Runnable r, ThreadPoolExecutor executor);
如何优化线程池配置?
[外链图片转存中…(img-sEneDFBA-1715790303887)]
[外链图片转存中…(img-qX7lzLLI-1715790303888)]
[外链图片转存中…(img-KKzs7mwT-1715790303888)]
既有适合小白学习的零基础资料,也有适合3年以上经验的小伙伴深入学习提升的进阶课程,涵盖了95%以上软件测试知识点,真正体系化!
由于文件比较多,这里只是将部分目录截图出来,全套包含大厂面经、学习笔记、源码讲义、实战项目、大纲路线、讲解视频,并且后续会持续更新


 1317
1317


 被折叠的 条评论
为什么被折叠?
被折叠的 条评论
为什么被折叠?
 到【灌水乐园】发言


