


紧跟潮流
大前端和全栈是以后前端的一个趋势,懂后端的前端,懂各端的前端更加具有竞争力,以后可以往这个方向靠拢。
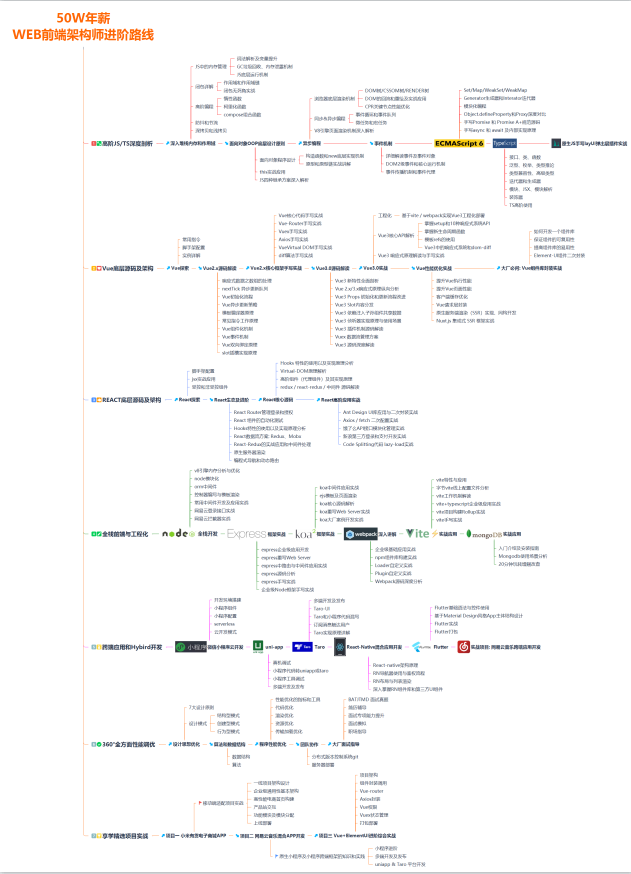
这边整理了一个对标“阿里 50W”年薪企业高级前端工程师成长路线,由于图片太大仅展示一小部分
开源分享:【大厂前端面试题解析+核心总结学习笔记+真实项目实战+最新讲解视频】
nextTick (() => {
//业务 代码
});
##### created


在vue3中无需再定义created,我们只需要直接写在setup里面就相当于了created,使用方法如下
##### this


在vue3中无法使用this,所以如果我们全局自定义的插件想要去获取就可以用通过proxy,使用方法如下
import { getCurrentInstance} from “vue”;
const { proxy } = getCurrentInstance();
function xxx(){
proxy.$xxx
}
##### route、router


在vue3中我们想要使用route和router的话,就得从vue-router中引入, 使用方法如下
import { useRoute, useRouter } from “vue-router”;
const route = useRoute();
const router = useRouter();
function xxx(){
//获取参数
route.params.articleId
//跳转页面
router.push({ path: “xxx”});
}
##### props


在vue3中我们需要引入defineProps 才能去定义props属性,使用如下:
import { defineProps } from “vue”;
const props = defineProps({
userInfo: {
type: Object,
default: null,
},
});
##### watch


在vue3中我们需要引入watch才能去定义watch属性监听内容,使用如下:
import { watch } from “vue”;
//这是监听变量
watch(windowWidth, (newX) => {
isMobile.value = newX < 1119;
showSearch.value = newX < 1500;
showUser.value = newX > 1350;
});
// 监听路由变化,必须加上immediate这个。否则不生效
watch(
() => route.path,
(newPath, oldPath) => {
path.value = newPath;
},
{ immediate: false }
);
##### emit


在2.0中使用emit我们都是通过this去获取,但在vue3中我们需要引入defineEmits才能去使用emit,使用如下:
import { defineEmits} from “vue”;
//先定义父组件的回调方法
const emit = defineEmits([“chooseEmoji”]);
function xxx(){
//value为参数
emit(“chooseEmoji”, value);
}
##### 自定义组件引入
### 紧跟潮流
大前端和全栈是以后前端的一个趋势,懂后端的前端,懂各端的前端更加具有竞争力,以后可以往这个方向靠拢。
这边整理了一个对标“阿里 50W”年薪企业高级前端工程师成长路线,由于图片太大仅展示一小部分
**[开源分享:【大厂前端面试题解析+核心总结学习笔记+真实项目实战+最新讲解视频】](https://bbs.csdn.net/topics/618166371)**


 被折叠的 条评论
为什么被折叠?
被折叠的 条评论
为什么被折叠?
 到【灌水乐园】发言


