


总结
这份面试题几乎包含了他在一年内遇到的所有面试题以及答案,甚至包括面试中的细节对话以及语录,可谓是细节到极致,甚至简历优化和怎么投简历更容易得到面试机会也包括在内!也包括教你怎么去获得一些大厂,比如阿里,腾讯的内推名额!
某位名人说过成功是靠99%的汗水和1%的机遇得到的,而你想获得那1%的机遇你首先就得付出99%的汗水!你只有朝着你的目标一步一步坚持不懈的走下去你才能有机会获得成功!
成功只会留给那些有准备的人!

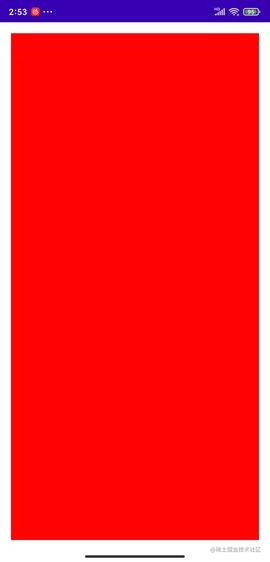
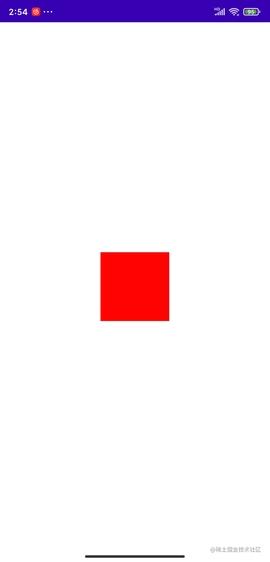
③View的width和height都是100dp
<?xml version="1.0" encoding="utf-8"?>上面三段代码展示效果如下:
场景①和②:
场景③:
简单描述下上面出现的情况:
- 当view的宽高设置成match_parent和wrap_content的时候,显示的大小和父view的大小一致
- 当view的宽高设置成固定值(xxdp)的时候,显示的大小就是我们设置的固定值大小
如果你已经对上面结果感觉毫无疑问而且心里已经知其所以然了,后面的内容可以不用看了。点个赞就可以走了。。。
等等。。开个玩笑。。怎么就当真了呢。。哈哈哈。。废话不多说,走,我们点进去源码瞅瞅。
View.onMeasure
//View.java
public final void measure(int widthMeasureSpec, int heightMeasureSpec) {
…
//1
onMeasure(widthMeasureSpec, heightMeasureSpec);
…
}
上述代码①处代码调用了view的onMeasure方法,先不聊widthMeasureSpec和heightMeasureSpec的由来,这个后面补上。接着我们看View的onMeasure方法:
//View.java
protected void onMeasure(int widthMeasureSpec, int heightMeasureSpec) {
//1
setMeasuredDimension(
getDefaultSize(getSuggestedMinimumWidth(),widthMeasureSpec),//4
getDefaultSize(getSuggestedMinimumHeight(), heightMeasureSpec)//4
);
}
//2
protected final void setMeasuredDimension(int measuredWidth, int measuredHeight) {
…
setMeasuredDimensionRaw(measuredWidth, measuredHeight);
}
//3
private void setMeasuredDimensionRaw(int measuredWidth, int measuredHeight) {
mMeasuredWidth = measuredWidth;
mMeasuredHeight = measuredHeight;
mPrivateFlags |= PFLAG_MEASURED_DIMENSION_SET;
}
//返回background(Drawable)的minWidth、mMinWidth(android_minWitdh)较大值
protected int getSuggestedMinimumWidth() {
return (mBackground == null) ? mMinWidth : max(mMinWidth,mBackground.getMinimumWidth());
}
//返回background(Drawable)的minHeight、mMinHeight(android_minHeight)较大值
protected int getSuggestedMinimumHeight() {
return (mBackground == null) ? mMinHeight :
max(mMinHeight, mBackground.getMinimumHeight());
}
//4
public static int getDefaultSize(int size, int measureSpec) {
int result = size;
int specMode = MeasureSpec.getMode(measureSpec);
int specSize = MeasureSpec.getSize(measureSpec);
switch (specMode) {
//5
case MeasureSpec.UNSPECIFIED:
result = size;
break;
//6
case MeasureSpec.AT_MOST:
case MeasureSpec.EXACTLY:
result = specSize;
break;
}
return result;
}
上述代码略微多一点,但是方法都比较简单,下面我们一一介绍下:
- 标注①②③处的调用链:onMeasure–>setMeasuredDimension–>setMeasuredDimensionRaw 走到方法③setMeasuredDimensionRaw处,view的测量流程就结束了,同时赋值了mMeasuredWidth 和mMeasuredHeight,这个时候我们就可以通过getMeasuredWidth()和getMeasuredHeight() 拿到宽高值了
- 方法②setMeasuredDimension处又调用了方法④getDefaultSize
- 方法④getDefaultSize里面大致逻辑是:
- 如果传入的measureSpec的MeasureSpec.Mode的值是MeasureSpec.AT_MOST或者MeasureSpec.EXACTLY 则返回specSize。
- 如果传入的measureSpec的MeasureSpec.Mode的值是MeasureSpec.UNSPECIFIED 则返回size(getSuggestedMinimumWidth()、getSuggestedMinimumHeight())。
现在我们的疑惑点就在于方法①onMeasure的参数是从哪里来的
那么下面我们就瞅瞅FrameLayout相关测量源码
FrameLayout的onMeasure源码解析
在讲FrameLayout的onMeasure前,我们先默认一个事实,这个FrameLayout是Activity的根View,它会被添加到DecorView上,DecorView实际上也是一个FramLayout,下面的源码解释了DecorView的MeasureSpec的由来:
//ViewRootImpl.java
private void performTraversals() {
…
//获取DecorView的MeasureSpec
int childWidthMeasureSpec = getRootMeasureSpec(mWidth, lp.width);
int childHeightMeasureSpec = getRootMeasureSpec(mHeight, lp.height);
//测量入口
performMeasure(childWidthMeasureSpec, childHeightMeasureSpec);
…
//layout入口
performLayout(lp, mWidth, mHeight);
…
//draw入口
performDraw();
…
}
private static int getRootMeasureSpec(int windowSize, int rootDimension) {
int measureSpec;
switch (rootDimension) {
case ViewGroup.LayoutParams.MATCH_PARENT:
// Window can’t resize. Force root view to be windowSize.
//默认DecorView的measureSpec是:size=windowSize mode是EXACTLY
measureSpec = MeasureSpec.makeMeasureSpec(windowSize, MeasureSpec.EXACTLY);
break;
case ViewGroup.LayoutParams.WRAP_CONTENT:
// Window can resize. Set max size for root view.
measureSpec = MeasureSpec.makeMeasureSpec(windowSize, MeasureSpec.AT_MOST);
break;
default:
// Window wants to be an exact size. Force root view to be that size.
measureSpec = MeasureSpec.makeMeasureSpec(rootDimension,MeasureSpec.EXACTLY);
break;
}
return measureSpec;
}
private void performMeasure(int childWidthMeasureSpec, int childHeightMeasureSpec) {
if (mView == null) {
return;
}
…
//mView即为DecorView
mView.measure(childWidthMeasureSpec, childHeightMeasureSpec);
…
}
从上面的代码得知:DecorView的measureSpec是size=windowSize比如(1920px 1080px) mode=EXACTLY, 然后由于Activity根FramLayout的width和height都是match_parent, 所以 FrameLayout measureSpec和DecorView的measureSpec是一致的, 接下来我们看FrameLayout的onMeasure源码:
//FrameLayout.java
//这里的widthMeasureSpec的size 手机屏幕宽度 mode是EXACTLY
//heightMeasureSpec的size是手机屏幕高度-状态栏高度 mode是EXACTLY
protected void onMeasure(int widthMeasureSpec, int heightMeasureSpec) {
…
int maxHeight = 0;
int maxWidth = 0;
for (int i = 0; i < count; i++) {
final View child = getChildAt(i);
if (mMeasureAllChildren || child.getVisibility() != GONE) {
//1
measureChildWithMargins(child, widthMeasureSpec, 0, heightMeasureSpec, 0);
final LayoutParams lp = (LayoutParams) child.getLayoutParams();
maxWidth = Math.max(maxWidth,
child.getMeasuredWidth() + lp.leftMargin + lp.rightMargin);
maxHeight = Math.max(maxHeight,
child.getMeasuredHeight() + lp.topMargin + lp.bottomMargin);
…
}
}
…
//2
setMeasuredDimension(resolveSizeAndState(maxWidth, widthMeasureSpec, childState),
resolveSizeAndState(maxHeight, heightMeasureSpec,
childState << MEASURED_HEIGHT_STATE_SHIFT));
}
//ViewGroup.java
//3
protected void measureChildWithMargins(View child, int parentWidthMeasureSpec,
int widthUsed, int parentHeightMeasureSpec, int heightUsed) {
final MarginLayoutParams lp = (MarginLayoutParams) child.getLayoutParams();
//4
final int childWidthMeasureSpec = getChildMeasureSpec(parentWidthMeasureSpec,
mPaddingLeft + mPaddingRight + lp.leftMargin + lp.rightMargin
- widthUsed, lp.width);
//5
final int childHeightMeasureSpec = getChildMeasureSpec(parentHeightMeasureSpec,
mPaddingTop + mPaddingBottom + lp.topMargin + lp.bottomMargin - heightUsed, lp.height);
//6
child.measure(childWidthMeasureSpec, childHeightMeasureSpec);
}
//7
public static int getChildMeasureSpec(int spec, int padding, int childDimension) {
//measureSpec的mode
int specMode = MeasureSpec.getMode(spec);
//measureSpec的size
int specSize = MeasureSpec.getSize(spec);
int size = Math.max(0, specSize - padding);
int resultSize = 0;
int resultMode = 0;
switch (specMode) {
case MeasureSpec.EXACTLY:
if (childDimension >= 0) {//child的宽高值是固定值比如40dp
resultSize = childDimension;
resultMode = MeasureSpec.EXACTLY;
} else if (childDimension == LayoutParams.MATCH_PARENT) {
//child的lp.width是match_parent
resultSize = size;
resultMode = MeasureSpec.EXACTLY;
} else if (childDimension == LayoutParams.WRAP_CONTENT) {
//child的lp.width是wrap_content
resultSize = size;
resultMode = MeasureSpec.AT_MOST;
}
break;
case MeasureSpec.AT_MOST:
if (childDimension >= 0) {//child的宽高值是固定值比如40dp
resultSize = childDimension;
resultMode = MeasureSpec.EXACTLY;
} else if (childDimension == LayoutParams.MATCH_PARENT) {
//此时 child的match_parent 和 wrap_content 返回的MeasureSpec 一模一样
//mode都是AT_MOST
resultSize = size;
resultMode = MeasureSpec.AT_MOST;
} else if (childDimension == LayoutParams.WRAP_CONTENT) {
resultSize = size;
resultMode = MeasureSpec.AT_MOST;
}
break;
case MeasureSpec.UNSPECIFIED:
if (childDimension >= 0) {
//child的宽高值是固定值比如40dp
Kafka实战笔记
关于这份笔记,为了不影响大家的阅读体验,我只能在文章中展示部分的章节内容和核心截图

- Kafka入门
- 为什么选择Kafka
- Karka的安装、管理和配置

- Kafka的集群
- 第一个Kafka程序

afka的生产者

- Kafka的消费者
- 深入理解Kafka
- 可靠的数据传递


- Spring和Kalka的整合
- Sprinboot和Kafka的整合
- Kafka实战之削峰填谷
- 数据管道和流式处理(了解即可)

- Kafka实战之削峰填谷

了解即可)**
[外链图片转存中…(img-kzReI3qv-1715655965058)]
- Kafka实战之削峰填谷
[外链图片转存中…(img-EK8Mr7Nu-1715655965059)]


 被折叠的 条评论
为什么被折叠?
被折叠的 条评论
为什么被折叠?
 到【灌水乐园】发言


