


总结
上述知识点,囊括了目前互联网企业的主流应用技术以及能让你成为“香饽饽”的高级架构知识,每个笔记里面几乎都带有实战内容。
很多人担心学了容易忘,这里教你一个方法,那就是重复学习。
打个比方,假如你正在学习 spring 注解,突然发现了一个注解@Aspect,不知道干什么用的,你可能会去查看源码或者通过博客学习,花了半小时终于弄懂了,下次又看到@Aspect 了,你有点郁闷了,上次好像在哪哪哪学习,你快速打开网页花了五分钟又学会了。
从半小时和五分钟的对比中可以发现多学一次就离真正掌握知识又近了一步。

人的本性就是容易遗忘,只有不断加深印象、重复学习才能真正掌握,所以很多书我都是推荐大家多看几遍。哪有那么多天才,他只是比你多看了几遍书。
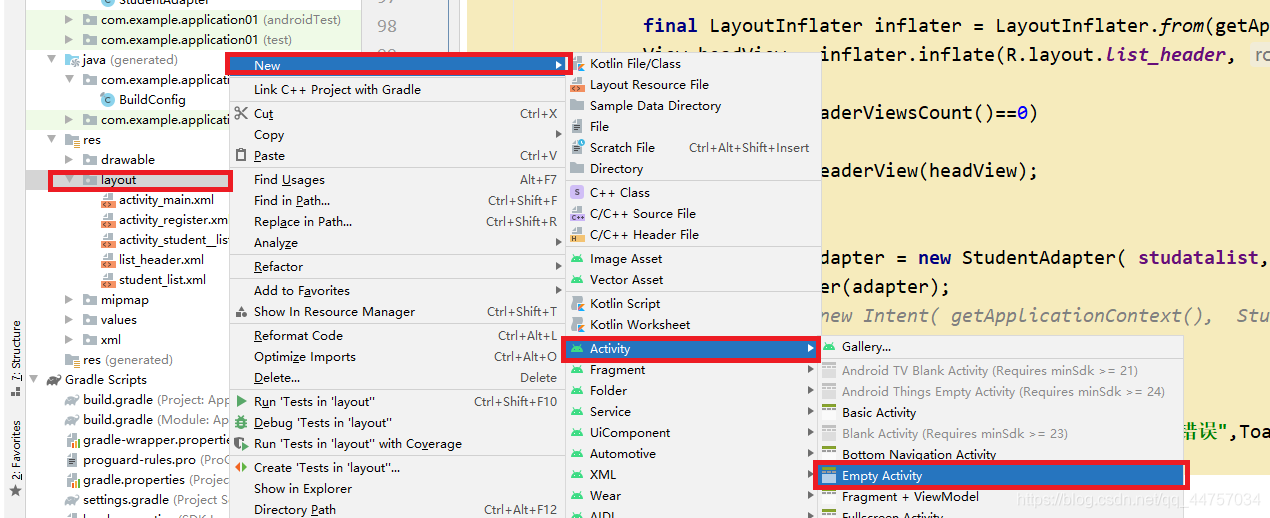
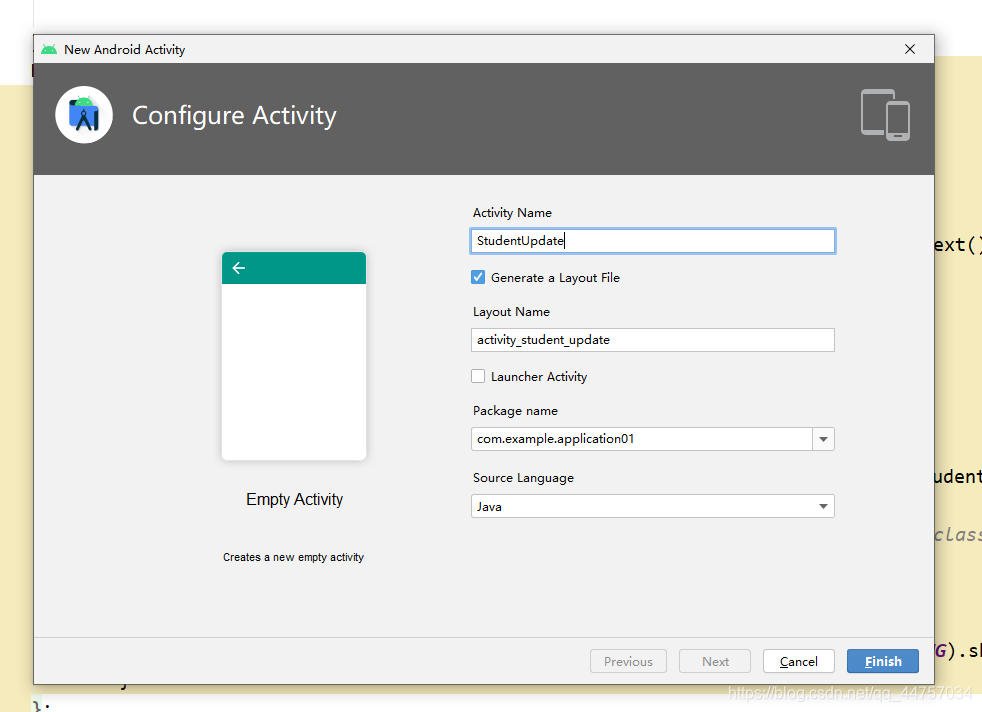
(一)安卓端
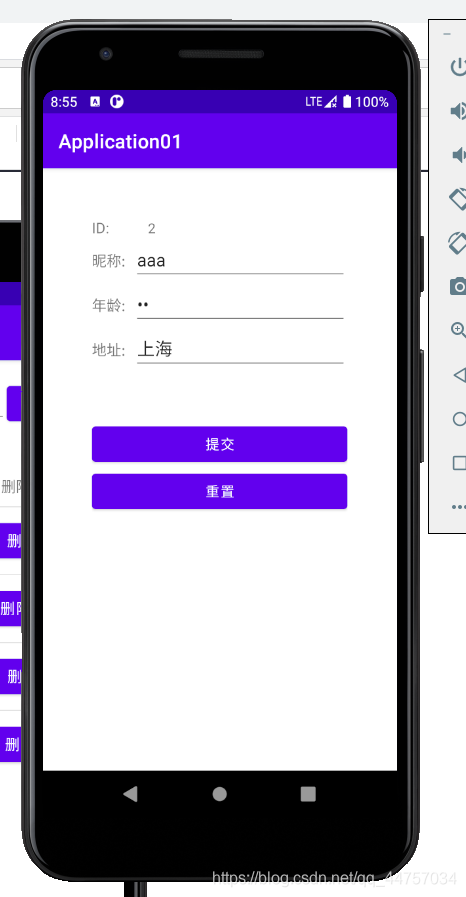
1、创建显示学生信息的页面
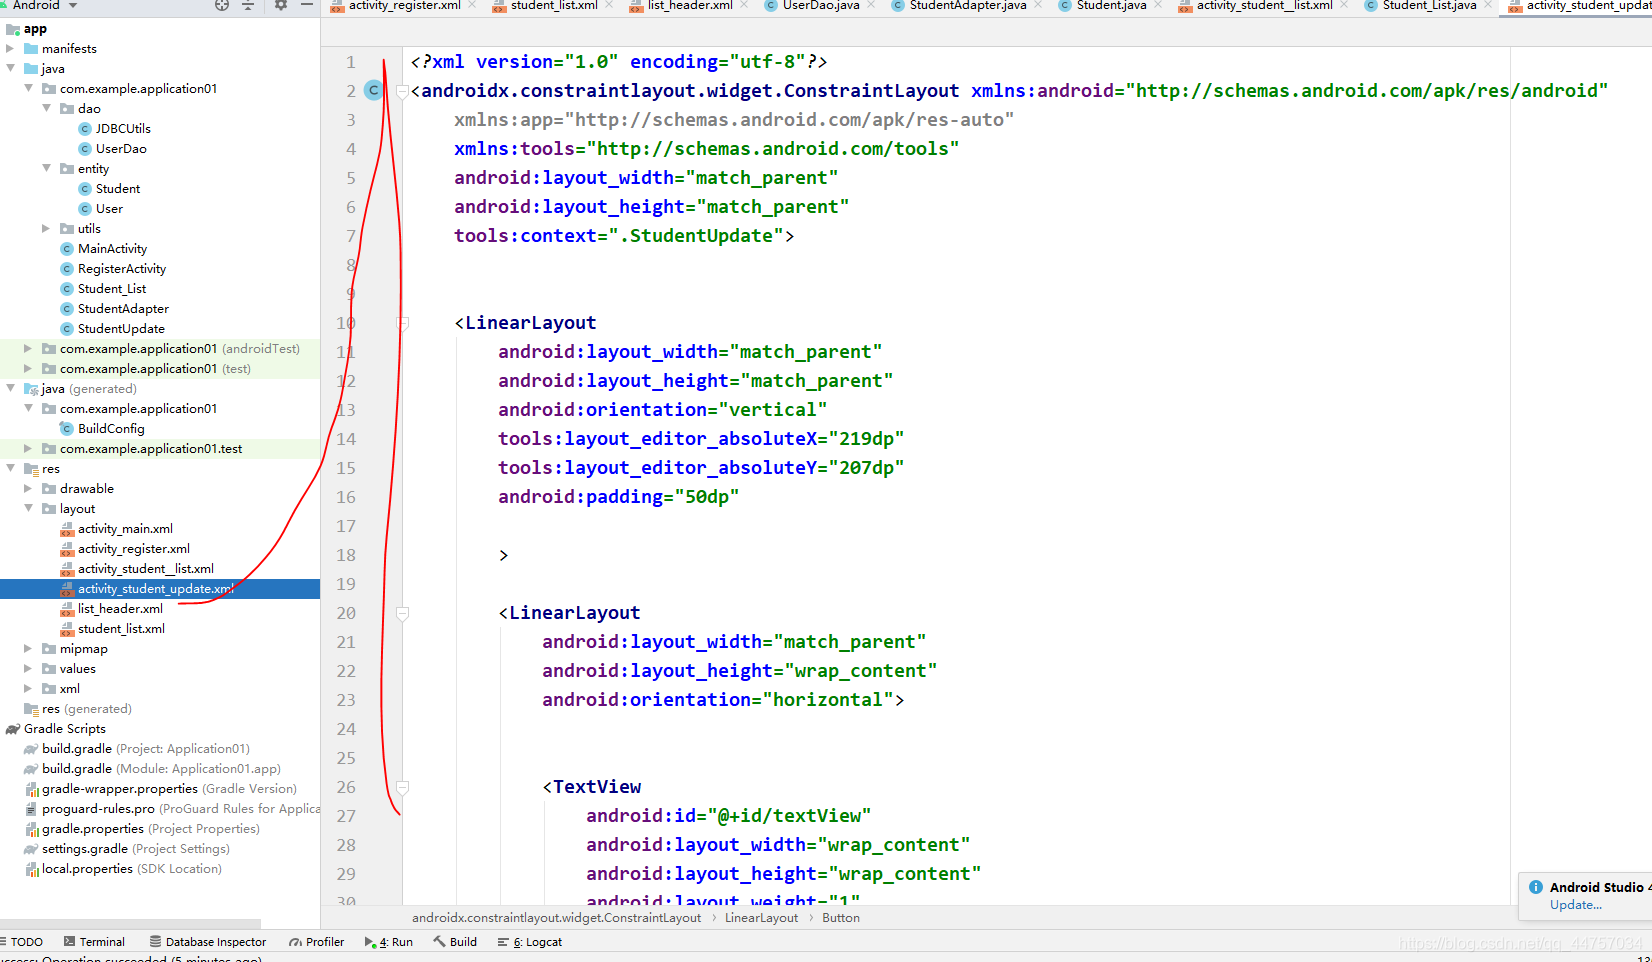
<androidx.constraintlayout.widget.ConstraintLayout xmlns:android=“http://schemas.android.com/apk/res/android”
xmlns:app=“http://schemas.android.com/apk/res-auto”
xmlns:tools=“http://schemas.android.com/tools”
android:layout_width=“match_parent”
android:layout_height=“match_parent”
tools:context=“.StudentUpdate”>
<LinearLayout
android:layout_width=“match_parent”
android:layout_height=“match_parent”
android:orientation=“vertical”
tools:layout_editor_absoluteX=“219dp”
tools:layout_editor_absoluteY=“207dp”
android:padding=“50dp”
<LinearLayout
android:layout_width=“match_parent”
android:layout_height=“wrap_content”
android:orientation=“horizontal”>
<TextView
android:id=“@+id/textView”
android:layout_width=“wrap_content”
android:layout_height=“wrap_content”
android:layout_weight=“1”
android:textSize=“15sp”
android:text=“ID:” />
<TextView
android:id=“@+id/id”
android:layout_width=“wrap_content”
android:layout_height=“wrap_content”
android:layout_weight=“1”
android:ems=“10”
/>
<LinearLayout
android:layout_width=“match_parent”
android:layout_height=“wrap_content”
android:orientation=“horizontal”>
<TextView
android:layout_width=“wrap_content”
android:layout_height=“wrap_content”
android:layout_weight=“1”
android:textSize=“15sp”
android:text=“昵称:” />
<EditText
android:id=“@+id/name”
android:layout_width=“wrap_content”
android:layout_height=“wrap_content”
android:layout_weight=“1”
android:ems=“10”
android:inputType=“textPersonName”
/>
<LinearLayout
android:layout_width=“match_parent”
android:layout_height=“wrap_content”
android:orientation=“horizontal”>
<TextView
android:id=“@+id/textView2”
android:layout_width=“wrap_content”
android:layout_height=“wrap_content”
android:layout_weight=“1”
android:textSize=“15sp”
android:text=“年龄:”
/>
<EditText
android:id=“@+id/age”
android:layout_width=“wrap_content”
android:layout_height=“wrap_content”
android:layout_weight=“1”
android:ems=“10”
/>
<LinearLayout
android:layout_width=“match_parent”
android:layout_height=“wrap_content”
android:orientation=“horizontal”>
<TextView
android:layout_width=“wrap_content”
android:layout_height=“wrap_content”
android:layout_weight=“1”
android:textSize=“15sp”
android:text=“地址:”
/>
<EditText
android:id=“@+id/address”
android:layout_width=“wrap_content”
android:layout_height=“wrap_content”
android:layout_weight=“1”
android:ems=“10”
android:inputType=“phone”
/>
<LinearLayout
android:layout_width=“match_parent”
android:layout_height=“wrap_content”
android:orientation=“horizontal”>
<Button
android:layout_marginTop=“50dp”
android:id=“@+id/button2”
android:layout_width=“match_parent”
android:layout_height=“wrap_content”
android:text=“提交”
android:onClick=“updatestudent”
/>
<Button
android:id=“@+id/button3”
android:layout_width=“match_parent”
android:layout_height=“wrap_content”
android:text=“重置” />
</androidx.constraintlayout.widget.ConstraintLayout>
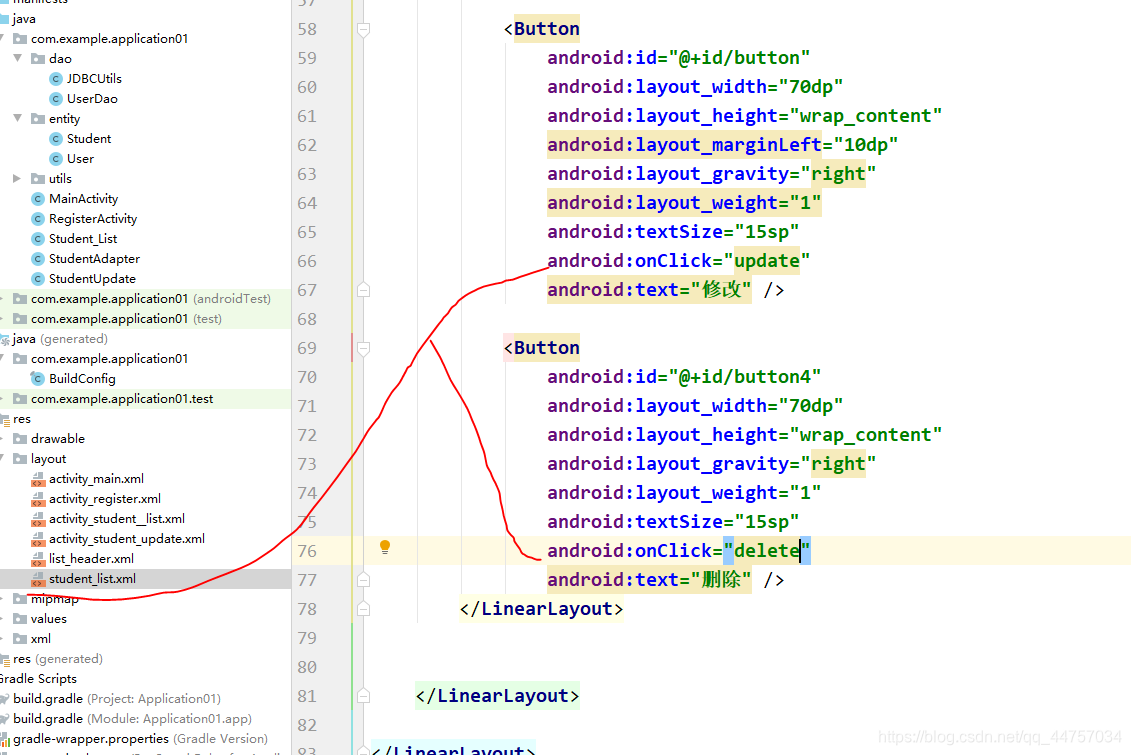
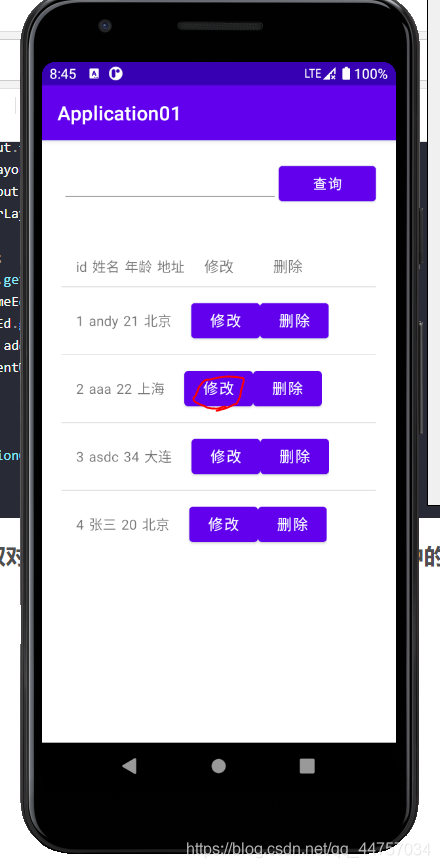
2、在student_list.xml页面上的按钮上添加onClick
3、完善Student_List当中的update方法
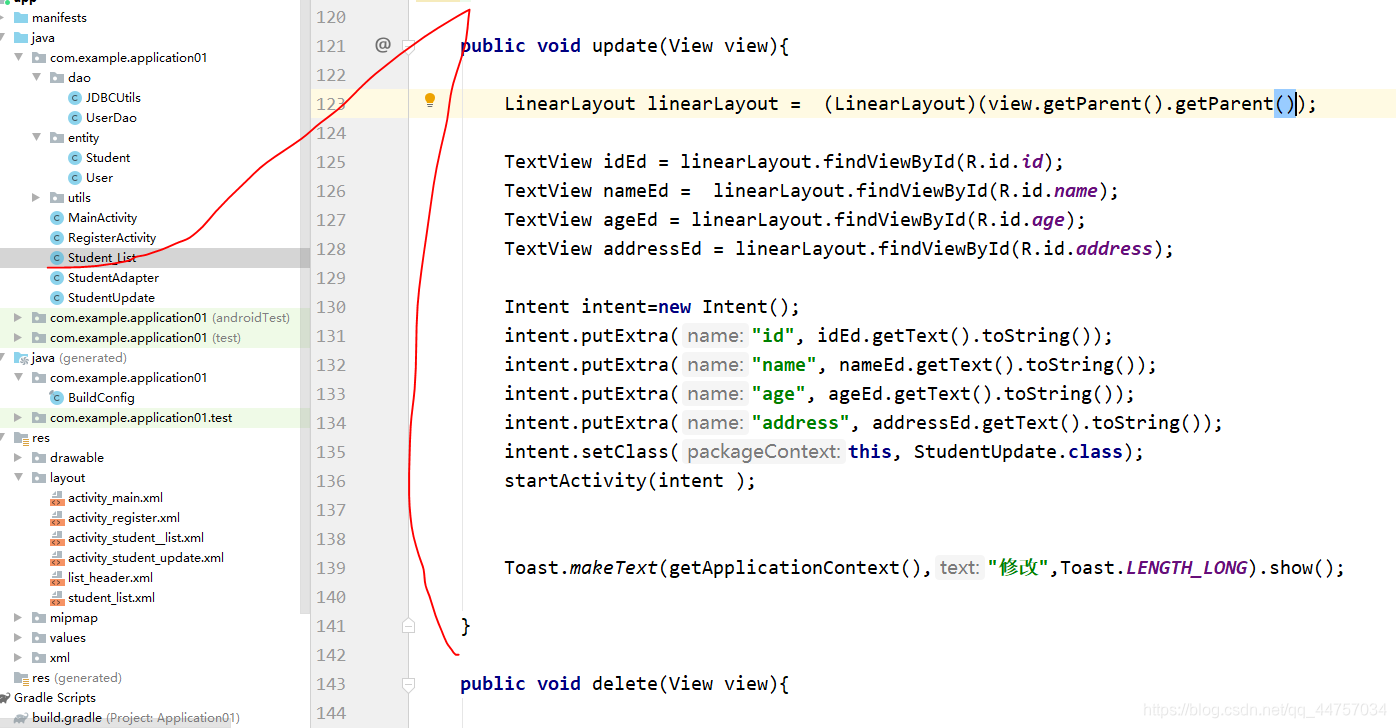
public void update(View view){
LinearLayout linearLayout = (LinearLayout)(view.getParent().getParent());
TextView idEd = linearLayout.findViewById(R.id.id);
TextView nameEd = linearLayout.findViewById(R.id.name);
TextView ageEd = linearLayout.findViewById(R.id.age);
TextView addressEd = linearLayout.findViewById(R.id.address);
Intent intent=new Intent();
intent.putExtra(“id”, idEd.getText().toString());
intent.putExtra(“name”, nameEd.getText().toString());
intent.putExtra(“age”, ageEd.getText().toString());
intent.putExtra(“address”, addressEd.getText().toString());
intent.setClass(this, StudentUpdate.class);
startActivity(intent );
Toast.makeText(getApplicationContext(),“修改”,Toast.LENGTH_LONG).show();
}
4、StudentUpdate当中获取对应Intent 对象当中的值并放入到页面当中的修改框当中
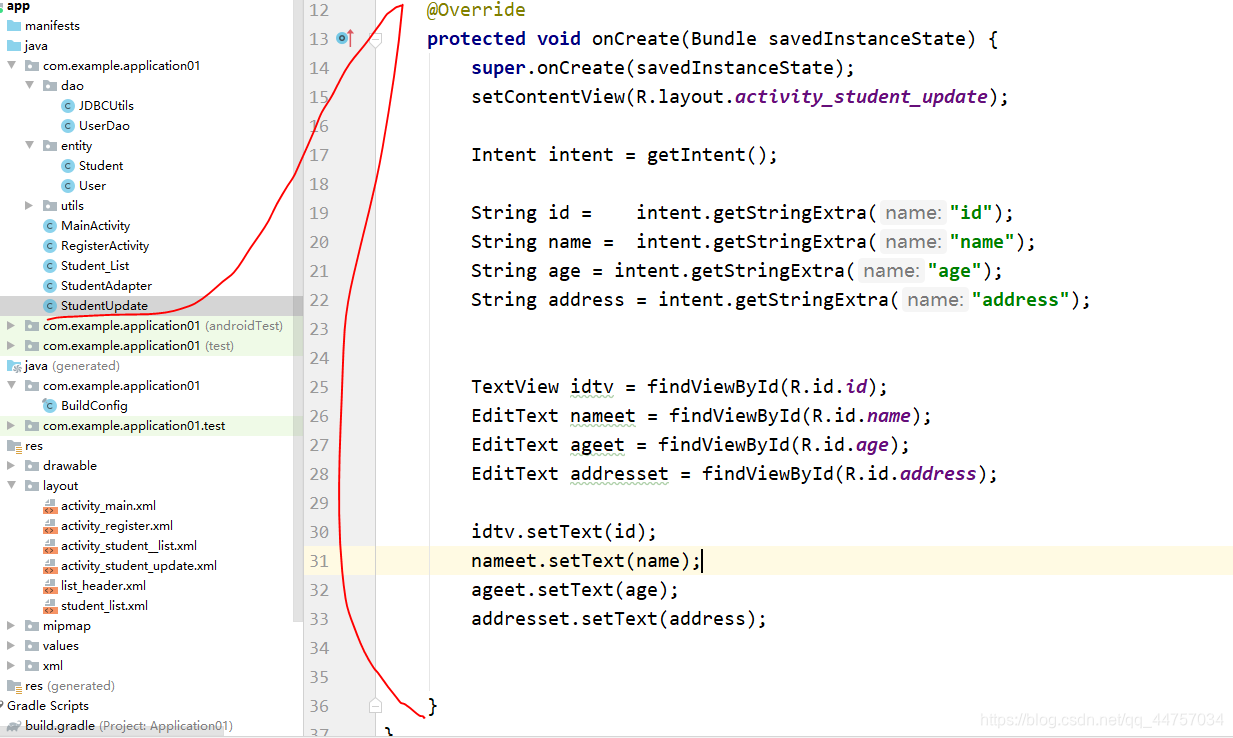
@Override
protected void onCreate(Bundle savedInstanceState) {
super.onCreate(savedInstanceState);
setContentView(R.layout.activity_student_update);
Intent intent = getIntent();
String id = intent.getStringExtra(“id”);
String name = intent.getStringExtra(“name”);
String age = intent.getStringExtra(“age”);
String address = intent.getStringExtra(“address”);
TextView idtv = findViewById(R.id.id);
EditText nameet = findViewById(R.id.name);
EditText ageet = findViewById(R.id.age);
EditText addresset = findViewById(R.id.address);
idtv.setText(id);
nameet.setText(name);
ageet.setText(age);
addresset.setText(address);
}
运行测试
(二)web端
1、创建更新学生信息的dao

public boolean update(Student stu){
String sql=“update student set name=?,age=?,address=? where id=?”;
Connection con = JDBCUtils.getConn();
try {
PreparedStatement pst=con.prepareStatement(sql);
pst.setString(1,stu.getName());
pst.setInt(2,stu.getAge());
pst.setString(3,stu.getAddress() );
pst.setInt(4,stu.getId() );
int value = pst.executeUpdate();
if(value>0){
return true;
}
} catch (SQLException throwables) {
throwables.printStackTrace();
}finally {
JDBCUtils.close(con);
}
return false;
}
2、创建对应更新学生信息的Servlet

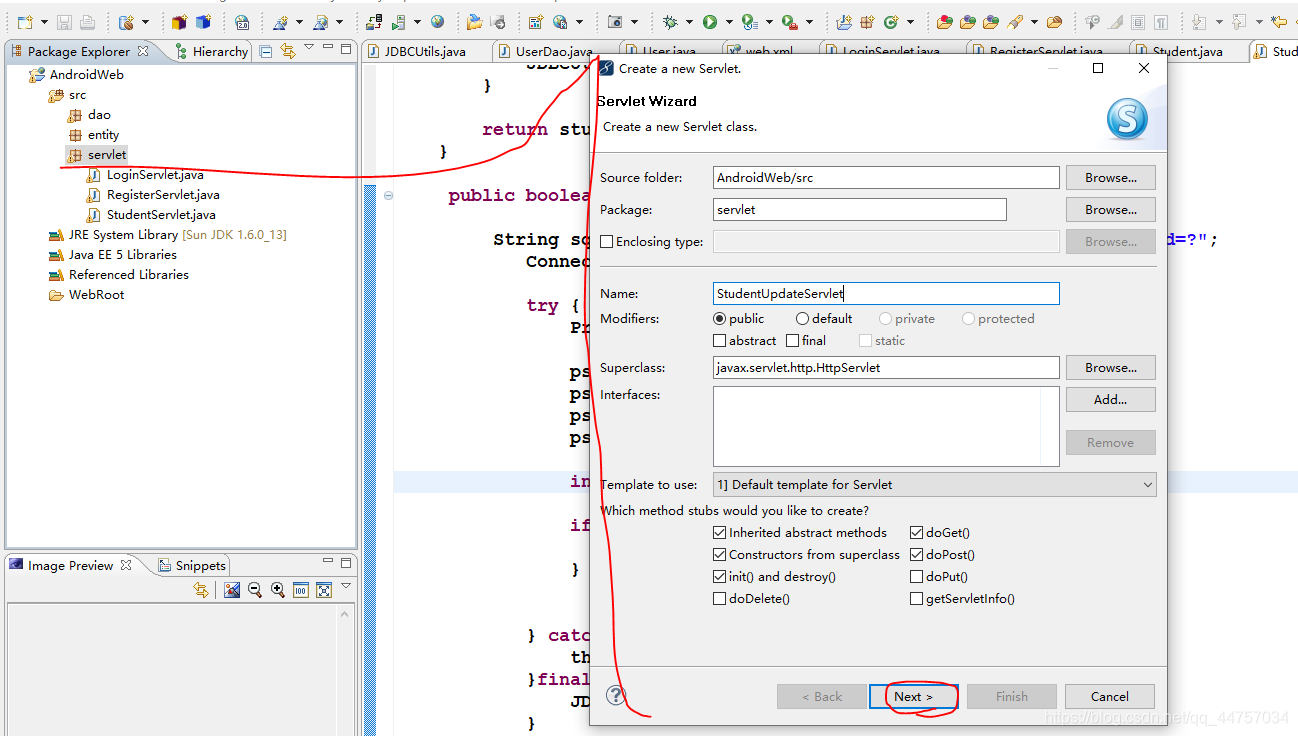
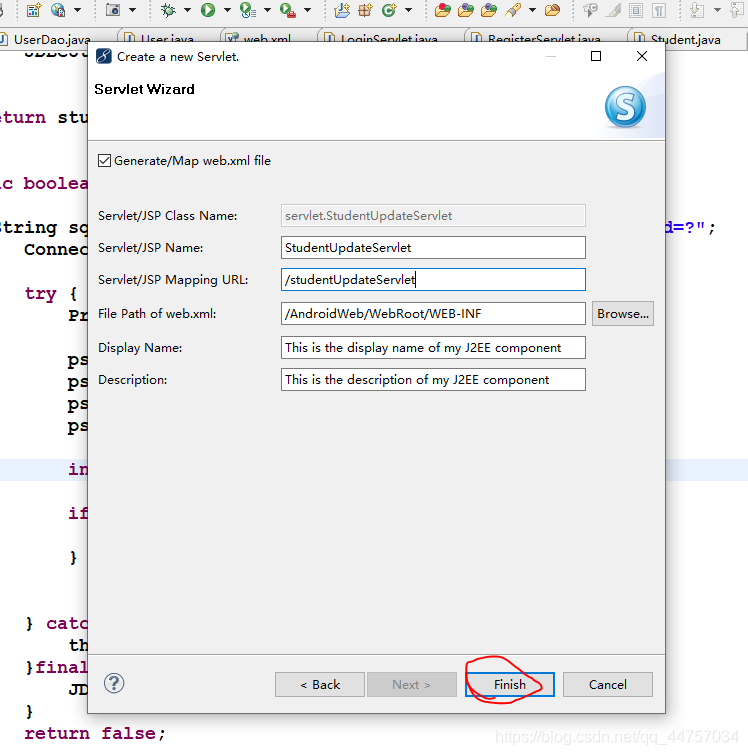
完善StudentUpdateServlet
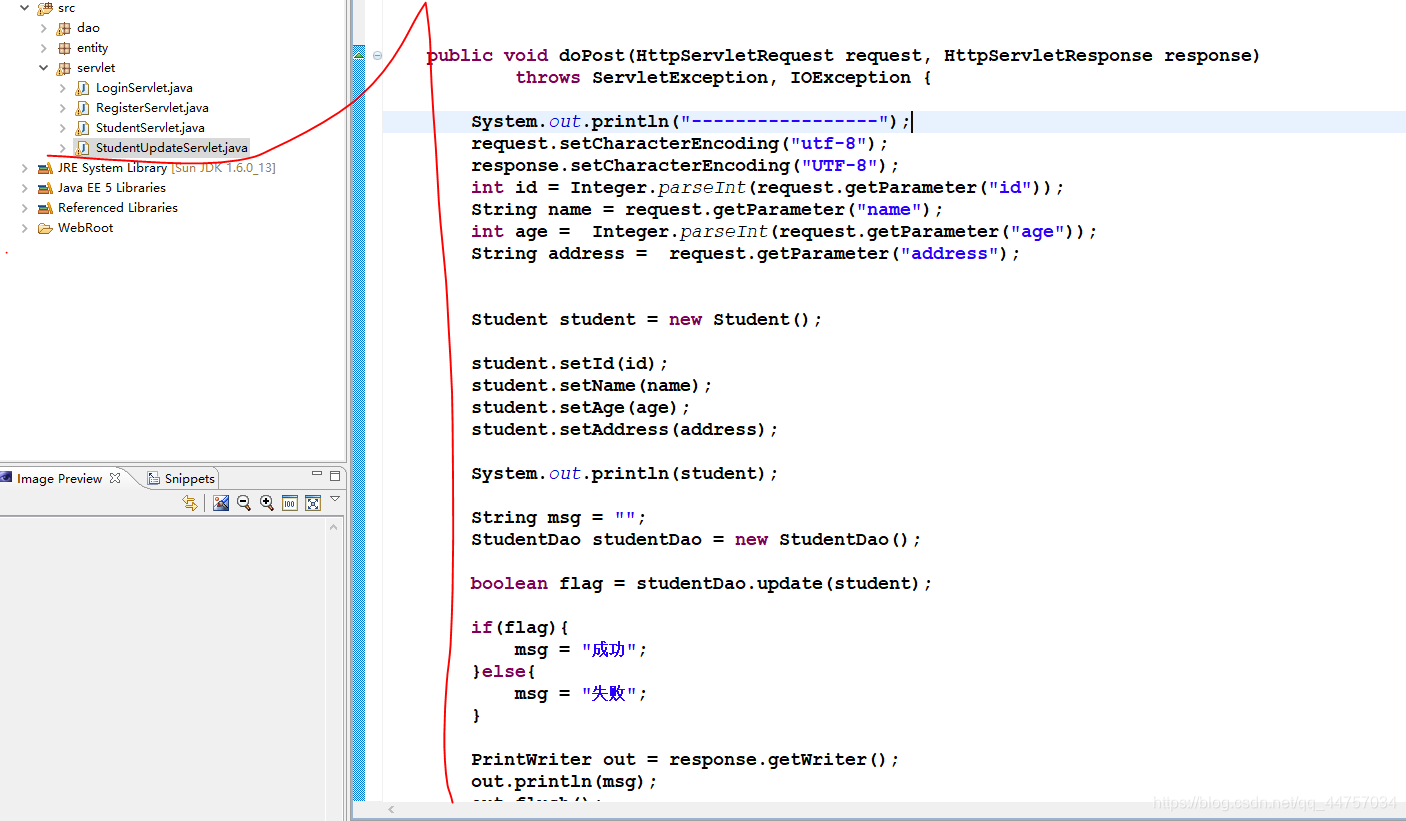
public void doPost(HttpServletRequest request, HttpServletResponse response)
throws ServletException, IOException {
System.out.println(“-----------------”);
request.setCharacterEncoding(“utf-8”);
response.setCharacterEncoding(“UTF-8”);
int id = Integer.parseInt(request.getParameter(“id”));
String name = request.getParameter(“name”);
int age = Integer.parseInt(request.getParameter(“age”));
String address = request.getParameter(“address”);
Student student = new Student();
student.setId(id);
student.setName(name);
student.setAge(age);
student.setAddress(address);
String msg = “”;
StudentDao studentDao = new StudentDao();
boolean flag = studentDao.update(student);
if(flag){
msg = “成功”;
}else{
msg = “失败”;
}
PrintWriter out = response.getWriter();
out.println(msg);
out.flush();
out.close();
}
(三)安卓端
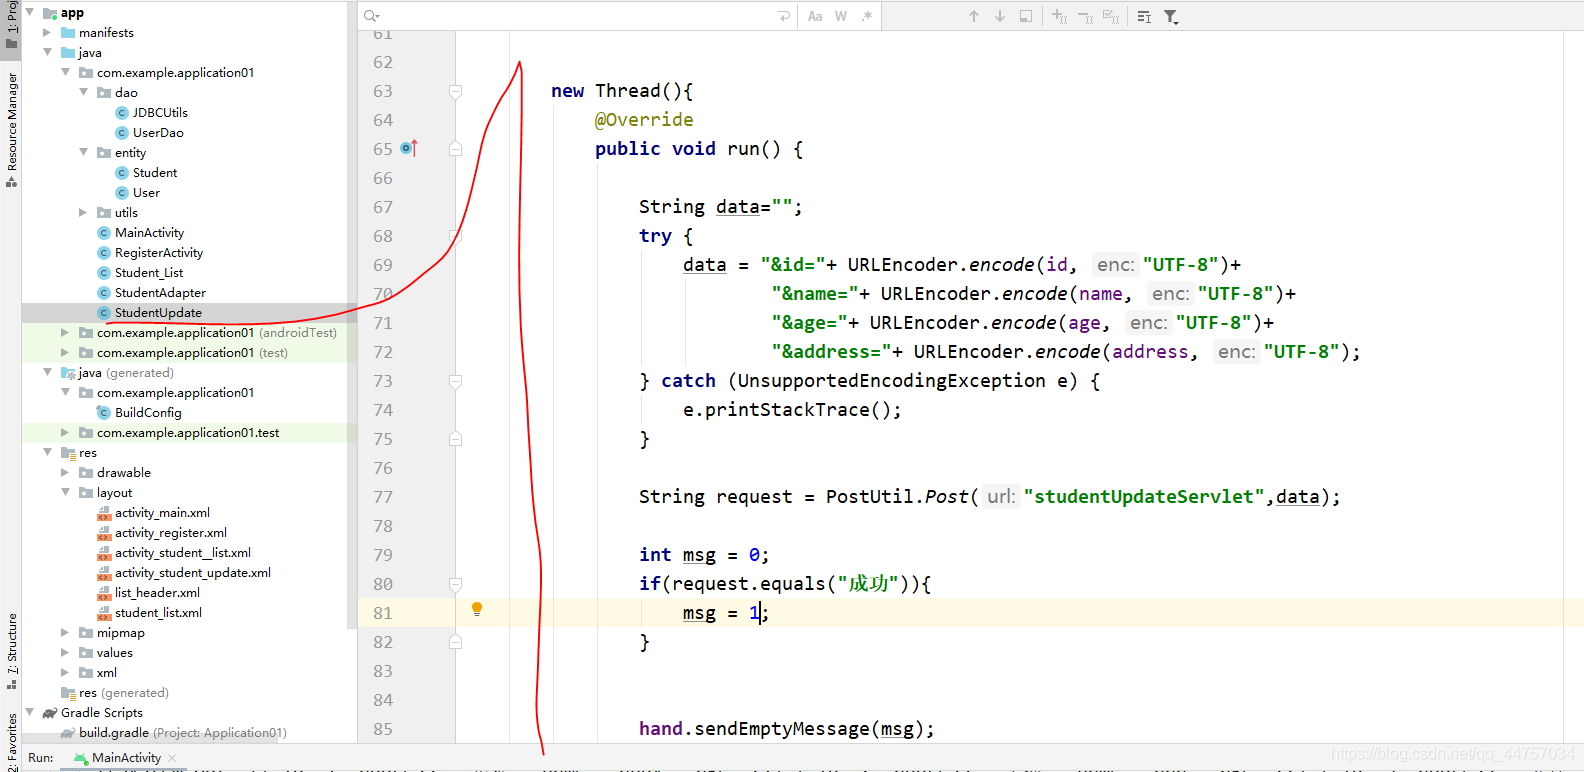
1、在StudentUpdate当中创建updatestudent实现向studentUpdateServlet发送更新信息的请求
package com.example.application01;
import androidx.appcompat.app.AppCompatActivity;
import android.content.Intent;
import android.os.Bundle;
import android.os.Handler;
import android.os.Message;
import android.view.LayoutInflater;
import android.view.View;
import android.widget.EditText;
import android.widget.ListView;
import android.widget.TextView;
import android.widget.Toast;
import com.example.application01.utils.PostUtil;
import java.io.UnsupportedEncodingException;
import java.net.URLEncoder;
public class StudentUpdate extends AppCompatActivity {
@Override
protected void onCreate(Bundle savedInstanceState) {
super.onCreate(savedInstanceState);
setContentView(R.layout.activity_student_update);
Intent intent = getIntent();
String id = intent.getStringExtra(“id”);
String name = intent.getStringExtra(“name”);
String age = intent.getStringExtra(“age”);
String address = intent.getStringExtra(“address”);
TextView idtv = findViewById(R.id.id);
EditText nameet = findViewById(R.id.name);
EditText ageet = findViewById(R.id.age);
EditText addresset = findViewById(R.id.address);
idtv.setText(id);
nameet.setText(name);
ageet.setText(age);
addresset.setText(address);
}
public void updatestudent(View view){
TextView idtv = findViewById(R.id.id);
EditText nameet = findViewById(R.id.name);
EditText ageet = findViewById(R.id.age);
EditText addresset = findViewById(R.id.address);
String id = idtv.getText().toString();
String name = nameet.getText().toString();
String age = ageet.getText().toString();
String address = addresset.getText().toString();
new Thread(){
@Override
public void run() {
String data=“”;
try {
data = “&id=”+ URLEncoder.encode(id, “UTF-8”)+
“&name=”+ URLEncoder.encode(name, “UTF-8”)+
最后
各位读者,由于本篇幅度过长,为了避免影响阅读体验,下面我就大概概括了整理了


.toString();
String name = nameet.getText().toString();
String age = ageet.getText().toString();
String address = addresset.getText().toString();
new Thread(){
@Override
public void run() {
String data=“”;
try {
data = “&id=”+ URLEncoder.encode(id, “UTF-8”)+
“&name=”+ URLEncoder.encode(name, “UTF-8”)+
最后
各位读者,由于本篇幅度过长,为了避免影响阅读体验,下面我就大概概括了整理了
[外链图片转存中…(img-4n9Dp25b-1715281267831)]
[外链图片转存中…(img-vMoGGpSy-1715281267832)]
[外链图片转存中…(img-ZoBTpDeI-1715281267832)]
[外链图片转存中…(img-0pNjRG8S-1715281267832)]


 4393
4393


 被折叠的 条评论
为什么被折叠?
被折叠的 条评论
为什么被折叠?
 到【灌水乐园】发言


