


一线互联网大厂Java核心面试题库

正逢面试跳槽季,给大家整理了大厂问到的一些面试真题,由于文章长度限制,只给大家展示了部分题目,更多Java基础、异常、集合、并发编程、JVM、Spring全家桶、MyBatis、Redis、数据库、中间件MQ、Dubbo、Linux、Tomcat、ZooKeeper、Netty等等已整理上传,感兴趣的朋友可以看看支持一波!
- 方法参数:
username
表示用户名。此值是客户端表单传递过来的数据,默认情况下必须叫username,否则无法接收!
⑤ PasswordEncoder接口
//表示把参数按照特定的解析规则进行解析
String encode(CharSequence rawPassword);
/\*\*
 表示验证从存储中获取的编码密码与编码后提交的原始密码是否匹配,如果密码匹配,则返回true,如果不匹配,则返回 false,第一个参数表示需要被解析的密码,第二个参数表示存储的密码
\*/
boolean matches(CharSequence rawPassword,String encodedPassword);
//表示如果解析密码能够再次进行解析,且达到更安全的结果则返回 true,否则返回false,默认返回false
default boolean upgradeEncoding(String encodedPassword){
	return false;
}
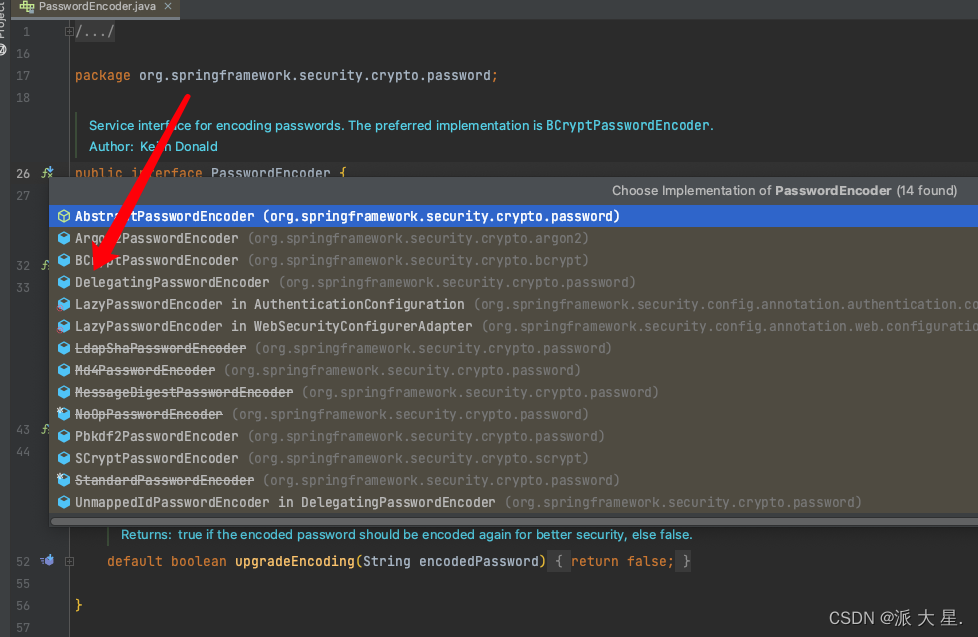
BCryptPasswordEncoder是Spring Security官方推荐的密码解析器,平时多使用这个解析器。
BCryptPasswordEncoder是对bcrypt强散列方法的具体实现。是基于Hash算法实现的单向加密,可以通过strength控制加密强度,默认为10
测试
@Test
public void testBCrypt(){
  // 创建密码解析器
  BCryptPasswordEncoder passwordEncoder = new BCryptPasswordEncoder();
  // 对密码进行加密
  String password = passwordEncoder.encode("admin");
  System.out.println("加密之后的密码:"+password);

  //判断原始密码与加密后的密码是否一致
  boolean isTrue = passwordEncoder.matches("admin", password);
  System.out.println("密码是否相等:"+isTrue);
}
2.6 SpringBoot对 Security的自动配置
https://docs.spring.io/springsecurity/site/docs/5.3.4.RELEASE/reference/html5/#servlet-hello
🌽 SpringSecurity Web权限方案
① 设置登录的用户名和密码
- 方式一:配置文件
spring.security.user.name=admin
spring.security.user.password=admin
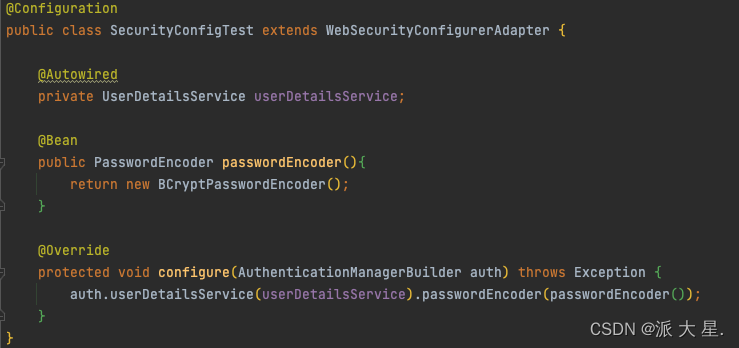
- 方式二:配置类
@Configuration
public class SecurityConfig extends WebSecurityConfigurerAdapter {

    @Bean
    public PasswordEncoder passwordEncoder(){
        return new BCryptPasswordEncoder();
    }


    @Override
    protected void configure(AuthenticationManagerBuilder auth) throws Exception {
        BCryptPasswordEncoder passwordEncoder = new BCryptPasswordEncoder();
        String password = passwordEncoder.encode("123");
        auth.inMemoryAuthentication().withUser("lucy").password(password).roles("admin");
    }
}
- 方式三:自定义编写实现类
第一步 创建配置类,设置使用哪个userDetailsService实现类
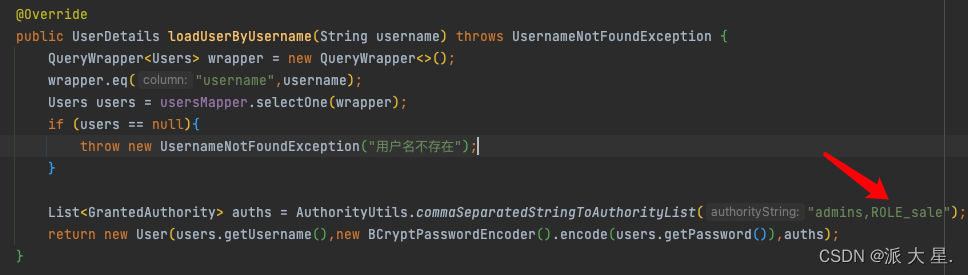
第二步:编写实现类,返回User对象,User对象有用户名密码和操作权限

② 自定义设置登录页面不需要认证可以访问
- 在配置类实现相关的配置
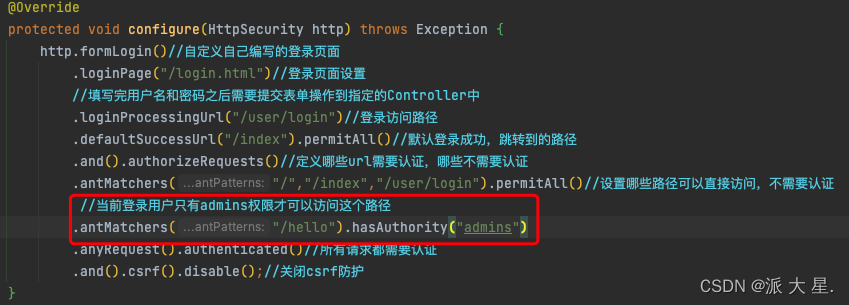
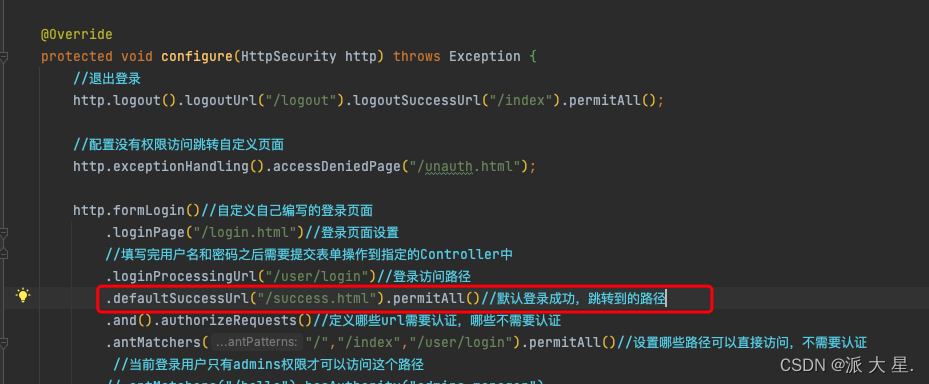
    @Override
    protected void configure(HttpSecurity http) throws Exception {
        http.formLogin()//自定义自己编写的登录页面
            .loginPage("/login.html")//登录页面设置
            //填写完用户名和密码之后需要提交表单操作到指定的Controller中
            .loginProcessingUrl("/user/login")//登录访问路径
            .defaultSuccessUrl("/index").permitAll()//默认登录成功,跳转到的路径
            .and().authorizeRequests()//定义哪些url需要认证,哪些不需要认证
            .antMatchers("/","/index","/user/login").permitAll()//设置哪些路径可以直接访问,不需要认证
            .anyRequest().authenticated()//所有请求都需要认证
            .and().csrf().disable();//关闭csrf防护
    }
③ 基于角色或权限进行访问控制
(1) hasAuthority方法
如果当前的主体具有指定的权限,则返回
true,否则返回false
- 修改配置类
-
修改
MyUserDetailsService手动给登录用户添加所属权限
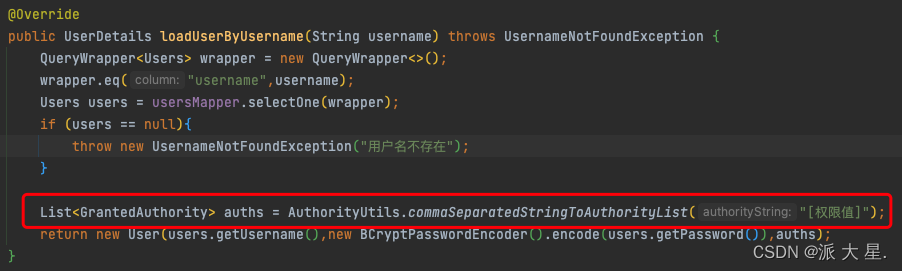
- 权限为
admins
- 权限为

- 权限为
其他时:
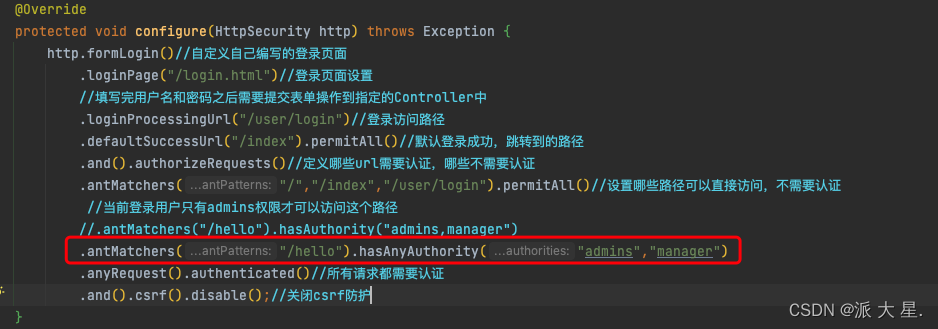
(2) hasAnyAuthority方法
如果当前的主体有任何提供的角色(给定的作为一个逗号分隔的字符串列表)的话,返回
true
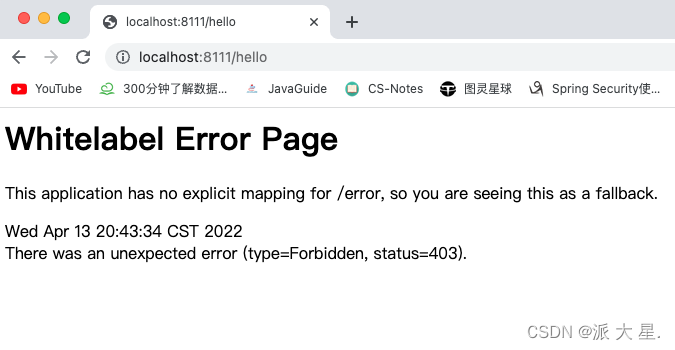
(3) hasRole方法
如果用户具备给定的角色就允许访问,否则出现403
如果当前主体具有指定的角色,则返回true
底层源码
	private static String hasRole(String role) {
		Assert.notNull(role, "role cannot be null");
		Assert.isTrue(!role.startsWith("ROLE\_"),
				() -> "role should not start with 'ROLE\_' since it is automatically inserted. Got '" + role + "'");
		return "hasRole('ROLE\_" + role + "')";
	}
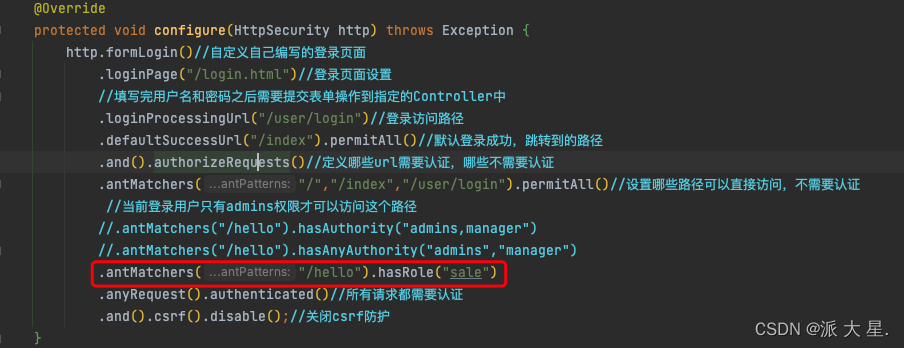
注意:由于底层对角色信息进行了甄别,判断角色是否以ROLE_开头,如果不是则自动拼接,所以在测试的时候需要添加ROLE_
(4) hasAnyRole
表示用户具备任何一个条件都可以访问。
给用户添加角色:

修改配置类

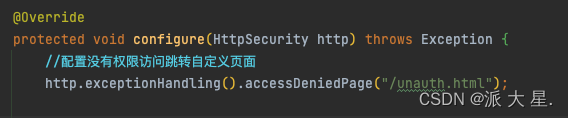
④ 自定义403没有权限访问页面

在配置类中进行配置
⑤ 注解使用
(1) @Secured
判断是否具有角色,另外注意的是这里匹配的字符串需要添加前缀ROLE_。
使用之前需要先开启注解功能!
@EnableGlobalMethodSecurity(securedEnabled = true)
@EnableGlobalMethodSecurity(securedEnabled = true)
@SpringBootApplication
@MapperScan("com.pdx.mapper")
public class SpringSecurity03Application {

    public static void main(String[] args) {
        SpringApplication.run(SpringSecurity03Application.class, args);
    }

}
编写前端控制器使用注解,设置角色
@GetMapping("/update")
@Secured({"ROLE\_sale","ROLE\_manager"})
@ResponseBody
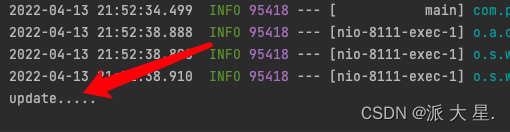
public String update(){
return "hello update";
}
userDetailsService设置用户角色

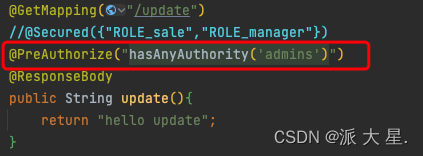
(2) @PreAuthorize
先开启注解功能:
@EnableGlobalMethodSecurity(prePostEnabled = true)
@EnableGlobalMethodSecurity(securedEnabled = true,prePostEnabled = true)
@PreAuthorize:注解适合进入方法前的权限验证,@PreAuthorize可以将登录用户的roles/permissions参数传到方法中。
在controller的方法上添加注解
(3) @PostAuthorize
先开启注解功能
@EnableGlobalMethodSecurity(prePostEnabled = true)
@PostAuthorize注解使用并不多,在方法执行后再进行权限验证,适合验证带有返回值的权限
在controller的方法上添加注解

如果使用一个没有权限访问此资源的用户去访问此资源的时候肯定是要跳转到之前我们自定义403页面的,但是实际上此方法已经执行过了!
(4) @PostFilter【少用】
@PostFilter:权限验证之后对数据进行过滤,留下用户名是admin1的数据
表达式中的filterObject引用的是方法返回值List中的某一个元素
@GetMapping("/getAll")
@PostAuthorize("hasAnyAuthority('admins')")
@PostFilter("filterObject.username == 'admin1'")
public List<Users> getAllUsers(){
  List<Users> list = new ArrayList<>();
  list.add(new Users(11,"admin1","666"));
  list.add(new Users(21,"admin2","888"));
  System.out.println(list );
  return list;
}
(5) @PreFilter【少用】
@PreFilter:进入控制器之前对数据进行过滤
@GetMapping("/putAll")
@PreAuthorize("hasAnyAuthority('admins')")
@PreFilter(value = "filterObject.id%2==0")
public List<Users> putAll(@RequestBody List<Users> list){
  list.forEach(t ->{
    System.out.println(t.getId()+"\t"+t.getUsername());
  });
  return list;
}
⑥ 用户注销
(1) 在登录页面添加一个退出连接
<body>
  登录成功<br>
  <a href="/logout">退出</a>
</body>
修改配置类

⑦ 自动登录(Remember me)
(1) 实现原理
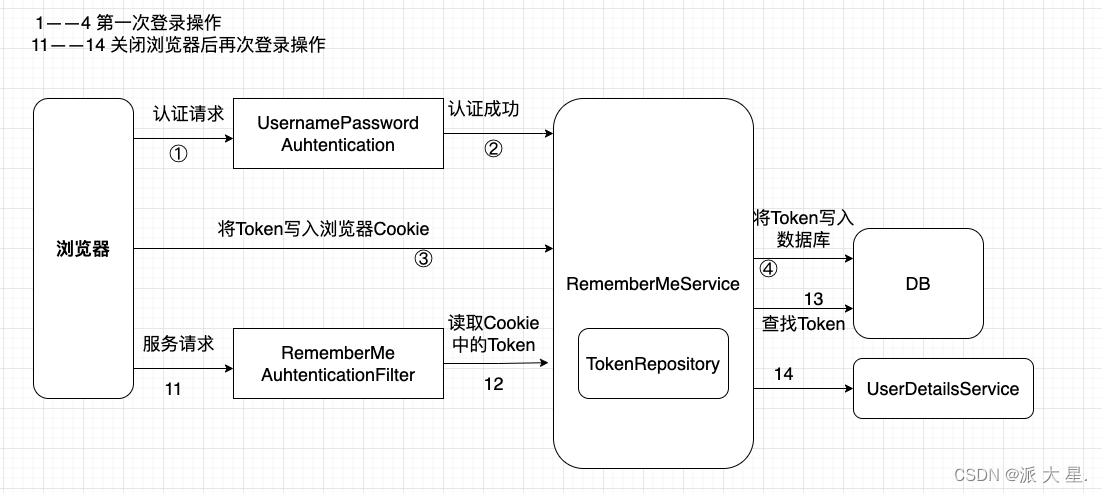
第一步:创建相关表
create table `persistent\_logins`(
   `username` varchar(64) not null,
   `series` varchar(64) not null,
   `token` varchar(64) not null,
   `last\_used` TIMESTAMP NOT NULL DEFAULT CURRENT\_TIMESTAMP ON UPDATE CURRENT\_TIMESTAMP,
   PRIMARY KEY(`series`)
);
第二步:配置类,注入数据源,配置操作数据库对象
//注入数据源
@Autowired
private DataSource dataSource;

//配置对象
@Bean
public PersistentTokenRepository persistentTokenRepository(){
  JdbcTokenRepositoryImpl jdbcTokenRepository = new JdbcTokenRepositoryImpl();
  jdbcTokenRepository.setDataSource(dataSource);
  //在启动时是否创建表
  //jdbcTokenRepository.setCreateTableOnStartup(true);
  return jdbcTokenRepository;
}
第三步:配置类中配置自动登录
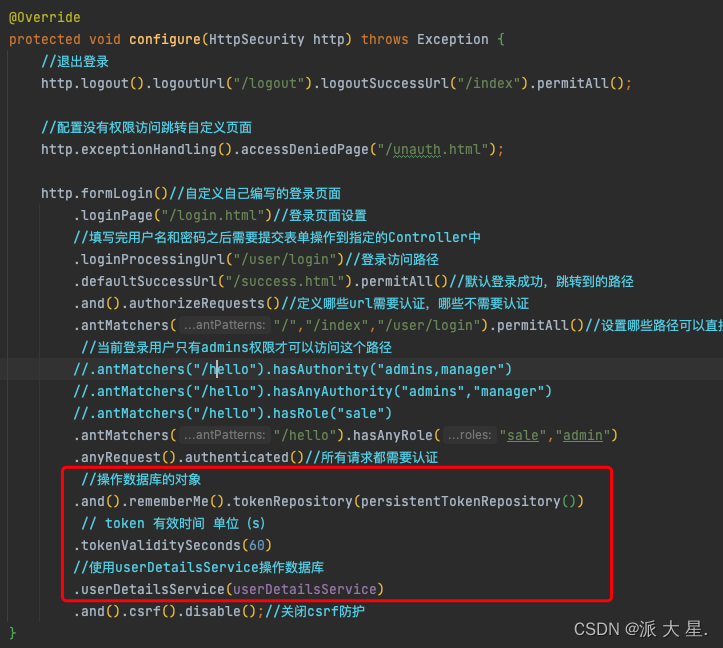
第四步:在
login.html添加checkbox
笔者福利
以下是小编自己针对马上即将到来的金九银十准备的一套“面试宝典”,不管是技术还是HR的问题都有针对性的回答。
有了这个,面试踩雷?不存在的!
回馈粉丝,诚意满满!!!


b.png)
第四步:在
login.html添加checkbox
笔者福利
以下是小编自己针对马上即将到来的金九银十准备的一套“面试宝典”,不管是技术还是HR的问题都有针对性的回答。
有了这个,面试踩雷?不存在的!
回馈粉丝,诚意满满!!!
[外链图片转存中…(img-9EH3ACgc-1715596657706)]
[外链图片转存中…(img-RLfrG3cl-1715596657706)]
[外链图片转存中…(img-mt1vaJyH-1715596657706)]
[外链图片转存中…(img-gHS5m6YW-1715596657706)]


 840
840


 被折叠的 条评论
为什么被折叠?
被折叠的 条评论
为什么被折叠?
 到【灌水乐园】发言


