


网上学习资料一大堆,但如果学到的知识不成体系,遇到问题时只是浅尝辄止,不再深入研究,那么很难做到真正的技术提升。
一个人可以走的很快,但一群人才能走的更远!不论你是正从事IT行业的老鸟或是对IT行业感兴趣的新人,都欢迎加入我们的的圈子(技术交流、学习资源、职场吐槽、大厂内推、面试辅导),让我们一起学习成长!
完成本篇Codelab我们首先要完成开发环境的搭建,本示例以RK3568开发板为例,参照以下步骤进行:
- 获取OpenHarmony系统版本:标准系统解决方案(二进制)。以3.2 Release版本为例:

2. 搭建烧录环境。
1. [完成DevEco Device Tool的安装]( )
2. [完成RK3568开发板的烧录]( )
-
搭建开发环境。
代码结构解读
本篇Codelab只对核心代码进行讲解,对于完整代码,我们会在gitee中提供。由于本篇Codelab页面较多,因此component和pages目录下只展示“购物主页面”的hml、js、css。
├──entry/src/main/js	             // 代码区
│  └──MainAbility
│     ├──common
│     │  ├──constant
│     │  │  └──commonConstants.js    // 公共常量类
│     │  └──images                   // 图片区
│     ├──component
│     │  ├──backComponent            // 后退子组件
│     │  ├──commonButton             // 支付按钮子组件
│     │  ├──commonToolbar            // 导航栏子组件
│     │  ├──home                     // 购物主页子组件
│     │  ├──likedCards               // 猜你喜欢卡片子组件
│     │  ├──myInfo                   // 我的子组件
│     │  ├──newProduct               // 新品子组件
│     │  ├──orderReusableCom         // 用户商品信息子组件
│     │  ├──productBuyInfo           // 购买商品卡片子组件
│     │  ├──shoppingCart             // 购物车子组件
│     │  └──subtitle                 // 副标题子组件
│     ├──i18n
│     │  ├──en-US.json               // 英文国际化
│     │  └──zh-CN.json               // 中文国际化
│     ├──pages
│     │  ├──allOrders                // 全部订单页
│     │  ├──homePage                 // 购物主页
│     │  │  ├──homePage.css          // 购物主页面样式
│     │  │  ├──homePage.hml          // 购物主页面
│     │  │  └──homePage.js           // 购物主页面逻辑
│     │  ├──launchPage               // 启动页
│     │  ├──pendingPayment           // 待支付页
│     │  ├──productDetails           // 产品详情页
│     │  └──sureOrder                // 确定订单页
│     └──app.js                      // 程序入口
└──entry/src/main/resources          // 应用资源目录
构建购物应用首页
本篇Codelab选取购物应用的主页面、购物车页面、以及导航栏进行详细的讲解,对于完整代码,可在gitee源码中进行查看。
购物应用的主页面主要由界面底部导航栏和导航栏上的内容组成。效果如图所示:

<!-- homePage.hml -->
<element name="home" src="../../component/home/home.hml"></element>
<element name="new-product" src="../../component/newProduct/newProduct.hml"></element>
<element name="shopping-cart" src="../../component/shoppingCart/shoppingCart.hml"></element>
<element name="my-info" src="../../component/myInfo/myInfo.hml"></element>
<element name="common-toolbar" src="../../component/commonToolbar/commonToolbar.hml"></element>

<div class="container">
    <!-- 主页面 -->
    <home if="{{ tag === homePageIndex }}"></home>

    <!-- 新品页面 -->
    <new-product if="{{ tag === newProductIndex }}"></new-product>

    <!-- 购物车页面 -->
    <shopping-cart if="{{ tag === shoppingCartIndex }}"></shopping-cart>

    <!-- 我的页面 -->
    <my-info if="{{ tag === myInfoIndex }}"></my-info>

    <!-- 导航栏 -->
    <common-toolbar tag="{{ tag }}" @switch-toolbar="switchToolbar"></common-toolbar>
</div>
底部导航栏:由“主页”、“新品”、“购物车”以及“我的”页面组成,点击导航栏内容,展示所点击模块的内容。
// homePage.js
import CommonConstants from '../../common/constant/commonConstants';

export default {
  data: {
    // 页面默认展示主页,tag是主页面的索引
    tag: 1,
    // 主页面索引
    homePageIndex: CommonConstants.HOME_PAGE_INDEX,
    // 新品页面索引
    newProductIndex: CommonConstants.NEW_PRODUCT_INDEX,
    // 购物车页面索引
    shoppingCartIndex: CommonConstants.SHOPPING_CART_INDEX,
    // 我的页面索引
    myInfoIndex: CommonConstants.MY_INFO_INDEX
  },

  /**
   * 切换导航栏内容
   *
   * @param value 子组件传过来的索引
   */
  switchToolbar(value) {
    this.tag = value.detail.index;
  }
}
子组件:导航栏的使用
导航栏由“主页”、“新品”、“购物车”以及“我的”组成,点击导航栏对应的子组件,页面会展示对应模块的内容。效果如图所示:
在父组件homePage.hml中使用@switch-toolbar="switchToolbar"绑定子组件的事件,用于接收子组件传过来的索引,通过if判断,从而展示索引对应的页面。
<!-- homePage.hml -->
...
<div class="container">
    <!-- 主页面 -->
    <home if="{{ tag === homePageIndex }}"></home>

    <!-- 新品页面 -->
    <new-product if="{{ tag === newProductIndex }}"></new-product>

    <!-- 购物车页面 -->
    <shopping-cart if="{{ tag === shoppingCartIndex }}"></shopping-cart>

    <!-- 我的页面 -->
    <my-info if="{{ tag === myInfoIndex }}"></my-info>

    <!-- 导航栏 -->
    <common-toolbar tag="{{ tag }}" @switch-toolbar="switchToolbar"></common-toolbar>
</div>

<!-- commonToolbar.hml -->
<div class="container">
    <toolbar class="toolbar">
        <toolbar-item value="{{ $t(toolbarName.home) }}" @click="switchToolbar(homePageIndex)"
                      icon="{{ tag === homePageIndex ? commonIcon.home : commonIcon.homeDisable }}">
        </toolbar-item>
        <toolbar-item value="{{ $t(toolbarName.newProduct) }}" @click="switchToolbar(newProductIndex)"
                      icon="{{ tag === newProductIndex ? commonIcon.newProduct : commonIcon.newProductDisable }}">
        </toolbar-item>
        <toolbar-item value="{{ $t(toolbarName.shoppingCart) }}" @click="switchToolbar(shoppingCartIndex)"
                      icon="{{ tag === shoppingCartIndex ? commonIcon.shoppingCart : commonIcon.shoppingCartDisable }}">
        </toolbar-item>
        <toolbar-item value="{{ $t(toolbarName.me) }}" @click="switchToolbar(myInfoIndex)"
                      icon="{{ tag === myInfoIndex ? commonIcon.me : commonIcon.meDisable }}">
        </toolbar-item>
    </toolbar>
</div>
在子组件commonToolbar.js中通过this.$emit(‘switchToolbar’, {info: value})触发事件并向上传递参数,homePage.js中的switchToolbar方法接收子组件传过来的索引。在子组件commonToolbar.js文件中定义props,props用于组件之间的数据通信,当父组件中的tag发生变化的时候,子组件也会随之响应,然后改变toolbar-item中icon的颜色。
// homePage.js
import CommonConstants from '../../common/constant/commonConstants';

export default {
  data: {
    // 页面默认展示主页,tag是主页面的索引
    tag: 1,
    ...
  },

  /**
   * 切换导航栏内容
   *
   * @param value 子组件传过来的索引
   */
  switchToolbar(value) {
    this.tag = value.detail.index;
  }
}

// commonToolbar.js
import CommonConstants from '../../common/constant/commonConstants';

export default {
  props: ['tag'],
  data: {
    commonIcon: CommonConstants.COMMON_TOOLBAR_ICON,
    toolbarName: CommonConstants.COMMON_TOOLBAR_NAME,
    // 主页面索引
    homePageIndex: CommonConstants.HOME_PAGE_INDEX,
    // 新品页面索引
    newProductIndex: CommonConstants.NEW_PRODUCT_INDEX,
    // 购物车页面索引
    shoppingCartIndex: CommonConstants.SHOPPING_CART_INDEX,
    // 我的页面索引
    myInfoIndex: CommonConstants.MY_INFO_INDEX
  },

  /**
   * 向父组件传值
   *
   * @param index 选中子模块的索引
   */
  switchToolbar(index) {
    this.$emit('switchToolbar', {
      index: index
    });
  }
}
构建购物车页面
购物车页面由顶部标题栏、购物车商品列表、猜你喜欢的商品列表三部分组成,并以子组件的形式显示在主页面中。其中,购物车商品列表使用list组件和for循环,实现对多条商品数据进行展示。猜你喜欢的商品列表是通过引用自定义组件实现的。效果如图所示:

<!-- shoppingCart.hml -->
<element name="liked-cards" src="../../component/likedCards/likedCards.hml"></element>

<div class="container">
    <div class="top">
        <!-- 顶部导航标题栏 -->
        <div class="top-title">
            <text class="shopping-cart">{{ $t('strings.shopping_cart') }}</text>
            <text class="edit">{{ $t('strings.edit') }}</text>
        </div>
        <!-- 购物车商品列表 -->
        <div class="top-list">
            <div class="list-title">
                <input class="all-checkbox" type="checkbox" checked="{{ isAllSelect }}" @change="checkboxOnChange">
                </input>
                <image class="my-icon-size" src="{{ person }}"></image>
                <text class="mall-self-operated">{{ $t('strings.mall_self_operated') }}</text>
            </div>
            <list class="list">
                <list-item for="{{ (index, item) in shoppingListData }}" class="list-item">
                    <div class="list-content">
                        <input class="checkbox" type="checkbox" checked="{{ item.isSelect }}"></input>
                        <image class="product-pictures" src="{{ item.image }}"></image>
                        <div class="box-content">
                            <text class="product-title">{{ $t(item.title) }}</text>
                            <text class="product-subtitle">{{ $t(item.subtitle) }}</text>
                            <div class="content-price">
                                <text class="product-price">{{ item.price }}</text>
                                <div class="price-num">
                                    <image class="my-icon-size" @click="subtractNum(index)" src="{{ item.num === 0 ?
                                            commonIcon.decreaseDisableIcon : commonIcon.decreaseIcon }}">
                                    </image>
                                    <text class="product-num">{{ item.num }}</text>
                                    <image class="my-icon-size" src="{{ commonIcon.increaseIcon }}"
                                           @click="addNum(index)">
                                    </image>
                                </div>
                            </div>
                        </div>
                    </div>
                </list-item>
            </list>
        </div>
    </div>
    <!-- 猜你喜欢商品列表 -->
    <div class="middle-card">
        <liked-cards></liked-cards>
    </div>
</div>
- 点击“商品自营”头像前的多选框,会触发checkboxOnChange()方法,页面会勾选/不勾选购物车的中所有商品。
- 点击“+”按钮会触发addNum()方法,增加单件商品的数量。
- 点击“-”按钮会触发subtractNum()方法,减少单件商品的数量。
// shoppingCart.js
import CommonConstants from '../../common/constant/commonConstants';
export default {
data: {
isAllSelect: false,
shoppingListData: CommonConstants.SHOPPING_LIST_DATA,
commonIcon: CommonConstants.SHOPPING_CART_ICON,
person: CommonConstants.COMMON_ICON.person
},
/**
* 购物车商品全选/非全选
*/
checkboxOnChange() {
this.isAllSelect = !this.isAllSelect;
this.shoppingListData.filter((item) => {
item.isSelect = this.isAllSelect;
});
},
/**
* 勾选单个商品
*
* @param subscript 选中商品的索引
* @param event 单选框事件
*/
singleAnswer(subscript, event) {
**深知大多数程序员,想要提升技能,往往是自己摸索成长,但自己不成体系的自学效果低效又漫长,而且极易碰到天花板技术停滞不前!**
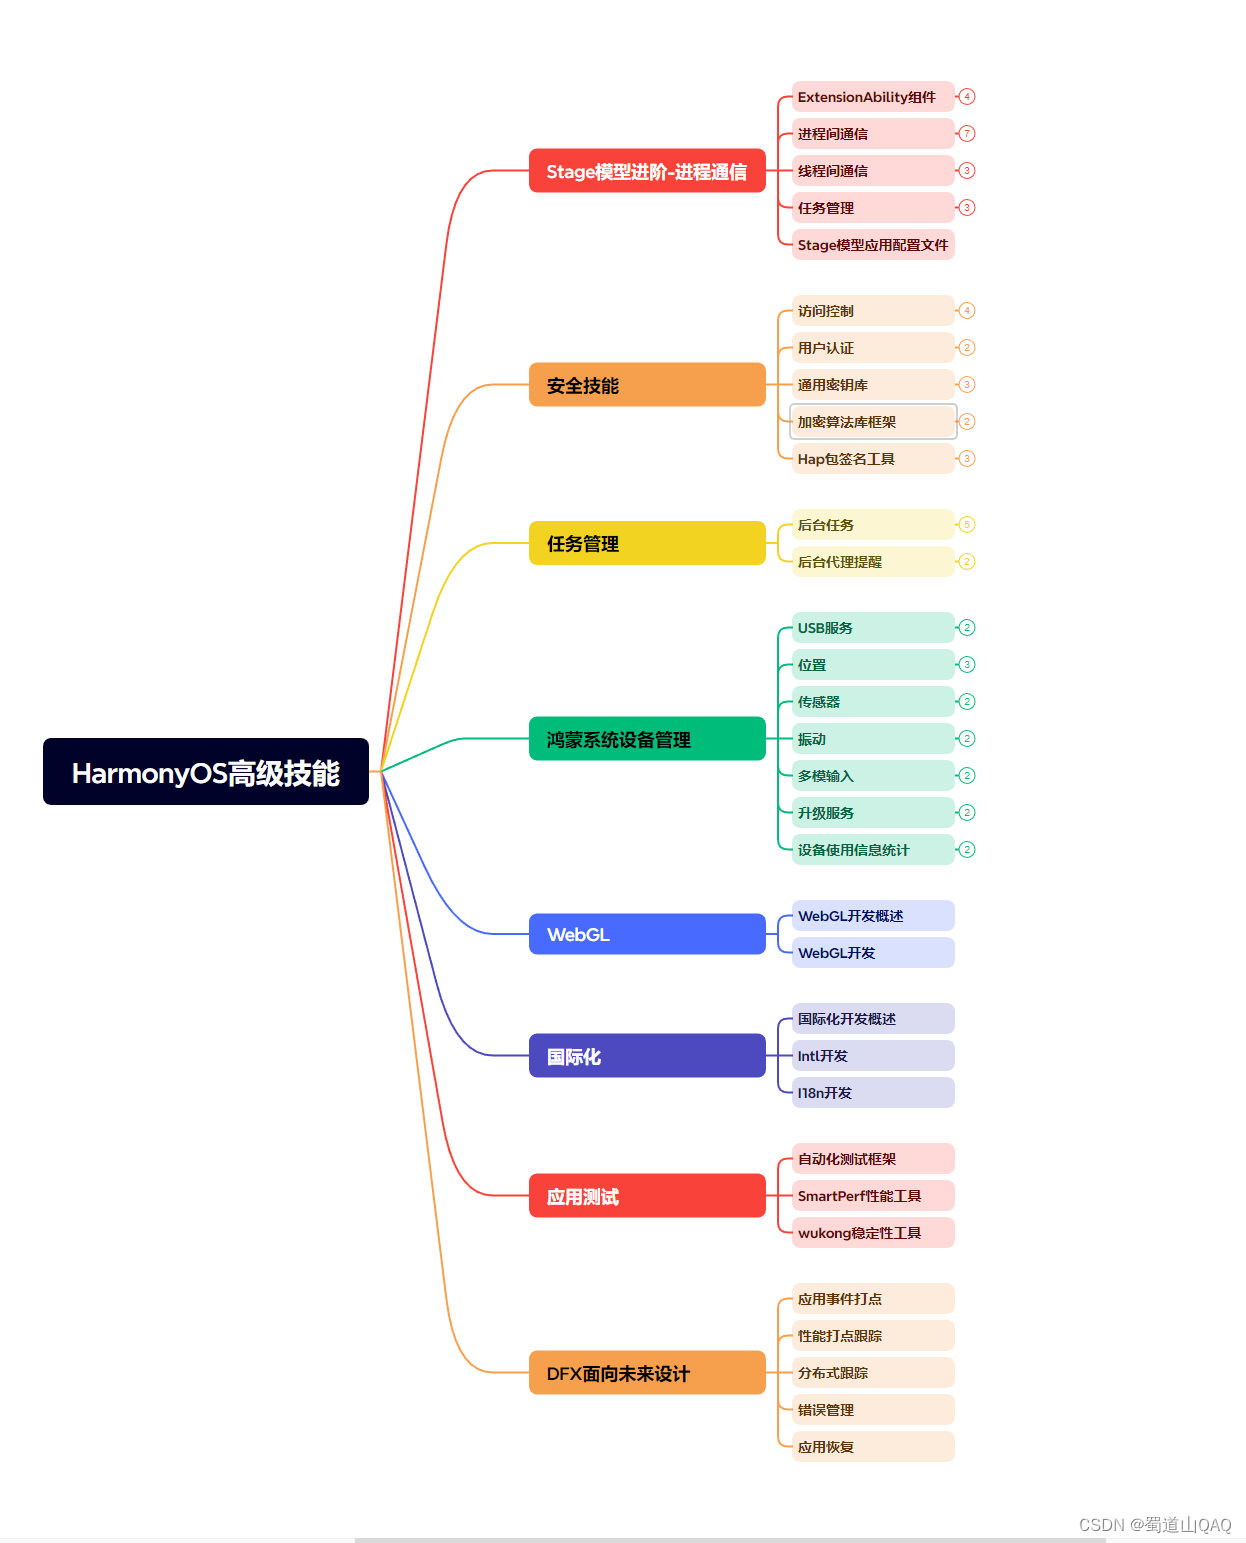


**既有适合小白学习的零基础资料,也有适合3年以上经验的小伙伴深入学习提升的进阶课程,涵盖了95%以上鸿蒙开发知识点,真正体系化!**
**由于文件比较多,这里只是将部分目录截图出来,全套包含大厂面经、学习笔记、源码讲义、实战项目、大纲路线、讲解视频,并且后续会持续更新**
**[需要这份系统化的资料的朋友,可以戳这里获取](https://bbs.csdn.net/topics/618636735)**
s://img-blog.csdnimg.cn/direct/743b668910224b259a5ffe804fa6d0db.png)
[外链图片转存中...(img-e0gC81m9-1715727597968)]
[外链图片转存中...(img-klIidGED-1715727597968)]
**既有适合小白学习的零基础资料,也有适合3年以上经验的小伙伴深入学习提升的进阶课程,涵盖了95%以上鸿蒙开发知识点,真正体系化!**
**由于文件比较多,这里只是将部分目录截图出来,全套包含大厂面经、学习笔记、源码讲义、实战项目、大纲路线、讲解视频,并且后续会持续更新**
**[需要这份系统化的资料的朋友,可以戳这里获取](https://bbs.csdn.net/topics/618636735)**


 被折叠的 条评论
为什么被折叠?
被折叠的 条评论
为什么被折叠?
 到【灌水乐园】发言


