


2.1 launch方法解析
我们首先看一下协程是怎样启动的,传入了什么参数
public fun CoroutineScope.launch(
context: CoroutineContext = EmptyCoroutineContext,
start: CoroutineStart = CoroutineStart.DEFAULT,
block: suspend CoroutineScope.() -> Unit
): Job {
val newContext = newCoroutineContext(context)
val coroutine = if (start.isLazy)
LazyStandaloneCoroutine(newContext, block) else
StandaloneCoroutine(newContext, active = true)
coroutine.start(start, coroutine, block)
return coroutine
}
总共有3个参数:
1.传入的协程上下文
2.CoroutinStart启动器,是个枚举类,定义了不同的启动方法,默认是CoroutineStart.DEFAULT
3.block就是我们传入的协程体,真正要执行的代码
这段代码主要做了两件事:
1.组合新的CoroutineContext
2.再创建一个 Continuation
2.1.1 组合新的CoroutineContext
public actual fun CoroutineScope.newCoroutineContext(context: CoroutineContext): CoroutineContext {
val combined = coroutineContext + context
val debug = if (DEBUG) combined + CoroutineId(COROUTINE_ID.incrementAndGet()) else combined
return if (combined !== Dispatchers.Default && combined[ContinuationInterceptor] == null)
debug + Dispatchers.Default else debug
}
从上面可以提炼出以下信息:
1.会将launch方法传入的context与CoroutineScope中的context组合起来
2.如果combined中没有拦截器,会传入一个默认的拦截器,即Dispatchers.Default,这也解释了为什么我们没有传入拦截器时会有一个默认切换线程的效果
2.1.2 创建一个Continuation
val coroutine = if (start.isLazy)
LazyStandaloneCoroutine(newContext, block) else
StandaloneCoroutine(newContext, active = true)
coroutine.start(start, coroutine, block)
默认情况下,我们会创建一个StandloneCoroutine
值得注意的是,这个coroutine其实是我们协程体的complete,即成功后的回调,而不是协程体本身
然后调用coroutine.start,这表明协程开始启动了
2.2 协程的启动
public fun start(start: CoroutineStart, receiver: R, block: suspend R.() -> T) {
initParentJob()
start(block, receiver, this)
}
接着调用CoroutineStart的start来启动协程,默认情况下调用的是CoroutineStart.Default
经过层层调用,最后到达了:
internal fun <R, T> (suspend ® -> T).startCoroutineCancellable(receiver: R, completion: Continuation) =
runSafely(completion) {
// 外面再包一层 Coroutine
createCoroutineUnintercepted(receiver, completion)
// 如果需要,做拦截处理
.intercepted()
// 调用 resumeWith 方法
.resumeCancellableWith(Result.success(Unit))
}
这里就是协程启动的核心代码,虽然比较短,却包括3个步骤:
1.创建协程体Continuation
2.创建拦截 Continuation,即DispatchedContinuation
3.执行DispatchedContinuation.resumeWith方法
2.3 创建协程体Continuation
调用createCoroutineUnintercepted,会把我们的协程体即suspend block转换成Continuation,它是SuspendLambda,继承自ContinuationImpl
createCoroutineUnintercepted方法在源码中找不到具体实现,不过如果你把协程体代码反编译后就可以看到真正的实现
详情可见:字节码反编译
2.4 创建DispatchedContinuation
public actual fun Continuation.intercepted(): Continuation =
(this as? ContinuationImpl)?.intercepted() ?: this
//ContinuationImpl
public fun intercepted(): Continuation<Any?> =
intercepted
?: (context[ContinuationInterceptor]?.interceptContinuation(this) ?: this)
.also { intercepted = it }
//CoroutineDispatcher
public final override fun interceptContinuation(continuation: Continuation): Continuation =
DispatchedContinuation(this, continuation)
从上可以提炼出以下信息
1.interepted是个扩展方法,最后会调用到ContinuationImpl.intercepted方法
2.在intercepted会利用CoroutineContext,获取当前的拦截器
3.因为当前的拦截器是CoroutineDispatcher,因此最终会返回一个DispatchedContinuation,我们其实也是利用它实现线程切换的
4.我们将协程体的Continuation传入DispatchedContinuation,这里其实用到了装饰器模式,实现功能的增强
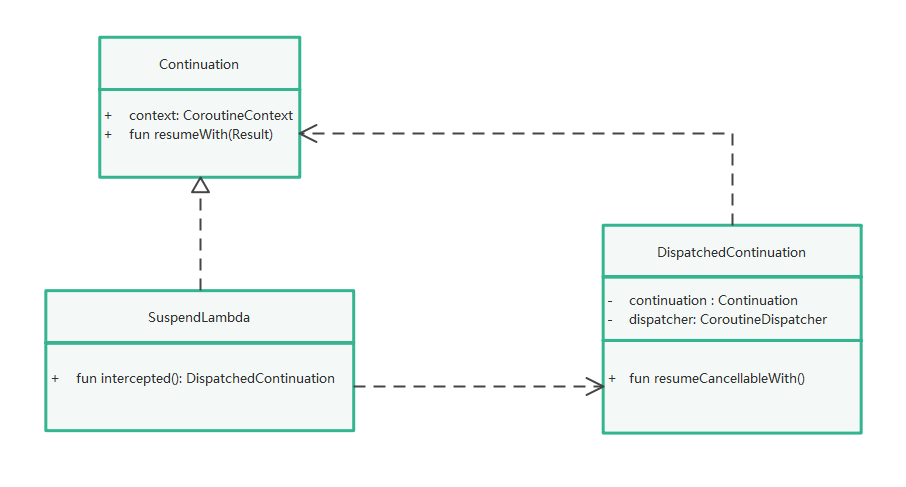
这里其实很明显了,通过DispatchedContinuation装饰原有协程,在DispatchedContinuation里通过调度器处理线程切换,不影响原有逻辑,实现功能的增强
2.5 拦截处理
//DispatchedContinuation
inline fun resumeCancellableWith(
result: Result,
noinline onCancellation: ((cause: Throwable) -> Unit)?
) {
val state = result.toState(onCancellation)
if (dispatcher.isDispatchNeeded(context)) {
_state = state
resumeMode = MODE_CANCELLABLE
dispatcher.dispatch(context, this)
} else {
executeUnconfined(state, MODE_CANCELLABLE) {
if (!resumeCancelled(state)) {
resumeUndispatchedWith(result)
}
}
}
}
上面说到了启动时会调用DispatchedContinuation的resumeCancellableWith方法
这里面做的事也很简单:
1.如果需要切换线程,调用dispatcher.dispatcher方法,这里的dispatcher是通过CoroutineConext取出来的
2.如果不需要切换线程,直接运行原有线程即可
2.5.2 调度器的具体实现
我们首先明确下,CoroutineDispatcher是通过CoroutineContext取出来的,这也是协程上下文作用的体现
CoroutineDispater官方提供了四种实现:Dispatchers.Main,Dispatchers.IO,Dispatchers.Default,Dispatchers.Unconfined
我们一起简单看下Dispatchers.Main的实现
internal class HandlerContext private constructor(
private val handler: Handler,
private val name: String?,
private val invokeImmediately: Boolean
) : HandlerDispatcher(), Delay {
public constructor(
handler: Handler,
name: String? = null
) : this(handler, name, false)
//…
override fun dispatch(context: CoroutineContext, block: Runnable) {
// 利用主线程的 Handler 执行任务
handler.post(block)
}
}
可以看到,其实就是用handler切换到了主线程
如果用Dispatcers.IO也是一样的,只不过换成线程池切换了
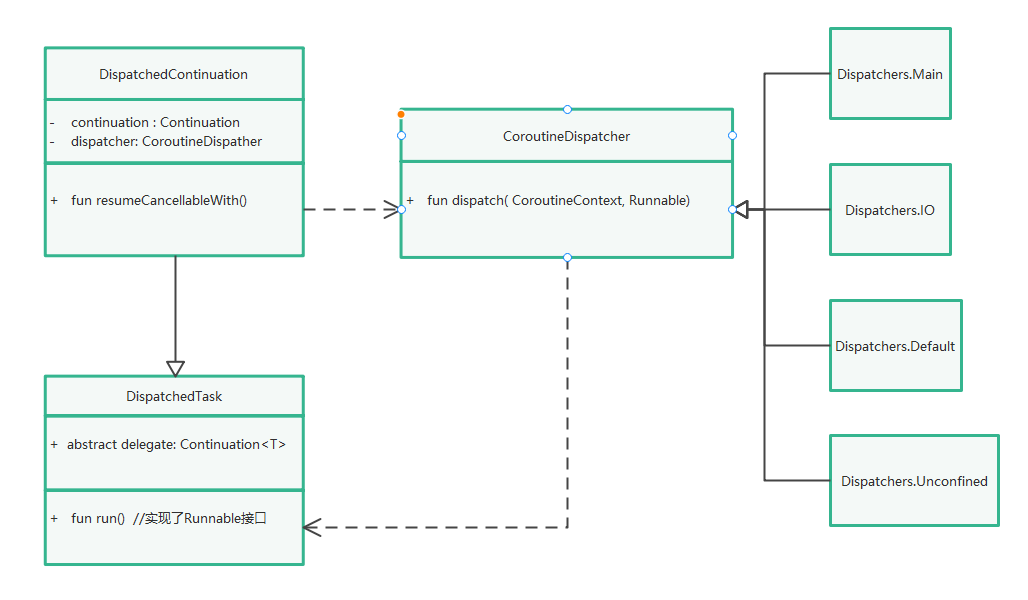
如上所示,其实就是一个装饰模式
1.调用CoroutinDispatcher.dispatch方法切换线程
2.切换完成后调用DispatchedTask.run方法,执行真正的协程体
上面我们介绍了协程线程调度的基本原理与实现,下面我们来回答几个小问题
我们知道delay函数会挂起,然后等待一段时间再恢复。
可以想象,这里面应该也涉及到线程的切换,具体是怎么实现的呢?
public suspend fun delay(timeMillis: Long) {
if (timeMillis <= 0) return // don’t delay
return suspendCancellableCoroutine sc@ { cont: CancellableContinuation ->
// if timeMillis == Long.MAX_VALUE then just wait forever like awaitCancellation, don’t schedule.
if (timeMillis < Long.MAX_VALUE) {
cont.context.delay.scheduleResumeAfterDelay(timeMillis, cont)
}
}
}
internal val CoroutineContext.delay: Delay get() = get(ContinuationInterceptor) as? Delay ?: DefaultDelay
Dealy的代码也很简单,从上面可以提炼出以下信息
delay的切换也是通过拦截器来实现的,内置的拦截器同时也实现了Delay接口
我们来看一个具体实现
internal class HandlerContext private constructor(
private val handler: Handler,
private val name: String?,
private val invokeImmediately: Boolean
) : HandlerDispatcher(), Delay {
override fun scheduleResumeAfterDelay(timeMillis: Long, continuation: CancellableContinuation) {
// 利用主线程的 Handler 延迟执行任务,将完成的 continuation 放在任务中执行
val block = Runnable {
with(continuation) { resumeUndispatched(Unit) }
}
handler.postDelayed(block, timeMillis.coerceAtMost(MAX_DELAY))
continuation.invokeOnCancellation { handler.removeCallbacks(block) }
}
//…
}
1.可以看出,其实也是通过handler.postDelayed实现延时效果的
2.时间到了之后,再通过resumeUndispatched方法恢复协程
3.如果我们用的是Dispatcher.IO,效果也是一样的,不同的就是延时效果是通过切换线程实现的
我们在协程体内,可能通过withContext方法简单便捷的切换线程,用同步的方式写异步代码,这也是kotin协程的主要优势之一
fun test(){
viewModelScope.launch(Dispatchers.Main) {
print(“1:” + Thread.currentThread().name)
withContext(Dispatchers.IO){
delay(1000)
print(“2:” + Thread.currentThread().name)
}
print(“3:” + Thread.currentThread().name)
}
}
//1,2,3处分别输出main,DefaultDispatcher-worker-1,main
可以看出这段代码做了一个切换线程然后再切换回来的操作,我们可以提出两个问题
1.withContext是怎样切换线程的?
2.withContext内的协程体结束后,线程怎样切换回到Dispatchers.Main?
public suspend fun withContext(
context: CoroutineContext,
block: suspend CoroutineScope.() -> T
): T {
return suspendCoroutineUninterceptedOrReturn sc@ { uCont ->
// 创建新的context
val oldContext = uCont.context
val newContext = oldContext + context
…
//使用新的Dispatcher,覆盖外层
val coroutine = DispatchedCoroutine(newContext, uCont)
coroutine.initParentJob()
//DispatchedCoroutine作为了complete传入
block.startCoroutineCancellable(coroutine, coroutine)
coroutine.getResult()
}
}
private class DispatchedCoroutine(
context: CoroutineContext,
uCont: Continuation
) : ScopeCoroutine(context, uCont) {
//在complete时会会回调
override fun afterCompletion(state: Any?) {
afterResume(state)
}
override fun afterResume(state: Any?) {
//uCont就是父协程,context仍是老版context,因此可以切换回原来的线程上
uCont.intercepted().resumeCancellableWith(recoverResult(state, uCont))
}
}
这段代码其实也很简单,可以提炼出以下信息
1.withContext其实就是一层Api封装,最后调用到了startCoroutineCancellable,这就跟launch后面的流程一样了,我们就不继续跟了
2.传入的context会覆盖外层的拦截器并生成一个newContext,因此可以实现线程的切换
3.DispatchedCoroutine作为complete传入协程体的创建函数中,因此协程体执行完成后会回调到afterCompletion中
4.DispatchedCoroutine中传入的uCont是父协程,它的拦截器仍是外层的拦截器,因此会切换回原来的线程中
最后
只要是程序员,不管是Java还是Android,如果不去阅读源码,只看API文档,那就只是停留于皮毛,这对我们知识体系的建立和完备以及实战技术的提升都是不利的。
真正最能锻炼能力的便是直接去阅读源码,不仅限于阅读各大系统源码,还包括各种优秀的开源库。

腾讯、字节跳动、阿里、百度等BAT大厂 2019-2021面试真题解析

资料太多,全部展示会影响篇幅,暂时就先列举这些部分截图
《Android学习笔记总结+移动架构视频+大厂面试真题+项目实战源码》,点击传送门,即可获取!
2.传入的context会覆盖外层的拦截器并生成一个newContext,因此可以实现线程的切换
3.DispatchedCoroutine作为complete传入协程体的创建函数中,因此协程体执行完成后会回调到afterCompletion中
4.DispatchedCoroutine中传入的uCont是父协程,它的拦截器仍是外层的拦截器,因此会切换回原来的线程中
最后
只要是程序员,不管是Java还是Android,如果不去阅读源码,只看API文档,那就只是停留于皮毛,这对我们知识体系的建立和完备以及实战技术的提升都是不利的。
真正最能锻炼能力的便是直接去阅读源码,不仅限于阅读各大系统源码,还包括各种优秀的开源库。
[外链图片转存中…(img-r2N58A8C-1715846655851)]
腾讯、字节跳动、阿里、百度等BAT大厂 2019-2021面试真题解析
[外链图片转存中…(img-DXTJm75K-1715846655854)]
资料太多,全部展示会影响篇幅,暂时就先列举这些部分截图
《Android学习笔记总结+移动架构视频+大厂面试真题+项目实战源码》,点击传送门,即可获取!


 被折叠的 条评论
为什么被折叠?
被折叠的 条评论
为什么被折叠?
 到【灌水乐园】发言


