


既有适合小白学习的零基础资料,也有适合3年以上经验的小伙伴深入学习提升的进阶课程,涵盖了95%以上C C++开发知识点,真正体系化!
由于文件比较多,这里只是将部分目录截图出来,全套包含大厂面经、学习笔记、源码讲义、实战项目、大纲路线、讲解视频,并且后续会持续更新
if (it1 != s1.end())
	cout << "find的返回值(指向该元素):" << \*it1 << endl;
else cout << "返回Nullptr" << endl;
cout << "8值是否存在(返回1表示存在0表示不存在):" << s1.count(8) << endl;
cout <<"s1的元素个数(返回元素个数):" << s1.size() << " | s1是否为空(0表示非空反之1为空):" << s1.empty() << endl;

cout << endl;

s1.clear();//清空元素
set<int>::iterator it2 = s1.find(8);
if(it2 != s1.end())
	cout << "find的返回值(指向该元素):" << \*it2 << endl;
else cout << "返回Nullptr" << endl;
cout << "8值是否存在(返回1表示存在0表示不存在):" << s1.count(8) << endl;
cout << "s1的元素个数(返回元素个数):" << s1.size() << " | s1是否为空(0表示非空反之1为空):" << s1.empty() << endl;
}
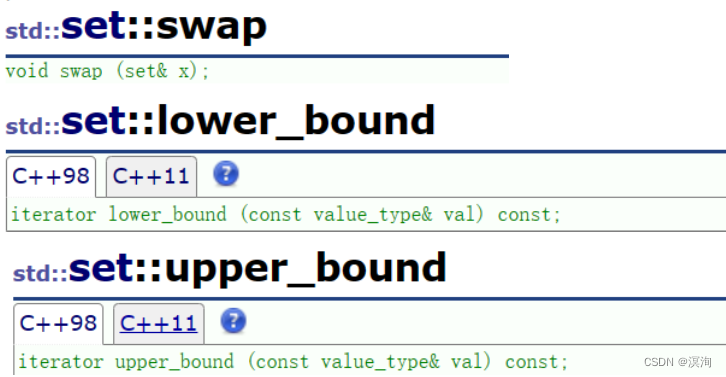
7. set的交换swap、指定区间的lower\_bound、upper\_bound:
>
> lower\_bound和upper\_bound是通过指定数值来确定迭代器区间,常用来指定删除数据的区间,如:1 2 3 4 5 6 , lower\_bound(2),upper\_bound(5),这样取出来的区间lower\_bound指向的就是2(取>=value的值),而upper\_bound指向的是6(取>value的值),但因为迭代器区间是左闭右开的所以即使删除也不会删到6!
> 
>
>
>
源码:
void Print(const set& s1)
{
cout << “P:”;
for (auto k : s1)
{
cout << k << " ";
}
c
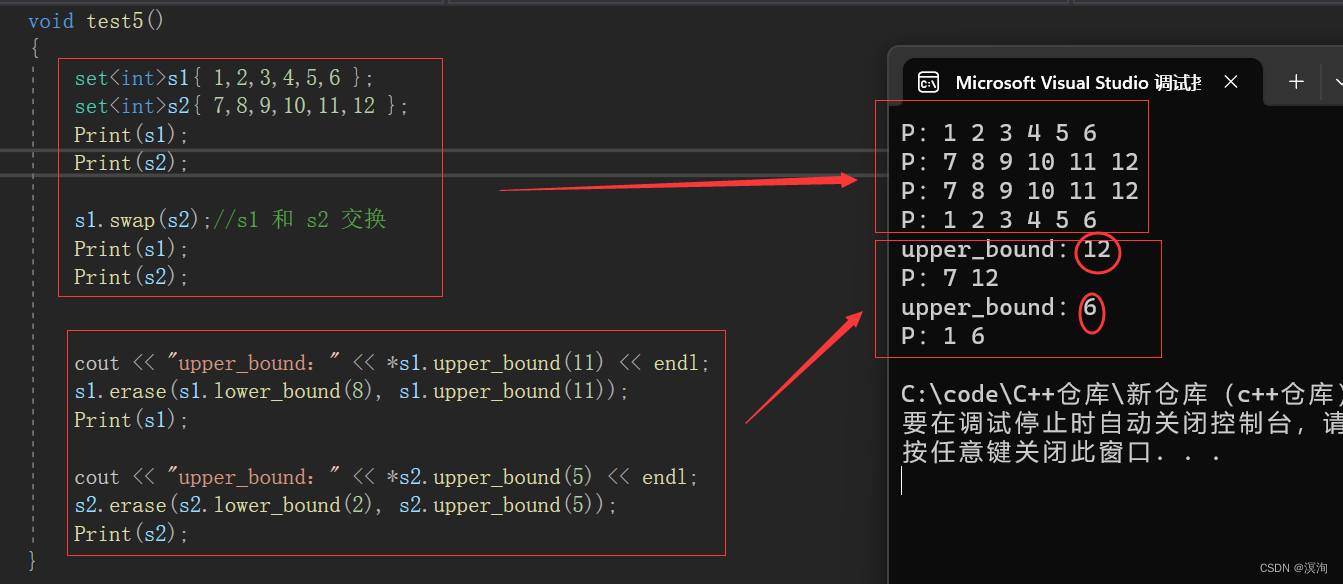
void test5()
{
sets1{ 1,2,3,4,5,6 };
sets2{ 7,8,9,10,11,12 };
Print(s1);
Print(s2);
s1.swap(s2);//s1 和 s2 交换
Print(s1);
Print(s2);


cout << "upper\_bound:" << \*s1.upper\_bound(11) << endl;
s1.erase(s1.lower\_bound(8), s1.upper\_bound(11));
Print(s1);

cout << "upper\_bound:" << \*s2.upper\_bound(5) << endl;
s2.erase(s2.lower\_bound(2), s2.upper\_bound(5));
Print(s2);
}
## 1.3 multiset的概念和使用
>
> 其原理和set几乎一致,只是multiset能存多个相同的值了
> 注意点:是find查找时是返回第一个遇到的value,count将返回该值存在的个数
> 其中还要交代一个函数(set中也有不过不够实用)
> 
> 他**返回的是pair<iterator,iterator>,这两个迭代器分别表示的就是value值的lower\_bound和upper\_bound**,这样就能一次性删除所有相同的元素!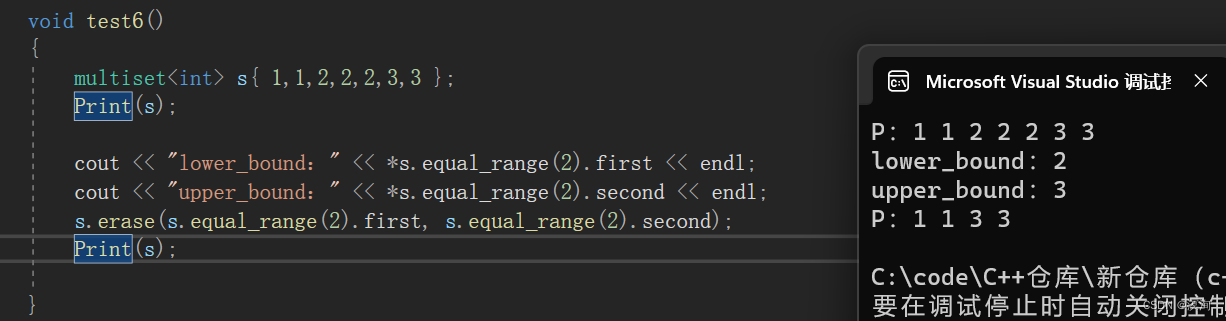
>
>
>
void Print(const multiset& s1)
{
cout << “P:”;
for (auto k : s1)
{
cout << k << " ";
}
cout << endl;
}
void test6()
{
multiset s{ 1,1,2,2,2,3,3 };
Print(s);
cout << "lower\_bound:" << \*s.equal\_range(2).first << endl;
cout << "upper\_bound:" << \*s.equal\_range(2).second << endl;
s.erase(s.equal\_range(2).first, s.equal\_range(2).second);
Print(s);
}
## 2.map
### 2.1map的概念
>
> map底层也是红黑树,同理也就表明了他就是一个二叉搜索树。map不同于set他的K,V两个值都是有用的,map也是关联式容器,
> 1. 容器内部的元素都是pair<K,V>构成的一个个键值对
> 2. 如果是比较大小的话通常是用key值来进行
> 3. 在map中所有元素的值都是唯一的(指的是key值不能重复)
> 4. 在map中不能修改元素的值(即是不能修改K值的,只能修改value值)
>
>
>
### 2.2map常使用的方法
1. map的模板参数:

>
> 同样Compare默认缺省为less
>
>
>
2. map的构造:
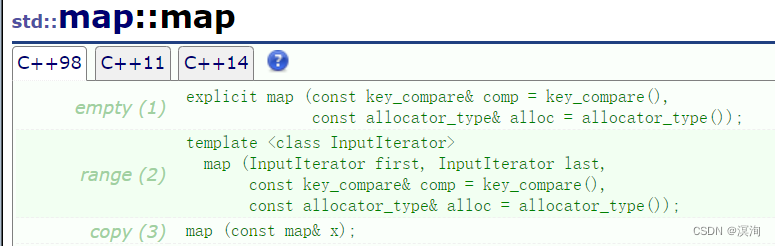
对照着set几乎一样,直接通过代码展示了
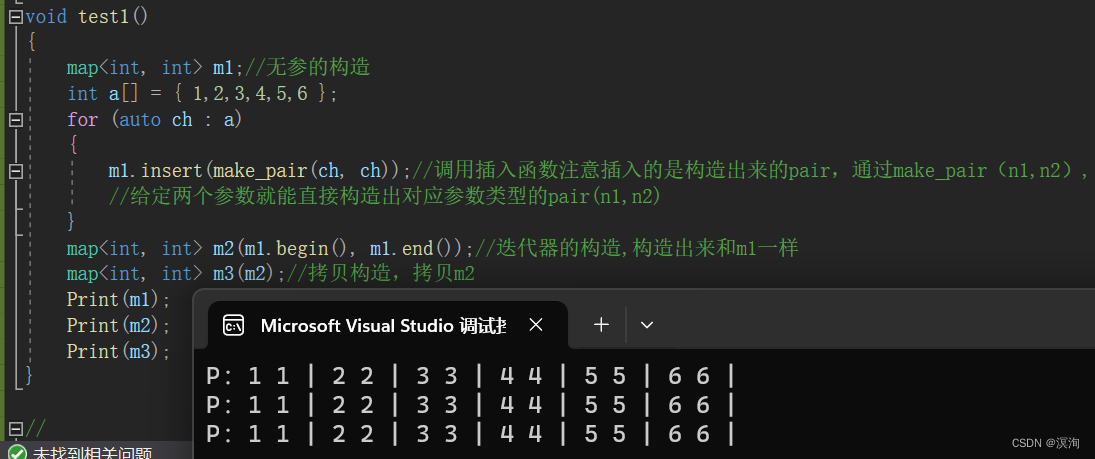
注意点:
1. 范围for打印时给kv的是迭代器,迭代器的类型是pair<K,V>所以kv.first指向Key,kv.second指向value
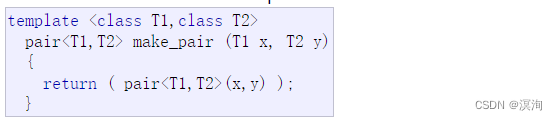
2. 插入的数据必须是键值对,用make\_pair()函数直接构造
源码:
void Print(const map<int,int>& m1)
{
cout << “P:”;
for (auto kv : m1)
{
cout << kv.first << " " << kv.second << " | ";
}
cout << endl;
}
void test1()
{
map<int, int> m1;//无参的构造
int a[] = { 1,2,3,4,5,6 };
for (auto ch : a)
{
m1.insert(make_pair(ch, ch));//调用插入函数注意插入的是构造出来的pair,通过make_pair(n1,n2),
//给定两个参数就能直接构造出对应参数类型的pair(n1,n2)
}
map<int, int> m2(m1.begin(), m1.end());//迭代器的构造,构造出来和m1一样
map<int, int> m3(m2);//拷贝构造,拷贝m2
Print(m1);
Print(m2);
Print(m3);
}
3. set的插入: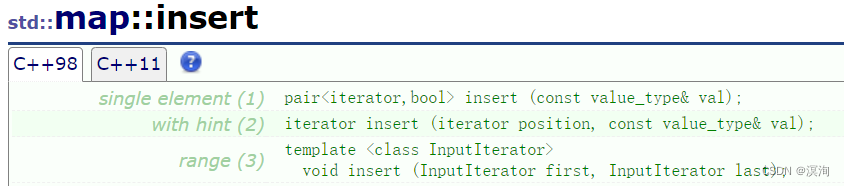
其中插入函数参数的value\_type的实际类型是pair<const K,V>
注意点:
1. 用make\_pair(key,value)构造出K,V类型的pair<K,V>当参数传递进去,或者写成用pair的构造pair<K,V>(key,value)(具体如下)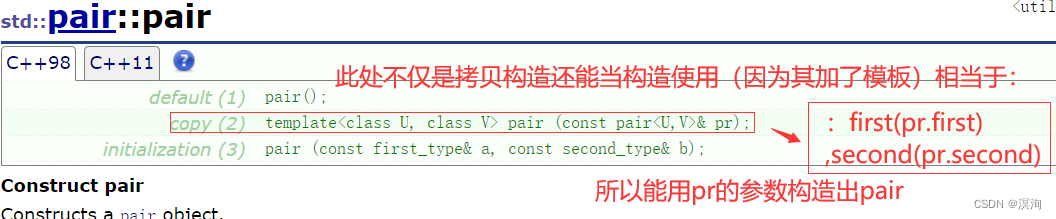
2. 返回pair<iterator,bool>。
3. 若返回的iterator,需要注意的是其类型是pair<K,V>型
map<int, int> m1;
m1.insert(make_pair(1,1));//构造出pair(1,1) 或m1.insert(pair<int,int>(1,1));
4. map的删除:
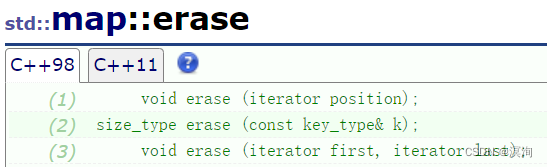
同理使用迭代器部分是一样的,此处删除时就不用在使用pair了,直接通过确定key即可删除。
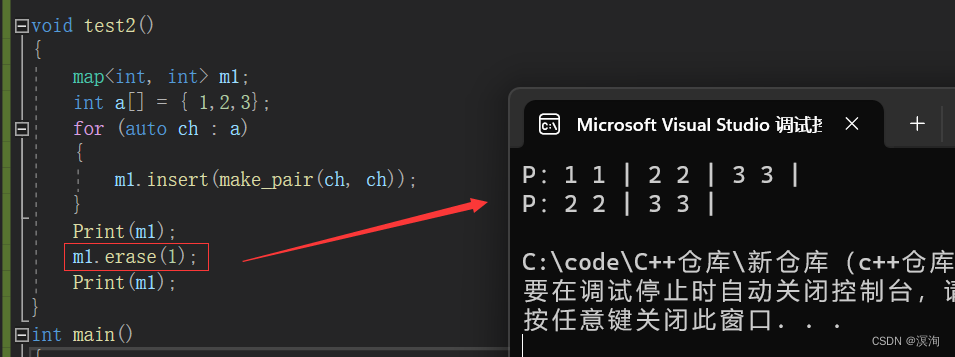
void test2()
{
map<int, int> m1;
int a[] = { 1,2,3};
for (auto ch : a)
{
m1.insert(make_pair(ch, ch));
}
Print(m1);
m1.erase(1);
Print(m1);
}
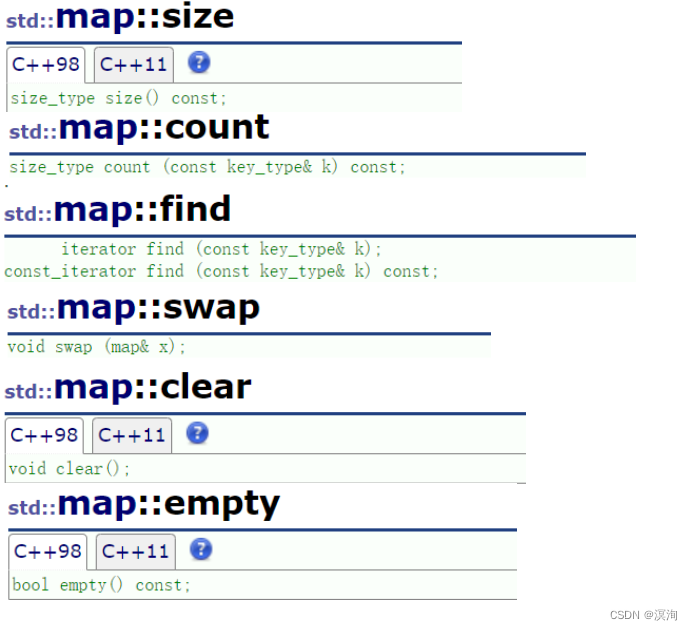
5. map的查找find、查看个数size、是否为空empty、是否存在count、清空元素clear、交换swap:
>
> 此处find、count的参数同样用key即可使用、其余函数和set完全一样。
> 
>
>
>
6. map的重载operator[](极其重要)
>
> 通过代码和底层来解释: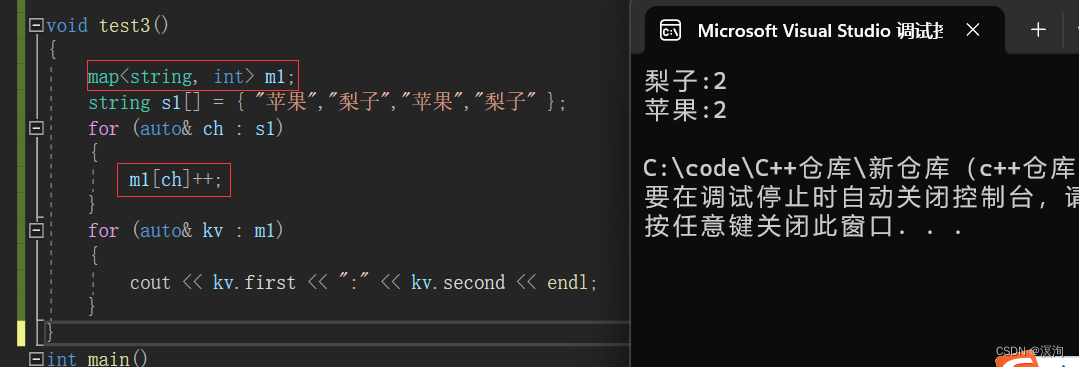
> 其中我们operator[]的底层是:
> `(*((this->insert(make_pair(k,mapped_type()))).first)).second`
> 其中能看到他是调用了插入函数,所以[]能实现插入功能
> 而我们map的插入返回的类型是:pair<iterator,bool>
> 所以就能简化为:`(*pair<iterator,bool>.first).second//此处.的优先级高于*所以是先访问,得到iterator后,再(*iterator).second`得到其迭代器的value值,也就是插入时的第二个参数
> 所以分析上面代码:m1[ch]++;第一次进去的时候插入成功并且返回来他的second++,这样就能不断的插入,即使后面是插入失败也能返回second进行++,所以就能形成计数器。(其中注意点我们虽然没有初始化int,但其实其内部会默认为0开始,也就是上面的mapped\_type()他会自动构造出该类型的初始值,int为0,string为"")
>
>
>
## 2.3 multimap的概念和使用
>
> 与multiset一样,都是可以出现重复的值,只是其中没有了map的operator[ ],就不过诉了。
>
>
>
## 3.map、set的底层实现
### 3.1红黑树的修改
>
> 为了给set、map做底层,我们需要完善一下红黑树在里面主要是
>
>
> 1. 模板的改变:将原本第二个参数V改成T,T代表的是K,V组成成的键值对pair<K,V>
> 2. 添加迭代器以及begin、end函数,让map、set也能用迭代器
> 3. 修改插入的返回值:将原本的iterator改成pair<iterator,bool>,(这是STL源码内的设计,也是为了map的[]做准备)
>
>
>
修改后的源码:
#pragma once
#include
using namespace std;
enum Color
{
BLACK,
RED
};
template
struct RBTreeNode {
RBTreeNode<T>\* _left = nullptr;
RBTreeNode<T>\* _right = nullptr;
RBTreeNode<T>\* _parent = nullptr;

T _data;

Color _col = RED;//默认生成的节点颜色是红色

RBTreeNode(const T& data)
	:\_data(data)
{}
};
//迭代器
template<class T, class Ptr, class Ref>
struct _TreeIterator
{
typedef _TreeIterator<T, Ptr, Ref> Self;
typedef RBTreeNode Node;
Node* _node;//迭代器的成员变量
\_TreeIterator(Node\* node)
	:\_node(node)
{}

Self& operator++()
{
	Node\* cur = _node;
	if (cur->_right)//若右边不为空,则找到其左边的右边节点
	{
		cur = cur->_right;
		while (cur->_left)
		{
			cur = cur->_left;
		}
		_node = cur;
	}
	else
	{
		Node\* parent = cur->_parent;
		while (parent && parent->_left != cur)
		{
			cur = parent;
			parent = parent->_parent;
		}
		_node = parent;
	}
	return \*this;
}

Ref operator\*()
{
	return _node->_data;
}

Ptr operator->()
{
	return &_node->_data;
}

bool operator==(const Self & it)
{
	return _node == it._node;
}

bool operator!=(const Self & it)
{
	return _node != it._node;
}
};
template<class K, class T, class Compare>
class RBTree
{
typedef RBTreeNode Node;
Compare kot;
public:
typedef _TreeIterator<T,T\*,T&> iterator;
typedef _TreeIterator<T,const T\*,const T&> const_iterator;

//typedef typename RBTree<K, pair<K, V>, Mapofkey>::iterator iterator;

// 在红黑树中插入值为data的节点,插入成功返回true,否则返回false
// 注意:为了简单起见,本次实现红黑树不存储重复性元素
iterator begin()
{
	Node\* cur = _root;
	while (cur && cur->_left)
	{
		cur = cur->_left;
	}
	return iterator(cur);
}
iterator end()
{
	return iterator(nullptr);//end指向最后数据的后面故为空
}

const_iterator begin() const
{
	Node\* cur = _root;
	while (cur && cur->_left)
	{
		cur = cur->_left;
	}
	return const\_iterator(cur);
}
const_iterator end() const
{
	return const\_iterator(nullptr);//end指向最后数据的后面故为空
}
//此处用Node\* 的原因set处的iterator为了防止被修改所以set内的iterator本质还是const\_iterator,
//所以这里用了 Node\* 来代替iterator 的返回

pair<Node\*, bool> Insert(const T& data)
{
	//此处和AVL平衡二叉树的性质一样找到所要插入节点的位置 大的在右 、 小的在左
	Node\* parent = nullptr;
	Node\* cur = _root;

	if (cur == nullptr)
	{
		_root = new Node(data);
		_root->_col = BLACK;
		return make\_pair(_root, true);
	}

	//找到插入的位置!
	while (cur)//当为null时表示此处就是要插入的位置!
	{
		if (kot(cur->_data) > kot(data))
		{
			parent = cur;
			cur = cur->_left;
		}
		else if (kot(cur->_data) < kot(data))
		{
			parent = cur;
			cur = cur->_right;
		}
		else
		{
			return make\_pair(nullptr, false);
		}
	}
	//找到位置后,插入
	cur = new Node(data);//建立新节点
	Node\* ret = cur;
	//建立链接
	if (kot(parent->_data) > kot(data))
	{
		parent->_left = cur;
	}
	else
	{
		parent->_right = cur;
	}
	cur->_parent = parent;

	//插入时要判断插入后是否会导致不平衡!对于红黑树来说主要问题有
		//1. 不能出现连续的红节点
		//2. 最长路径不超过最短路径的两倍
	//判断是否需要变色/旋转
	//
	//1.当父亲节点为黑色时,当新增了一个红色节点时就结束插入了
	//
	//2.当父为红时:
	// 情况一(仅变色即可):当parent为红 grandfather为黑 uncle存在且为黑 插入一个新节点

	while (parent && parent->_col == RED)
	{
		Node\* g = parent->_parent;//grandfather
		if (g->_left == parent)
		{
			Node\* u = g->_right;//uncle

			if (u && u->_col == RED)//u存在且为红
			{
				//变色即可
				u->_col = parent->_col = BLACK;
				g->_col = RED;

				//向上调整
				cur = g;
				parent = g->_parent;
				//当g 的 父亲为黑时或者为null时停止调整
			}
			else //u不存在或者为黑
			{
				if (cur == parent->_left)//此处u不存在和当插入节点在左边时的情况一样直接右旋加变色即可
				{
					//旋转加变色
					RotateR(g);
					parent->_col = BLACK;
					g->_col = RED;
				}
				else
				{
					//旋转加变色
					RotateL(parent);
					RotateR(g);

					cur->_col = BLACK;
					g->_col = RED;
				}
			}
		}
		else
		{
			Node\* u = g->_left;//uncle
			if (u && u->_col == RED)//u存在且为红
			{
				//变色即可
				u->_col = parent->_col = BLACK;
				g->_col = RED;

				//向上调整
				cur = g;
				parent = g->_parent;

				//当g 的 父亲为黑时或者为null时停止调整
			}
			else //u不存在或者为黑
			{
				if (cur == parent->_right)//此处u不存在和当插入节点在左边时的情况一样直接右旋加变色即可
				{
					RotateL(g);
					parent->_col = BLACK;
					g->_col = RED;
				}
				else
				{
					RotateR(parent);
					RotateL(g);

					cur->_col = BLACK;
					g->_col = RED;
				}
			}
		}
	}
	_root->_col = BLACK;
	return make\_pair(ret, true);
}


void Inorder()
{
	\_Inorder(_root);
	cout << endl;
}
// 获取红黑树最左侧节点
Node\* LeftMost()
{
	Node\* cur = _root;
	while (cur)
	{
		if (cur->_left == nullptr)
		{
			return cur;
		}
		cur = cur->_left;
	}
	return nullptr;
}
// 获取红黑树最右侧节点
Node\* RightMost()
{
	Node\* cur = _root;
	while (cur)
	{
		if (cur->_right == nullptr)
		{
			return cur;
		}
		cur = cur->_right;
	}
	return nullptr;
}
// 检测红黑树是否为有效的红黑树,注意:其内部主要依靠\_IsValidRBTRee函数检测
// 1.每条路径中的黑色节点个数是否一样
// 2.最长路径不超过最短路径的两倍
// 3.不能出现连续的红色节点
// 4.根节点为黑色
bool IsValidRBTRee()
{
	if (_root == nullptr) return true;

	if (_root->_col == RED) return false;

	Node\* cur = _root;
	int blackCount = 0;
	while (cur)
	{
		if (cur->_col == BLACK)
		{
			blackCount++;
		}
		cur = cur->_left;
	}
	return \_IsValidRBTRee(_root, blackCount, 0);
}

int Height()
{
	if (_root == nullptr) return 0;
	return \_Height(_root);
}

int Size()
{
	if (_root == nullptr) return 0;

	return \_Size(_root);
}
//检测红黑树中是否存在值为data的节点,存在返回该节点的地址,否则返回nullptr
Node\* Find(const K& val)
{
	Node\* cur = _root;
	while (cur)
	{
		if (kot(cur->_data) == val)
		{
			return cur;
		}
		else if (kot(cur->_data) > val)
		{
			cur = cur->_left;
		}
		else {
			cur = cur->_right;
		}
	}
	return nullptr;
}
private:
int _Size(Node* root)
{
if (root == nullptr)return 0;
	return \_Size(root->_left) +
		\_Size(root->_right) + 1;
}

int \_Height(Node\* root)
{
	if (root == nullptr)return 0;

	int lefthight = \_Height(root->_left);

	int righthight = \_Height(root->_right);

	return lefthight > righthight ? lefthight + 1 : righthight + 1;
}

void \_Inorder(Node\* root)
{
	if (root == nullptr)return;

	\_Inorder(root->_left);
	cout << root->_data.first << " ";
	\_Inorder(root->_right);
}

bool \_IsValidRBTRee(Node\* root, size_t blackCount, size_t pathBlack)
{
	if (root == nullptr)
	{


网上学习资料一大堆,但如果学到的知识不成体系,遇到问题时只是浅尝辄止,不再深入研究,那么很难做到真正的技术提升。
一个人可以走的很快,但一群人才能走的更远!不论你是正从事IT行业的老鸟或是对IT行业感兴趣的新人,都欢迎加入我们的的圈子(技术交流、学习资源、职场吐槽、大厂内推、面试辅导),让我们一起学习成长!
t->_right);
	return lefthight > righthight ? lefthight + 1 : righthight + 1;
}

void \_Inorder(Node\* root)
{
	if (root == nullptr)return;

	\_Inorder(root->_left);
	cout << root->_data.first << " ";
	\_Inorder(root->_right);
}

bool \_IsValidRBTRee(Node\* root, size_t blackCount, size_t pathBlack)
{
	if (root == nullptr)
	{
[外链图片转存中…(img-nSbGyz54-1715568535597)]
[外链图片转存中…(img-hgdNIhON-1715568535597)]
网上学习资料一大堆,但如果学到的知识不成体系,遇到问题时只是浅尝辄止,不再深入研究,那么很难做到真正的技术提升。
一个人可以走的很快,但一群人才能走的更远!不论你是正从事IT行业的老鸟或是对IT行业感兴趣的新人,都欢迎加入我们的的圈子(技术交流、学习资源、职场吐槽、大厂内推、面试辅导),让我们一起学习成长!


 被折叠的 条评论
为什么被折叠?
被折叠的 条评论
为什么被折叠?
 到【灌水乐园】发言


