


网上学习资料一大堆,但如果学到的知识不成体系,遇到问题时只是浅尝辄止,不再深入研究,那么很难做到真正的技术提升。
一个人可以走的很快,但一群人才能走的更远!不论你是正从事IT行业的老鸟或是对IT行业感兴趣的新人,都欢迎加入我们的的圈子(技术交流、学习资源、职场吐槽、大厂内推、面试辅导),让我们一起学习成长!
2#define DRM_FORMAT_RGB888 fourcc_code(‘R’, ‘G’, ‘2’, ‘4’)
3#define DRM_FORMAT_BGR888 fourcc_code(‘B’, ‘G’, ‘2’, ‘4’)
4
5/* 32 bpp RGB */
6#define DRM_FORMAT_XRGB8888 fourcc_code(‘X’, ‘R’, ‘2’, ‘4’)
7#define DRM_FORMAT_XBGR8888 fourcc_code(‘X’, ‘B’, ‘2’, ‘4’)
8#define DRM_FORMAT_RGBX8888 fourcc_code(‘R’, ‘X’, ‘2’, ‘4’)
9#define DRM_FORMAT_BGRX8888 fourcc_code(‘B’, ‘X’, ‘2’, ‘4’)
创建FRAME BUFFER
创建成功可在dev下看见fb设备

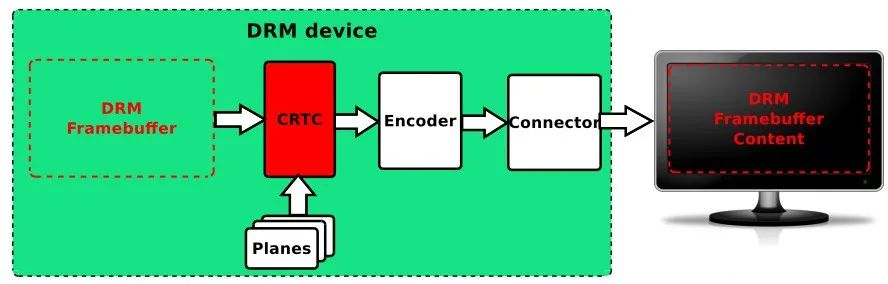
**##CRTC**
CRT Controller, 阴极射线管控制,对显示buffer进行扫描,并产生时序信号。
CRTC funcs
1static const struct drm_crtc_funcs ade_crtc_funcs = {
2 .destroy = drm_crtc_cleanup,
3 .set_config = drm_atomic_helper_set_config,
4 .page_flip = drm_atomic_helper_page_flip,
5 .reset = drm_atomic_helper_crtc_reset,
6 .atomic_duplicate_state = drm_atomic_helper_crtc_duplicate_state,
7 .atomic_destroy_state = drm_atomic_helper_crtc_destroy_state,
8 .enable_vblank = ade_crtc_enable_vblank,
9 .disable_vblank = ade_crtc_disable_vblank,
10};
CRTC helper funcs
1static const struct drm_crtc_helper_funcs ade_crtc_helper_funcs = {
2 .mode_fixup = ade_crtc_mode_fixup,
3 .mode_set_nofb = ade_crtc_mode_set_nofb,
4 .atomic_begin = ade_crtc_atomic_begin,
5 .atomic_flush = ade_crtc_atomic_flush,
6 .atomic_enable = ade_crtc_atomic_enable,
7 .atomic_disable = ade_crtc_atomic_disable,
8};
**##PLANE**
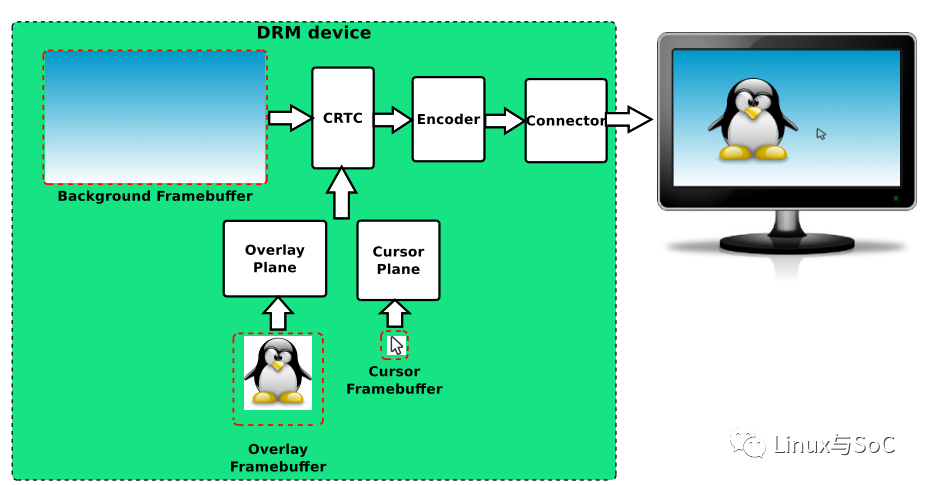
*图片来源于网络*
***========================***
PLANE funcs
1static struct drm_plane_funcs ade_plane_funcs = {
2 .update_plane = drm_atomic_helper_update_plane,
3 .disable_plane = drm_atomic_helper_disable_plane,
4 .destroy = drm_plane_cleanup,
5 .reset = drm_atomic_helper_plane_reset,
6 .atomic_duplicate_state = drm_atomic_helper_plane_duplicate_state,
7 .atomic_destroy_state = drm_atomic_helper_plane_destroy_state,
8};
PLANE helper funcs
1static const struct drm_plane_helper_funcs ade_plane_helper_funcs = {
2 .atomic_check = ade_plane_atomic_check,
3 .atomic_update = ade_plane_atomic_update,
4 .atomic_disable = ade_plane_atomic_disable,
5};
**##ENCODER/CONNECTOR**
ENCODER负责将CRTC输出的timing时序转换成外部设备所需要的信号的模块,如HDMI转换器。CONNECTOR 连接物理显示设备的连接器,如HDMI、DisplayPort、DSI总线,通常和Encoder驱动绑定在一起。
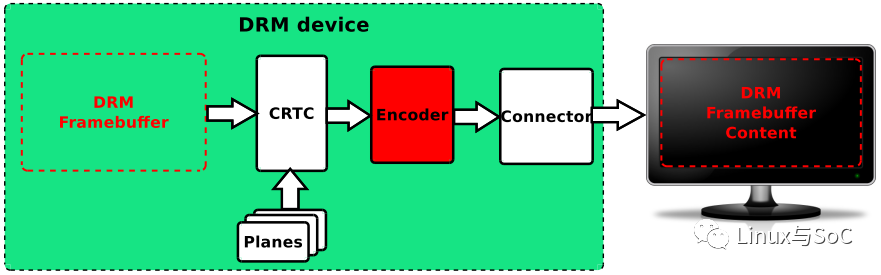
*图片来源于网络*
***========================***
ENCODER/helper funcs
1static const struct drm_encoder_helper_funcs dw_encoder_helper_funcs = {
2 .atomic_check = dsi_encoder_atomic_check,
3 .mode_valid = dsi_encoder_mode_valid,
4 .mode_set = dsi_encoder_mode_set,
5 .enable = dsi_encoder_enable,
6 .disable = dsi_encoder_disable
7};
8
9static const struct drm_encoder_funcs dw_encoder_funcs = {
10 .destroy = drm_encoder_cleanup,
11};
CONNECTOR/helper funcs
1static const struct drm_connector_helper_funcs
2panel_bridge_connector_helper_funcs = {
3 .get_modes = panel_bridge_connector_get_modes,
4};
5
6static const struct drm_connector_funcs panel_bridge_connector_funcs = {
7 .reset = drm_atomic_helper_connector_reset,
8 .fill_modes = drm_helper_probe_single_connector_modes,
9 .destroy = drm_connector_cleanup,
10 .atomic_duplicate_state = drm_atomic_helper_connector_duplicate_state,
11 .atomic_destroy_state = drm_atomic_helper_connector_destroy_state,
12};
**##ioctl注册**
**component组件系统**
**3**kernel中的component框架是为了subsystem能够按照一定的顺序初始化设备而提出的架构。
subsystem中由较多设备模块组成,而[QQ购买](https://bbs.csdn.net/topics/618668825)内核加载每个模块时间不定。则需要component框架来保证需最后初始化的设备加载前,所需设备全部加载完毕。
在component中,包含两个基本概念,master和component。
master是设备树中的“超级设备(superdevice)”,负责管理该超级设备下的普通设备。component是由master管理的普通设备,要先初始化。
**#初始化分为两部分**
master即超级设备,执行probe使用component\_master\_add\_with\_match函数注册自己到component框架中。
component即普通设备,执行probe使用component\_add函数注册自己到component框架中。
**##Master初始化**
1static int kirin_drm_platform_probe(struct platform_device *pdev)
2{
3 struct device *dev = &pdev->dev;
4 struct device_node *np = dev->of_node;
5 struct component_match *match = NULL;
6 struct device_node *remote;
7
8 remote = of_graph_get_remote_node(np, , );
9 if (!remote)
10 return -ENODEV;
11
12 drm_of_component_match_add(dev, &match, compare_of, remote);
13 of_node_put(remote);
14
15 return component_master_add_with_match(dev, &kirin_drm_ops, match);
16}
**##Component初始化**
1static int dsi_probe(struct platform_device *pdev)
2{
3 struct dsi_data *data;
4 struct dw_dsi *dsi;
5 struct dsi_hw_ctx *ctx;
6 int ret;
7
8 data = devm_kzalloc(&pdev->dev, sizeof(*data), GFP_KERNEL);
9 if (!data) {
10 DRM_ERROR(“failed to allocate dsi data.\n”);
11 return -ENOMEM;
12 }
13 dsi = &data->dsi;
14 ctx = &data->ctx;
15 dsi->ctx = ctx;
16
17 ret = dsi_parse_dt(pdev, dsi);
18 if (ret)
19 return ret;
20
21 platform_set_drvdata(pdev, data);
22
23 return component_add(&pdev->dev, &dsi_ops);
24}
**##设备树定义**


图显系统设备树定义要遵循component框架的定义,使得各个组件能够组成一个完成的拓扑结构。
1ade: ade@f4100000 {

既有适合小白学习的零基础资料,也有适合3年以上经验的小伙伴深入学习提升的进阶课程,涵盖了95%以上C C++开发知识点,真正体系化!
由于文件比较多,这里只是将部分目录截图出来,全套包含大厂面经、学习笔记、源码讲义、实战项目、大纲路线、讲解视频,并且后续会持续更新
…(img-TzLqEYxk-1715816641433)]
[外链图片转存中…(img-NJ5DoW9G-1715816641434)]
既有适合小白学习的零基础资料,也有适合3年以上经验的小伙伴深入学习提升的进阶课程,涵盖了95%以上C C++开发知识点,真正体系化!
由于文件比较多,这里只是将部分目录截图出来,全套包含大厂面经、学习笔记、源码讲义、实战项目、大纲路线、讲解视频,并且后续会持续更新


 2215
2215


 被折叠的 条评论
为什么被折叠?
被折叠的 条评论
为什么被折叠?
 到【灌水乐园】发言


