


【一线大厂Java面试题解析+后端开发学习笔记+最新架构讲解视频+实战项目源码讲义】
**开源地址:https://docs.qq.com/doc/DSmxTbFJ1cmN1R2dB **
@javax.persistence.PostUpdate:更新后。
@javax.persistence.PreRemove:删除前。
@javax.persistence.PostRemove:删除后。
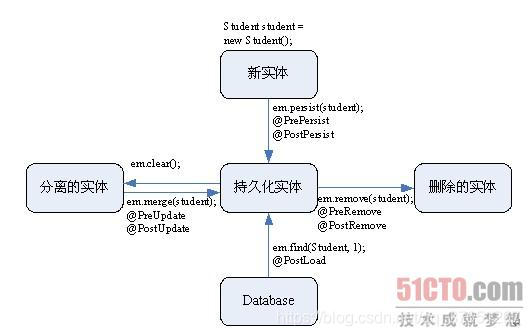
- 数据库查询
@PostLoad事件在下列情况下触发:
执行EntityManager.find()或getreference()方法载入一个实体后。
执行JPQL查询后。
EntityManager.refresh()方法被调用后。
- 数据库插入
@PrePersist和@PostPersist事件在实体对象插入到数据库的过程中发生:
@PrePersist事件在调用persist()方法后立刻发生,此时的数据还没有真正插入进数据库。
@PostPersist事件在数据已经插入进数据库后发生。
- 数据库更新
@PreUpdate和@PostUpdate事件的触发由更新实体引起:
@PreUpdate事件在实体的状态同步到数据库之前触发,此时的数据还没有真正更新到数据库。
@PostUpdate事件在实体的状态同步到数据库之后触发,同步在事务提交时发生。
- 数据库删除
@PreRemove和@PostRemove事件的触发由删除实体引起:
@PreRemove事件在实体从数据库删除之前触发,即在调用remove()方法删除时发生,此时的数据还没有真正从数据库中删除。
@PostRemove事件在实体从数据库中删除后触发。
@NoArgsConstructor & @AllArgsConstructor(lombok)
@NoArgsConstructor,提供一个无参的构造方法。
@AllArgsConstructor,提供一个全参的构造方法。
@Configuration & @bean1.@Configuration标注在类上,相当于把该类作为spring的xml配置文件中的,作用为:配置spring容器(应用上下文)
package com.test.spring.support.configuration;
@Configuration
public class TestConfiguration {
public TestConfiguration(){
System.out.println(“spring容器启动初始化。。。”);
}
}
相当于:
<?xml version="1.0" encoding="UTF-8"?><beans xmlns=“http://www.springframework.org/schema/beans” xmlns:xsi=“http://www.w3.org/2001/XMLSchema-instance”
xmlns:context=“http://www.springframework.org/schema/context” xmlns:jdbc=“http://www.springframework.org/schema/jdbc”
xmlns:jee=“http://www.springframework.org/schema/jee” xmlns:tx=“http://www.springframework.org/schema/tx”
xmlns:util=“http://www.springframework.org/schema/util” xmlns:task=“http://www.springframework.org/schema/task” xsi:schemaLocation="
http://www.springframework.org/schema/beans http://www.springframework.org/schema/beans/spring-beans-4.0.xsd
http://www.springframework.org/schema/context http://www.springframework.org/schema/context/spring-context-4.0.xsd
http://www.springframework.org/schema/jdbc http://www.springframework.org/schema/jdbc/spring-jdbc-4.0.xsd
http://www.springframework.org/schema/jee http://www.springframework.org/schema/jee/spring-jee-4.0.xsd
http://www.springframework.org/schema/tx http://www.springframework.org/schema/tx/spring-tx-4.0.xsd
http://www.springframework.org/schema/util http://www.springframework.org/schema/util/spring-util-4.0.xsd
http://www.springframework.org/schema/task http://www.springframework.org/schema/task/spring-task-4.0.xsd" default-lazy-init=“false”>
主方法进行测试:
package com.test.spring.support.configuration;
public class TestMain {
public static void main(String[] args) {
//@Configuration注解的spring容器加载方式,用AnnotationConfigApplicationContext替换ClassPathXmlApplicationContext
ApplicationContext context = new AnnotationConfigApplicationContext(TestConfiguration.class);
//如果加载spring-context.xml文件:
//ApplicationContext context = new ClassPathXmlApplicationContext(“spring-context.xml”);
}
}
从运行主方法结果的控制台可以看出,spring容器已经启动了:
八月 11, 2016 12:04:11 下午 org.springframework.context.annotation.AnnotationConfigApplicationContext prepareRefresh
信息: Refreshing org.springframework.context.annotation.AnnotationConfigApplicationContext@203e25d3: startup date [Thu Aug 11 12:04:11 CST 2016]; root of context hierarchy
spring容器启动初始化。。。
- @Bean标注在方法上(返回某个实例的方法),等价于spring的xml配置文件中的,作用为:注册bean对象
bean类:
package com.test.spring.support.configuration;
public class TestBean {
public void sayHello(){
System.out.println(“TestBean sayHello…”);
}
public String toString(){
return “username:”+this.username+“,url:”+this.url+“,password:”+this.password;
}
public void start(){
System.out.println(“TestBean 初始化。。。”);
}
public void cleanUp(){
System.out.println(“TestBean 销毁。。。”);
}
}
配置类:
package com.test.spring.support.configuration;
@Configuration
public class TestConfiguration {
public TestConfiguration(){
System.out.println(“spring容器启动初始化。。。”);
}
//@Bean注解注册bean,同时可以指定初始化和销毁方法
//@Bean(name=“testNean”,initMethod=“start”,destroyMethod=“cleanUp”)
@Bean
@Scope(“prototype”)
public TestBean testBean() {
return new TestBean();
}
}
主方法测试类:
package com.test.spring.support.configuration;
public class TestMain {
public static void main(String[] args) {
ApplicationContext context = new AnnotationConfigApplicationContext(TestConfiguration.class);
//获取bean
TestBean tb = context.getBean(“testBean”);
tb.sayHello();
}
}
注:
(1)、@Bean注解在返回实例的方法上,如果未通过@Bean指定bean的名称,则默认与标注的方法名相同;
(2)、@Bean注解默认作用域为单例singleton作用域,可通过@Scope(“prototype”)设置为原型作用域;
(3)、既然@Bean的作用是注册bean对象,那么完全可以使用@Component、@Controller、@Service、@Ripository等注解注册bean,当然需要配置@ComponentScan注解进行自动扫描。
bean类:
package com.test.spring.support.configuration;
//添加注册bean的注解
@Component
public class TestBean {
public void sayHello(){
System.out.println(“TestBean sayHello…”);
}
public String toString(){
return “username:”+this.username+“,url:”+this.url+“,password:”+this.password;
}
}
配置类:
//开启注解配置
@Configuration
//添加自动扫描注解,basePackages为TestBean包路径
@ComponentScan(basePackages = “com.test.spring.support.configuration”)
public class TestConfiguration {
public TestConfiguration(){
System.out.println(“spring容器启动初始化。。。”);
}
//取消@Bean注解注册bean的方式
//@Bean
//@Scope(“prototype”)
//public TestBean testBean() {
// return new TestBean();
//}
}
主方法测试获取bean对象:
public class TestMain {
public static void main(String[] args) {
ApplicationContext context = new AnnotationConfigApplicationContext(TestConfiguration.class);
//获取bean
TestBean tb = context.getBean(“testBean”);
tb.sayHello();
}
}
sayHello()方法都被正常调用。
- 使用@Configuration注解来代替Spring的bean配置
下面是一个典型的Spring配置文件(application-config.xml):
使用bean:
ApplicationContext ctx = new ClassPathXmlApplicationContext(“application-config.xml”);
OrderService orderService = (OrderService) ctx.getBean(“orderService”);
现在Spring Java Configuration这个项目提供了一种通过java代码来装配bean的方案:
@Configuration
public class ApplicationConfig {
public @Bean OrderService orderService() {
return new OrderService(orderRepository());
}
public @Bean OrderRepository orderRepository() {
return new OrderRepository(dataSource());
}
public @Bean DataSource dataSource() {
// instantiate and return an new DataSource …
}
}
使用bean:
JavaConfigApplicationContext ctx = new JavaConfigApplicationContext(ApplicationConfig.class);
OrderService orderService = ctx.getBean(OrderService.class);
这么做的好处
1.使用纯java代码,不在需要xml。
2.在配置中也可享受OO带来的好处(面向对象)。
3.类型安全对重构也能提供良好的支持。
4.减少复杂配置文件的同时依旧能享受到所有springIoC容器提供的功能。
============================================================================
@Service: 注解在类上,表示这是一个业务层bean
@Controller:注解在类上,表示这是一个控制层bean
@Repository: 注解在类上,表示这是一个数据访问层bean
@Component: 注解在类上,表示通用bean ,value不写默认就是类名首字母小写
@Autowired:按类型注入.默认属性required= true;当不能确定 Spring 容器中一定拥有某个类的Bean 时, 可以在需要自动注入该类 Bean 的地方可以使用 @Autowired(required = false), 这等于告诉Spring:在找不到匹配Bean时也不抛出BeanCreationException 异常。@Autowired 和 @Qualifier 结合使用时,自动注入的策略就从 byType 转变byName 了。@Autowired可以对成员变量、方法以及构造函数进行注释,而 @Qualifier 的标注对象是成员变量、方法入参、构造函数入参。正是由于注释对象的不同,所以 Spring 不将 @Autowired 和 @Qualifier 统一成一个注释类。
@Resource: 按名称装配
- 对比:
@Resource默认按照名称方式进行bean匹配,@Autowired默认按照类型方式进行bean匹配
@Resource(importjavax.annotation.Resource;)是J2EE的注解
@Autowired(importorg.springframework.beans.factory.annotation.Autowired;)是Spring的注解
@Configuration:注解在类上,表示这是一个IOC容器,相当于spring的配置文件,java配置的方式。
IOC容器的配置类一般与 @Bean 注解配合使用,用 @Configuration 注解类等价与 XML 中配置 beans,用@Bean 注解方法等价于 XML 中配置 bean。
@Bean: 注解在方法上,声明当前方法返回一个Bean
@Scope:注解在类上,描述spring容器如何创建Bean实例。
(1)singleton: 表示在spring容器中的单例,通过spring容器获得该bean时总是返回唯一的实例
(2)prototype:表示每次获得bean都会生成一个新的对象
(3)request:表示在一次http请求内有效(只适用于web应用)
(4)session:表示在一个用户会话内有效(只适用于web应用)
(5)globalSession:表示在全局会话内有效(只适用于web应用)
在多数情况,我们只会使用singleton和prototype两种scope,如果未指定scope属性,默认为singleton
@Value:注解在变量上,从配置文件中读取。
例如:@Value(value = “#{message}”)
@ConfigurationProperties 赋值,将注解转换成对象。给对象赋值。车险项目:HttpClientSetting类
@Profile:注解在方法类上在不同情况下选择实例化不同的Bean特定环境下生效!!!!!
- @SpringBootApplication:@SpringBootApplication=@ComponentScan+@Configuration+@EnableAutoConfiguration:约定优于配置
@EnableAutoConfiguration启用 Spring 应用程序上下文的自动配置,试图猜测和配置您可能需要的bean。自动配置类通常采用基于你的classpath 和已经定义的 beans 对象进行应用。被 @EnableAutoConfiguration 注解的类所在的包有特定的意义,并且作为默认配置使用。通常推荐将 @EnableAutoConfiguration 配置在 root 包下,这样所有的子包、类都可以被查找到。
@ComponentScan:注解在类上,扫描标注了@Controller等注解的类,注册为bean 。@ComponentScan 为 @Configuration注解的类配置组件扫描指令。@ComponentScan 注解会自动扫描指定包下的全部标有 @Component注解的类,并注册成bean,当然包括 @Component下的子注解@Service、@Repository、@Controller。
- @RestController @RestController 是一个结合了 @ResponseBody 和 @Controller 的注解
@Responsebody 注解表示该方法的返回的结果直接写入 HTTP 响应正文(ResponseBody)中,一般在异步获取数据时使用,通常是在使用 @RequestMapping 后,返回值通常解析为跳转路径,加上@Responsebody 后返回结果不会被解析为跳转路径,而是直接写入HTTP 响应正文中。
- @RequestBody、@PathVariable、@RequestParam
一个请求,只有一个RequestBody;一个请求,可以有多个RequestParam。
两者的作用都是将request里的参数的值绑定到contorl里的方法参数里的,区别在于,URL写法不同。
当请求参数username不存在时会有异常发生,可以通过设置属性required=false解决,例如:
@RequestParam(value=“username”,required=false)
使用@RequestParam时,URL是这样的:http://host:port/path?参数名=参数值
使用@PathVariable时,URL是这样的:http://host:port/path/参数值
当同时使用@RequestParam()和@RequestBody时,@RequestParam()指定的参数可以是普通元素、数组、集合、对象等等(即:当,@RequestBody 与@RequestParam()可以同时使用时,原SpringMVC接收参数的机制不变,只不过RequestBody 接收的是请求体里面的数据;而RequestParam接收的是key-value里面的参数,所以它会被切面进行处理从而可以用普通元素、数组、集合、对象等接收)。
即:如果参数时放在请求体中,传入后台的话,那么后台要用@RequestBody才能接收到;如果不是放在 请求体中的话,那么后台接收前台传过来的参数时,要用@RequestParam来接收,或则形参前什么也不写也能接收。
- @RequestMapping 和请求报文是做对应的
a:value,指定请求的地址
b:method 请求方法类型 这个不写的话,自适应:get或者post
c:consumes 请求的提交内容类型
d:produces 指定返回的内容类型 仅当request请求头中的(Accept)类型中包含该指定类型才返回
e: params 指定request中必须包含某些参数值
f:headers 指定request中必须包含指定的header值
g: name 指定映射的名称
@RequestMapping(method = RequestMethod.GET)
@RequestMapping(method = RequestMethod.POST)
@RequestMapping(method = RequestMethod.PUT)
@RequestMapping(method = RequestMethod.DELETE)
当然也可以使用
@GetMapping
@PostMapping
@PutMapping
@EnablCaching @EnableCaching注解是spring framework中的注解驱动的缓存管理功能。自spring版本3.1起加入了该注解。如果你使用了这个注解,那么你就不需要在XML文件中配置cache manager了。
- @suppresswarnings 抑制警告
@Modifying 如果是增,改,删加上此注解
1:方法的返回值应该是int,表示更新语句所影响的行数。
2:在调用的地方必须加事务,没有事务不能正常执行。@Transactional 事务注解
JPA注解
- @Entity:
@Table(name=“”):注解在类上表明这是一个实体类。一般用于jpa这两个注解一般一块使用,但是如果表名和实体类名相同的话,@Table可以省略
@Column:通过@Column注解设置,包含的设置如下
name:数据库表字段名
unique:是否唯一
nullable:是否可以为空
Length:长度
inserttable:是否可以插入
updateable:是否可以更新
columnDefinition: 定义建表时创建此列的DDL
secondaryTable: 从表名。如果此列不建在主表上(默认建在主表),该属性定义该列所在从表的名字。
@Column(name = “user_code”, nullable = false, length=32)//设置属性userCode对应的字段为user_code,长度为32,非空
private String userCode;
@Column(name = “user_wages”, nullable = true, precision=12,scale=2)//设置属性wages对应的字段为user_wages,12位数字可保留两位小数,可以为空
private double wages;
@Id:表示该属性为主键。
@Temporal(TemporalType.DATE)//设置为时间类型
private Date joinDate;
@Transient:表示该属性并非一个到数据库表的字段的映射,ORM框架将忽略该属性。如果一个属性并非数据库表的字段映射,就务必将其标示为@Transient,否则,ORM框架默认其注解为@Basic。@Basic(fetch=FetchType.LAZY):标记可以指定实体属性的加载方式
@JsonIgnore:作用是json序列化时将Java bean中的一些属性忽略掉,序列化和反序列化都受影响。
@JoinColumn(name=”loginId”):一对一:本表中指向另一个表的外键。一对多:另一个表指向本表的外键。
@OneToOne、@OneToMany、@ManyToOne:对应hibernate配置文件中的一对一,一对多,多对一。
@GeneratedValue 用于标注主键的生成策略,通过 strategy 属性指定。默认情况下,JPA 自动选择一个最适合底层数据库的主键生成策略:SqlServer 对应 identity,MySQL 对应 auto increment。 在 javax.persistence.GenerationType 中定义了以下几种可供选择的策略:
IDENTITY:采用数据库 ID自增长的方式来自增主键字段,Oracle 不支持这种方式;
AUTO: JPA自动选择合适的策略,是默认选项;
SEQUENCE:通过序列产生主键,通过 @SequenceGenerator 注解指定序列名,MySql 不支持这种方式
TABLE:通过表产生主键,框架借由表模拟序列产生主键,使用该策略可以使应用更易于数据库移植。
- Spring Boot的优缺点:
优点:
使用Java或Groovy开发基于Spring的应用程序非常容易。
它减少了大量的开发时间并提高了生产力。
它避免了编写大量的样板代码,注释和XML配置。
Spring Boot应用程序与其Spring生态系统(如Spring JDBC,Spring ORM,Spring Data,SpringSecurity等)集成非常容易。
它遵循“自用默认配置”方法,以减少开发工作量。
它提供嵌入式HTTP服务器,如Tomcat,Jetty等,以开发和测试Web应用程序非常容易。
它提供CLI(命令行界面)工具从命令提示符,非常容易和快速地开发和测试Spring Boot(Java或Groovy)应用程序。
它提供了许多插件来开发和测试Spring启动应用程序非常容易使用构建工具,如Maven和Gradle。
它提供了许多插件,以便与嵌入式和内存数据库工作非常容易。
缺点
Spring Boot作为一个微框架,离微服务的实现还是有距离的。springboot 只是为了提高开发效率,是为了提升生产力的。
没有提供相应的服务发现和注册的配套功能,自身的acturator所提供的监控功能,也需要与现有的监控对接。没有配套的安全管控方案,对于REST的落地,还需要自行结合实际进行URI的规范化工作。
注意:
将现有或传统的Spring Framework项目转换为Spring Boot应用程序是一个非常困难和耗时的过程。它仅适用于全新Spring项目。
- Spring Boot的核心功能
(1)独立运行的Spring项目
Spring Boot可以以jar包的形式进行独立的运行,使用:java -jar xx.jar 就可以成功的运行项目,或者在应用项目的主程序中运行main函数即可;
(2)内嵌的Servlet容器
内嵌容器,使得我们可以执行运行项目的主程序main函数,是想项目的快速运行;
主程序代码SpringbootDemoApplication.java
package com.xuliugen.demo;
import org.springframework.boot.SpringApplication;
import org.springframework.boot.autoconfigure.SpringBootApplication;
@SpringBootApplication
public class SpringbootDemoApplication {
public static void main(String[] args) {
SpringApplication.run(SpringbootDemoApplication.class, args);
}
}


 2813
2813

 被折叠的 条评论
为什么被折叠?
被折叠的 条评论
为什么被折叠?
 到【灌水乐园】发言


