


【一线大厂Java面试题解析+后端开发学习笔记+最新架构讲解视频+实战项目源码讲义】
**开源地址:https://docs.qq.com/doc/DSmxTbFJ1cmN1R2dB **
docker inspect
查看容器内部细节,很重要!
能看挂载相关信息,和网络等详细信息
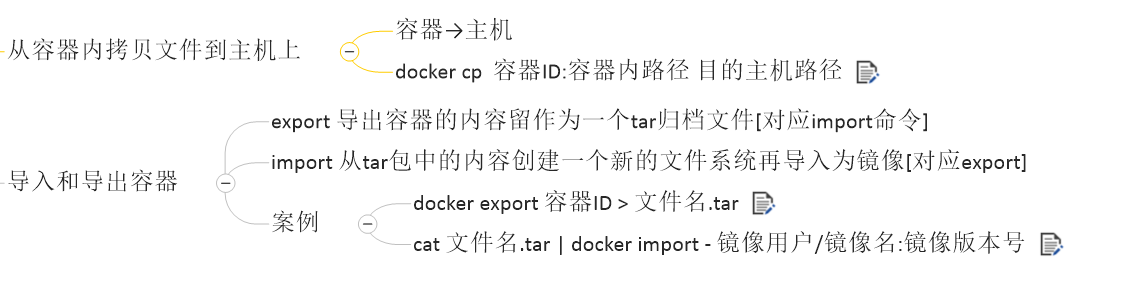
docker cp

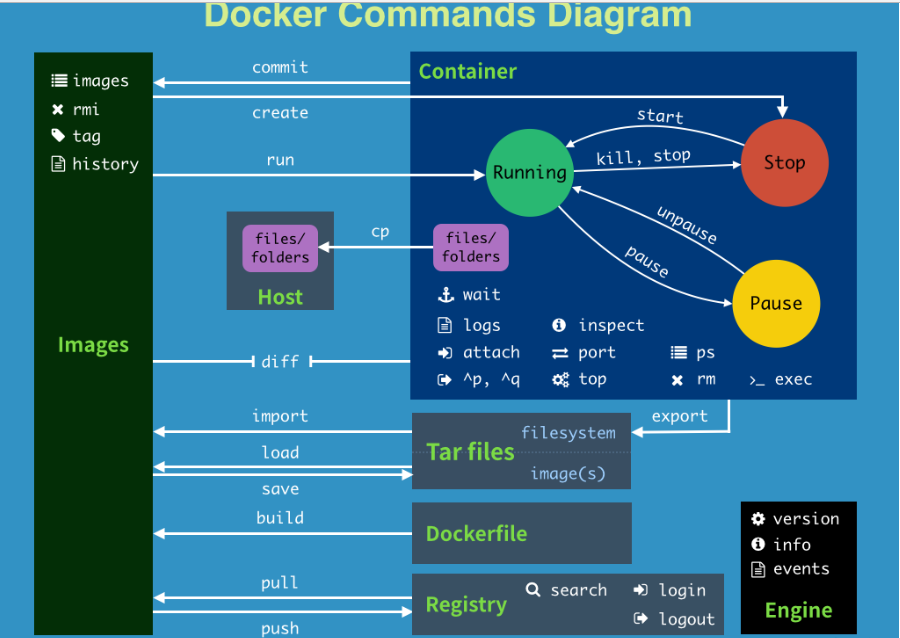
3.3.1 常用命令
-
attach Attach to a running container # 当前 shell 下 attach 连接指定运行镜像
-
build Build an image from a Dockerfile # 通过 Dockerfile 定制镜像
-
commit Create a new image from a container changes # 提交当前容器为新的镜像
-
cp Copy files/folders from the containers filesystem to the host path #从容器中拷贝指定文件或者目录到宿主机中
-
create Create a new container # 创建一个新的容器,同 run,但不启动容器
-
diff Inspect changes on a container’s filesystem # 查看 docker 容器变化
-
events Get real time events from the server # 从 docker 服务获取容器实时事件
-
exec Run a command in an existing container # 在已存在的容器上运行命令
-
export Stream the contents of a container as a tar archive # 导出容器的内容流作为一个 tar 归档文件[对应 import ]
-
history Show the history of an image # 展示一个镜像形成历史
-
images List images # 列出系统当前镜像
-
import Create a new filesystem image from the contents of a tarball # 从tar包中的内容创建一个新的文件系统映像[对应export]
-
info Display system-wide information # 显示系统相关信息
-
inspect Return low-level information on a container # 查看容器详细信息
-
kill Kill a running container # kill 指定 docker 容器
-
load Load an image from a tar archive # 从一个 tar 包中加载一个镜像[对应 save]
-
login Register or Login to the docker registry server # 注册或者登陆一个 docker 源服务器
-
logout Log out from a Docker registry server # 从当前 Docker registry 退出
-
logs Fetch the logs of a container # 输出当前容器日志信息
-
port Lookup the public-facing port which is NAT-ed to PRIVATE_PORT # 查看映射端口对应的容器内部源端口
-
pause Pause all processes within a container # 暂停容器
-
ps List containers # 列出容器列表
-
pull Pull an image or a repository from the docker registry server # 从docker镜像源服务器拉取指定镜像或者库镜像
-
push Push an image or a repository to the docker registry server # 推送指定镜像或者库镜像至docker源服务器
-
restart Restart a running container # 重启运行的容器
-
rm Remove one or more containers # 移除一个或者多个容器
-
rmi Remove one or more images # 移除一个或多个镜像[无容器使用该镜像才可删除,否则需删除相关容器才可继续或 -f 强制删除]
-
run Run a command in a new container # 创建一个新的容器并运行一个命令
-
save Save an image to a tar archive # 保存一个镜像为一个 tar 包[对应 load]
-
search Search for an image on the Docker Hub # 在 docker hub 中搜索镜像
-
start Start a stopped containers # 启动容器
-
stop Stop a running containers # 停止容器
-
tag Tag an image into a repository # 给源中镜像打标签
-
top Lookup the running processes of a container # 查看容器中运行的进程信息
-
unpause Unpause a paused container # 取消暂停容器
-
version Show the docker version information # 查看 docker 版本号
-
wait Block until a container stops, then print its exit code # 截取容器停止时的退出状态值
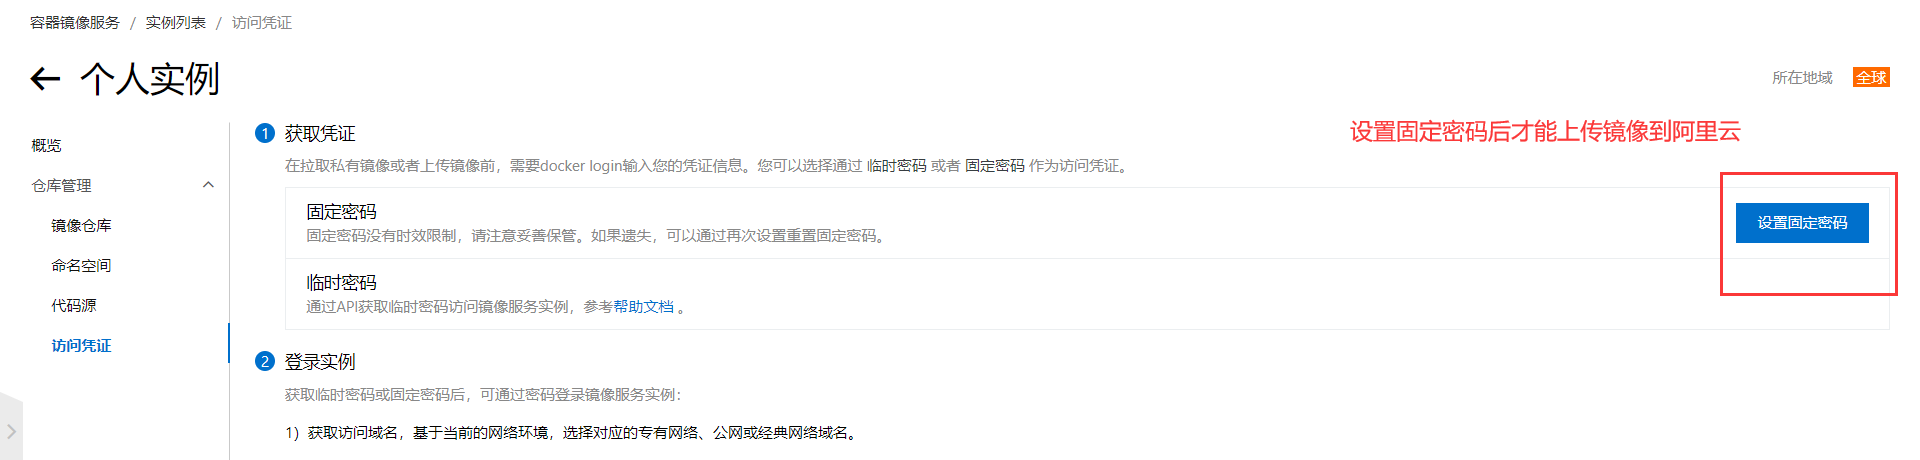
镜像服务的密码和阿里云账户的密码不是同一个密码,
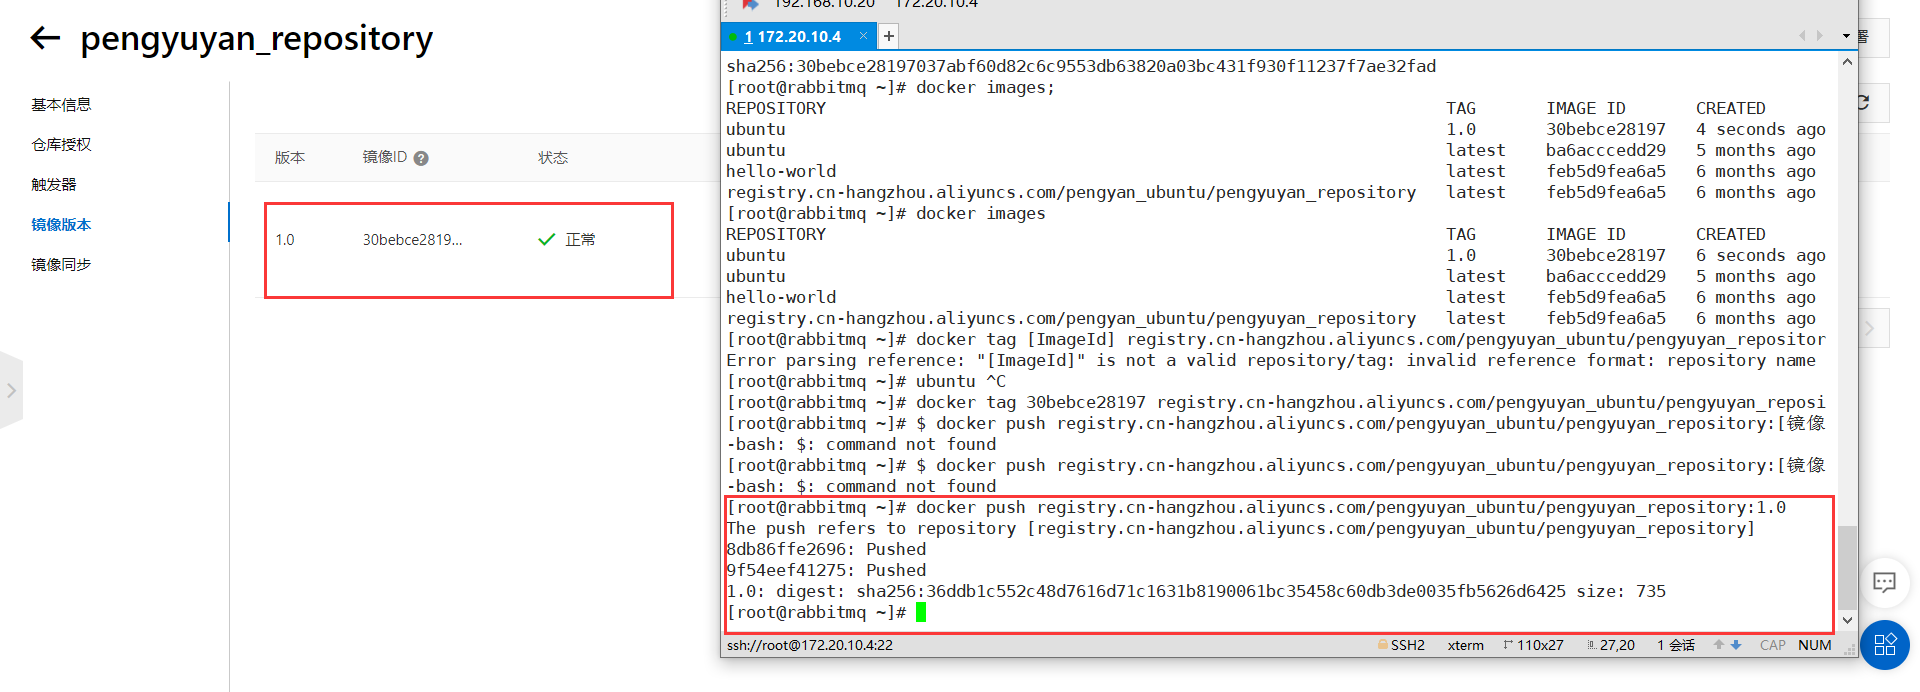
上传成功
docker exec -it 1f1ed5798baa /bin/bash
docker commit -m=“ifconfig cmd add” -a=“pyy” 1f1ed5798baa:1.0
[root@VM-16-8-centos ~]# docker run -d -p 5000:5000 -v /myregistry:/tmp/registry --privileged=true registry
[root@VM-16-8-centos ~]# curl -XGET http://124.221.228.148:5000/v2/_catalog
{“repositories”:[“pyyubuntu”]}
===================================================================
镜像
是一种轻量级、可执行的独立软件包,它包含运行某个软件所需的所有内容,我们把应用程序和配置依赖打包好形成一个可交付的运行环境(包括代码、运行时需要的库、环境变量和配置文件等),这个打包好的运行环境就是image镜像文件。
只有通过这个镜像文件才能生成Docker容器实例(类似Java中new出来一个对象)。
分层的镜像
我们拉取镜像的时候好像是一层一层下载的,这是为什么呢?
UnionFS(联合文件系统):Union文件系统(UnionFS)是一种分层、轻量级并且高性能的文件系统,它支持对文件系统的修改作为一次提交来一层层的叠加,同时可以将不同目录挂载到同一个虚拟文件系统下(unite several directories into a single virtual filesystem)。Union 文件系统是 Docker 镜像的基础。镜像可以通过分层来进行继承,基于基础镜像(没有父镜像),可以制作各种具体的应用镜像。
特性:一次同时加载多个文件系统,但从外面看起来,只能看到一个文件系统,联合加载会把各层文件系统叠加起来,这样最终的文件系统会包含所有底层的文件和目录
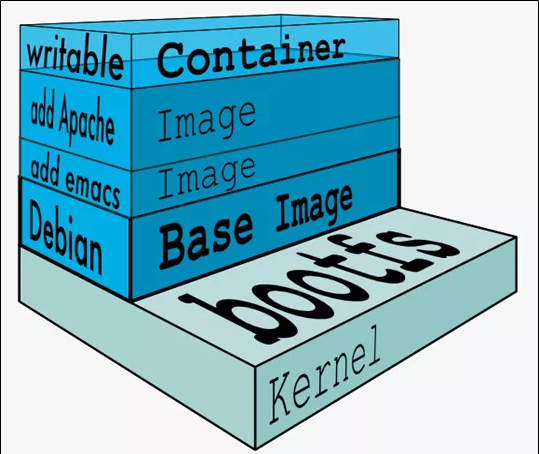
Docker镜像加载原理:
docker的镜像实际上由一层一层的文件系统组成,这种层级的文件系统UnionFS。bootfs(boot file system)主要包含bootloader和kernel, bootloader主要是引导加载kernel, Linux刚启动时会加载bootfs文件系统,==在Docker镜像的最底层是引导文件系统bootfs。==这一层与我们典型的Linux/Unix系统是一样的,包含boot加载器和内核。当boot加载完成之后整个内核就都在内存中了,此时内存的使用权已由bootfs转交给内核,此时系统也会卸载bootfs。
rootfs (root file system) ,在bootfs之上。包含的就是典型 Linux 系统中的 /dev, /proc, /bin, /etc 等标准目录和文件。rootfs就是各种不同的操作系统发行版,比如Ubuntu,Centos等等。
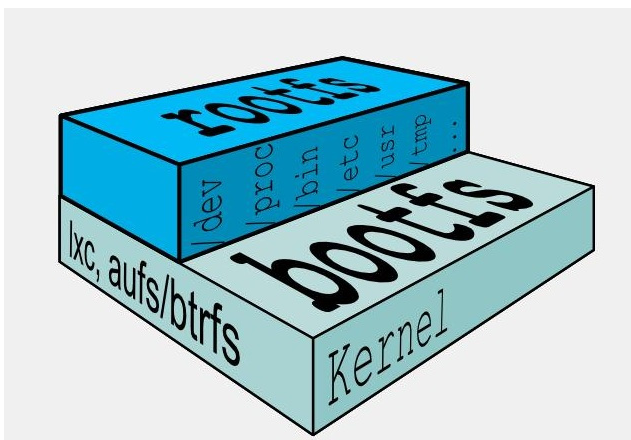
对于一个精简的OS,rootfs可以很小,只需要包括最基本的命令、工具和程序库就可以了,因为底层直接用Host的kernel,自己只需要提供 rootfs 就行了。由此可见对于不同的linux发行版, bootfs基本是一致的, rootfs会有差别, 因此不同的发行版可以公用bootfs。
镜像分层最大的一个好处就是共享资源,方便复制迁移,就是为了复用。
比如说有多个镜像都从相同的 base 镜像构建而来,那么 Docker Host 只需在磁盘上保存一份 base 镜像;
同时内存中也只需加载一份 base 镜像,就可以为所有容器服务了。而且镜像的每一层都可以被共享。
看了好几遍docker了,这个真的很重要!
Docker镜像层都是只读的,容器层是可写的
当容器启动时,一个新的可写层被加载到镜像的顶部。这一层通常被称作“容器层”,“容器层”之下的都叫“镜像层”。
所有对容器的改动 - 无论添加、删除、还是修改文件都只会发生在容器层中。只有容器层是可写的,容器层下面的所有镜像层都是只读的。
新镜像
docker commit提交容器副本使之成为一个新的镜像
docker commit -m=“提交的描述信息” -a=“作者” 容器ID 要创建的目标镜像名:[标签名]
ubuntu安装vim命令
apt-get update
apt-get -y install vim
本地镜像发布阿里云
- 登录
$ docker login --username=用户名 registry.cn-hangzhou.aliyuncs.com
用于登录的用户名为阿里云账号全名,密码为开通服务时设置的密码。
- 推送
docker tag [ImageId] registry.cn-hangzhou.aliyuncs.com/pengyuyan_ubuntu/pengyuyan_repository:[镜像版本号]
docker push registry.cn-hangzhou.aliyuncs.com/pengyuyan_ubuntu/pengyuyan_repository:[镜像版本号]
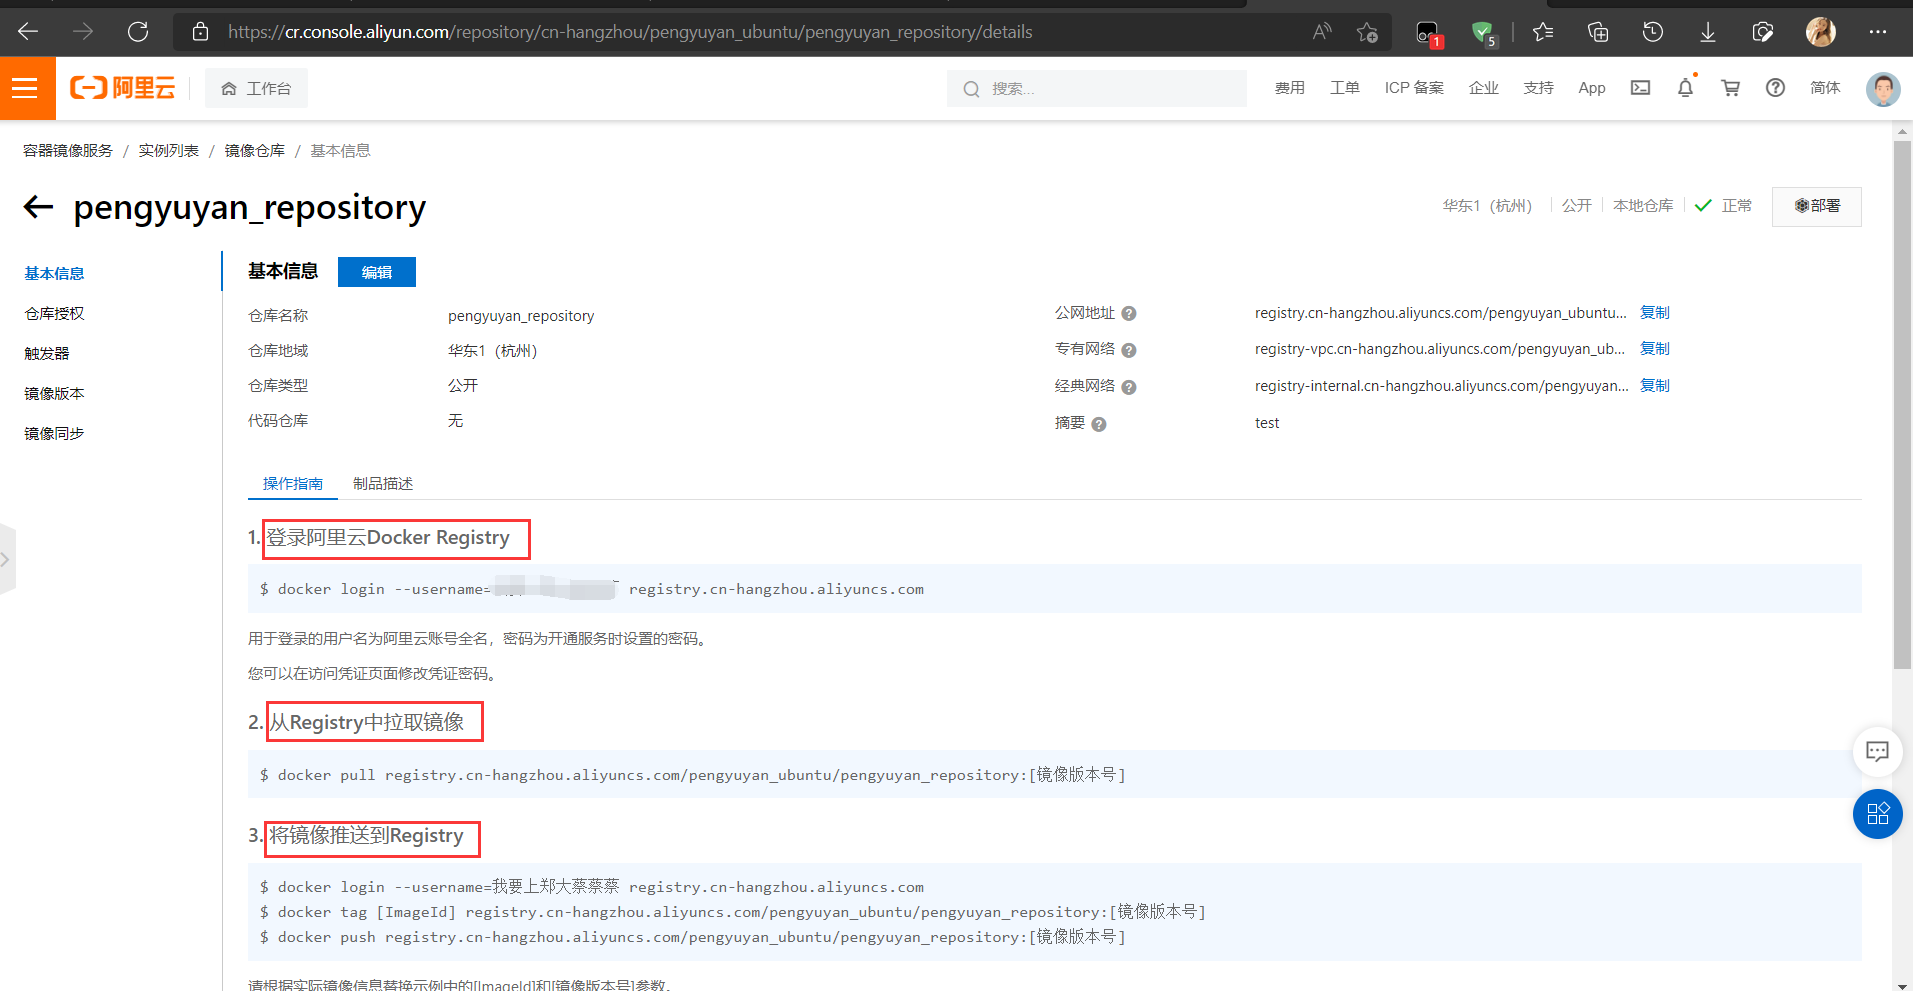
下载阿里云镜像到本地
docker pull registry.cn-hangzhou.aliyuncs.com/pengyuyan_ubuntu/pengyuyan_repository:[镜像版本号]
本地镜像发布到私有库
私有库:
1 官方Docker Hub地址:https://hub.docker.com/,中国大陆访问太慢了且准备被阿里云取代的趋势,不太主流。
2 Dockerhub、阿里云这样的公共镜像仓库可能不太方便,涉及机密的公司不可能提供镜像给公网,所以需要创建一个本地私人仓库供给团队使用,基于公司内部项目构建镜像。
Docker Registry是官方提供的工具,可以用于构建私有镜像仓库
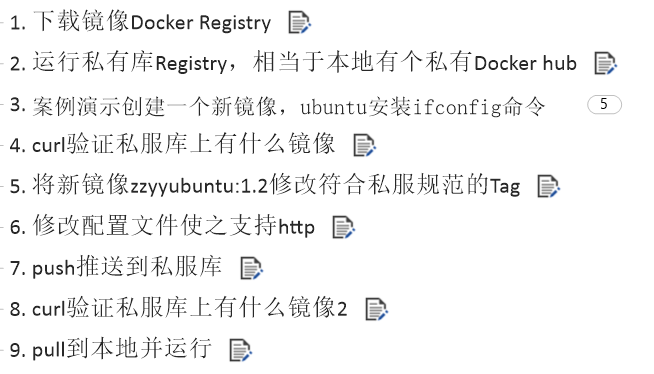
- 安装运行私有仓库
docker pull registry
docker run -d -p 5000:5000 -v /myregistry/:/tmp/registry --privileged=true registry
默认情况,仓库被创建在容器的/var/lib/registry目录下,建议自行用容器卷映射,方便于宿主机联调
- 给容器增加命令
docker run -it ubuntu /bin/bash
apt-get update
apt-get install net-tools
公式:
docker commit -m=“提交的描述信息” -a=“作者” 容器ID 要创建的目标镜像名:[标签名]
命令:在容器外执行,记得
docker commit -m=“ifconfig cmd add” -a=“pyy” a69d7c825c4f pyyubuntu:1.2
- 打标签,改配置
docker tag pyyubuntu:1.2 192.168.100.10:5000/pyyubuntu:1.2
vim /etc/docker/daemon.json
{
“registry-mirrors”: [“https://pengyuyan227.mirror.aliyuncs.com”],
“insecure-registries”: [“192.168.100.10:5000”]
}
- 上传
docker push 192.168.111.162:5000/zzyyubuntu:1.2
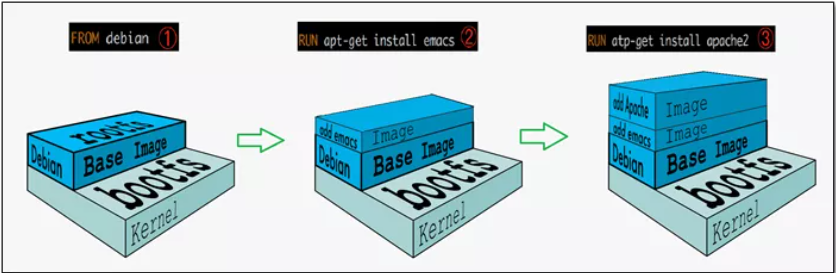
Docker中的镜像分层,支持通过扩展现有镜像,创建新的镜像。类似Java继承于一个Base基础类,自己再按需扩展。
新镜像是从 base 镜像一层一层叠加生成的。每安装一个软件,就在现有镜像的基础上增加一层
====================================================================
–privileged=true
Docker挂载主机目录访问如果出现cannot open directory .: Permission denied
解决办法:在挂载目录后多加一个–privileged=true参数即可
一句话:有点类似我们Redis里面的rdb和aof文件
将docker容器内的数据保存进宿主机的磁盘中
运行一个带有容器卷存储功能的容器实例
docker run -it --privileged=true -v /宿主机绝对路径目录:/容器内目录 镜像名
*将运用与运行的环境打包镜像,run后形成容器实例运行 ,但是我们对数据的要求希望是持久化的
Docker容器产生的数据,如果不备份,那么当容器实例删除后,容器内的数据自然也就没有了。
为了能保存数据在docker中我们使用卷。
特点:
1:数据卷可在容器之间共享或重用数据
2:卷中的更改可以直接实时生效,爽
3:数据卷中的更改不会包含在镜像的更新中
4:数据卷的生命周期一直持续到没有容器使用它为止
[root@VM-16-8-centos ~]# docker run -it --privileged=true -v /tmp/host_data:/tmp/docker_data --name=u1 ubuntu
root@2e431ba4f3bf:/# cd /tmp/docker_data/
root@2e431ba4f3bf:/tmp/docker_data# mkdir test_docker.txt
[root@VM-16-8-centos ~]# cd /tmp/host_data/
[root@VM-16-8-centos host_data]# ll
total 4
drwxr-xr-x 2 root root 4096 Apr 3 16:10 test_docker.txt
[root@VM-16-8-centos host_data]# mkdir test_host.txt
root@2e431ba4f3bf:/tmp/docker_data# ll
total 16
drwxr-xr-x 4 root root 4096 Apr 3 08:13 ./
drwxrwxrwt 1 root root 4096 Apr 3 08:10 …/
drwxr-xr-x 2 root root 4096 Apr 3 08:10 test_docker.txt/
drwxr-xr-x 2 root root 4096 Apr 3 08:13 test_host.txt/
可以发现,容器卷和挂载在本地的目录内容是一致的
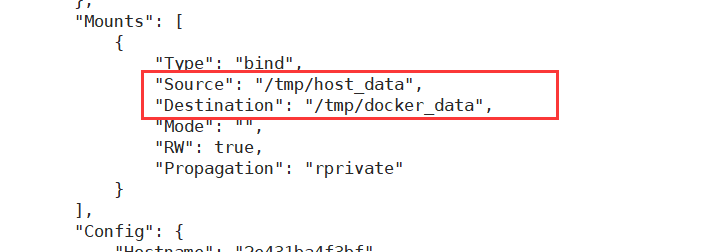
查看改容器详细信息,也能查看到
docker inspect imageID
–volumes-from 要继承的容器名
[root@VM-16-8-centos ~]# docker run -it --privileged=true --volumes-from u1 --name u2 ubuntu
root@de0f937528ac:/# cd /tmp
root@de0f937528ac:/tmp# cd docker_data/
root@de0f937528ac:/tmp/docker_data# ll
total 16
drwxr-xr-x 4 root root 4096 Apr 3 08:13 ./
drwxrwxrwt 1 root root 4096 Apr 3 08:26 …/
drwxr-xr-x 2 root root 4096 Apr 3 08:10 test_docker.txt/
drwxr-xr-x 2 root root 4096 Apr 3 08:13 test_host.txt/
=======================================================================
[root@VM-16-8-centos ~]# docker pull tomcat
Using default tag: latest
latest: Pulling from library/tomcat
dbba69284b27: Pull complete
9baf437a1bad: Pull complete
6ade5c59e324: Pull complete
b19a994f6d4c: Pull complete
43c0aceedb57: Pull complete
24e7c71ec633: Pull complete
612cf131e488: Pull complete
dc655e69dd90: Pull complete
efe57b7441f6: Pull complete
8db51a0119f4: Pull complete
Digest: sha256:263f93ac29cb2dbba4275a4e647b448cb39a66334a6340b94da8bf13bde770aa
Status: Downloaded newer image for tomcat:latest
docker.io/library/tomcat:latest
[root@VM-16-8-centos ~]# docker images
REPOSITORY TAG IMAGE ID CREATED SIZE
124.221.228.148:5000/pyyubuntu 1.1 138c010d2c99 About an hour ago 109MB
ubuntu 1.0 138c010d2c99 About an hour ago 109MB
tomcat latest b00440a36b99 37 hours ago 680MB
registry latest d3241e050fc9 4 days ago 24.2MB
ubuntu latest ff0fea8310f3 2 weeks ago 72.8MB
新版tomcat,首页不在webapp下了
把webapps.dist目录换成webapps

当然我们不修改也是可以的,只需要下载tomcat8即可
[root@VM-16-8-centos ~]# docker run --name test-mysql -p 3306:3306 -e MYSQL_ROOT_PASSWORD=a -d mysql:5.7
b0fbfe45fce1ef90b4caf946efacbef0e50a425a25dec1d8e15902244e43747b
[root@VM-16-8-centos ~]# docker ps
CONTAINER ID IMAGE COMMAND CREATED STATUS PORTS NAMES
b0fbfe45fce1 mysql:5.7 “docker-entrypoint.s…” 8 seconds ago Up 7 seconds 3306/tcp, 33060/tcp test-mysql
ce89351d51ec tomcat “catalina.sh run” 16 minutes ago Up 16 minutes 0.0.0.0:8080->8080/tcp funny_bose
de0f937528ac ubuntu “bash” 29 minutes ago Up 29 minutes u2
2e431ba4f3bf ubuntu “bash” 45 minutes ago Up 45 minutes u1
9dabfdf1b57d registry “/entrypoint.sh /etc…” About an hour ago Up About an hour 0.0.0.0:5000->5000/tcp sharp_brown
1f1ed5798baa ubuntu “
 最低0.47元/天 解锁文章


 565
565

 被折叠的 条评论
为什么被折叠?
被折叠的 条评论
为什么被折叠?
 到【灌水乐园】发言


