


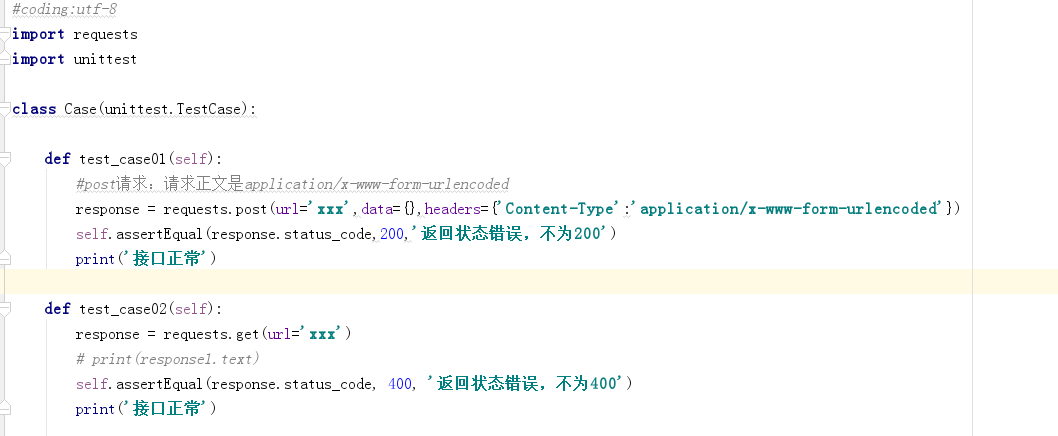
1 requests.post(url=‘’,data={‘key1’:‘value1’,‘key2’:‘value2’},headers={‘Content-Type’:‘application/x-www-form-urlencoded’})
(2)请求正文是multipart/form-data
1 requests.post(url=‘’,data={‘key1’:‘value1’,‘key2’:‘value2’},headers={‘Content-Type’:‘multipart/form-data’})
(3)请求正文是raw
传入xml格式文本
1 requests.post(url=‘’,data=‘<?xml ?>’,headers={‘Content-Type’:‘text/xml’})
传入json格式文本
1 requests.post(url=‘’,data=json.dumps({‘key1’:‘value1’,‘key2’:‘value2’}),headers={‘Content-Type’:‘application/json’})
或者
1 requests.post(url=‘’,json={{‘key1’:‘value1’,‘key2’:‘value2’}},headers={‘Content-Type’:‘application/json’})
(4)请求正文是binary
1 requests.post(url=‘’,files={‘file’:open(‘test.xls’,‘rb’)},headers={‘Content-Type’:‘binary’})
【2】请求之后对返回结果进行断言:assertEqual()等,断言方法很多,可上网查询
(2)实际中,有些参数或方法在执行用例之前必须说明,这就涉及到setUp、tearDown、setUpClass、tearDownClass的用法
【1】setup():每个测试函数运行前运行;teardown():每个测试函数运行完后执行;setUpClass():必须使用@classmethod 装饰器,所有test运行前运行一次;tearDownClass():必须使用@classmethod装饰器,所有test运行完后运行一次
【2】也可以对某些用例执行过程中跳过:unittest.skip(),具体使用方法可上网查询
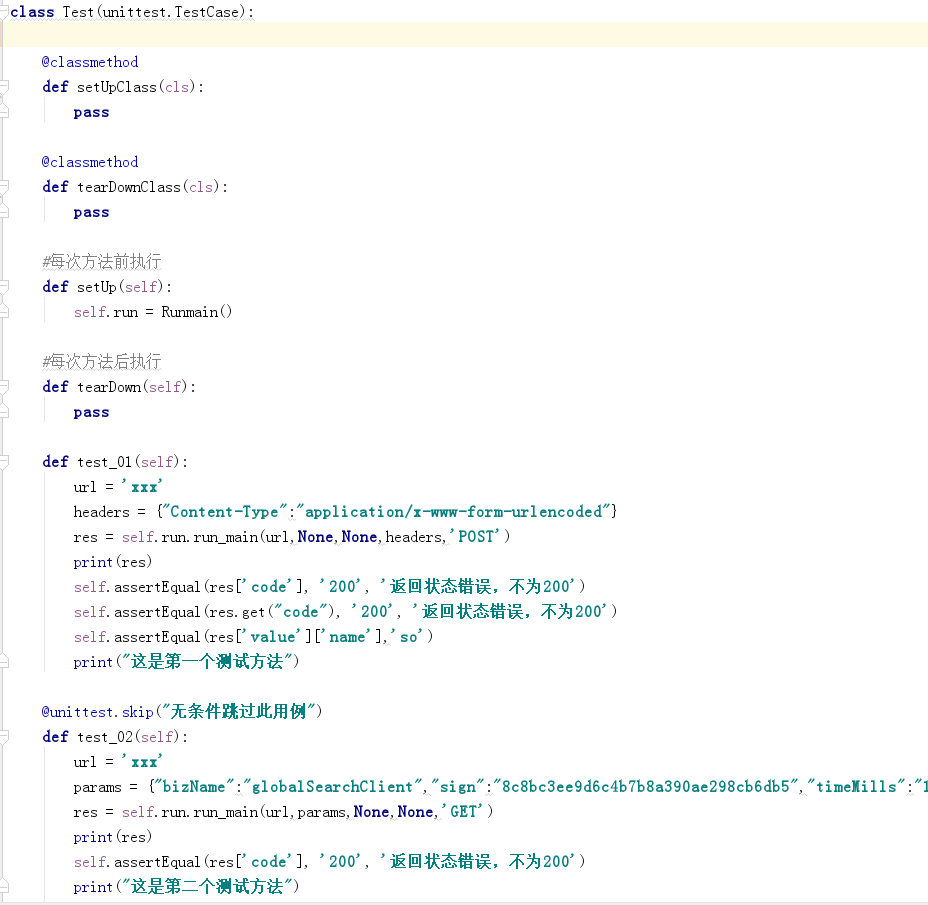
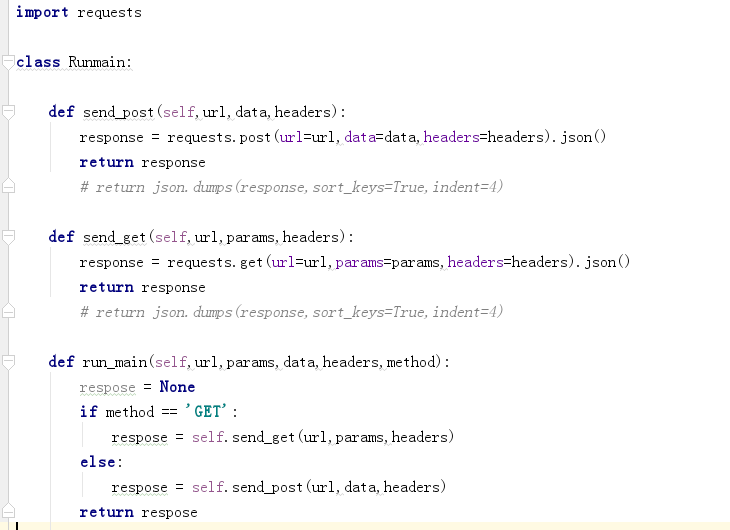
(3)如果每次接口请求时都使用requests/get、post请求实在是繁琐,我们可以对该方法进行封装,接口请求时直接调用即可
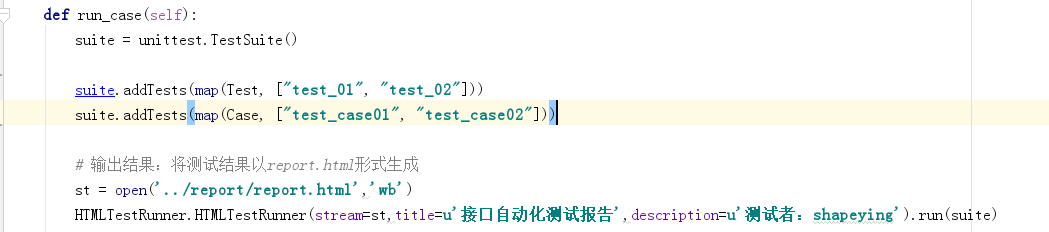
(4)测试用例编写完之后,主函数run.py直接使用unittest模块将所有用例一并执行
【1】unittest模块:TestSuite 多个测试用例集合在一起;TestRunner 是来执行测试用例的,测试的结果会保存到TestResult实例中,包括运行了多少测试用例,成功了多少,失败了多少等信息(unittest.TextTestRunner().run(suite))
【2】suite.addTests()和suite.addTest()均可实现
2种用法:第一种suite.addTest()
suite.addTest(Case(‘test_case01’))
suite.addTest(Case(‘test_case02’))
suite.addTest(Test(‘test_01’))
suite.addTest(Test(‘test_02’))
#2种用法:第二种suite.addTests()
suite.addTests(map(Test, [“test_01”, “test_02”]))
suite.addTests(map(Case, [“test_case01”, “test_case02”]))
【3】TestRunner测试结果输出到控制台,要将测试结果输出到report中,使用HTMLTestRunner.py文件(该文件参考地址:[GitHub - huilansame/HTMLTestRunner\_PY3: 针对PY3做了修改,增加对subTest的支持,用Echarts加了执行统计表]( ))
(5)测试完成之后,想要将测试结果发送邮件给相关人员
发送邮件具体实现方法,
## [python3:利用SMTP协议发送QQ邮件+附件]( )
转载请表明出处:[python3:利用SMTP协议发送QQ邮件+附件 - Shapelei - 博客园]( )
1.发送QQ邮件,首先必须知道QQ邮箱的SMTP服务器
http://service.mail.qq.com/cgi-bin/help?id=28&no=167&subtype=1
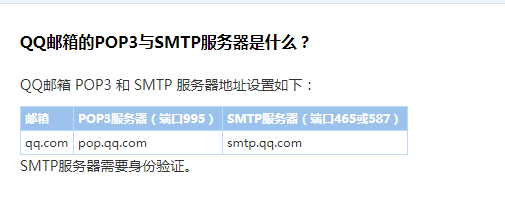
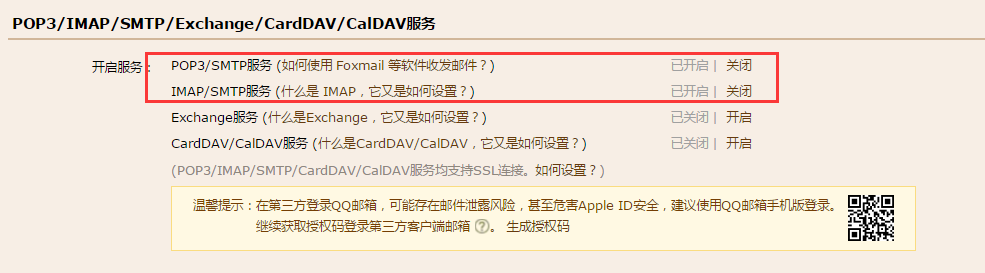
2.发送邮件之前,必须开启qq邮箱的smtp服务
设置路径:邮箱设置--账户--开启截图服务--保存更改
3.代码抛出异常分析
(1)邮箱密码传入值为日常登录密码,报错

global send_user
global email_host
global password
password = ‘xxx92’
email_host = “smtp.qq.com”
send_user = “11xxx@qq.com”

抛出异常:
smtplib.SMTPAuthenticationError:(535, b'Error: \xc7\xeb\xca\xb9\xd3\xc3\xca\xda\xc8\xa8\xc2\xeb\xb5\xc7\xc2\xbc\xa1\xa3\xcf\xea\xc7\xe9\xc7\xeb\xbf\xb4: http://service.mail.qq.com/cgi-bin/help?subtype=1&&id=28&&no=1001256')
打开抛出异常中的链接:是关于授权码的介绍,根据介绍,登录时应该使用授权码作为登录密码,该处的授权码是开启服务时收到的16位授权码
http://service.mail.qq.com/cgi-bin/help?subtype=1&&id=28&&no=1001256
修改代码:
password = "lunkbrgwqxhfjgxx"(对应的16位授权码)
(2)安全邮件,需要通过SSL发送
server = smtplib.SMTP()
server.connect(email_host,25)
抛出异常:


smtplib.SMTPServerDisconnected: Connection unexpectedly closed


QQ邮箱是支持安全邮件的,需要通过SSL发送的邮件:使用标准的25端口连接SMTP服务器时,使用的是明文传输,发送邮件的整个过程可能会被窃听。要更安全地发送邮件,可以加密SMTP会话,实际上就是先创建SSL安全连接,然后再使用SMTP协议发送邮件


修改代码:
server = smtplib.SMTP_SSL()
server.connect(email_host,465)# 启用SSL发信, 端口一般是465
4.附上完整代码

#coding:utf-8
import smtplib
from email.mime.text import MIMEText
class SendEmail:
global send_user
global email_host
global password
password = “lunkbrgwqxhfjgxx”
email_host = “smtp.qq.com”
send_user = “11xx@qq.com”
def send_mail(self,user_list,sub,content):
    user = "shape" + "<" + send_user + ">"
    message = MIMEText(content,_subtype='plain',_charset='utf-8')
    message['Subject'] = sub
    message['From'] = user
    message['To'] = ";".join(user_list)
    server = smtplib.SMTP_SSL()
    server.connect(email_host,465)
    server.login(send_user,password)
    server.sendmail(user,user_list,message.as_string())
    server.close()
if name == ‘main’:
send = SendEmail()
user_list = [‘11xx@qq.com’]
sub = “测试邮件”
content = “ceshi看看”
send.send_mail(user_list,sub,content)

(1)Python对SMTP支持有smtplib和email两个模块,email负责构造邮件,smtplib负责发送邮件
(2)构造MIMEText对象时,第一个参数是邮件正文;第二个参数是MIME的subtype,传入'plain'表示纯文本,最终的MIME就是'text/plain';最后一定要用utf-8编码保证多语言兼容性
(3)发送的邮件需要添加头部信息,头部信息中包含发送者、接收者、邮件主题等信息:message['From']、message['To']、message['Subject']
(4)构造完要发送的邮件信息后,通过SMTP发出去:login()方法用来登录SMTP服务器;sendmail()方法就是发邮件,由于可以一次发给多个人,所以传入一个list;邮件正文是一个str,as\_string()把MIMEText对象变成str
(5)SMTP.close() :关闭SMTP服务器连接
5、发送邮件带附件
参考代码:

#coding:utf-8
import smtplib
from email.mime.text import MIMEText
from email.mime.multipart import MIMEMultipart
class SendEmail:
global send_user
global email_host
global password
password = “lunkbrgwqxhfjgxx”
email_host = “smtp.qq.com”
send_user = “xx@qq.com”
def send_mail(self,user_list,sub,content):
    user = "shape" + "<" + send_user + ">"

    # 创建一个带附件的实例
    message = MIMEMultipart()
    message['Subject'] = sub
    message['From'] = user
    message['To'] = ";".join(user_list)

    # 邮件正文内容
    message.attach(MIMEText(content, 'plain', 'utf-8'))

    # 构造附件(附件为txt格式的文本)
    att = MIMEText(open('../log/log.txt', 'rb').read(), 'base64', 'utf-8')
    att["Content-Type"] = 'application/octet-stream'
    att["Content-Disposition"] = 'attachment; filename="Log.txt"'
    message.attach(att)

    server = smtplib.SMTP_SSL()
    server.connect(email_host,465)# 启用SSL发信, 端口一般是465
    # server.set_debuglevel(1)# 打印出和SMTP服务器交互的所有信息
    server.login(send_user,password)
    server.sendmail(user,user_list,message.as_string())
    server.close()

def send_main(self,pass_list,fail_list,no_run_list):

既有适合小白学习的零基础资料,也有适合3年以上经验的小伙伴深入学习提升的进阶课程,涵盖了95%以上软件测试知识点,真正体系化!
user_list,message.as_string())
server.close()
def send_main(self,pass_list,fail_list,no_run_list):
[外链图片转存中…(img-rnhDwuMo-1719269516513)]
[外链图片转存中…(img-8bUa8Xo6-1719269516513)]
[外链图片转存中…(img-ojkaqg9K-1719269516514)]
既有适合小白学习的零基础资料,也有适合3年以上经验的小伙伴深入学习提升的进阶课程,涵盖了95%以上软件测试知识点,真正体系化!


 4962
4962

 被折叠的 条评论
为什么被折叠?
被折叠的 条评论
为什么被折叠?
 到【灌水乐园】发言


