


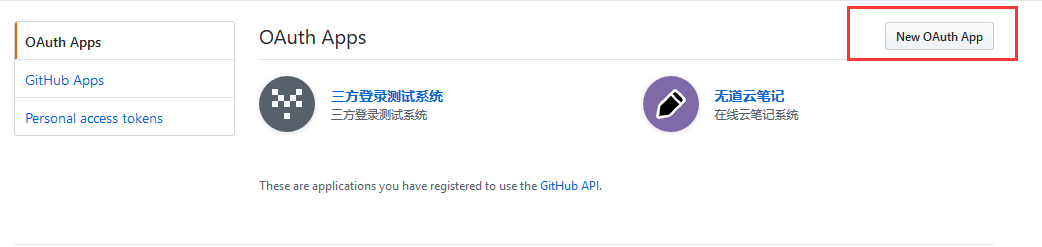
1.1 注册应用
进入 Github 的 Setting 页面,点击 Developer settings,如图所示:

进入后点击 New Oauth App,如图所示:
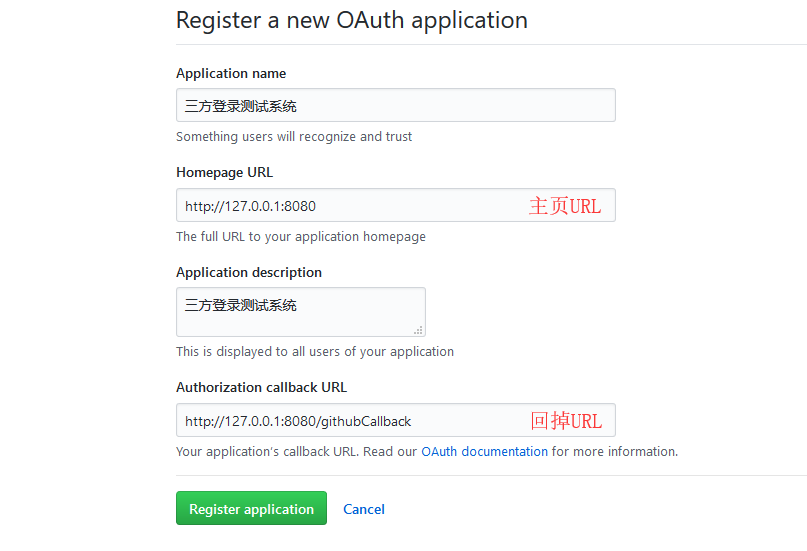
在其中填写主页 URL 和 回调 URL,回调 URL 尤为重要,如果不太明白可以先和我一致。
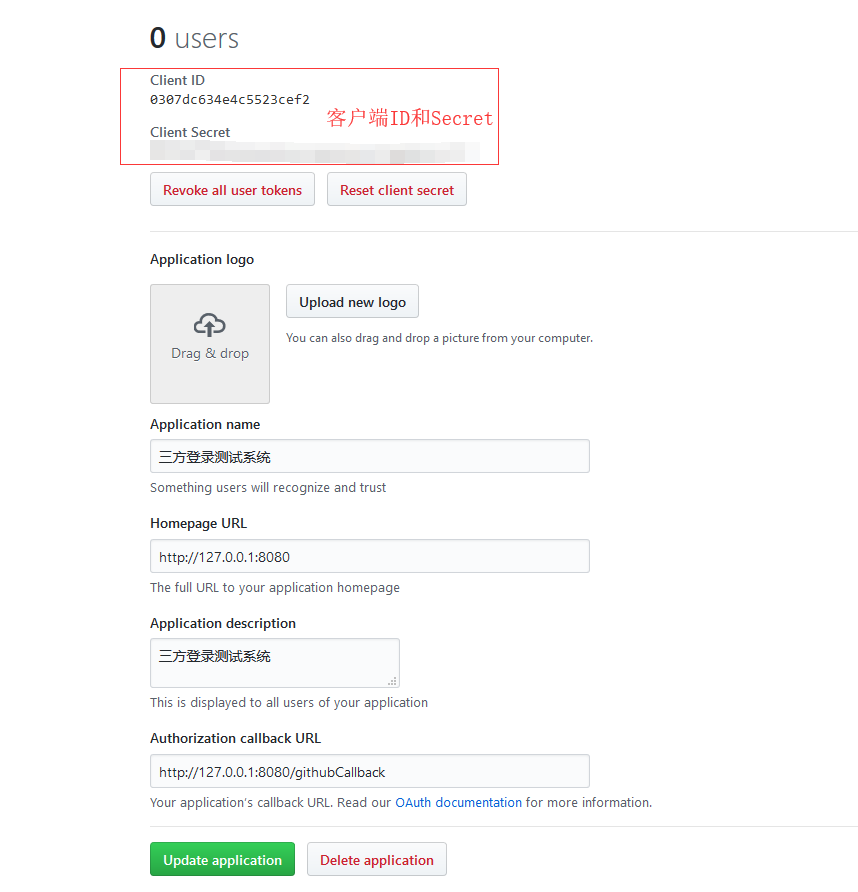
点击注册后,上方会生成 Client ID 和 Client Secret,这两个后面要用到。
1.2 HTML 页面
页面十分简单,只有两个跳转链接:
三方登录Demo
1.3 Github 登录方法
在这个方法中,我们需要访问 GitHub 的认证服务器,使用 Get 请求,这里使用重定向来实现。
遵循 Oauth 2.0 规范,需要携带以下参数:
-
response_type:对于授权码模式,该值固定为code -
client_id:注册应用时的 Client ID -
state:回调时会原样返回 -
redirect_uri: 回调 URL,注册应用时填写的
这里的 state 参数我要额外说明下,因为该参数会在后面的回调 URL 中被原样携带回来,绝大多数的开发者会忽略该字段,阮一峰老师的文章也没有着重提及这一点。但是忽略该参数是会导致 CSRF攻击的,在回调函数中应当对该字段进行校验!
关于如何校验,我一开始的想法是使用 session 来存储 state 进行校验的,但是我发现使用重定向后 session 不是同一个 session,方案一失败。
然后我想通过 ajax 请求,在页面中使用
window.location.href方法跳转到认证服务器,使用 session 存储,但是很不幸这样也不是同一个 session,方案二失败。
最后我的解决办法是使用 redis 缓存,使用 set 存储,回调时判断是否存在。当然你也可以用 HashMap 来存储,这也是一个解决办法。
关于 Redis,可以参考:https://jitwxs.cn/e331e26a.html
private static String GITHUB_CLIENT_ID = “0307dc634e4c5523cef2”;
private static String GITHUB_CLIENT_SECRET = “707647176eb3bef1d4c2a50fcabf73e0401cc877”;
private static String GITHUB_REDIRECT_URL = “http://127.0.0.1:8080/githubCallback”;
@RequestMapping(“/githubLogin”)
public void githubLogin(HttpServletResponse response) throws Exception {
// Github认证服务器地址
String url = “https://github.com/login/oauth/authorize”;
// 生成并保存state,忽略该参数有可能导致CSRF攻击
String state = oauthService.genState();
// 传递参数response_type、client_id、state、redirect_uri
String param = “response_type=code&” + “client_id=” + GITHUB_CLIENT_ID + “&state=” + state
- “&redirect_uri=” + GITHUB_REDIRECT_URL;
// 1、请求Github认证服务器
response.sendRedirect(url + “?” + param);
}
1.4 Github 回调方法
在上一步中,浏览器会被跳转到 Github 的授权页,当用户登录并点击确认后,GitHub认证服务器会跳转到我们填写的回调URL中,我们在程序中处理回调。
在回调方法中,步骤如下:
1. 首先验证 state 与发送时是否一致,如果不一致,可能遭遇了 CSRF 攻击。
2. 得到 code,向 GitHub 认证服务器申请令牌(token)
这一步使用模拟的 POST 请求,携带参数包括:
-
grant_type:授权码模式固定为authorization_code -
code:上一步中得到的code -
redirect_uri:回调URL -
client_id:注册应用时的Client ID -
client_secret:注册应用时的Client Secret
3. 得到令牌(access_token)和令牌类型(token_type),向GitHub资源服务器获取资源(以 user_info 为例)
这一步使用模拟的 GET 请求,携带参数包括:
-
access_token:令牌 -
token_type:令牌类型
4. 输出结果
/**
-
GitHub回调方法
-
@param code 授权码
-
@param state 应与发送时一致
-
@author jitwxs
-
@since 2018/5/21 15:24
*/
@RequestMapping(“/githubCallback”)
public void githubCallback(String code, String state, HttpServletResponse response) throws Exception {
// 验证state,如果不一致,可能被CSRF攻击
if(!oauthService.checkState(state)) {
throw new Exception(“State验证失败”);
}
// 2、向GitHub认证服务器申请令牌
String url = “https://github.com/login/oauth/access_token”;
// 传递参数grant_type、code、redirect_uri、client_id
String param = “grant_type=authorization_code&code=” + code + “&redirect_uri=” +
GITHUB_REDIRECT_URL + “&client_id=” + GITHUB_CLIENT_ID + “&client_secret=” + GITHUB_CLIENT_SECRET;
// 申请令牌,注意此处为post请求
String result = HttpClientUtils.sendPostRequest(url, param);
/*
-
result示例:
-
失败:error=incorrect_client_credentials&error_description=The+client_id+and%2For+client_secret+passed+are+incorrect.&
-
error_uri=https%3A%2F%2Fdeveloper.github.com%2Fapps%2Fmanaging-oauth-apps%2Ftroubleshooting-oauth-app-access-token-request-errors%2F%23incorrect-client-credentials
-
成功:access_token=7c76186067e20d6309654c2bcc1545e41bac9c61&scope=&token_type=bearer
*/
Map<String, String> resultMap = HttpClientUtils.params2Map(result);
// 如果返回的map中包含error,表示失败,错误原因存储在error_description
if(resultMap.containsKey(“error”)) {
throw new Exception(resultMap.get(“error_description”));
}
// 如果返回结果中包含access_token,表示成功
if(!resultMap.containsKey(“access_token”)) {
throw new Exception(“获取token失败”);
}
// 得到token和token_type
String accessToken = resultMap.get(“access_token”);
String tokenType = resultMap.get(“token_type”);
// 3、向资源服务器请求用户信息,携带access_token和tokenType
String userUrl = “https://api.github.com/user”;
String userParam = “access_token=” + accessToken + “&token_type=” + tokenType;
// 申请资源
String userResult = HttpClientUtils.sendGetRequest(userUrl, userParam);
// 4、输出用户信息
response.setContentType(“text/html;charset=utf-8”);
response.getWriter().write(userResult);
}
二、QQ 登录
2.1 注册应用
进入 QQ 互联管理中心:https://connect.qq.com/manage.html,创建一个新应用(需要先审核个人身份):
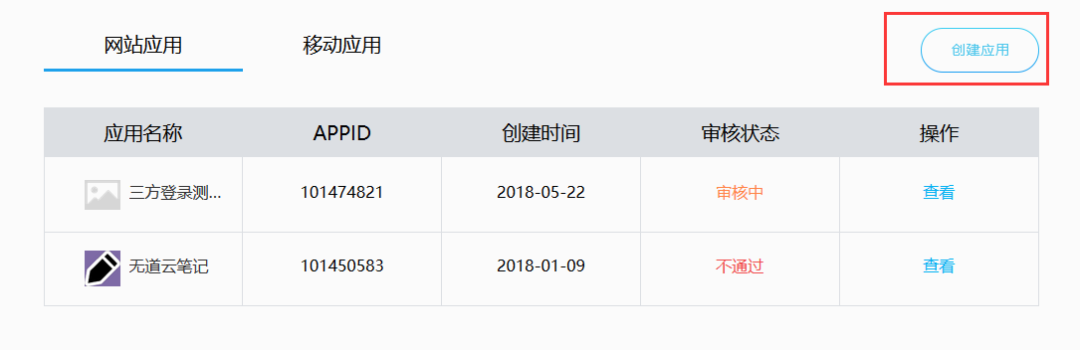
然后注册应用信息,和 GitHub 的步骤大差不差:

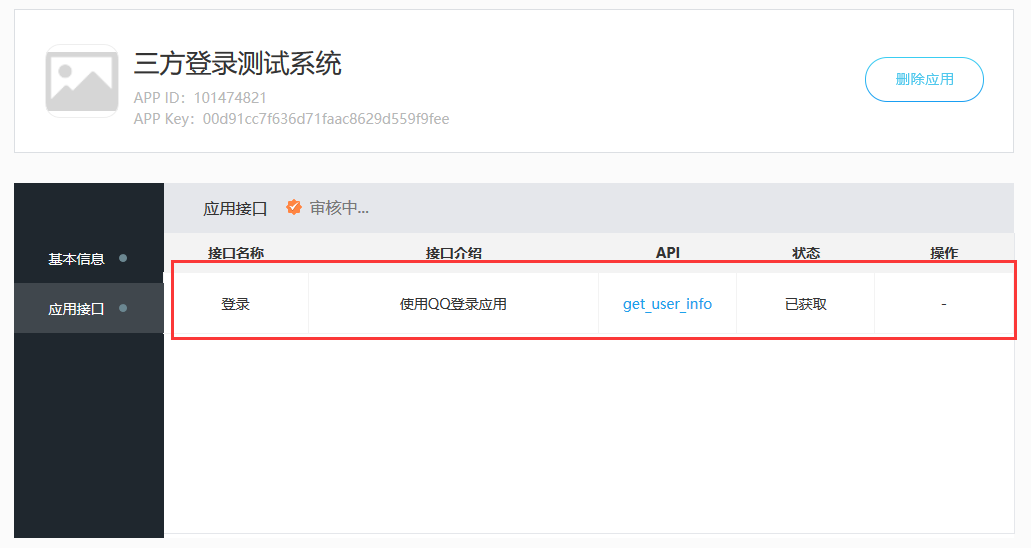
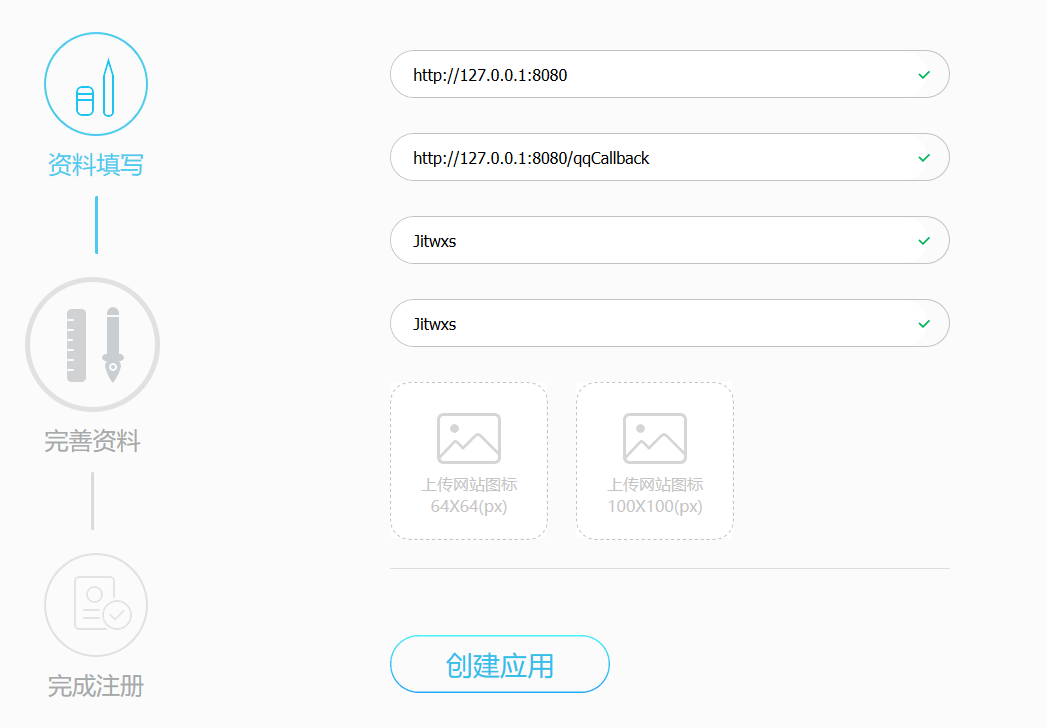 注册后,可以看到应用的 APP ID、APP Key,以及你被允许的接口,当然只有一个获取用户信息。
官方开发文档点击这里:
http://wiki.connect.qq.com/%E5%BC%80%E5%8F%91%E6%94%BB%E7%95%A5_server-side
注意:审核状态为审核中和审核失败也是可以使用的,不用担心(只是无法实际上线而已,作为 Demo 足够了)。
2.2 QQ 登录方法
private static String QQ_APP_ID = “101474821”;
private static String QQ_APP_KEY = “00d91cc7f636d71faac8629d559f9fee”;
private static String QQ_REDIRECT_URL = “http://127.0.0.1:8080/qqCallback”;
@RequestMapping(“/qqLogin”)
public void qqLogin(HttpServletResponse response) throws Exception {
// QQ认证服务器地址
String url = “https://graph.qq.com/oauth2.0/authorize”;
// 生成并保存state,忽略该参数有可能导致CSRF攻击
String state = oauthService.genState();
// 传递参数response_type、client_id、state、redirect_uri
String param = “response_type=code&” + “client_id=” + QQ_APP_ID + “&state=” + state
- “&redirect_uri=” + QQ_REDIRECT_URL;
// 1、请求QQ认证服务器
response.sendRedirect(url + “?” + param);
}
2.3 QQ 回调方法
/**
-
QQ回调方法
-
@param code 授权码
-
@param state 应与发送时一致
-
@author jitwxs
-
@since 2018/5/21 15:24
*/
@RequestMapping(“/qqCallback”)
public void qqCallback(String code, String state, HttpServletResponse response) throws Exception {
// 验证state,如果不一致,可能被CSRF攻击
if(!oauthService.checkState(state)) {
throw new Exception(“State验证失败”);
}
// 2、向QQ认证服务器申请令牌
String url = “https://graph.qq.com/oauth2.0/token”;
// 传递参数grant_type、code、redirect_uri、client_id
String param = “grant_type=authorization_code&code=” + code + “&redirect_uri=” +
QQ_REDIRECT_URL + “&client_id=” + QQ_APP_ID + “&client_secret=” + QQ_APP_KEY;
// 申请令牌,注意此处为post请求
// QQ获取到的access token具有3个月有效期,用户再次登录时自动刷新。
String result = HttpClientUtils.sendPostRequest(url, param);
/*
-
result示例:
-
成功:access_token=A24B37194E89A0DDF8DDFA7EF8D3E4F8&expires_in=7776000&refresh_token=BD36DADB0FE7B910B4C8BBE1A41F6783
*/
Map<String, String> resultMap = HttpClientUtils.params2Map(result);
/
/ 如果返回结果中包含access_token,表示成功
if(!resultMap.containsKey(“access_token”)) {
throw new Exception(“获取token失败”);
}


 22万+
22万+

 被折叠的 条评论
为什么被折叠?
被折叠的 条评论
为什么被折叠?
 到【灌水乐园】发言


