


FastDFS向使用者提供基本文件访问接口,比如upload、download、append、delete等,以客户端库的方式提供给用户使用
Tracker集群
FastDFS集群中的Tracker server可以有多台,Tracker server之间是相互平等关系,同时提供服务
Trackerserver不存在单点故障。客户端请求Trackerserver采用轮询方式,如果请求的tracker无法提供服务则换另一个tracker
Storage server会连接集群中所有的Tracker server,定时向他们报告自己的状态,包括磁盘剩余空间、文件同步状况、文件上传下载次数等统计信息
Storage集群
为了支持大容量,storage server采用了分组的形式。存储系统由一个或多个group组成,group之间的文件是相互独立的,所有group内的文件容量累加就是整个存储系统中的文件容量
一个group内包含一台或多台storage server,group内的storage是平等关系,不同group内的storage不会相互通信,同group内的storage之间会相互连接进行文件同步,从而保证同group内的每个storage上的文件完全一致
在group中添加 storage时,系统会自动同步已有的文件系统,同步完成后,系统自动将新增storage到线上提供服务。当存储空间不足或者即将耗尽时,可以动态添加group。只需要增加一台或多台storage并将它们配置到同一个group内就行
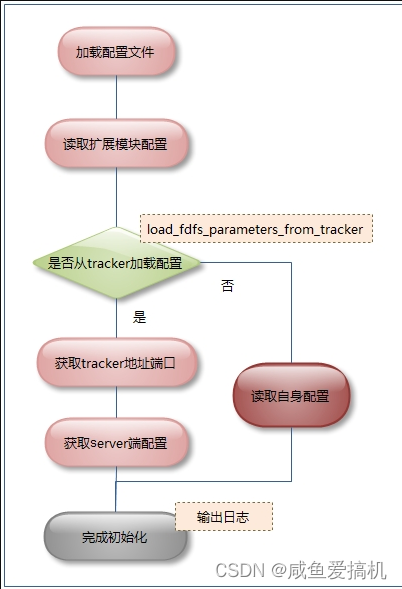
FastDFS初始化过程
FastDFS文件操作
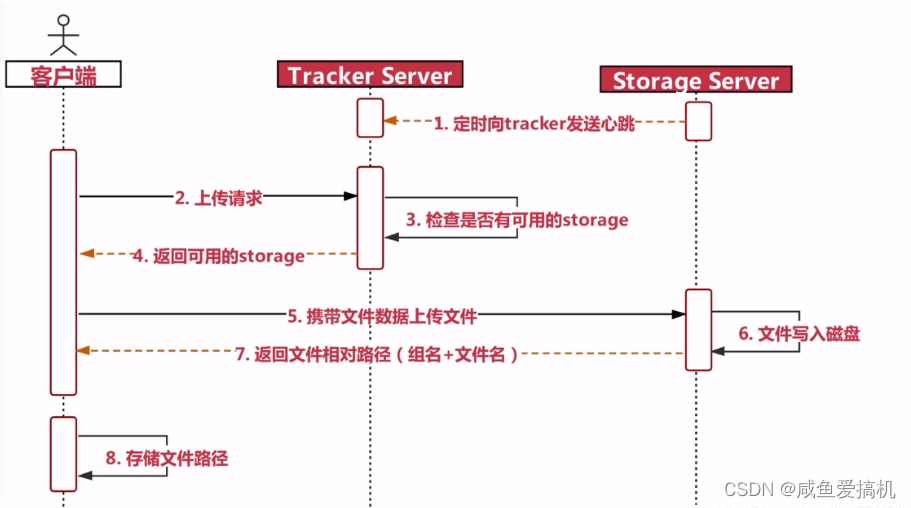
1.上传
FastDFS向使用者提供基本文件访问接口,比如upload、download、append、delete等,以客户端库的方式提供给用户使用
当tracker收到客户端上传文件的请求时,会为该文件分配一个可以存储文件的group,当选定了group后就要决定给客户端分配group中哪一个storage
分配好storage后,将客户端请求分发到指定storage上,storage会为文件分配一个数据存储目录然后为文件分配一个fileid,最后根据以上的信息生成文件名存储文件,Storage将文件写入磁盘后,会返回路径信息给客户端,客户端就可以根据这个路径信息找到上传的文件
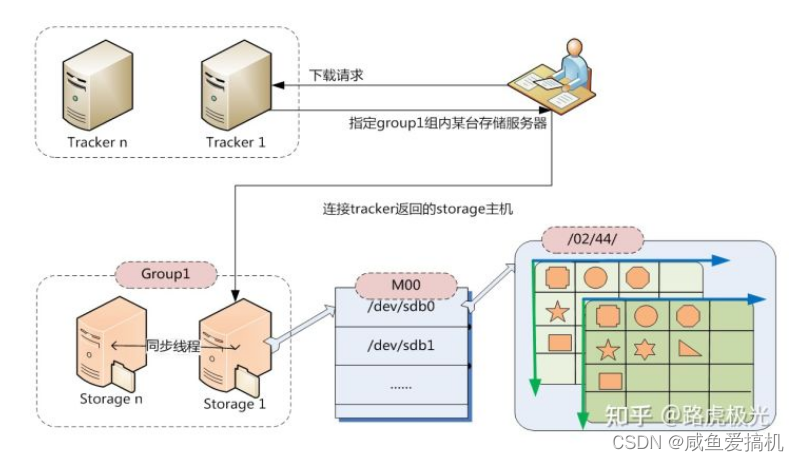
2.下载
Storage会定时的向Tracker安装发送心跳,告诉Tracker自己还还活着,这样Fastdfs就可以工作了
客户端发送下载请求到Tracker上,Tracker查找到存储的Storage地址后返回给客户端
客户端拿到Storage地址后,去Storage上找到文件
Storage把文件返回给客户端
group1/M00/02/44/Swtdssdsdfsdf.txt

1.通过组名tracker能够很快的定位到客户端需要访问的存储服务器组是group1,并选择合适的storage提供客户端访问。
2.storage根据“文件存储虚拟磁盘路径”和“数据文件两级目录”可以很快定位到文件所在目录,并根据文件名找到客户端需要访问的文件。
拓展模块
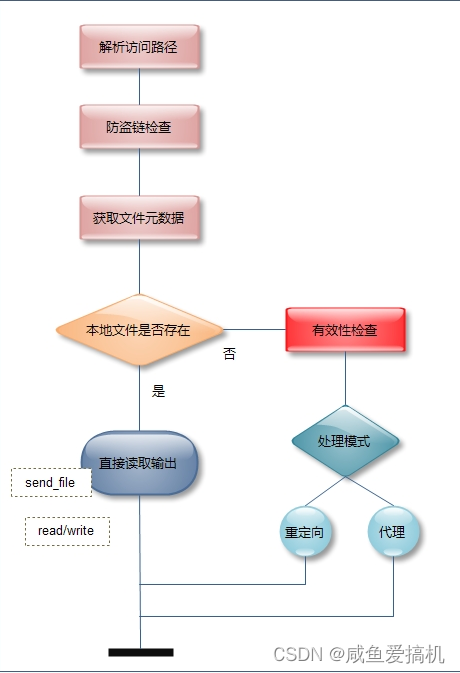
在大多数业务场景中,往往需要为FastDFS存储的文件提供http下载服务,而尽管FastDFS在其storage及tracker都内置了http服务, 但性能表现却不尽如人意;
作者余庆在后来的版本中增加了基于当前主流web服务器(nginx/apache)的扩展模块,其用意在于利用web服务器直接对本机storage数据文件提供http服务,以提高文件下载的性能
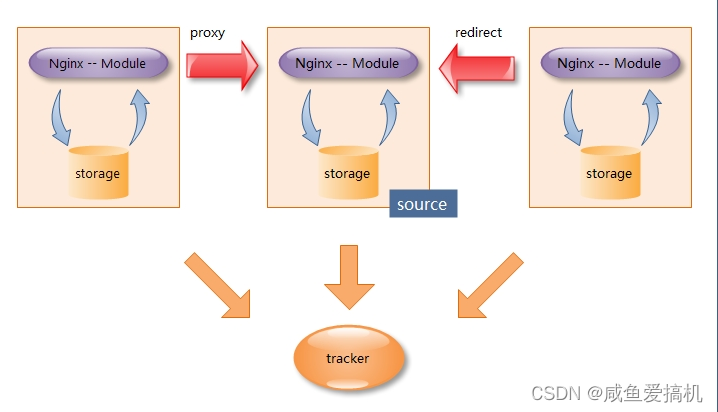
在每一台storage服务器主机上部署Nginx及FastDFS扩展模块,由Nginx模块对storage存储的文件提供http下载服务, 仅当当前storage节点找不到文件时会向源storage主机发起redirect或proxy动作
例如:文件上传至节点A,但是通过负载均衡之后,访问了节点B,则不能访问文件,所以会出现时而能访问时而不能访问的结果,而FastDFS扩展模块就可以解决这个问题,它会发起重定向或者代理的动作
文件下载过程
单机部署
单机:192.168.149.131
注:一定要先启动Tracker,在启动Storage
包目录:/usr/local/
需要安装的包
1.libfatscommon:FastDFS分离出的一些公用函数包
2.FastDFS:FastDFS本体
3.fastdfs-nginx-module:FastDFS和nginx的关联模块
4.nginx:发布访问服务
- 安装编译环境
yum -y install gcc pcre-devel  zlib-devel openssl-devel libxml2-devel \
libxslt-devel gd-devel GeoIP-devel jemalloc-devel libatomic_ops-devel \
perl-devel  perl-ExtUtils-Embed git gcc gcc-c++ make automake autoconf libtool pcre pcre-devel zlib zlib-devel openssl-devel
- 安装相关包
#创建包目录
mkdir /usr/local/fastdfs
cd /usr/local/fastdfs
wget --no-check-certificate https://github.com/happyfish100/libfastcommon/archive/refs/heads/master.zip -O libfastcommon-master.zip

wget --no-check-certificate https://github.com/happyfish100/fastdfs/archive/refs/heads/master.zip -O fastdfs.zip

wget --no-check-certificate https://github.com/happyfish100/fastdfs-nginx-module/archive/refs/heads/master.zip -O fastdfs-nginx-module.zip

unzip libfastcommon-master.zip
unzip fastdfs.zip
unzip fastdfs-nginx-module.zip

rm -rf *.zip
- 编译安装
cd /usr/local/fastdfs/libfastcommon-master && sh make.sh clean && sh make.sh && sh make.sh install

cd /usr/local/fastdfs/fastdfs-master && sh make.sh clean && sh make.sh && sh make.sh install

cd /usr/local/fastdfs/fastdfs-master && sh setup.sh /etc/fdfs
- 配置文件更新
cp -r -a /usr/local/fastdfs/fastdfs-master/conf/* /etc/fdfs

cp -r -a /usr/local/fastdfs/fastdfs-master/systemd/* /usr/lib/systemd/system
- tracker和storage配置
#创建工作目录
mkdir /opt/fdfs/{tracker,storage,client} -pv && mkdir /opt/fdfs/storage/data
#切换目录
cd /etc/fdfs/

##tracker文件配置和修改启动服务配置
cp tracker.conf tracker.conf.bak
vim tracker.conf
base_path = /opt/fdfs/tracker

vim /usr/lib/systemd/system/fdfs_trackerd.service
PIDFile=/opt/fdfs/tracker/data/fdfs_trackerd.pid

##storage文件配置和修改启动服务配置
cp storage.conf storage.conf.bak
vim storage.conf
group_name =group1
base_path = /opt/fdfs/storage
store_path0 = /opt/fdfs/storage/data
tracker_server =192.168.149.131:22122
http.server_port =8888

vim /usr/lib/systemd/system/fdfs_storaged.service
PIDFile=/opt/fdfs/storage/data/fdfs_storaged.pid

#client配置
cp client.conf client.conf.bak
vim client.conf
base_path = /opt/fdfs/client
tracker_server =192.168.149.131:22122
#重新加载启动服务
systemctl daemon-reload

#启动服务
systemctl start fdfs_trackerd
systemctl start fdfs_storaged
# 建立fdfs快捷命令
alias fdfs\_delete\_file='fdfs\_delete\_file /etc/fdfs/client.conf'
alias fdfs\_download\_file='fdfs\_download\_file /etc/fdfs/client.conf'
alias fdfs\_file\_info='fdfs\_file\_info /etc/fdfs/client.conf'
alias fdfs\_monitor='fdfs\_monitor /etc/fdfs/client.conf'
alias fdfs\_upload\_file='fdfs\_upload\_file /etc/fdfs/client.conf'
alias fdfs\_test='fdfs\_test /etc/fdfs/client.conf'
- 验证
fdfs_upload_file 1.jpg
group1/M00/00/00/wKiVg2L8Uq6AO3LzAADZ-GROavg913.jpg
1.Nginx外部访问
fastdfs 安装好以后是无法通过 http 访问的,这个时候就需要借助 Nginx 了,所以需要安装 fastdfs 的第三方模块到 Nginx 中,就能使用了
- 安装Nginx
cd /usr/local/
wget http://nginx.org/download/nginx-1.15.4.tar.gz
tar -zxvf nginx-1.15.4.tar.gz

#编译安装,添加FastDFS模块--add-module=/usr/local/fastdfs/fastdfs-nginx-module-master/src
cd nginx-1.15.4/

./configure --with-threads --with-file-aio --with-http_ssl_module --with-http_v2_module --with-http_realip_module --with-http_addition_module --with-http_xslt_module=dynamic --with-http_image_filter_module=dynamic --with-http_geoip_module=dynamic --with-http_sub_module --with-http_dav_module --with-http_flv_module --with-http_mp4_module --with-http_gunzip_module --with-http_gzip_static_module --with-http_auth_request_module --with-http_random_index_module --with-http_secure_link_module --with-http_degradation_module --with-http_slice_module --with-http_stub_status_module --with-stream=dynamic --with-stream_ssl_module --with-stream_realip_module --with-stream_geoip_module=dynamic --with-stream_ssl_preread_module --with-compat --with-pcre-jit --add-module=/usr/local/fastdfs/fastdfs-nginx-module-master/src

make

make install

cd ..
- 修改配置文件
cp nginx-1.15.4/conf/nginx.conf nginx-1.15.4/conf/nginx.conf.bak

vim nginx-1.15.4/conf/nginx.conf
worker_processes  1;
events {
    worker_connections  1024;
}

http {
    include       mime.types;
    default_type  application/octet-stream;
	log_format  main '$remote\_addr - $remote\_user [$time\_local] "$request" '
                   '$status $body\_bytes\_sent "$http\_referer" '
                   '"$http\_user\_agent" "$http\_x\_forwarded\_for" "$upstream\_addr"';
    sendfile        on;

    keepalive_timeout  65;
    server {
        listen       8080;
        server_name  localhost;

       location ~/group([0-9])/M00 {
            ngx_fastdfs_module;
        }

        location / {
            root   html;
            index  index.html index.htm;
        }

        error_page   500 502 503 504  /50x.html;
        location = /50x.html {
            root   html;
        }
    }
}
#转移
cp nginx-1.15.4/conf/nginx.conf /usr/local/nginx/conf/
Nginx Fastdfs模块配置
cp /usr/local/fastdfs/fastdfs-nginx-module-master/src/mod_fastdfs.conf /etc/fdfs/

#备份文件
cp /etc/fdfs/mod_fastdfs.conf /etc/fdfs/mod_fastdfs.conf.bak

vim /etc/fdfs/mod_fastdfs.conf
tracker_server =192.168.149.131:22122
url_have_group_name =true
store\_path0=/opt/fdfs/storage/data
由于Nginx是编译安装,我们还需要为它注册服务
#注册nginx服务
vim /usr/lib/systemd/system/nginx.service
[Unit]
Description=The nginx HTTP and reverse proxy server
After=network-online.target remote-fs.target nss-lookup.target
Wants=network-online.target
[Service]
Type=forking
**既有适合小白学习的零基础资料,也有适合3年以上经验的小伙伴深入学习提升的进阶课程,涵盖了95%以上运维知识点,真正体系化!**
详情docs.qq.com/doc/DSmdCdUNwcEJDTXFK
proxy server
After=network-online.target remote-fs.target nss-lookup.target
Wants=network-online.target
[Service]
Type=forking
[外链图片转存中...(img-6eUqOSqp-1724214658036)]
[外链图片转存中...(img-z4TcJKXf-1724214658036)]
[外链图片转存中...(img-vt75DpBG-1724214658037)]
**既有适合小白学习的零基础资料,也有适合3年以上经验的小伙伴深入学习提升的进阶课程,涵盖了95%以上运维知识点,真正体系化!**
详情docs.qq.com/doc/DSmdCdUNwcEJDTXFK


 1027
1027

 被折叠的 条评论
为什么被折叠?
被折叠的 条评论
为什么被折叠?
 到【灌水乐园】发言


