


蜂信物联FastBee平台https://gitee.com/beecue/fastbee
阿里资料开源项目https://gitee.com/vip204888
百度低代码前端框架https://gitee.com/baidu/amis
OpenHarmony开源项目https://gitcode.com/openharmony
仓颉编程语言开放项目https://gitcode.com/Cangjie
-
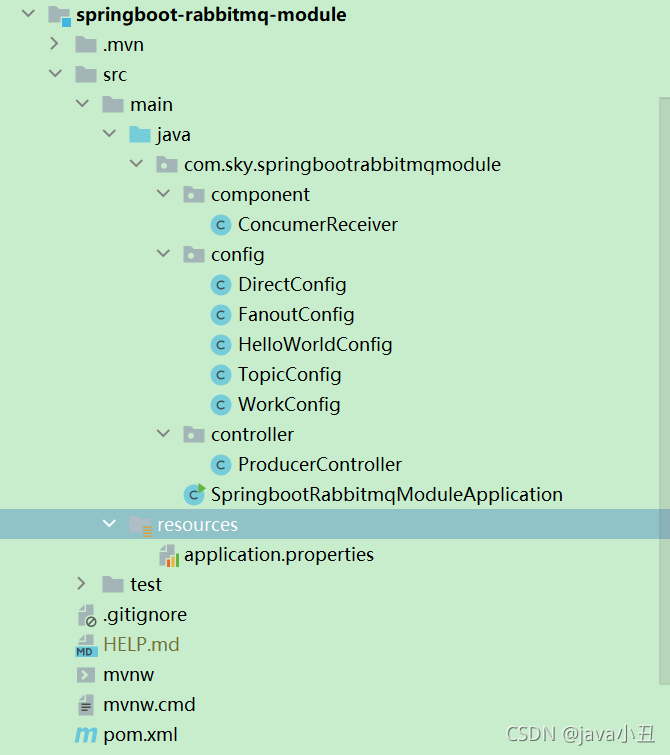
DirectConfig
-
TopicConfig
-
4.消费端component
-
5.生产者controller
-
三、演示步骤
-
- 1.启动项目
-
2.调用接口演示
-
- 1.直连模式
-
- 1.接口调用
-
2.控制台打印
-
2.工作队列模式
-
- 1.接口调用
-
2.控制台打印
-
3.发布订阅模式(交换机类型:fanout)
-
- 1.接口调用
-
2.控制台打印
-
4.路由工作模式(交换机类型:direct)
-
- 1.接口调用
-
2.控制台打印
-
5.通配符模式(交换机类型:topic)
-
- 1.接口调用
-
2.控制台打印
-
总结
===============================================================
提示:Springboot集成Rabbitmq实战案例,通过接口调用的方式演示。
提示:以下是本篇文章正文内容,下面案例可供参考
===================================================================
-
创建生产者SpringBoot工程
-
引入pom依赖
org.springframework.boot
spring-boot-starter-amqp
-
编写rabbitmq配置消息
-
定义交换机,队列以及绑定关系的配置类
-
注入RabbitTemplate,调用方法,完成消息发送
-
创建生产者SpringBoot工程
-
引入pom依赖
org.springframework.boot
spring-boot-starter-amqp
-
编写rabbitmq配置消息
-
定义监听类,使用@RabbitListener注解完成队列监听。
===================================================================
代码如下(示例):
1.pom依赖
<?xml version="1.0" encoding="UTF-8"?><project xmlns=“http://maven.apache.org/POM/4.0.0” xmlns:xsi=“http://www.w3.org/2001/XMLSchema-instance”
xsi:schemaLocation=“http://maven.apache.org/POM/4.0.0 https://maven.apache.org/xsd/maven-4.0.0.xsd”>
4.0.0
org.springframework.boot
spring-boot-starter-parent
2.5.5
com.sky
springboot-rabbitmq-module
0.0.1-SNAPSHOT
springboot-rabbitmq-module
springboot-rabbitmq-module
<project.build.sourceEncoding>UTF-8</project.build.sourceEncoding>
<maven.compiler.source>1.7</maven.compiler.source>
<maven.compiler.target>1.7</maven.compiler.target>
org.springframework.boot
spring-boot-starter
org.springframework.boot
spring-boot-starter-test
test
org.springframework.boot
spring-boot-starter-amqp
org.springframework.boot
spring-boot-starter-web
junit
junit
4.11
test
springboot_rabbitmq
maven-clean-plugin
3.1.0
maven-resources-plugin
3.0.2
maven-compiler-plugin
3.8.0
maven-surefire-plugin
2.22.1
maven-war-plugin
3.2.2
maven-install-plugin
2.5.2
maven-deploy-plugin
2.8.2
2.application.properties配置
server.port=8080
#spring.rabbitmq.host=localhost
spring.rabbitmq.port=5672
spring.rabbitmq.username=guest
spring.rabbitmq.password=guest
spring.rabbitmq.addresses=110.42.239.246
spring.rabbitmq.virtual-host=springboot
#spring.rabbitmq.addresses=110.42.239.246:5672,110.42.239.247:5672,110.42.239.248:5672
说明:这里免费提供rabbitmq连接方式给大家使用学习
3.config配置
HelloWorldConfig
package com.sky.springbootrabbitmqmodule.config;
import org.springframework.amqp.core.Queue;
import org.springframework.context.annotation.Bean;
import org.springframework.context.annotation.Configuration;
/**
-
HelloWorld rabbitmq课上讲解的第一个工作模式
-
直连模式只需要声明队列,所有消息都通过队列转发。
-
无需设置交换机
*/
@Configuration
public class HelloWorldConfig {
@Bean
public Queue setQueue() {
return new Queue(“helloWorldqueue”);
}
}
FanoutConfig
package com.sky.springbootrabbitmqmodule.config;
import org.springframework.amqp.core.Binding;
import org.springframework.amqp.core.BindingBuilder;
import org.springframework.amqp.core.FanoutExchange;
import org.springframework.amqp.core.Queue;
import org.springframework.context.annotation.Bean;
import org.springframework.context.annotation.Configuration;
/**
-
Fanout模式需要声明exchange,并绑定queue,由exchange负责转发到queue上。
-
广播模式 交换机类型设置为:fanout
*/
@Configuration
public class FanoutConfig {
//声明队列
@Bean
public Queue fanoutQ1() {
return new Queue(“fanout.q1”);
}
@Bean
public Queue fanoutQ2() {
return new Queue(“fanout.q2”);
}
//声明exchange
@Bean
public FanoutExchange setFanoutExchange() {
return new FanoutExchange(“fanoutExchange”);
}
//声明Binding,exchange与queue的绑定关系
@Bean
public Binding bindQ1() {
return BindingBuilder.bind(fanoutQ1()).to(setFanoutExchange());
}
@Bean
public Binding bindQ2() {
return BindingBuilder.bind(fanoutQ2()).to(setFanoutExchange());
}
}
WorkConfig
package com.sky.springbootrabbitmqmodule.config;
import org.springframework.amqp.core.Queue;
import org.springframework.context.annotation.Bean;
import org.springframework.context.annotation.Configuration;
@Configuration
public class WorkConfig {
//声明队列
@Bean
public Queue workQ1() {
return new Queue(“work_sb_mq_q”);
}
}
DirectConfig
package com.sky.springbootrabbitmqmodule.config;
import org.springframework.amqp.core.*;
import org.springframework.context.annotation.Bean;
import org.springframework.context.annotation.Configuration;
/*
路由模式|Routing模式 交换机类型:direct
*/
@Configuration
public class DirectConfig {
//声明队列
@Bean
public Queue directQ1() {
return new Queue(“direct_sb_mq_q1”);
}
@Bean
public Queue directQ2() {
return new Queue(“direct_sb_mq_q2”);
}
//声明exchange
@Bean
public DirectExchange setDirectExchange() {
return new DirectExchange(“directExchange”);
}
//声明binding,需要声明一个routingKey
@Bean
public Binding bindDirectBind1() {
return BindingBuilder.bind(directQ1()).to(setDirectExchange()).with(“directBind.one”);
}
@Bean
public Binding bindDirectBind2() {
return BindingBuilder.bind(directQ2()).to(setDirectExchange()).with(“directBind.two”);
}
}
TopicConfig
package com.sky.springbootrabbitmqmodule.config;
import org.springframework.amqp.core.Binding;
import org.springframework.amqp.core.BindingBuilder;
import org.springframework.amqp.core.Queue;
import org.springframework.amqp.core.TopicExchange;
import org.springframework.context.annotation.Bean;
import org.springframework.context.annotation.Configuration;
/*
Topics模式 交换机类型 topic
- */
@Configuration
public class TopicConfig {
//声明队列
@Bean
public Queue topicQ1() {
return new Queue(“topic_sb_mq_q1”);
}
@Bean
public Queue topicQ2() {
return new Queue(“topic_sb_mq_q2”);
}
//声明exchange
@Bean
public TopicExchange setTopicExchange() {
return new TopicExchange(“topicExchange”);
}
//声明binding,需要声明一个roytingKey
@Bean
public Binding bindTopicHebei1() {
return BindingBuilder.bind(topicQ1()).to(setTopicExchange()).with(“directBind.*”);
}
总结
以上是字节二面的一些问题,面完之后其实挺后悔的,没有提前把各个知识点都复习到位。现在重新好好复习手上的面试大全资料(含JAVA、MySQL、算法、Redis、JVM、架构、中间件、RabbitMQ、设计模式、Spring等),现在起闭关修炼半个月,争取早日上岸!!!
下面给大家分享下我的面试大全资料
- 第一份是我的后端JAVA面试大全

后端JAVA面试大全
- 第二份是MySQL+Redis学习笔记+算法+JVM+JAVA核心知识整理

MySQL+Redis学习笔记算法+JVM+JAVA核心知识整理
- 第三份是Spring全家桶资料

MySQL+Redis学习笔记算法+JVM+JAVA核心知识整理
ueue(“topic_sb_mq_q2”);
}
//声明exchange
@Bean
public TopicExchange setTopicExchange() {
return new TopicExchange(“topicExchange”);
}
//声明binding,需要声明一个roytingKey
@Bean
public Binding bindTopicHebei1() {
return BindingBuilder.bind(topicQ1()).to(setTopicExchange()).with(“directBind.*”);
}
总结
以上是字节二面的一些问题,面完之后其实挺后悔的,没有提前把各个知识点都复习到位。现在重新好好复习手上的面试大全资料(含JAVA、MySQL、算法、Redis、JVM、架构、中间件、RabbitMQ、设计模式、Spring等),现在起闭关修炼半个月,争取早日上岸!!!
下面给大家分享下我的面试大全资料
- 第一份是我的后端JAVA面试大全
[外链图片转存中…(img-suaPnySj-1725211067056)]
后端JAVA面试大全
- 第二份是MySQL+Redis学习笔记+算法+JVM+JAVA核心知识整理
[外链图片转存中…(img-7OCs95Al-1725211067057)]
MySQL+Redis学习笔记算法+JVM+JAVA核心知识整理
- 第三份是Spring全家桶资料
[外链图片转存中…(img-S0ipbU7H-1725211067057)]
MySQL+Redis学习笔记算法+JVM+JAVA核心知识整理


 49万+
49万+

 被折叠的 条评论
为什么被折叠?
被折叠的 条评论
为什么被折叠?
 到【灌水乐园】发言


