


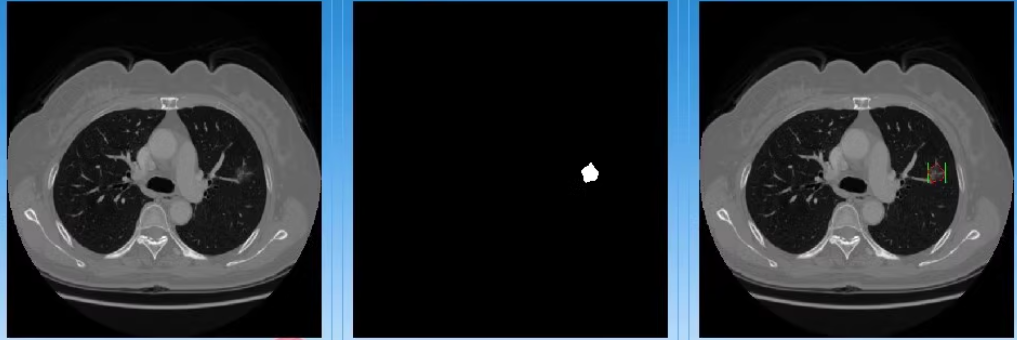
通过python语言 pyqt5界面 建立 基于深度学习的CT医学图像分割检测系统
文章目录
以下文字及代码仅供参考。
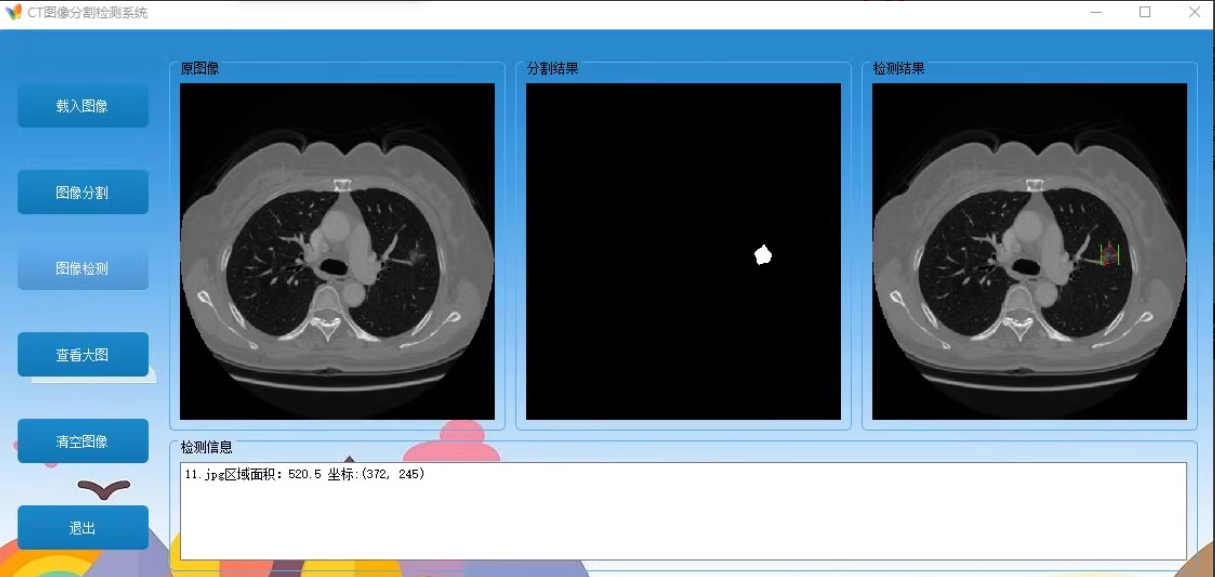
构建一个CT图像分割检测系统,有那个 登录界面、图像加载、分割和检测功能,使用Python和PyQt5。
以下是一个详细的步骤和代码示例:
1. 安装依赖库
确保安装了以下库:
- PyQt5
- OpenCV
- TensorFlow/Keras (或其他深度学习框架)
- Numpy
pip install PyQt5 opencv-python tensorflow numpy
2. 创建主窗口和登录界面
main_window.py
import sys
from PyQt5.QtWidgets import QApplication, QMainWindow, QWidget, QVBoxLayout, QPushButton, QLabel, QFileDialog, QMessageBox
from PyQt5.QtGui import QPixmap, QImage
from PyQt5.QtCore import Qt
import cv2
import numpy as np
import tensorflow as tf

class MainWindow(QMainWindow):
    def __init__(self):
        super().__init__()
        self.setWindowTitle("CT Image Segmentation and Detection System")
        self.setGeometry(100, 100, 800, 600)

        self.initUI()

    def initUI(self):
        self.central_widget = QWidget()
        self.setCentralWidget(self.central_widget)

        self.layout = QVBoxLayout()

        self.original_image_label = QLabel()
        self.segmented_image_label = QLabel()
        self.detected_image_label = QLabel()

        self.load_button = QPushButton("Load Image", self)
        self.load_button.clicked.connect(self.load_image)

        self.segment_button = QPushButton("Segment Image", self)
        self.segment_button.clicked.connect(self.segment_image)

        self.detect_button = QPushButton("Detect Image", self)
        self.detect_button.clicked.connect(self.detect_image)

        self.layout.addWidget(self.load_button)
        self.layout.addWidget(self.segment_button)
        self.layout.addWidget(self.detect_button)
        self.layout.addWidget(self.original_image_label)
        self.layout.addWidget(self.segmented_image_label)
        self.layout.addWidget(self.detected_image_label)

        self.central_widget.setLayout(self.layout)

    def load_image(self):
        options = QFileDialog.Options()
        file_name, _ = QFileDialog.getOpenFileName(self, "Select Image File", "", "Image Files (*.jpg *.png *.bmp)", options=options)
        if file_name:
            self.image_path = file_name
            self.update_images()

    def update_images(self):
        image = cv2.imread(self.image_path)
        image = cv2.cvtColor(image, cv2.COLOR_BGR2RGB)
        qimage = QImage(image.data, image.shape[1], image.shape[0], QImage.Format_RGB888)
        pixmap = QPixmap.fromImage(qimage)
        self.original_image_label.setPixmap(pixmap)

    def segment_image(self):
        # Placeholder for segmentation logic
        pass

    def detect_image(self):
        # Placeholder for detection logic
        pass

if __name__ == "__main__":
    app = QApplication(sys.argv)
    window = MainWindow()
    window.show()
    sys.exit(app.exec_())
login_window.py
import sys
from PyQt5.QtWidgets import QApplication, QWidget, QVBoxLayout, QLabel, QLineEdit, QPushButton, QMessageBox

class LoginWindow(QWidget):
    def __init__(self):
        super().__init__()
        self.setWindowTitle("Login")
        self.setGeometry(100, 100, 300, 200)

        self.initUI()

    def initUI(self):
        self.layout = QVBoxLayout()

        self.username_label = QLabel("Username:")
        self.username_input = QLineEdit()

        self.password_label = QLabel("Password:")
        self.password_input = QLineEdit()
        self.password_input.setEchoMode(QLineEdit.Password)

        self.login_button = QPushButton("Login", self)
        self.login_button.clicked.connect(self.login)

        self.layout.addWidget(self.username_label)
        self.layout.addWidget(self.username_input)
        self.layout.addWidget(self.password_label)
        self.layout.addWidget(self.password_input)
        self.layout.addWidget(self.login_button)

        self.setLayout(self.layout)

    def login(self):
        username = self.username_input.text()
        password = self.password_input.text()

        if username == "admin" and password == "password":
            self.accept()
        else:
            QMessageBox.warning(self, "Login Failed", "Invalid username or password")

if __name__ == "__main__":
    app = QApplication(sys.argv)
    login_window = LoginWindow()
    if login_window.exec_() == QDialog.Accepted:
        main_window = MainWindow()
        main_window.show()
    sys.exit(app.exec_())
3. 整合登录界面和主窗口

在main_window.py中,修改主窗口的初始化逻辑以等待登录成功后再显示:
if __name__ == "__main__":
    app = QApplication(sys.argv)
    login_window = LoginWindow()
    if login_window.exec_() == QDialog.Accepted:
        main_window = MainWindow()
        main_window.show()
    sys.exit(app.exec_())
4. 实现分割和检测逻辑
你需要实现具体的分割和检测逻辑。这里提供一个简单的示例:
segment_image.py
def segment_image(image_path):
    # Placeholder for segmentation logic
    pass
detect_image.py
def detect_image(image_path):
    # Placeholder for detection logic
    pass
5. 更新主窗口中的按钮点击事件
def segment_image(self):
    segment_image(self.image_path)
    # Update segmented_image_label with the result

def detect_image(self):
    detect_image(self.image_path)
    # Update detected_image_label with the result
通过以上步骤,同学你可以构建一个完整的CT图像分割检测系统,包括登录界面、图像加载、分割和检测功能。
仅供参考,同学们。


 被折叠的 条评论
为什么被折叠?
被折叠的 条评论
为什么被折叠?
 到【灌水乐园】发言


