


在Centos中使用下面命令安装rsync:
对于负荷较重的 rsync 服务器应该使用独立运行方式
# yum install rsync xinetd --服务安装
# /usr/bin/rsync --daemon
对于负荷较轻的 rsync 服务器可以使用 xinetd 运行方式
# yum install rsync xinetd --服务安装
# vim /etc/xinetd.d/rsync --配置托管服务,将下项改为 no
disable = no
# /etc/init.d/xinetd start --启动托管服务 xinetd
# chkconfig rsync on
# netstat -ntpl | grep 873 --查看服务是否启动
实例一:本机中的两个目录进行同步
要同步本地计算机中的两个目录,使用rsync -zvr命令:
[root@localhost ~]# rsync -zvr /var/log/ /root/temp/
sending incremental file list
btmp
dnf.librepo.log
...
sssd/sssd_implicit_files.log
sssd/sssd_nss.log
tuned/tuned.log

sent 516,136 bytes  received 605 bytes  1,033,482.00 bytes/sec
total size is 5,451,242  speedup is 10.55
参数解释:
-z 启用压缩
-v 输出详细信息
-r 表示递归
查看一下/root/temp目录,发现rsync在同步期间未保留时间戳。

实例二:使用rsync -a在同步期间保留时间戳
rsync命令的-a选项表示存档模式。-a选项递归同步、保留符号链接、保留权限、保留时间戳、保留所有者和组。
现在,执行以下命令,然后查看文件的时间:
[root@localhost ~]# rsync -azv /var/log/ /root/temp/
sending incremental file list
./
btmp
dnf.librepo.log
dnf.log
dnf.rpm.log
...
sssd/sssd_nss.log
tuned/
tuned/tuned.log

sent 516,231 bytes  received 629 bytes  1,033,720.00 bytes/sec
total size is 5,451,789  speedup is 10.55
如下所示,rsync在同步期间保留了时间戳。

实例三:将文件从本地同步到远程目录
rsync允许在本地和远程系统之间同步文件/目录,前提是本地和远程系统都要安装rsync才行,否则会提示如下信息:
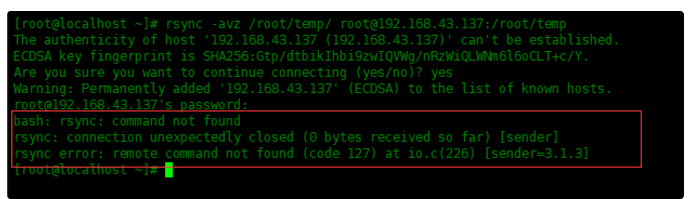
[root@localhost ~]# rsync -avz /root/temp/ root@192.168.43.137:/root/temp
root@192.168.43.137's password:
sending incremental file list
created directory /root/temp
./
btmp
dnf.librepo.log
dnf.log
dnf.rpm.log
...
sssd/sssd_nss.log
tuned/
tuned/tuned.log

sent 516,231 bytes  received 662 bytes  206,757.20 bytes/sec
total size is 5,451,789  speedup is 10.55

下面是在远程系统里面查看已同步的目录:

上面可以看到同步时需要输入密码,有时候不希望将文件从本地服务器备份到远程服务器时输入密码,可以在两台主机间设置免密要登录。
实例四:将文件从远程目录同步到本地
要将文件从远程系统同步到本地时,如下所示,在源中指定远程路径,在目标中指定本地路径即可:
[root@localhost ~]# rsync -avz root@192.168.43.137:/root/temp /root/temp
root@192.168.43.137's password:
receiving incremental file list
temp/
temp/btmp
temp/dnf.librepo.log
temp/dnf.log
...
temp/tuned/
temp/tuned/tuned.log

sent 634 bytes  received 516,247 bytes  206,752.40 bytes/sec
total size is 5,451,789  speedup is 10.55

实例五:不要覆盖目标位置上已修改的文件
如果在目标位置修改了文件,我们可能不想用源位置的旧文件覆盖该文件。使用-u选项就可以做到这一点。在下面的示例中,在本地将test.txt文件修改了内容。它不会被远程系统的test.txt文件所覆盖:
# 查看一下远程系统temp目录下的test.txt文件大小
[root@localhost ~]# ssh root@192.168.43.137 ls -l /root/temp
root@192.168.43.137's password:
total 4
-rw-r--r--. 1 root root 7 Apr  7  2021 test.txt
# 查看一下本机的temp目录下的test.txt文件大小,本机的test.txt文件已修改,所以比远程系统里面的test.txt文件大
[root@localhost ~]# ll /root/temp/
total 4
-rw-r--r--. 1 root root 77 Apr  7 21:10 test.txt
# 执行rsync -avzu同步一下
[root@localhost ~]# rsync -avzu root@192.168.43.137:/root/temp /root/
root@192.168.43.137's password:
receiving incremental file list

sent 25 bytes  received 76 bytes  40.40 bytes/sec
total size is 7  speedup is 0.07
下面查看一下本机的/root/temp目录里面的test.txt是否被覆盖:

发现并没有被覆盖。
网上学习资料一大堆,但如果学到的知识不成体系,遇到问题时只是浅尝辄止,不再深入研究,那么很难做到真正的技术提升。
color_FFFFFF,t_70)
发现并没有被覆盖。
[外链图片转存中…(img-GuosglpA-1726054476880)]
[外链图片转存中…(img-2rFaifeB-1726054476880)]
网上学习资料一大堆,但如果学到的知识不成体系,遇到问题时只是浅尝辄止,不再深入研究,那么很难做到真正的技术提升。


 2036
2036

 被折叠的 条评论
为什么被折叠?
被折叠的 条评论
为什么被折叠?
 到【灌水乐园】发言


