


C代码
.h文件
extern "C" \_\_declspec(dllexport) void PrintCdll();
.cpp文件
//extern "C" \_\_declspec(dllexport) void PrintCdll(); 这样暴露接口
void PrintCdll()
{
	cout << "C DLL cout :" << endl;
}
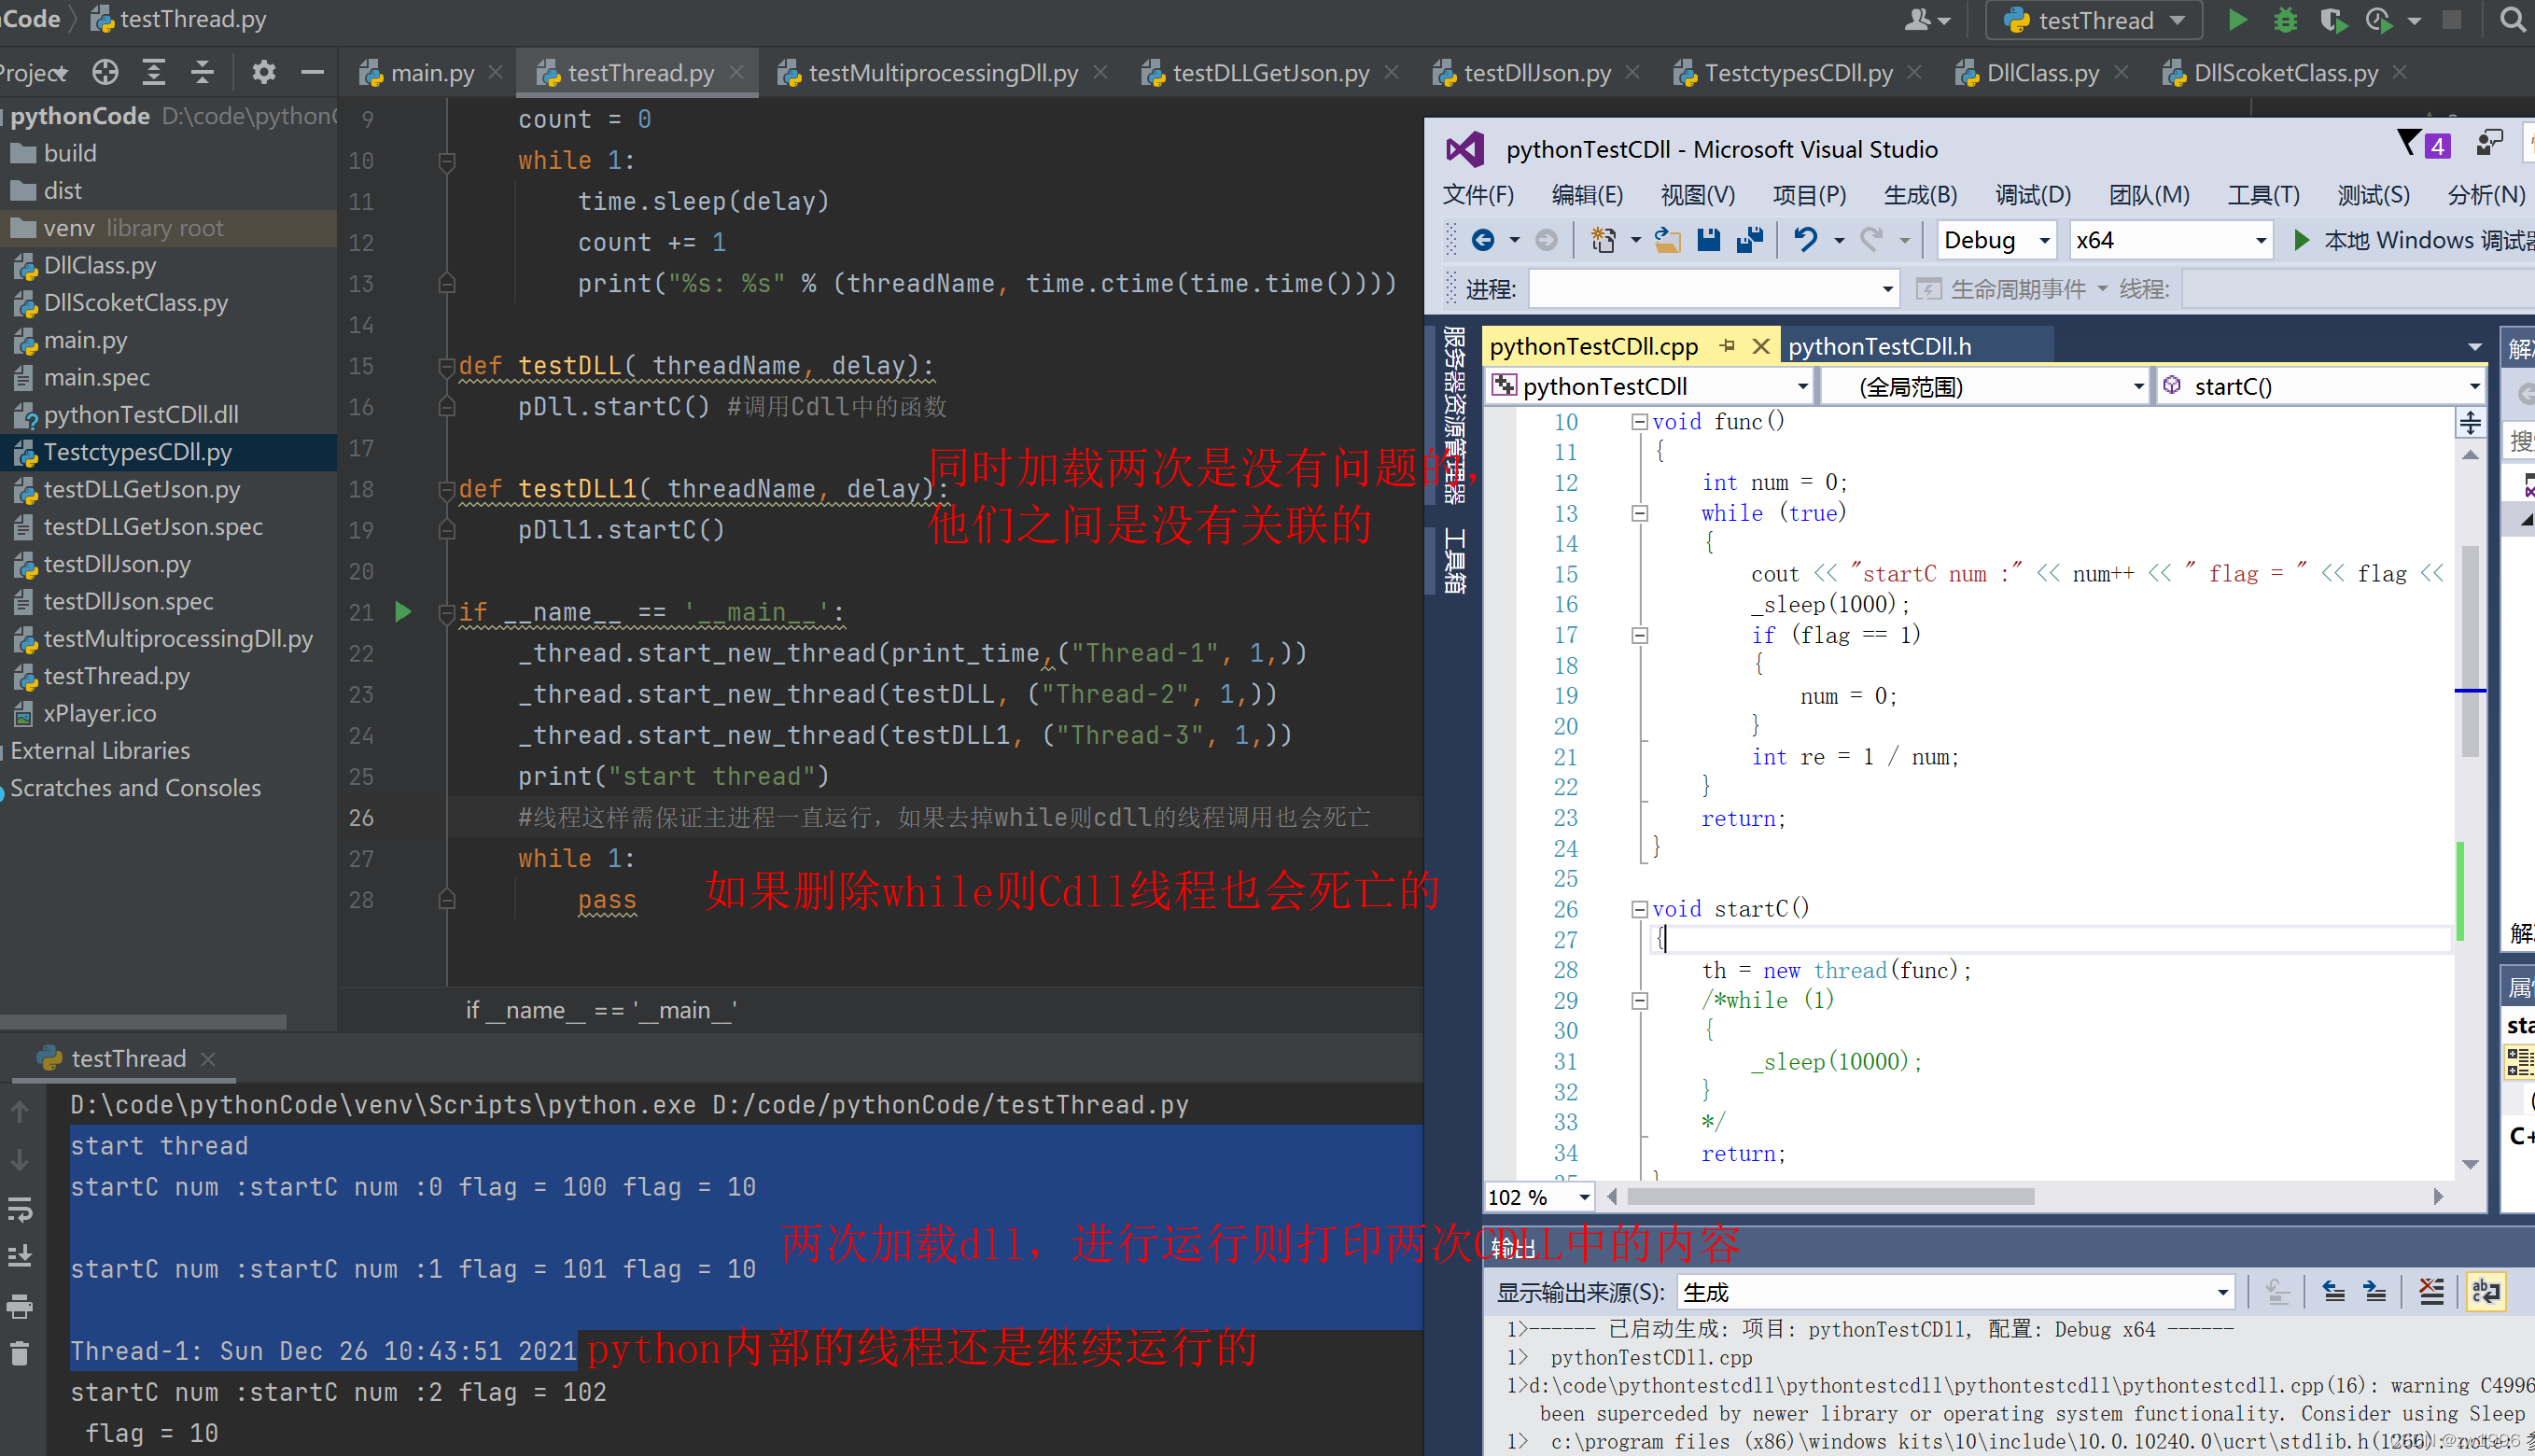
2、python中以_thread方式调用Cdll启动其中线程
python代码
from ctypes import \*
import _thread
import time

#以线程的方式启动Cdll
pDll = CDLL("./pythonTestCDll.dll") #加载Cdll库
pDll1 = CDLL("./pythonTestCDll.dll")
def print\_time(threadName, delay):
    count = 0
    while 1:
        time.sleep(delay)
        count += 1
        print("%s: %s" % (threadName, time.ctime(time.time())))

def testDLL( threadName, delay):
    pDll.startC() #调用Cdll中的函数

def testDLL1( threadName, delay):
    pDll1.startC()

if __name__ == '__main__':
    _thread.start\_new\_thread(print_time,("Thread-1", 1,))
    _thread.start\_new\_thread(testDLL, ("Thread-2", 1,))
    _thread.start\_new\_thread(testDLL1, ("Thread-3", 1,))
    print("start thread")
    #线程这样需保证主进程一直运行,如果去掉while则cdll的线程调用也会死亡
    while 1:
        pass
C代码
.h文件
extern "C" \_\_declspec(dllexport) void startC();
.cpp文件
#include "pythonTestCDll.h"
#include <iostream>
#include <thread>
#include <string>
using namespace std;

thread \*th = NULL;


void func()
{
	int num = 0;
	while (true)
	{
		cout << "startC num :" << num++ << " flag = " << flag << endl;
		\_sleep(1000);
		if (flag == 1)
		{
			num = 0;
		}
		int re = 1 / num;
	}
	return;
}

void startC()
{
	th = new thread(func);
	/\*while (1)
 {
 \_sleep(10000);
 }
 \*/
	return;
}
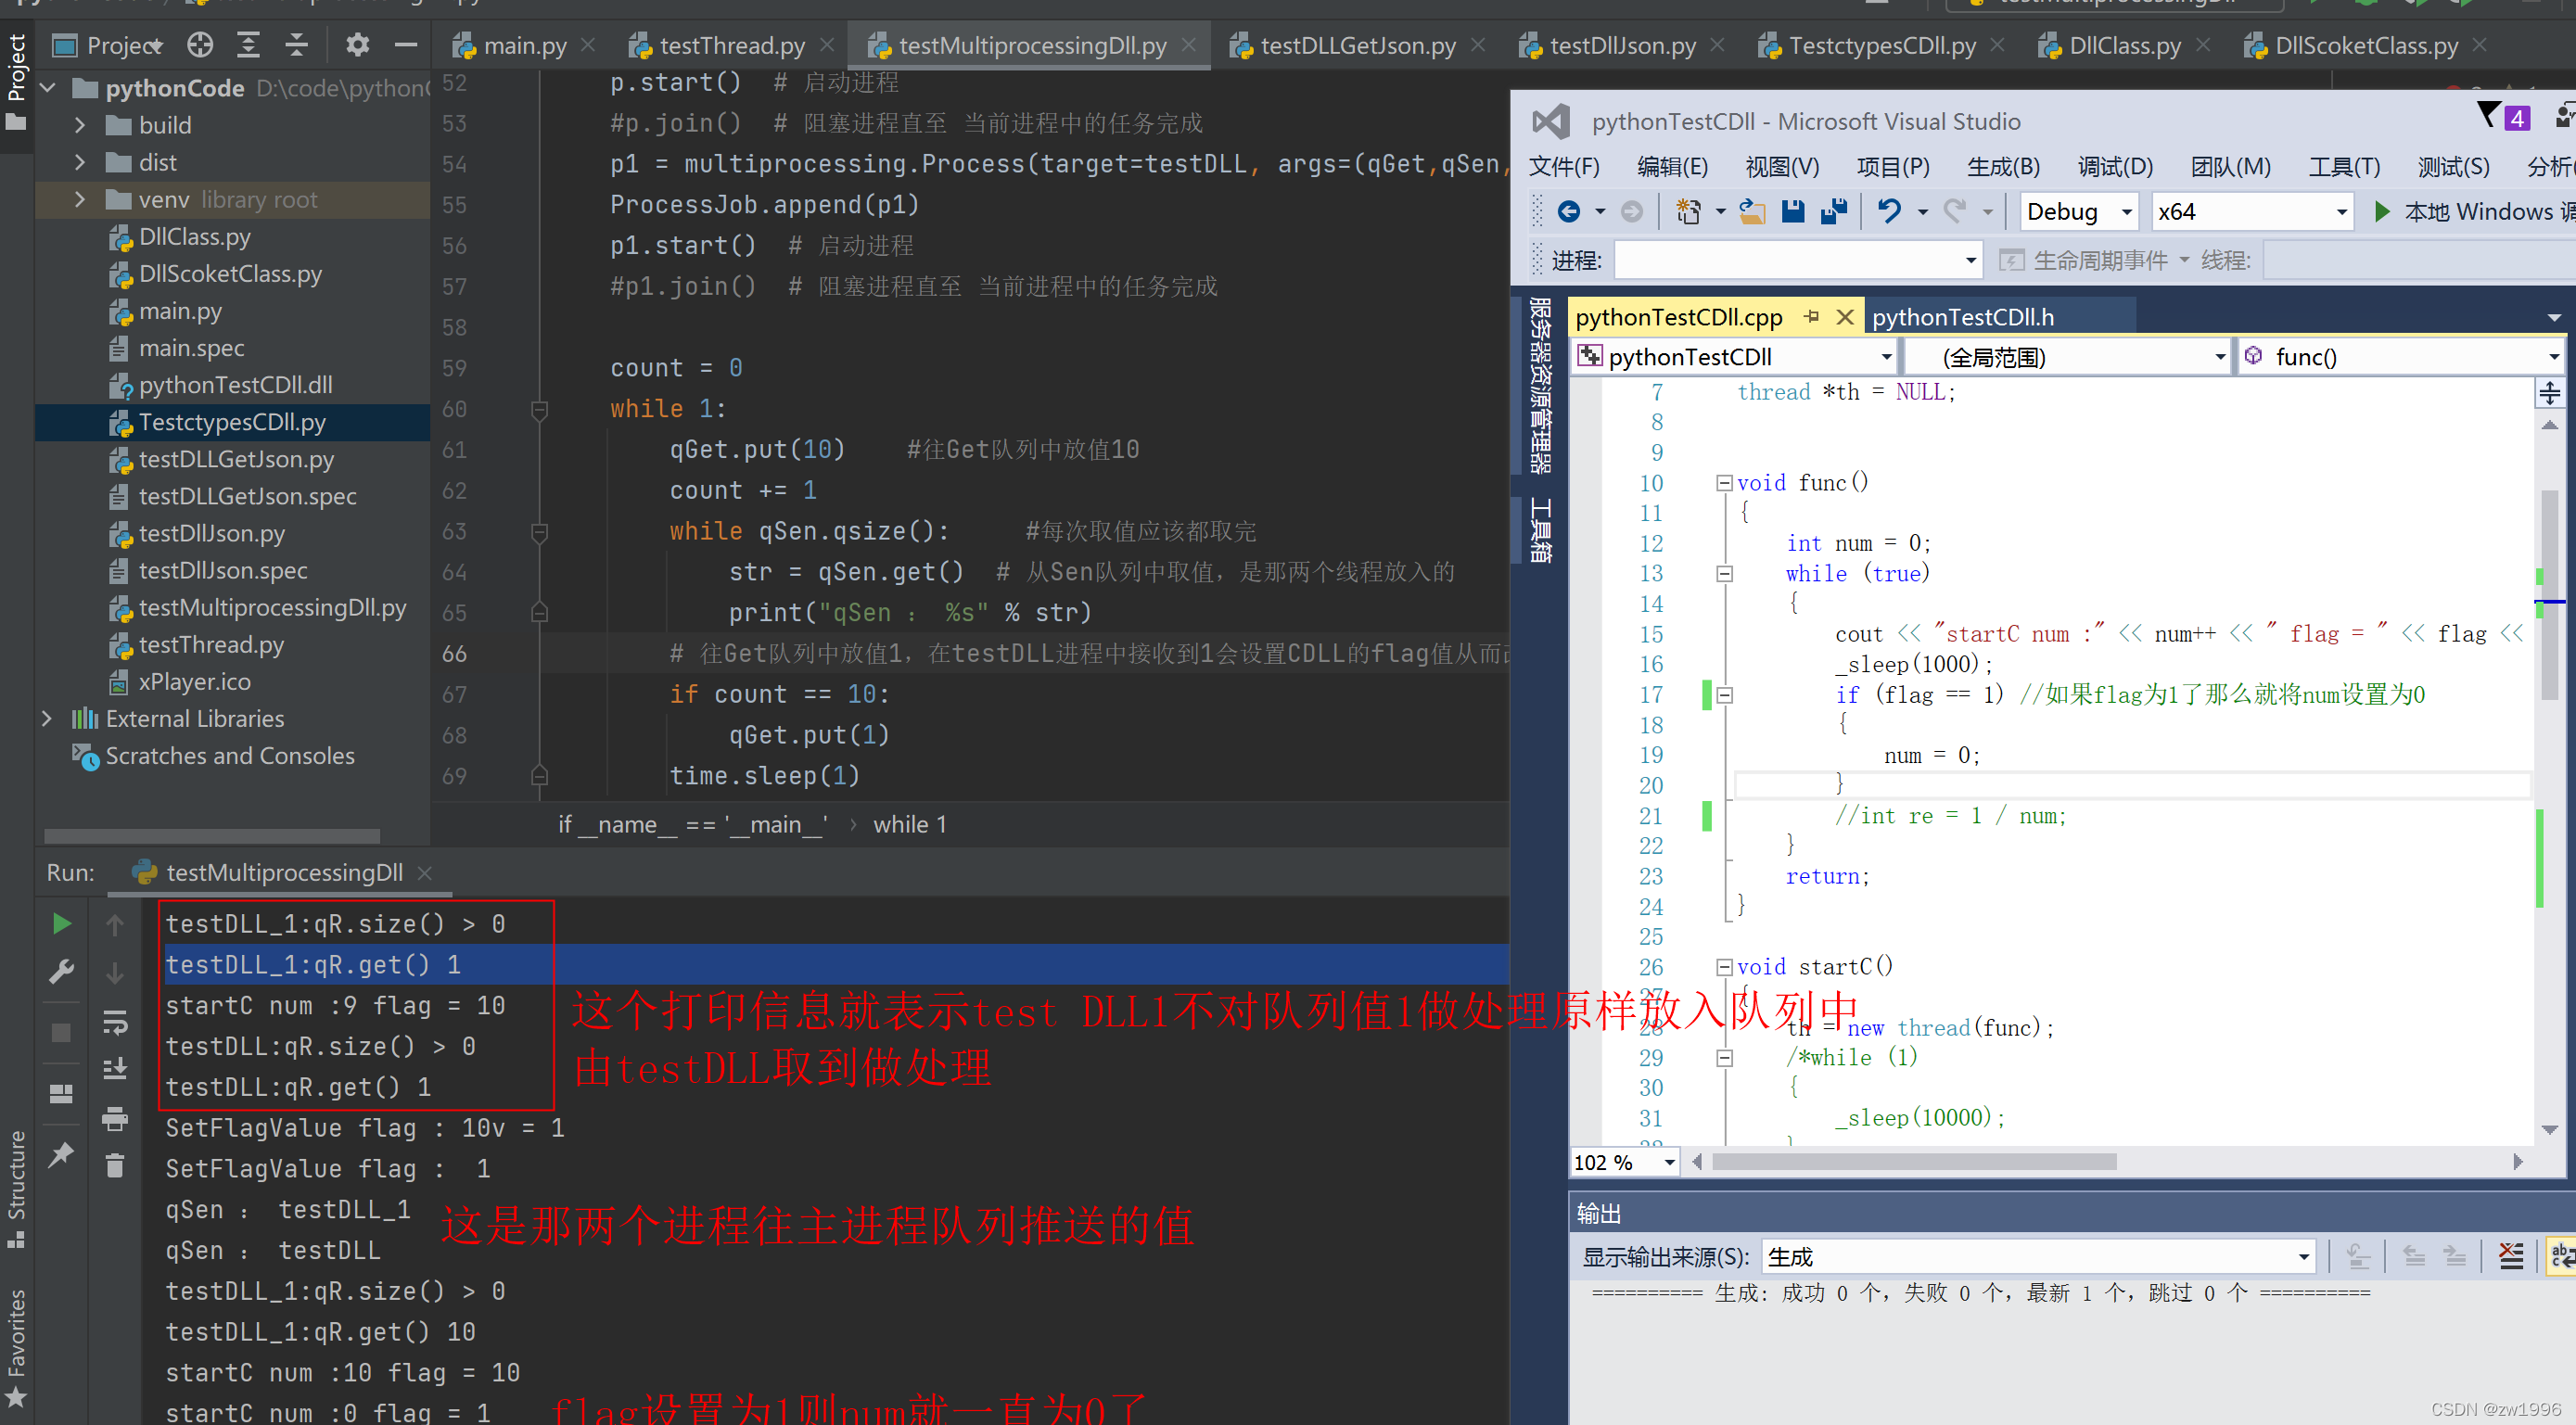
3、python以multiprocessing进程方式运行CDLL中的线程
从而最后可以从任务管理器中查看到每个c线程都是一个进程相当于一个exe在跑。

python代码
import multiprocessing
from multiprocessing import Process,Queue
import os
from ctypes import \*
import time

pDll = CDLL("./pythonTestCDll.dll")
pDll_1 = CDLL("./pythonTestCDll.dll")

def testDLL():
    pDll.startC()
    while 1:
        time.sleep(1)
        print("testDLL:")

def testDLL\_1():
    pDll_1.startC()
    #得保证调用Cdll线程的子进程存在while死循环不然Cdll线程也会死亡
    while 1:
        time.sleep(1)
        print("testDLL\_1:")

if __name__ == '__main__':
    p = multiprocessing.Process(target=testDLL, args=())
    p.start()
    p = multiprocessing.Process(target=testDLL_1, args=())
    p.start()
    #使用进程的方式 则主进程没有一直运行也没有关系
    #while 1:
     # time.sleep(1)
     # print("\_\_name\_\_:")
C代码
.h文件
extern "C" \_\_declspec(dllexport) void startC();
.cpp文件
#include "pythonTestCDll.h"
#include <iostream>
#include <thread>
#include <string>
using namespace std;

thread \*th = NULL;


void func()
{
	int num = 0;
	while (true)
	{
		cout << "startC num :" << num++ << " flag = " << flag << endl;
		\_sleep(1000);
		if (flag == 1)
		{
			num = 0;
		}
		int re = 1 / num;
	}
	return;
}

void startC()
{
	th = new thread(func);
	/\*while (1)
 {
 \_sleep(10000);
 }
 \*/
	return;
}
4、python主进程通过multiprocessing.Queue()队列向子进程传递值从而改变Cdll的执行逻辑
python代码
import multiprocessing
from multiprocessing import Process,Queue
import os
from ctypes import \*
import time
pDll = CDLL("./pythonTestCDll.dll")
pDll_1 = CDLL("./pythonTestCDll.dll")
flag = 0
def testDLL(qR, qS):
    pDll.startC()
    while 1:
        time.sleep(1)
        # 注意队列get是阻塞的,因此要先判断队列是否有值防止堵塞
        while qR.qsize():
            v = qR.get()
            print("testDLL:qR.size() > 0")
            if v == 1:
                print("testDLL:qR.get() %i" % v)
                pDll.SetFlagValue(1)
            else:
                print("testDLL:qR.get() %i" % v)
        qS.put("testDLL")

def testDLL\_1(qR, qS):
    pDll_1.startC()
    while 1:
        time.sleep(1)
        #注意队列get是阻塞的,因此要先判断队列是否有值防止堵塞
        #操作逻辑是如果是进程testDLL\_1 取到队列值为1则不进行处理并放回队列,队列是线程安全的
        while qR.qsize():
            print("testDLL\_1:qR.size() > 0")
            v = qR.get()
            if v == 1:
                print("testDLL\_1:qR.get() %i" % v)
                qR.put(v)
                break
            else:
                print("testDLL\_1:qR.get() %i" % v)
        qS.put("testDLL\_1")

if __name__ == '__main__':
    ProcessJob = []
    qGet = multiprocessing.Queue()  #队列是线程进程安全的无需加锁
    qSen = multiprocessing.Queue()
    p = multiprocessing.Process(target=testDLL_1, args=(qGet,qSen,))
    ProcessJob.append(p)
    p.start()  # 启动进程
    #p.join() # 阻塞进程直至 当前进程中的任务完成
    p1 = multiprocessing.Process(target=testDLL, args=(qGet,qSen,))
    ProcessJob.append(p1)
    p1.start()  # 启动进程
    #p1.join() # 阻塞进程直至 当前进程中的任务完成

    count = 0
    while 1:
        qGet.put(10)    #往Get队列中放值10
        count += 1
        while qSen.qsize():     #每次取值应该都取完
            str = qSen.get()  # 从Sen队列中取值,是那两个线程放入的
            print("qSen : %s" % str)
        # 往Get队列中放值1,在testDLL进程中接收到1会设置CDLL的flag值从而改变线程执行,而testDLL1接收1则不做处理又再将1放入进去
        if count == 10:
            qGet.put(1)
        time.sleep(1)
C++代码
.h文件
extern "C" \_\_declspec(dllexport) void startC();
extern "C" \_\_declspec(dllexport) void SetFlagValue(int v);
.cpp文件
#include "pythonTestCDll.h"
#include <iostream>
#include <thread>
#include <string>
using namespace std;

thread \*th = NULL;


void func()
{
	int num = 0;
	while (true)
	{
		cout << "startC num :" << num++ << " flag = " << flag << endl;
		\_sleep(1000);
		if (flag == 1) //如果flag为1了那么就将num设置为0
		{
			num = 0;
		}
		//int re = 1 / num;
	}
	return;
}

void startC()
{
	th = new thread(func);
	/\*while (1)
 {
 \_sleep(10000);
 }
 \*/
	return;
}

void SetFlagValue(int v)
{
	cout << "SetFlagValue flag : " << flag << "v = "<< v << endl;
	flag = v;
	cout << "SetFlagValue flag : " << flag << endl;
}
5、以类多个文件的管理形式实现进程multiprocessing方式的
from DllClass import MyClass 即可导入DllClass 文件中的MyClass

python代码
DllClass.py文件
class MyClass:
    #成员变量
    name = ''
    id = 0
    state = 0
    pDll = 0
    # 构造函数
    def \_\_init\_\_(self, name, id, state):
        self.name = name
        self.id = id
        self.state = state

    #成员方法
    def getState(self):
        return self.state

    def pocD(self, name):
        return
 -----------------------------------------
 DllScoketClass.py文件
from ctypes import \*import time
from multiprocessing import Queue
from DllClass import MyClass

class DllScoketClass(MyClass):
    soc = ''
    def \_\_init\_\_(self, soc, name, id, state):
        super(DllScoketClass, self).\_\_init\_\_(name, id, state)       #需显示调用父类__init__构造函数
        self.soc = soc

    def pocD(self, qR, qS):
        pDll = CDLL("./pythonTestCDll.dll")
        pDll.startC() #启动Cdll的线程
        #处理逻辑
        while 1:
            time.sleep(1)
            #接收守护进程中对队列传递的参数
            if qR.qsize() > 0:
                v = qR.get()
                print("DllScoketClass:qR.size() > 0")
                if v == 1:
                    pDll.SetFlagValue(1) #调用CDLL的函数改变其中流程
            else:
                print("DllScoketClass:qR.size() < 0")
            qS.put("DllScoketClass")
        end
   --------------------------------------------------
main.py文件
import os
import time
import multiprocessing
from DllScoketClass import DllScoketClass #从DllClass.py中导入MyClass类

if __name__ == '__main__':
    c1 = DllScoketClass("soc", "c1", 0, 0)
    c2 = DllScoketClass("soc2", "c2", 0, 0)
    print("父类方法: %i" % c1.getState())
    ProcessJob = []
    qGet = multiprocessing.Queue()
    qSen = multiprocessing.Queue()
    p = multiprocessing.Process(target=c1.pocD, args=(qGet, qSen, ))
    ProcessJob.append(p)
    p.start()  # 启动进程
    p = multiprocessing.Process(target=c2.pocD, args=(qGet, qSen,))
    ProcessJob.append(p)
    p.start()  # 启动进程

    count = 0
    while 1:
        if qSen.qsize() > 0:    #防止get阻塞进程
            str = qSen.get()
            print("qSen : %s" % str)
        if count == 10:
            qGet.put(1)
        count += 1
        time.sleep(1)
    end
C++代码与上节一致
6、如Cdll崩溃需由multiprocessing再次调起
如果Cdll崩溃那么其实调用Cdll的子进程的状态也是死亡了那么就可以根据判断子进程的状态判断是否奔溃,从而进行再次调起子进程从而再次调起Cdll线程。
python代码,只有main.py代码的main函数的while中多出判断子进程状态并如果有死亡子进程则重新调起
main.py文件
# This is a sample Python script.

import os
import time
import multiprocessing
from DllScoketClass import DllScoketClass #从DllClass.py中导入MyClass类

if __name__ == '__main__':
    c1 = DllScoketClass("soc", "c1", 0, 0)
    c2 = DllScoketClass("soc2", "c2", 0, 0)
    print("父类方法: %i" % c1.getState())
    ProcessJob = []
    qGet = multiprocessing.Queue()
    qSen = multiprocessing.Queue()
    p = multiprocessing.Process(target=c1.pocD, args=(qGet, qSen, ))
    ProcessJob.append(p)
    p.start()  # 启动进程
    p = multiprocessing.Process(target=c2.pocD, args=(qGet, qSen,))
    ProcessJob.append(p)
    p.start()  # 启动进程

    count = 0
    while 1:
        if qSen.qsize() > 0:    #防止get阻塞进程
            str = qSen.get()
            print("qSen : %s" % str)
        if count == 10:
            qGet.put(1)
        count += 1
        time.sleep(1)
        nums = 0
        while nums < len(ProcessJob):       #循环遍历所有子进程判断其状态,如果死亡则重新调起
            if ProcessJob[nums].is\_alive() == False:  # 如果进程状态死亡那么则重新启动
                ProcessJob[nums].terminate()    #杀死进程
                ProcessJob[nums].join(0.1)      #回收
                print(ProcessJob)
                ProcessJob.remove(ProcessJob[nums])
                print(ProcessJob)
                p = multiprocessing.Process(target=c1.pocD, args=(qGet, qSen,))     #重新创建
                count = 0
                ProcessJob.append(p)
                p.start()       #调起
                print(ProcessJob)
            nums+=1
    end
7、在Cdll和python中传入传出字符串使用ctypes

python代码
import multiprocessing
from multiprocessing import Process,Queue
import os
from ctypes import \*
import time

pDll = CDLL("./pythonTestCDll.dll")

def testDLL():
    pstr = create\_string\_buffer(1024,  '\0')    # 创建字符串缓冲区
    # 对输入输出参数进行声明
    GetAndSetString = pDll.GetAndSetString
    GetAndSetString.restype = c_char_p
    GetAndSetString.argtypes = [c\_char\_p]
    pchar = GetAndSetString(pstr)
    szbuffer = c\_char\_p(pchar)  # 强制转换为c_char_p类型,取其value值
    print(pstr.value)
    print(szbuffer.value)


if __name__ == '__main__':
    testDLL()
C++代码
.h文件
extern "C" \_\_declspec(dllexport) char\* GetAndSetString(char\*);
.cpp文件
char\* GetAndSetString(char\* s)
{
	strcpy(s, "CDLL");
	char \* greeting = "Cdll String";
	cout << "C DLL cout :" << s << endl;
	return greeting;
}
8、在Cdll和python相互间json字符串的相关操作
纯python内部json与python对象的转换
import json

# Python 字典类型转换为 JSON 对象
data1 = {
    'no': 1,
    'name': 'Runoob',
    'url': 'http://www.runoob.com'
}

json_str = json.dumps(data1)
print("Python 原始数据:", repr(data1))
print("JSON 对象:", json_str)

# 将 JSON 对象转换为 Python 字典
data2 = json.loads(json_str)
print("data2['name']: ", data2['name'])
print("data2['url']: ", data2['url'])

python代码
from ctypes import \*


 被折叠的 条评论
为什么被折叠?
被折叠的 条评论
为什么被折叠?
 到【灌水乐园】发言


