


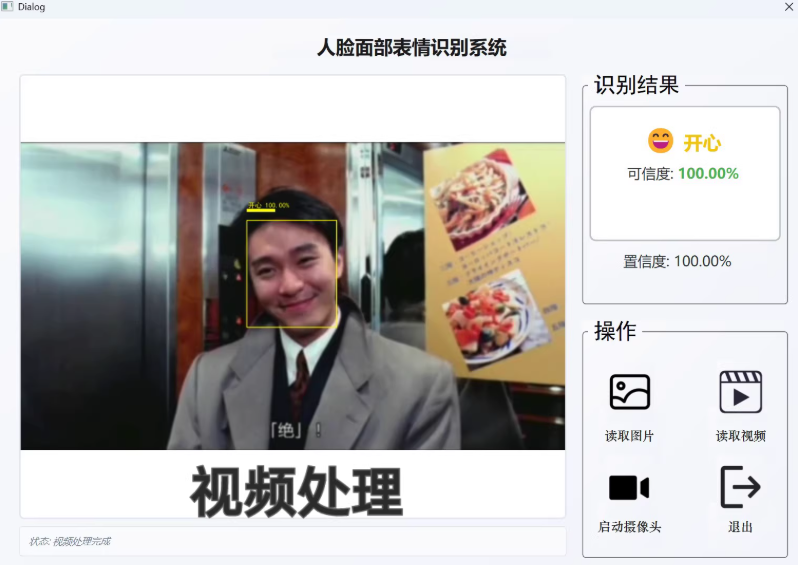
深度学习卷积神经网络_基于 ResNet50 的人脸面部表情识别系统,用 OpenCV 人脸检测,PyTorch 进行情绪分类,且PySide6 构建 GUI。
以下文字及代码仅供参考。
基于resnet的人脸面部表情识别系统(7种情绪检测)

预实现目标:
①双模型协同:OpenCV人脸检测 + ResNet50情绪分类
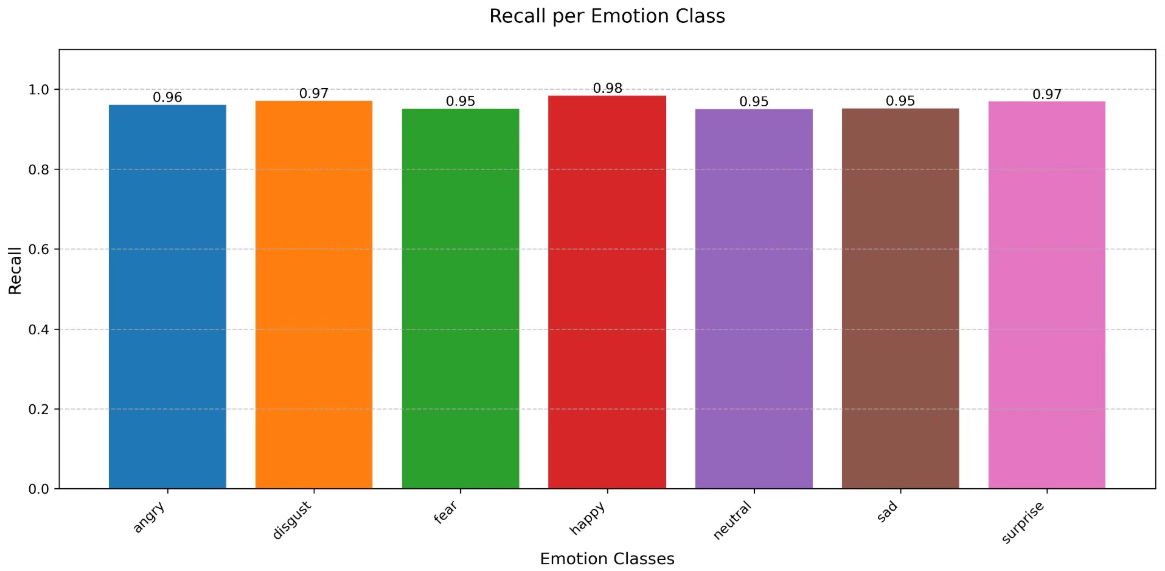
②七种情绪识别:
angry: ‘愤怒’,
disgust: ‘厌恶’,
fear: ‘恐惧’,
happy:. ‘开心’,
neutral: ‘中性’,
sad: ‘悲伤’,
surprise: ‘惊讶’
预实现目标:
流程技术栈:
- 人脸定位:SSD算法(Caffe模型)
- 情绪分类:预训练ResNet50+自定义分类头(Dropout+BN+GELU优化)
- 动态可视化:中文标签+置信度条等
4. 可视化GUI:PySide6开发,可支持图片/视频/摄像头三种输入源
技术栈:
OpenCV+Pytorch+Pyside6
基于 ResNet50 的人脸面部表情识别系统,并使用 OpenCV 进行人脸检测,PyTorch 进行情绪分类,以及 PySide6 构建 GUI。
以下是详细的步骤和代码实现。
1. 安装依赖
首先安装必要的库:
pip install opencv-python-headless numpy torch torchvision pytorch-pretrained-models pyside6
2. 准备数据集
确保你有一个包含7种情绪的标注数据集,且已经准备好用于训练 ResNet50 模型。
3. 数据预处理
import cv2
import numpy as np
from PIL import Image
import torch
from torchvision import transforms

# 图像预处理
def preprocess_image(image):
    transform = transforms.Compose([
        transforms.Resize((224, 224)),
        transforms.ToTensor(),
        transforms.Normalize(mean=[0.485, 0.456, 0.406], std=[0.229, 0.224, 0.225])
    ])
    image = Image.fromarray(cv2.cvtColor(image, cv2.COLOR_BGR2RGB))
    return transform(image).unsqueeze(0)

# 加载预训练模型
model = torch.hub.load('pytorch/vision:v0.10.0', 'resnet50', pretrained=True)
model.fc = torch.nn.Linear(model.fc.in_features, 7)  # 修改分类头
model.load_state_dict(torch.load('path_to_your_model.pth'))  # 加载自定义训练的权重
model.eval()
4. 人脸检测
使用 SSD 算法进行人脸检测:
import caffe
from caffe.proto import caffe_pb2

# 加载 SSD 模型
net = caffe.Net('path_to_ssd_deploy.prototxt', 'path_to_ssd_weights.caffemodel', caffe.TEST)

def detect_faces(image):
    net.blobs['data'].reshape(1, *image.shape)
    net.blobs['data'].data[...] = image
    detections = net.forward()['detection_out']
    return detections[0, 0, :, :]
5. 情绪分类
def classify_emotion(image):
    preprocessed_image = preprocess_image(image)
    with torch.no_grad():
        output = model(preprocessed_image)
        probabilities = torch.softmax(output, dim=1)
    return probabilities
6. GUI 应用程序
使用 PySide6 构建 GUI 应用程序:
import sys
from PySide6.QtWidgets import QApplication, QMainWindow, QVBoxLayout, QWidget, QLabel, QPushButton, QFileDialog, QMessageBox
from PySide6.QtGui import QImage, QPixmap
from PySide6.QtCore import QTimer, Qt

class EmotionRecognitionApp(QMainWindow):
    def __init__(self):
        super().__init__()
        self.setWindowTitle("人脸面部表情识别系统")
        self.setGeometry(100, 100, 800, 600)

        self.initUI()

    def initUI(self):
        layout = QVBoxLayout()

        self.image_label = QLabel(self)
        layout.addWidget(self.image_label)

        self.result_label = QLabel(self)
        layout.addWidget(self.result_label)

        self.button_layout = QVBoxLayout()

        self.load_image_button = QPushButton("读取图片", self)
        self.load_image_button.clicked.connect(self.load_image)
        self.button_layout.addWidget(self.load_image_button)

        self.load_video_button = QPushButton("读取视频", self)
        self.load_video_button.clicked.connect(self.load_video)
        self.button_layout.addWidget(self.load_video_button)

        self.start_camera_button = QPushButton("启动摄像头", self)
        self.start_camera_button.clicked.connect(self.start_camera)
        self.button_layout.addWidget(self.start_camera_button)

        self.exit_button = QPushButton("退出", self)
        self.exit_button.clicked.connect(self.close)
        self.button_layout.addWidget(self.exit_button)

        layout.addLayout(self.button_layout)

        container = QWidget()
        container.setLayout(layout)
        self.setCentralWidget(container)

        self.timer = QTimer(self)
        self.timer.timeout.connect(self.update_frame)

    def load_image(self):
        options = QFileDialog.Options()
        file_name, _ = QFileDialog.getOpenFileName(self, "选择图像文件", "", "Images (*.png *.jpg *.jpeg)", options=options)
        if file_name:
            self.image_path = file_name
            self.process_image(file_name)

    def load_video(self):
        options = QFileDialog.Options()
        file_name, _ = QFileDialog.getOpenFileName(self, "选择视频文件", "", "Videos (*.mp4 *.avi)", options=options)
        if file_name:
            self.video_path = file_name
            self.cap = cv2.VideoCapture(file_name)
            self.timer.start(30)

    def start_camera(self):
        self.cap = cv2.VideoCapture(0)
        self.timer.start(30)

    def update_frame(self):
        ret, frame = self.cap.read()
        if ret:
            self.process_image(frame)

    def process_image(self, image):
        if isinstance(image, str):
            image = cv2.imread(image)
        else:
            image = image.copy()

        detections = detect_faces(image)
        for detection in detections:
            if detection[2] > 0.5:  # 置信度阈值
                x1, y1, x2, y2 = int(detection[3]), int(detection[4]), int(detection[5]), int(detection[6])
                face = image[y1:y2, x1:x2]
                probabilities = classify_emotion(face)
                emotion_index = torch.argmax(probabilities).item()
                emotions = ['愤怒', '厌恶', '恐惧', '开心', '中性', '悲伤', '惊讶']
                emotion = emotions[emotion_index]
                confidence = round(float(probabilities[emotion_index].item()) * 100, 2)
                self.result_label.setText(f"{emotion} {confidence}%")

                # 绘制矩形框
                cv2.rectangle(image, (x1, y1), (x2, y2), (0, 255, 0), 2)
                cv2.putText(image, f"{emotion} {confidence}%", (x1, y1 - 10), cv2.FONT_HERSHEY_SIMPLEX, 0.9, (0, 255, 0), 2)

        # 显示图像
        qimage = QImage(image.data, image.shape[1], image.shape[0], QImage.Format_RGB888)
        pixmap = QPixmap.fromImage(qimage.rgbSwapped())
        self.image_label.setPixmap(pixmap)

if __name__ == '__main__':
    app = QApplication(sys.argv)
    window = EmotionRecognitionApp()
    window.show()
    sys.exit(app.exec_())
7. 运行应用程序
- 确保所有依赖已安装。
- 启动 GUI 应用程序:
python emotion_recognition_gui.py - 在界面中选择“读取图片”、“读取视频”或“启动摄像头”,查看检测结果。
总结
从人脸检测到情绪分类,结合 PySide6 构建了一个简单的 GUI 工具,能够加载图像、视频或实时摄像头流,并显示检测结果。


 被折叠的 条评论
为什么被折叠?
被折叠的 条评论
为什么被折叠?
 到【灌水乐园】发言


