


通过使用Python和PyTorch实现车道线检测 训练大量的车道线检测数据集 构建基于深度学习的车道线检测系统
文章目录
- 1. 数据准备
- 数据预处理
- 2. 模型选择与训练
- U-Net模型定义
- 训练模型
- 3. 推理与可视化
- 4. 用户界面设计
以下文字及代码仅供参考。
深度学习车道线检测
构建一个基于深度学习的车道线检测系统是一个涉及图像处理、深度学习模型训练和推理等多个步骤的复杂任务。以下是一个详细的指南,包括数据准备、模型选择与训练、以及使用Python和PyTorch实现车道线检测的代码示例。
1. 数据准备
首先,需要收集和标注车道线数据集。常用的公开数据集有TuSimple和CULane等。这些数据集包含大量带有车道线标注的图片。
数据预处理
对数据进行预处理,包括裁剪、缩放、归一化等操作,以便于模型训练。
import cv2
import numpy as np

def preprocess_image(image):
    # 裁剪和缩放
    image = image[240:, :, :]
    image = cv2.resize(image, (320, 160))

    # 归一化
    image = image / 255.0

    return image
2. 模型选择与训练
选择一个适合车道线检测的深度学习模型,如U-Net、SegNet或LaneNet等。这里以U-Net为例。
U-Net模型定义
import torch
import torch.nn as nn
import torch.nn.functional as F

class UNet(nn.Module):
    def __init__(self):
        super(UNet, self).__init__()

        # Encoder
        self.conv1 = nn.Conv2d(3, 64, kernel_size=3, padding=1)
        self.conv2 = nn.Conv2d(64, 128, kernel_size=3, padding=1)
        self.conv3 = nn.Conv2d(128, 256, kernel_size=3, padding=1)

        # Decoder
        self.upconv3 = nn.ConvTranspose2d(256, 128, kernel_size=2, stride=2)
        self.conv4 = nn.Conv2d(256, 128, kernel_size=3, padding=1)
        self.upconv2 = nn.ConvTranspose2d(128, 64, kernel_size=2, stride=2)
        self.conv5 = nn.Conv2d(128, 64, kernel_size=3, padding=1)
        self.conv6 = nn.Conv2d(64, 1, kernel_size=1)

    def forward(self, x):
        # Encoder
        x1 = F.relu(self.conv1(x))
        x2 = F.max_pool2d(F.relu(self.conv2(x1)), 2)
        x3 = F.max_pool2d(F.relu(self.conv3(x2)), 2)

        # Decoder
        x = F.relu(self.upconv3(x3))
        x = torch.cat((x2, x), dim=1)
        x = F.relu(self.conv4(x))
        x = F.relu(self.upconv2(x))
        x = torch.cat((x1, x), dim=1)
        x = F.relu(self.conv5(x))
        x = self.conv6(x)

        return x
训练模型
import torch.optim as optim

# 初始化模型和优化器
model = UNet()
optimizer = optim.Adam(model.parameters(), lr=0.001)

# 定义损失函数
criterion = nn.BCEWithLogitsLoss()

# 训练循环
for epoch in range(num_epochs):
    for images, masks in dataloader:
        optimizer.zero_grad()

        outputs = model(images)
        loss = criterion(outputs, masks)

        loss.backward()
        optimizer.step()

        print(f'Epoch [{epoch+1}/{num_epochs}], Loss: {loss.item()}')
3. 推理与可视化
在完成模型训练后,可以使用训练好的模型进行车道线检测,并将结果可视化。
def detect_lane_lines(image_path, model):
    image = cv2.imread(image_path)
    image = preprocess_image(image)
    image = torch.tensor(image).permute(2, 0, 1).unsqueeze(0).float()

    with torch.no_grad():
        output = model(image)
        output = torch.sigmoid(output)
        output = output.squeeze().numpy()

    # 可视化结果
    lane_lines = (output > 0.5).astype(np.uint8) * 255
    lane_lines = cv2.cvtColor(lane_lines, cv2.COLOR_GRAY2BGR)

    result = cv2.addWeighted(image, 0.5, lane_lines, 0.5, 0)

    return result

# 使用模型进行车道线检测
result = detect_lane_lines('test_image.jpg', model)
cv2.imshow('Lane Line Detection', result)
cv2.waitKey(0)
cv2.destroyAllWindows()
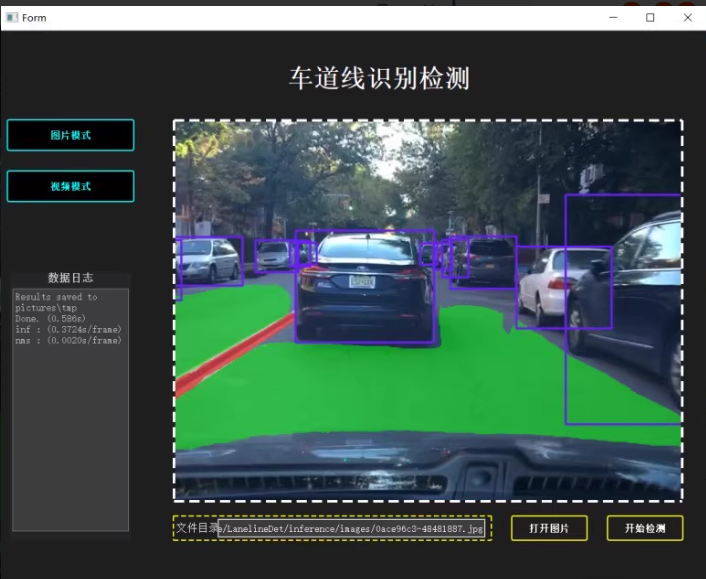
4. 用户界面设计
为了提供更好的用户体验,可以使用PyQt5等库设计一个图形用户界面(GUI)。
from PyQt5.QtWidgets import QApplication, QMainWindow, QPushButton, QLabel, QVBoxLayout, QWidget, QFileDialog
from PyQt5.QtGui import QImage, QPixmap
from PyQt5.QtCore import QTimer
import sys

class LaneDetectionApp(QMainWindow):
    def __init__(self):
        super().__init__()

        self.setWindowTitle("车道线识别检测")
        self.setGeometry(100, 100, 800, 600)

        self.label = QLabel(self)
        self.label.setGeometry(10, 10, 640, 480)

        self.open_button = QPushButton('打开图片', self)
        self.open_button.move(10, 490)
        self.open_button.clicked.connect(self.open_image)

        self.detect_button = QPushButton('开始检测', self)
        self.detect_button.move(170, 490)
        self.detect_button.clicked.connect(self.detect_lane_lines)

    def open_image(self):
        options = QFileDialog.Options()
        file_name, _ = QFileDialog.getOpenFileName(self, "QFileDialog.getOpenFileName()", "", "Images (*.png *.xpm *.jpg *.bmp);;All Files (*)", options=options)
        if file_name:
            self.image_path = file_name
            self.display_image(file_name)

    def display_image(self, file_name):
        image = QImage(file_name)
        pixmap = QPixmap.fromImage(image)
        self.label.setPixmap(pixmap)

    def detect_lane_lines(self):
        if hasattr(self, 'image_path'):
            result = detect_lane_lines(self.image_path, model)
            height, width, channel = result.shape
            bytes_per_line = 3 * width
            q_img = QImage(result.data, width, height, bytes_per_line, QImage.Format_RGB888)
            pixmap = QPixmap.fromImage(q_img)
            self.label.setPixmap(pixmap)

if __name__ == '__main__':
    app = QApplication(sys.argv)
    window = LaneDetectionApp()
    window.show()
    sys.exit(app.exec_())
。你可以根据实际需求调整模型结构、优化超参数或改进用户界面,以进一步提升系统的性能和用户体验。


 被折叠的 条评论
为什么被折叠?
被折叠的 条评论
为什么被折叠?
 到【灌水乐园】发言


