


-
前言
-
原理
-
-
- 一、色彩矩阵基本原理
-
-
- *什么是色彩矩阵*
-
*改变颜色*
-
二、相机的基本原理
-
- *openGL ES*
-
*制作一个camera*
-
CameraDemo
============================================================
如今美颜相机可以说是每个女生甚至是男生手机上的必备软件,可以轻而易举的拍出令人满意的“照骗”,本人的女盆友(非本专业)一直好奇美颜相机是如何开发出来的,这片文章我们主要来实现对相片的色调调整的基本方法,而要制作成一个功能完备的美颜相机还远不止这一项内容哦。
============================================================
一、色彩矩阵基本原理
Android在处理图片时,最常使用到的数据结构是位图(Bitmap),它包含了一张图片所有的数据。整个图片都是由点阵和颜色值组成的,所谓点阵就是一个包含像素的矩阵,每一个元素对应着图片的一个像素。而颜色值——ARGB,分别对应着透明度、红、绿、蓝这四个通道分量,他们共同决定了每个像素点显示的颜色

什么是色彩矩阵
在Android中,系统使用一个颜色矩阵-ColorMatrix来处理图像的色彩效果。对于图像的每个像素点,都有一个颜色分量矩阵用来保存颜色的RGBA值,Android中的颜色矩阵是一个 4x5 的数字矩阵,它用来对图片的色彩进行处理。
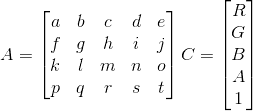
在Android系统中,如果想要改变一张图像的色彩显示效果,可以使用矩阵的乘法运算来修改颜色分量矩阵的值。上面矩阵A就是一个 4x5 的颜色矩阵。在Android中,它会以一维数组的形式来存储[a,b,d,e,f,g,h,i,j,k,l,m,n,o,p,q,r,s,t],而C则是一个颜色矩阵分量。在处理图像时,使用矩阵乘法运算AC来处理颜色分量矩阵。

R1 = aR + bG + cB + dA + e;
G1 = fR + gG + hB + iA + j;
B1 = kR + lG + mB + nA + o;
A1 = pR + qG + rB + sA + t;
从等式中可以看出abcde决定红色、fghi决定绿色、klmn决定蓝色、pqrs决定透明色
而ejot就决定了偏移量。
改变颜色
通过上面对色彩矩阵的简单了解,我们可以想到改变图片的颜色方法来给相片进行色彩渲染,有以下两种方法可以实现:
- 改变偏移量
即保持矩阵其他列的值不变,只改变最后一列的值来是图片的rgb值发生变化
- 改变rgba值分量的系数
使r、g、b、a分量的系数改变,即使原矩阵乘以对角矩阵使得每个值发生不同的改变来进行色调的改变。
二、相机的基本原理
openGL ES
在制作Camera前还需要向大家介绍一下openGL ES本人也是第一次接触这个技术,所以有一些地方并是很理解,个人感觉这项技术对于新手不是很容易接受。
并且在安卓中,OpenGL ES的开发有基本着固定的代码形式,为实现不同的功能,只需将shader编写好,按步就班的在代码中调用就可以了,但是OpenGL ES提供的API比较抽象,写起来不容易记忆,而且重复代码也比较多。
制作一个camera
1.新建一个Android project
这是很基本的操作想必大家也都清楚,如果有初学者,新建Android project这是基本的新建方法。
2.集成camera框架到项目中
在project/build.grdle文件中添加依赖:
allprojects {
repositories {
…
maven { url ‘https://jitpack.io’ }
}
}
在app/build.grdle文件中添加依赖:
dependencies {
implementation ‘com.github.smzhldr:AGLFramework:v1.0’
}
调用美颜相机:
<?xml version="1.0" encoding="utf-8"?><RelativeLayout xmlns:android=“http://schemas.android.com/apk/res/android”
xmlns:tools=“http://schemas.android.com/tools”
android:layout_width=“match_parent”
android:layout_height=“match_parent”
tools:context=“.CameraActivity”>
<com.aglframework.smzh.camera.CameraPreview
android:id=“@+id/camera_preview”
android:layout_width=“match_parent”
android:layout_height=“match_parent” />
在Activity中加入以下代码:
public class CameraActivity extends Activity {
private AGLView aglView;
private AGLCamera1 aglCamera1;
@Override
protected void onCreate(Bundle savedInstanceState) {
super.onCreate(savedInstanceState);
setContentView(R.layout.activity_camea);
aglView = findViewById(R.id.camera_preview);
}
@Override
protected void onResume() {
super.onResume();
if (aglCamera1 == null) {
aglCamera1 = new AGLCamera1(aglView, 1080, 1920);
}
aglCamera1.open();
}
}
@Override
protected void onPause() {
super.onPause();
if (aglCamera1 != null) {
aglCamera1.close();
}
}
}
====================================================================
将 4x5 矩阵转换成一维数组,然后再将这一维数组设置到ColorMatrix类里去:
//将矩阵设置到图像
private void setImageMatrix() {
Bitmap bmp = Bitmap.createBitmap(bitmap.getWidth(), bitmap.getHeight(), Bitmap.Config.ARGB_8888);
ColorMatrix colorMatrix = new ColorMatrix();
colorMatrix.set(mColorMatrix);//将一维数组设置到ColorMatrix
Canvas canvas = new Canvas(bmp);
Paint paint = new Paint();
paint.setColorFilter(new ColorMatrixColorFilter(colorMatrix));
canvas.drawBitmap(bitmap, 0, 0, paint);
iv_photo.setImageBitmap(bmp);
}
xml布局:
<?xml version="1.0" encoding="utf-8"?><LinearLayout
xmlns:android=“http://schemas.android.com/apk/res/android”
xmlns:tools=“http://schemas.android.com/tools”
android:layout_width=“match_parent”
android:layout_height=“match_parent”
tools:context=“com.example.deeson.mycolormatrix.MainActivity”
android:orientation=“vertical”>
<ImageView
android:id=“@+id/iv_photo”
android:layout_width=“300dp”
android:layout_height=“0dp”
android:layout_weight=“3”
android:layout_gravity=“center_horizontal”/>
<GridLayout
android:id=“@+id/matrix_layout”
android:layout_width=“match_parent”
android:layout_height=“0dp”
android:layout_weight=“4”
android:columnCount=“5”
android:rowCount=“4”>
<LinearLayout
android:layout_width=“match_parent”
android:layout_height=“wrap_content”
android:orientation=“horizontal”>
<Button
android:id=“@+id/btn_change”
android:layout_width=“0dp”
android:layout_height=“wrap_content”
android:layout_weight=“1”
android:text=“change”/>
<Button
android:id=“@+id/btn_reset”
android:layout_width=“0dp”
android:layout_height=“wrap_content”
android:layout_weight=“1”
android:text=“reset”/>
通过 View 的 post() 方法,在视图创建完毕后获得其宽高值:
matrixLayout.post(new Runnable() {
@Override
public void run() {
mEtWidth = matrixLayout.getWidth() / 5;
mEtHeight = matrixLayout.getHeight() / 4;
addEts();
initMatrix();
}
});
MainActivity代码:
public class MainActivity extends AppCompatActivity implements View.OnClickListener {
Bitmap bitmap;
ImageView iv_photo;
GridLayout matrixLayout;
//每个edittext的宽高
int mEtWidth;
int mEtHeight;
//保存20个edittext
EditText[] mEts = new EditText[20];
//一维数组保存20个矩阵值
float[] mColorMatrix = new float[20];
@Override
protected void onCreate(Bundle savedInstanceState) {
super.onCreate(savedInstanceState);
setContentView(R.layout.activity_main);
bitmap = BitmapFactory.decodeResource(getResources(), R.drawable.iv_model);
iv_photo = (ImageView) findViewById(R.id.iv_photo);
matrixLayout = (GridLayout) findViewById(R.id.matrix_layout);
Button btn_change = (Button) findViewById(R.id.btn_change);
Button btn_reset = (Button) findViewById(R.id.btn_reset);
btn_change.setOnClickListener(this);
btn_reset.setOnClickListener(this);
iv_photo.setImageBitmap(bitmap);
//我们无法在onCreate()方法中获得视图的宽高值,所以通过View的post()方法,在视图创建完毕后获得其宽高值
matrixLayout.post(new Runnable() {
@Override
public void run() {
mEtWidth = matrixLayout.getWidth() / 5;
mEtHeight = matrixLayout.getHeight() / 4;
addEts();
initMatrix();
}
});
}


 1200
1200

 被折叠的 条评论
为什么被折叠?
被折叠的 条评论
为什么被折叠?
 到【灌水乐园】发言


