


-
目录
- 一、主从复制:
- 主从复制原理:
- master开启二进制日志记录,数据更新写入二进制日志(Binary log)
- slave开启IO进程,从master中读取二进制日志并写入slave的中继日志(Relay log)
- slave开启SQL进程,从中继日志中读取二进制日志
- 对二进制日志进行重放,写入数据到slave数据库中,最终达到slave与master中数据一致的状态
- 搭建环境:
- 至少两台主机,一台作为主服务器(master),一台作为从服务器(slave),额外配备一台作为客户端,三台主机之间能进行网络互通,关闭firewall防火墙、selinux安全策略。
- 主机之间需要随时进行网络对时,保证时间的一致性,至少保证误差在一分钟内,搭建对时环境(每台主机都需要设置):
#测试阿里云时间服务器对时服务
[root@master ~]# ntpdate ntp.aliyun.com
26 Jun 20:51:09 ntpdate[22496]: step time server 203.107.6.88 offset -84.620019 sec
#更改定时服务配置,设定每分钟进行一次对时
[root@master ~]# vim /etc/crontab
SHELL=/bin/bash
PATH=/sbin:/bin:/usr/sbin:/usr/bin
MAILTO=root
# For details see man 4 crontabs
# Example of job definition:
# .---------------- minute (0 - 59)
# | .------------- hour (0 - 23)
# | | .---------- day of month (1 - 31)
# | | | .------- month (1 - 12) OR jan,feb,mar,apr ...
# | | | | .---- day of week (0 - 6) (Sunday=0 or 7) OR sun,mon,tue,wed,thu,fri,sat
# | | | | |
# * * * * * user-name command to be executed
* * * * * root ntpdate ntp.aliyum.com
启动定时服务
[root@master ~]# systemctl start crond.service
- 搭建服务
#主从服务器都需要安装mariadb的服务端和客户端,客户端只需要安装客户端mariadb
[root@slave ~]# yum install -y mariadb-server mariadb
已加载插件:fastestmirror, langpacks
Loading mirror speeds from cached hostfile
* base: mirrors.aliyun.com
* extras: mirrors.aliyun.com
* updates: mirrors.aliyun.com
base | 3.6 kB 00:00
extras | 2.9 kB 00:00
mysql-connectors-community | 2.6 kB 00:00
mysql-tools-community | 2.6 kB 00:00
mysql57-community | 2.6 kB 00:00
updates | 2.9 kB 00:00
软件包 1:mariadb-server-5.5.68-1.el7.x86_64 被已安装的 mysql-community-server-5.7.44-1.el7.x86_64 取代
软件包 1:mariadb-5.5.68-1.el7.x86_64 被已安装的 mysql-community-client-5.7.44-1.el7.x86_64 取代
无须任何处理
(1)主服务器
[root@master ~]# vim /etc/my.cnf
您在 /var/spool/mail/root 中有新邮件
[mysqld]
datadir=/var/lib/mysql
socket=/var/lib/mysql/mysql.sock
# Disabling symbolic-links is recommended to prevent assorted security risks
symbolic-links=0
# Settings user and group are ignored when systemd is used.
# If you need to run mysqld under a different user or group,
# customize your systemd unit file for mariadb according to the
# instructions in http://fedoraproject.org/wiki/Systemd
#标志主从组中的唯一标识符,不能相同
server-id=11
#启用二进制日志,后半部分是日志文件的前缀,自己定义
log-bin=master-bin
#允许从服务器,进行日志文件读取
log-slave-updates=true
[mysqld_safe]
log-error=/var/log/mariadb/mariadb.log
pid-file=/var/run/mariadb/mariadb.pid
#重启服务器
[root@master ~]# systemctl enable --now mariadb
Created symlink from /etc/systemd/system/multi-user.target.wants/mariadb.service to /usr/lib/systemd/system/mariadb.service.
#查看是否生成日志文件
[root@master ~]# cd /var/lib/mysql/
您在 /var/spool/mail/root 中有新邮件
[root@master mysql]# ls
aria_log.00000001 ib_logfile1 master-bin.index test
aria_log_control master-bin.000001 mysql
ibdata1 master-bin.000002 mysql.sock
ib_logfile0 master-bin.000003 performance_schema
#登录主服务器数据库
[root@master mysql]# mysql
Welcome to the MariaDB monitor. Commands end with ; or \g.
Your MariaDB connection id is 2
Server version: 5.5.68-MariaDB MariaDB Server
Copyright (c) 2000, 2018, Oracle, MariaDB Corporation Ab and others.
Type 'help;' or '\h' for help. Type '\c' to clear the current input statement.
#创建从主机可以进行访问的用户
MariaDB [(none)]> grant all on *.* to 'slave'@'192.168.201.%' identified by 'Qas@123!!!!!';
Query OK, 0 rows affected (0.00 sec)
#查看master正在使用的日志文件及日志书写位置
MariaDB [(none)]> show master status;
+-------------------+----------+--------------+------------------+
| File | Position | Binlog_Do_DB | Binlog_Ignore_DB |
+-------------------+----------+--------------+------------------+
| master-bin.000003 | 392 | | |
+-------------------+----------+--------------+------------------+
1 row in set (0.00 sec)
#注意:查看位置完毕后,不要对master做insert、update、delete、create、drop等操作!!!
(2)从服务器
[root@slave ~]# vim /etc/my.cnf
您在 /var/spool/mail/root 中有新邮件
#标志主从组中的唯一标识符,不能相同
server-id=22
#启用中继日志,后半部分是日志文件的前缀,自己定义
relay-log=slave-bin
#定义了从中继日志索引文件中读取和写入中继日志条目的文件名
relay-log-index=slave-bin.index
#登录从服务器数据库(注意:我这里使用的主从服务器版本不同,生产环境尽量使用相同版本,避免不兼容)
[root@slave mysql]# mysql -uroot -p
Enter password:
Welcome to the MySQL monitor. Commands end with ; or \g.
Your MySQL connection id is 3
Server version: 5.7.44 MySQL Community Server (GPL)
Copyright (c) 2000, 2023, Oracle and/or its affiliates.
Oracle is a registered trademark of Oracle Corporation and/or its
affiliates. Other names may be trademarks of their respective
owners.
Type 'help;' or '\h' for help. Type '\c' to clear the current input statement.
#配置从服务器所属主服务器,进行连接
mysql> change master to master_host='192.168.201.8',master_user='slave',master_password='Qas@123!!!!!',master_log_file='master-bin.000003',master_log_pos=392;
Query OK, 0 rows affected, 2 warnings (0.03 sec)
#启动从服务器的slave角色,默认没有配置主从时,所有的mysql节点都是master
mysql> start slave;
Query OK, 0 rows affected (0.01 sec)
#查看slave状态信息
mysql> show slave status\G;
*************************** 1. row ***************************
Slave_IO_State: Waiting for master to send event
Master_Host: 192.168.201.8
Master_User: slave
Master_Port: 3306
Connect_Retry: 60
Master_Log_File: master-bin.000003
Read_Master_Log_Pos: 392
Relay_Log_File: slave-bin.000002
Relay_Log_Pos: 443
Relay_Master_Log_File: master-bin.000003
Slave_IO_Running: Yes #从服务器的I/O线程正在运行,并且正在与主服务器进行通信
Slave_SQL_Running: Yes #从服务器的SQL线程正在运行,并且正在将主服务器上的更改应用到从服务器上的数据库中
从这两条可以看出我们连接成功
二、读写分离:
1、读写分离原理:在应用层进行相应的配置和开发,应用程序需要维护一个数据库连接池,包括主库连接和从库连接。对于写操作,应用程序直接使用主库连接进行操作;对于读操作,应用程序从连接池中获取一个从库连接进行操作
2、搭建环境:需要一台主机单独作为读写控制应用程序,同时面向客户端进行沟通,关闭firewall防火墙、selinux安全策略。
#获取所需的两个文件,因为这个amoeba版本适配的是java1.6版,所以需要更改java环境,下面先更改java环境:
[root@amoeba /]# ls
amoeba-mysql-binary-2.2.0.tar.gz etc lib64 proc srv var
bin home media root sys
boot jdk-6u14-linux-x64.bin mnt run tmp
dev lib opt sbin usr
#这是个二进制安装文件,安装的是java环境,直接赋权进行安装
[root@amoeba /]# chmod +x jdk-6u14-linux-x64.bin
[root@amoeba /]# ./jdk-6u14-linux-x64.bin
#安装好后,将安装好的目录放在自己定义的位置,最好同时改一个名字,而定义的指令就是这个目录下的bin里面的指令。
[root@amoeba /]# mv jdk1.6.0_14/ /usr/local/jdk1.6
[root@amoeba /]# cd /usr/local/jdk1.6/
[root@amoeba jdk1.6]# ls
bin jre README_ja.html sample
COPYRIGHT lib README_zh_CN.html src.zip
db LICENSE register.html THIRDPARTYLICENSEREADME.txt
demo man register_ja.html
include README.html register_zh_CN.html
[root@amoeba jdk1.6]# cd bin
[root@amoeba bin]# ls
appletviewer jarsigner jconsole jrunscript native2ascii schemagen xjc
apt java jcontrol jsadebugd orbd serialver
ControlPanel javac jdb jstack pack200 servertool
extcheck javadoc jhat jstat policytool tnameserv
HtmlConverter javah jinfo jstatd rmic unpack200
idlj javap jmap jvisualvm rmid wsgen
jar javaws jps keytool rmiregistry wsimport
#现在的java环境还是1.8,删除原来的java环境
[root@amoeba bin]# java -version
openjdk version "1.8.0_262"
OpenJDK Runtime Environment (build 1.8.0_262-b10)
OpenJDK 64-Bit Server VM (build 25.262-b10, mixed mode)
[root@amoeba bin]# which java
/usr/bin/java
[root@amoeba bin]# rm -rf `which java`
[root@amoeba bin]# java
bash: /usr/bin/java: 没有那个文件或目录
#配置java6环境,设置为了全局变量,保证开机就能使用
[root@amoeba bin]# vim /etc/profile
#增加下列配置,这些配置与/usr/local/amoeba/bin/amoeba相互联系,形成amoeba运行环境
JAVA_HOME=/usr/local/jdk1.6
CLASSPATH=$CLASSPATH:$JAVA_HOME/lib:$JAVA_HOME/jre/lib
AMOEBA_HOME=/usr/local/amoeba
PATH=$PATH:$JAVA_HOME/bin:$JAVA_HOME/jre/bin:$AMOEBA_HOME/bin
export JAVA_HOME CLASSPATH PATH AMOEBA_HOME
#修改配置文件后,在当前的shell环境中,进行刷新,才能使用
[root@amoeba bin]# source /etc/profile
#查看java环境改变情况
[root@amoeba bin]# java -version
java version "1.6.0_14"
Java(TM) SE Runtime Environment (build 1.6.0_14-b08)
Java HotSpot(TM) 64-Bit Server VM (build 14.0-b16, mixed mode)
3、amoba服务程序安装、配置
#解压amoeba软件包压缩文件在,我们指定的目录下,amoeba是一个免装的应用程序,解压就可以使用,但我们还是需要对他的配置进行更改
[root@amoeba bin]# mkdir /usr/local/amoeba
[root@amoeba bin]# cd /
[root@amoeba /]# tar xf amoeba-mysql-binary-2.2.0.tar.gz -C /usr/local/amoeba/
[root@amoeba /]# cd /usr/local/amoeba/
[root@amoeba amoeba]# ls
benchmark bin changelogs.txt conf lib LICENSE.txt README.html
[root@amoeba amoeba]# cd conf
[root@amoeba conf]# ls
access_list.conf dbserver.dtd functionMap.xml rule.dtd
amoeba.dtd dbServers.xml log4j.dtd ruleFunctionMap.xml
amoeba.xml function.dtd log4j.xml rule.xml
#amoeba.xml是amoeba程序的入口配置文件,定义了客户端访问amoeba的用户名和密码,amoeba服务的监听地址及端口,以及进行读写分离的writepool和readpool等,类似定义了一个虚拟的mysql服务器
[root@amoeba conf]# vim amoeba.xml
#取消注释,定义应用程序(本机)绑定的地址、监听的端口号


#定义前端连接数据库的用户、密码(虚拟的数据库用户),由自己任意虚拟,后面客户端连接时,使用此账户连接


#定义了默认的数据库连接池、写连接池、读连接池


#amoeba启动调用amoeba.xml文件,amoeba.xml文件调用dbservers.xml文件,dbsercers.xml文件定义了后端正真的master和slave的具体身份。
[root@amoeba conf]# vim dbServers.xml
#定义了后端服务器(后端的两台服务器连接的信息应该相同,保证一致性)连接amoeba的端口(mysql的默认端口)、默认链接库(测试库更安全)、连接的用户、密码(重点:去除密码行注释,原配置文件是将密码注释了的)
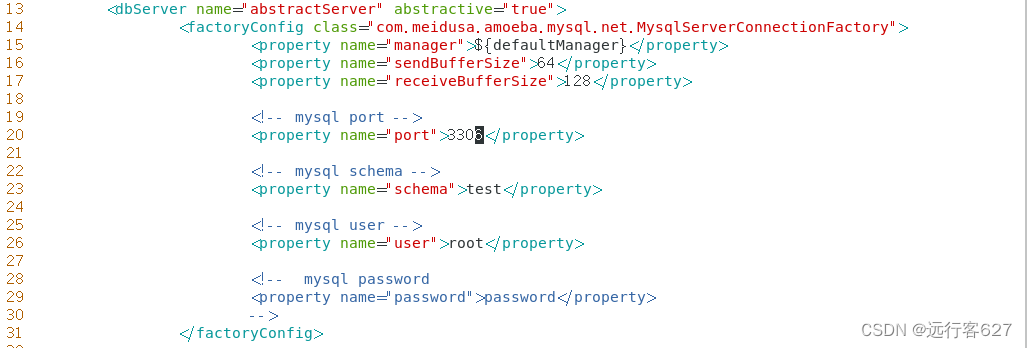
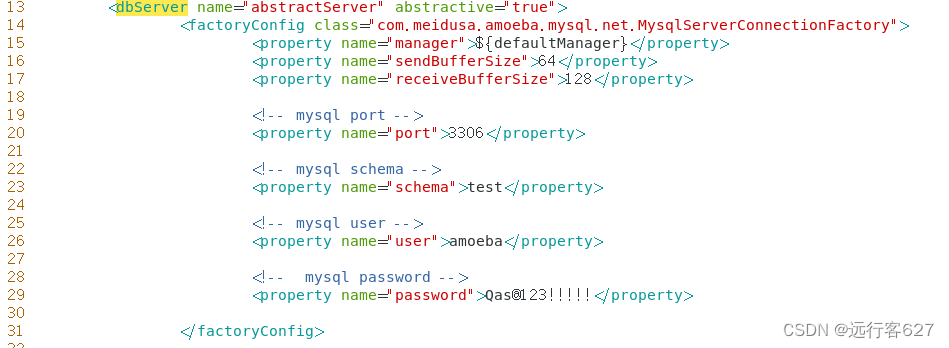
#定义了后端连接anoeba的具体身份,与amoeba.xml文件产生了联系
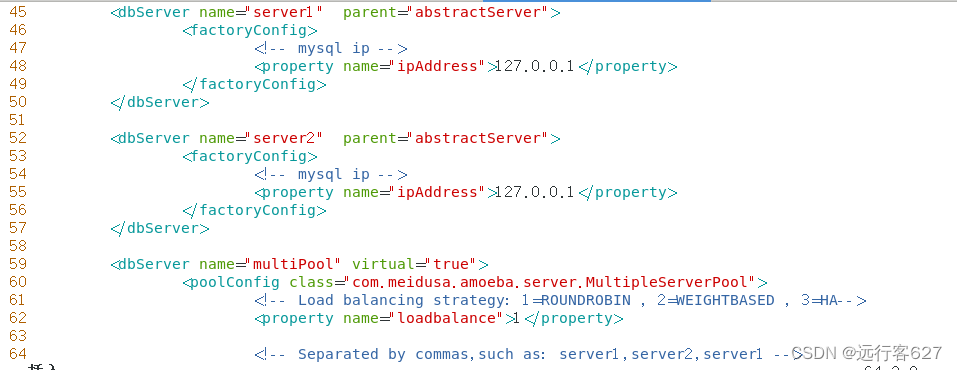
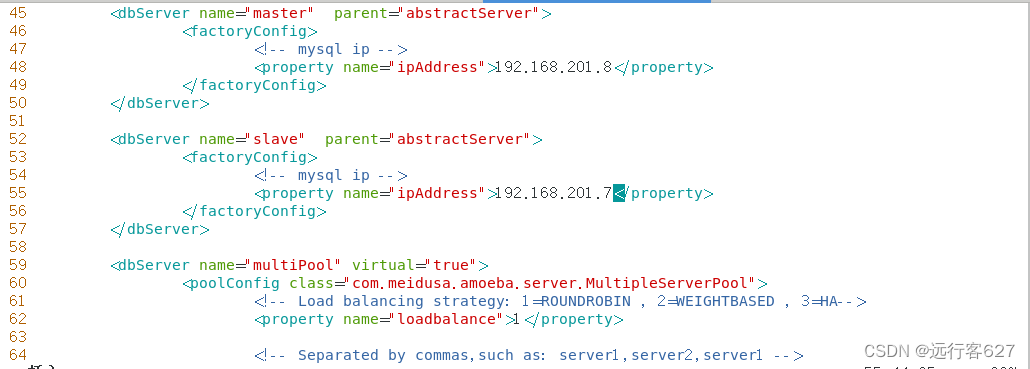
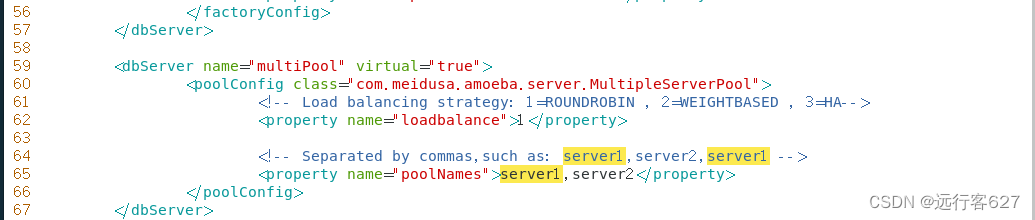
#再后面定义了虚拟库服务器,属于多池操作(提供了负载均衡和故障转移等功能),同时也可以定义多台后端服务器进行连接,如果不使用需要将这些删除,或按需要修改,避免在启动过程中,出现读取配置的问题

#配置文件配置完成,启动amoeba服务,查看启动情况
[root@amoeba conf]# amoeba start &
[8] 71236
[root@amoeba conf]# remote application= .Amoeba:22122 response OK
amoeba server is running with port=22122
[root@amoeba conf]# netstat -anptu |grep 8066
tcp6 0 0 192.168.201.9:8066 :::* LISTEN 70950/java
4、客户端连接测试
#客户端服务器进行连接,注意:这里连接的是amoeba服务器的地址,端口和用户等都是amoeba.xml文件中定义的端口和用户,因为amoeba.xml文件是定义保证客户端的文件
[root@khd ~]# mysql -h192.168.201.9 -uadmin -P8066 -p
Enter password:
Welcome to the MariaDB monitor. Commands end with ; or \g.
Your MySQL connection id is 1721906704
Server version: 5.1.45-mysql-amoeba-proxy-2.2.0
Copyright (c) 2000, 2018, Oracle, MariaDB Corporation Ab and others.
Type 'help;' or '\h' for help. Type '\c' to clear the current input statement.
MySQL [(none)]>
#查询库结构,得到主服务器数据库数据,证明连接成功
MySQL [(none)]> show databases;
ERROR 2006 (HY000): MySQL server has gone away
No connection. Trying to reconnect...
Connection id: 1432094680
Current database: *** NONE ***
+--------------------+
| Database |
+--------------------+
| information_schema |
| cehnli |
| chengsong |
| chensong |
| mysql |
| performance_schema |
| test |
+--------------------+
7 rows in set (0.02 sec)
#断开从服务器数据库的从服务
MariaDB [(none)]> stop slave;
Query OK, 0 rows affected (0.01 sec)
#在客户端切换到某个库中
MySQL [(none)]> use chenli;
No connection. Trying to reconnect...
Connection id: 1432094680
Current database: *** NONE ***
#在客户端库中新建表格数据正常运行,证明写的功能在amoeba的转接中正常运行
MySQL [chenli]> create table xx(name varchar(50) not null,age int not null);
Query OK, 0 rows affected (0.06 sec)
MySQL [chenli]> insert xx value('chenli',18);
Query OK, 1 row affected (0.05 sec)
#在客户端库中进行查询,由于前面断开了从服务器,所以显示无法查询
MySQL [chenli]> select * from xx;
ERROR 1146 (42S02): Table 'chenli.xx' doesn't exist
#在主服务器上面正常查询,已存在数据信息
MariaDB [chenli]> select * from xx;
+--------+-----+
| name | age |
+--------+-----+
| chenli | 18 |
+--------+-----+
1 row in set (0.00 sec)
#在主服务器重新查询,二进制文件状态信息
MariaDB [(none)]> show master status;
+-------------------+----------+--------------+------------------+
| File | Position | Binlog_Do_DB | Binlog_Ignore_DB |
+-------------------+----------+--------------+------------------+
| master-bin.000005 | 1641 | | |
+-------------------+----------+--------------+------------------+
1 row in set (0.00 sec)
#重新在从服务器连接主服务器、开启从服务
MariaDB [chenli]> change master to master_host='192.168.201.8',master_user='slave',master_password='Qas@123!!!!!',master_log_file='master-bin.000005',master_log_pos=1641;
Query OK, 0 rows affected (0.06 sec)
MariaDB [chenli]> start slave;
Query OK, 0 rows affected (0.00 sec)
MariaDB [chenli]> show slave status\G;
*************************** 1. row ***************************
Slave_IO_State: Waiting for master to send event
Master_Host: 192.168.201.8
Master_User: slave
Master_Port: 3306
Connect_Retry: 60
Master_Log_File: master-bin.000005
Read_Master_Log_Pos: 1641
Relay_Log_File: slave-bin.000002
Relay_Log_Pos: 530
Relay_Master_Log_File: master-bin.000005
Slave_IO_Running: Yes
Slave_SQL_Running: Yes
#在客户端查询表数据,无法查询,但能查看到表,证明未进行数据的同步,但读写分离正常。
MySQL [chenli]> select * from xx;
ERROR 1146 (42S02): Table 'chenli.xx' doesn't exist
MySQL [chenli]> show tables;
+------------------+
| Tables_in_chenli |
+------------------+
| stu |
| xx |
+------------------+
2 rows in set (0.01 sec)


 被折叠的 条评论
为什么被折叠?
被折叠的 条评论
为什么被折叠?
 到【灌水乐园】发言


