


在我们使用高德地图的时候,官方给我们推荐了很多案例,但是这些案例都是使用原生方法接入,并没有提供 vue 或者 react 的demo,vue2的接入网上也很多人都有写过,今天我们就来看看 vue3 如何使用常用的高德地图api。
前置工作
在开发之前我们需要了解 vue3 中接入高德地图的几个步骤。
首先安装包并引入。
npm i @amap/amap-jsapi-loader --saveimport AMapLoader from '@amap/amap-jsapi-loader'
使用官方介绍的方式进行加载。
高德地图这里提供了接口可以直接下载 vue3 组件的完整代码, 这里我直接官方的这个下载下来进行开发。Vue3 有选项式和组合式两种开发方式,选项式使用上面的方式即可,我的示例使用组合式。下载好了以后这个项目是直接可以 run 的, 我在 dependencies 中增加两个依赖 分别是 element-plus 和 pinia 。
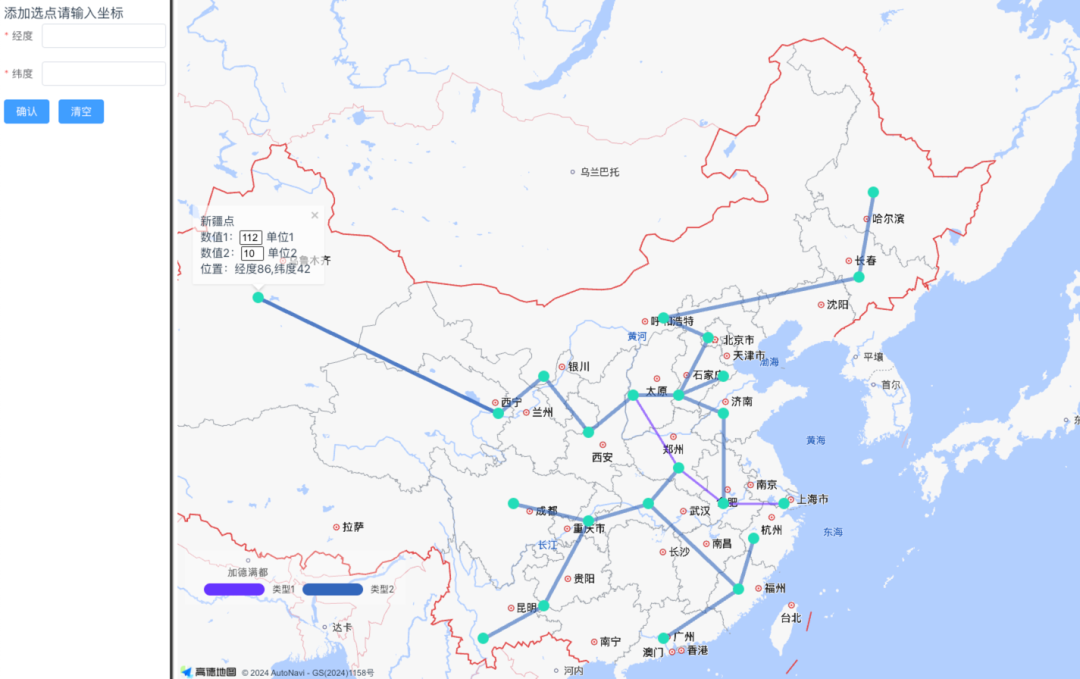
完成效果
1、初始化地图,绘制点及线,渲染点位信息窗体。
2、点及点、线、及空白处弹出不同的信息窗体。
3、绘制图例。
4、可连接两个点,绘制直线或曲线。
5、可根据输入的经纬度,新增节点。
模块的引入
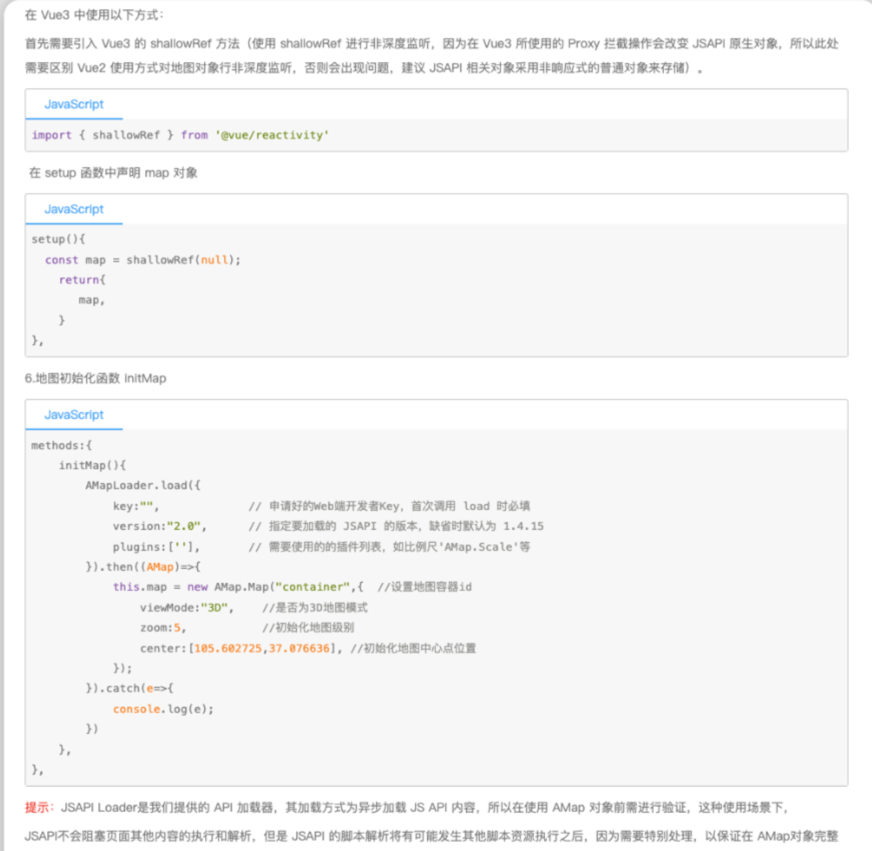
首先导入的方式,和官网一样,后面我会贴完整代码,这里我们使用 plugins 加载插件,其他配置如 Loca,直接进行配置,这里需要注意版本问题,写成 ‘2.0’ 是不行的,初始化函数在 onmounted 生命周期中执行。
AMap存储 这里我做了很多存储,大家知道 .value 的语法是 vue3 获取 ref 的语法,使ref的话会比较麻烦,这里我直接把实例化以后的对象存储在了pinia中,其他api的调用也直接在 pinia 里面进行,可以做到很好的解耦及维护。
模版样式不生效问题 我们在使用的时候,就像我之前写的文章,点位新增的时候,我们会插入 content 字符串模版,替换点样式,这里有两种方案修改样式,一种是 插入 DOM ,不使用字符串,然后在 DOM 上通过 style 直接修改样式,另一种就是使用模版的时候直接给 class 类名,但是这种样式如果我们给 vue 的 style 加了 scoped 就不会生效,这里大家可以自己灵活选择用哪种,我这里暂时先使用模版的方式,去掉了 scoped。
图例 图例这里除了导入的时候,需要配置一下,使用上来说变化不大,样式的修改包括位置信息等,也都可以通过对象进行配置。
存储方案 这里除了地图初始化以后,其他的操作我们都封装到了 pinia 中,包括每一次实例化需要复用的类都进行了存储,一些交互型的数据使用了虚拟数据或本地存储,正常在业务逻辑中这些部分应该是和后端通信的。
注意:代码中 key 请使用自己的key, 高德key 的申请如果不会的话,可以直接查看官方示例流程即可。
下面我们先看一下模版代码,这里面我们显示在生命周期里面加载了地图,然后通过 initMapHandler 方法完成绘制、事件注册、信息窗体注册等初始化。同时模版中我们使用一个简单的 form 来动态获取经纬度,通过 setMarker 方法完成点的绘制。
<template><div id="root"><div><h3>添加选点请输入坐标</h3><el-form ref="ruleFormRef" :rules="rules" :model="form" label-width="auto" style="max-width: 600px"><el-form-item label="经度" prop="lng"><el-input v-model="form.lng"/></el-form-item><el-form-item label="纬度" prop="lat"><el-input v-model="form.lat"/></el-form-item><el-form-item><el-button type="primary" @click="onSubmit(ruleFormRef)">确认</el-button><el-button type="primary" @click="onClear(ruleFormRef)">清空</el-button></el-form-item></el-form></div><div id="container"></div></div></template><script setup>import { onMounted, reactive, ref } from "vue";import AMapLoader from "@amap/amap-jsapi-loader";import getStroe from "./pinia/index";const store = getStroe();const { initMapHandler, setMarker } = store;const ruleFormRef = ref()const rules = reactive({lng: [{required:true, message: '请输入经度', trigger: 'blur'}],lat: [{required:true, message: '请输入纬度', trigger: 'blur'}]})const form = reactive({lng: '',lat: ''})const onSubmit = async (formEl) => {await formEl.validate((valid,fields)=>{if(valid){const marker = {position: [form.lng, form.lat],name:'新增点位',pointData: { out: 0, provide: 0}}setMarker(marker, 'new')}})}const onClear = (formEl) => {formEl.resetFields()}onMounted(() => {window._AMapSecurityConfig = {securityJsCode: "d35fb6edbcc00628e7fa9200c2829953",};AMapLoader.load({key: "", // 申请好的Web端开发者Key,首次调用 load 时必填version: "2.0", // 指定要加载的 JSAPI 的版本,缺省时默认为 1.4.15plugins: ["AMap.Scale", "AMap.ToolBar", "AMap.MouseTool", "AMap.Driving", "AMap.BezierCurve"], // 需要使用的的插件列表,如比例尺'AMap.Scale'等Loca: {version: "2.0.0",},}).then(res=>{initMapHandler(res, "container");}).catch((e) => {console.log("error", e);});});</script><style>#container {width: 1350px;height: 900px;}#root {display: flex;width: 100%;}#root > div:first-child {display: flex;flex-direction: column;width: 250px;padding: 5px;margin-right: 10px;box-shadow: 2px 2px 2px 2px #333;}.context_menu {position: relative;min-width: 12rem;padding: 0;background-color: white;}.context_menu p {padding: 0.25rem 1.25rem;cursor: pointer;}.context_menu p:hover {background: #ccc;}.btn {width: 80px;margin-top: 10px;}.marker-route {width: 15px;height: 15px;background-color: #22ddb8;border-radius: 10px;}.marker-route.new{background-color: #dd0a69;}.active {background-color: #f76809;}.content {display: flex;align-items: center;padding: 1px;color: white;background-color: rgb(0 0 0 / 30%);}.content span {display: block;width: 20px;height: 20px;margin: 0 10px;background-color: #36b;}.content p {margin-right: 10px;}.test {box-sizing: content-box;display: inline;float: left;height: 30px;padding: 2px 10px;line-height: 30px;}.test a {color: #333 !important;}.test span {width: 80px !important;margin-left: 10px;border-radius: 10px;}.amap-info-content {background-color: rgb(255 255 255 / 60%);}.test_container {display: flex;flex-direction: column;align-items: center;justify-content: center;width: 180px;padding: 10px 18px 10px 10px;overflow: auto;line-height: 1.4;background-color: rgb(255 255 255 / 60%);border: 1px solid rgb(0 0 0 / 20%);}.input_inner {width: 30px;margin-right: 5px;border: 1px solid #333;border-radius: 2px;}</style>
在拆分逻辑代码之前,可以先看一下我们的模拟数据长什么样, 我使用的 coordData 模拟数据就是由这样的对象组成的数组, 大家可以任意 增加其他点位。
{name: "黑龙江",position: [127, 47],pointData: {out: 100,provide: 10,},line: [{current: [[127, 47],[126, 43],],type: 1,},],},
需要关注的细节点
样式 点和线的样式都是可以更改或配置的,比如点的样式 在setMarker中我通过设置 content 模版的动态类名还修改样式,这里也可以使用配置项的 icon,来动态加载图标,线的样式也是同理。
事件 弹窗的事件,我们实例化了点或者线的实例对象以后通过 on 的方式进行注册,在这里我们通过点击(click)来触发,这里修改成原生的其他事件也是可以的,比如 mouseover 这种。
信息窗体 点、线、和空白处点击弹出信息窗体的逻辑分别是在 点注册、线注册、以及初始化的时候注册的。空白处我们需要注册右键菜单,需要实例化类,这里我们直接在 contextMenuHandler 方法封装了实例化的过程。信息窗体弹出的位置通过事件注册中的 实例对象的open方法第二个参数配置。
贝赛尔曲线 绘制曲线这里我封装了 setCurlLines 方法,通过注释可以更改曲线还是直线的绘制,通过 getCenterLonLat 方法获取两个坐标点之间的中间点,中间点便宜的方式设置曲率,具体的贝塞尔曲线规则及使用方案可以查看官方示例。
完整代码
代码如何使用?首先就是上面的流程,在官网上下载 vue3 组件完整代码,增加我上面说的两个依赖,使用我上面的模版替换掉 MapContainer 的内容。
然后在 components 新增 data.js ,内容为上面的对象组成的数据导出,同时新增 pinia文件夹,新建 index.js, 将下面的完整代码 复制到 这个 index.js 中。最后别忘了在 main 中注册 pinia 以及 element,运行项目即可。
import { defineStore } from "pinia";import { coordData } from "../data";// 过滤线方法function setLine(arr) {return arr.reduce((prev, item) => {if (item?.line) {prev.push(...item.line);}return prev;}, []);}const headColors = ["#3366bb", "#6622FF"];function getCenterLonLat(oneLon, oneLat, twoLon, twoLat) {//oneLon:第一个点的经度;oneLat:第一个点的纬度;twoLon:第二个点的经度;twoLat:第二个点的纬度;let aLon = 0, aLat = 0;let bLon = Number(oneLon) - Number(twoLon);let bLat = Number(oneLat) - Number(twoLat);//Math.abs()绝对值if( bLon > 0){aLon = Number(oneLon) - Math.abs(bLon) / 2;}else{aLon = Number(twoLon) - Math.abs(bLon) / 2;}if( bLat > 0){aLat = Number(oneLat) - Math.abs(bLat) / 2;}else{aLat = Number(twoLat) - Math.abs(bLat) / 2;}return [aLon, aLat];}const geoStore = defineStore("getStroe", {state: () => {return {sourceInfoWindow: null, // 信息窗体AMapInstance: null, // 高德实例currentData: {}, // 当前选中点信息currentPonit: null, // 当前选中点DOMmapInstance: null, // 实例化后的地图容器};},actions: {// 初始化地图实例initMapHandler(amap,instance){this.AMapInstance = amap;this.mapInstance = new amap.Map(instance, {//设置地图容器idviewMode: "3D", //是否为3D地图模式zoom: 4.8, //初始化地图级别center: [116.397428, 39.90923], //初始化地图中心点位置});this.initWindow()// 添加一些分布不均的点到地图上,地图上添加三个点标记,作为参照coordData.forEach( (marker) => {this.setMarker(marker); // 设置点});// 过滤线信息let renderLine = setLine(coordData);// 设置线let polyline = renderLine.reduce((prev, item) => {let weight = item.type === 1 ? 5 : 3;let color = item.type === 1 ? headColors[0] : headColors[1];prev.push(this.setLines(item.current, color, weight));return prev;}, []);this.mapInstance.add([...polyline]); // 绘制线this.setLegentHa() // 图例},// 设置图例setLegentHa(){new this.contextMenuHandler(this.mapInstance) // 自定义右键菜单// Loca 在加载的时候 直接被挂在到了 window 上let loca = new window.Loca.Container({map: this.mapInstance,});// 图例, 图例可以实例化多个,使用定位来设置位置new window.Loca.Legend({loca: loca,title: {label: "线段类型",fontColor: "rgba(255,255,255,0.2)",fontSize: "16px",fontWeight: 'bold',padding: '0 0 5px 0',margin: 0,},style: {backgroundColor: "rgba(255,255,255,0.2)",left: "10px",bottom: "100px",fontSize: "12px",},dataMap: [{ label: "类型1", color: headColors[1] },{ label: "类型2", color: headColors[0] },],});//修改图例排列方式document.getElementsByClassName("amap-loca loca-controls")[0].setAttribute("id", "testid");let lis = document.querySelectorAll("#testid li");for (let i = 0; i < lis.length; i++) {lis[i].setAttribute("class", "test");}},// 设置直线setLines(lnglat, color, weight){// 中心点用于弹出线上的信息窗体const centerLngLat = getCenterLonLat(lnglat[0][0],lnglat[0][1],lnglat[1][0],lnglat[1][1]) // 获取两点之间的中心点const category = new this.AMapInstance.Polyline({path: lnglat,// showDir:true ,// 设置线方向strokeColor: color, // 线颜色strokeWeight: weight, // 线宽// draggable: true, 是否可拖拽cursor: "pointer", // 鼠标在线上的样式strokeOpacity: 0.6, // 透明度});category.on("click", (ev) => {// 此处也可像下面的右键菜单一样,添加左键菜单。// console.log(AMap, "ev", ev, category);const { lnglat } = ev // 当前点击位置经纬度const infoWindow = new this.AMapInstance.InfoWindow({content: `<div>测试信息</div>`})infoWindow.open(this.mapInstance, [centerLngLat[0],centerLngLat[1]]);});//创建右键菜单let contextMenu = new this.AMapInstance.ContextMenu();//右键放大contextMenu.addItem("放大一级",() => {this.mapInstance.zoomIn();},0);//绑定鼠标右击事件——弹出右键菜单category.on("rightclick", (e) => {contextMenu.open(this.mapInstance, e.lnglat);});return category;},// 设置曲线setCurlLines(lnglat, color, weight){// 控制点计算 https://lbs.amap.com/demo/javascript-api-v2/example/overlayers/beziercurve-draw-and-edit//贝塞尔曲线经过的起点,途经点,控制点的二维数组const pointA = lnglat[0]const centerLngLat = getCenterLonLat(lnglat[0][0],lnglat[0][1],lnglat[1][0],lnglat[1][1]) // 获取两点之间的中心点const center = [centerLngLat[0]+0.51,centerLngLat[1]+0.51] // 中心点位置偏移,绘制曲线const path = [pointA,[...center,...lnglat[1]]]// 打印路径检查console.log('path',path, this.AMapInstance.BezierCurve);return new this.AMapInstance.BezierCurve({path,isOutline: true,outlineColor: '#ffeeff',borderWeight: 3,strokeColor: color,strokeOpacity: 1,strokeWeight: weight,// 线样式还支持 'dashed'strokeStyle: "solid",// strokeStyle是dashed时有效strokeDasharray: [10, 10],lineJoin: 'round',lineCap: 'round',zIndex: 50,})},// 设置点setMarker(marker, type) {//创建右键菜单let contextMenu = new this.AMapInstance.ContextMenu();//右键放大contextMenu.addItem("放大一级",() => {this.mapInstance.zoomIn();},0);//右键缩小contextMenu.addItem("缩小一级",() => {this.mapInstance.zoomOut();},1);contextMenu.addItem("设置起点", () => {this.changeStyle(markerd.dom, marker);contextMenu.close(); // 关闭右键菜单});contextMenu.addItem("与起点连线", () => {if (!this.currentPonit) {alert("请选择起点");contextMenu.close();return;} else {// 这里其实可以根据数据判定线类型了,因为第二个选中点的信息+和第一个选中点的信息都有了,但是过滤方法会比较复杂let path = [this.currentData.position, marker.position];// const polyline1 = this.setLines(path, "#3366bb", 5); // 设置直线const polyline1 = this.setCurlLines(path, "#3366bb", 5); // 设置曲线this.mapInstance.add(polyline1); // 添加线this.mapInstance.setFitView([polyline1]) // 自动聚焦到所添加的线this.clearPoint();}contextMenu.close(); // 关闭右键菜单});// 根据是否是新增点位 来设置样式let content = `<div class="marker-route ${type === 'new' ? 'new' : ''}"></div>`;let markerd = new this.AMapInstance.Marker({map: this.mapInstance,// icon: marker?.icon, // 可根据 数据中提供的 状态设置图标content,offset: new this.AMapInstance.Pixel(-8, -8),visible: true, // 点标记是否可见position: [marker.position[0], marker.position[1]],});let inputO = window.localStorage.getItem(marker.name + "inputOut");let inputP = window.localStorage.getItem(marker.name + "inputPro");// 左键点击的信息窗体, 宽度会在碰触到容器边缘的时候自适应的缩小markerd.contents = `<div>${marker.name}点</div><div>数值1:<input id="inputOut" class="input_inner" value="${inputO ?? marker?.pointData?.out}"/>单位1</div><div>数值2:<input id="inputPro" class="input_inner" value="${inputP ?? marker?.pointData?.provide}" />单位2</div><div>位置:经度${marker.position[0]},纬度${marker.position[1]}</div>`;markerd.data = marker;// 也可以使用 mouseover 等 原生事件触发 https://developer.mozilla.org/zh-CN/docs/Web/API/Element/mouseenter_eventmarkerd.on("click", (e)=>{// 设置信息窗体this.sourceInfoWindow.setContent(e.target.contents);this.sourceInfoWindow.open(this.mapInstance, e.target.getPosition());});// 初始化的时候主动触发 点的点击事件, 完成弹窗出现if (marker.name === "新疆") {// 触发上面的点击事件markerd.emit("click", { target: markerd });}//绑定鼠标右击事件——弹出右键菜单markerd.on("rightclick", (e) => {contextMenu.open(this.mapInstance, e.lnglat);});return markerd;},// 初始化信息窗体 侦听输入事件initWindow() {const _this = this// 信息窗体let infoWindow = new this.AMapInstance.InfoWindow({offset: new this.AMapInstance.Pixel(0, -10),retainWhenClose: true,});this.sourceInfoWindow = infoWindow;infoWindow.on("open", function () {let inputOut = document.getElementById("inputOut");let inputPro = document.getElementById("inputPro");inputOut.addEventListener("change", (e) => {_this.setInput(e, "inputOut");// window.location.reload();});inputPro.addEventListener("change", (e) => {_this.setInput(e, "inputPro");// window.location.reload();});});},contextMenuHandler(){const _this = this//自定义菜单类class ContextMenu {constructor(map) {let me = _this;//地图中添加鼠标工具MouseTool插件_this.mouseTool = new _this.AMapInstance.MouseTool(map);_this.contextMenuPositon = null;const fragment = document.createElement("div"); // 使用 DOM 方式, 方便添加事件fragment.className = "info context_menu";const p = document.createElement("p");p.addEventListener("click", this.delMarkerMenu);p.textContent = "移除上次选中信息";fragment.appendChild(p);//通过content自定义右键菜单内容_this.contextMenu = new _this.AMapInstance.ContextMenu({isCustom: true,content: fragment,});//地图绑定鼠标右击事件——弹出右键菜单map.on("rightclick", function (e) {me.contextMenu.open(map, e.lnglat);me.contextMenuPositon = e.lnglat; //右键菜单位置});}delMarkerMenu() {// 右键菜单上次选中点的信息_this.clearPoint();_this.mouseTool.close();_this.contextMenu.close();}}return new ContextMenu(this.mapInstance)},// 保存输入信息setInput(e, name) {let text =e.target.parentElement.parentElement.children[0].innerText.split("点")[0];// let current = coordData.filter((item) => {// return item.name === text// })window.localStorage.setItem(text + name, e.target.value);},// 工具方法// 修改DOM 类名changeStyle(res, data) {if (this.currentPonit !== null) {this.currentPonit.classList.remove("active");}this.currentPonit = res.children[0];this.currentData = data;this.currentPonit.classList.add("active");},// 清除点信息clearPoint() {if (this.currentPonit) {this.currentPonit.classList.remove("active");}this.currentPonit = null;this.currentData = {};},},getters: {},});export default geoStore;

高德开放平台第一期实战案例,三等奖作品
作者:李海波
仅代表作者个人观点


 2122
2122

 被折叠的 条评论
为什么被折叠?
被折叠的 条评论
为什么被折叠?
 到【灌水乐园】发言


