


前言
网络管理学习之后,就是程序管理的入门阶段,今天主要是对Linux系统程序的概念进行初步了解,以及一些安装软件的教程。
第二天对程序管理进行了收尾,主要是后半部分,包括源码包和二进制安装以及Linux操作系统启动流程的一些命令,还有故障排查和调试的一些相关操作,最后是systemd命令的运用。
一、Linux程序与进程
1、程序,进程,线程的概念
-
程序:是一组指令及参数的集合,按照既定的逻辑控制计算机运行用来完成特定任务,是静态的;
-
进程:是运行着的程序,是操作系统执行的基本单位,是程序运行的过程, 是动态的,是有生命周期及运行状态的。是操作系统分配内存、CPU时间片等资源的基本单位。
-
线程:是操作系统能够进行运算调度的最小单位,它被包含在进程之中,是进程中的实际运作单位。
2、程序和进程的区别
-
程序是静态的,它只是一组指令的集合,不具有任何的运行意义。而进程是程序运行的动态过程;
-
进程和程序并不是一一对应的关系,相同的程序运行在不同的数据集上就是不同的进程;
-
进程还具有并发性和交往性,而程序却是封闭的。
3、进程和线程的区别
-
一条线程指的是进程中一个单一顺序的控制流,一个进程中可以并发拥有多个线程,而一个线程同时只能被一个进程所拥有;
-
线程不能单独执行,但是每一个线程都有程序的入口、执行序列以及程序出口,它必须组成进程才能被执行。
二、Linux进程基础(生命周期)
1、进程生命周期
-
父进程复制自己的地址空间(fork)创建一个新的(子)进程结构。每个新进程分配一个唯一的进程 ID(PID),PID和父进程ID(PPID)是子进程环境的元素,任何进程都可以创建子进程。
-
所有进程都是第一个系统进程的后代:在centos6中,第一个系统进程是init,而在centos7中,第一个系统进程是systemd。
2、父子进程的关系
-
子进程由父进程产生,在linux系统中,使用系统调用fork创建进程。fork复制的内容包括父进程的数据和堆栈段以及父进程的进程环境。子进程继承父进程的安全性身份、过去和当前的文件描述符、端口和资源特权、环境变量,以及程序代码。
-
运行过程:子进程运行时父进程休眠。当子进程完成时发出(exit)信号请求,在退出时,子进程已经关闭或丢弃了其资源环境后,剩余释放不掉的资源称之为僵尸进程。父进程在子进程退出时收到信号而被唤醒,清理剩余的结构,然后继续执行其自己的程序代码。
三、程序管理
1、课程目标
-
掌握Linux系统安装软件的方法
-
掌握Linux系统软件管理命令
-
熟练配置yum源
-
掌握systemd管理机制
2、常见的软件包类型
1)rpm包:.rpm为后缀,红帽系列操作系统(RedHat,CentOS,OpenSUSE)主要的软件包封装格式,已经做好默认设置,如安装路径,配置文件存放路径,需要手动的解决依赖关系。(相关命令:rpm,yum,dnf)
2)deb包:.deb为后缀,debian系列操作系统(debian,Ubuntu,kali)主要的软件包封装格式,已经做好默认设置,如安装路径,配置文件存放路径等,需要手动的解决依赖关系。(相关命令:dpkg,apt[-get])
依赖关系:安装软件包所需的基础环境
3)二进制包:一般以.bin为后缀,直接被计算机执行安装。
4)源码包:一般C语言(高级语言中最底层的语言,一般结合汇编进行驱动编写)编写,安装前需要编译为二进制包;配置【如,安装路径,配置文件路径,运行用户,运行组,功能模块】--->编译--->安装;文件比较集中,便于后期进行维护与管理。
3、安装方法
-
使用独立的rpm包安装
需要下载对应的rpm包,一般在centos系统镜像中存在大量的rpm包
-
rpm包的命名方法
zip-0-11.el7.x86_64.rpm
软件名.版本号.安装平台.安装架构平台的位数(32位,x86或者64位,x86_64).rpm
-
rpm命令使用方法
已安装软件包查看选项
-q:查看指定rpm包是否安装;rpm -q 软件名

-qa 【all】:查看系统中所有已安装的软件包;rpm -qa [| grep 软件名]

-qi 【infomation】:查看已安装软件包的开发信息;rpm -qi 软件名

-ql  【list】:查看已安装软件包的安装路径及生成的文件;rpm -ql 软件名

-qf 【find】:查看命令由哪个软件包安装;which 命令字  rpm -qf 命令的绝对路径;常用于:系统中没有对应指令且不知道由哪个软件包安装生成

-qc:查看已安装软件的配置文件;rpm -qc 软件名;一般情况下,使用rpm安装的应用程序的配置文件都存储在/etc/[应用程序的名称]

-qd:查看已安装软件的帮助文档信息;rpm -qd 软件名
未安装软件包查看选项
-qpi:查看未安装的软件包开发信息;rpm -pqi 软件包名称(全格式)

-qpl:查看未安装软件包的安装路径及生成文件;rpm -pql 软件包名称(全格式)
安装、升级、卸载选项
-i 【install】:安装软件包;rpm -ivh /path/软件包名称(全格式)

-v:【verify】详细显示安装过程

-h:【human】人性化显示

-U:【update】升级软件包;rpm -Uvh 软件包名称

-e:【exclude】卸载已安装软件包;

--nodeps:忽略依赖关系的进行卸载、升级或安装
特殊安装
#将所有相关软件包放到同一目录下

rpm -ivh *
4、yum(dnf)安装
可以自动解决依赖关系
-
yum相关配置文件
yum源配置文件
指定yum程序运行时查找软件包的存储路径
/etc/yum.repos.dyum程序配置文件
yum程序运行时的运行配置
/etc/dnf/dnf.conf-
yum源类型
本地yum源
利用本地存在的软件包路径
file://localPath(绝对路径)【路径下要包含“repodata(包含rpm包的元数据)”目录】网络yum源
利用网络存储的软件包路径
http://域名/Path #不常用

https://域名/Path

ftp://域名/Path  #不常用
常见网络yum源
#阿里云yum源
 tee /etc/yum.repos.d/alicloud.repo << 'EOF'
[alicloud-os]
name=Alibaba Cloud OS
baseurl=https://mirrors.aliyun.com/rockylinux/8/BaseOS/x86_64/os/
enabled=1
gpgcheck=0
gpgkey=https://mirrors.aliyun.com/rockylinux/RPM-GPG-KEY-rockylinux

[alicloud-appstream]
name=Alibaba Cloud AppStream
baseurl=https://mirrors.aliyun.com/rockylinux/8/AppStream/x86_64/os/
enabled=1
gpgcheck=0
gpgkey=https://mirrors.aliyun.com/rockylinux/RPM-GPG-KEY-rockylinux
EOF

#epel源

yum -y install epel-release
常见开源镜像站
清华大学

https://mirrors.tuna.tsinghua.edu.cn/help/centos/

网易开源镜像站

http://mirrors.16com/
配置本地yum源
cd /etc/yum.repos.d
[root@localhost yum.repos.d]# rm -rf *
vim local.repo
[local]
name=local  #描述信息
baseurl=file:///mnt/AppStream  # 指定软件包及其元数据存储路径
enabled=1  #是否使用该源,0表示不使用,1表示使用
gpgcheck=0  #(一般使用不验证的方式) [gpgcheck=1]
gpgkey=keyPath

################################
yum clean all

yum makecache

mount  /dev/sr0 /mnt
5、yum命令语法
yum [options] command [package ...]子命令(command)
install [软件包名] [--downloadonly]
#安装【只下载】
remove [软件包名]
#卸载
list
#查看yum源中的软件包列表
update [软件包名]
#更新所有软件包
yum clean all
#清空元数据缓存
yum makecache
#生成元数据缓存
命令选项
-y:非交互交互式安装:yum install 软件名
Is this ok?

y

安装

n

不下载不安装
非交互式安装:yum -y install 软件名
6、源码包(编译)安装
需要依赖gcc和make环境
配置:cd 源码包的解压路径;./configure --prefix=安装路径(/usr/local/nginx)
编译:make
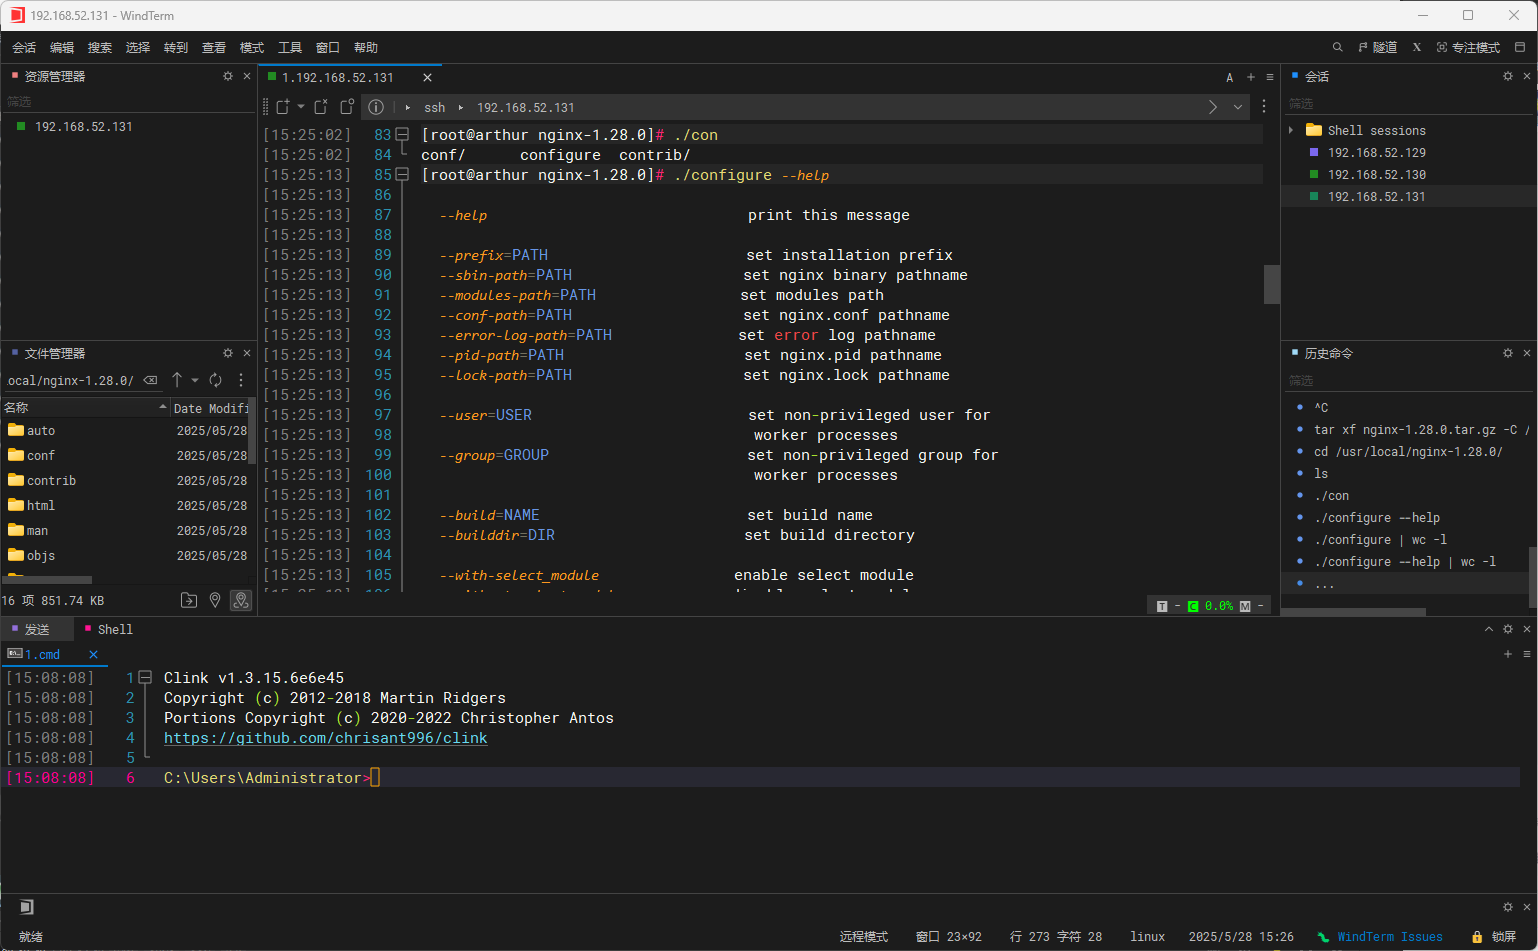
安装:make install.configure --help
  --help                             print this message

  --prefix=PATH                      set installation prefix
  --sbin-path=PATH                   set nginx binary pathname
  --modules-path=PATH                set modules path
  --conf-path=PATH                   set nginx.conf pathname
  --error-log-path=PATH              set error log pathname
  --pid-path=PATH                    set nginx.pid pathname
  --lock-path=PATH                   set nginx.lock pathname

  --user=USER                        set non-privileged user for
                                     worker processes
  --group=GROUP                      set non-privileged group for
                                     worker processes

  --build=NAME                       set build name
  --builddir=DIR                     set build directory

  --with-select_module               enable select module
  --without-select_module            disable select module
  --with-poll_module                 enable poll module
  --without-poll_module              disable poll module

  --with-threads                     enable thread pool support

  --with-file-aio                    enable file AIO support

  --without-quic_bpf_module          disable ngx_quic_bpf_module

  --with-http_ssl_module             enable ngx_http_ssl_module
  --with-http_v2_module              enable ngx_http_v2_module
  --with-http_v3_module              enable ngx_http_v3_module
  --with-http_realip_module          enable ngx_http_realip_module
  --with-http_addition_module        enable ngx_http_addition_module
  --with-http_xslt_module            enable ngx_http_xslt_module
  --with-http_xslt_module=dynamic    enable dynamic ngx_http_xslt_module
  --with-http_image_filter_module    enable ngx_http_image_filter_module
  --with-http_image_filter_module=dynamic
                                     enable dynamic ngx_http_image_filter_module
  --with-http_geoip_module           enable ngx_http_geoip_module
  --with-http_geoip_module=dynamic   enable dynamic ngx_http_geoip_module
  --with-http_sub_module             enable ngx_http_sub_module
  --with-http_dav_module             enable ngx_http_dav_module
  --with-http_flv_module             enable ngx_http_flv_module
  --with-http_mp4_module             enable ngx_http_mp4_module
  --with-http_gunzip_module          enable ngx_http_gunzip_module
  --with-http_gzip_static_module     enable ngx_http_gzip_static_module
  --with-http_auth_request_module    enable ngx_http_auth_request_module
  --with-http_random_index_module    enable ngx_http_random_index_module
  --with-http_secure_link_module     enable ngx_http_secure_link_module
  --with-http_degradation_module     enable ngx_http_degradation_module
  --with-http_slice_module           enable ngx_http_slice_module
  --with-http_stub_status_module     enable ngx_http_stub_status_module

  --without-http_charset_module      disable ngx_http_charset_module
  --without-http_gzip_module         disable ngx_http_gzip_module
  --without-http_ssi_module          disable ngx_http_ssi_module
  --without-http_userid_module       disable ngx_http_userid_module
  --without-http_access_module       disable ngx_http_access_module
  --without-http_auth_basic_module   disable ngx_http_auth_basic_module
  --without-http_mirror_module       disable ngx_http_mirror_module
  --without-http_autoindex_module    disable ngx_http_autoindex_module
  --without-http_geo_module          disable ngx_http_geo_module
  --without-http_map_module          disable ngx_http_map_module
  --without-http_split_clients_module disable ngx_http_split_clients_module
  --without-http_referer_module      disable ngx_http_referer_module
  --without-http_rewrite_module      disable ngx_http_rewrite_module
  --without-http_proxy_module        disable ngx_http_proxy_module
  --without-http_fastcgi_module      disable ngx_http_fastcgi_module
  --without-http_uwsgi_module        disable ngx_http_uwsgi_module
  --without-http_scgi_module         disable ngx_http_scgi_module
  --without-http_grpc_module         disable ngx_http_grpc_module
  --without-http_memcached_module    disable ngx_http_memcached_module
  --without-http_limit_conn_module   disable ngx_http_limit_conn_module
  --without-http_limit_req_module    disable ngx_http_limit_req_module
  --without-http_empty_gif_module    disable ngx_http_empty_gif_module
  --without-http_browser_module      disable ngx_http_browser_module
  --without-http_upstream_hash_module
                                     disable ngx_http_upstream_hash_module
  --without-http_upstream_ip_hash_module
                                     disable ngx_http_upstream_ip_hash_module
  --without-http_upstream_least_conn_module
                                     disable ngx_http_upstream_least_conn_module
  --without-http_upstream_random_module
                                     disable ngx_http_upstream_random_module
  --without-http_upstream_keepalive_module
                                     disable ngx_http_upstream_keepalive_module
  --without-http_upstream_zone_module
                                     disable ngx_http_upstream_zone_module

  --with-http_perl_module            enable ngx_http_perl_module
  --with-http_perl_module=dynamic    enable dynamic ngx_http_perl_module
  --with-perl_modules_path=PATH      set Perl modules path
  --with-perl=PATH                   set perl binary pathname

  --http-log-path=PATH               set http access log pathname
  --http-client-body-temp-path=PATH  set path to store
                                     http client request body temporary files
  --http-proxy-temp-path=PATH        set path to store
                                     http proxy temporary files
  --http-fastcgi-temp-path=PATH      set path to store
                                     http fastcgi temporary files
  --http-uwsgi-temp-path=PATH        set path to store
                                     http uwsgi temporary files
  --http-scgi-temp-path=PATH         set path to store
                                     http scgi temporary files

  --without-http                     disable HTTP server
  --without-http-cache               disable HTTP cache

  --with-mail                        enable POP3/IMAP4/SMTP proxy module
  --with-mail=dynamic                enable dynamic POP3/IMAP4/SMTP proxy module
  --with-mail_ssl_module             enable ngx_mail_ssl_module
  --without-mail_pop3_module         disable ngx_mail_pop3_module
  --without-mail_imap_module         disable ngx_mail_imap_module
  --without-mail_smtp_module         disable ngx_mail_smtp_module

  --with-stream                      enable TCP/UDP proxy module
  --with-stream=dynamic              enable dynamic TCP/UDP proxy module
  --with-stream_ssl_module           enable ngx_stream_ssl_module
  --with-stream_realip_module        enable ngx_stream_realip_module
  --with-stream_geoip_module         enable ngx_stream_geoip_module
  --with-stream_geoip_module=dynamic enable dynamic ngx_stream_geoip_module
  --with-stream_ssl_preread_module   enable ngx_stream_ssl_preread_module
  --without-stream_limit_conn_module disable ngx_stream_limit_conn_module
  --without-stream_access_module     disable ngx_stream_access_module
  --without-stream_geo_module        disable ngx_stream_geo_module
  --without-stream_map_module        disable ngx_stream_map_module
  --without-stream_split_clients_module
                                     disable ngx_stream_split_clients_module
  --without-stream_return_module     disable ngx_stream_return_module
  --without-stream_pass_module       disable ngx_stream_pass_module
  --without-stream_set_module        disable ngx_stream_set_module
  --without-stream_upstream_hash_module
                                     disable ngx_stream_upstream_hash_module
  --without-stream_upstream_least_conn_module
                                     disable ngx_stream_upstream_least_conn_module
  --without-stream_upstream_random_module
                                     disable ngx_stream_upstream_random_module
  --without-stream_upstream_zone_module
                                     disable ngx_stream_upstream_zone_module

  --with-google_perftools_module     enable ngx_google_perftools_module
  --with-cpp_test_module             enable ngx_cpp_test_module

  --add-module=PATH                  enable external module
  --add-dynamic-module=PATH          enable dynamic external module

  --with-compat                      dynamic modules compatibility

  --with-cc=PATH                     set C compiler pathname
  --with-cpp=PATH                    set C preprocessor pathname
  --with-cc-opt=OPTIONS              set additional C compiler options
  --with-ld-opt=OPTIONS              set additional linker options
  --with-cpu-opt=CPU                 build for the specified CPU, valid values:
                                     pentium, pentiumpro, pentium3, pentium4,
                                     athlon, opteron, sparc32, sparc64, ppc64

  --without-pcre                     disable PCRE library usage
  --with-pcre                        force PCRE library usage
  --with-pcre=DIR                    set path to PCRE library sources
  --with-pcre-opt=OPTIONS            set additional build options for PCRE
  --with-pcre-jit                    build PCRE with JIT compilation support
  --without-pcre2                    do not use PCRE2 library

  --with-zlib=DIR                    set path to zlib library sources
  --with-zlib-opt=OPTIONS            set additional build options for zlib
  --with-zlib-asm=CPU                use zlib assembler sources optimized
                                     for the specified CPU, valid values:
                                     pentium, pentiumpro

  --with-libatomic                   force libatomic_ops library usage
  --with-libatomic=DIR               set path to libatomic_ops library sources

  --with-openssl=DIR                 set path to OpenSSL library sources
  --with-openssl-opt=OPTIONS         set additional build options for OpenSSL

--with-debug enable debug logging-
案例
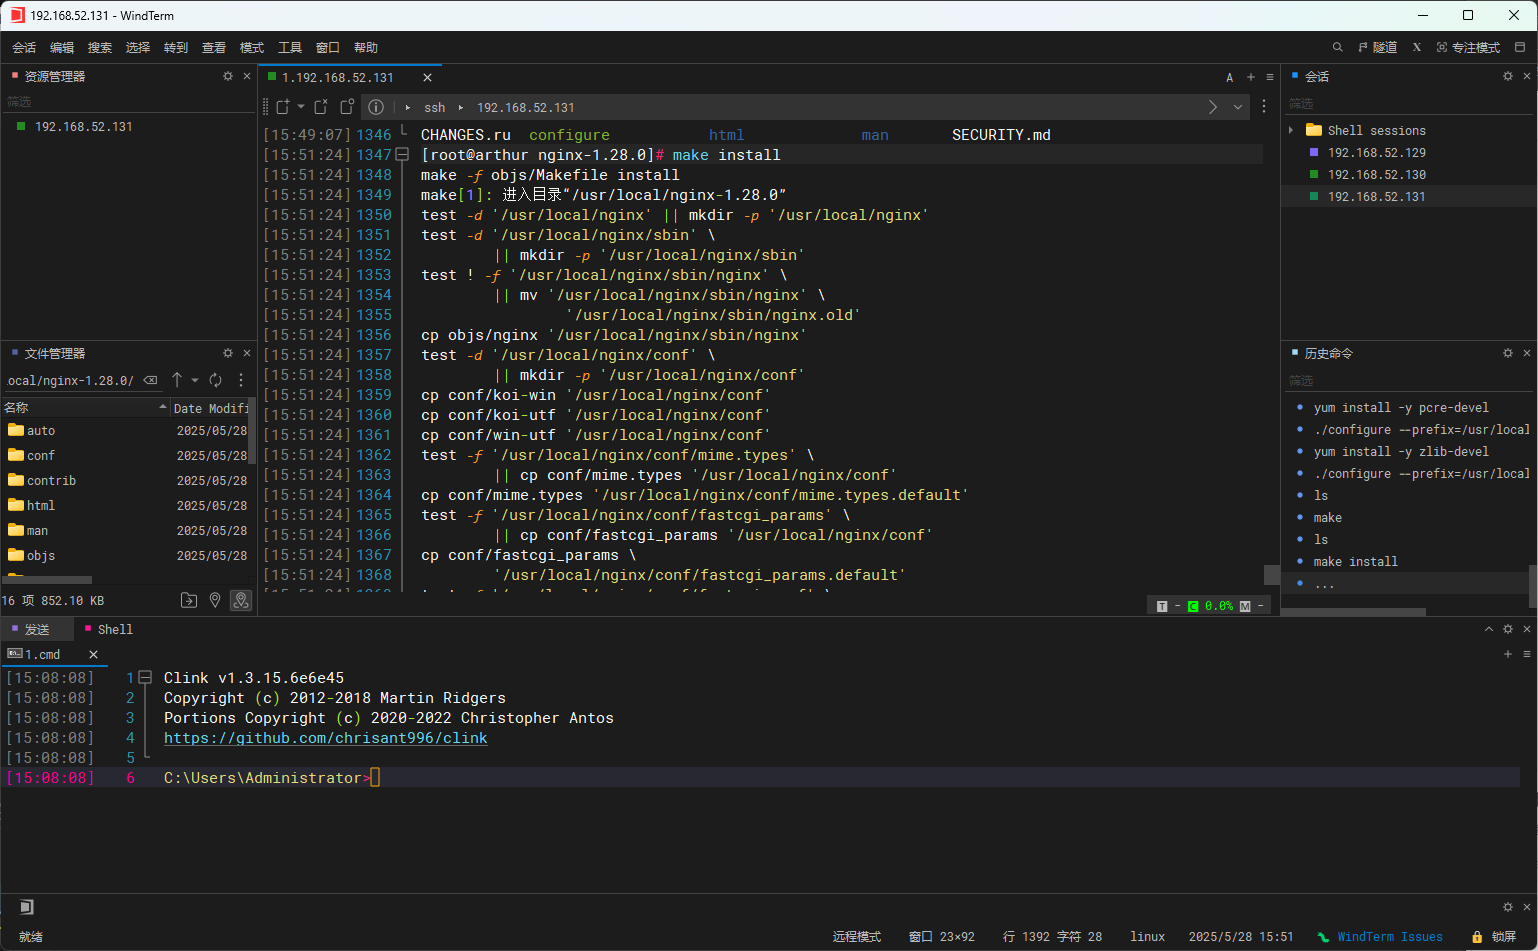
nginx编译安装
tar xf nginx-1.12.0.tar.gz
cd nginx-1.12.0
./configure --prefix=/usr/local/nginx1.12
发现依赖缺失
解决依赖
yum install -y pcre-devel或者untils
yum install -y zlib-devel
配置完成后
在源码包下生成Makefile文件
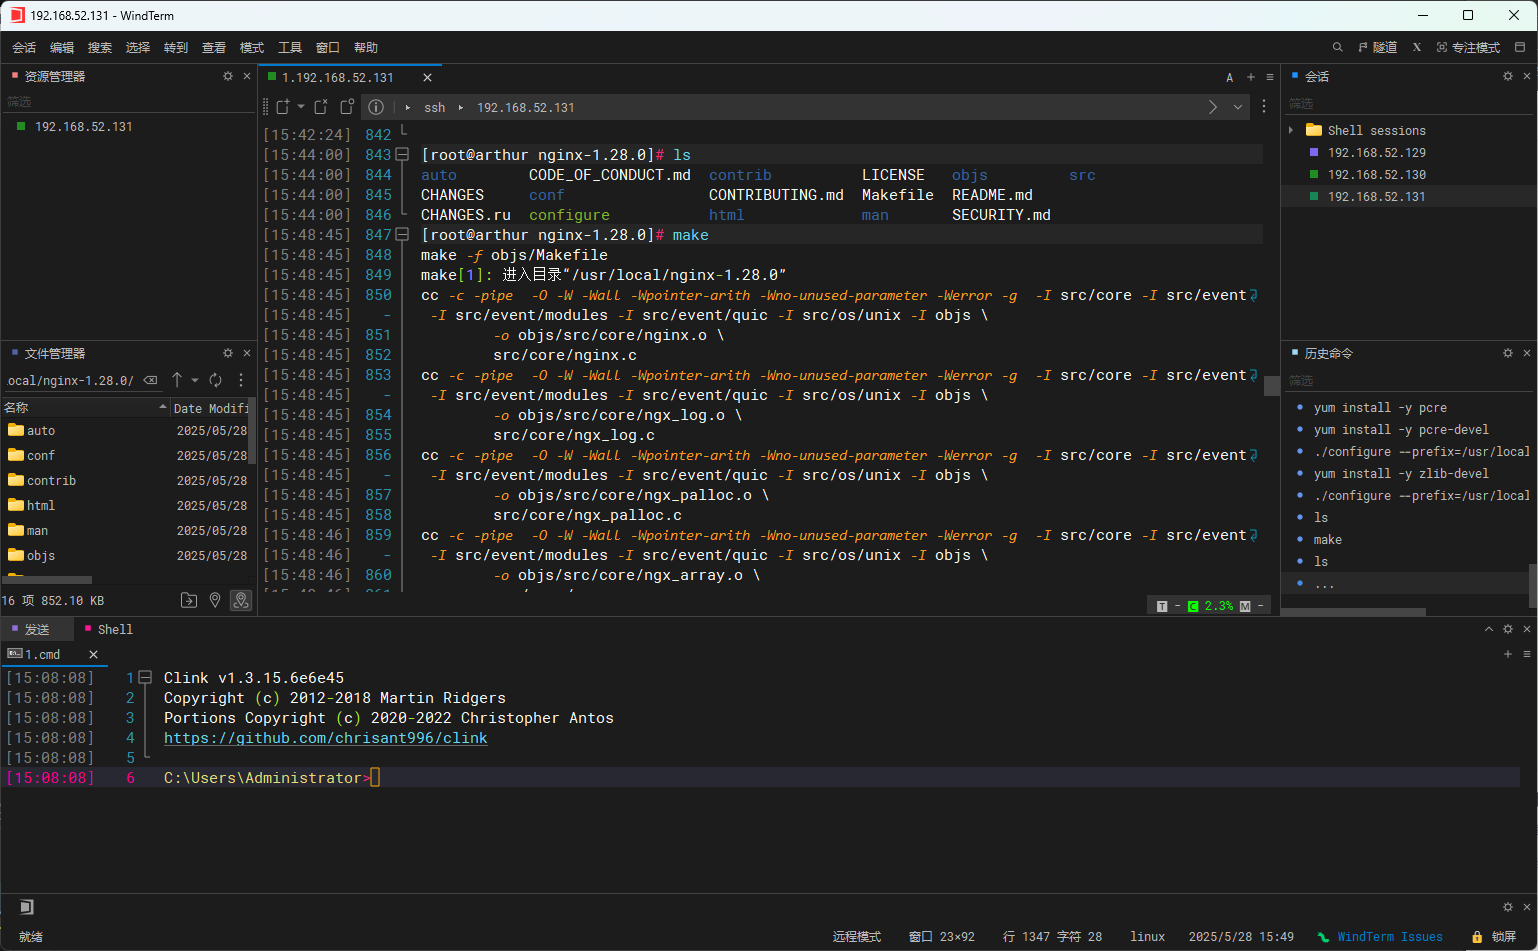
make
编译
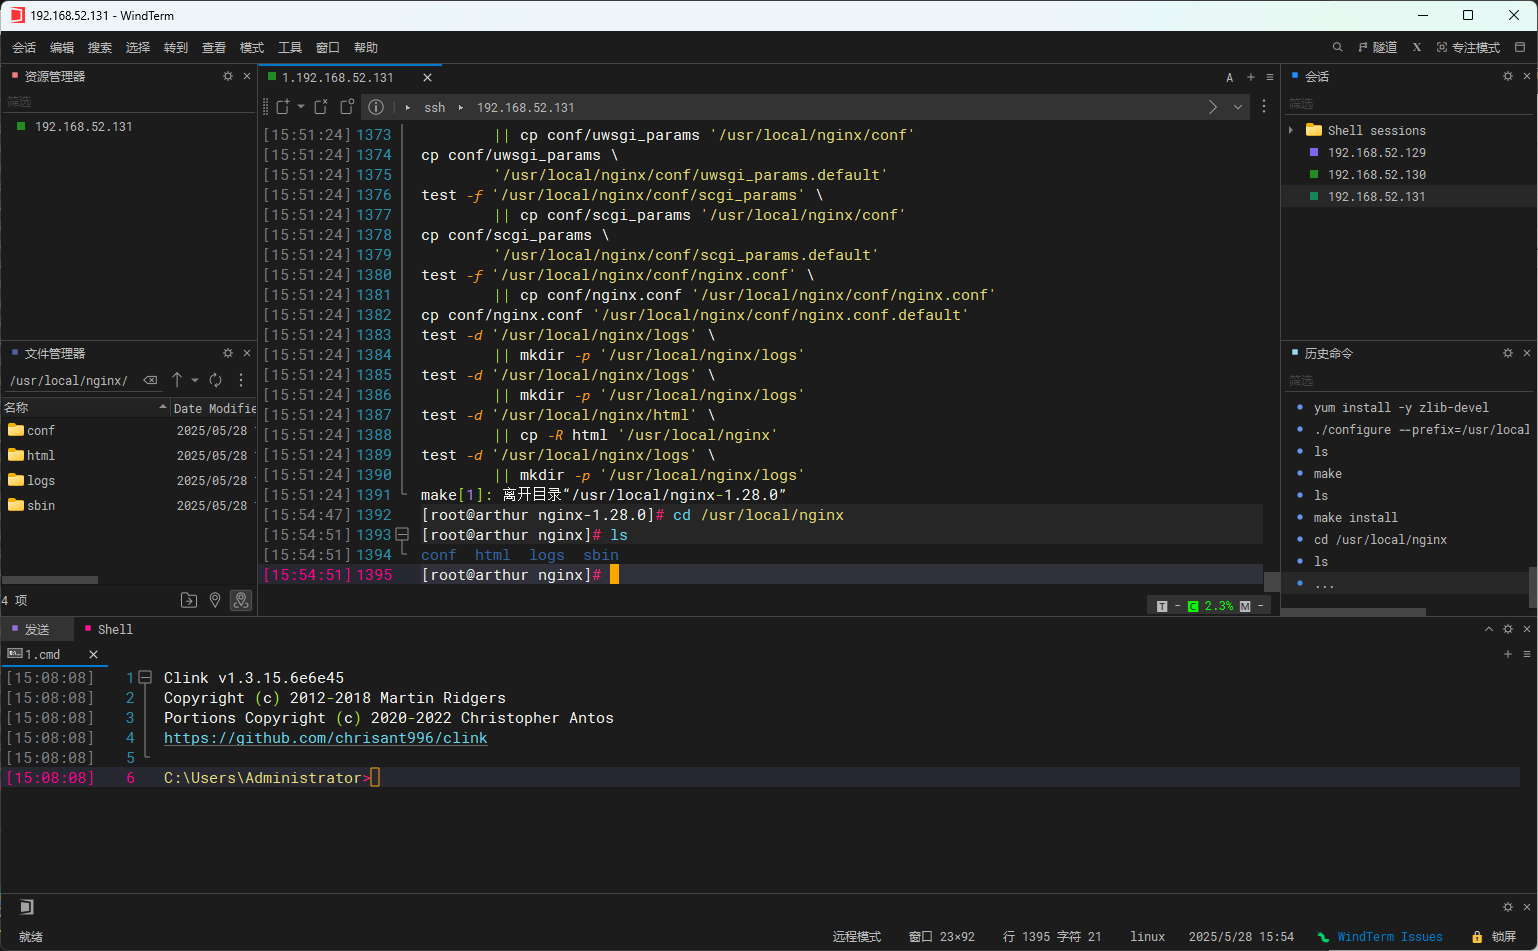
make install
安装
命令合并
./configure --prefix=/usr/local/nginx18 && make && make install
验证
cd /usr/local/nginx1.12
###命令优化####
ln -s /usr/local/nginx/sbin/nginx /usr/local/sbin/先将nginx压缩包放到桌面文件夹中
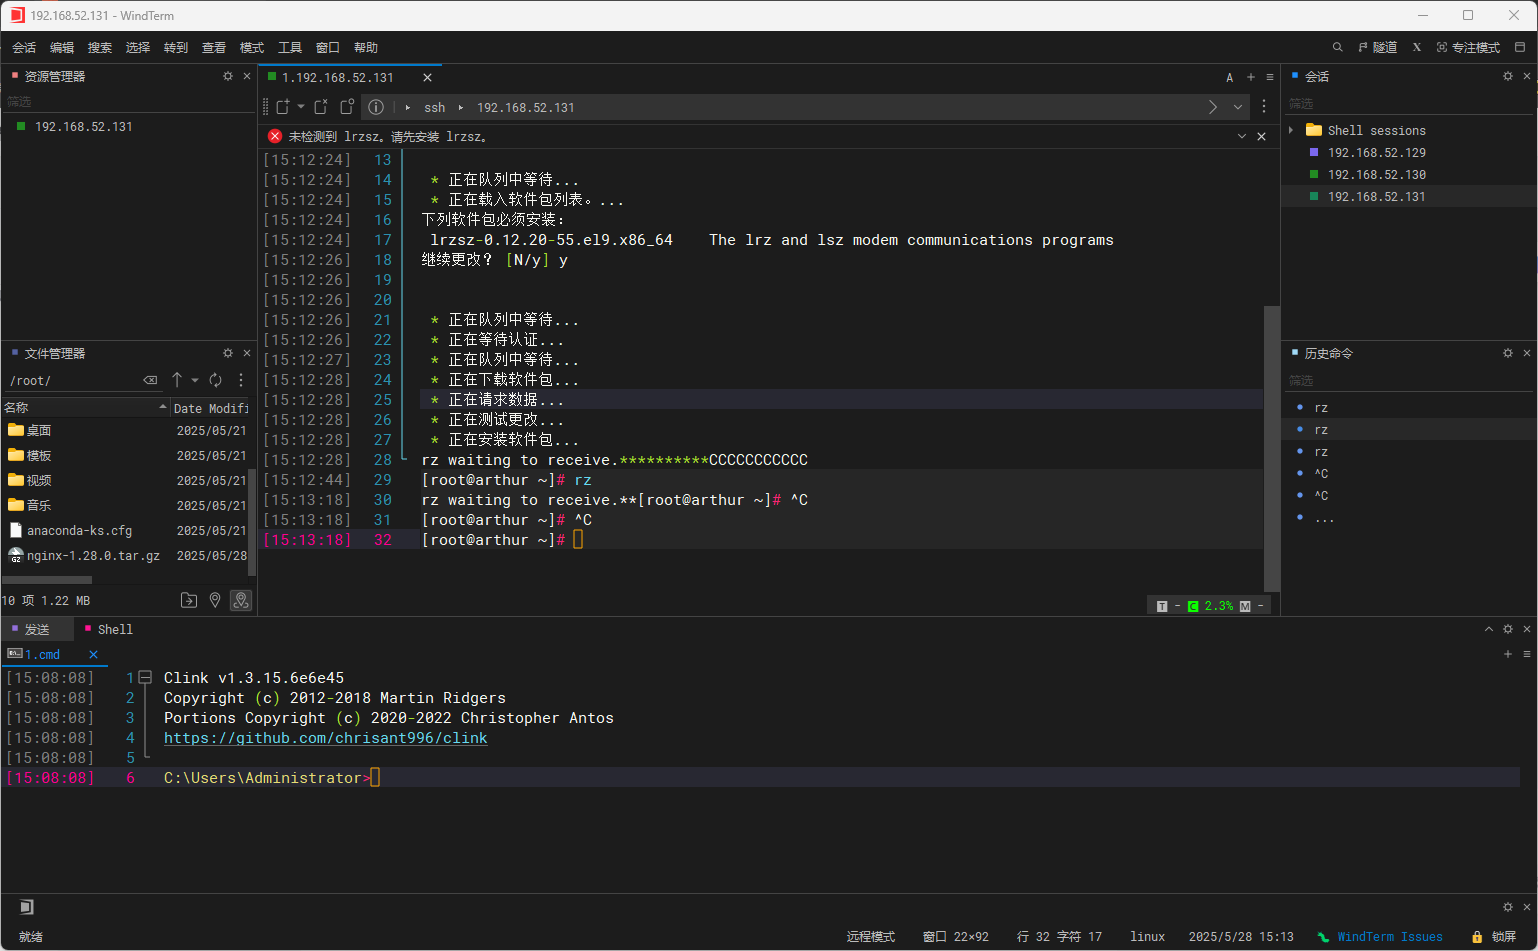
然后将nginx压缩包放到较大的文件夹目录中,这里选择的是home文件夹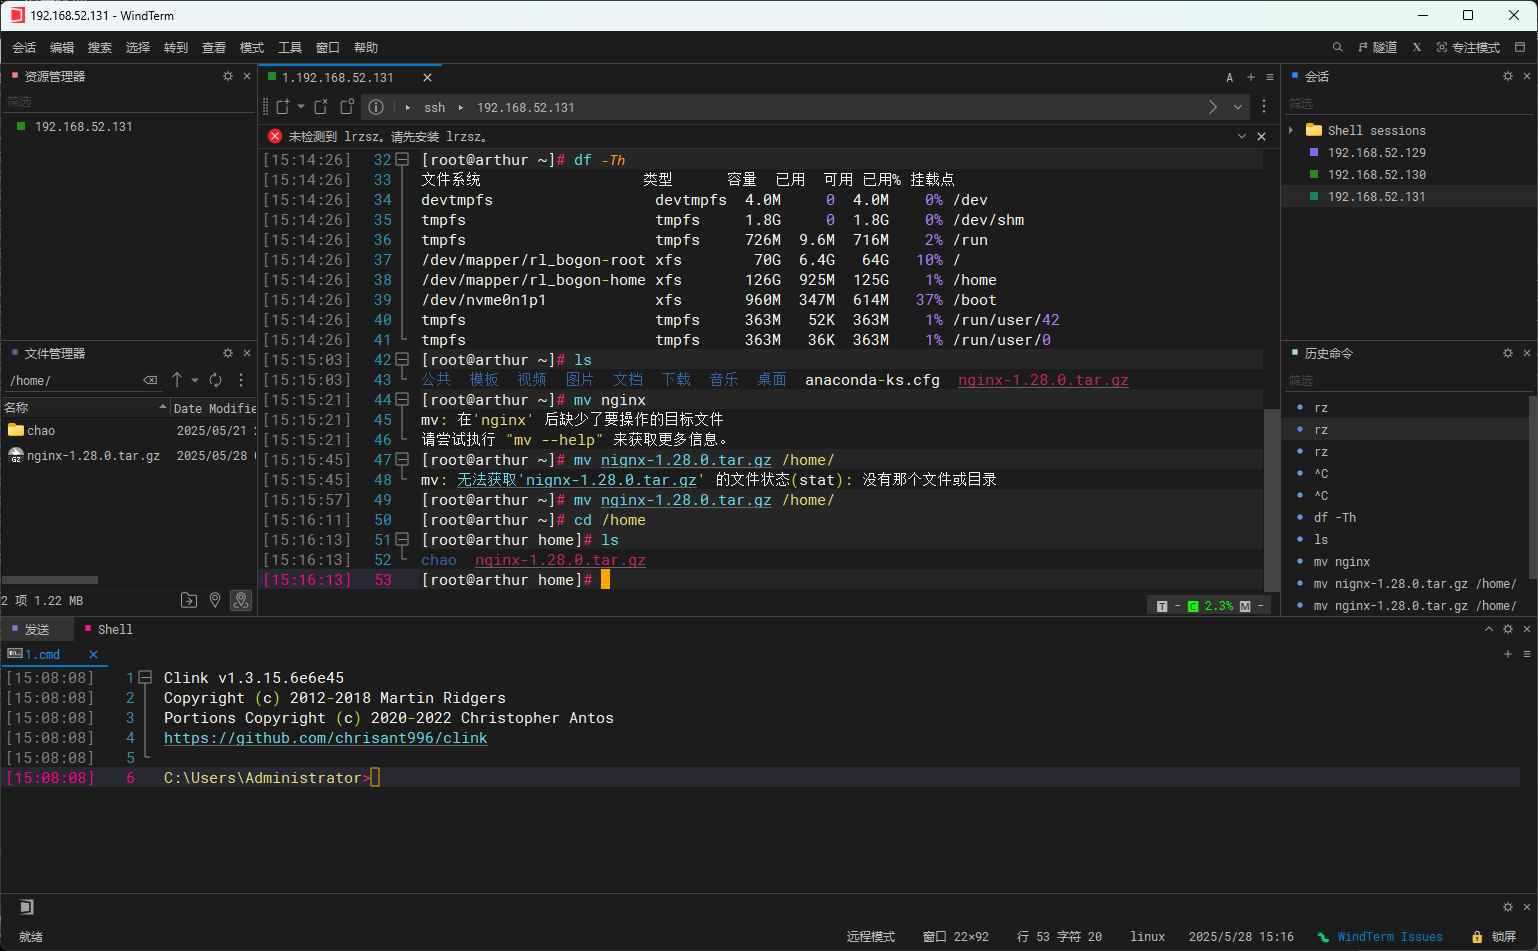
将nginx压缩包解压到一个适合的文件夹中,这里选择的是/usr/local/文件夹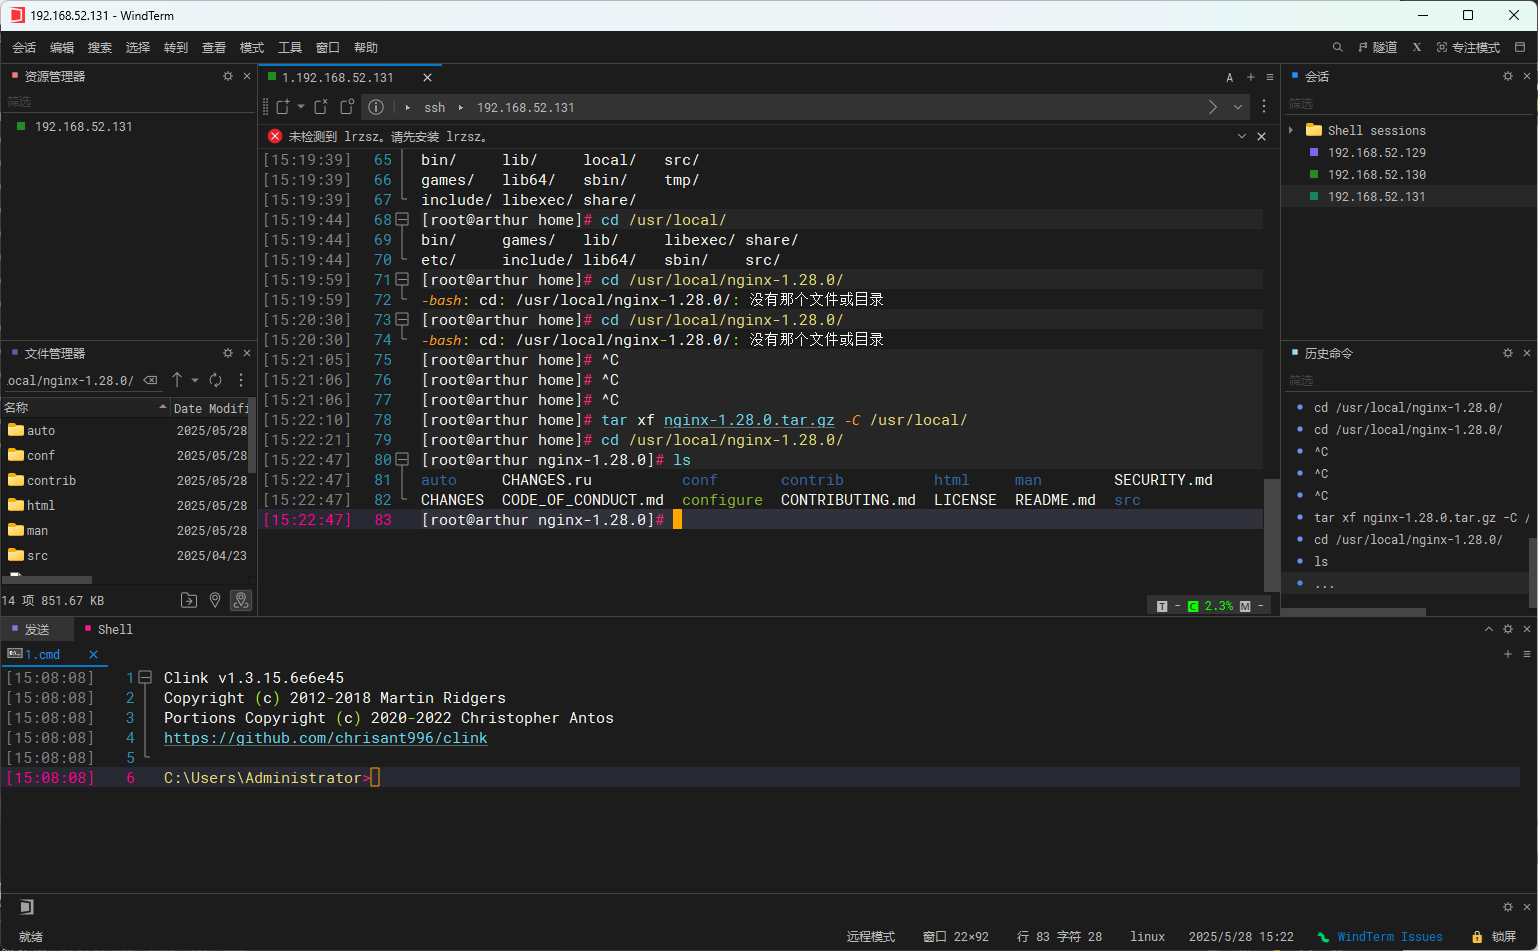
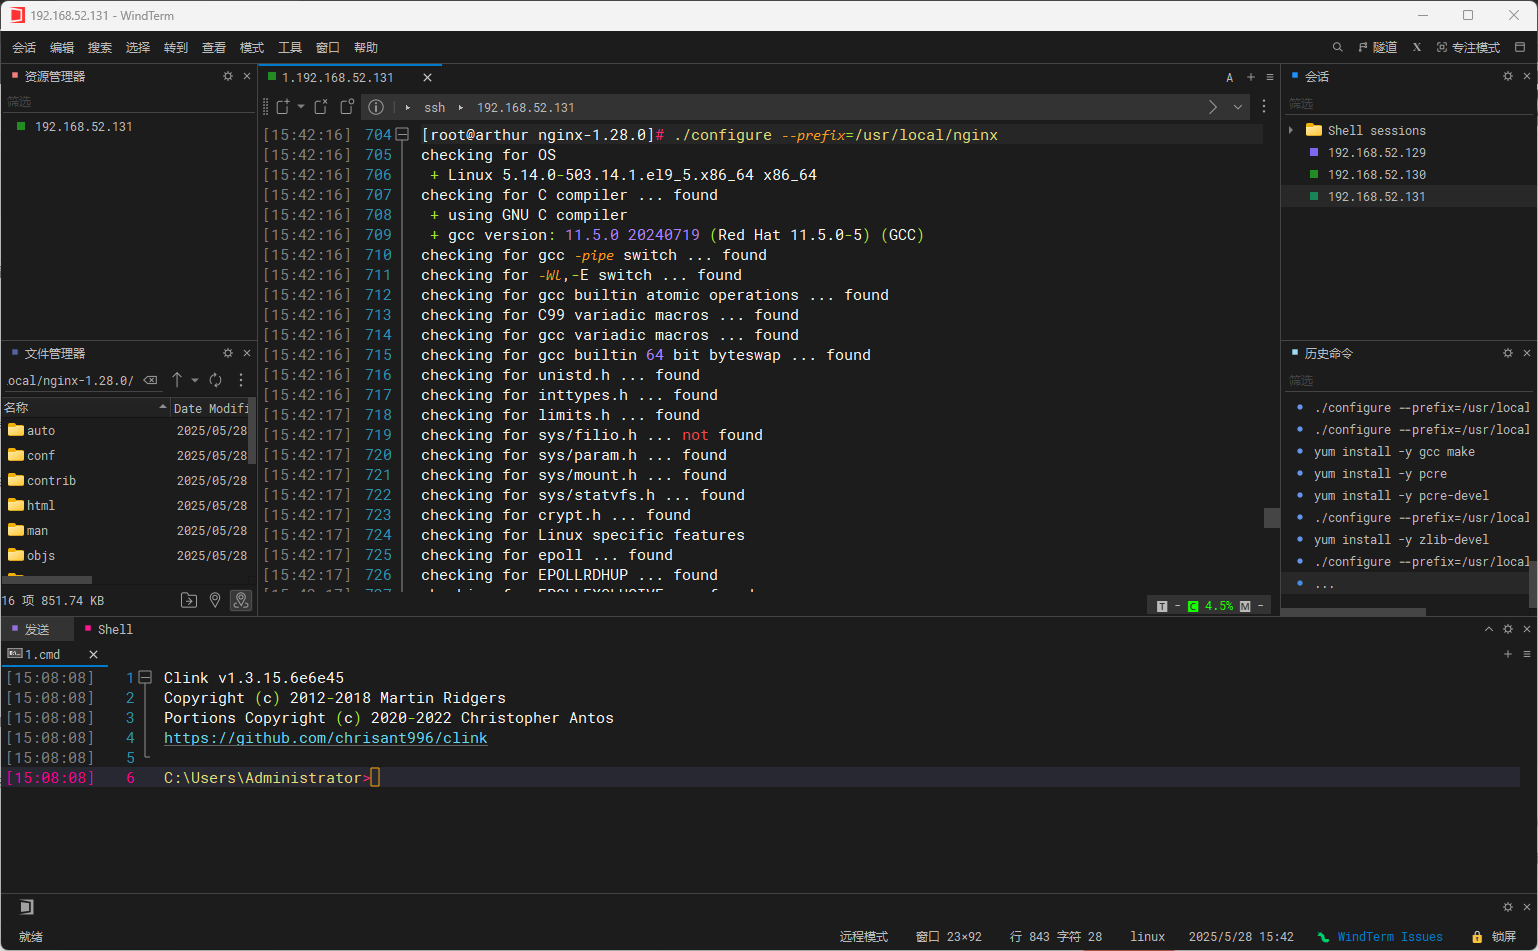
选择相对路径执行configure命令
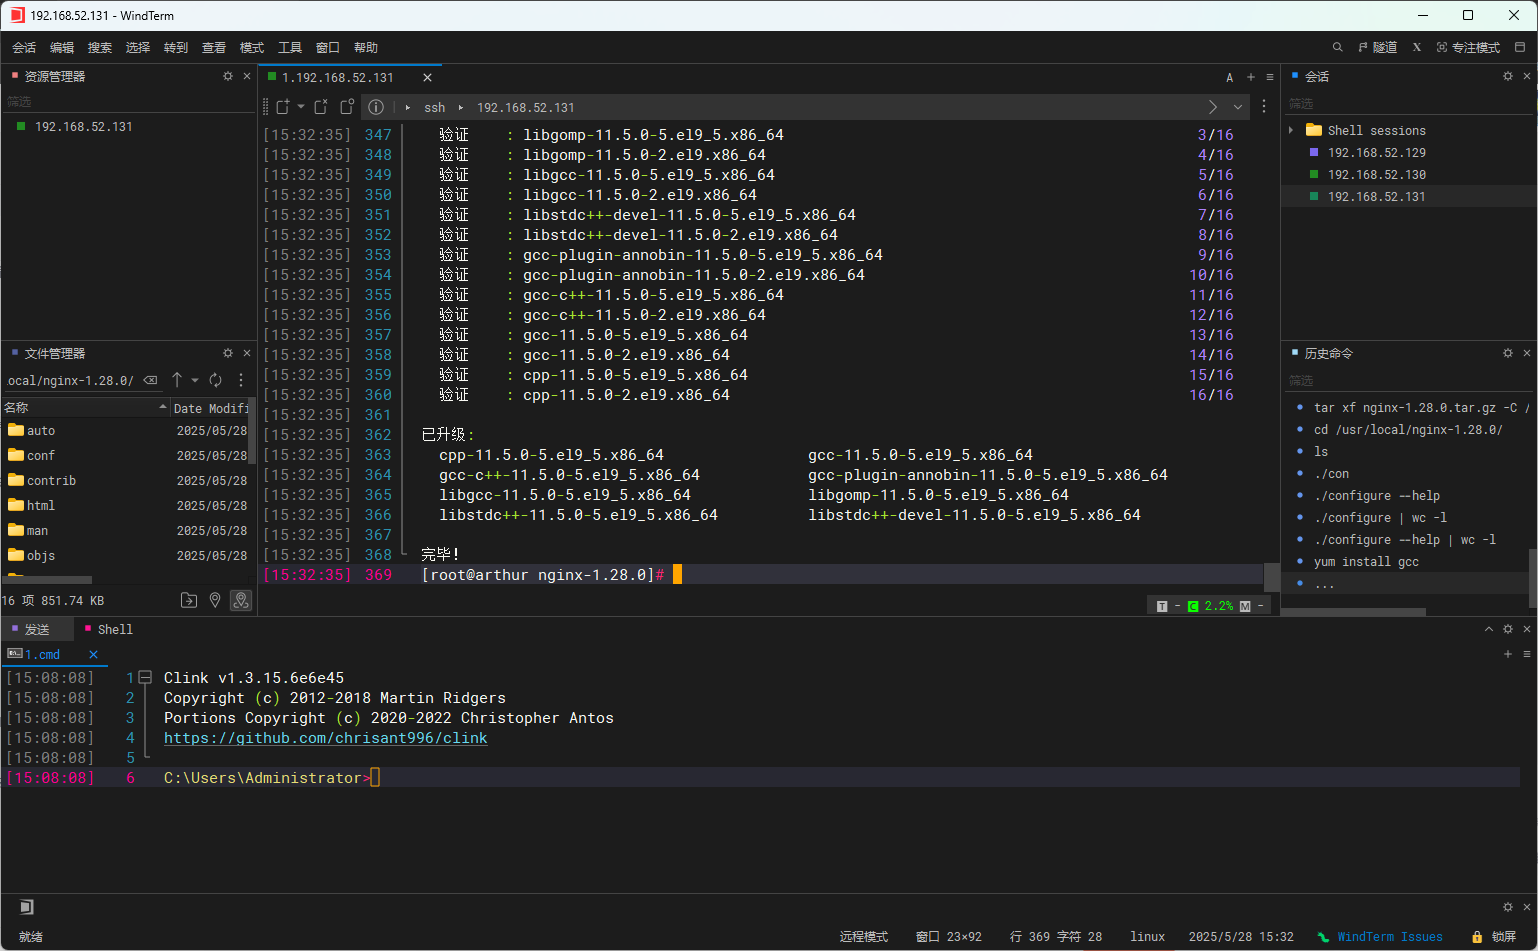
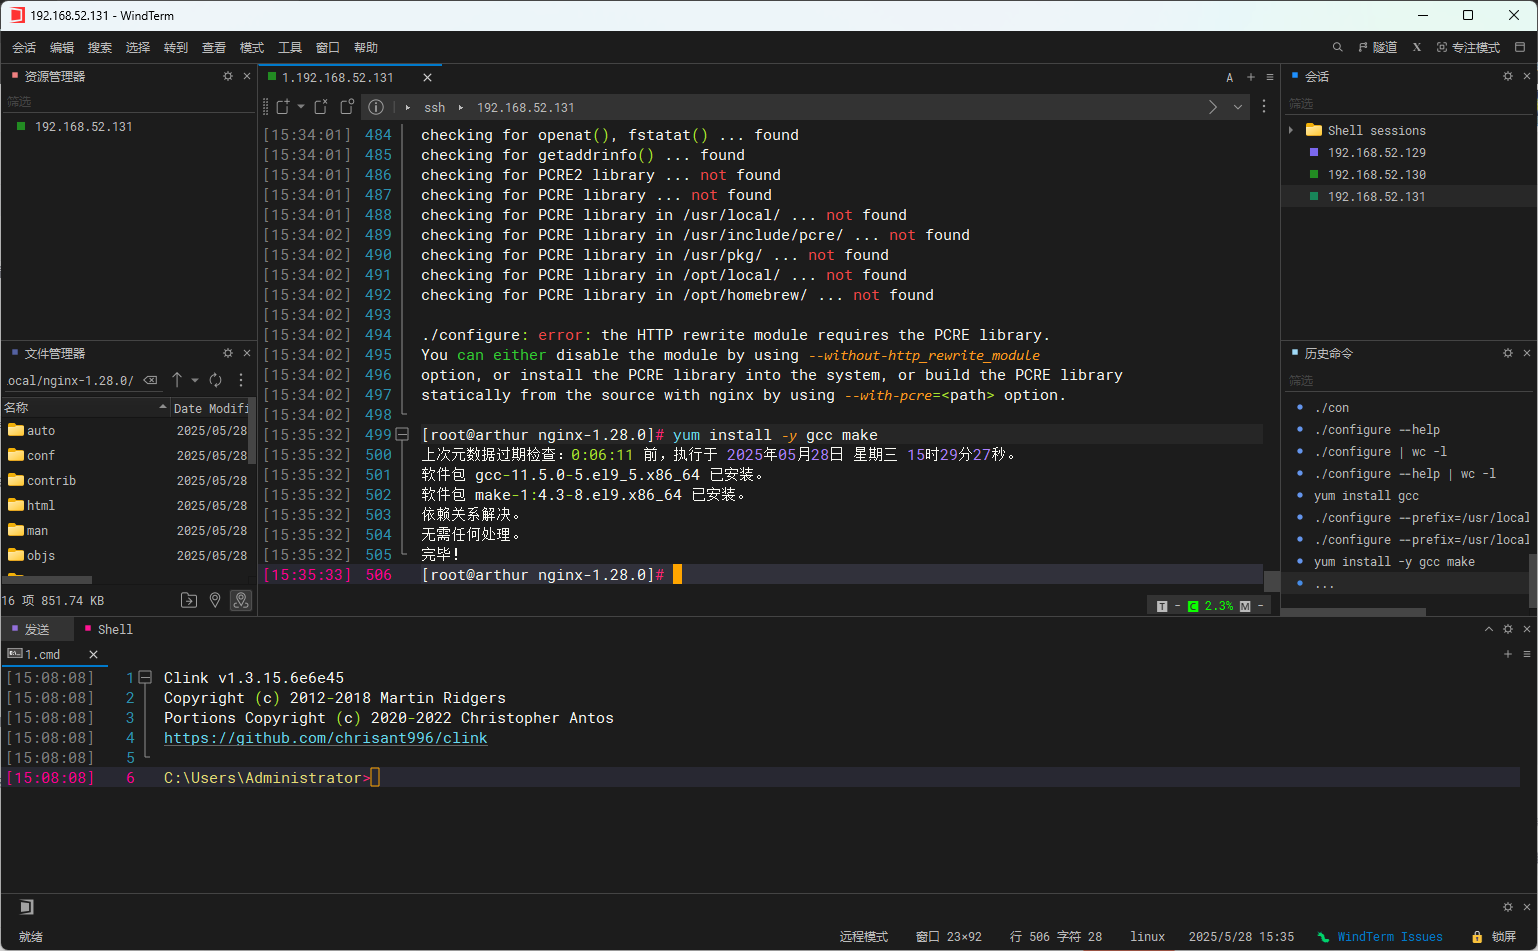
接下来安装gcc环境支持,源码包安装需要gcc或者make环境进行支持
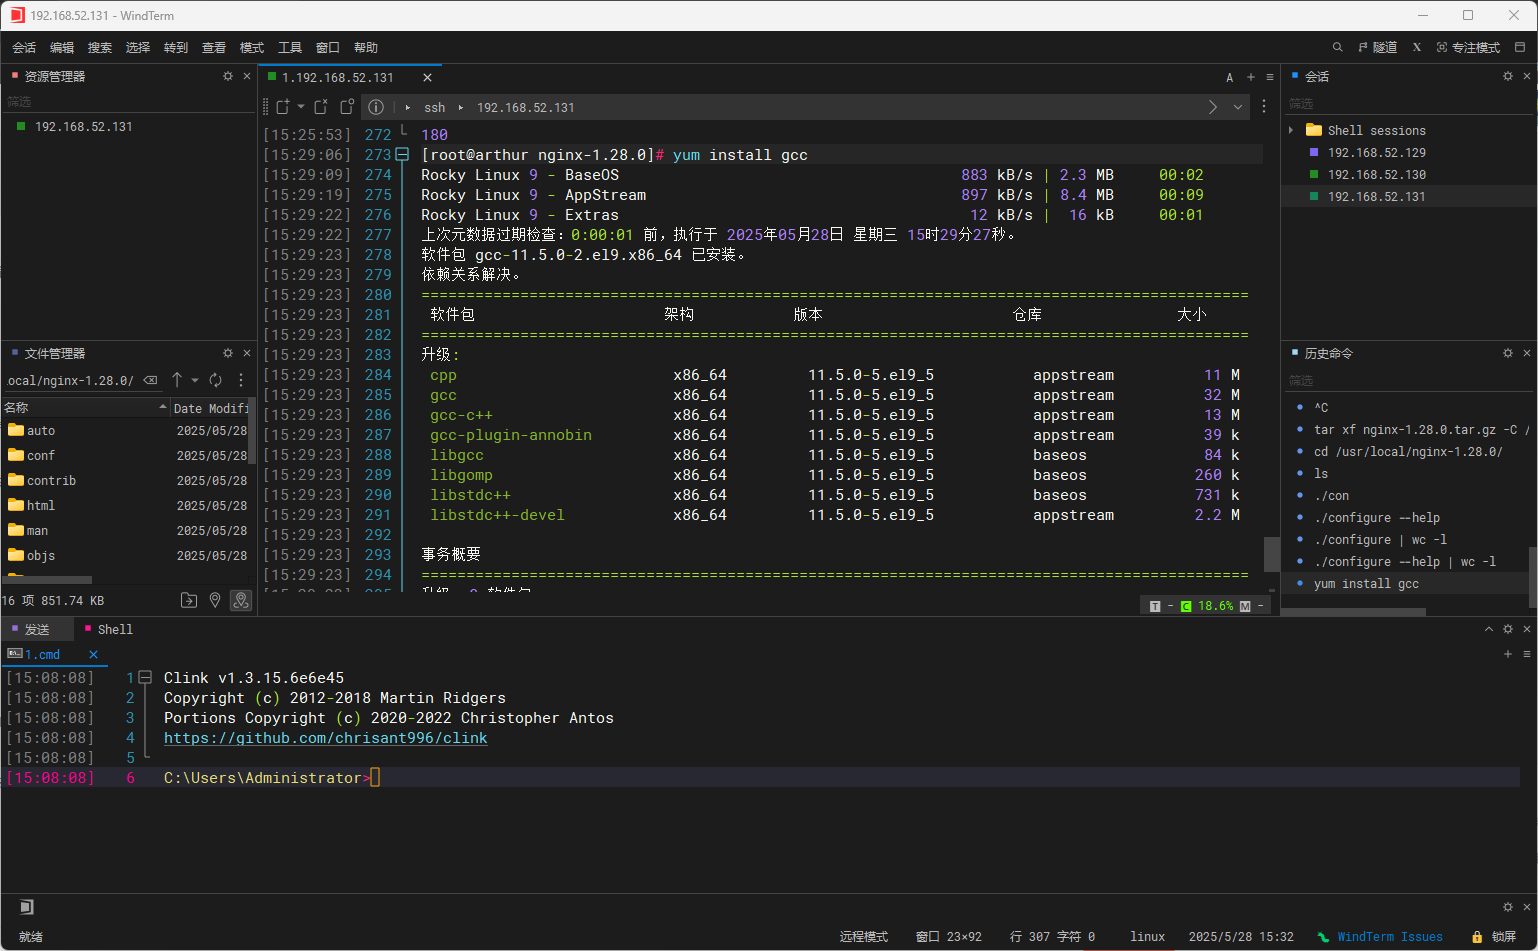
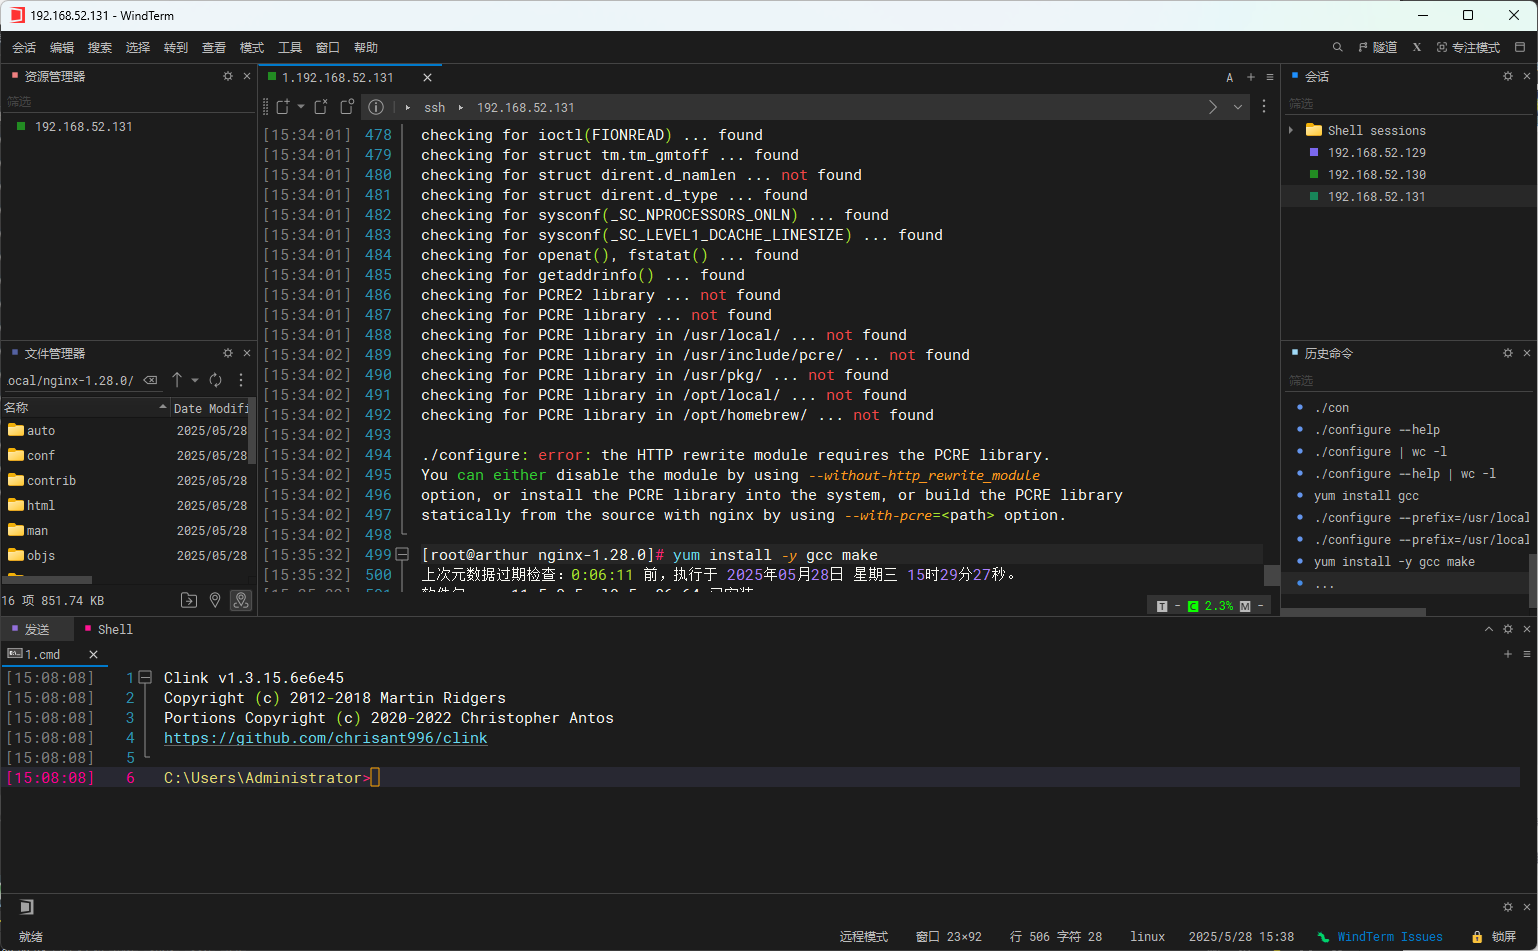
但是运行gcc和make环境还需要PCRE环境进行支持(有两种数据库utill和devel)

运行PCRE环境还需要ZLIB环境进行支持,同一环境需要的数据库是相同的(即这次都是devel)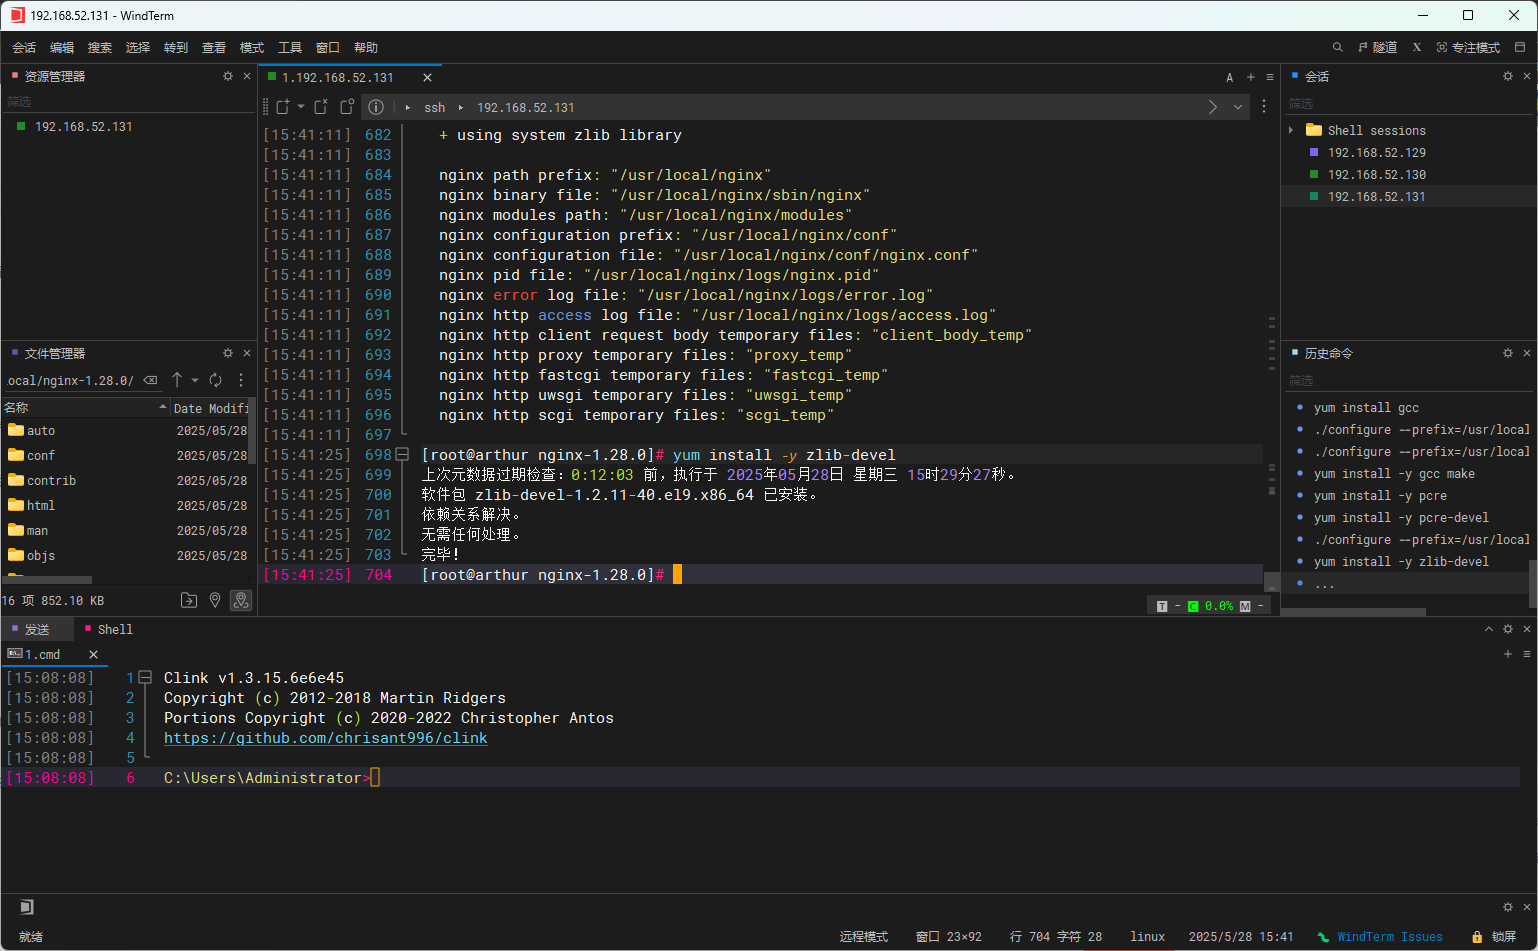
然后对configure进行配置,发现不再报错(注意:文本中出现的error标红仅为WindTerm远程连接自带标红)
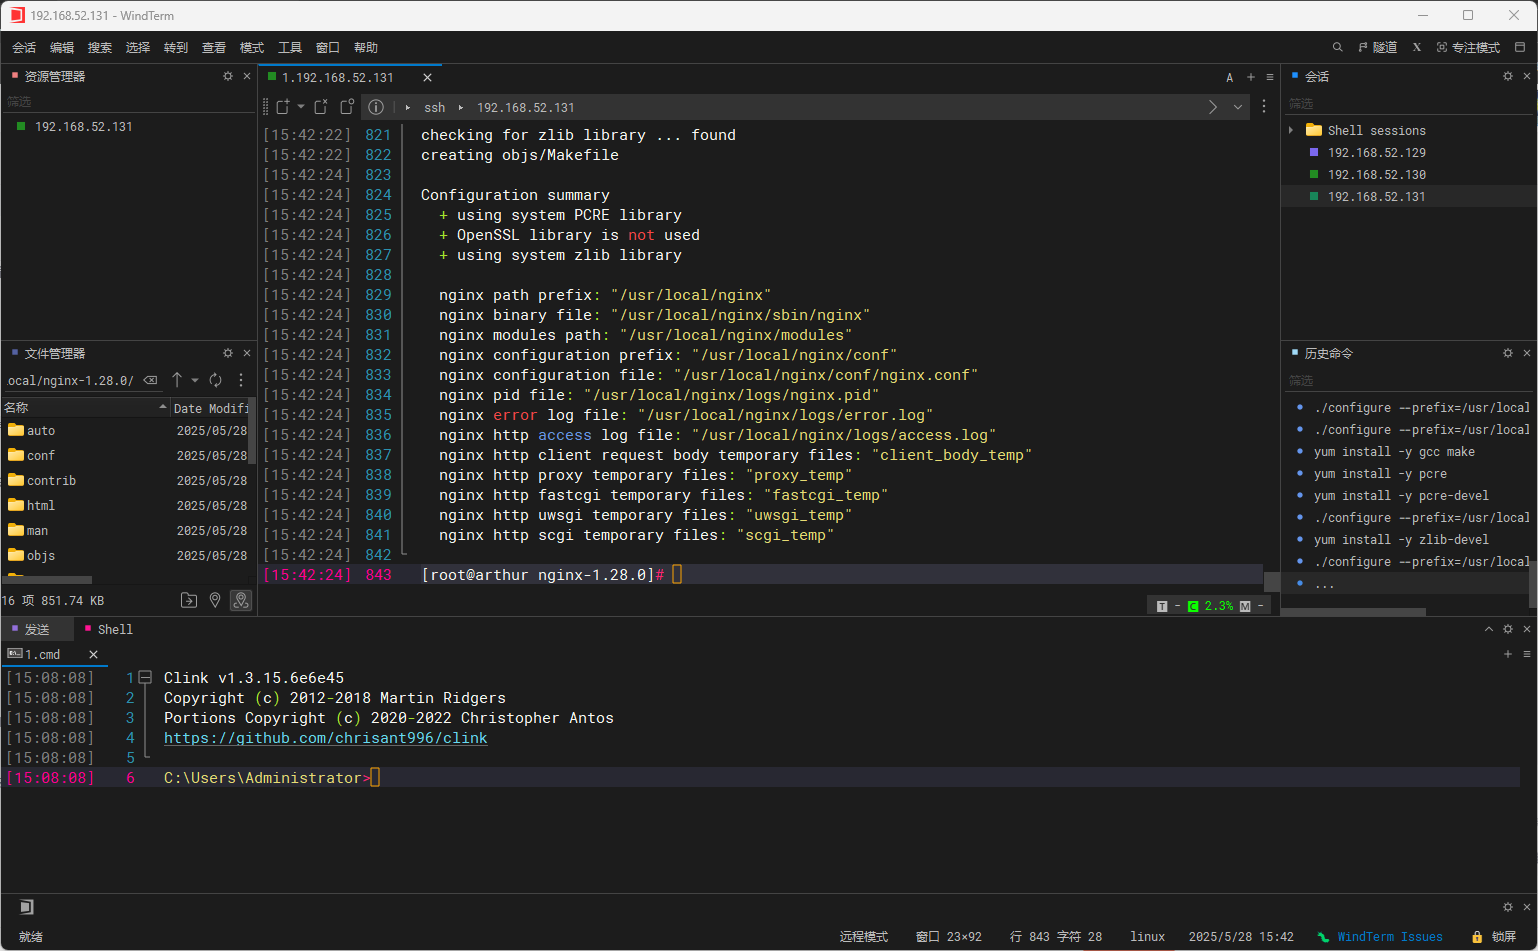
配置完成后会发现会多出Makefile和objs两个文件
然后在这个文件夹中进行编译(命令make,向objs文件中写入了代码)

然后输入命令make install进行安装(其实是shell脚本)
刚刚安装的命令都在这个文件夹中
然后发现无法直接使用该命令,需要进行优化操作,用软链接连接到命令环境中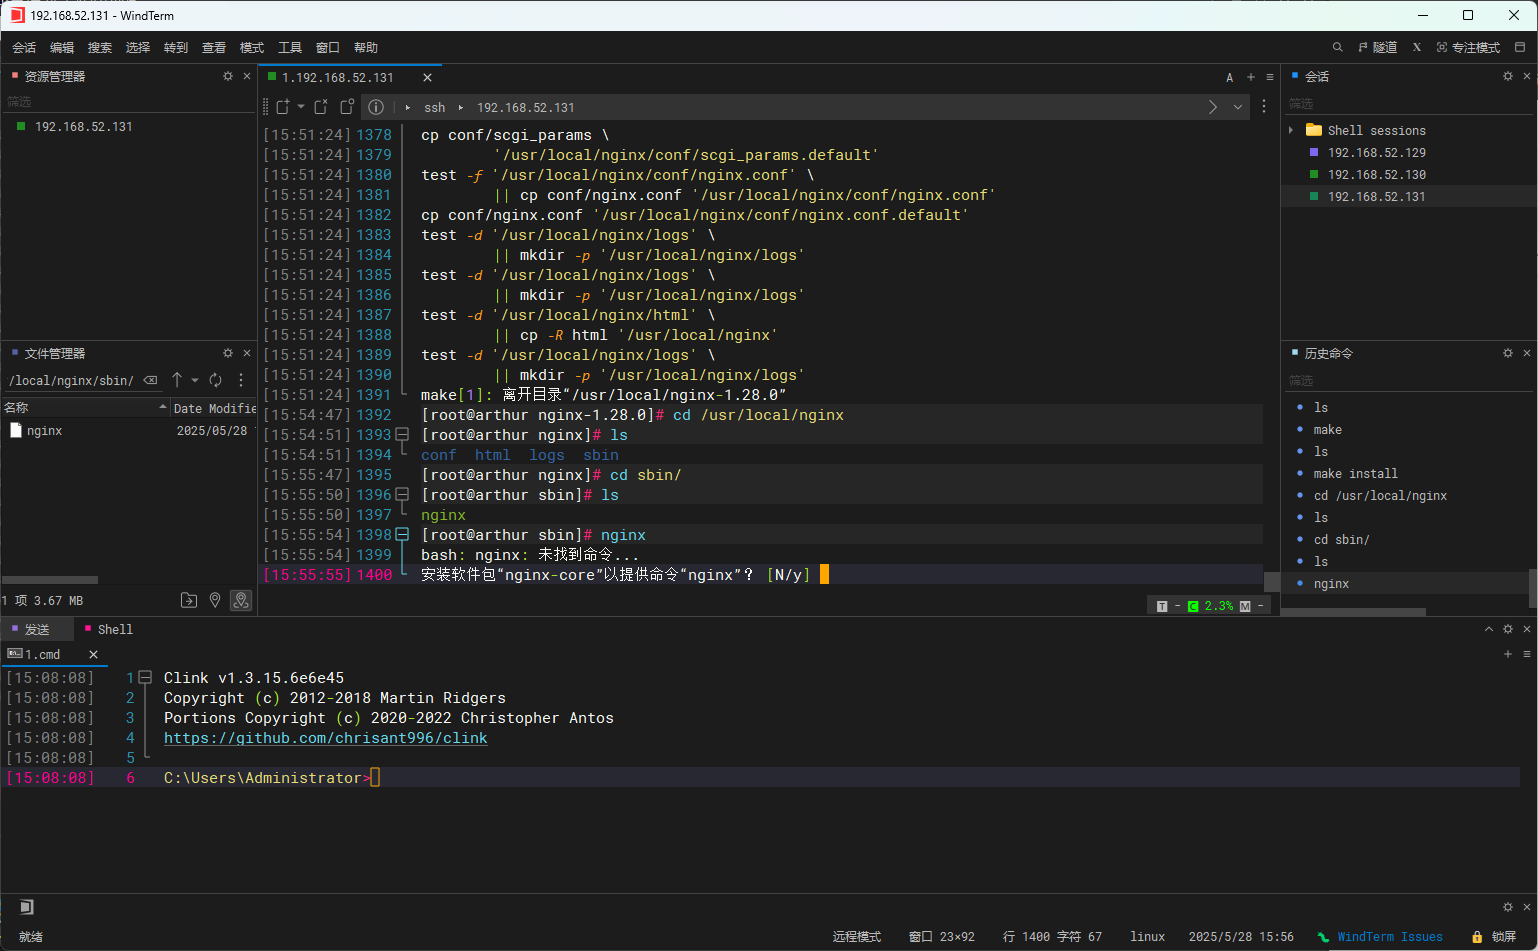
注意
编译安装完成的软件默认不被systemd管理
7、二进制安装
只需要运行bin文件案例
jdk-6u14-linux-x64.bin

./jdk-6u14-linux-x64.bin

根据提示进行操作即可
四、Linux操作系统启动流程详解
1、概述
Linux启动流程是从按下电源键到用户登录的完整过程,分为传统BIOS+MBR和现代UEFI+GPT两种模式。主流系统(如CentOS 7+/Ubuntu 18.04+)通常使用 UEFI + GRUB2 + systemd 组合。
2、启动流程核心阶段
1. 电源与固件阶段
-
UEFI/BIOS初始化
-
硬件自检(POST, Power-On Self-Test)
-
UEFI特点:图形化界面、支持GPT分区、独立于OS的Shell环境
-
定位启动设备:读取NVRAM中的启动项(
efibootmgr命令可管理)
-
2. 引导加载程序(Bootloader)
-
GRUB2 核心作用
-
配置文件路径:
/boot/grub2/grub.cfg(由grub2-mkconfig生成)
-

- 关键配置参数:
set root=(hd0,gpt1)  # 指定/boot所在分区
linux /vmlinuz-5.4.0 root=/dev/sda2 ro  # 内核路径及挂载参数
initrd /initramfs-5.4.0.img # 初始化内存文件系统-
用户交互
-
按
e临时编辑启动参数(如单用户模式systemd.unit=rescue.target) -
按
c进入GRUB命令行
-
3. 内核初始化
-
内核解压与初始化
-
加载
vmlinuz:压缩的内核镜像 -
initramfs作用:-
包含根文件系统挂载前的驱动(如LVM、RAID)
-
提供
dracut工具集(可通过dmesg | grep initramfs查看日志)
-
-
挂载根文件系统(
/)为只读模式
-
4. systemd 初始化进程
-
首个用户态进程
-
PID=1,替代传统
init -
核心任务:
-
解析
/etc/systemd/system/default.target(默认运行级别) -
并行启动服务单元(Unit)
-
激活
sysinit.target(系统初始化)、basic.target(基础服务)
-
-
-
关键操作命令
systemctl get-default         # 查看默认target
systemctl set-default multi-user.target  # 设置默认为命令行模式
journalctl -b # 查看本次启动日志 ![]()
ctrl+alt+F2、F3、F4、F5、F6会切到不同的用户等级,然后F再回到初始界面
5. 用户登录阶段
-
终端登录
-
getty服务生成终端(/etc/systemd/system/getty.target.wants/) -
调用
login验证用户身份
-
-
图形化登录
-
Display Manager(如GDM、LightDM)启动X/Wayland会话
-
3、故障排查与调试技巧
1. 常见启动问题
| 故障现象 | 可能原因 | 解决方法 |
| GRUB Rescue> 提示符 | 引导分区损坏/配置丢失 | 使用Live CD重建grub |
| Kernel panic | 驱动缺失/根文件系统错误 | 检查initramfs是否包含所需驱动 |
| systemd启动卡死 | 服务依赖死锁 | 添加systemd.unit=emergency.target内核参数 |
| 文件系统只读 | fsck未通过或磁盘错误 | 手动运行fsck /dev/sda1 |
2. 救援模式操作
在GRUB界面添加启动参数:
systemd.unit=rescue.target   # 单用户模式(需root密码)
systemd.unit=emergency.target # 紧急模式(只挂载根文件系统)
重新挂载根文件系统为读写:
mount -o remount,rw /3. 关键文件修复
重建GRUB(适用于MBR损坏):
grub2-install /dev/sda        # 安装引导到磁盘
grub2-mkconfig -o /boot/grub2/grub.cfg # 生成配置文件重建initramfs(CentOS/RHEL):
dracut -f /boot/initramfs-$(uname -r).img $(uname -r)4、启动流程示意图(文本版)
[UEFI固件] → 加载ESP分区的GRUB → 载入内核和initramfs →
           |                         |
           |                         v
           ←←←←←←←←←←←←←←←←←   systemd初始化 → 启动target → 用户登录
五、systemd管理机制
init进程是所有进程的父进程,systemd实际上是一种管理init的软件。只能管理rpm安装的
units存储路径

/usr/lib/systemd/system
基于unit概念实现,常见的unit类型
| 单元类型 | 扩展名 | 说明 |
| Service | .service | 描述一个系统服务 |
| Target | .target | 描述一组systemd的单元 |
| Socket | .socket | 描述一个进程间通信的套接字 |
| Device | .device | 描述一个内核识别的设备文件 |
| Mount | .mount | 描述一个文件系统的挂载点 |
| Automount | .automount | 描述一个文件系统的自动挂载点 |
| Swap | .swap | 描述一个内存交换设备或交换文件 |
| Path | .path | 描述一个文件系统中文件或目录 |
| Timer | .timer | 描述一个定时器(用于实现类似cron的调度任务) |
| Snapshot | .snapshot | 用于保存一个systemd的状态 |
| Scope | .scope | 使用systemd的总线接口以编程的方式创建外部进程 |
| Slice | .slice | 描述居于Cgroup的一组通过层次组织的管理系统进程 |
1、运行级别
-
运行级别与target对应关系
| 运行级别 | Systemd的target | 说明 |
| 0 | poweroff.target | 关机状态,使用该级别时将会关闭主机 |
| 1 | rescue.target | 单用户模式,不需要密码验证即可登录系统,多用于系统维护 |
| 2 | multi-user.target | 用户定义/域特定运行级别。默认等同于3 |
| 3 | multi-user.target | 字符界面的完整多用户模式,大多数服务器主机运行在此级别 |
| 4 | multi-user.target | 用户定义/域特定运行级别。默认等同于3 |
| 5 | graphical.target | 图形界面的多用户模式,提供了图形桌面操作环境 |
| 6 | reboot.target | 重新启动,使用该级别时将会重启主机 |
查看运行级别
runlevel

N|运行级别数字   当前运行级别数字
切换运行级别
init 运行级别数字查看默认运行级别
systemctl get-default设置默认运行级别
systemctl set-default 运行级别target2、systemctl命令的使用
语法结构:
systemctl 服务控制类型 服务名称[.service]服务控制类型
start:启动

Active: active (running)

stop:停止

Active: inactive (dead)

restart:重启

会停止服务

reload:重载

不停止服务,加载配置文件

优雅的重启

status:查看状态

enable:开机自启动

is-enabled:查看是否开机自启动

disabled

关闭开机自启动

enabled

开启开机自启动

disable:开机不进行自启动

--now 配合enable与disable使用;在进行开机自启或不自启的同时进行打开或关闭指定服务
选项
-t

指定unit类型

Unit Commands

list-units

列出所有unit,一般与-t结合
案例
systemctl list-units -t service

systemctl daemon-reload  #当改变unit的脚本文件后,需要进行重新识别
3、服务启动报错排查
脚本错误
###参数报错
Failed to restart crond.service: Unit is not loaded properly: Invalid argument.

See system logs and 'systemctl status crond.service' for details.

Loaded: error (Reason: Invalid argument)

###命令报错
8月 27 11:57:51 localhost.localdomain systemd[12545]: Failed at step EXEC spawning /usr/sbin/httpd1: No such file or directory
-- Subject: Process /usr/sbin/httpd1 could not be executed
配置文件错误
Job for httpd.service failed because the control process exited with error code. See "systemctl status httpd.service" and "journalctl -xe" for details.

Active: failed (Result: exit-code)

AH00526: Syntax error on line 42 of /etc/httpd/conf/httpd.conf:
未知错误
Active: failed (Result: exit-code)
8月 27 12:03:41 localhost.localdomain useradd[12790]: failed adding user 'apache', exit code: 9
没有具体的错误提示
排查关联服务及配置文件
服务排错命令
journalctl -xe图形化管理工具
ntsysv #只能在图形化运行级别使用结语
Linux程序管理入门主要以了解概念和简单安装程序为主,主要分为四类安装方法,rpm包安装,yum安装,源码包安装和二进制安装,熟练掌握这四种安装方法为今天的重点。
今天的收尾对于程序管理至关重要,包括一些记忆和试验的内容,希望在练习中对于这些命令能够熟练运用。


 被折叠的 条评论
为什么被折叠?
被折叠的 条评论
为什么被折叠?
 到【灌水乐园】发言


